

 Happy new year lovely followers!
I’m so delighted to share this pattern with you as my first post of 2015. It’s a timeless, vintage-style fur hat that will keep you warm and toasty in the most stylish way possible! And it’s a real quick project to sew up for that quick sewing fix when time isn’t on your side!
It really is so super easy to make. Just download and print out the FREE_fur_hat_pattern and follow these few simple instructions. The hardest thing about this hat will be to get your hands on some quality fur of the faux kind!
The pattern corresponds to my head size which is 22.5 inches or 57 cm.
You may need to adjust the pattern to personalise the fit.
You will need:
- 1/4 m of faux fur (retailers will only usually sell you 1/2m at a time but its often worth an ask!)
- 1/4 m of lining fabric (or find some scraps in your stash)
- coordinating thread
- a vacuum cleaner to hoover up all the fluff!
Instructions:
- Make sure you print out your FREE_fur_hat_pattern at actual size, and check with the test square (on page 4 of the pdf) that it has printed correctly. Cut out and paste the sheets together to match the layout on page 1 of the pdf. Complete the hat band and crown sections as full pieces as instructed on the pattern then cut out.
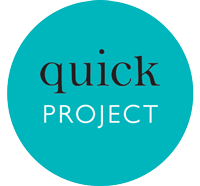
NOTE: Before you pin the pattern to your fur fabric, think about what direction you prefer the fur to lie. On this particular hat I made, the pile strokes downwards on the band, from the top of the crown, down towards my eyebrows! On the top circular piece, it strokes from front to back. Incidentally, the centre back of the hat is where the band is seamed.
TIP: When cutting your fur pieces, cut on the reverse and just snip carefully through the backing fabric so as not to cut through to the actual fur on the right side. You will achieve a much better finish on the seams.
- Pin the pattern to your fur pieces and cut out, paying heed to the tip above.
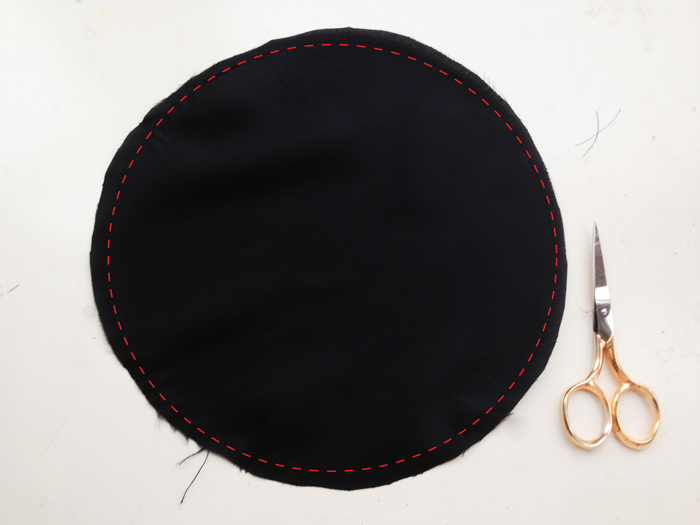
- Pin and cut out your lining pieces. It doesn’t matter for the circular lining piece but make sure the band is cut on a straight grain to avoid stretching.
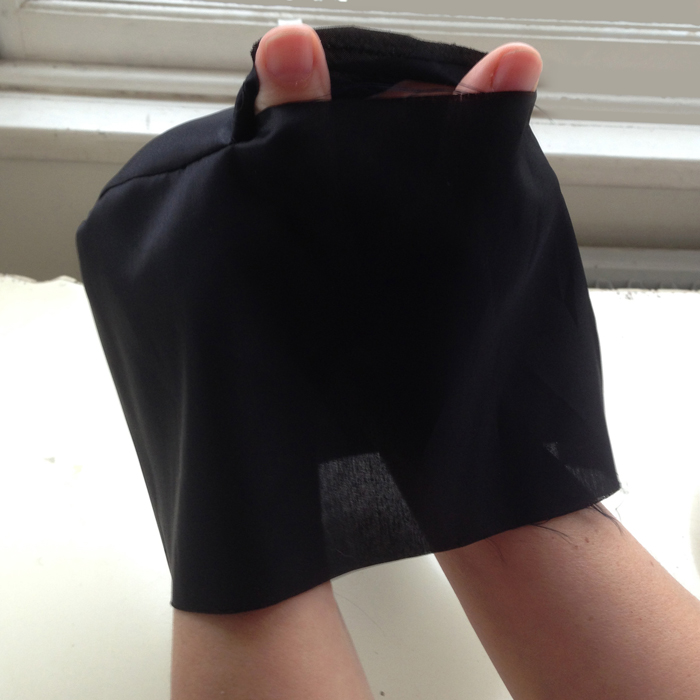
- Take your fur band piece and fold in half, right sides together. Pin the short ends together, making sure the fur is tucked inside, and stitch using a 1.5 cm seam allowance following the direction of the fur.
TIP: When sewing fur fabric, Increase your stitch length a little so prevent thread tangling.
- Finger-press the seam open and hold in place with a couple of tacking stitches top and bottom of seam.
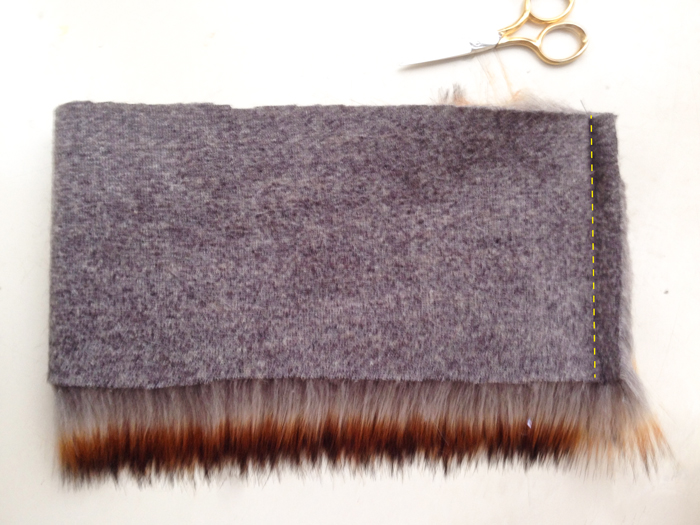
- Pin the fur circular crown piece to the hat band, making sure the fur is tucked in and checking the direction of the fur is correct. See note above. Sew the seam using a 1.5 cm seam allowance.
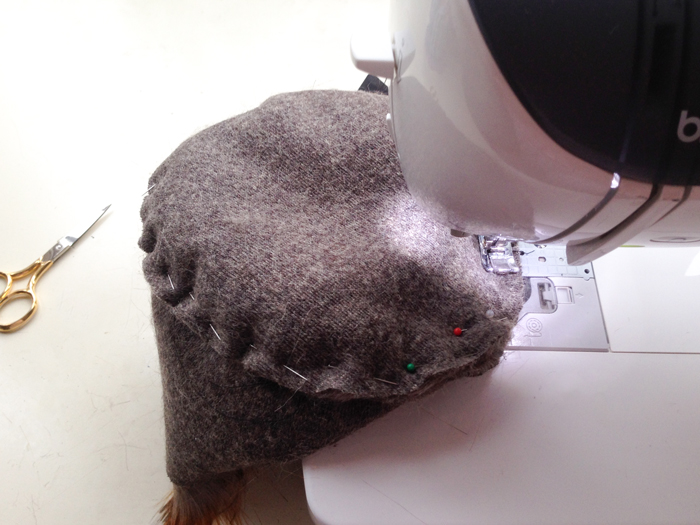
- Turn right side out. Using a long craft pin (a normal pin or needle will do) drag it along the seam allowance to free the fur that has got caught in the seam.
- Now take your lining piece for the band, pin the short edges together as above and stitch with a regular stitch length and a 1.5 cm seam allowance. Press seam open.
- Stay stitch the circular lining piece within the seam allowance, to prevent stretching.
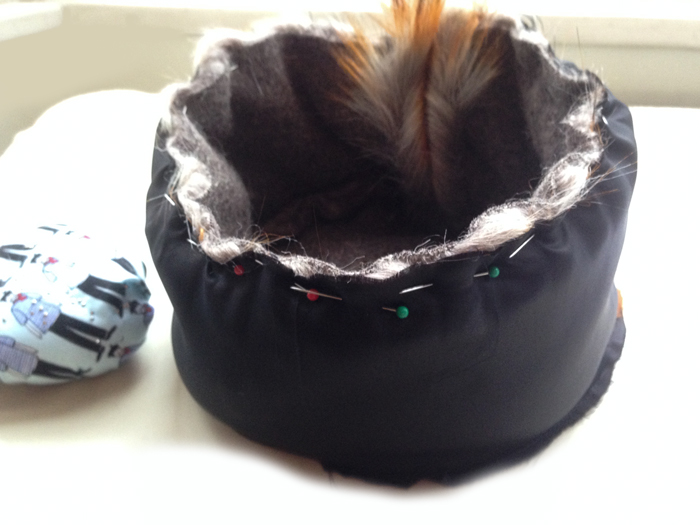
- Pin the lining piece for the crown along one edge of the band and seam together, leaving a about 4 inches / 10cm open for turning.
- With right sides together pin the rims of the lining and the fur hat together. Effectively the fur hat will be sitting inside the lining. Pin together, matching the two centre back seams and stitch along the entire edge, securing the stitching, beginning and end.
- Turn the hat to the right side through the opening left in the lining, and you’re almost done!
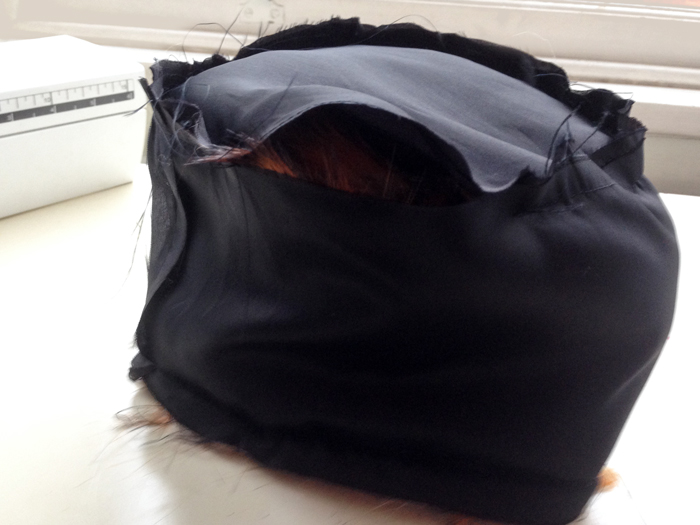
- Pin the lining opening together, tucking in the seam allowance, and slip-stitch closed. With matching thread, obvs!

Now all that is left to do is to don your new fancy fur hat, step out in the snow and hum the theme tune to Doctor Zhivago!
Please shout if anything is unclear. I’d be delighted to hear how you get on.
Thank you for your generosity in taking the time to put this tutorial together, even though I might not take advantage of it myself as it would probably be hunted down and torn to shreds by one of my dogs if left unattended. However, you look so stylish in your version that I am sorely tempted.
Happy New Year to you and yours!
Thank you Tialys. I have to say, my scaredy cat runs away from it so it probably wouldn’t fare well with your dogs either! Happy New Year wishes to you too x
Gorgeous!!! Lara always wanted to go live in Russia just so that she could wear a fuzzy hat (her words) everyday which is a kind of funny as her name came from the film Doctor Zhivago (strangely, the first film my parents took me to see).
I can so imagine Lara as a beautiful Russian princess! I think you’ll have to make her one, Jen!! xxx
I didn’t even know I wanted one of these until yesterday. But I have left over fur from 2013 fur collar (from Tilly’s free pattern) making, so I hope to create one of these lovely hats. Thank you for taking the time and trouble to make the pattern and instructions available.
You are very welcome, Kate. And I might just have enough left for a collar, yay! Happy sewing 🙂
Perfect timing! I work in a fabric store and I’ve been addicted to buying up bits of fur when they become remnants. I boxed it all up last night and realize I have about 4 boxes of different kinds of fur! I need to use it so I’ll start with this hat!
Shouldn’t take long. Maybe I can stitch one up tomorrow.
Thanks for the inspiration, and the pattern!
Jan
Oh how perfect! Thanks Jan. It really doesn’t take long at all. Would love to hear how you get on 🙂
Amazing! so inspired to try this RIGHT NOW except its bedtime for me so will come back later…night night!
(or I will lay awake thinking about it all night and not be able to sleep!!)
Bestest inspiring wishes to you
Daisy j x
Thanks so much Daisy. I’m going to be dreaming about those glossy perspex figures! x
I was really worried about making this pattern from scratch, but you have truly saved me so much time! Thank you so much for all the work you put into this page and for sharing it with us! You and my new hat are truly amazing!
First Thank You for posting this FREE fur hat pattern.
Help me here, I’m missing something, the fur band doesn’t look like it’s long enough. I’ve printed the pattern twice and and joined them together but it doesn’t look right?? Is this the Full size pattern piece?
Hi Joads. Sorry to hear you are having problems. Have you measured the test square to make sure its printing the correct size? If it isn’t perhaps check that your printer settings are not set to ‘fit to page’ or this will substantially reduce the pattern pieces. Let me know. J
I had the same issue. I went into Properties on the print dialogue box and upped the scale to 120% and it printed at the correct size.
Hi Terese. Sorry to hear that you have having issues too. It prints fine from my home printer but I just tested from another computer at my office to make sure. I double checked the printer settings were at 100% and that the test square measured 3 inches/7.62 cm. All is fine. Not sure why you are having to print out bigger but so long as your test square measures the same it shouldn’t matter. Happy sewing and thanks for popping by 🙂
Hi! Thanks for the great pattern! I’ve never sewn a hat before. My head circumference is 22.75/23 inches. I’ve been trying to figure out the modifications myself for an hour.
Do I just add the difference between my head and your head to the pattern? How about the crown?
I’d love to know this too. x
I’ve just googled the percentage increase from 22.5″ to 23″ and it is 2.22%. So on that reckoning, I would just print out the pattern to 102.22% if possible (maybe its only possible to print 102%) and then double check the circumference against the length of the band. You might also want to reduce the height of the band although I’m not sure 2% will make that much of a visible difference. Hope this helps.
I see you don’t monetize your website, don’t waste your traffic, you can earn additional cash
every month because you’ve got high quality content.
If you want to know how to make extra bucks, search for:
Mertiso’s tips best adsense alternative
Thank you! I’ve just made myself a faux fur jacket and made a hat to match from the left overs. In fact I’m making another one for my mum for Xmas. Nice clear instructions
Totes my pleasure! That’s so lovely to hear. Thank you and a happy new year to you 😀
Não encontrei o molde no arquivo
Hi there
That post is old and the links were broken, sorry, but I have just updated it for you
https://ooobop.com/wp-content/uploads/2014/12/FREE_fur_hat_pattern.pdf
I made a fur coat for a granddaughter and there is enough fur for a hat. She and I are excited to make this hat. Thank you so much.
Do you have recommendations for where to find high quality, realistic looking faux fur?