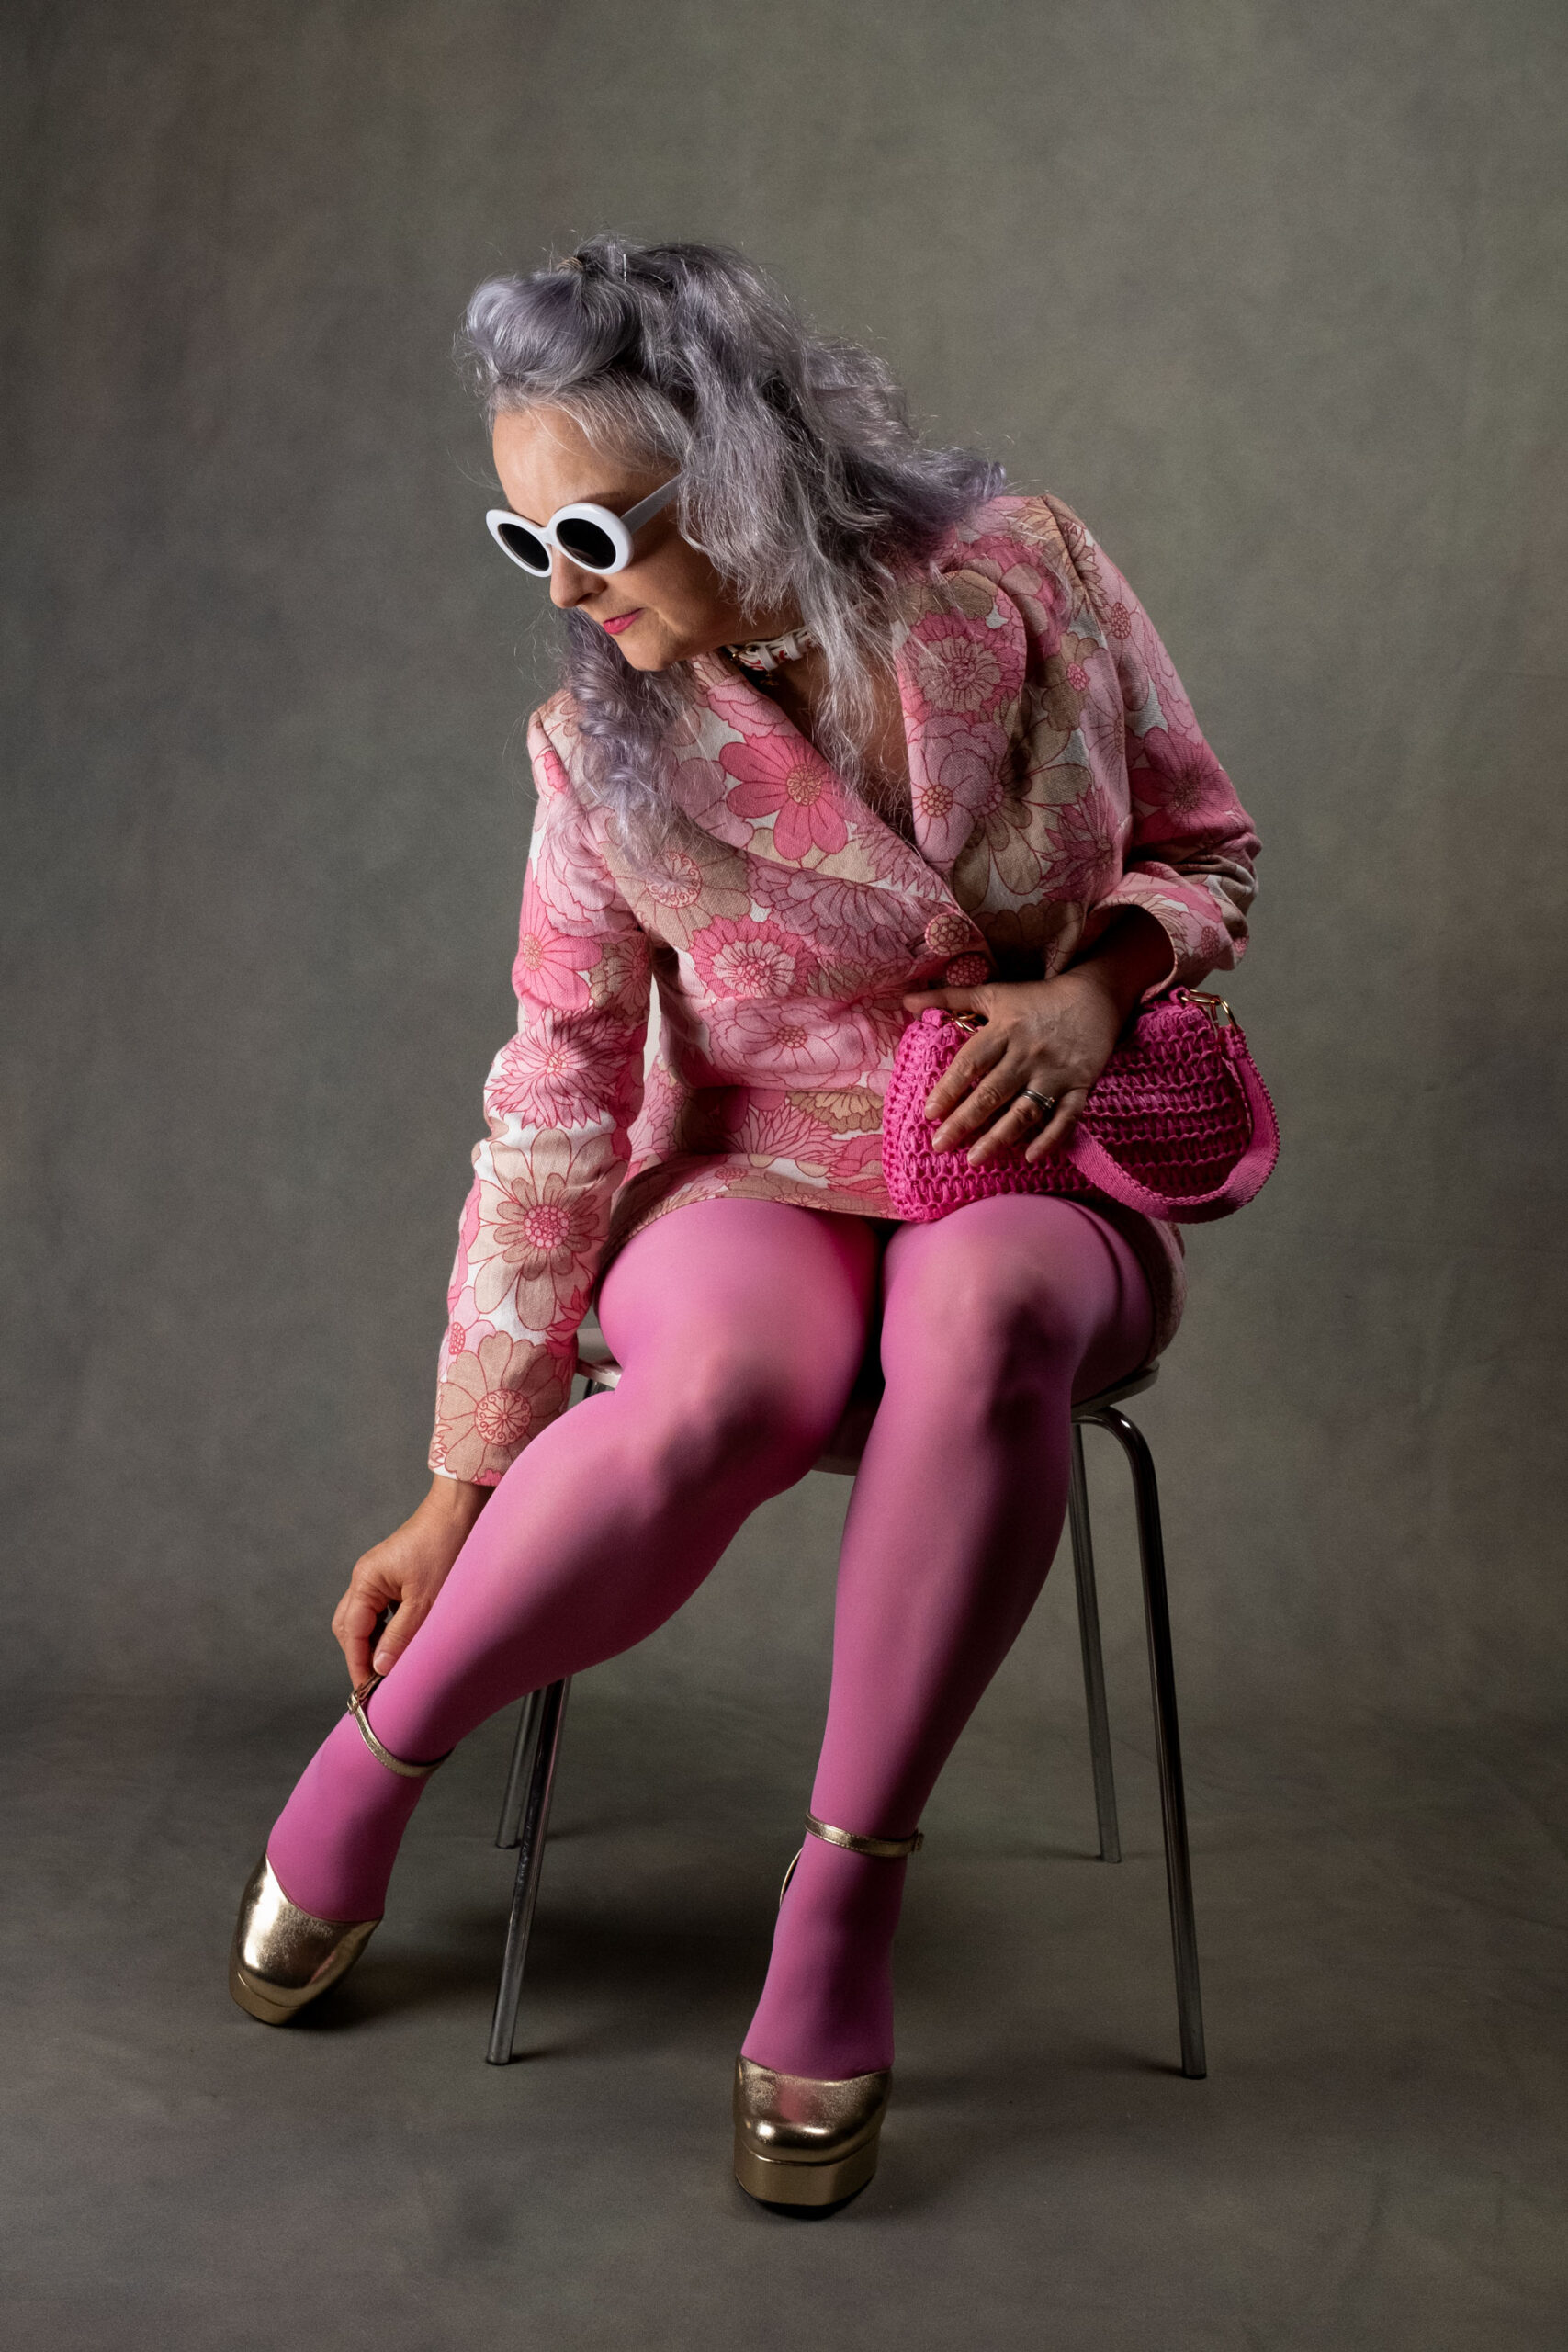
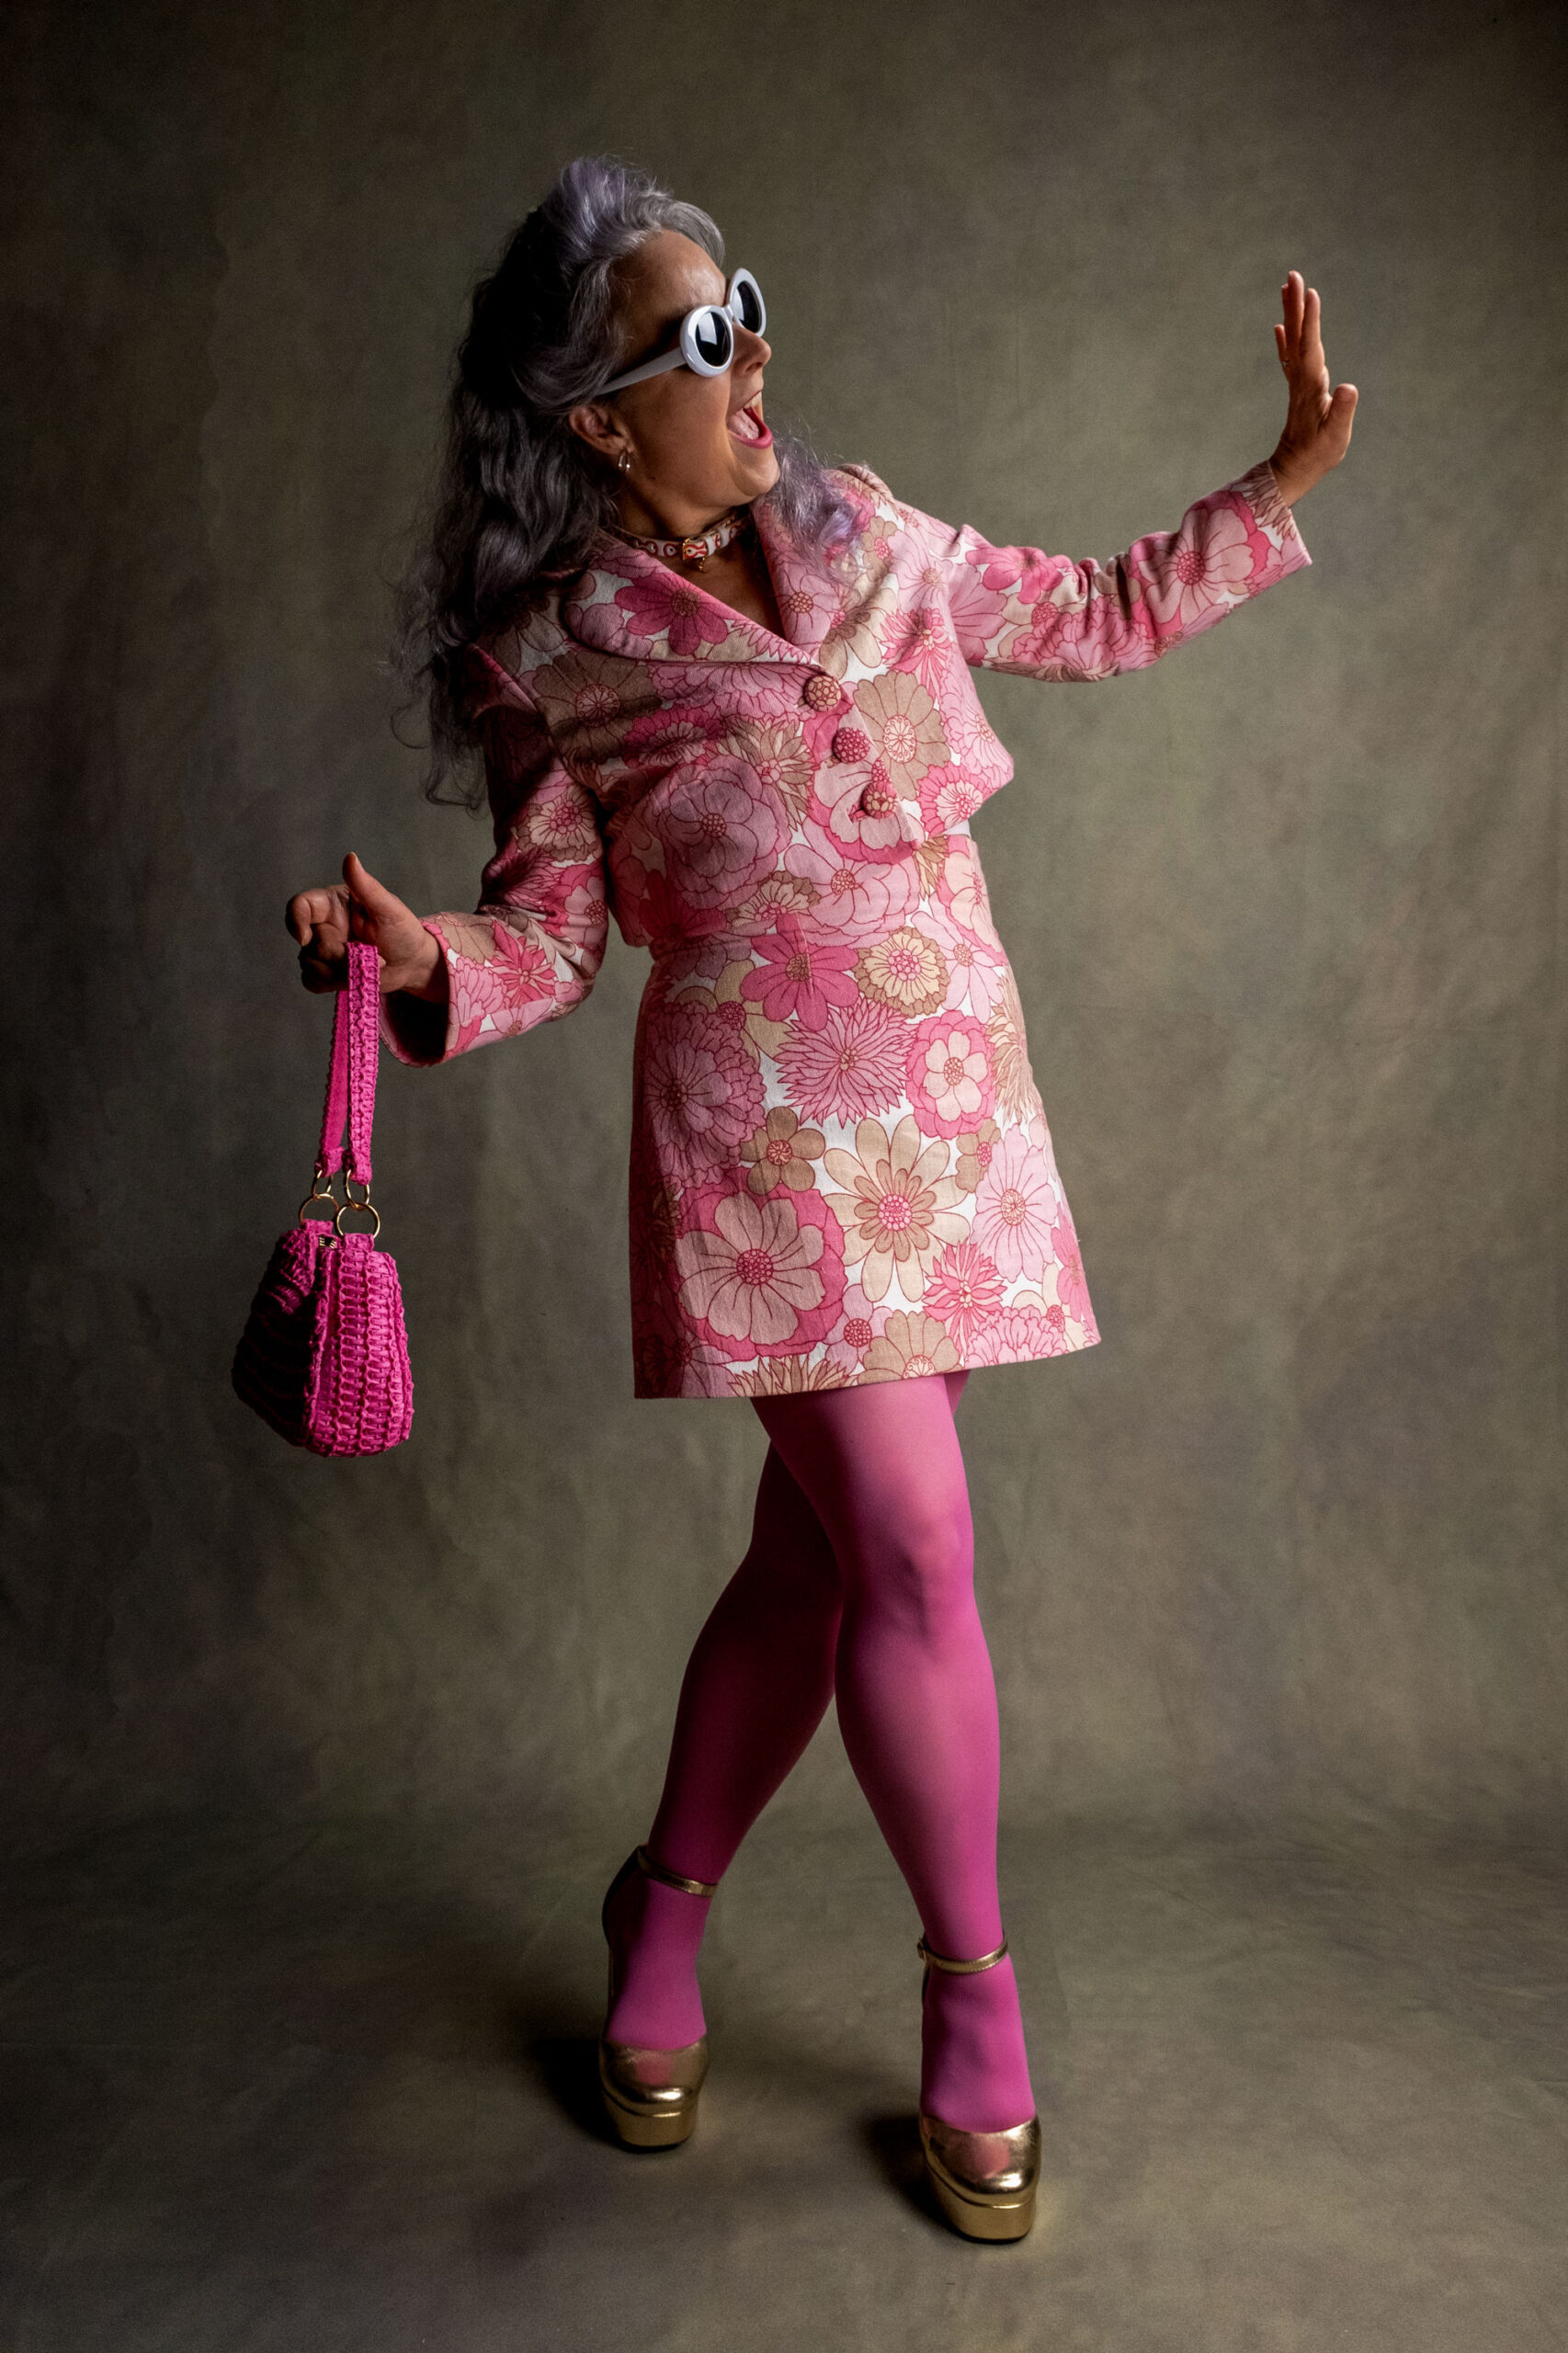
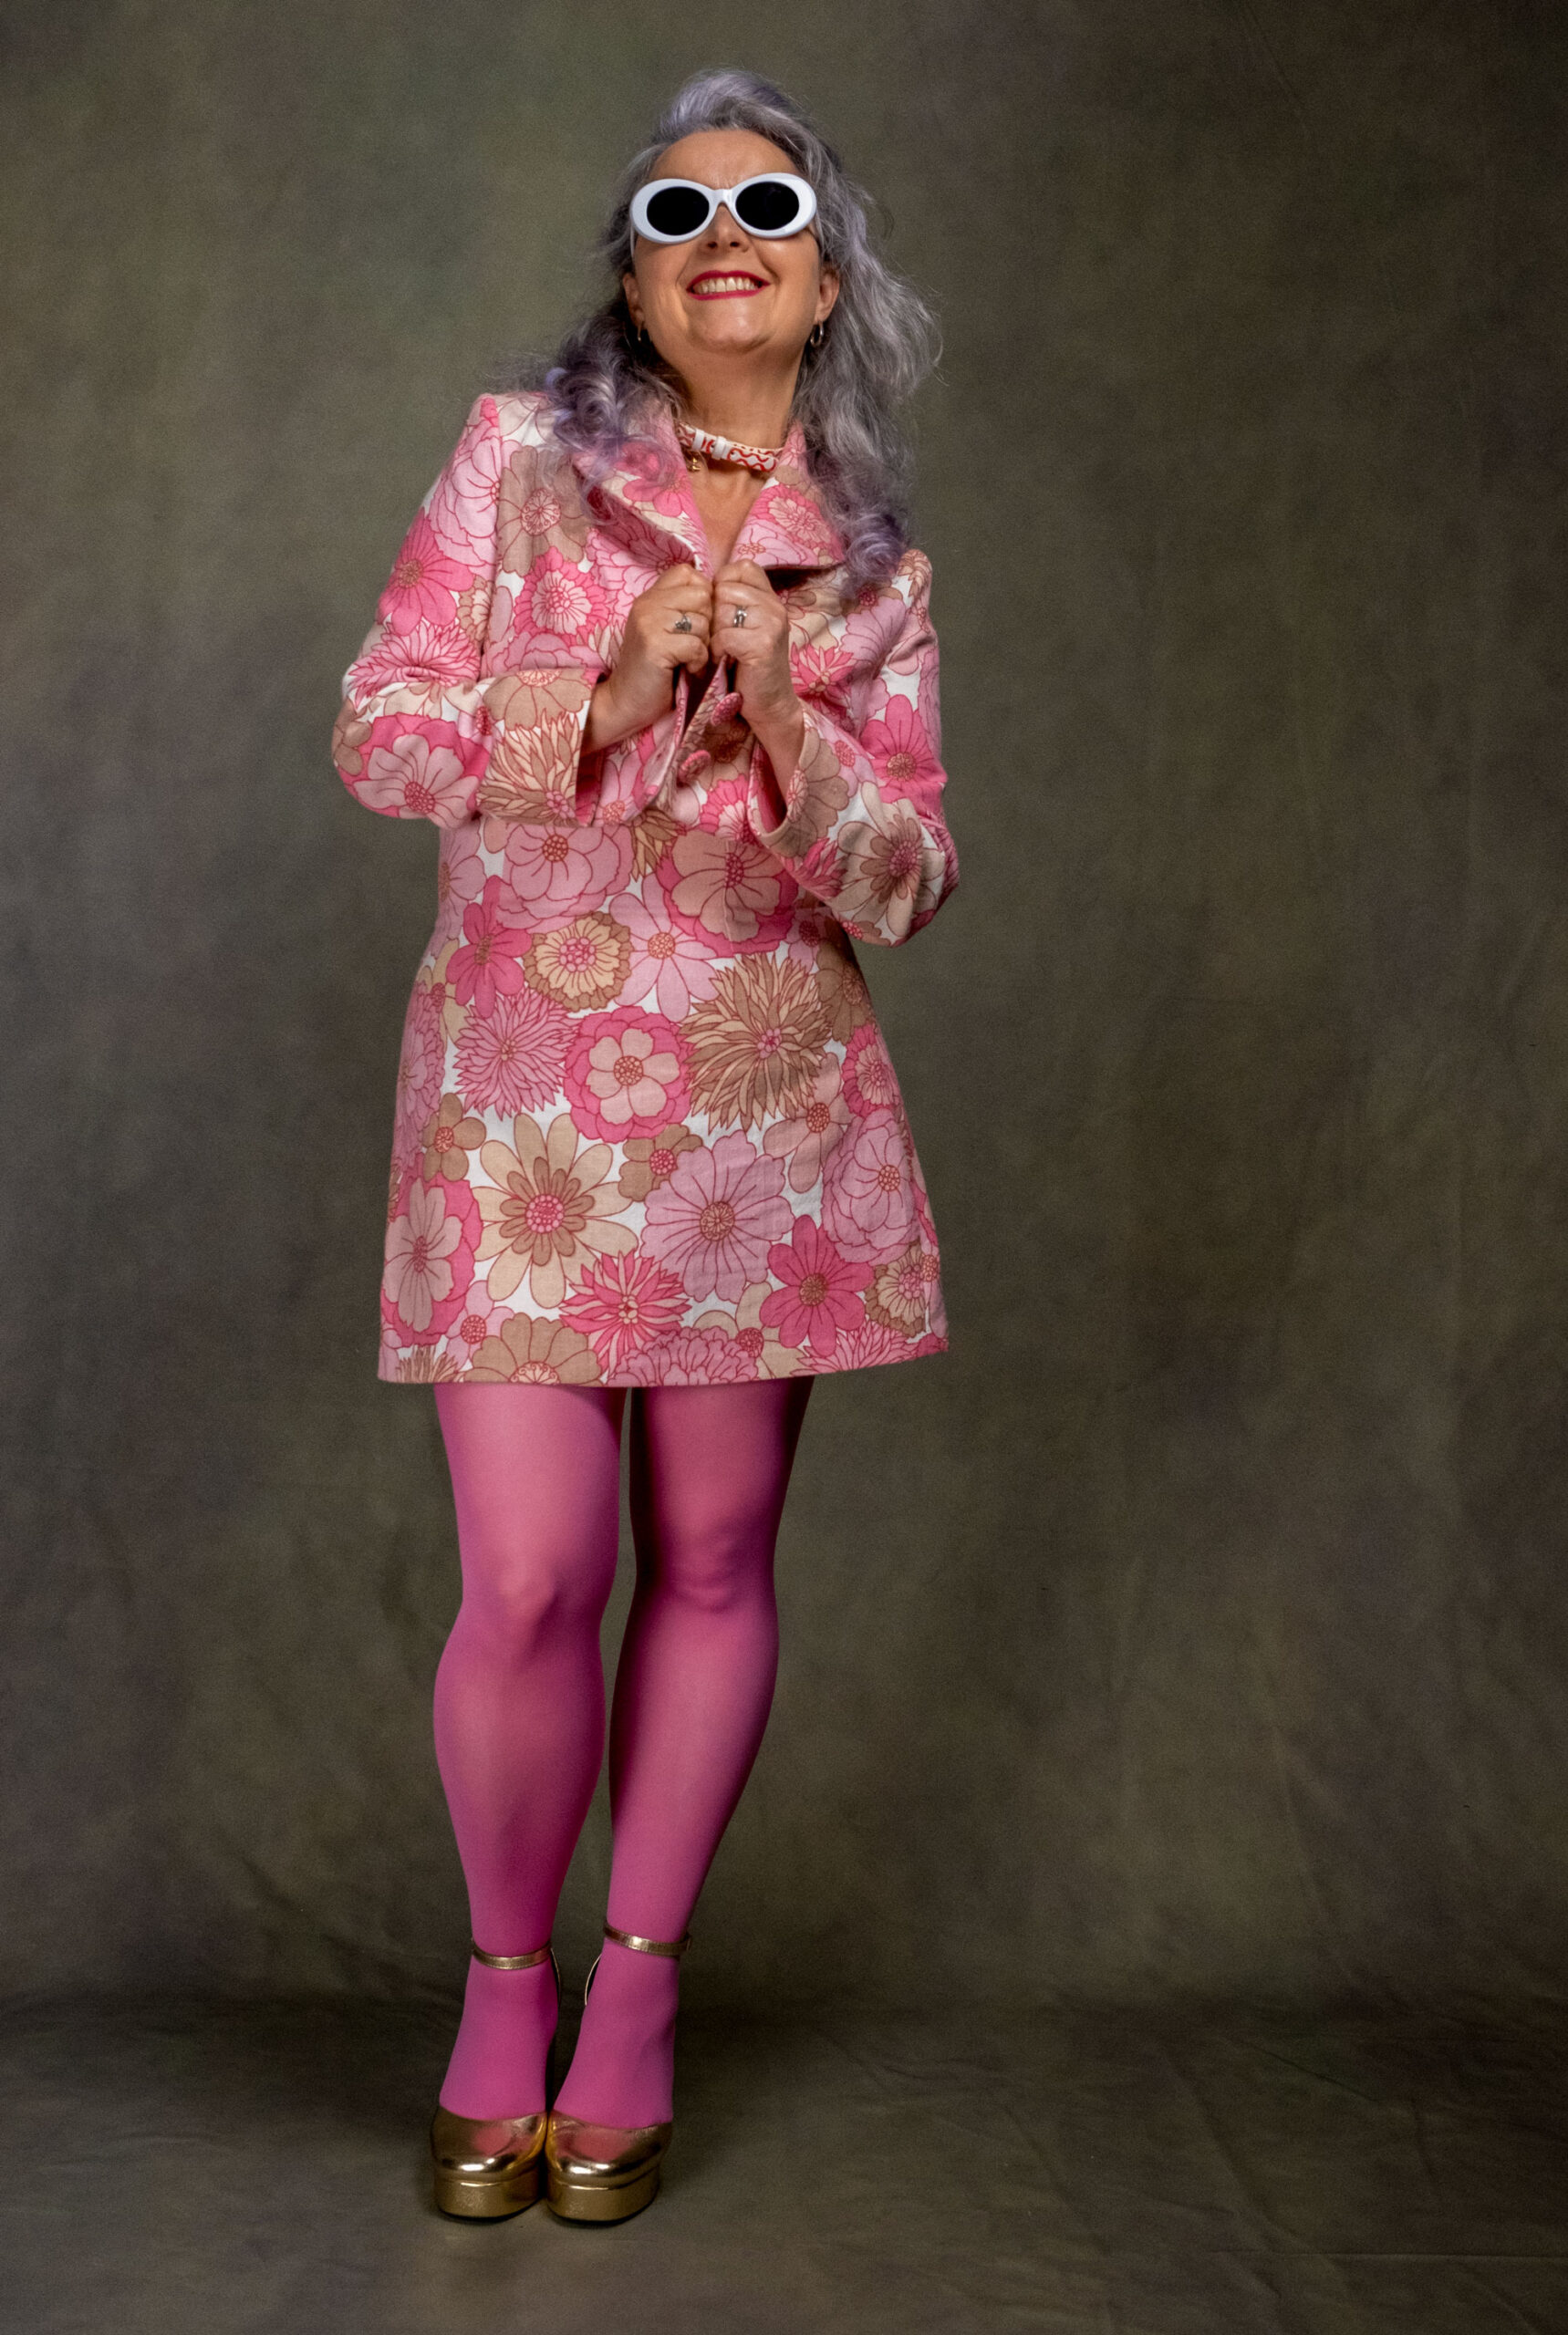
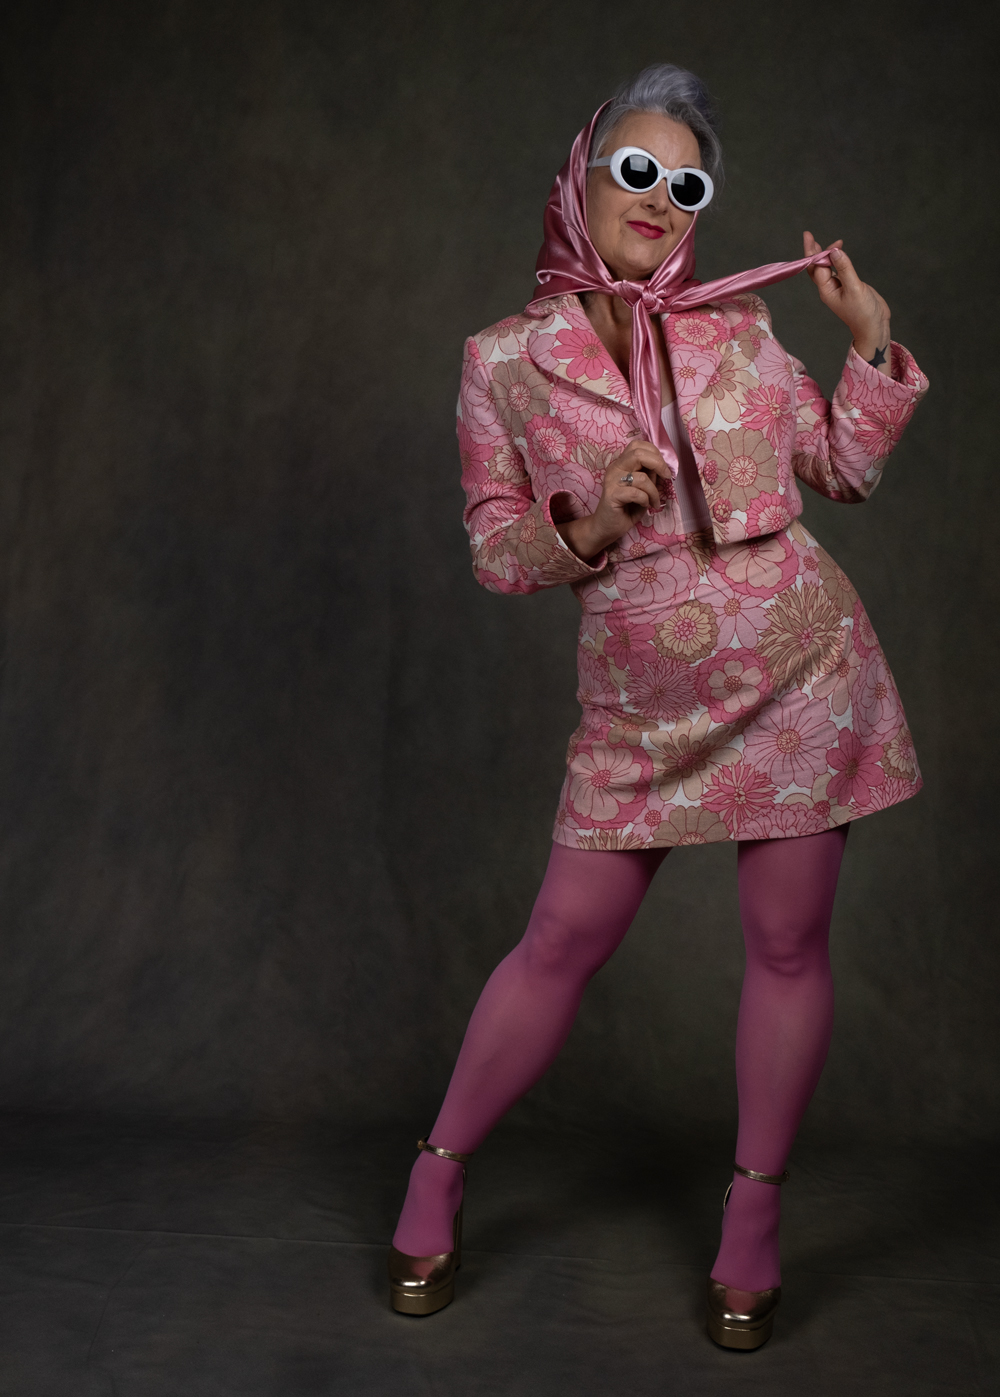
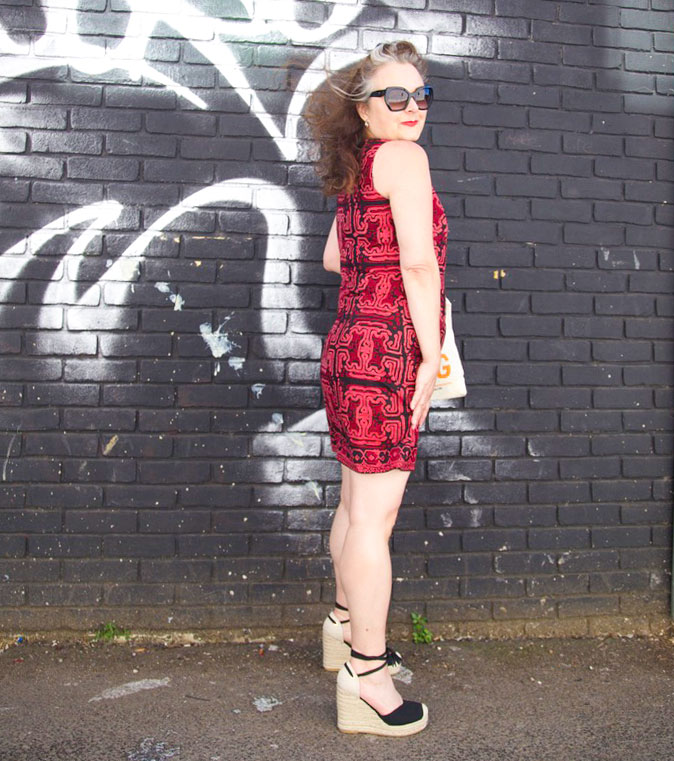
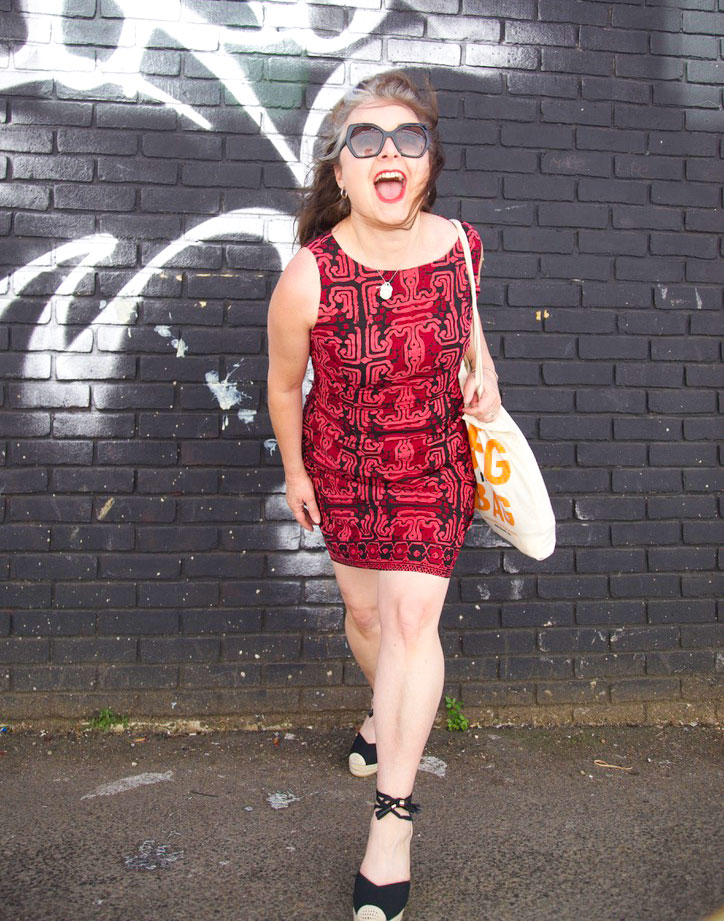
I don’t think I ever imagined myself wearing or making a pink suit. Yet here I am. Pink tights, scarf, handbag and all. And it totally wasn’t in the name of Barbie, I can assure you!
The back story begins with a gifted pair of freshly laundered and neatly folded vintage M&S curtains from my very good friend Kiki. The jury is still out as to whether they are late 60s or 70s but either way they are something special!
Initially I wasn’t sure as to why she’d ‘thought I could do something with them’. They were so far from my every day vibe. But I did feel a pull to retain the faith she had in me, to create something interesting from them. I had no idea what at the time. So they sat in their neat folded pile on top of my existing tower of interesting fabrics for quite some time before the eureka moment struck!
I’ve been practicing pattern making for a while – starting with basic blocks and having fun with adaptations but up to this point I had never drafted a jacket, for fear of that notched collar. It transpires, like anything else it just required a bit of learning and rehearsing to understand the process. And I’m so glad I did. I really wanted to draft a coat this year so this was my first toe dipped before that happens.
Once I’d drafted the pattern and visualised the final thing I couldn’t get the curtain fabric out of my head and I sketched those big flowers in my Fashionary to see if it would work. And I was pretty sold that it would.
The fabric was great to work with – great texture and relatively stable. Perhaps a wee bit on the heavy side but I really didn’t mind that because it gave some great structure.
I padded the shoulders and added a sleeve head before lining it. I can’t not do this now I know what a difference it makes. And I spent a lot of time cooing over the rounded shoulder cap before I moved on to the next stage!
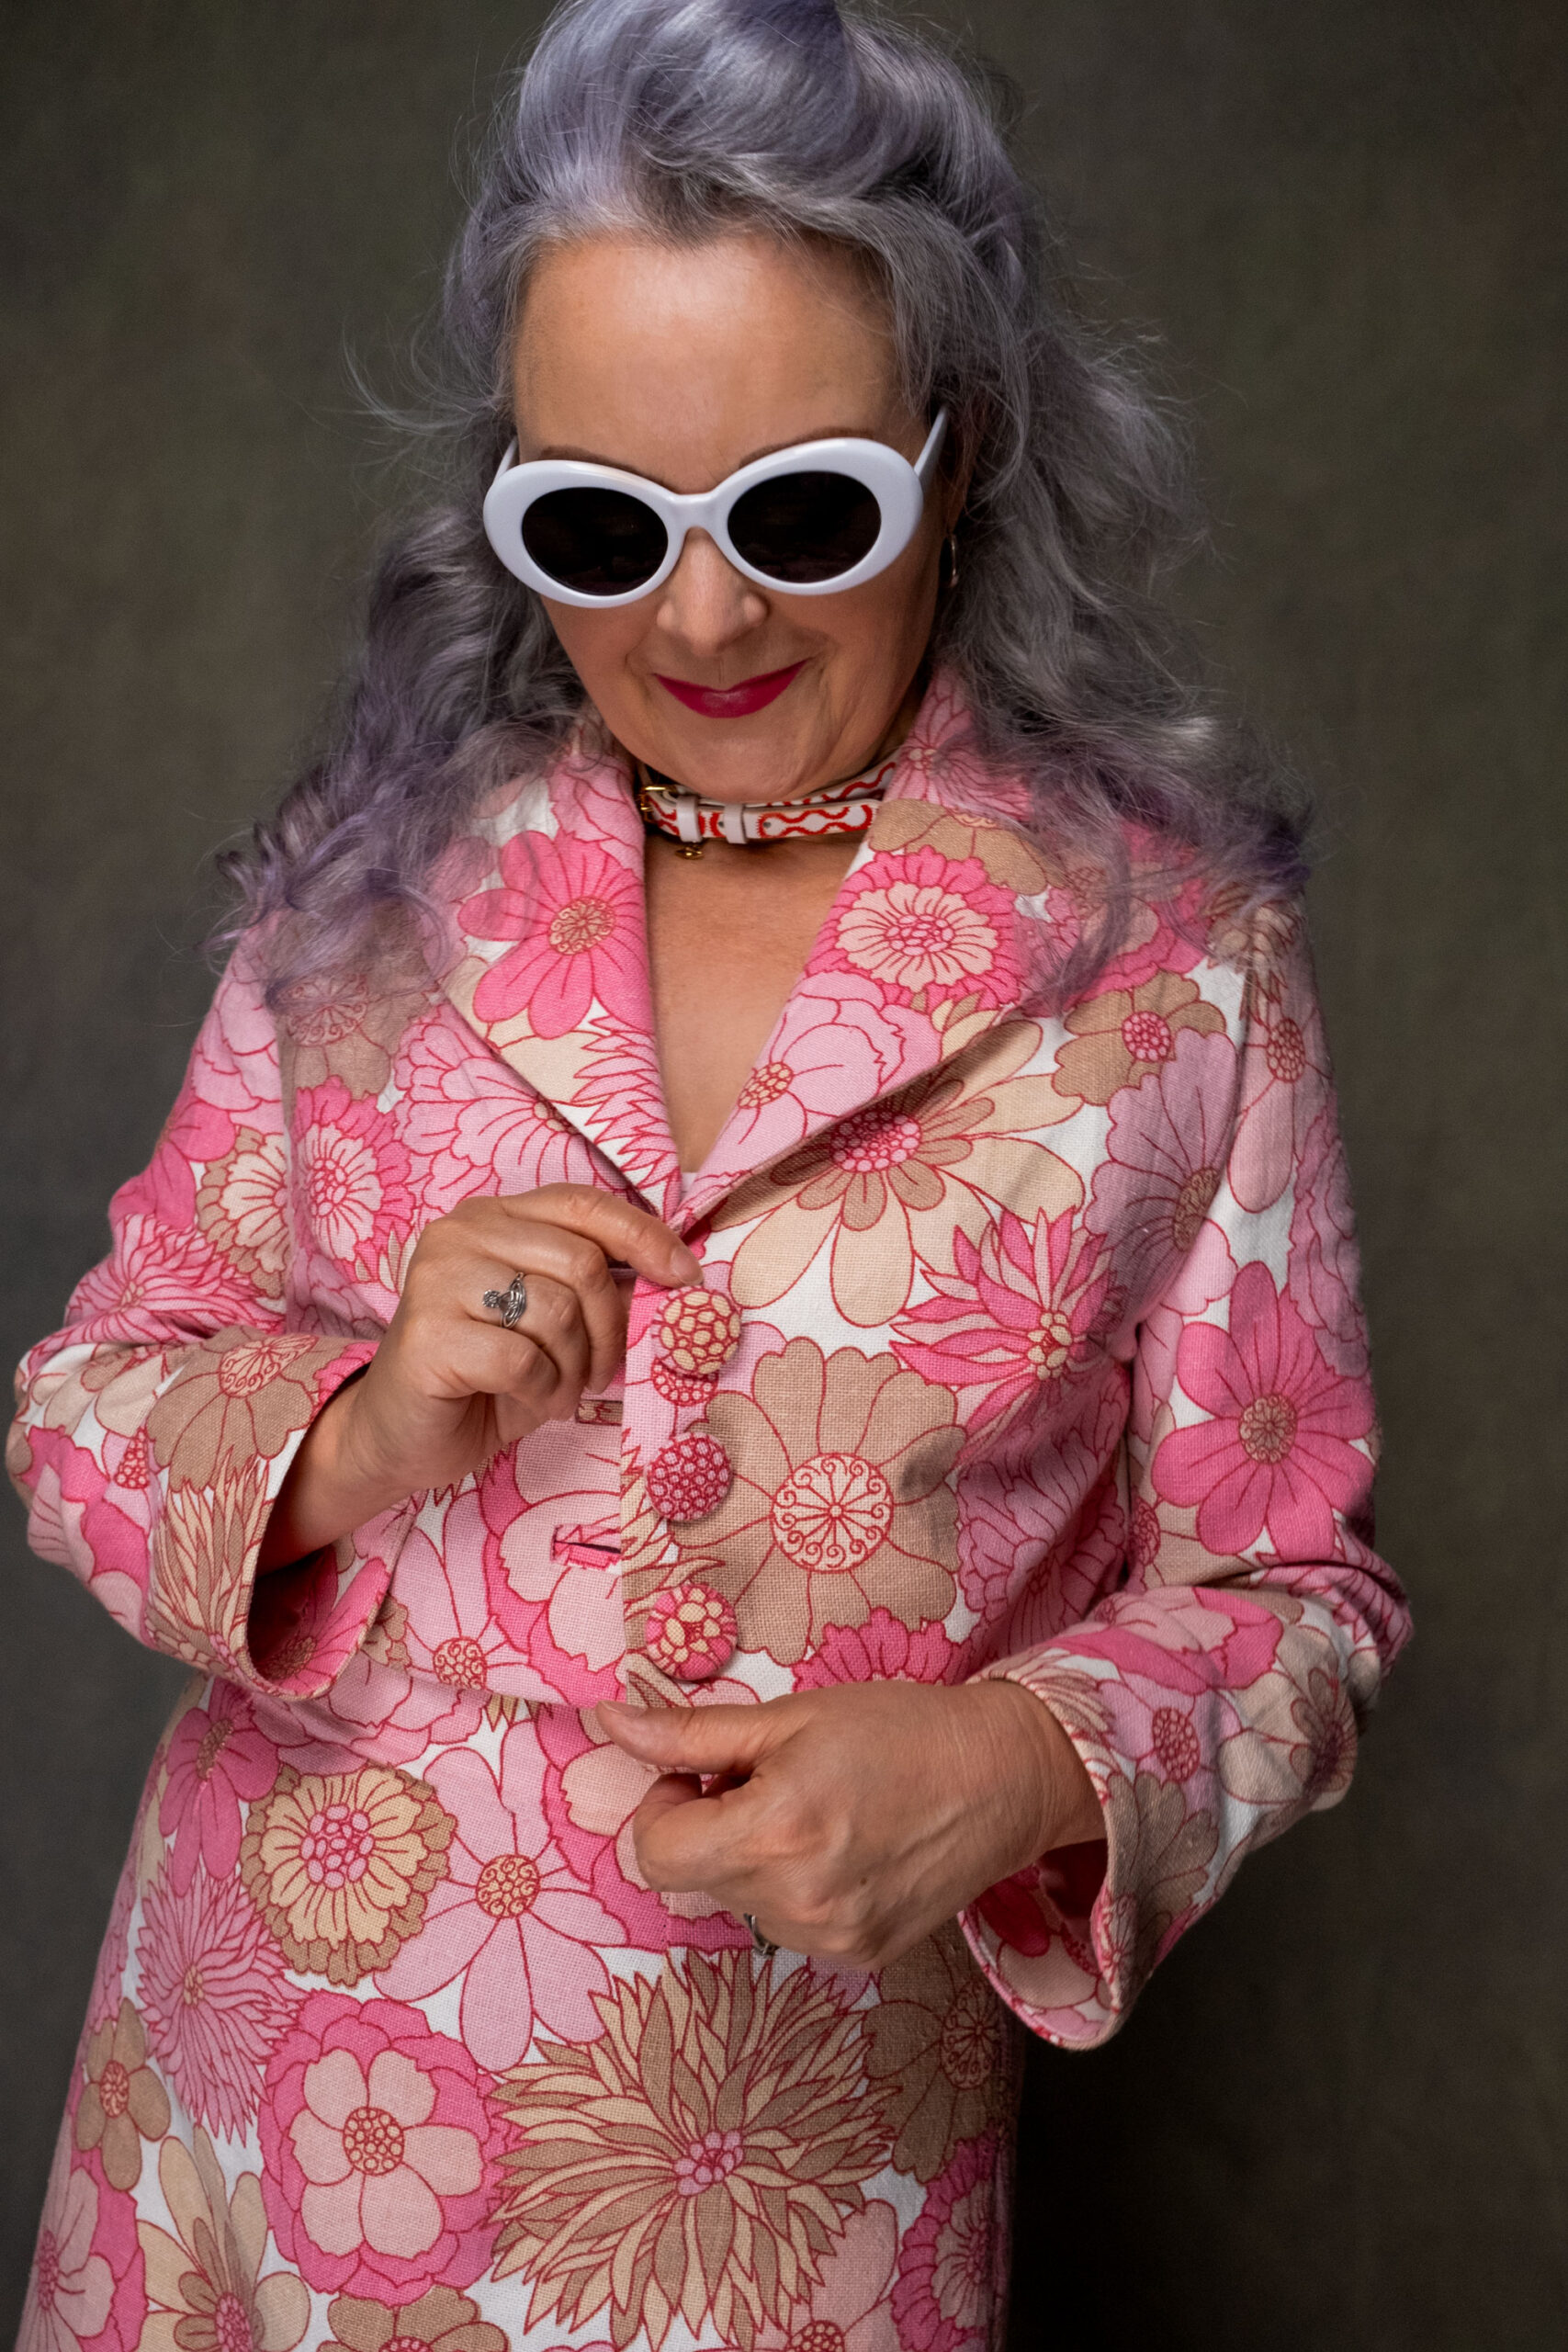
The rounded lapels were a conscious decision to reflect the rounded retro flower design, and also because I fell in love with the heart shaped lapels on a Vivienne Westwood jacket years ago, hoping one day I would replicate it. Not yet. But I’m one step closer!
Bound buttonholes were a must. Sometimes a machined button hole just doesn’t cut it. My jacket was a labour of love and was going to get the best kind of button holes. Covered buttons too. No other buttons I looked at came close to being able to use up the fun flower centres from the leftover scraps.
I used facings to finish the hems of the jacket bodice and the sleeves which I love to do and it makes it look all fancy inside too!
The only problem I had was that I didn’t really have anything to wear with it once it was finished! I mean it will totally go with a black dress and all but I weirdly don’t have many of those any more. So I whipped up a high waisted mini skirt on deciding that the fabric was too heavy for a shift dress which was an initial thought.
Now I have the option of wearing this as a suit or as separates. And I’m so happy about it.
The shoot was a great excuse to style it up. Dan was very encouraging of going full on retro although I had all of a couple of hours to pull something together. He’s becoming more and more in demand lately so I just have to make the most of when he’s around!
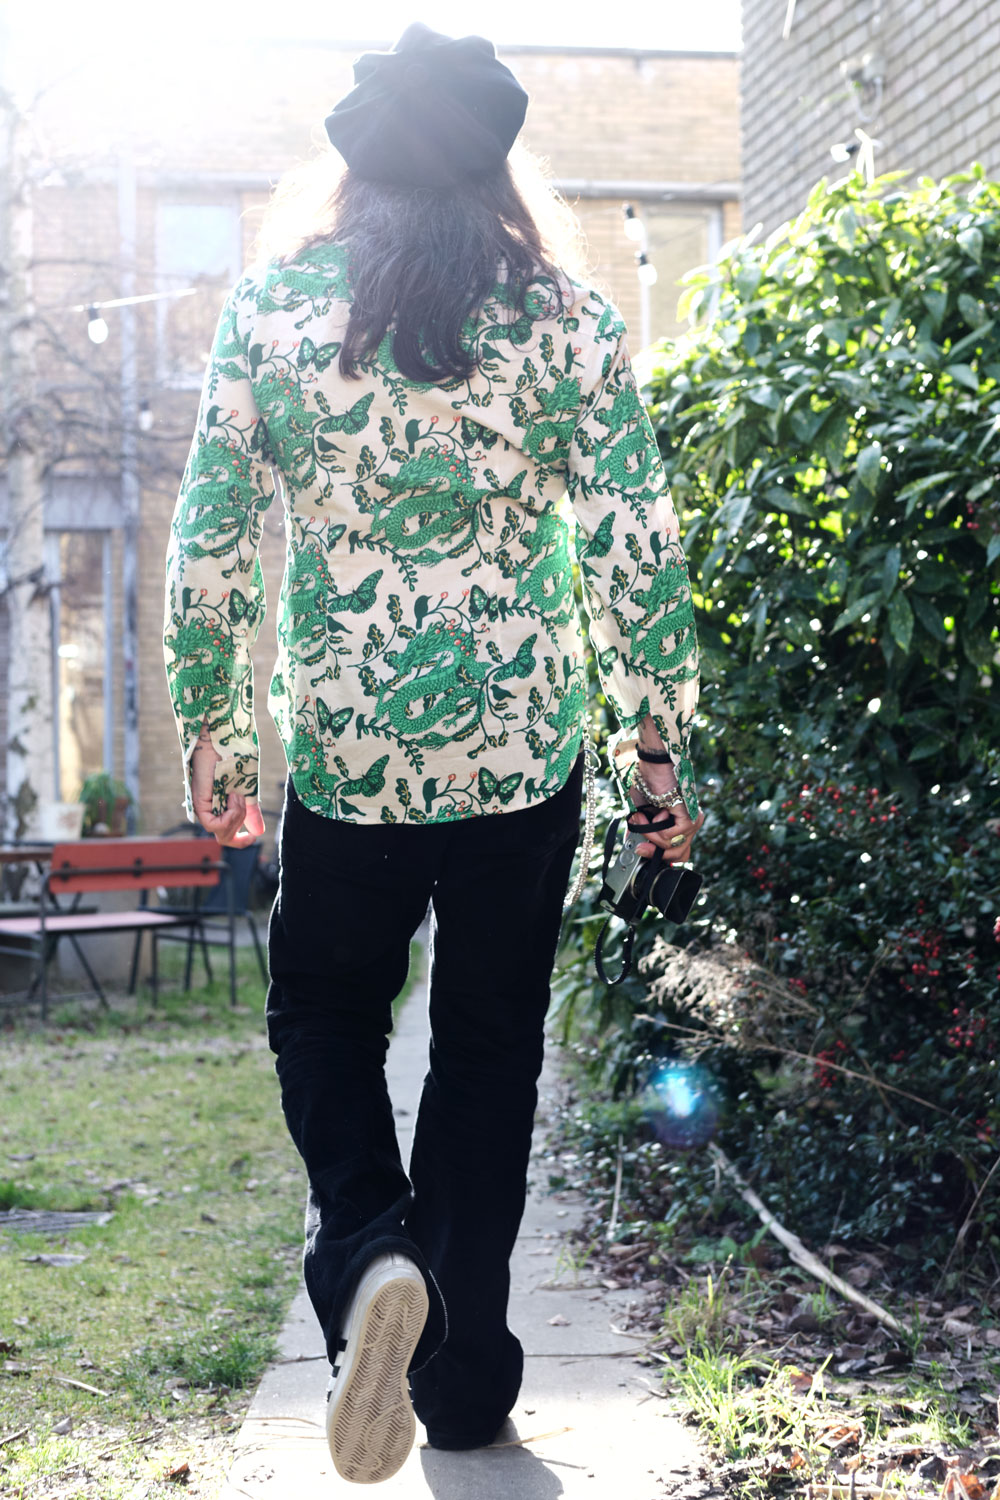
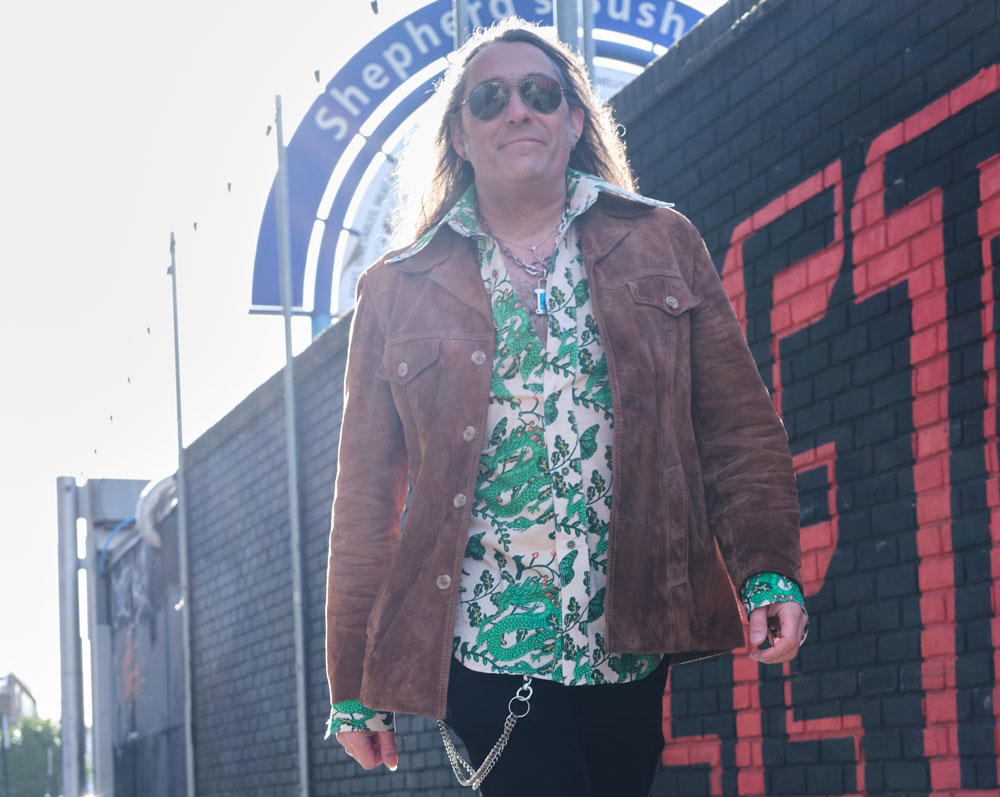
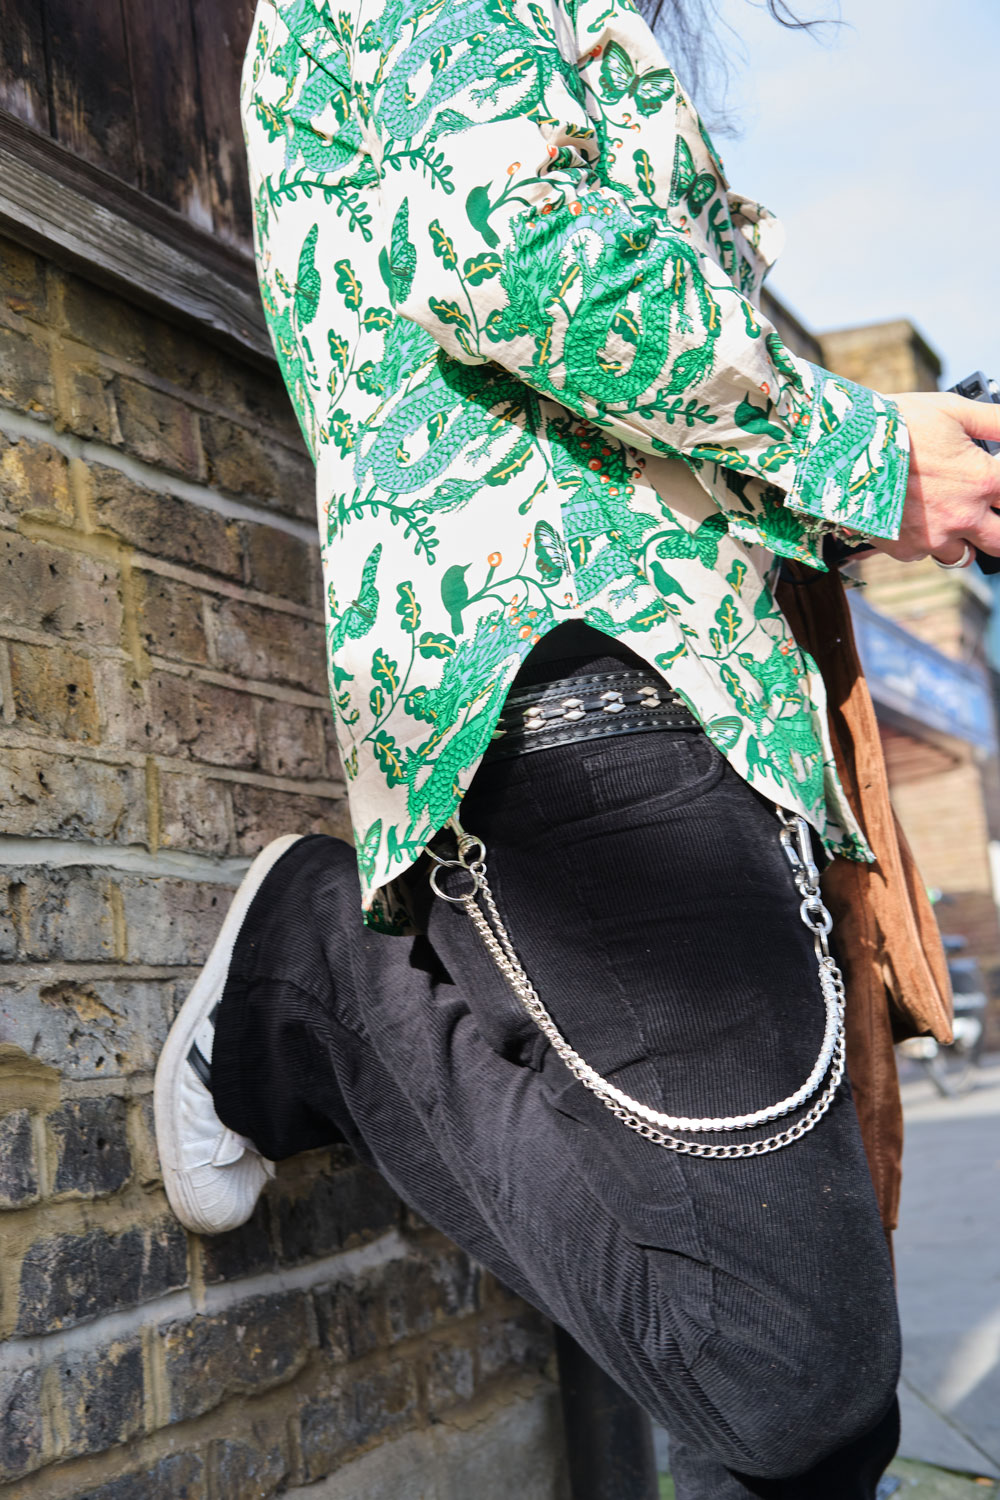
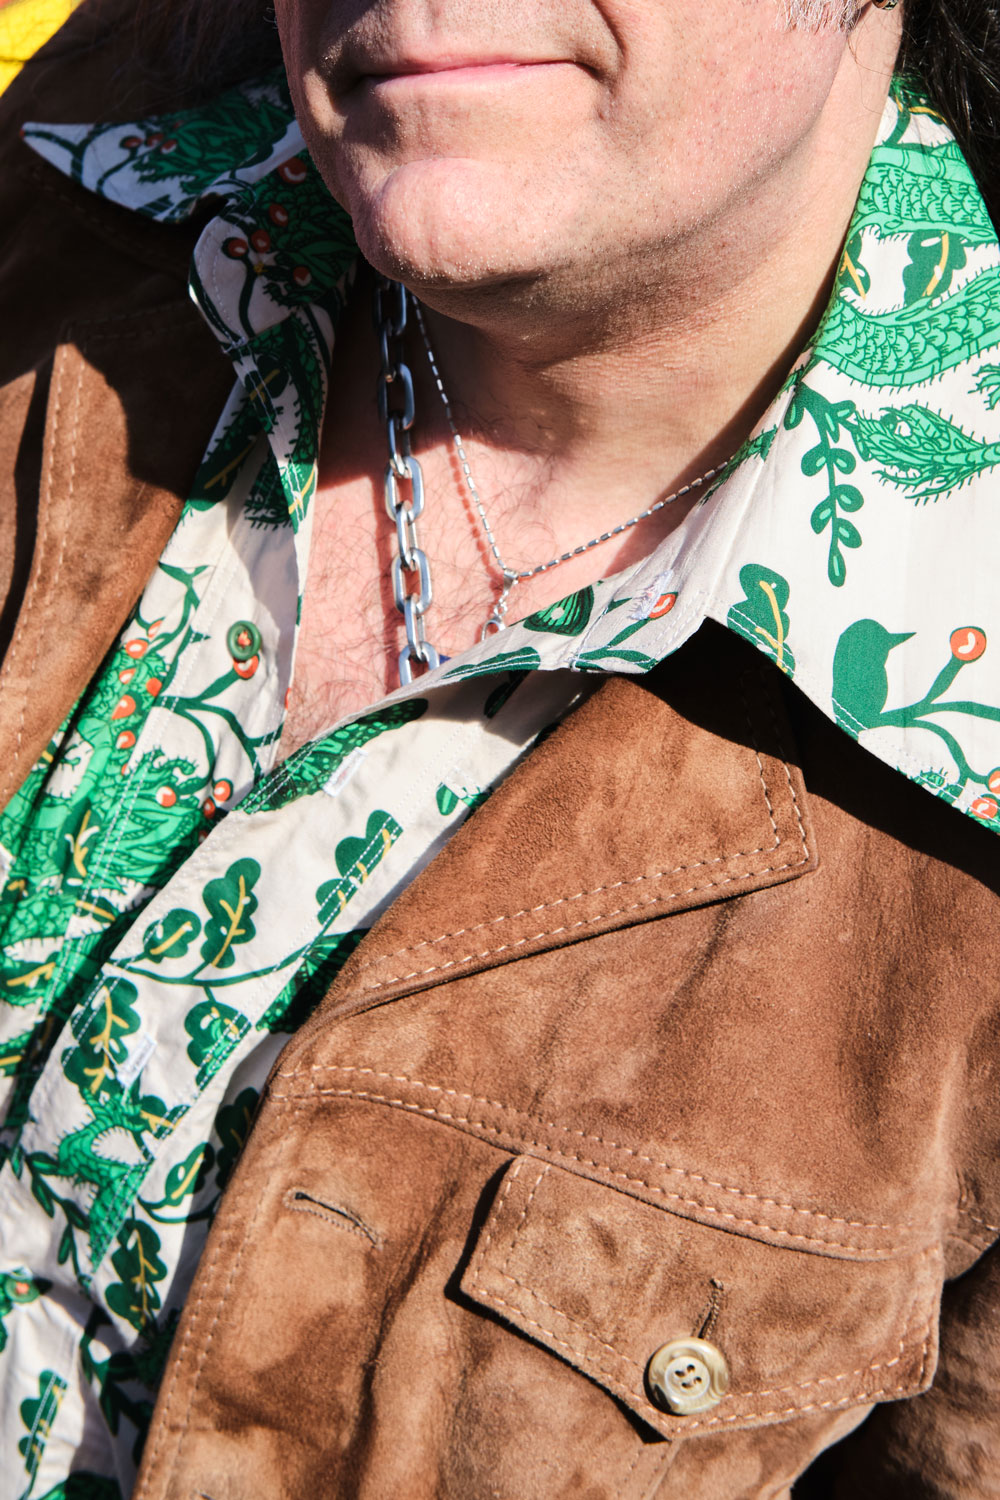
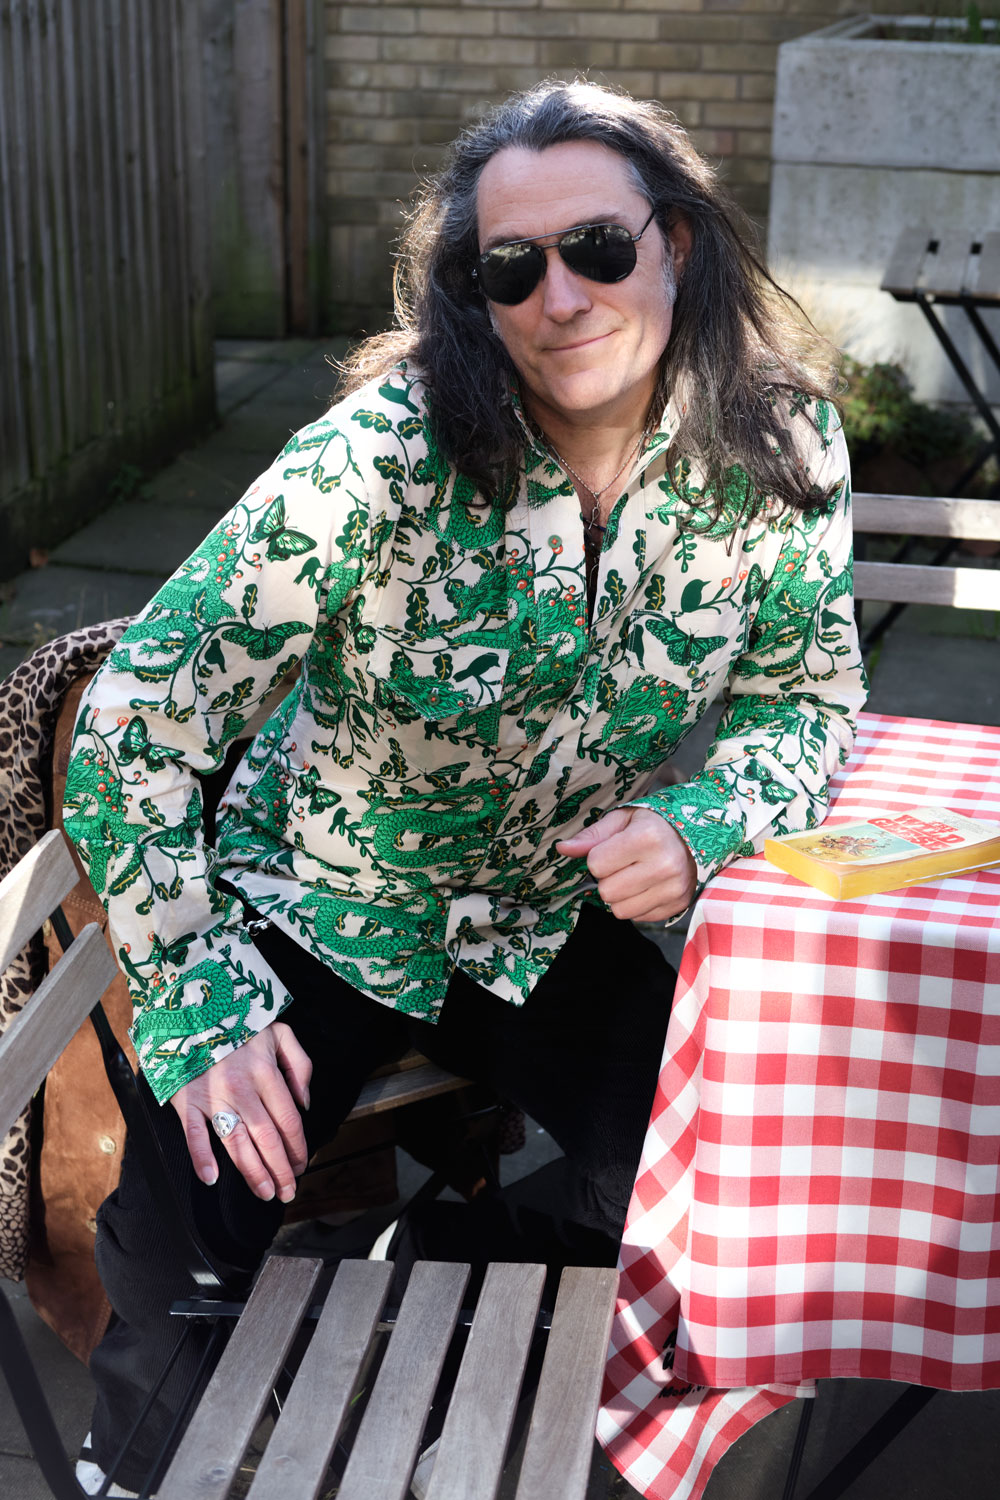
On waving this wonderful Serpentine fabric in front of Mr O, and declaring that I wasn’t sure what I should make with it, my foot suffered an instant shot. “A shirt for me” he said, with no hesitation. Doh! I had no quick comeback! It was a perfect suggestion, of course.
Fabric Godmother were so kind in forwarding on my goody bag, when I was unable to attend one of their events last year and this fabric was one of the treats inside. I thought on first feel that it was a cotton lawn but it turns out it’s a viscose sateen – a new one on me – and it is gorgeous to the touch and super to sew with. Presses beautifully too.
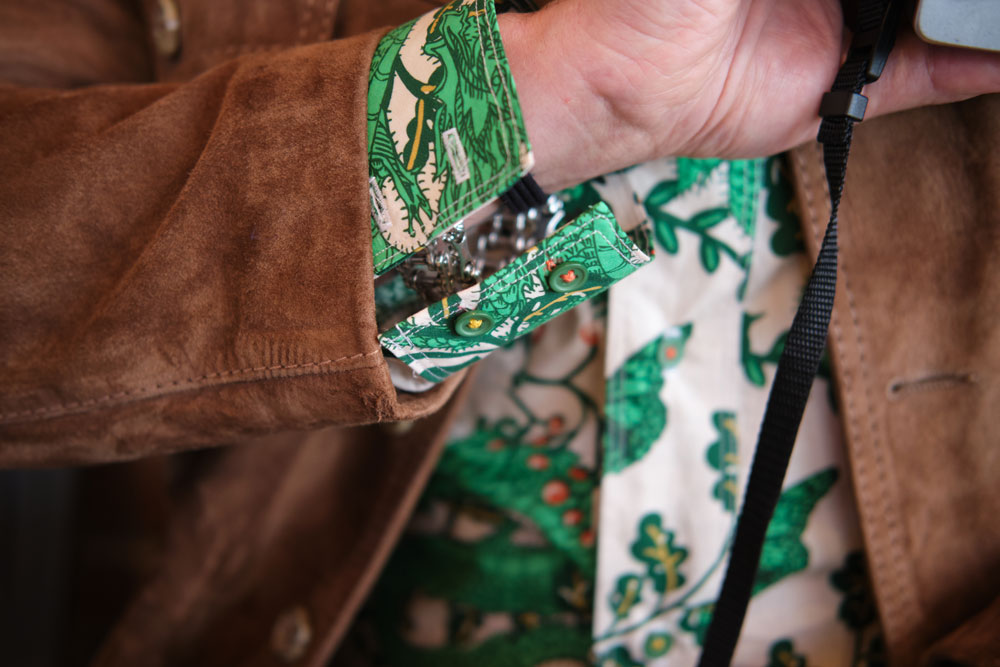
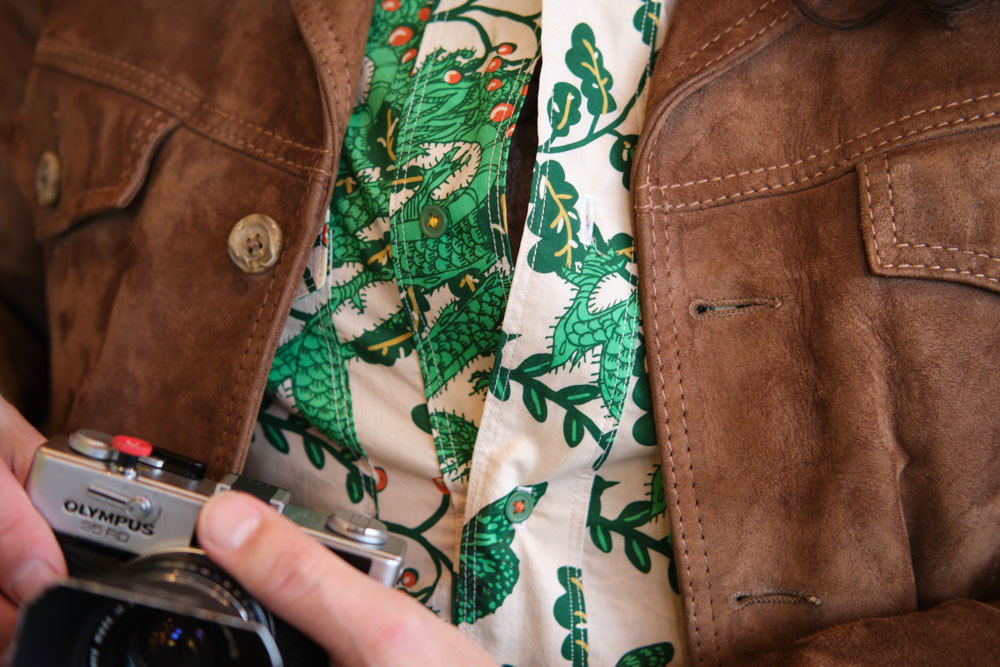
I reused vintage Butterick 5007, (western shirt pattern) for the 4th time – definitely less daunting this time round. The only things I still fear about it are the buttonholes because I know for a fact that at least one will mess up and I’ll have to deal with the nasty task of unpicking it. And that is exactly what happened. Is there actually anything more annoying?
It takes time to put this shirt together, mostly due to all the neat details: curved yokes, rounded hemline; pleats and darts on the cuffs; diamond darts for slim fitting and every single piece has 2 parallel rows of topstitching. But weirdly, I really like the process. The main section comes together pretty quickly and its a great one for sewing in stages if time is short. Which it is the story of my actual life!
It also has some serious statement collar action going on which Mr O loves. I personally couldn’t carry them off but I think he rocks these aeroplane wings, styled up with his 70s jacket and hat.
I didn’t make any attempt to pattern match as you can see. I only had 2m to work with – the exact amount required – and there would have been so much waste if I had even tried. That is my excuse and one I am firmly sticking to!
Even though I enjoyed the process, I properly ran out of steam when it came to sewing on the buttons. So I successfully managed to delegate the sourcing and sewing of, to Dan. And he did a fabulous job – giving way more attention to detail than I’d have given – he sewed with alternate orange and yellow threads throughout to complement the colours in the design and it looks simply awesome.
This is definitely not the last time I will use this pattern. I just noticed that Fabric Godmother has a Navy version of the same fabric on sale on their site, and made the mistake of showing Dan!
But he’s going to have to wait a wee while – I’ve got a lovely little commission I need to crack on with and also I want a new coat!
Photos are by me this time. But I think you probably guessed that already, haha! I think I’ll stick to my day job!
The Dressmaker’s Ball is an amazing annual event hosted by Crafty Sew and So in Leicester and presents a perfect opportunity to sew and wear whatever you damn like.
A free brief is pretty much unheard of in my work as a graphic designer. There are always rules – a style guide and house styles to abide by at the very least and so it is very refreshing indeed to be granted such freedom to create. Until of course, you start weighing up the possibilities which are endless!
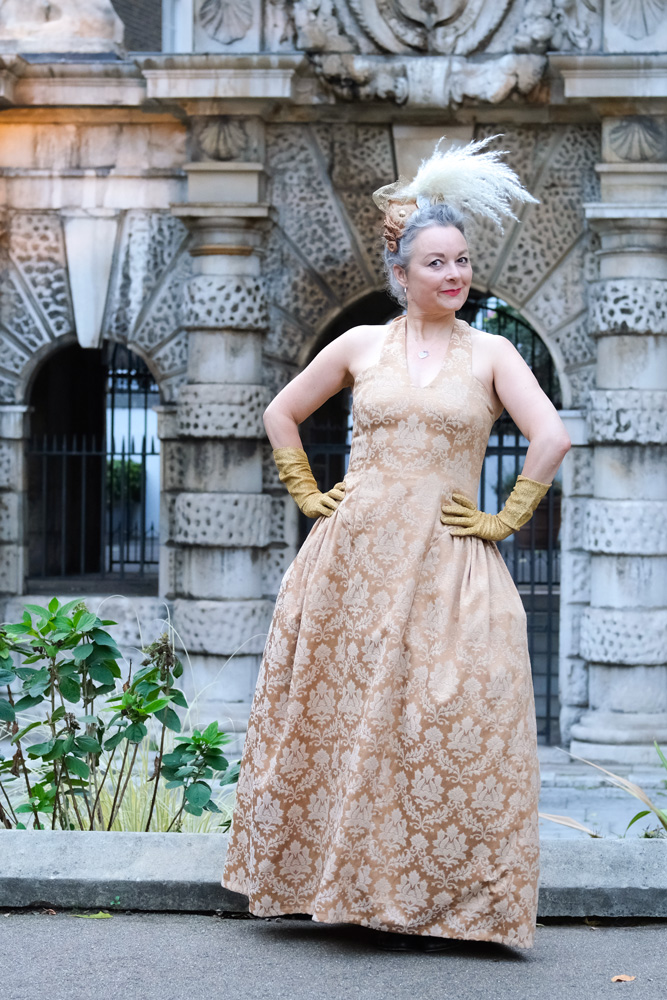
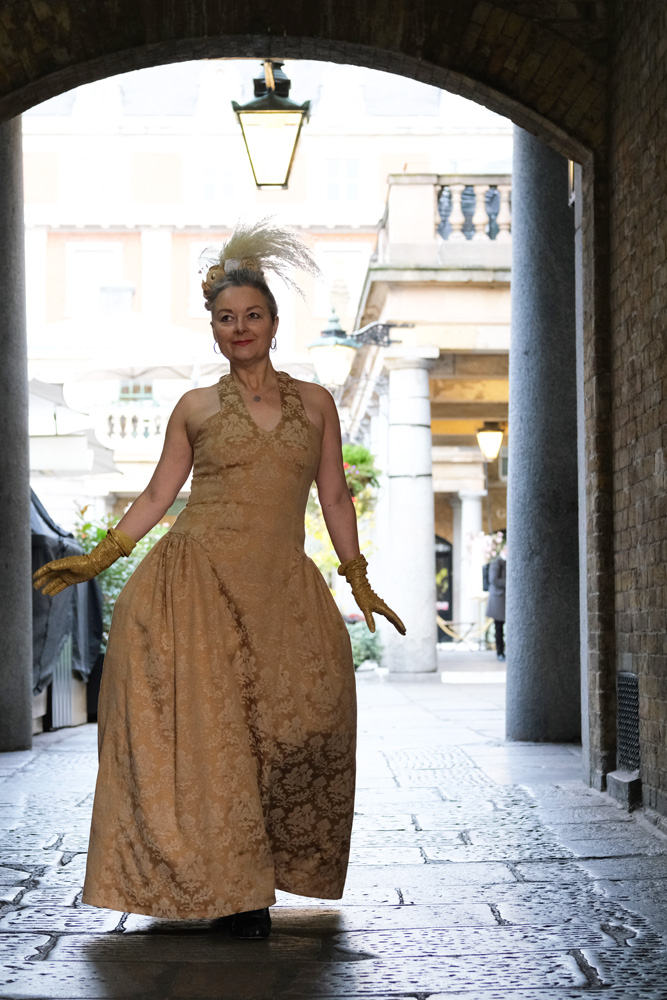
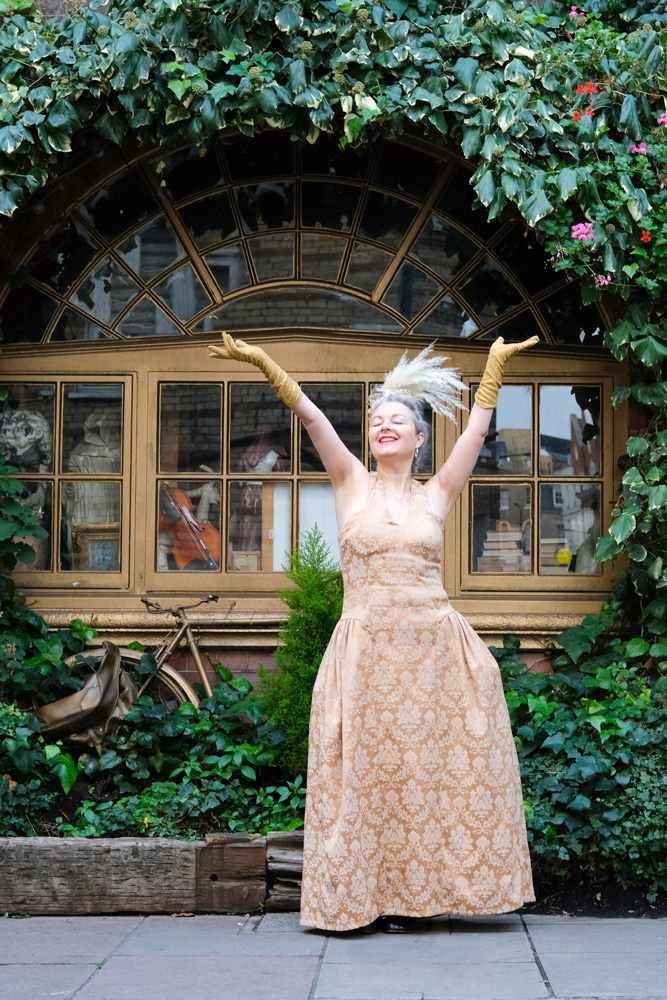
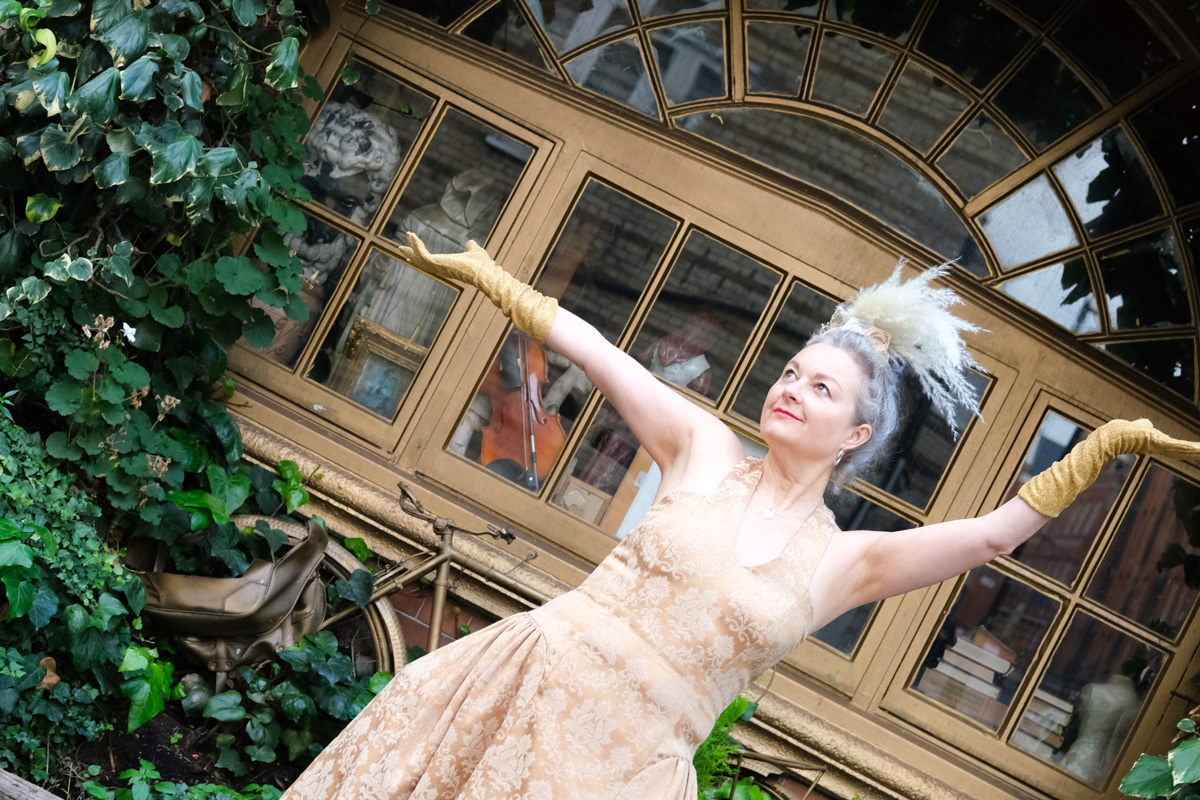
Gold damask ballgown front of York Watergate
One thing I was sure of was that mine was going to be self-drafted. I decided earlier this year that if I’m ever to get really good at designing and pattern-drafting, I would need to practise it a lot more – figures, right?! So that narrowed things down a bit (not)! Secondly, knowing the chances of me going to another ball quite so soon after, or even wanting to wear the same dress twice in any chase, were pretty slim, I wanted to make sure my fabric choice was a sustainable one.
Weirdly enough as I sketched out my design, I did imagine a damask curtaining of sorts. I just didn’t know I was literally going to strike gold in my local charity shop!
One pair of vintage gold damask curtains = £6 – Just enough fabric for a ball gown it transpires!
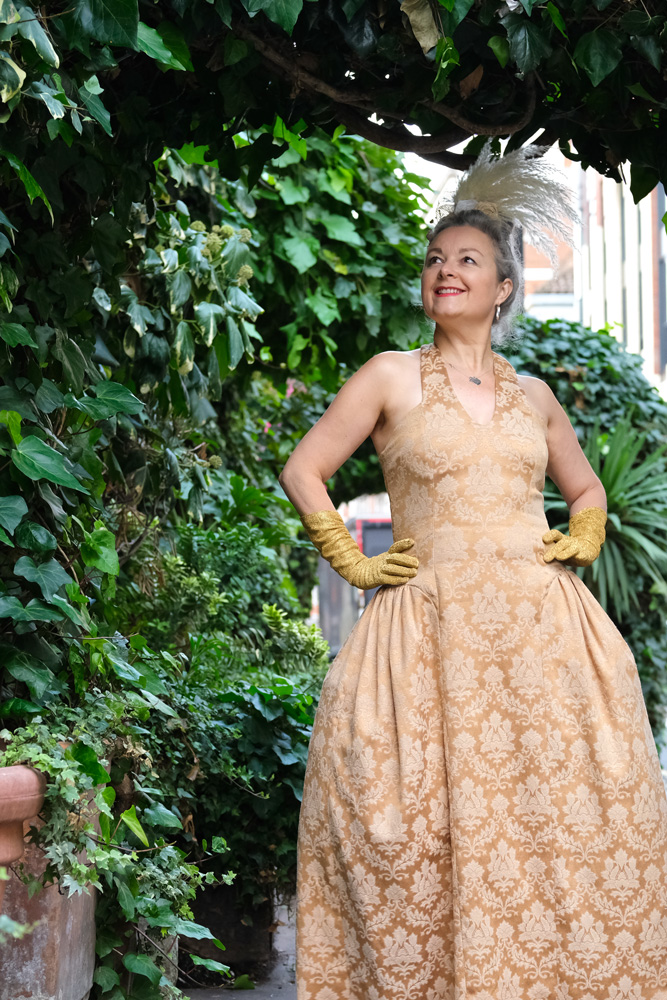
The design started out as a summer halter neck dress which I designed and made last year. I basically hacked the hip sections to create a silhouette similar to dresses of the 1700s. I can’t tell you why. I just did! Although if there was ever a wardrobe I could covet, it would most definitely belong to Marie Antoinette!
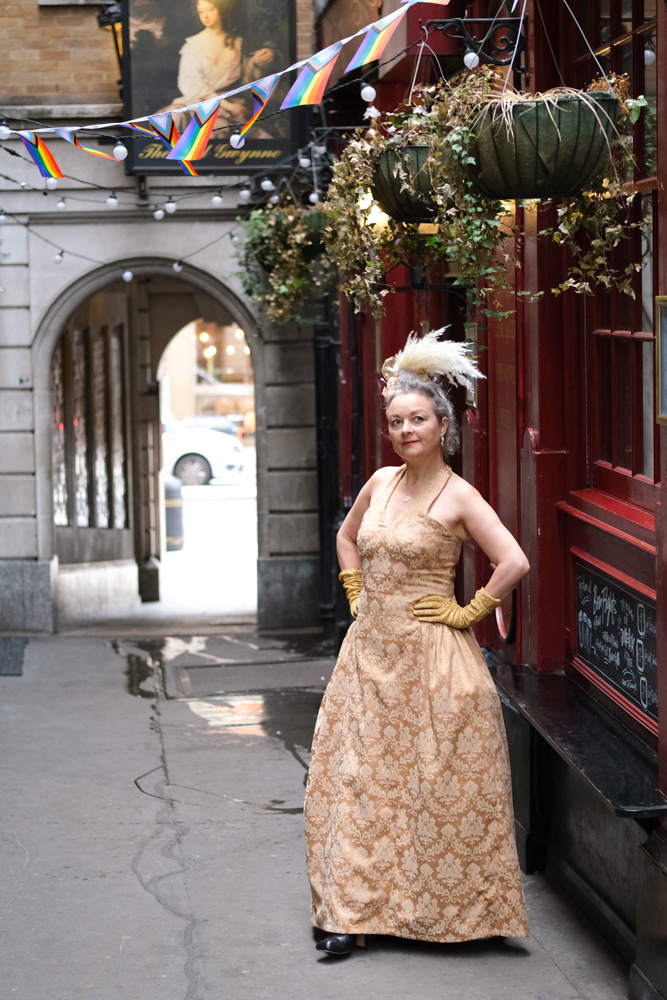
Gold damask ballgown outisde The Nell Gwynne Tavern
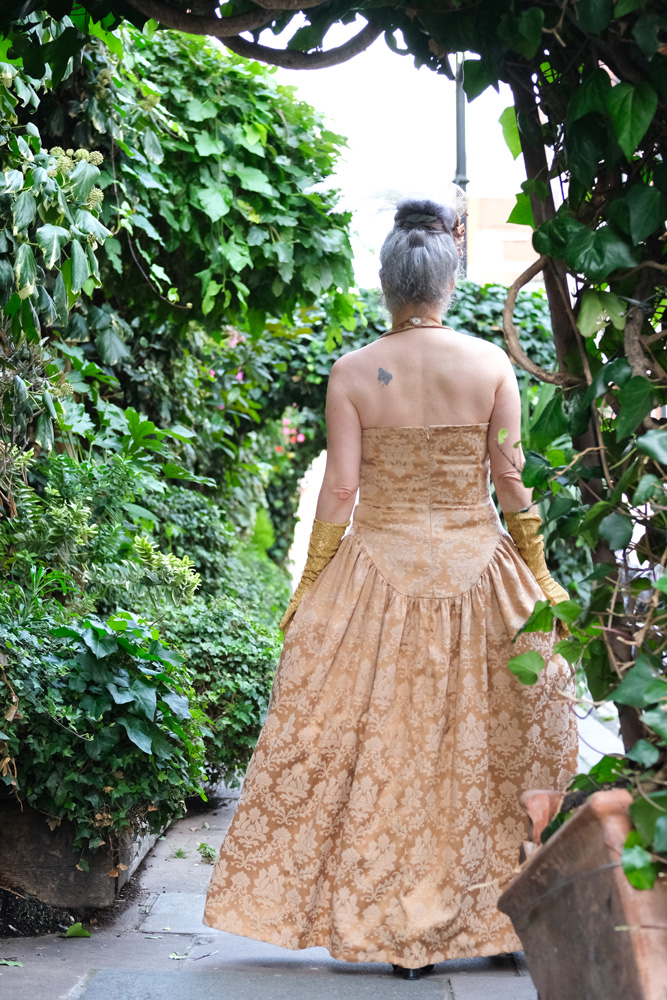
The styling of the dress was nailed quite soon and sewing it up was a relatively simple task, too but it was evident I needed some ‘scaffolding’ of sorts to make great shapes. There’s a lot of weight hinging on that halter neck and from past experience wearing my summer version, the back sags with its lack of support. So I created boning channels on the back and side seams to help it stay upright. I used plastic coated steel bones for no other reason other than I wanted to try something other than Rigilene. And I think I made totally the right choice. It felt very grown up to be cutting and filing them and sliding them in place. And I’m sure I’ll be finding more excuses to use them again soon.
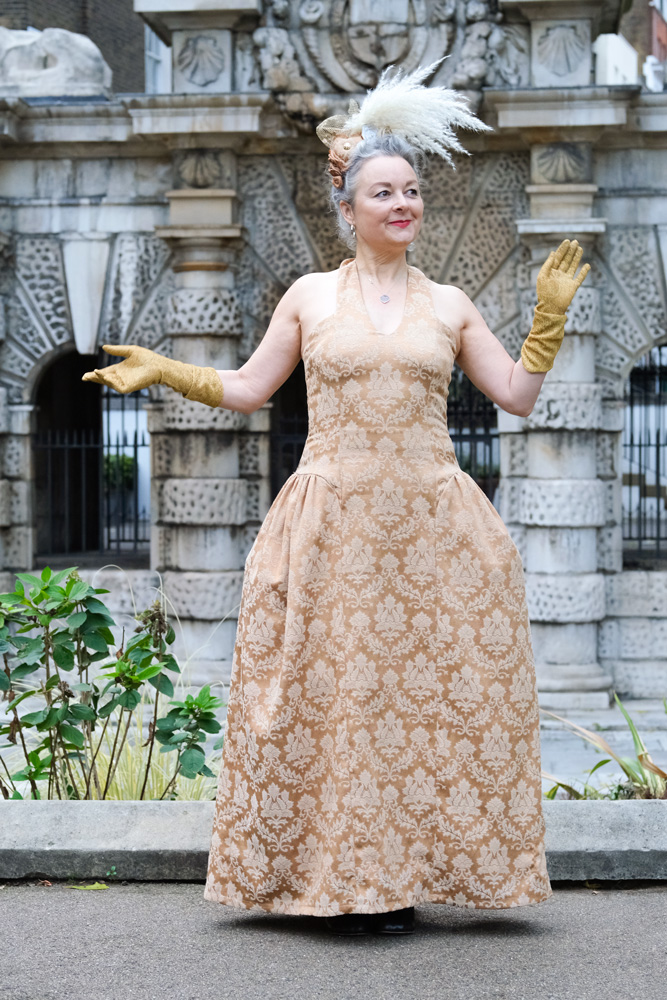
Gold damask ballgown in Covent Garden
And then of course I had to find a way to give some body to those hip sections!
I first tried to gather some doubled-over strips of double organza and sewed to the curved upper seam, in a similar way that I did with the puffed sleeves on my Alice in Wonderland dress. I didn’t get round to blogging that but here’s a link to my Insta reel which explains it a little. This method gave a little boost but ultimately, the weight of the curtain fabric just flattened it down.
The second experiment was very nearly the one I settled on, which was to use sections of crinoline. I found it in Classic Textiles in Goldhawk Road – I had no idea you could buy it by the metre. And I wasn’t entirely sure this was what it was for, but I tried to make gathered side panels again to sew along that top curved edge of the side sections. It was in need of boning too.
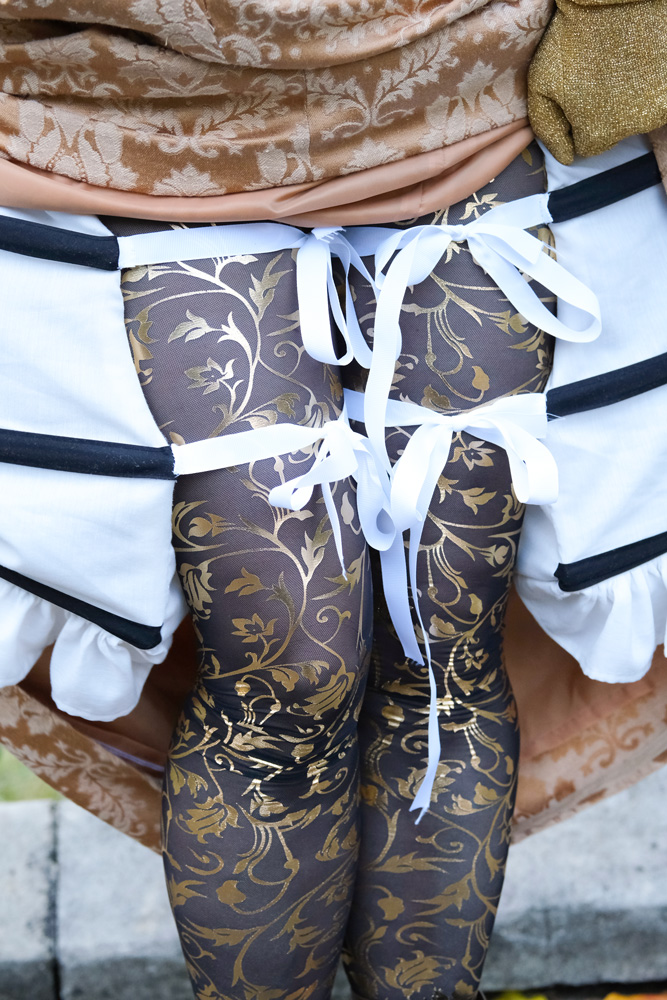
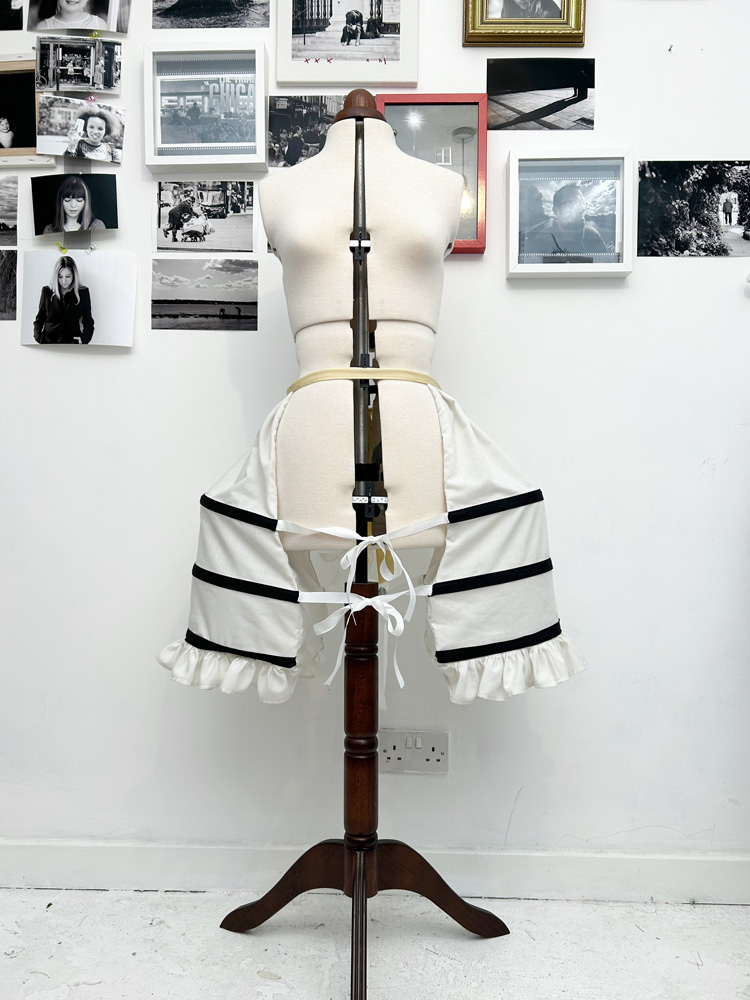
I mean it was ok but made the dress very difficult to fold without hard-creasing the crin. Plus, it was very scratchy and would need another layer of lining at least. I just knew I could do better. There had to be a way. And then the penny dropped that I just had to go trad with full on 18th century panniers!
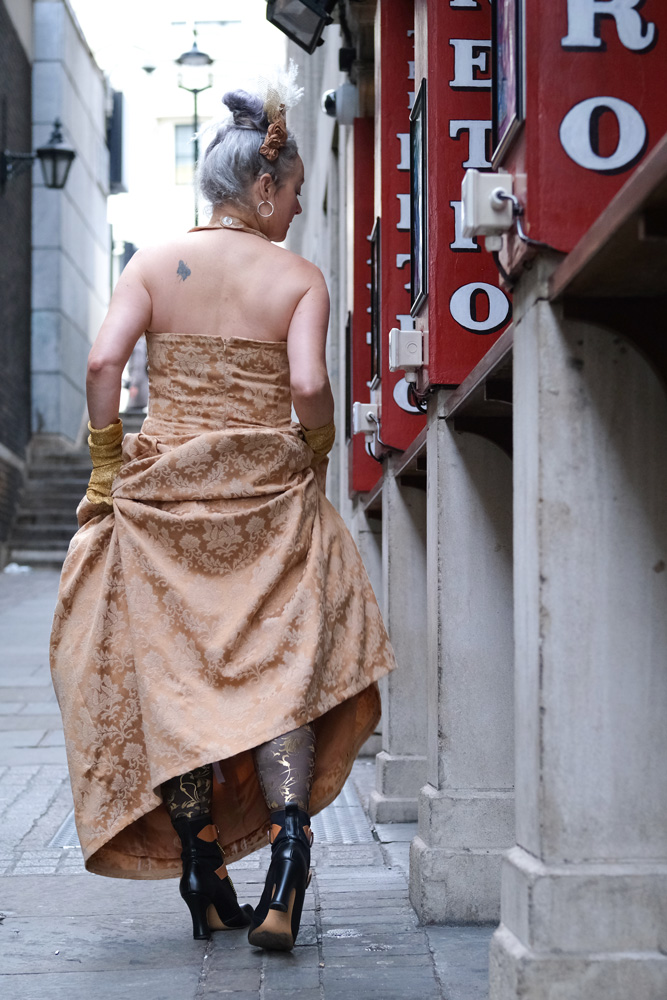
I Googled and YouTubed until I’d gleaned enough know-how to draft and sew a pair of pannier pockets from the leftover lining of the curtains. I already had some black bias binding, some white ribbon and some herringbone tape in stash so I thankfully didn’t have to fork out for any more materials. Not that I spent much on the curtains anyway!
There are three horizontal boning channels formed by the black tape, the top one is slightly shorter to create a gradual slope up to the hip and the whole ‘device’ ties around my waist and around each leg. Well, to be fair, it was Dan who suggested I tie the ribbons round my legs because for the do itself, I tied the front ones in front and the back ones in the back and it worked fine but restricted movement a little, especially going up and down the stairs but toilet trips were infinitely easier with this method!
I did end up lining the skirt section. And Im glad I did because it created a little buffer between the understructure and the fabric, smoothing out some lines and also made it feel more special to swoosh about in. I attached the section seams of the lining to the main fabric with French tacks to keep it from twisting round. That was a fun thing to do in the hotel room earlier in the day!
Gold damask ballgown in Covent Garden
The panniers are collapsible by the way, and fold flat which made for easy transportation to the ball and the dress itself didn’t even need an iron when I took it out of the case
Gold damask ballgown outside the Sarastro
I’ve shown a few in situ photos on insta and I’m sure the official event shots will be ready soon but I so wanted `Dan to do a separate London Shoot and I’m so pleased I manage to grab him for a session before he went away for work again and we are so very lucky that London presents so many wonderful locations for us to choose from. It turned out to be quite the history lesson too!
Gold damask ballgown outside the Sarastro
The first location was in front of York Watergate, once the river entrance to the Duke of Buckingham’s London mansion, and now stranded some distance from the water in Victoria Embankment Gardens. The impressive watergate is just a short walk into the gardens from Embankment tube station and was built in 1626.
The second, outside the Nell Gwynne Tavern: Built on the site of the Old Bull Inn, It was named after the infamous mistress of Charles II. Nell, born and raised in the locality at St Martin in the Fields, sold fruit in the nearby Covent Garden market before gaining fame as an actress on the Drury Lane stage. Samuel Pepys describes seeing “the mighty pretty Nell” on his way to the Strand in 1667.
Next we went to Covent Garden which has been in existence since the early 1600s too!
Gold damask ballgown outside the Sarastro
The leafy shots above were taken outside Sarastro restaurant in Drury Lane. I went there years ago and it was an amazing feast for the eyes! Outside presents curiosity shop styled windows, framed in gold. Inside is the stuff of theatre dreams!
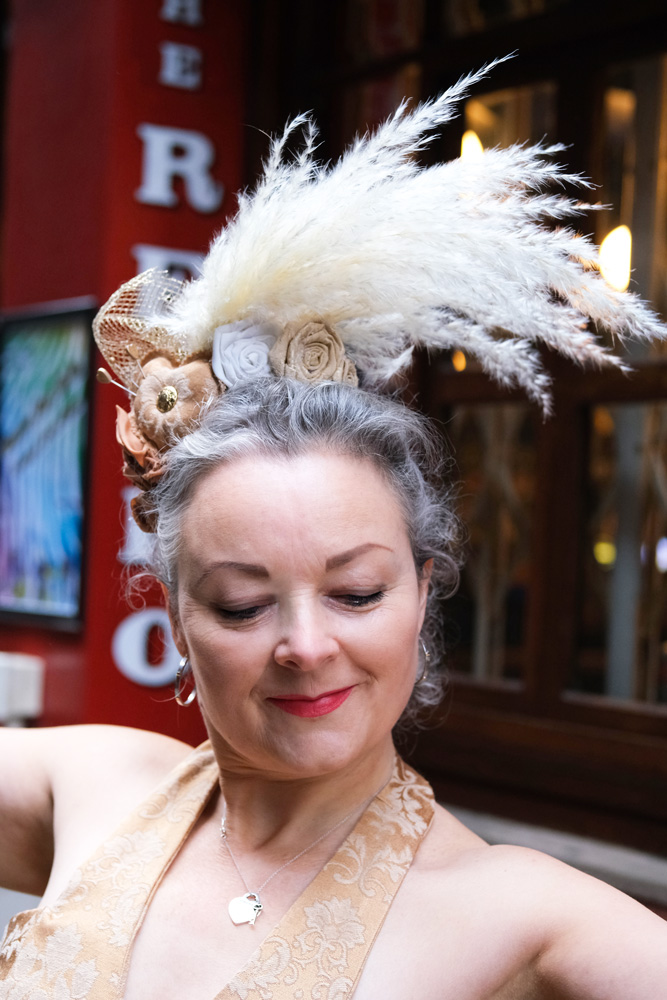
Before I sign off I must also mention my headpeice, hat, fascinator… I still don’t know the correct way to adddress it. But I made it. And I’m proud of it. And it was also formed from materials I already had to hand, ticking that sustainability box once more!
The plume is actually a piece of Pampass grass that I snaffled from the studio garden! The heart shaped pincushion is made from the leftover scraps of the dress, stuffed with overlocked offcuts and adorned with a gold lonesome vintage button from stash. I sprayed the pin heads gold, of course. The remaining flowers are made from scraps of the dress and lining fabric and the gold netting is also reclaimed.
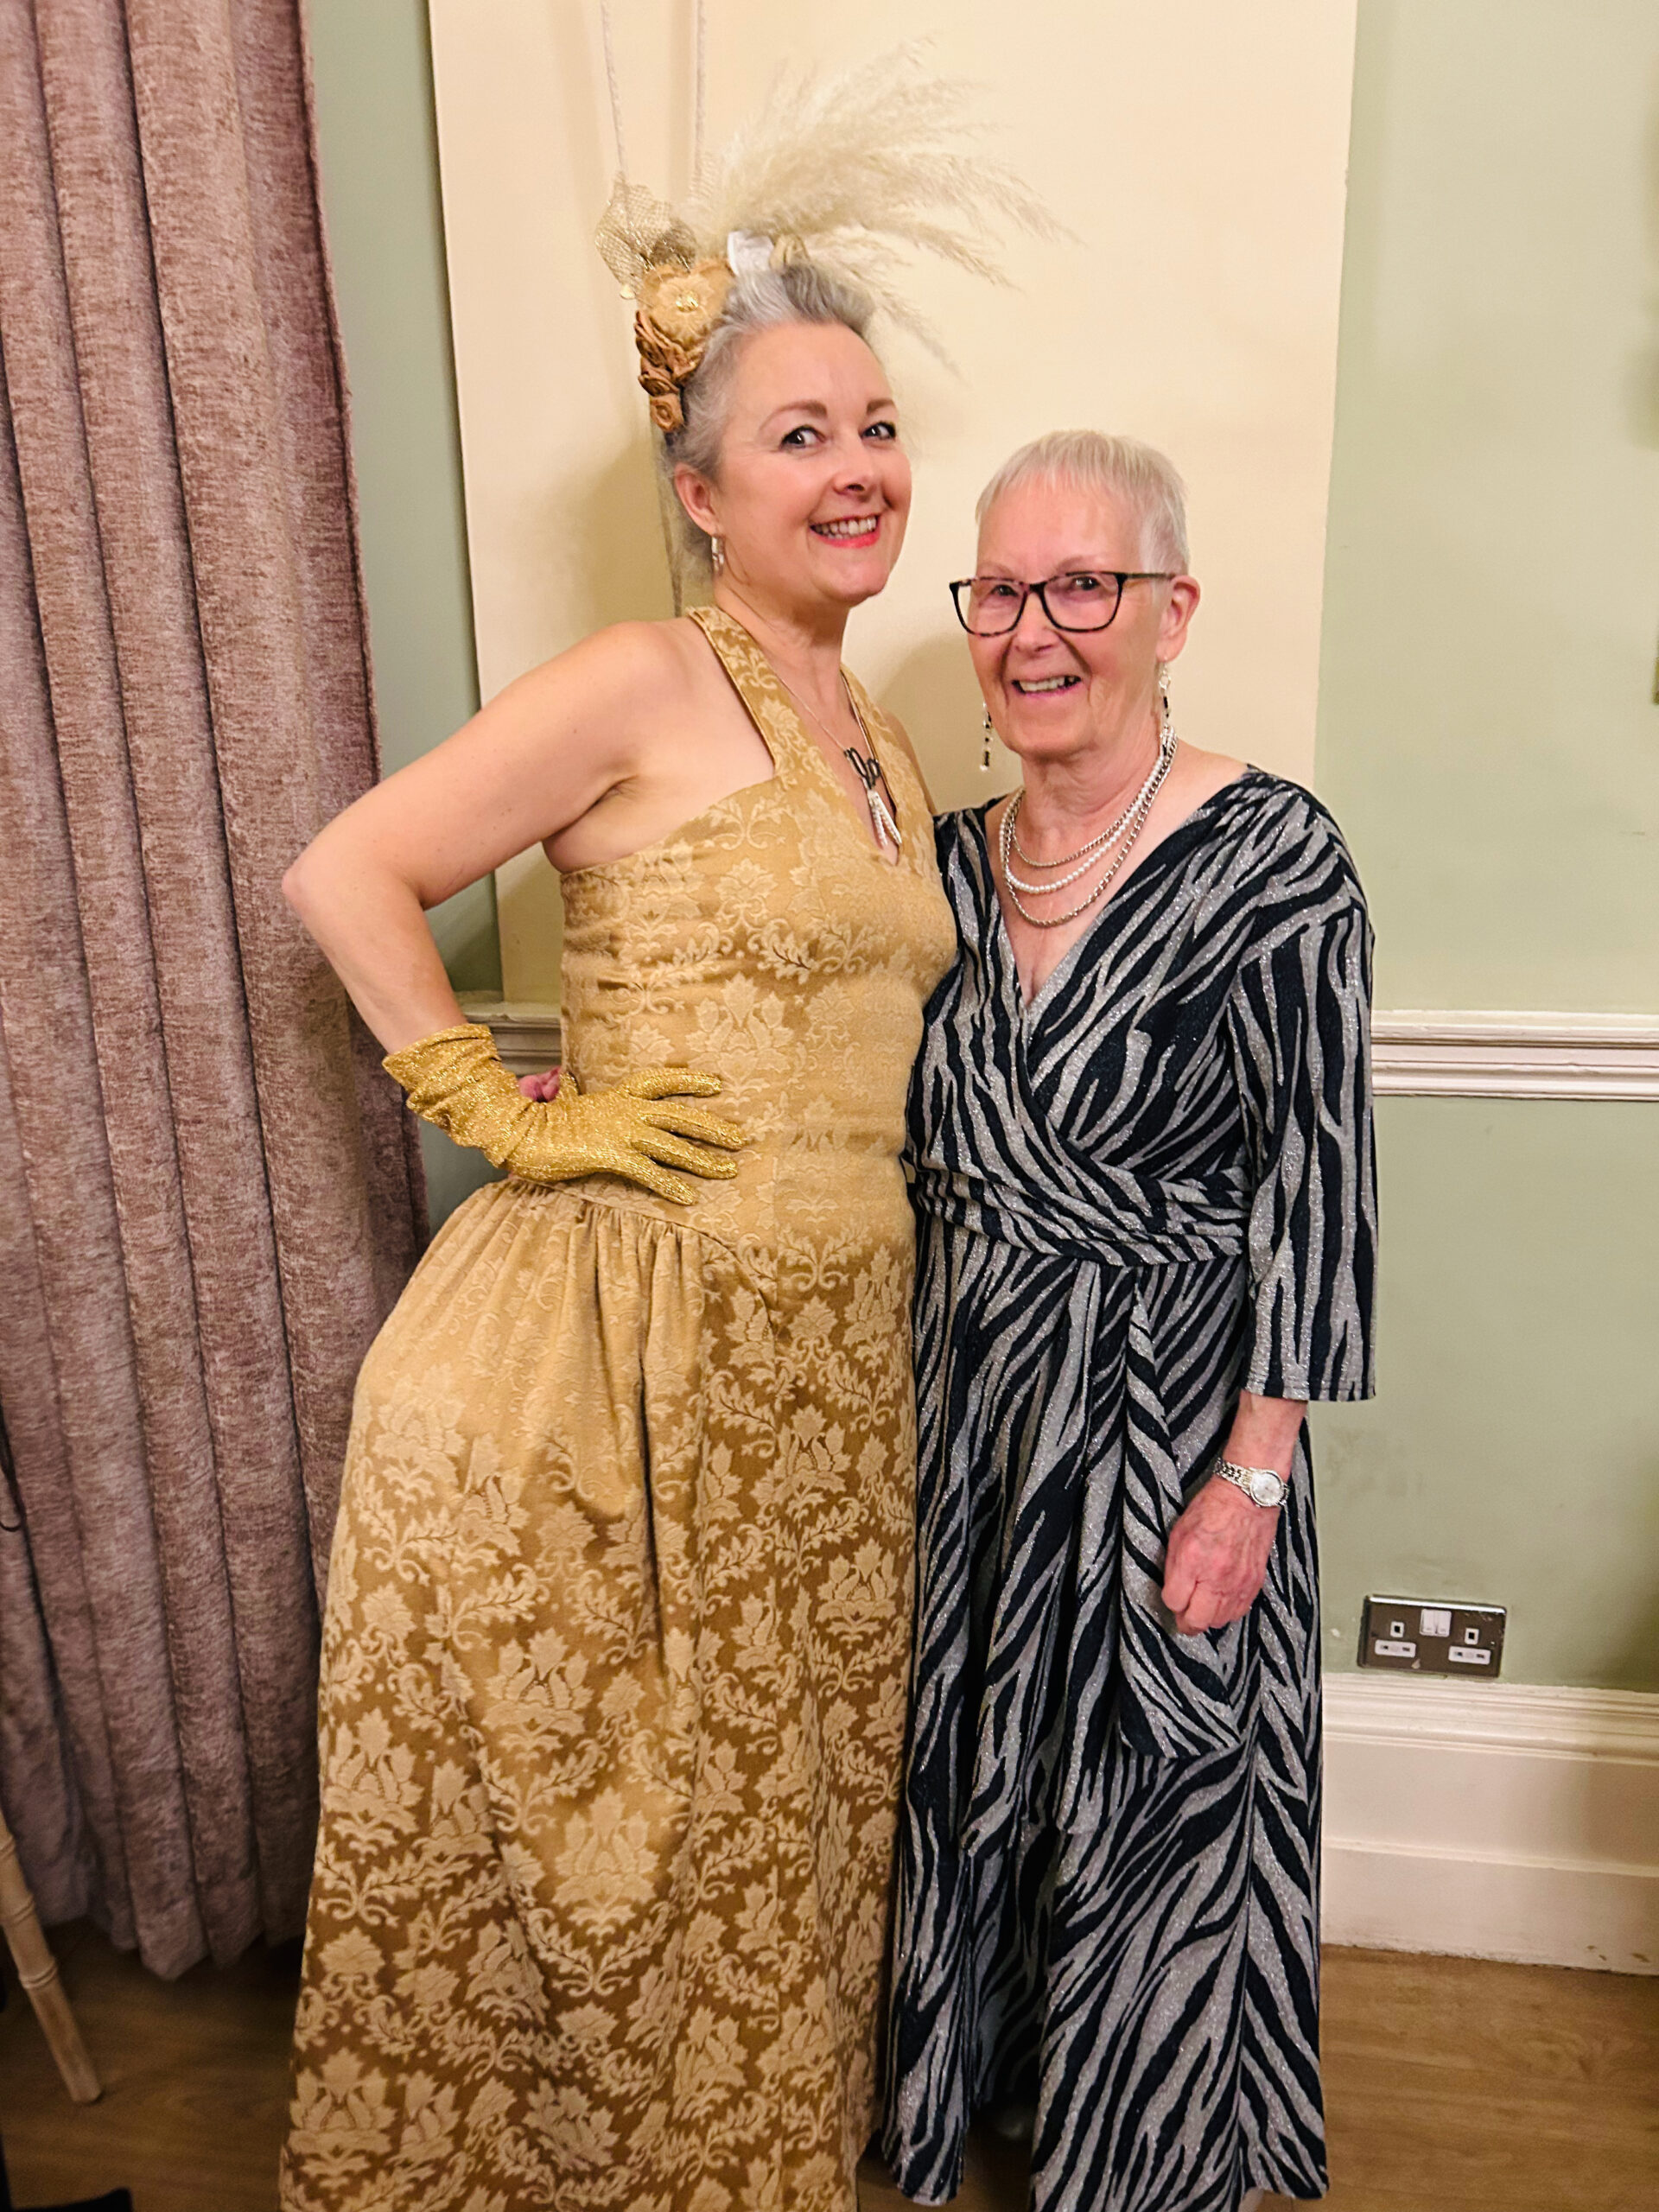
I must also include this photo of me and my mum, taken at the ball. She is the reason I sew. I’m so privileged to have inherited so many skills from her and I’m so proud that at 80 years young she is still sewing and finally took some time out of making for everyone else to make herself a gorgeous gown too.
And all that remains to be said is thank you. If indeed you reached the end of this marathon post. Or even if you didn’t, I totally appreciate your time and support. If you have any thoughts or questions please leave them in the comment box below and I will very happily get back to you. I can talk about this outfit till the cows come home. Just in case you didn’t gather that already!
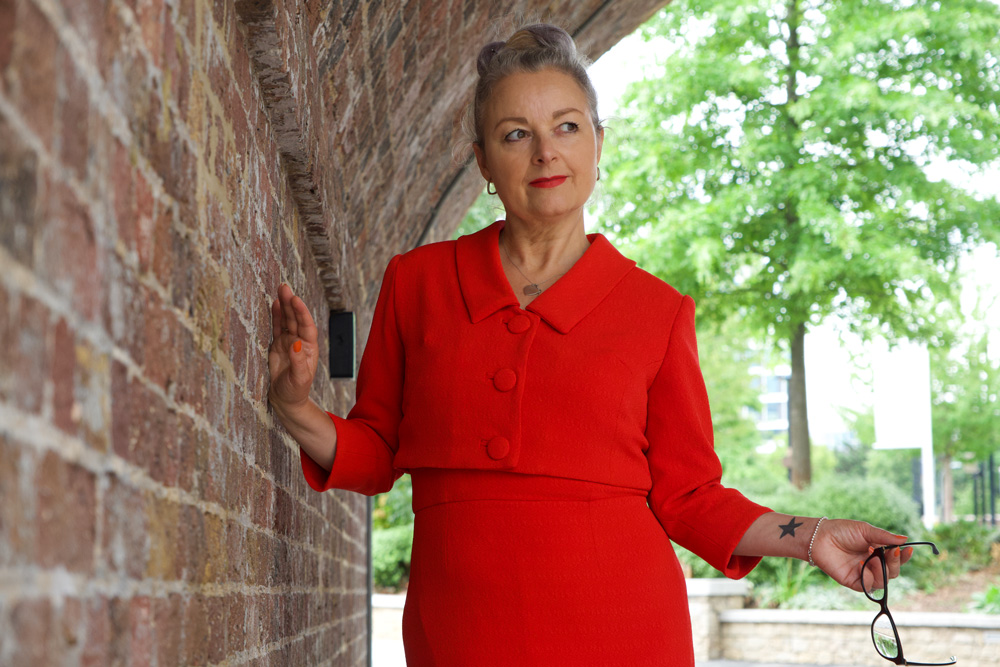
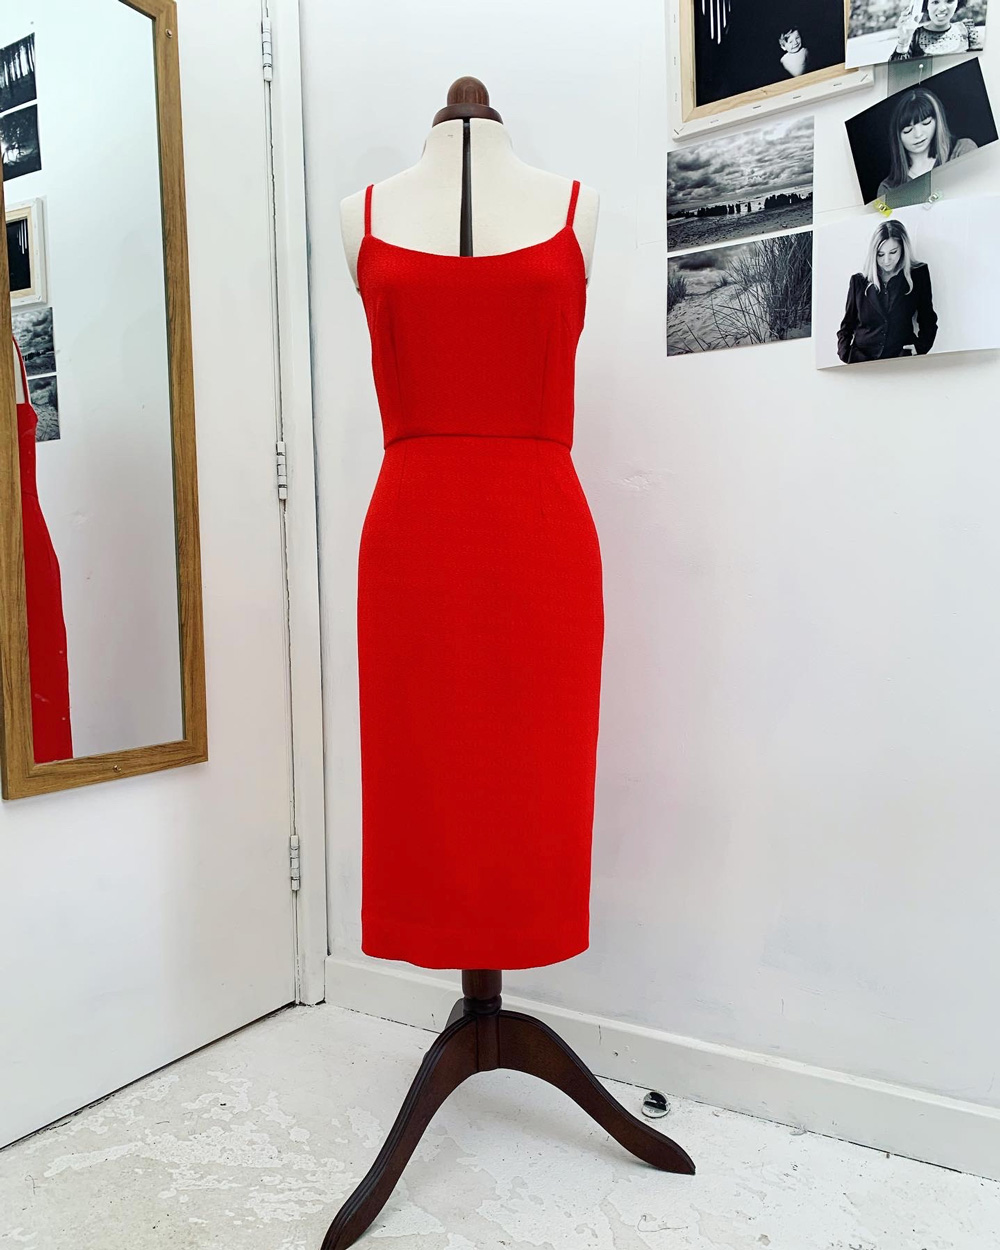
I’ve wanted to make a classic dress suit for as long as I can remember. And I own very, many original vintage patterns that would have been perfect, believe me. But an overriding anticipated disappointment in the result always held me back.
In fact its true to say I’ve altogether strayed away from vintage styles more recently, favouring an urge to be a bit more experimental instead. But I’ve never lost love for the classics. And when Lisa asked if I’d model for Sew Over It’s Vintage Dreaming collection I had to pinch myself. Every single garment of that Ebook is divine but the one look that took my breath away was Lisa in the pale blue polka dot Miriam set and Chantelle in the raspberry linen version. And I wanted it too!
There was something massively nostalgic about Sew Over It making a return to vintage. Because that’s where they were at when I discovered them, when indie pattern companies were brand new and it felt so refreshing to have exciting options outside of ‘the Big 4’ pattern companies, and is exactly the point at which I was keen on sewing all things 50s and 60s. The main benefits of modern vintage-style patterns are the more realistic and modern proportions of the body measurements and also the inclusion of multiple size options so you can grade very easily between 2 or more lines to get a perfect fit. Most of my 1950s patterns are generally an unprinted tissue template for a singular size only. And generally speaking don’t fit straight out of the packet!
And so it was such a joy to cut a straight size 12 for the Miriam set with no fitting adjustments at all!
The dress came together so easily and relatively quickly. This is largely due to the simplicity of the design, but also the instructions are very clear and concise. The only step I skipped was for the adjustable straps. I just made sure the straps were exactly in the right place and the right length by pinning and trying on and adjusting … about 15 times before finally sewing in place!
I used a medium weight, red textured crepe from New Crafthouse (always delighted to use deadstock) bought with a voucher I won back in April at the Spring Fling party. Also delighted that I’ve used it up relatively quickly and it’s not languished in stash! I’m trying so hard to create better habits recently regarding my fabric choices, sources and usage. More about that soon.
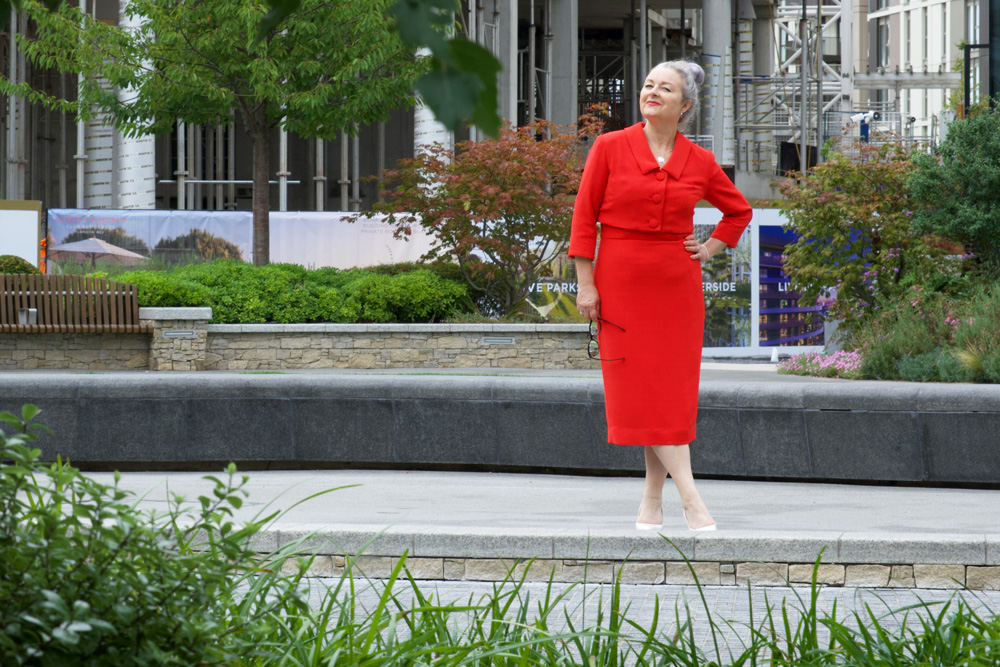
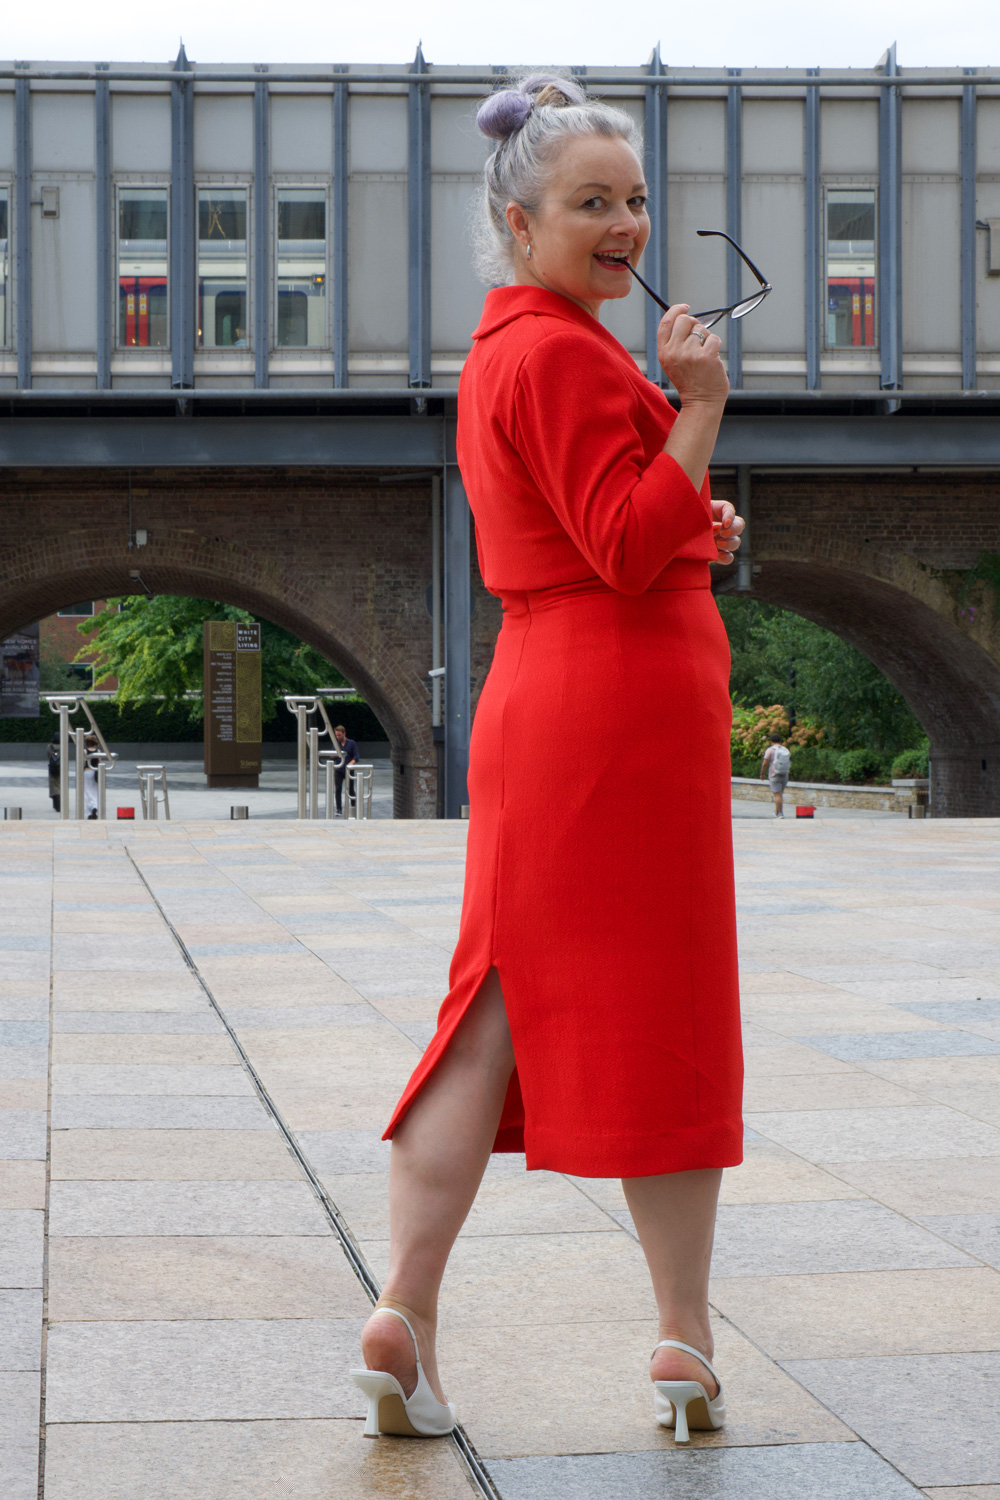
The jacket involved a bit more work. But that was mostly my fault! Although the fabric was great for the dress – it’s got great drape and is very huggy at the same time – I had a feeling it wasn’t going to have quite enough structure for a jacket so I needed to employ some extra techniques.
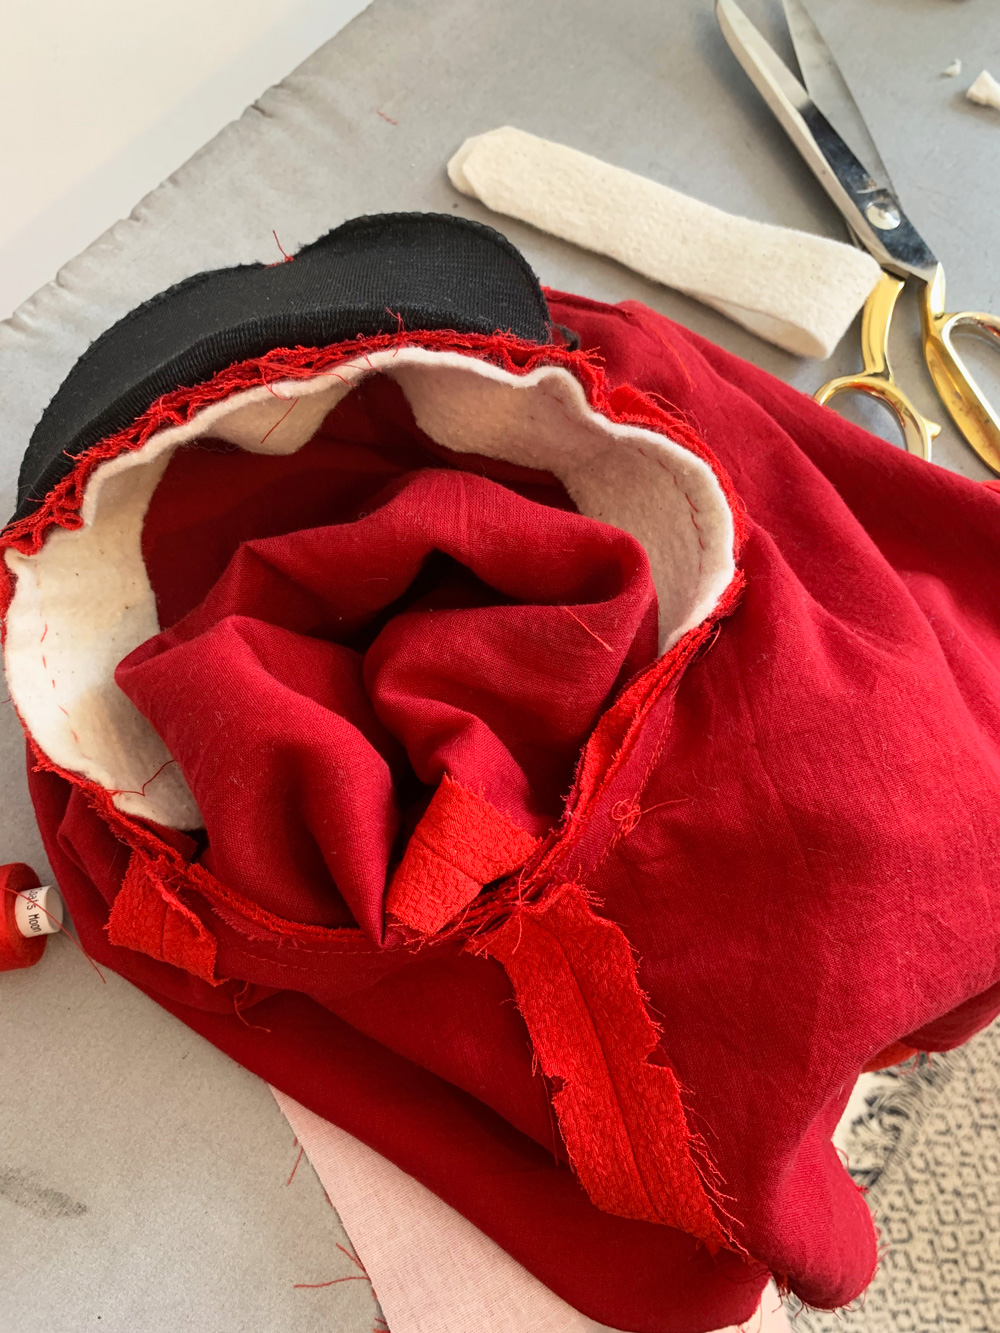
For starters, I underlined all the pieces with a red cotton voile – a great suggestion by SOI. I also padded the shoulders and added some strips of cotton fleece for the sleeve heads. I remembered to take a photo of the inner workings this time. Not quite so pretty though!
I had a horrible feeling that machine buttonholes were going to give me grief. I couldn’t bear to get to ‘almost finished’ stage only to ruin it all with raggedy buttonholes so I set about making old-school bound ones. And boy did I forget quite how faffy they are to do. I trialled some before I did the real ones. Worth it in the long run but I think I near fainted by holding my breath through the entire process.
Its worth noting the importance of having those welt sections on grain. They will fold better and press straighter and give a much better finish.
And once I’d finished the button holes it made total sense to make covered buttons too. Luckily I had inherited a bag of the button bases and the rubber pressing tool a while back. The size was a little larger than suggested but it worked just fine.
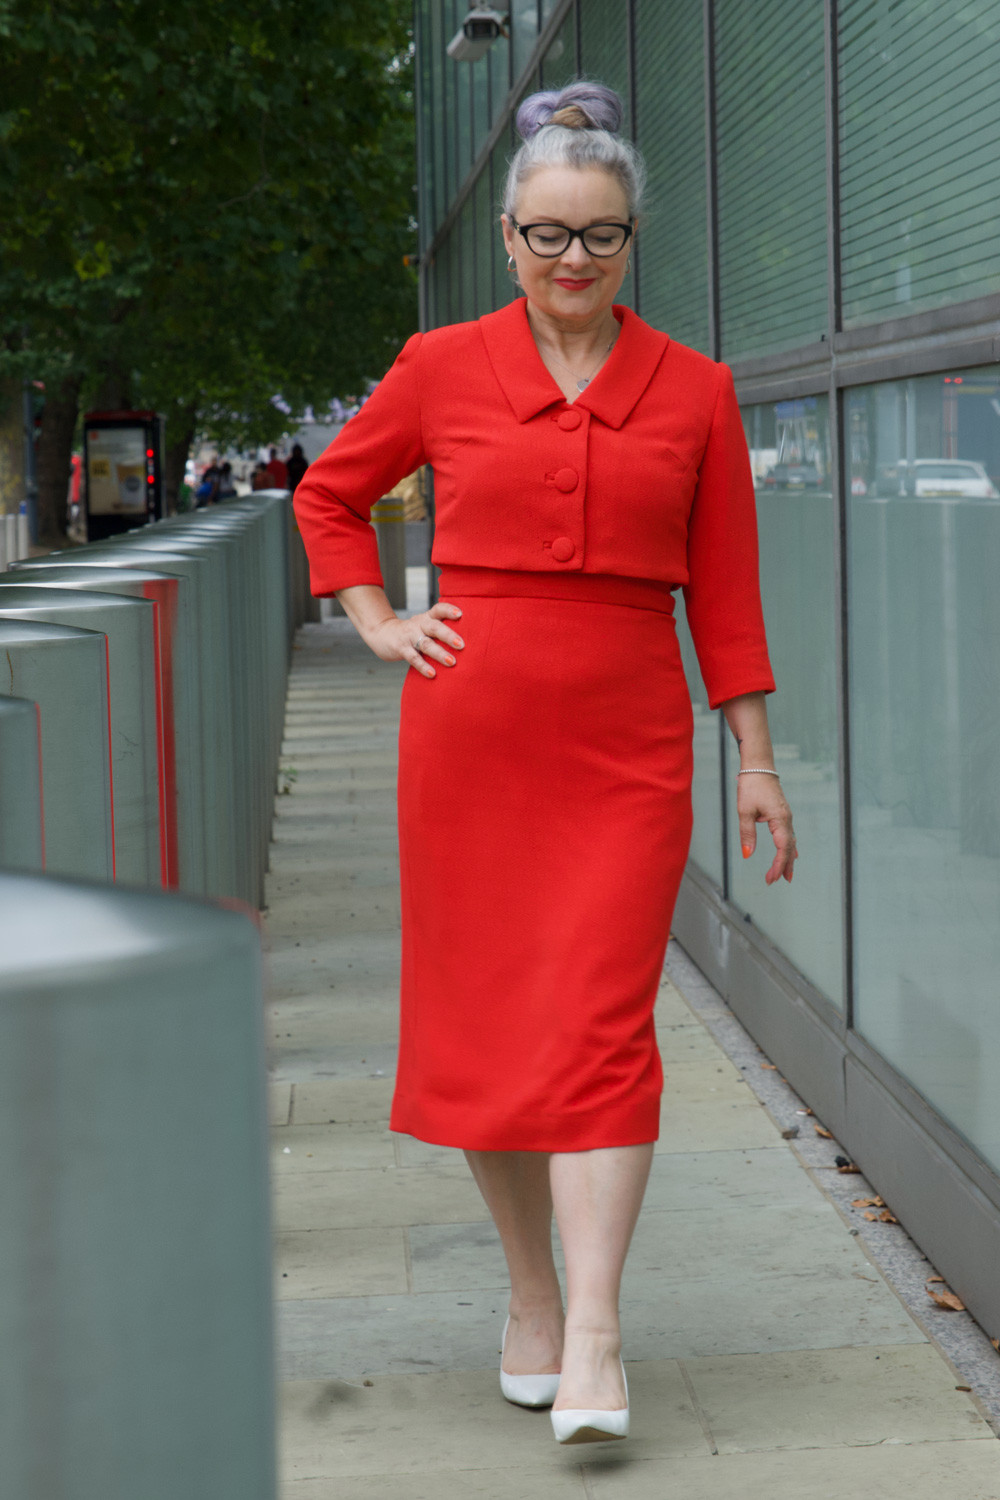
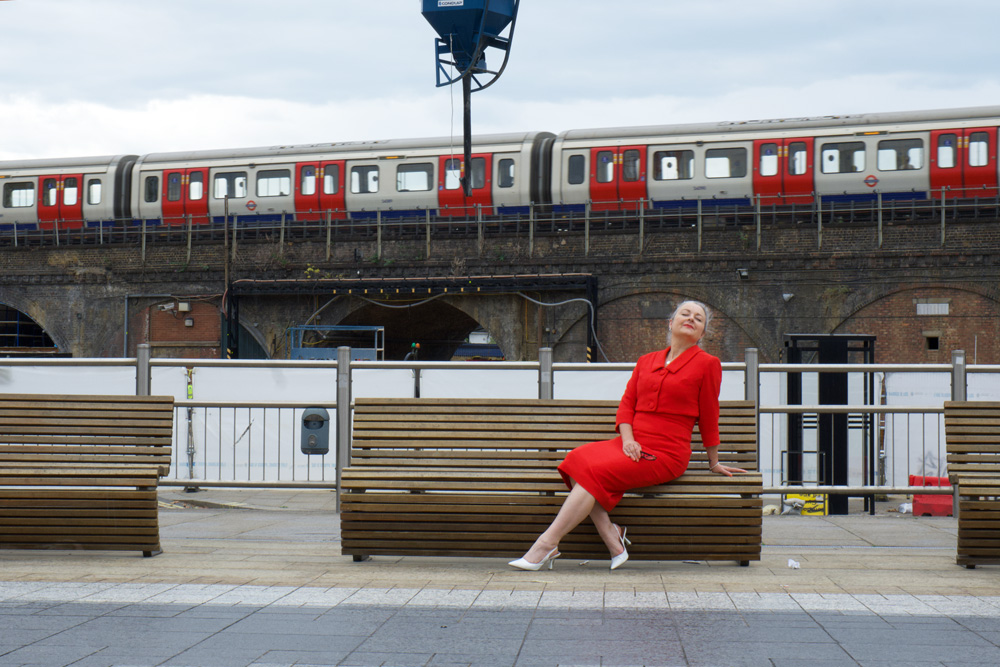
I completed the outfit in the nick of time to wear to my niece’s wedding and was so preoccupied I didn’t get any full length photos so all the thanks to Dan who took the time out to shoot these for me in and around where we work.
I just love how this suit makes me feel: mostly so grown up and properly dressed! It makes me walk tall and fills me with confidence. I got so many lovely comments from passing people, and that added to the feel good factor too! This is already a wardrobe bestie. And most probably will be for years to come.
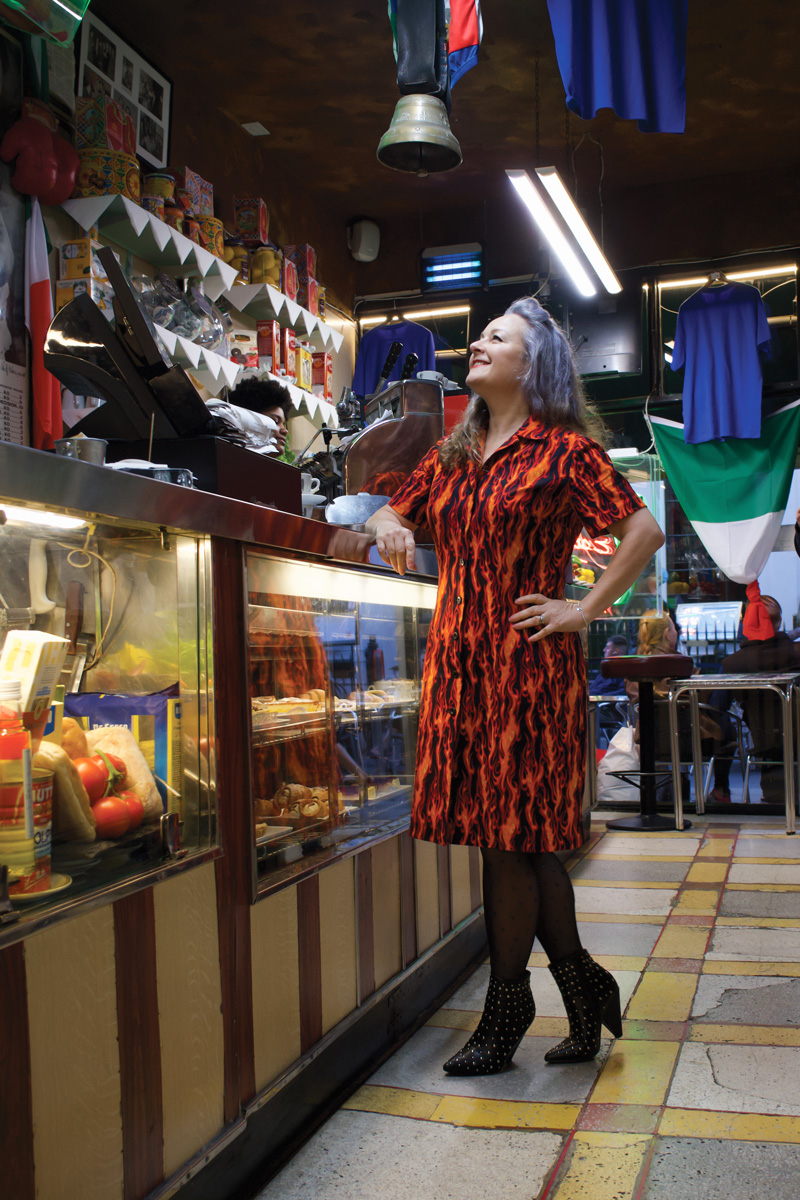
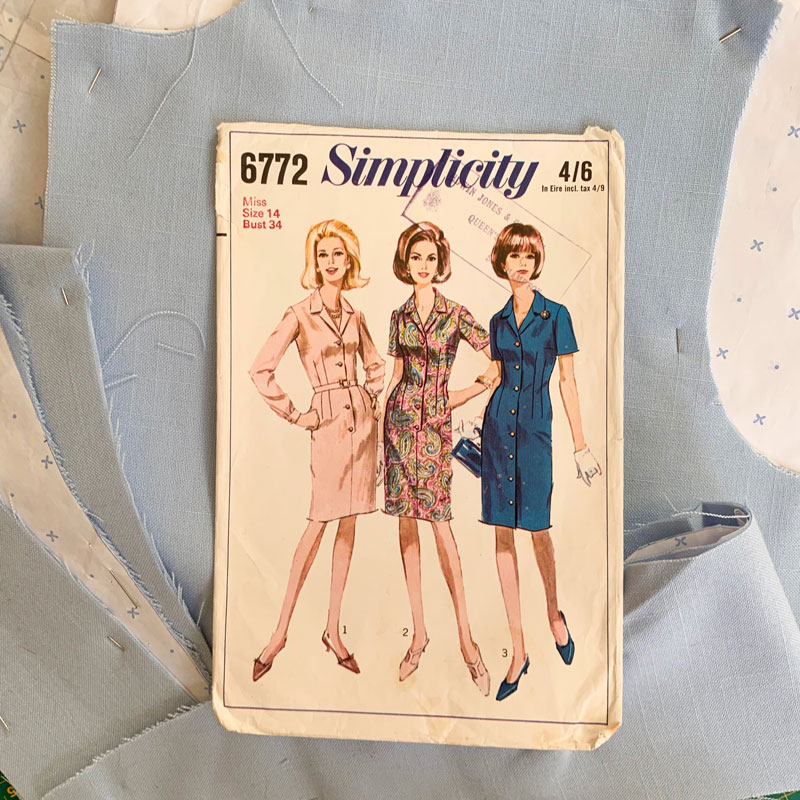
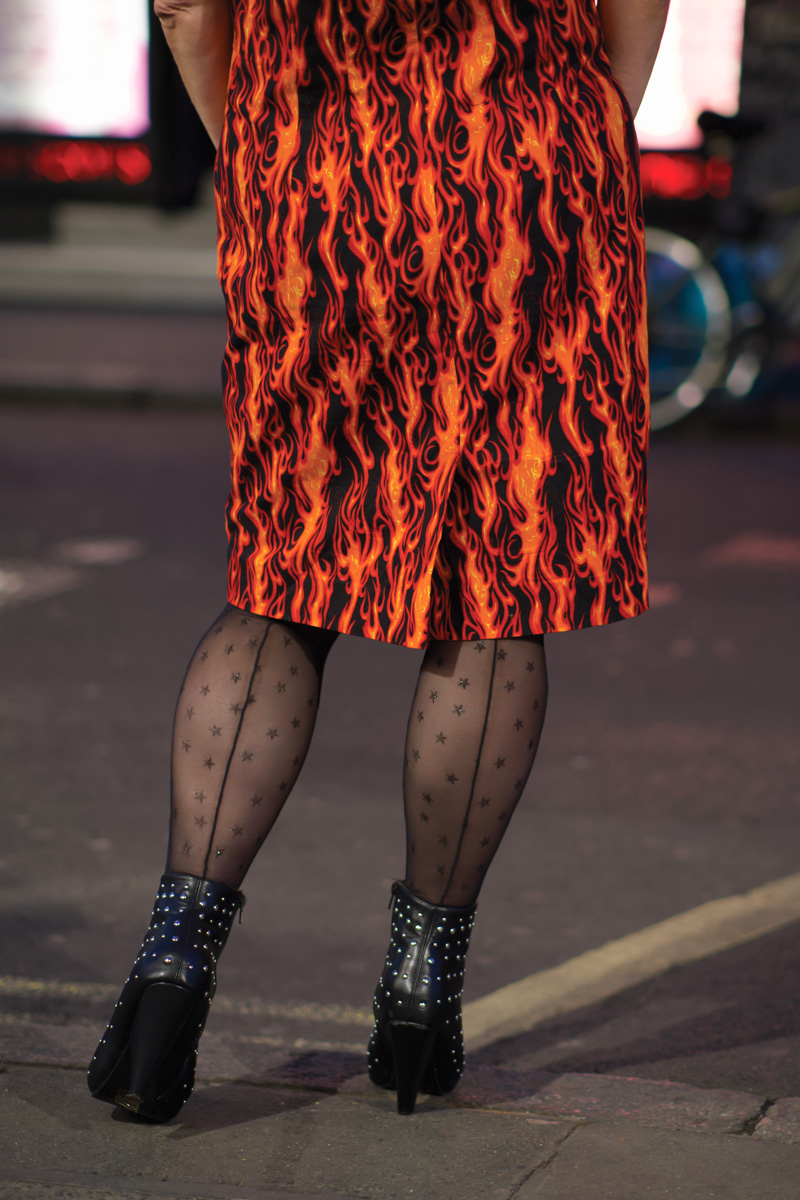
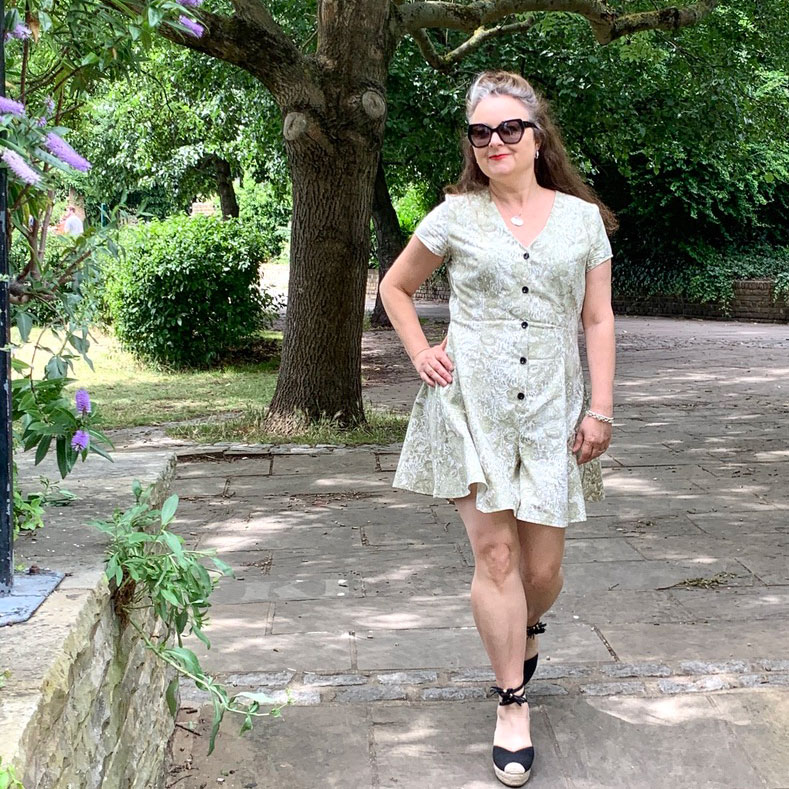
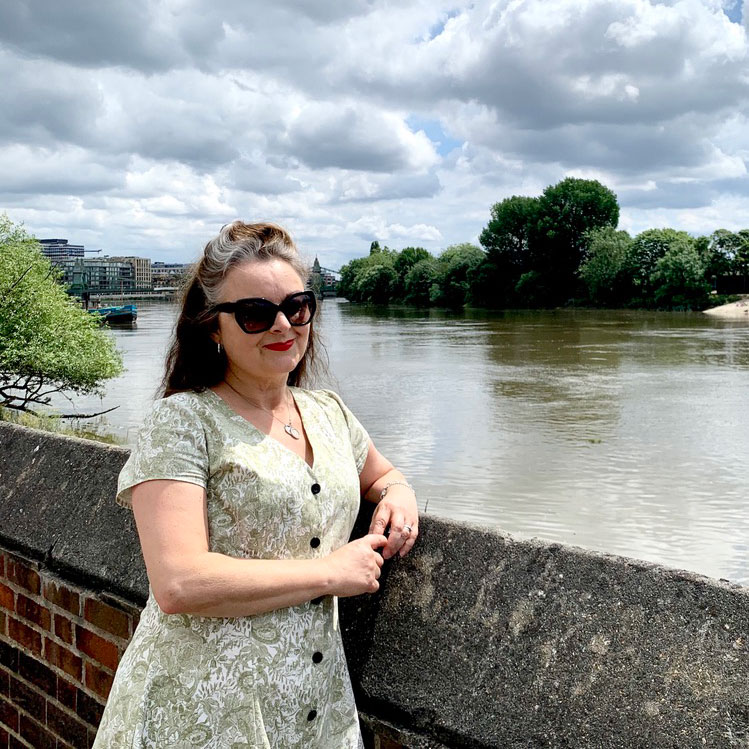
I love it when sewing stars align. Like when Minerva sends a call out to promote their new fabric ranges, and the ideal fabric screams to be made up from my go-to 60s shirtdress pattern during a month when one of my favourite annual Instagram challenges inspires me to dust off those vintage pattern boxes.
Well those flames spelled out the obvious, to me. A retro Rockabilly shirtdress.
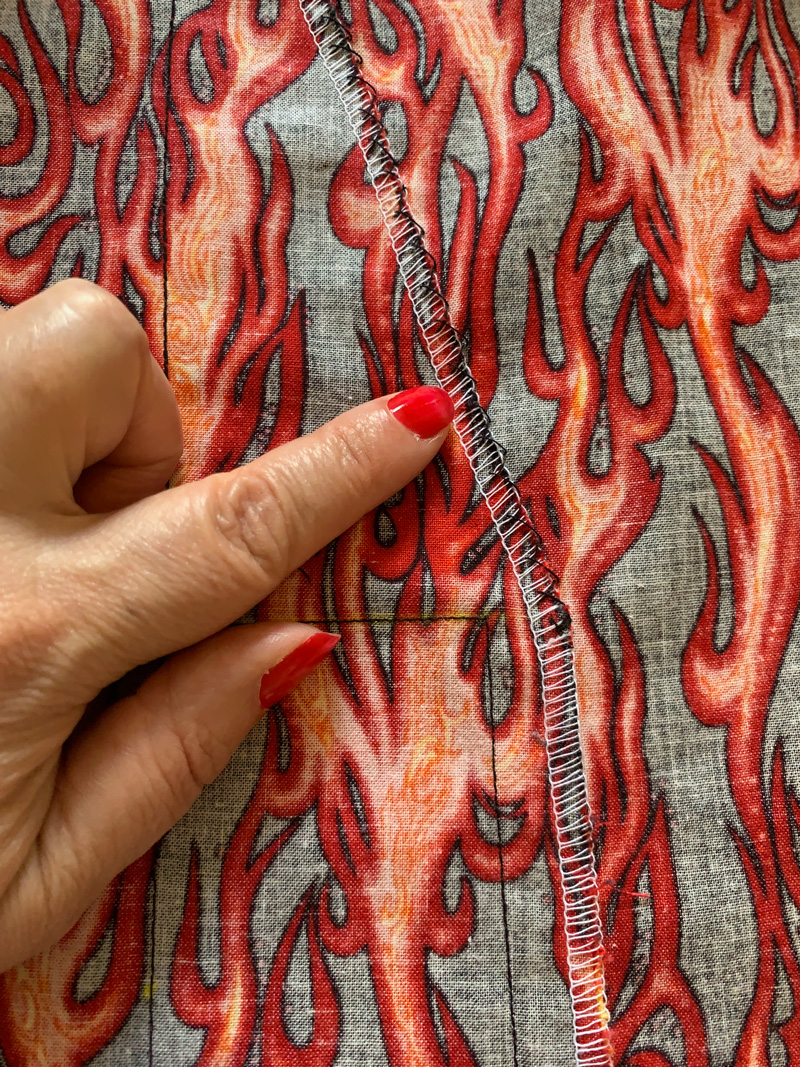
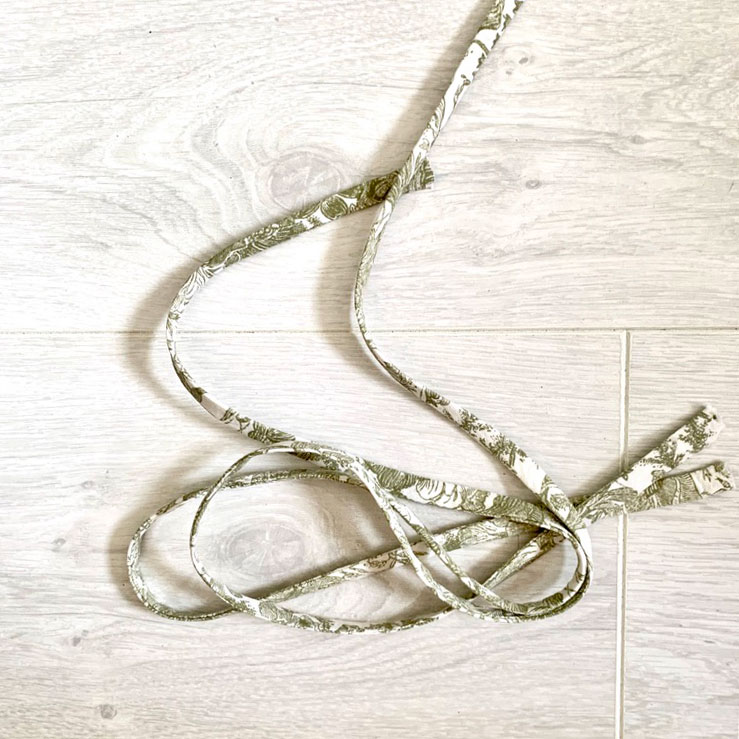
The pattern is vintage Simplicity 6772 from 1966. And a perfect project for sewing up in between busy work shifts. I’ve sewn it up twice before – in dogtooth and in blue – and that gave me confidence to forego any toiling though I did make a few fitting adjustments, namely extending the bodice length by quarter of an inch and lowering the bust and top points of the waist darts. There are 12 darts to this dress: 4 diamond waist darts on the front, 4 on the back, 2 bust darts and 2 shoulder darts which seems very excessive but actually this is very commonplace to vintage patterns and all the better for shaping.
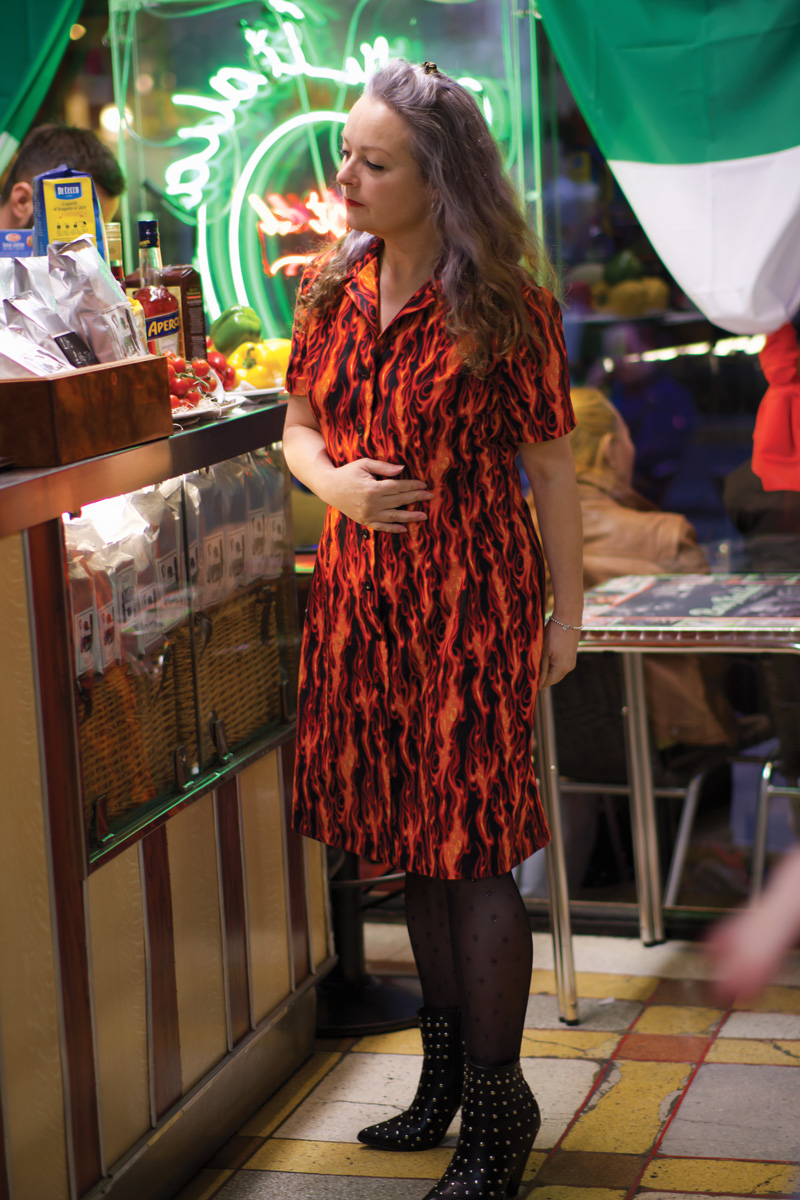
The fabric is a Robert Kaufman cotton poplin which I received as part of the Minerva Ambassador programme. I’ve used poplin only once before, for my self-drafted sundress but cannot fault the quality. It is such a lovely genuine medium weight, imho – not too light and not too heavy. The weave is such that it’s an absolute joy to hand finish the hems – so easy to pick up a single thread for a catch-stitch and it presses so effortlessly too.
Another advantage is that it doesn’t crease as easily as regular shirting cotton. Prior to taking these shots I’d been walking around in this dress and sitting down for a couple of hours and it still looked pretty neat.
My dresses usually get shorter as the months get colder but this time I opted for a to-the-knee rather than an above-the-knee hemline for a change. The actual pattern suggestion is quite a bit longer but I think I’ve hit the sweet spot. And the little kick pleat at the back looks more sensible when it’s longer in any case.
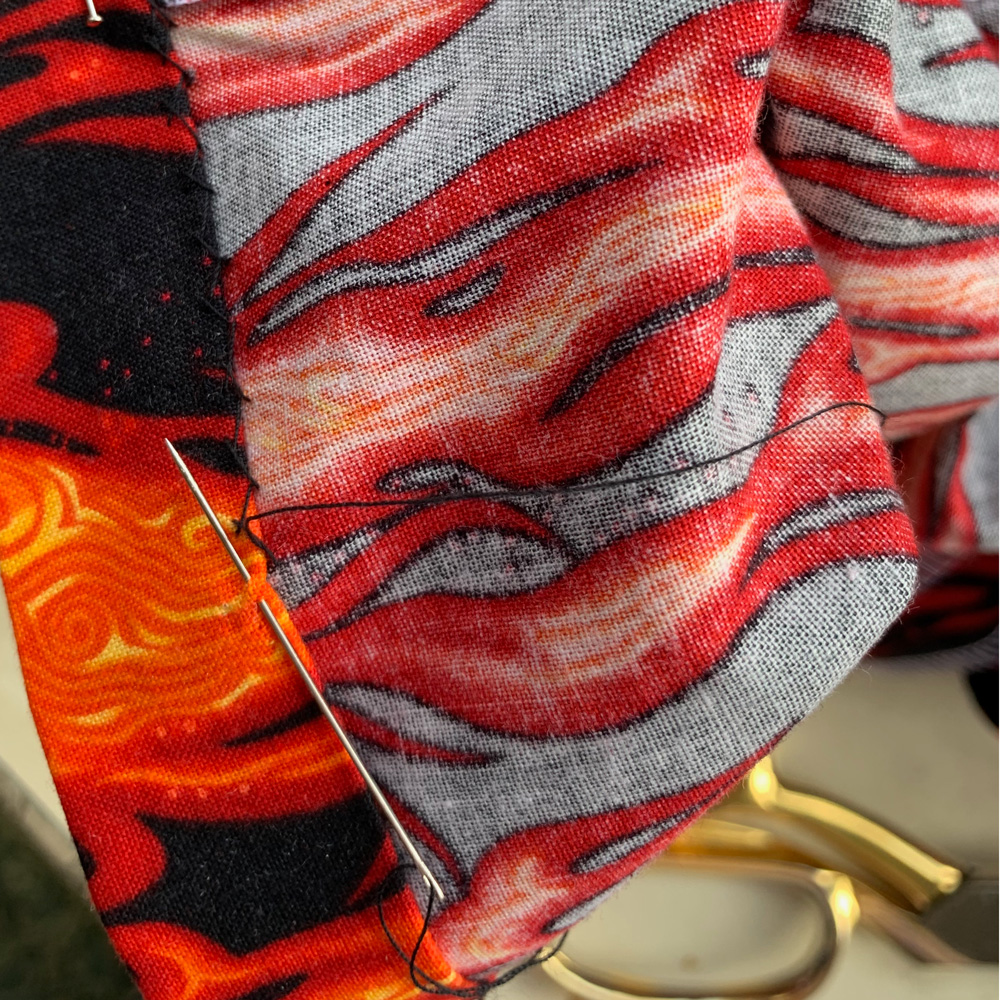
In order to keep that kick pleat nice and flat and in position, I stitched it down with with a few catch-stitches inside. I think you can tell how much I enjoyed hand stitching this fabric!
It’s amazing how a quality fabric can make so much difference to the whole sewing experience. For instance, pressing as I’ve mentioned before but also for turning nice sharp points on the collar sections and the corners of the front facings. Setting in the sleeves was a breeze, too.
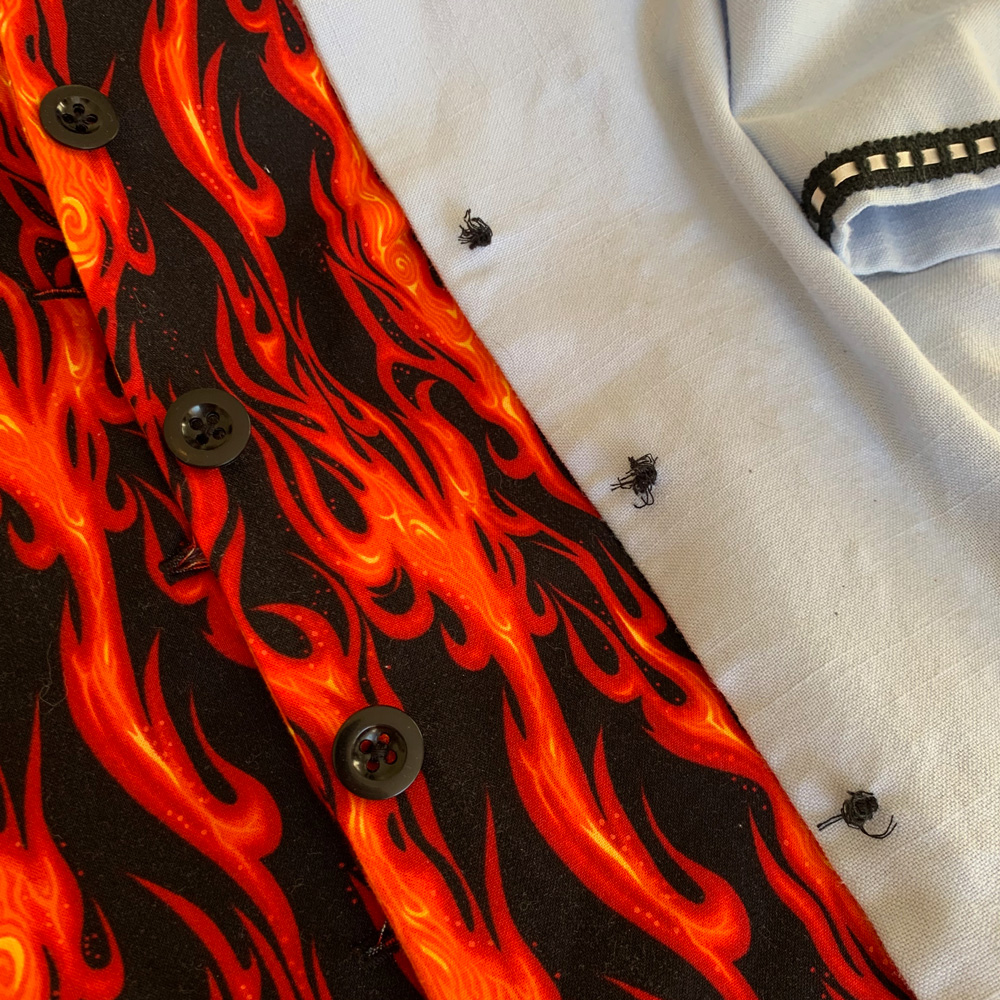
I decided the buttons had to be plain. I’ve exhausted my stash of black buttons and so I robbed some off a previous dress that won’t get any wear over the next six months at least, on account of it being too summery. So I have plenty of time to replace them!
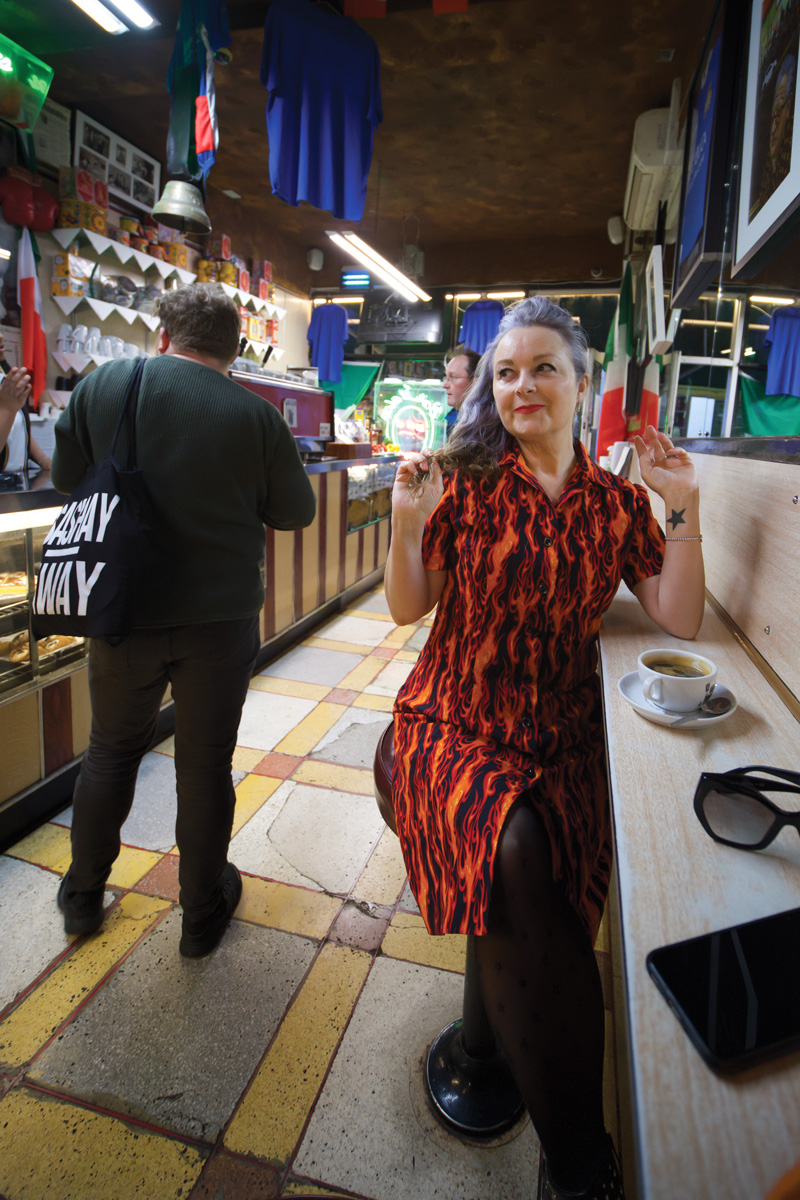
It was fun to take this dress out for it’s maiden stroll around Soho and stop for a coffee in Bar Italia. I used to hang out here a lot in my clubbing days. A pit stop after dancing the night away when you weren’t quite ready to go home – a quality hit of caffeine and always someone interesting to yabber away to. Some things never change!
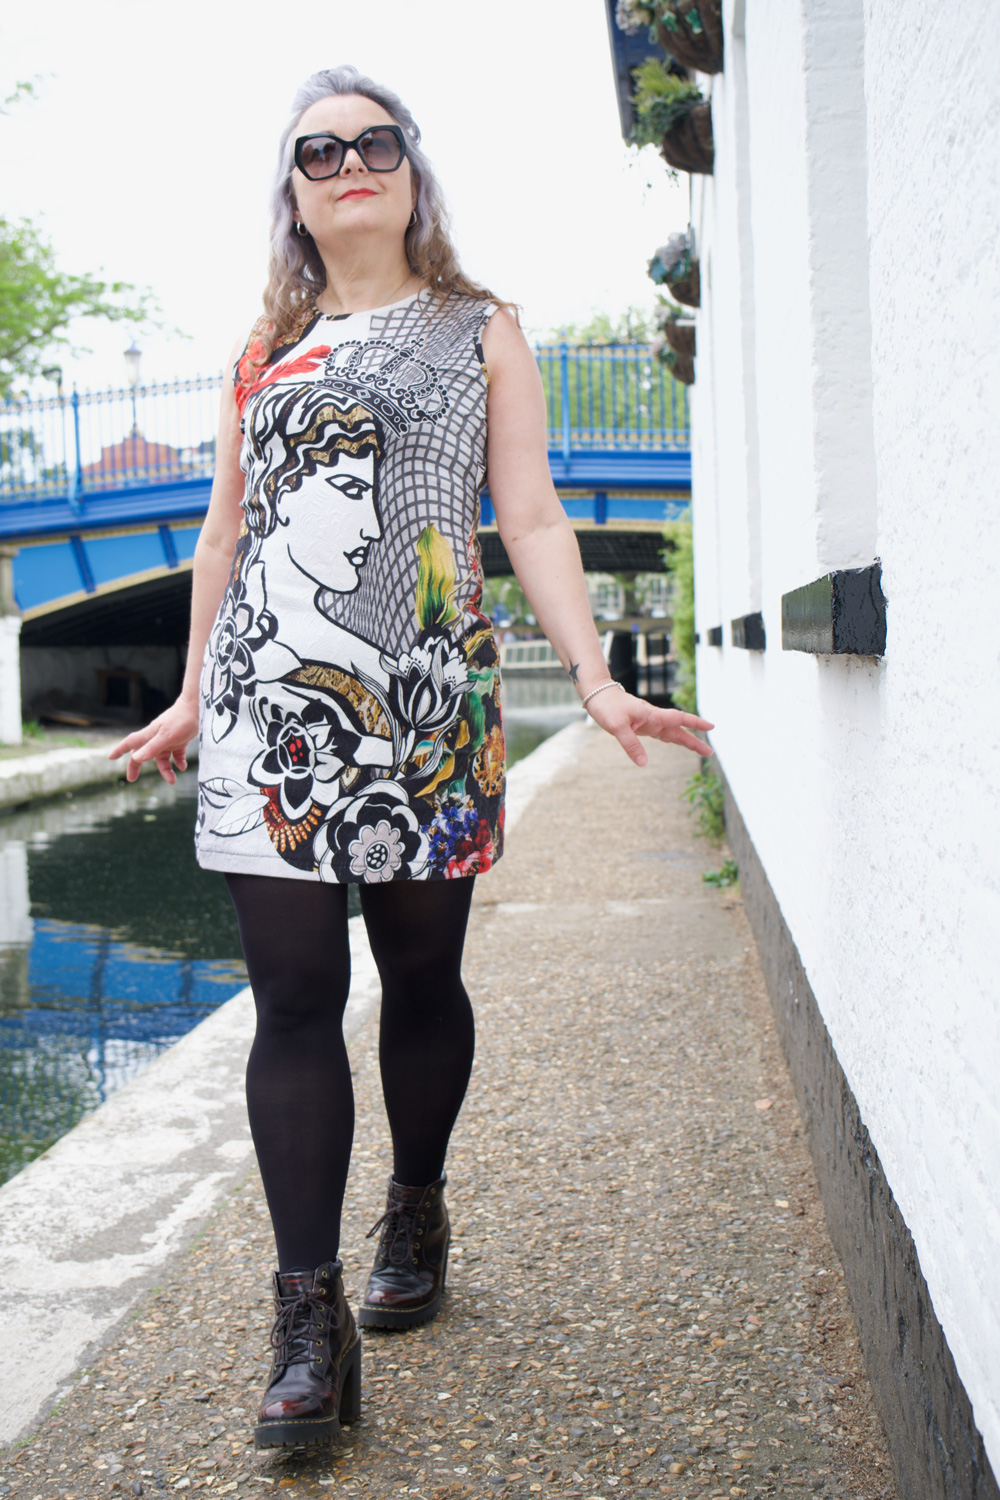
Remember that divine Dolce fabric I was compelled to buy, back at The Stitch Festival 2020? Well it just got stitched up. And boy oh boy it didn’t disappoint.
I had absolutely no idea what I was going to do with it at the time. But I knew it was going to be fabulous, even if I simply draped and cinched with a belt! It’s an Italian cotton metalassé according to the selvedge – a cotton and lycra Jacquard according to M. Rosenberg’s web listing. But all the same a quality weighty, textured stretch fabric of dreams. BTW, I pre-washed at 40 degrees and those colours still popped! And heads up, there are 3 singular metres left remaining on their site if you’re a sucker for a crazy-ass in-yer-face designer print as much as me!
Despite the try-hard distraction of the print, the texture of the metalassé holds it’s own
Ultimately, I decided to let the design speak for itself. Any clever design lines were going to get lost and I wasn’t going to jeopardise one bit of that amazing artwork if I could help it. That meant no darts, no pleats, no tucks, no waist seam. Mmmmm. A full length maxi dress for ultimate impact. That is the end goal. But first to trial a short sheath to test the fit. I bought enough to have a long and a short version, psychically of course!
I’ve drafted a few woven dresses in the past, for me and others, but I’ve only recently worked a knit sloper. So earlier this year I practised on some turtle neck rib-knit tops to test the fit – see black one here, and red one there. All I had to do was extend the bodice pieces to a dress length and omit the sleeves. I didn’t want a turtleneck but I did want a jewel neckline so I didn’t alter that much either.
Though I was happy with the results I knew that the template might not translate in this weightier stretch. Comparatively, the rib-knit was light weight and had way more stretch. I should really have trialled a sleeveless version too but impatient me couldn’t wait any more and I just went for it.
The pattern pieces simply consist of a back a front and some self binding for the neckline and the armholes. And cutting it out was a joy. Not only because is was dead quick with a rotary cutter and all, but it was so satisfying – no slippage, no stretching… just a lovely little satisfying crunch as that blade sliced through!
I first sewed the shoulder seams, after applying my favourite iron-on stabilising tape [aff-link] to limit any stretching, then I sewed the side seams using my overlocker. The first try-on highlighted a bit too much ease in the armholes so I nipped 1cm (so 2cm in total) off the end of the shoulder and graduated to zero at the neckline.
Happy with the rest of the fit I pondered the effect of facings over bindings. I have a love-hate relationship with separate facings – they always flap around and need ironing flat. The only ironing I don’t begrudge is pre-cutting out, and not post assembly! I much prefer an all in one neck and armhole facing that curves over or under bust. But this fabric is quite heavy and I feared the result would be too chunky.
So I decided on bindings which would mean trimming the seam allowances back a bit to allow for the additional 1cm wide strips to sit comfortably.
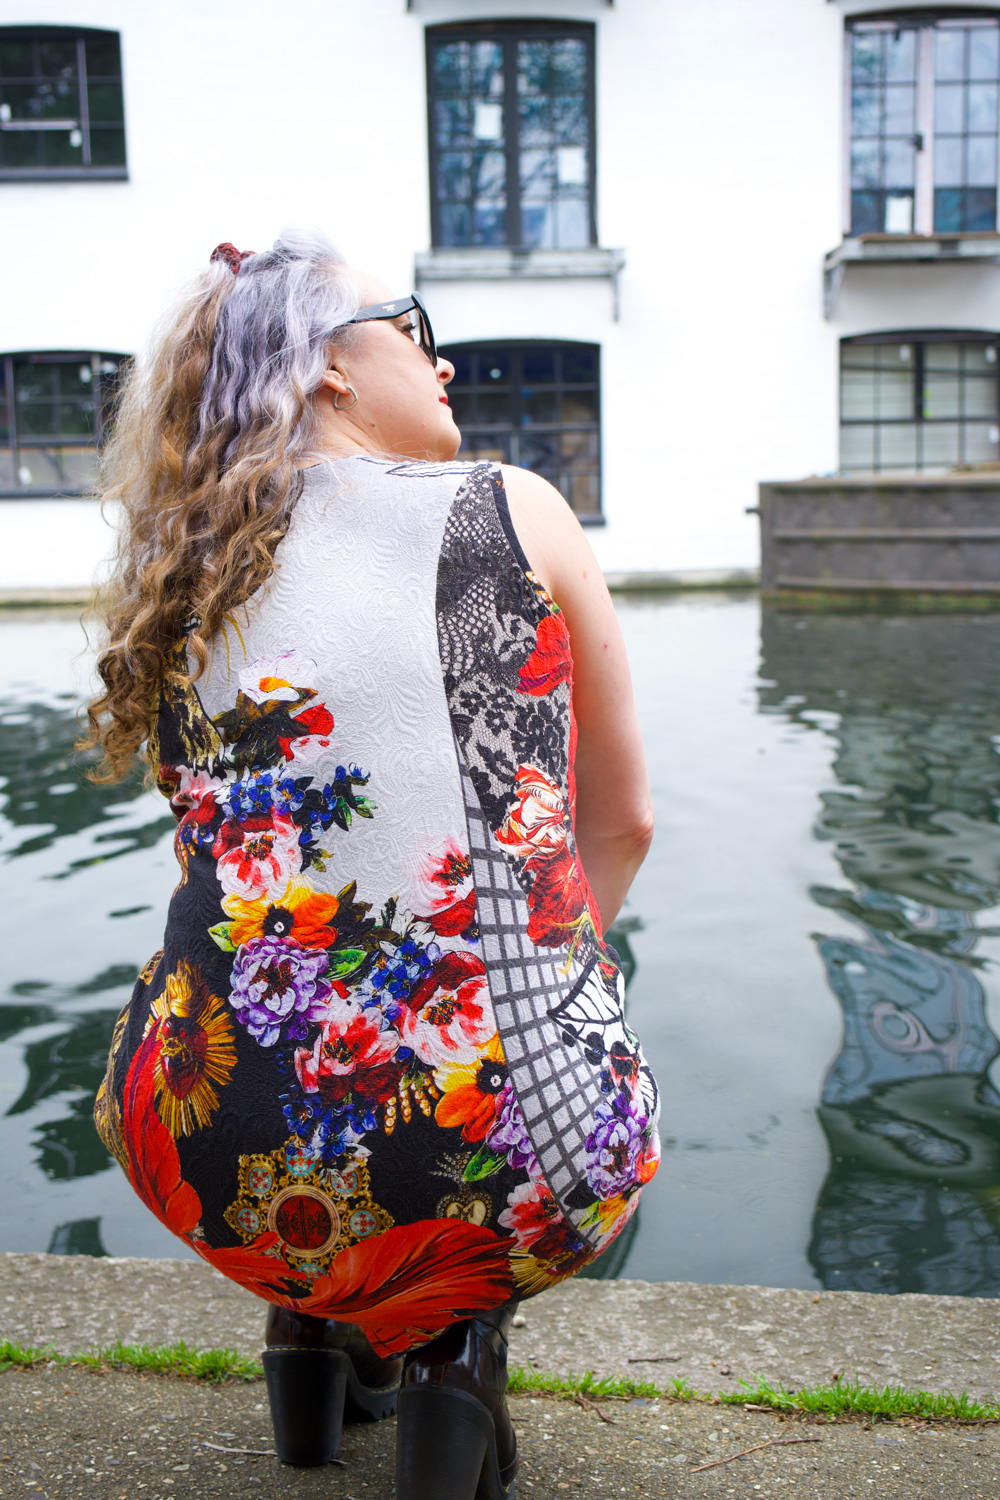
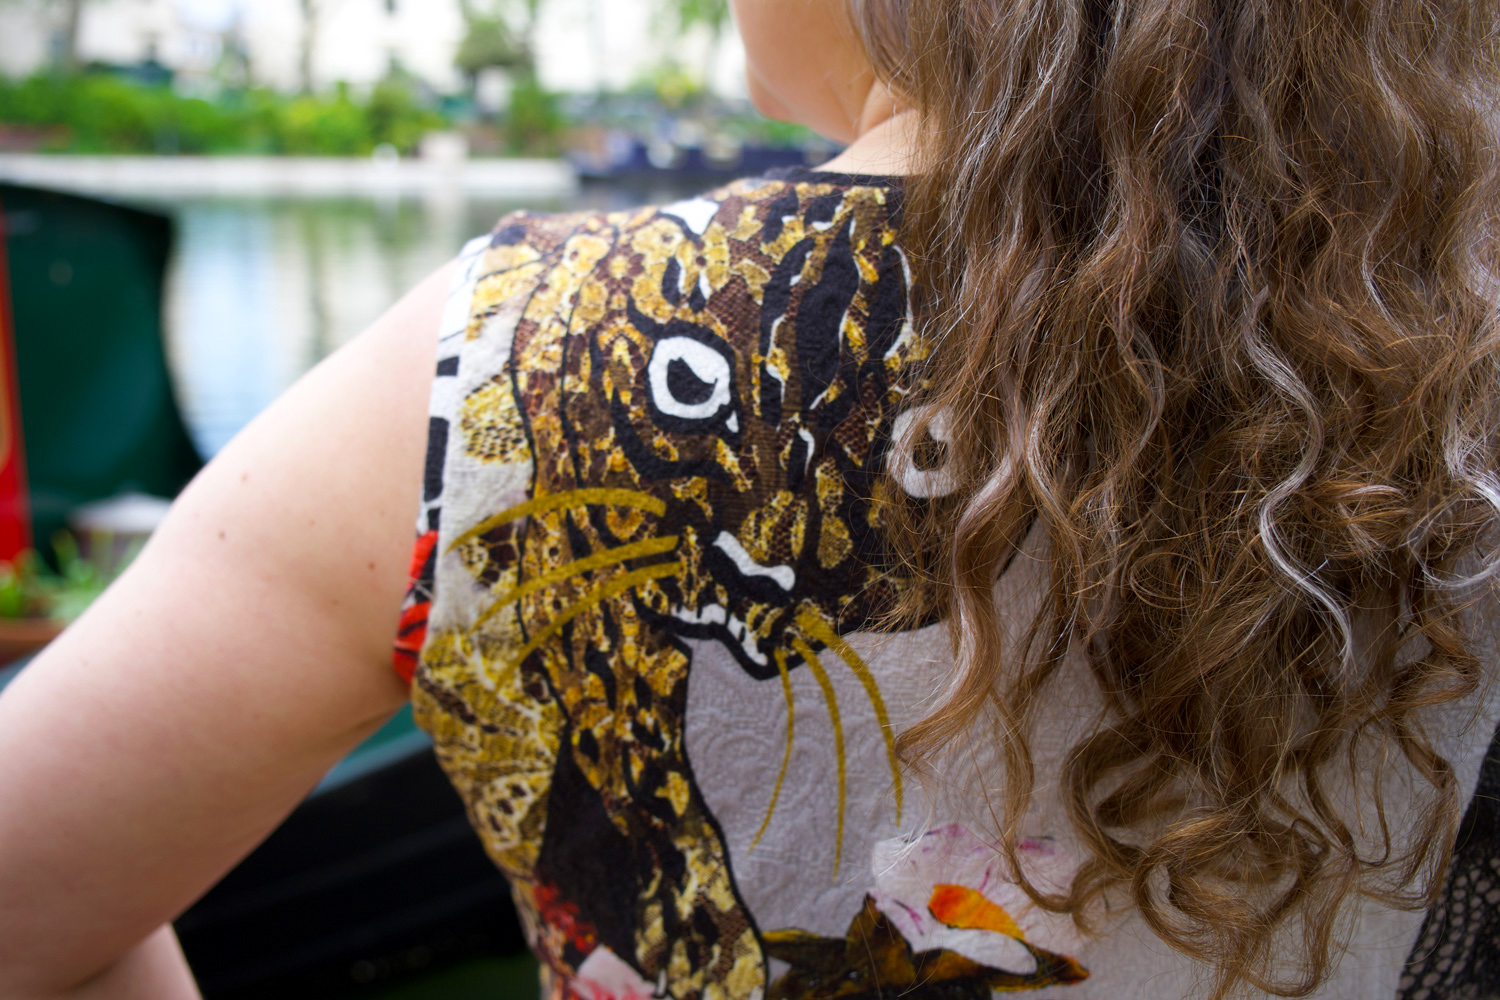
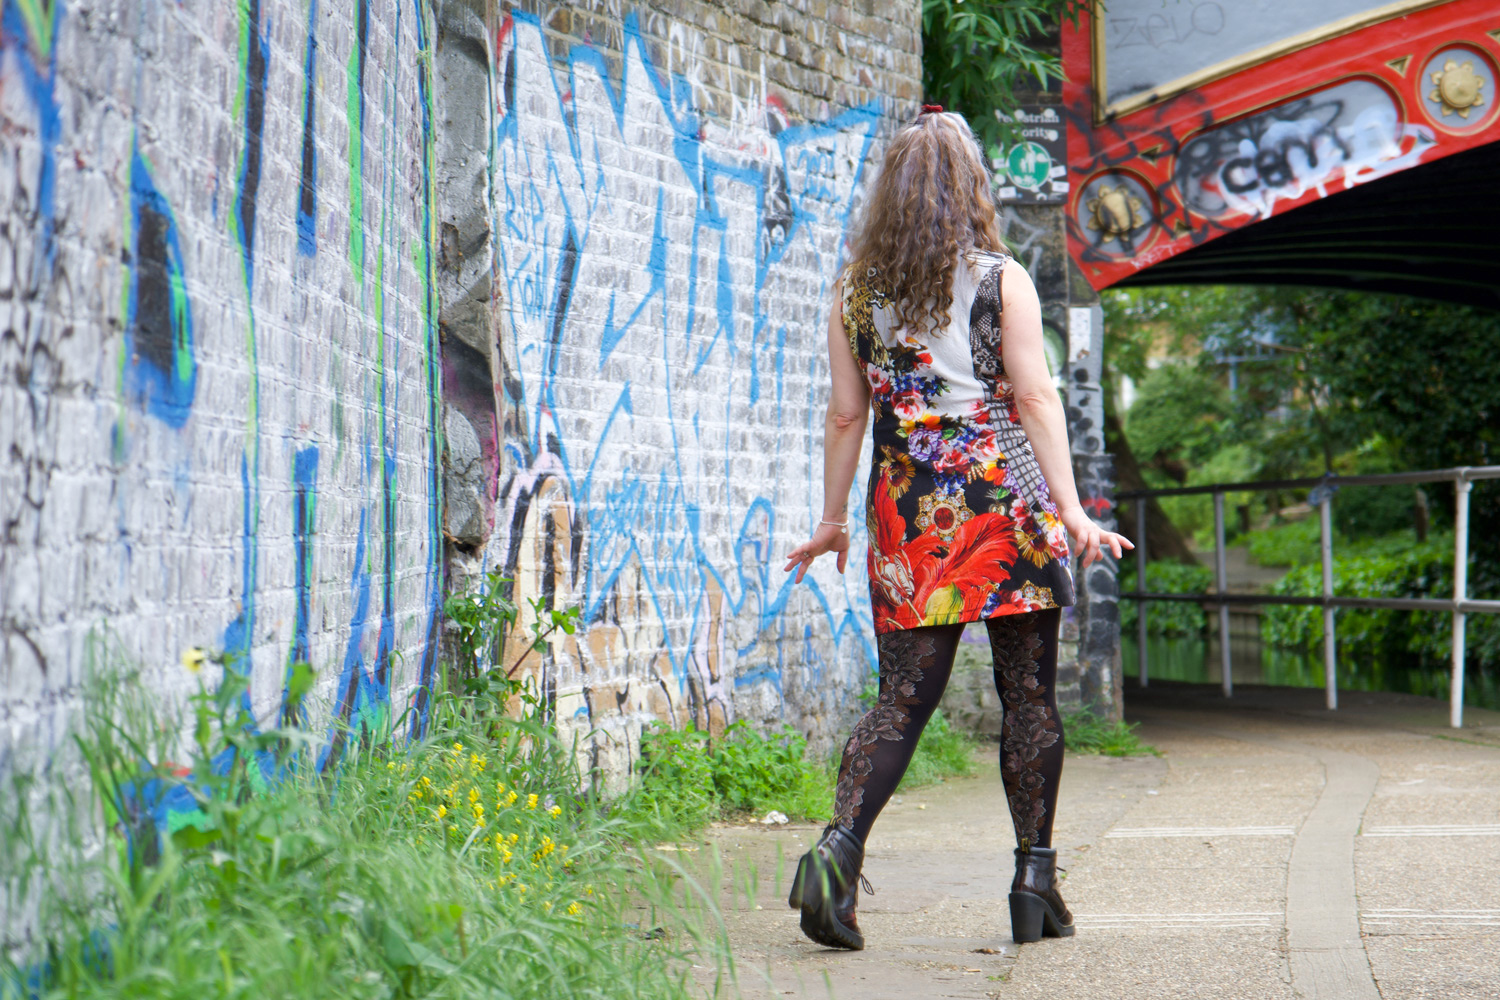
Looking at the back I can see that I would need to lower the armscyce next time. It’s comfortable and all but the knock on effect of taking out the ease on the shoulder has raised the underarm. Not a biggie though. That leopard over my shoulder is a dammed fine distraction!
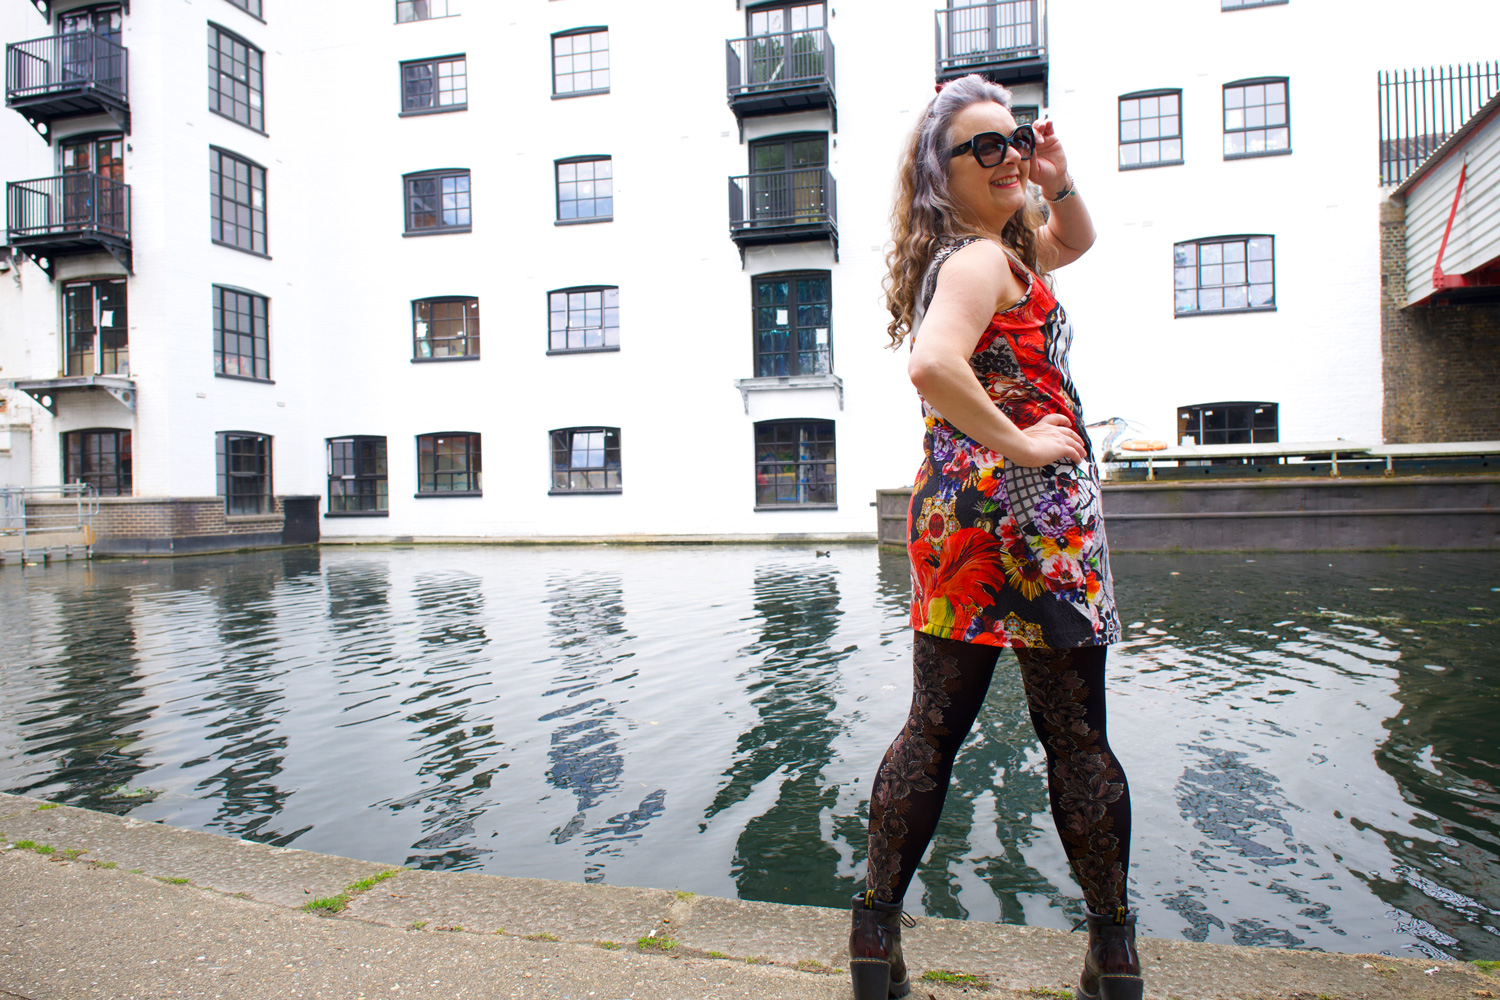
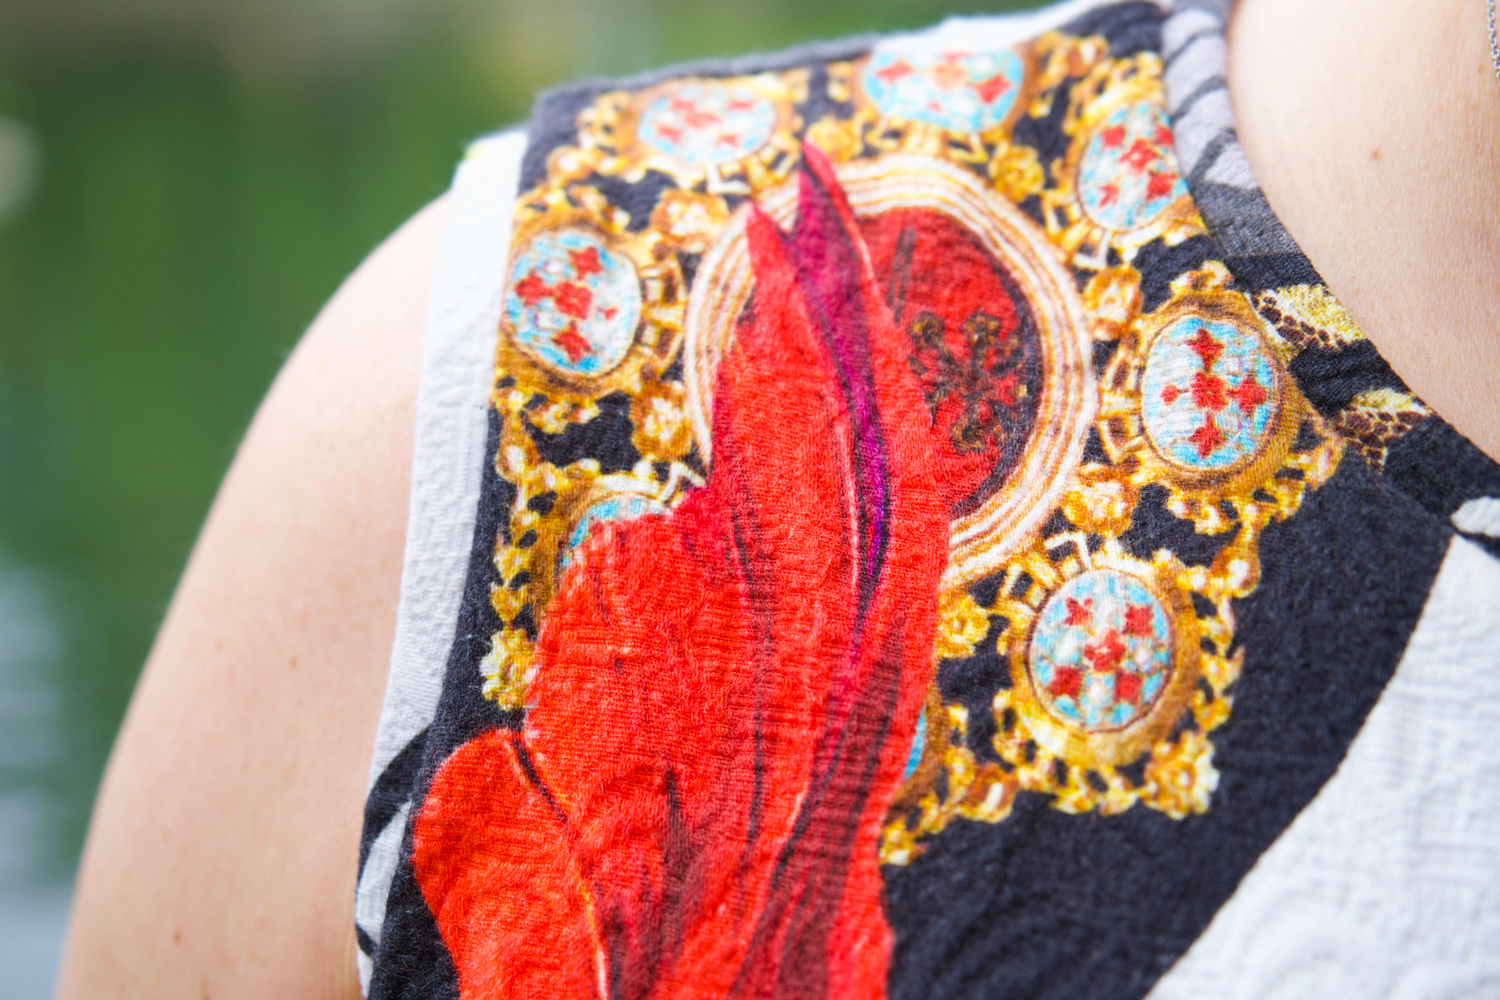
As you might imagine, the thing that took the longest with this dress was consideration of placement. Both back and front are good. Like stupendously good! There was no pattern matching necessary. It was just plain choice. Well, and the want to not decapitate the chap on the front! I decided I didn’t like the idea of someone on my back but I did like the possibility of the back side being prettier than the front. So that’s the way the cookie crumbled.
We had such fun taking these shots yesterday. Dan had recently been on a walk shooting birds along the Grand Union canal and suggested it might throw up some lovely backgrounds for the shoot. He wasn’t wrong and I was very humbled by all the wonderful comments from passing strangers, about my dress. It’s so effortless to wear. Though not quite the weather to wear without tights yet. No-one needs to be blinded by the intensity of my pale pins so soon into the year! In any case. It’s very short. I’m sure the world isn’t ready for my pants either!
More is more, when it comes to tights!
We walked to Westbourne Park, with a cheeky peek at some market stalls in Portobello along the way. Couldn’t resist this odd fabric from a vintage stall. Anyone want to hazard a guess as to what this is?!
If you can bear to watch this space for another year or so, who knows what kind of crazy dress this will turn into!
And there we started our walk, all the way to Paddington basin where we sat for a lovely lunch and a cheeky beer or two in a beautiful Victorian pub.
A bus ride back through the remnants of a demonstration in Hyde Park was quite exciting. A few more beers and a takeaway to round off a fabulous day of doing what we both love. Bring on the sunshine – we want more London days like this!
Big thanks to Marie @stitchoddyssey and Kerry @kestrelmakes for their great insta challenge, #sewvintageseptember, without which this dress would still be in tissue form, in its little envelope, nestled with the other hopefuls! The challenge encouraged us to sew up our neglected vintage patterns, something I’ve been meaning to do for such a long time. Plus it presented so many inspiring posts as everyone uploaded their gorgeous creations. I’m late to the finishing post but I’m so jolly glad I got there!
I used to sew so many more vintage dresses than I do of late. When I first began sewing I inherited (read stole) a few from my mum’s collection – just basic skirts and tops. And then my love for them grew so much that years later I found myself bidding silly money for 40s and 50s patterns online. I loved the cover art, the pre-cut pieces, the prompts to hand finish and the unfailing elegance of the times.I learned how to style the finished garment without conforming to an entire vintage look (totally ignoring the wails of the purists!) and made them my own. I’ve included links to some of my faves at the end of this post.
So what happened? Why don’t I sew vintage so much any more? Well basically, I discovered indie patterns. And later learned to draft patterns myself. And those vintage pattern boxes have since remained closed owing to the rip-off number of hours in a day! That said, I have left a couple of patterns, loose on the top of the pattern box tower, just in case I get a miracle few hours spare to schedule them in!
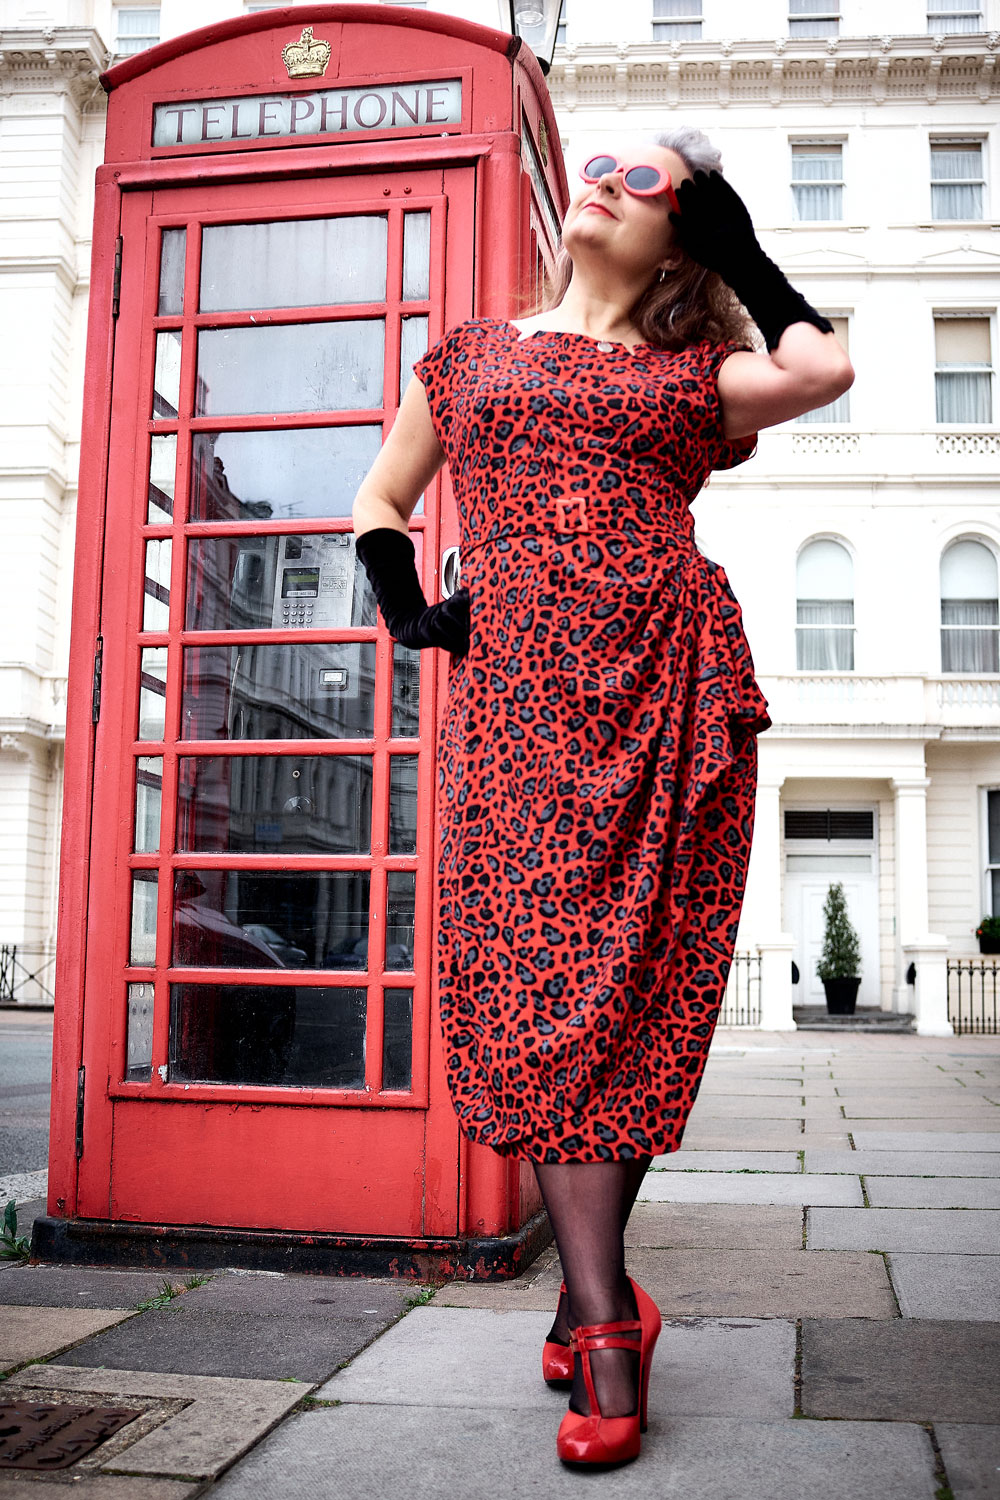
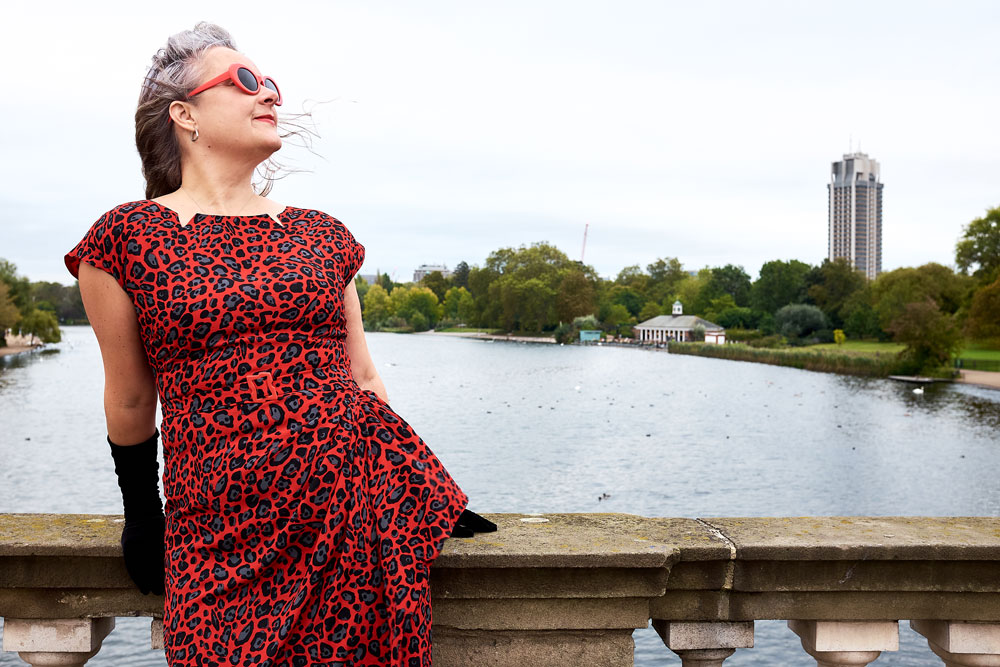
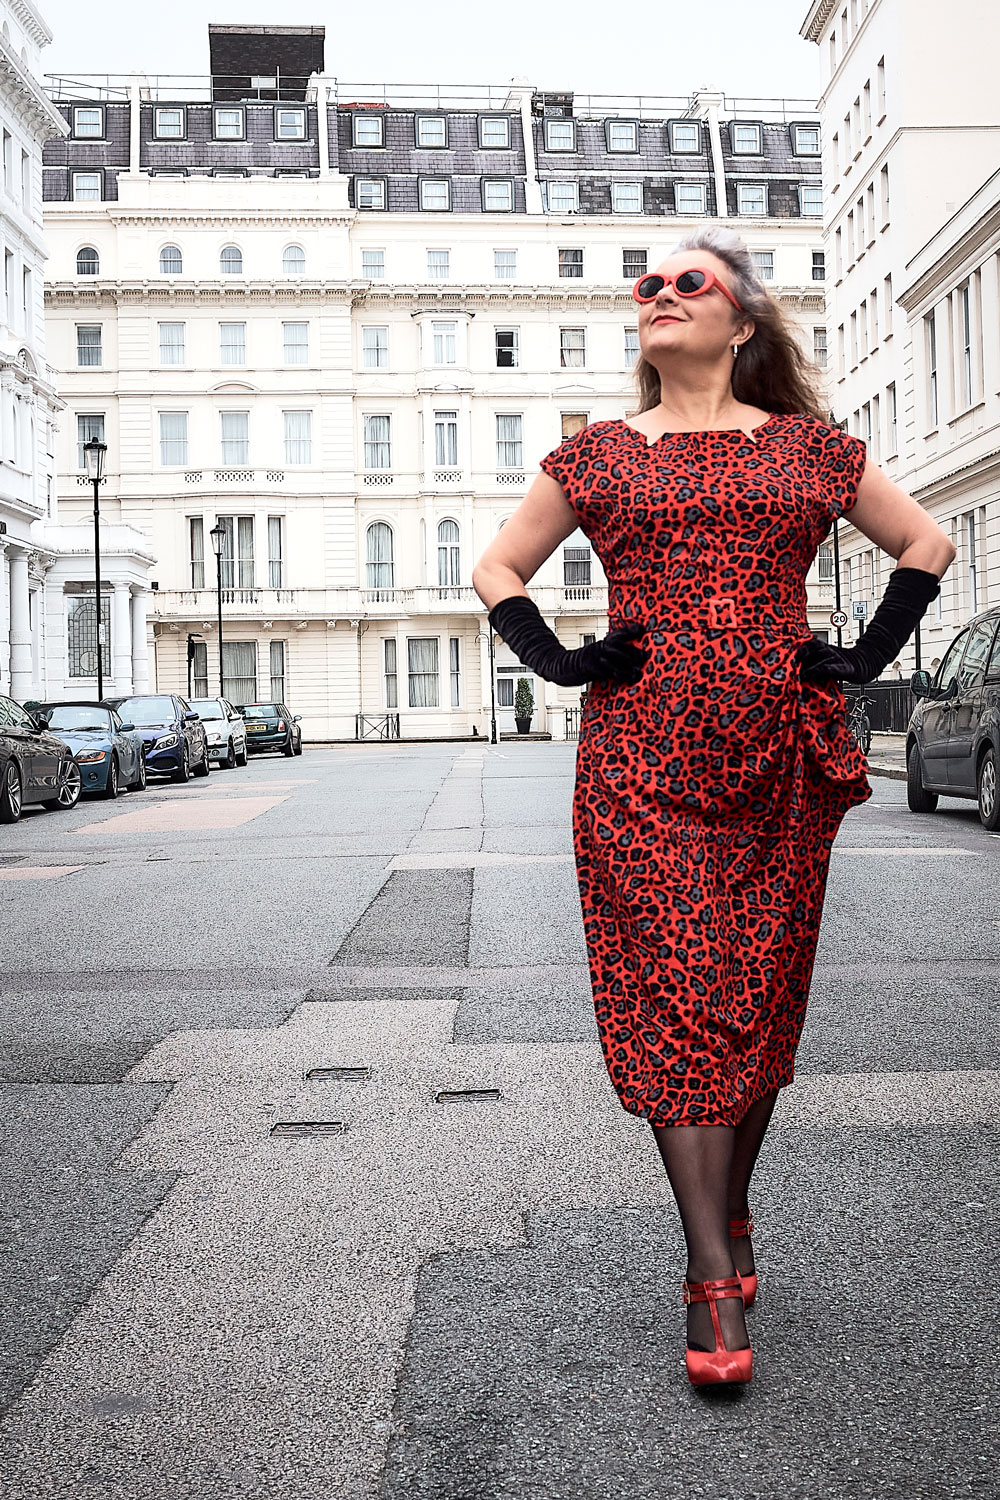
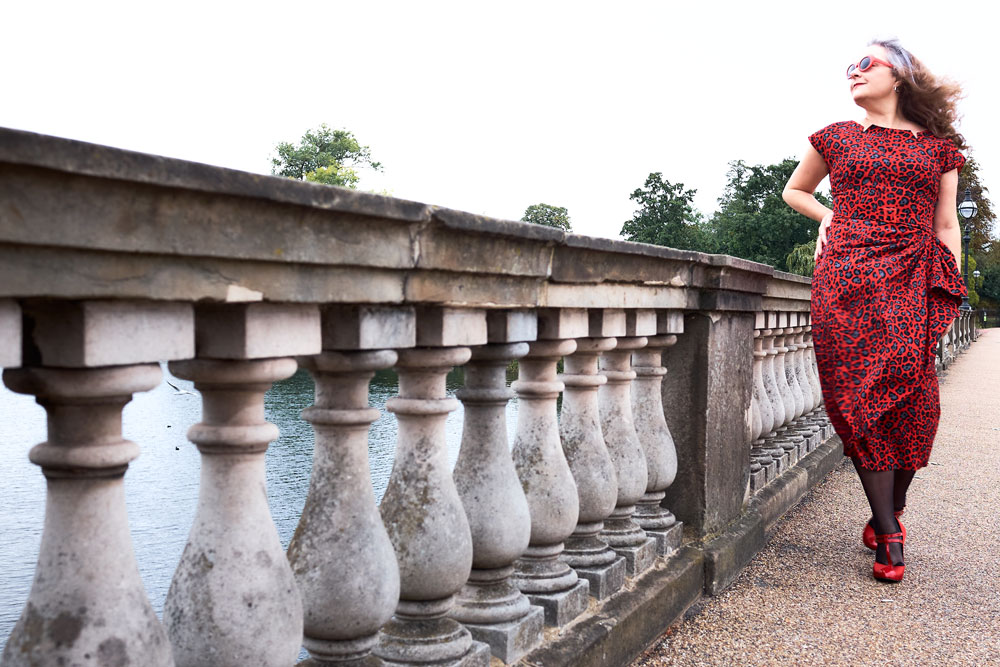
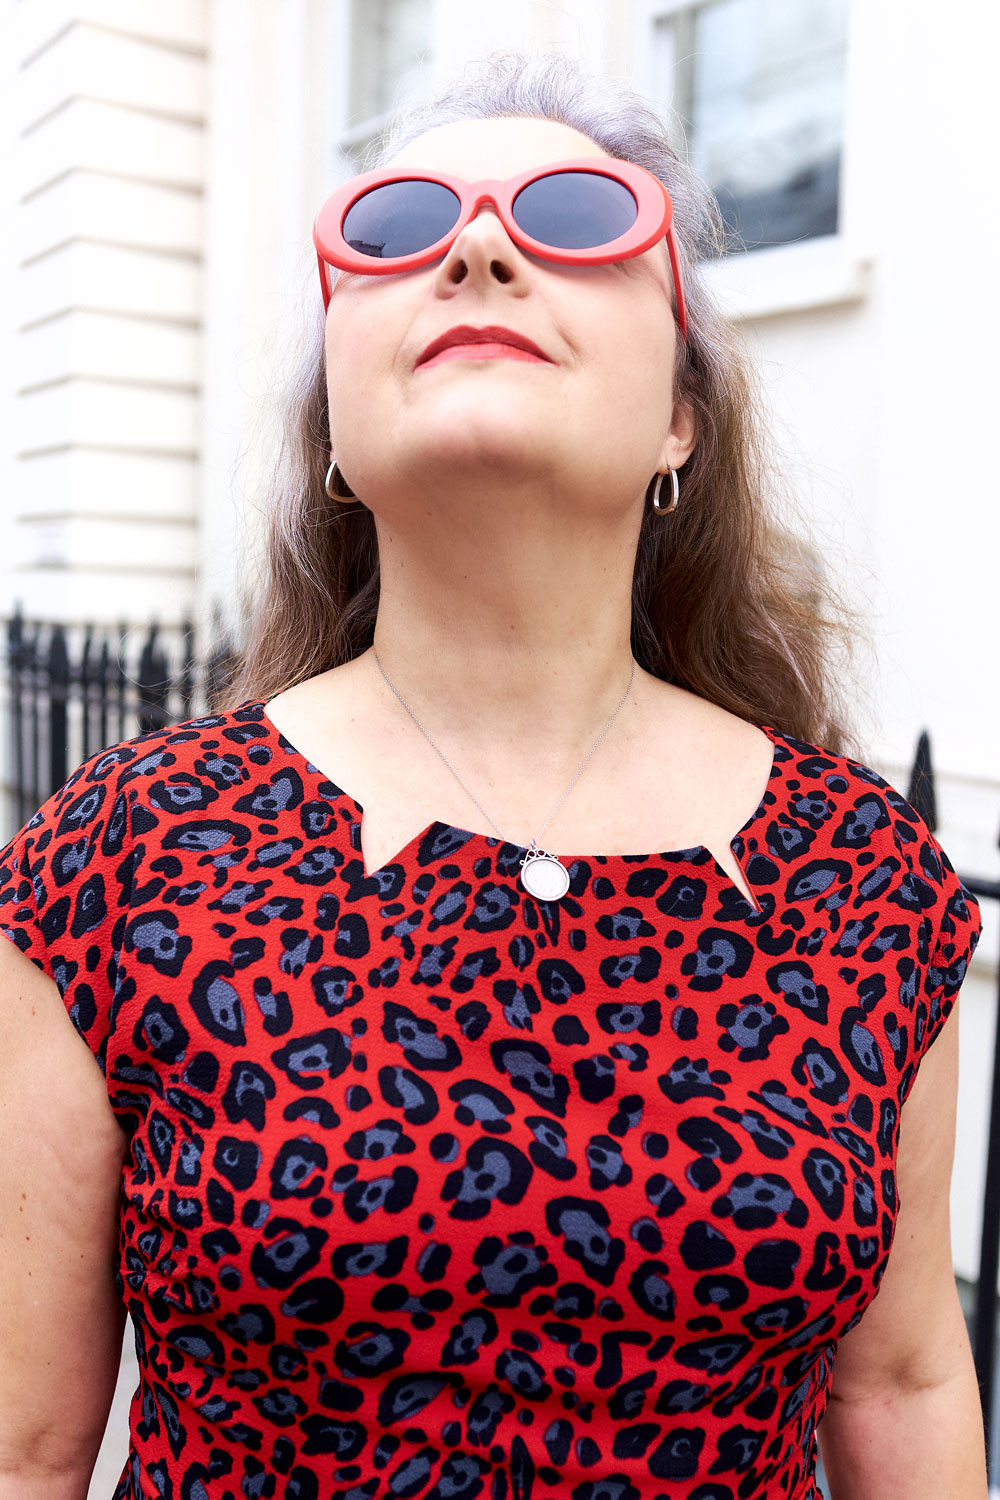
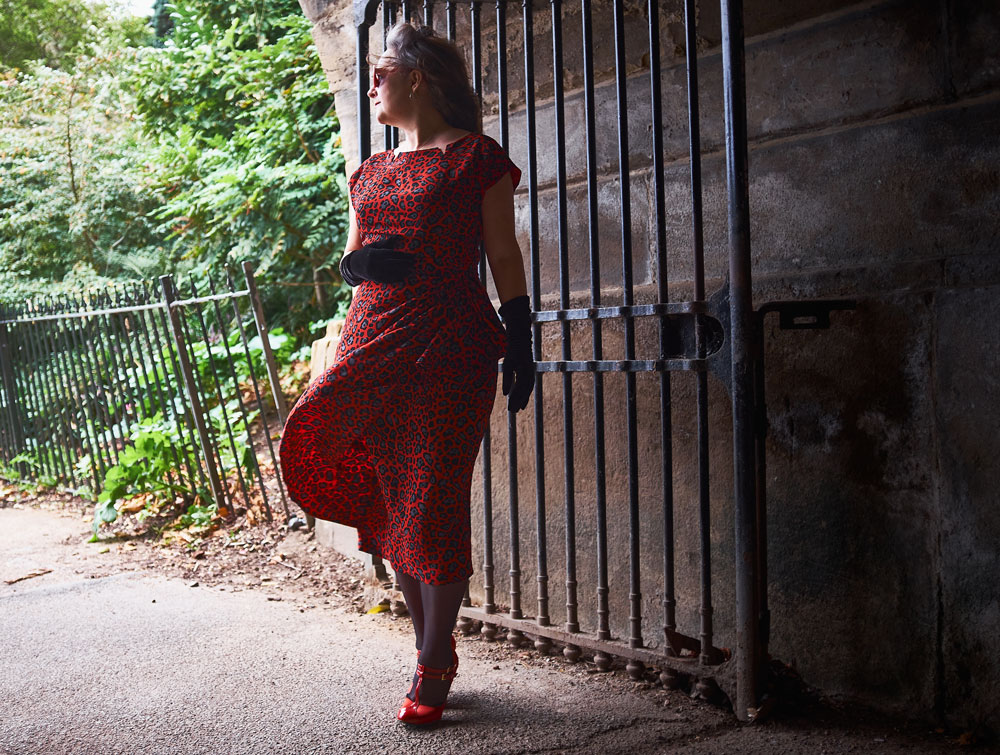
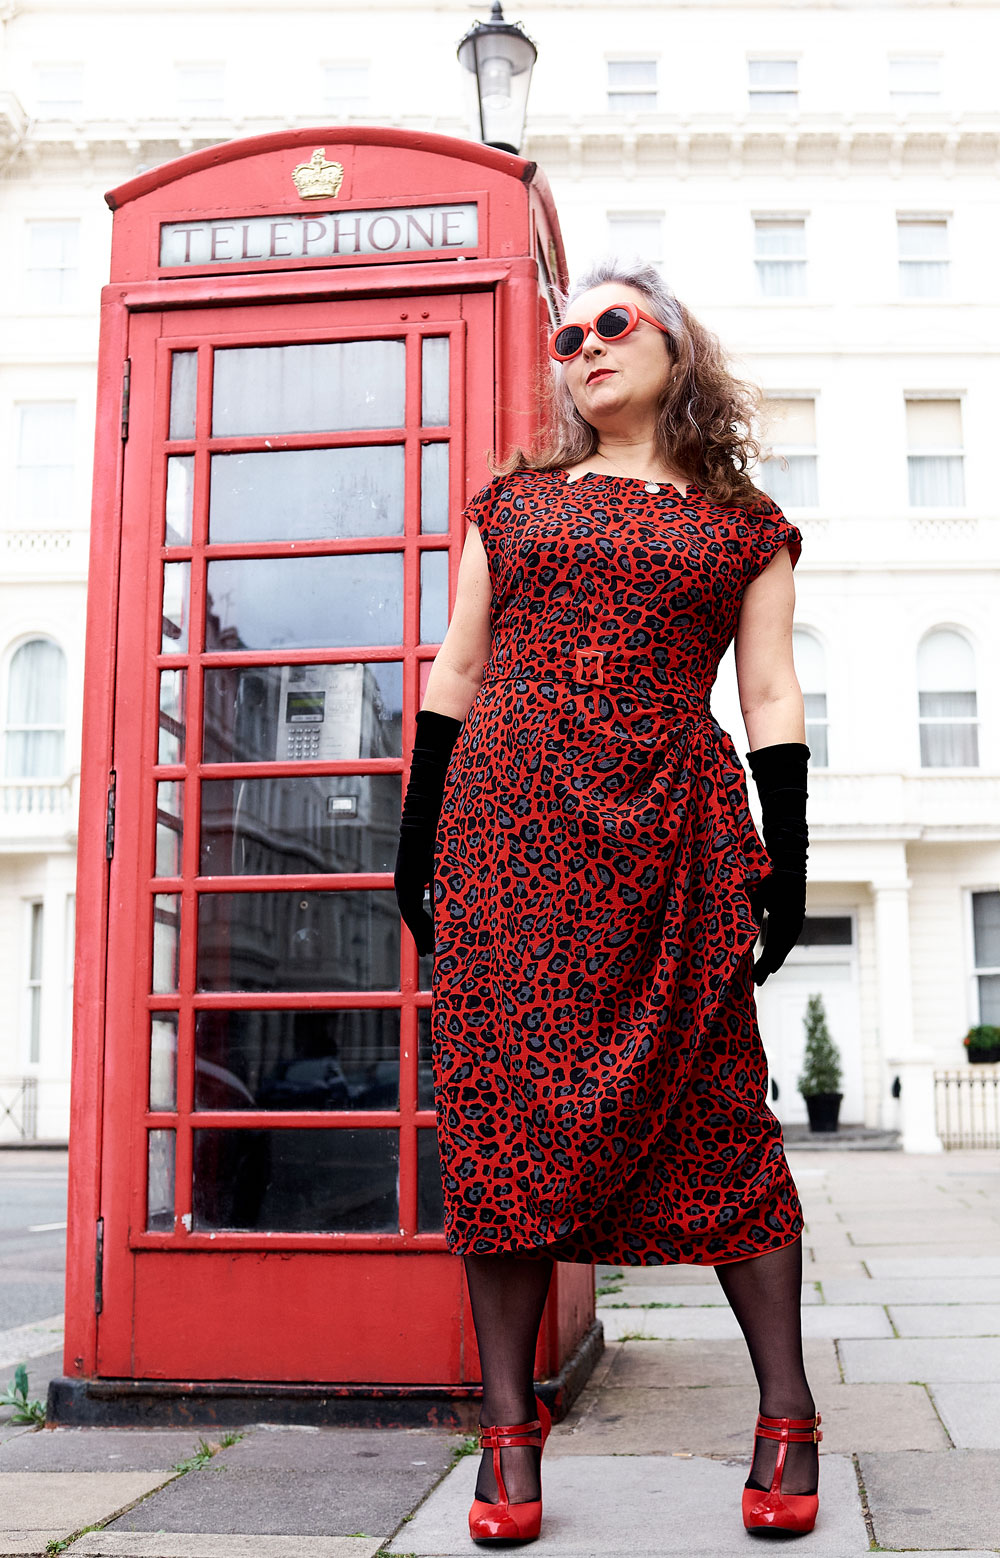
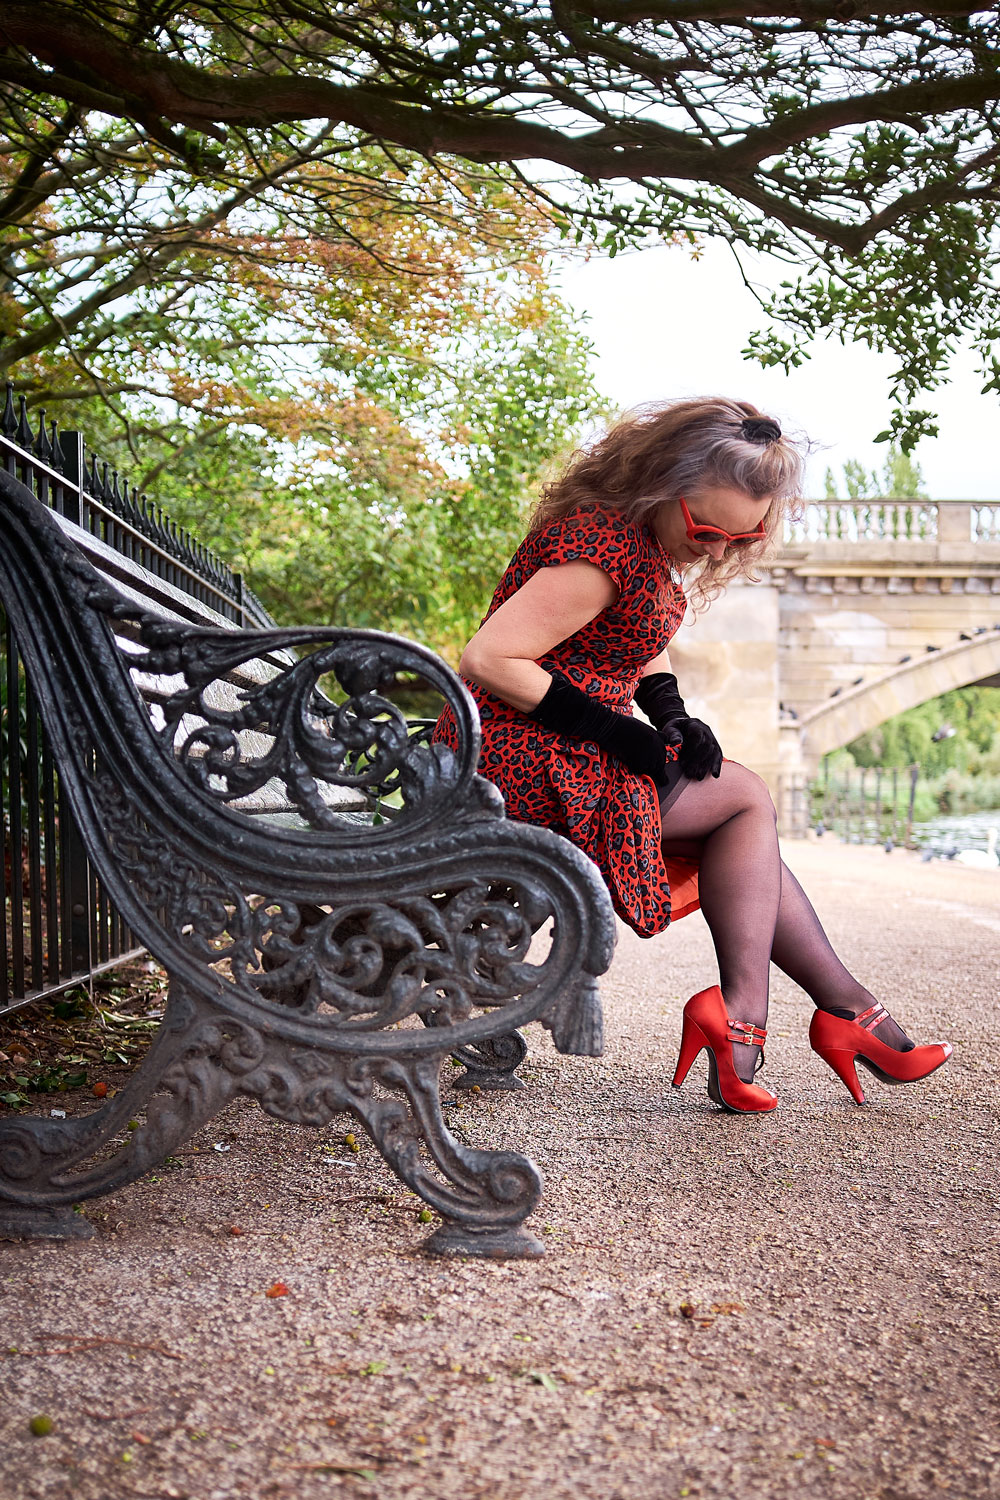
The pattern I used for this dress is Butterick 5880. A retro reproduction from 1951. I love the sarong-style side drape and the neckline with its little fang-like indents!
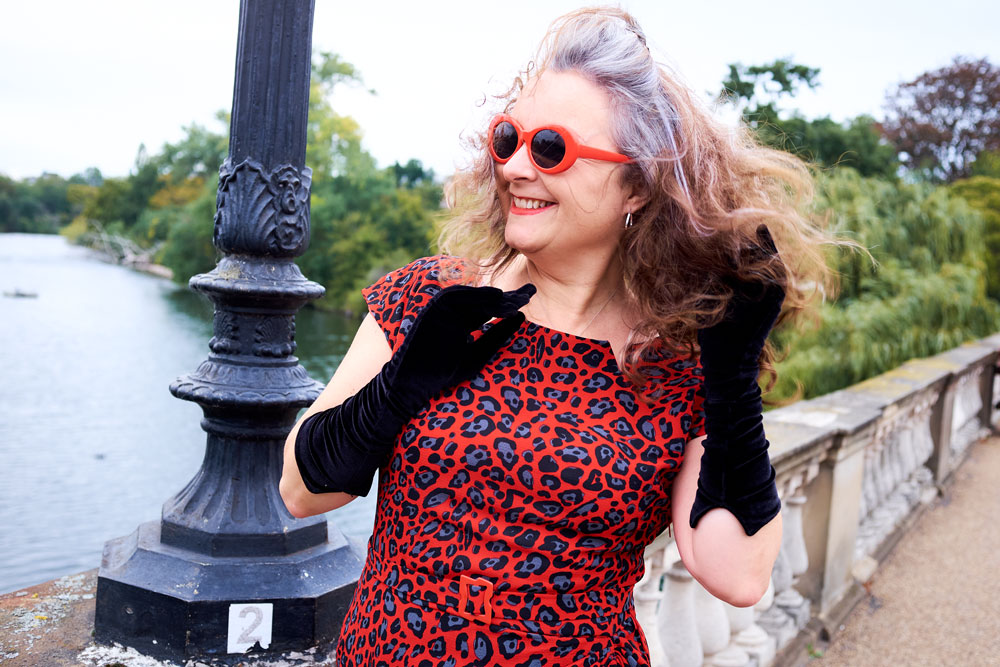
It screamed leopard-print at me from the off. But I can never find the perfect scale print in a perfect colour way, let alone the actual perfect fabric weight.
I asked in pretty much all the stores along the Goldhawk Road with not an ounce of success. A block colour probs would have worked fine and that was my next plan and was just deciding on red or black (of course) until I spotted this red, black and grey print in Classic Textiles. It was definitely an Hallellujah moment!
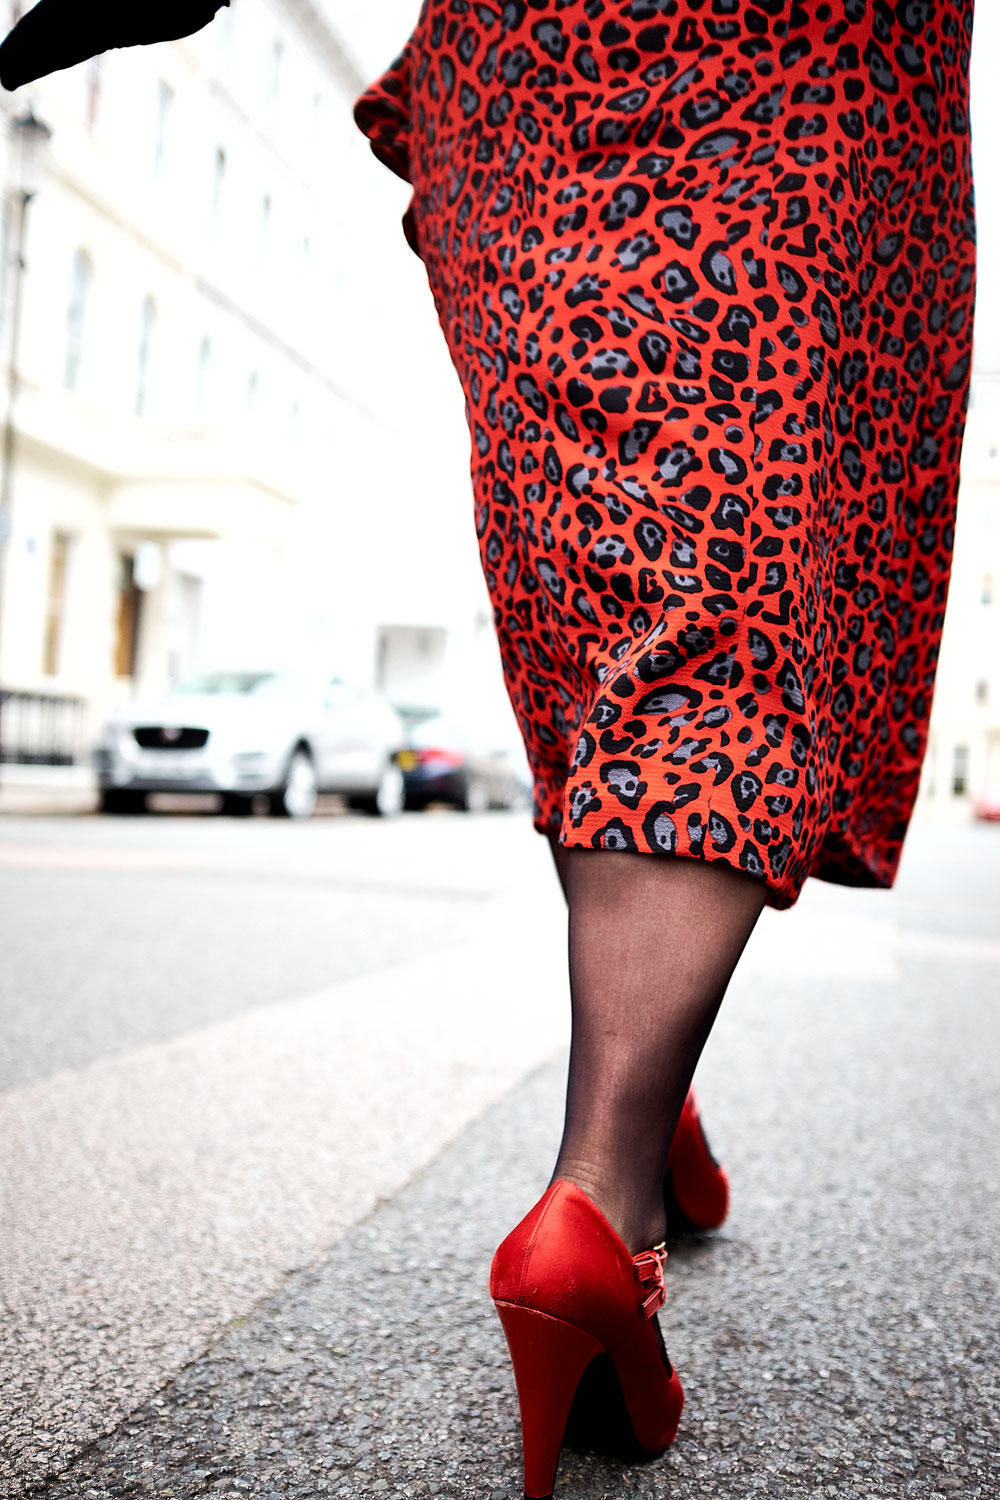
So my vision of Rockabilly chic was restored and off I skipped with some cheaper poly for the toile – I always try to mock up in as close a fabric as poss to get best fit – and some anti-static fabric from the little shop next to A-One (never can remember it’s name but the owner is always so friendly and kind). I paid £6.50 a metre for the lining. Pretty much the same as the main fabric because I didn’t want cling or spiky static stuff going on. It ironed like a dream and feels so silky to the touch – red of course!
I only mocked up the bodice. Knowing exactly what the issue was going to be – pooling at the back! The back piece is cut on the fold so to get round this I traced and cut the piece in two, adding seam allowance and taking 2 inches of ease out but cutting and slashing on a line drawn from a third of the way up from the bottom of the armhole, across to the centre back.
I sewed out a dart on the mock up to check it worked before cutting out my main pieces.
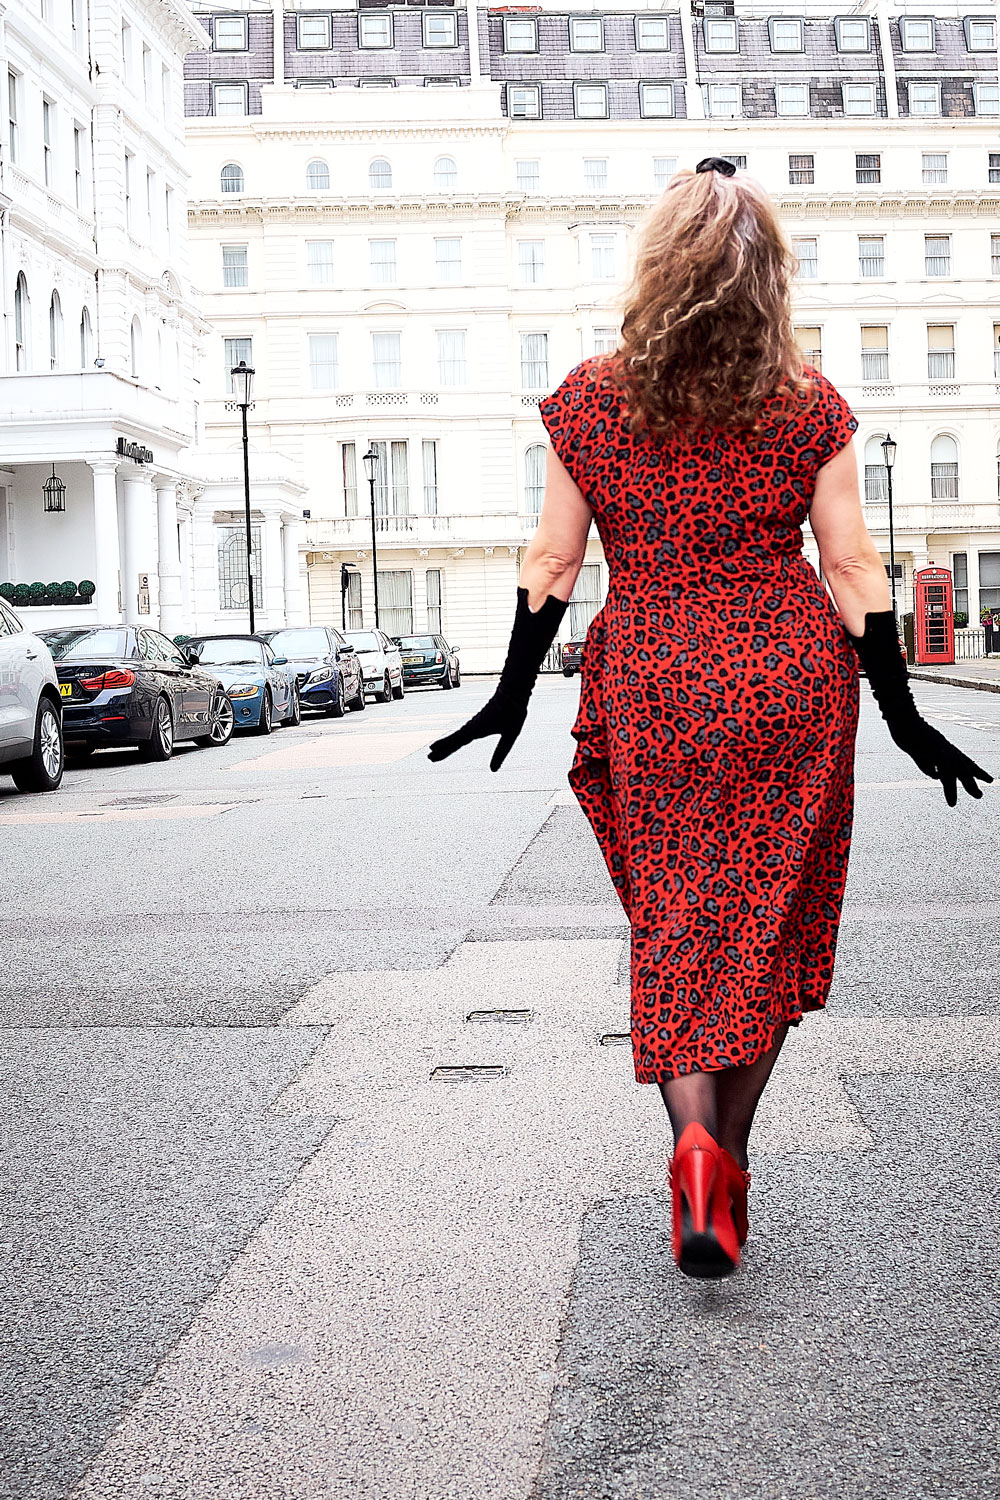
And here is where the fun started. That wrap piece is huge and because I wanted to keep the entire length of the skirt (I know right… where has Janene gone!) I had no chance of cutting out on my tiny kitchen table. I remember thinking laminate flooring would be a great idea in the living room so I could cut larger pieces. And it is mostly. But wiggling crepe and shiny scissors meant I was crawling around on the floor for aeons! Getting up and straightening up afterwards was an insight into being a hundred years old!
And just as I’d finished I had to cut the lining, too. All the moaning and groaning that day – you’d never have guessed it was my favourite thing to do!
The bodice came together pretty swiftly. I’m always a bit scared to clip so close to the point of a ‘V’. And you can see a smidge of the lining as a result. But I’d rather that, knowing its stronger as there will be some stress on those points at times. But kudos to the Vilene G710 Light Woven Iron On Fusible Interfacing I got from Minerva Crafts. It was such good quality and it was definitely key for providing just enough structure so that neckline doesn’t roll out.
I pinked the seam edges and the lining edges. Mostly so there would be no additional bulk on pressing. But also because it’s fun!
The main skirt pieces are dead simple to assemble too though I did overlock those seams. The bodice seams are enclosed and it felt safe to pink but when this dress ultimately gets tossed around with a wash load of other stuff, I worried the skirt seams would be more vulnerable and susceptible to fraying. And I didn’t want that after all the effort invested.
Now let’s talk wrap! All I can say is that I’m jolly grateful for that QR code bottom left of the pattern cover, that links to a very good tutorial by Professor Pincushion. I read the instructions included with the pattern about 50 times over and still couldn’t work it out. But the video was instrumental in working out those pleats.
I had assumed the wrap was a singular piece. And it would probably work just as well assuming ones fabric is double sided. But I like how much neater it’s finished by being faced. It adds a fair bit of weight though, and there’s quite a bit of stress where that pleated section joins the waist seam so will have to keep an eye on that. The full lining adds even more weight to this dress but its not a bad thing. It slides on with ease, helps the dress to hang better, prevents any show through and feels so special to wear.
Following the marathon hand finishing session (shoulder seams of lining, joining bodice lining at waist, hemming, French tacks) I almost forgot about the belt! That was pretty simple to whip up though. It’s basically an interfaced tube, sewn, trimmed and turned. Though the turning was not fun at all! Once pressed, the flat end is folded over the central bar of the buckle and hand stitched down. Luckily I had a small collection of vintage buckles to choose from – the asymmetric red one was a clear winner.
Although this is clearly a 50s dress design, it could so easily pass as 80s and be dressed down with Doc Martens and a denim jacket but for the purposes of our shoot on Sunday, I felt the need for glam – heels, care of Shelter Charity shop, Long velvet gloves from British Heart Foundation charity shop and Sunglasses, a lucky find in Cancer Research charity shop. Stockings bought from What Katie Did.
And yes, actual stockings! I’m so out of practice and really nervous of them pinging loose and ending up round my ankles. But they felt so good to wear with a dress of an ‘appropriate’ length and added to the feel good factor.
The weather wasn’t the least bit inspiring at the weekend but Dan was so keen to shoot with his new camera insisting that there’s no such thing as bad weather as far as photography is concerned. He’s mostly right of course, especially looking back at these photos, and I’m so pleased his eagerness helped me to meet the challenge deadline, but I might argue that wind is the exception to his rule!
Last weekend was a Godsend. Seriously. As a sewist, who wouldn’t relish permission to sew your undivided heart out for two full days whilst tuned in to all manor of inspirational videos and chat from the best kind of community ever. I’m talking the #SewingWeekender hosted by The Foldline and English Girl at Home, obviously. The event that sparked so much joy and raised so much money for such great causes.
And hey, I made a new outfit in the process, too!
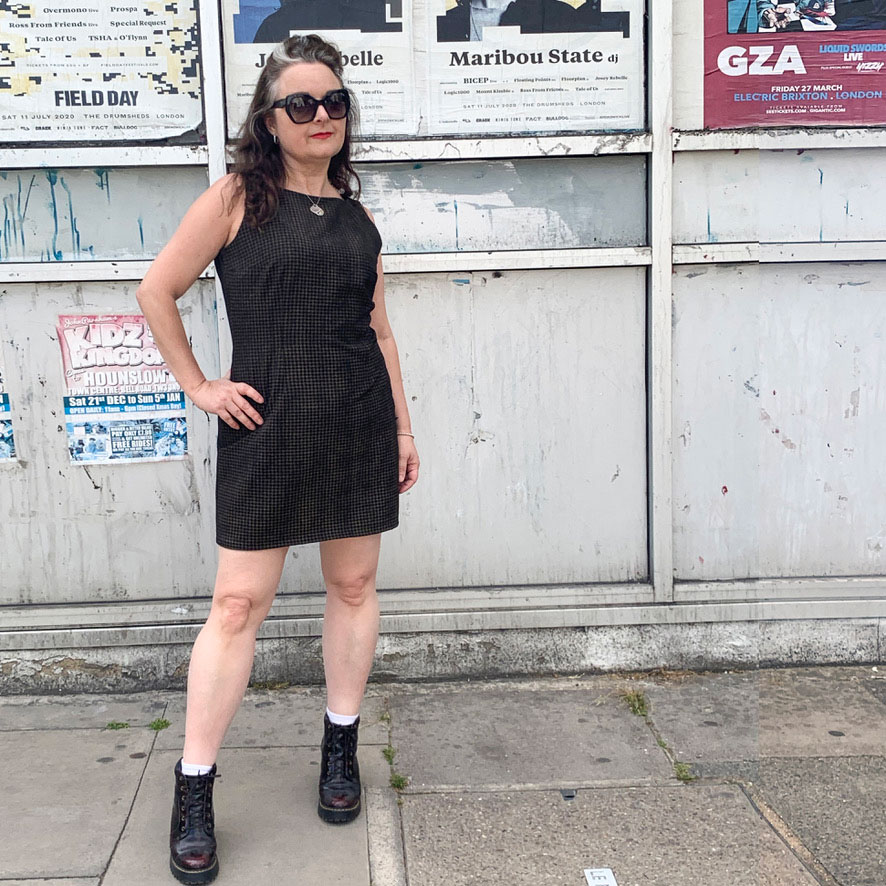
I’m not sure if I can ever stop making True Bias Shelby Rompers now. This is my third and still I’m not done!
This wasn’t the intended fabric though. I had factored in some crinkle cotton linen gauze, but following a prewash, it crinkled to half the size and became all elastic and everything. I set about ironing but got bored after the first 20cms and swapped it up for a really old pair of curtains instead. As you would!
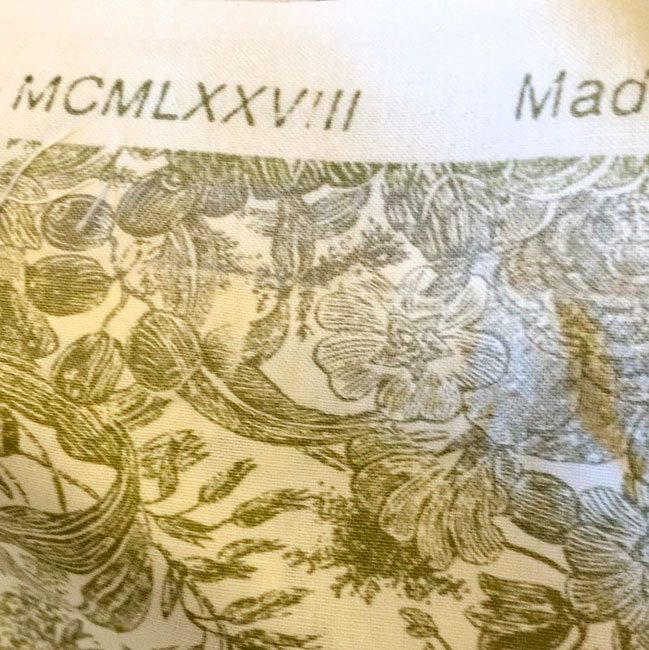
Ordinarily I have a reputation for exaggeration, but in this case I’m not joshing. I bought these Laura Ashley curtains in a charity shop many moons ago. Quite excited by the vintage factor. Had to look up those roman numerals though . . .
MCMLXXVIII = 1978 for the less Roman among us!
I bought them when I was dead broke. And still argued the West London inflated charity shop price! They served my previous two addresses as actual curtains and have sat wantingly in stash mountain for the last 10 years. So I think you might relate to my happiness at using them to make my third True Bias Shelby Romper suit.
I get it now. Using the same pattern over and over. If it ain’t broke and all that. Such an easy gig when it works straight out of the packet. I made my first ‘trial’ one in a very lightweight (quite see through) star-print viscose. And I love it still. The second, more improved version realised in a tropical print viscose and it’s so interesting to see the difference when it sews up in a fabric with a bit more structure. The silhouette is accentuated even more and feels good against the skin being 100% cotton and all. Feels even better knowing how many lives it’s lived and yet 42 years on its still many more years away from a landfill!
That said, there was a little issue with the tiny back straps. They didn’t turn as easily in curtain fabric. It’s a bit of a toughie compared to viscose. So following a wee tantrum, I re-cut the pieces on the bias – remembering a video tutorial I’d watched about cutting rouleau loops on the bias – and it bloody worked a treat. Thank goodness I had enough fabric left!
This isn’t the end of this particular project. I’ve got plans. Mostly to mess things up! You know what I’m like with my colour palette – there’s not a scrap of black going on, save for the buttons. So I’m going to add some paint. Just a bit. And not quite sure where and what. But watch this space!
Thank you Daniel once again, for my lovely photos. Especially when the clouds dictated we should never have strayed further than the garden gate, let alone to the riverside. But I’m jolly glad we did.
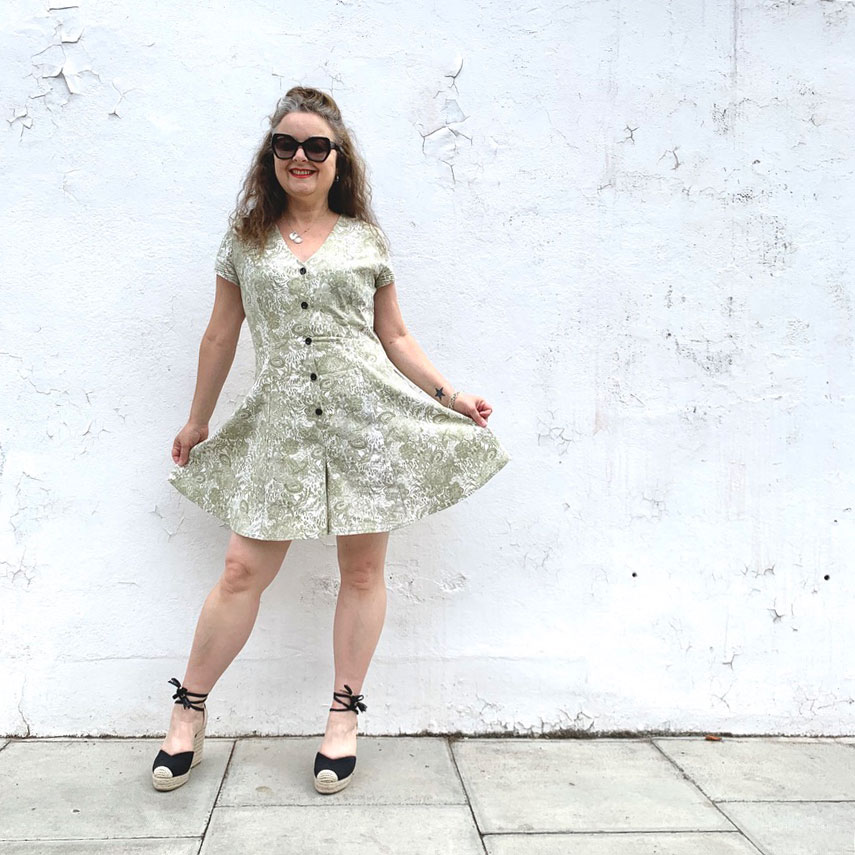
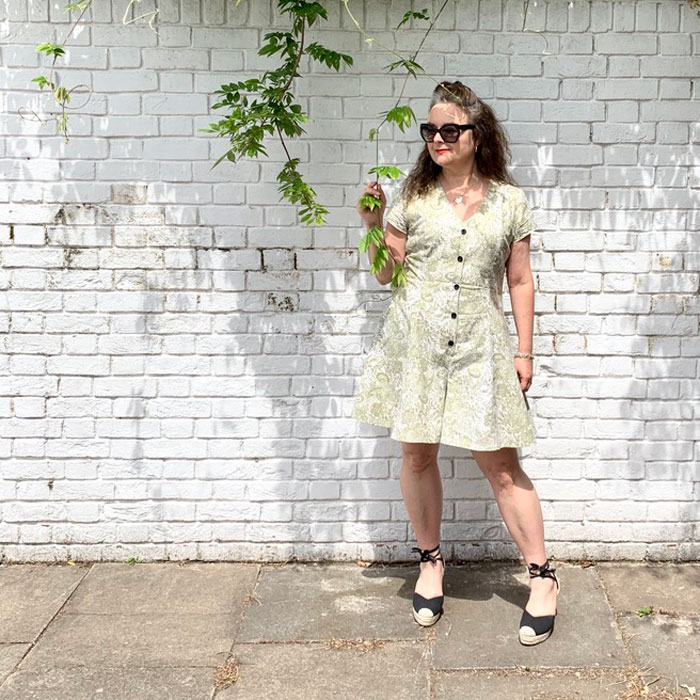
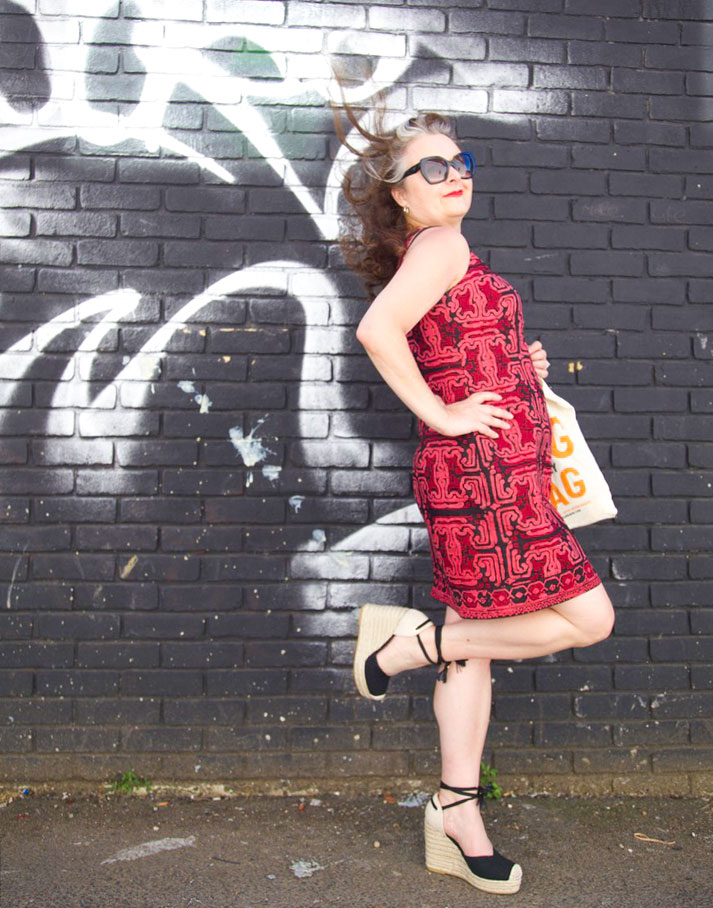
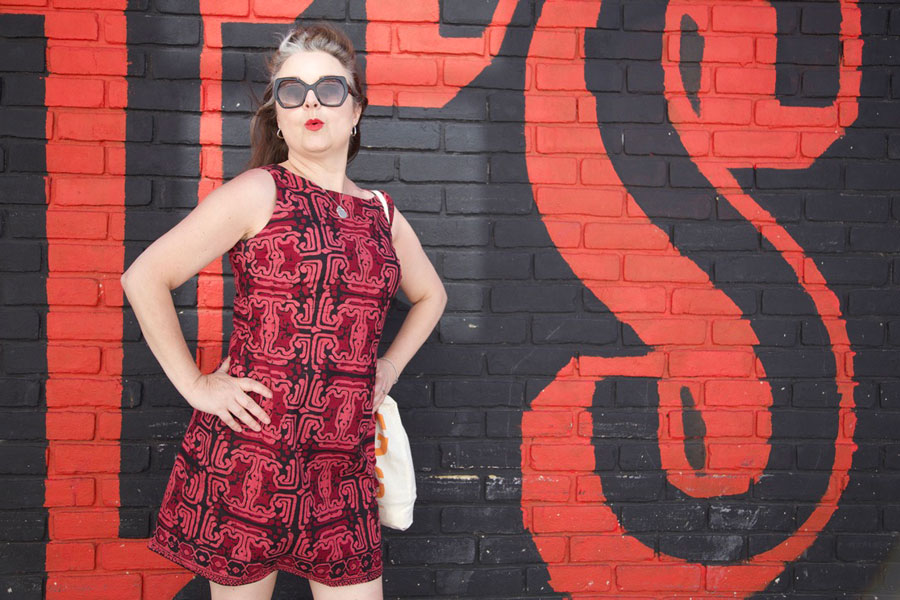
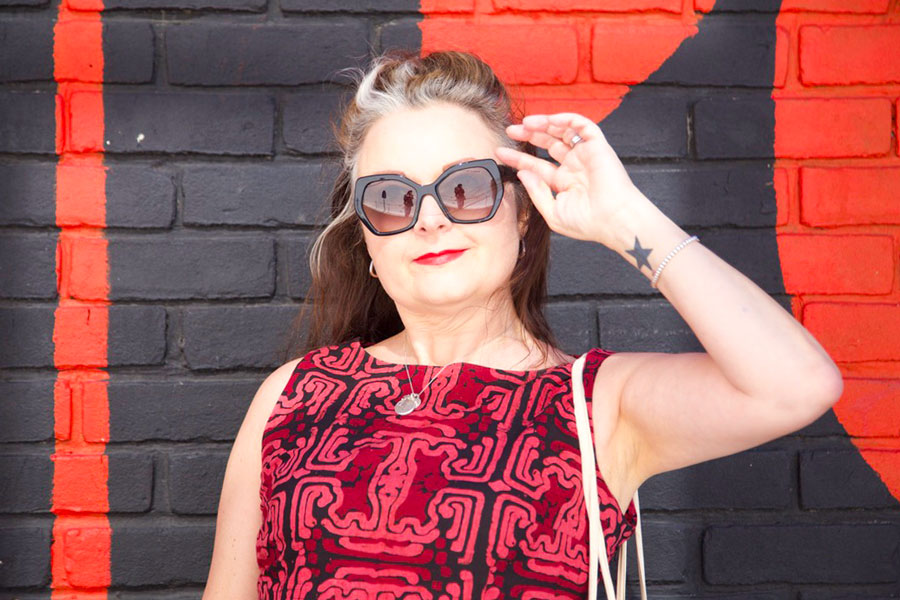
I’m so happy right now. Doesn’t take much – just a shed load of sunshine, some quality time with the fam and success at last with the fit of my shift dress.
In case you’ve missed any part of me whittling on about this process, my mission has been to achieve the best fit I can using my own dress pattern with minimal seam lines – ie a darted dress with both front and back pieces cut on the fold – so as not to disturb the print of a very boldly designed fabric that I have in mind to sew next!
The fabric I used here was the best test so far because it too required careful pattern placement. You can see the first version I made here and I just realised I didn’t even get round to blogging the second so here is an actual shot, instead!
I was gifted the gorgeous batik fabric a few years back, by a lovely friend who had inherited it from her parents. When she saw it featured in my instagram post she was so happy to see it again and so pleased that it was being put to good use. I kinda felt duty bound as I remember her telling me that her parents used to travel for to Thailand and Indonesia quite a lot in the 60s and 70s for work and that they always returned with gorgeous authentic fabrics. Proper sentimental value and vintage, too!
This piece in particular is undoubtedly a hand-blocked batik. Though this is based purely on my own research and I could be wrong so please correct me if you think different.
It wasn’t very wide but I knew it would be perfect for the third trial of my shift dress, knowing I was very nearly there with the fit. I wouldn’t have risked it otherwise!
It’s such a fine quality cotton. Actually feels so natural against my skin, which is an odd thing to say but I have worn cotton before that doesn’t feel nearly as good. And it completely stood up to a stroll in 24° of Shepherds Bush sunshine today.
I was intrigued by the selvedge of this fabric. Why would it have just one edge of border decoration? I put out to the wonderful, ever obliging sewing community on Instagram and the very clever Meg from @cookinandcraftin suggested it was very likely to be used for a hemline and a centre front detail for a sarong when wrapped. I loved knowing this and was determined not to waste this detail so I set about cutting my pieces on the cross grain in order to make the best use of the design.
But I hit a snag and realised just in time that the cross grain had absolutely no give at all, and considering the style and fit, it could have been a disastrous move. So I cut on the long grain, as I have trialled twice before (if it ain’t broke and all that) and cut the border separately to seam along the hemline with a generous seam allowance which is overlocked and pressed down on the wrong side. It actually helps to add a bit of weight to the bottom of the dress too.
I made a few other tweaks to the pattern since version 2:
I widened the shoulder straps by 1cm having struggled to pull the dress through the facing during construction, as per the ‘burrito-method’! The fabric I am going to use for the next one is much thicker and I don’t want to risk damaging it or pulling out any stitches in the process.
There was still an element of pooling at the back (swayback issues as usual). And even though I added a quarter of an inch more at the hips since last time – with some improvement – it didn’t seem to solve the issue as much as I’d like.
Then, just this morning, I saw that Cortney from @s.is.for.sew on Insta detailed how she lengthened her back darts to resolve a similar issue. So I moved the bottom point of the diamond dart down 2.25″ and continued the widest part down longer before tapering off. It worked a bloody treat!
And so I do believe I’m ready to cut into that prize D&G fabric that I got from The Stitch Festival 2020 – only dilemma now being, how the hell do I choose my favourite placement of the design? I anticipate this being the longest part of the process!
Dolce and Gabbana fabric at M Rosenberg’s stall
Thank you as always to Daniel for these amazing shots down the alley of the Laundry Yard in Shepherds Bush, London. For anyone who knows, you’ll know what a brave move this was!
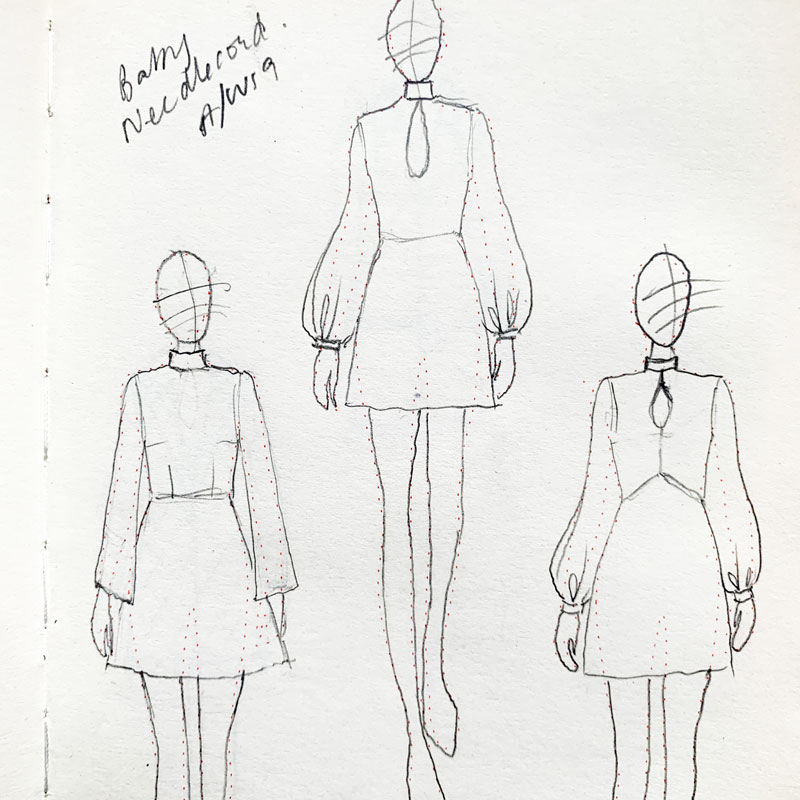
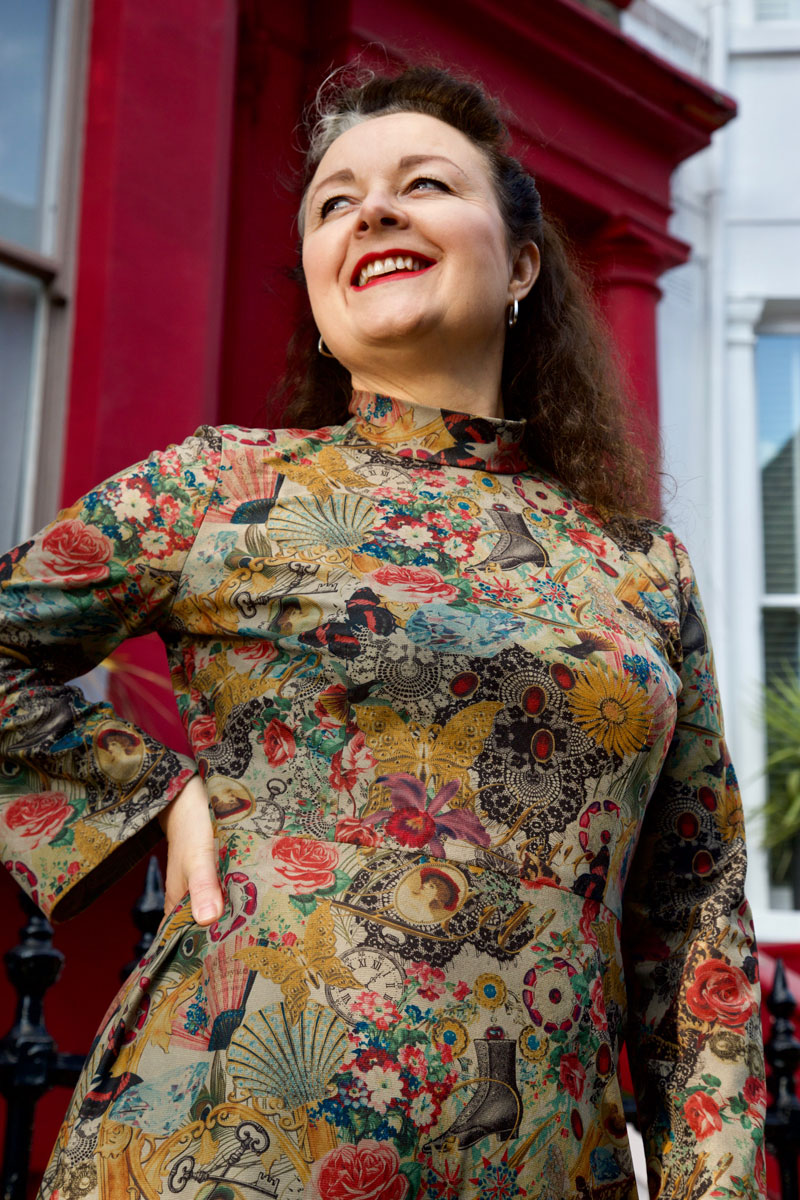
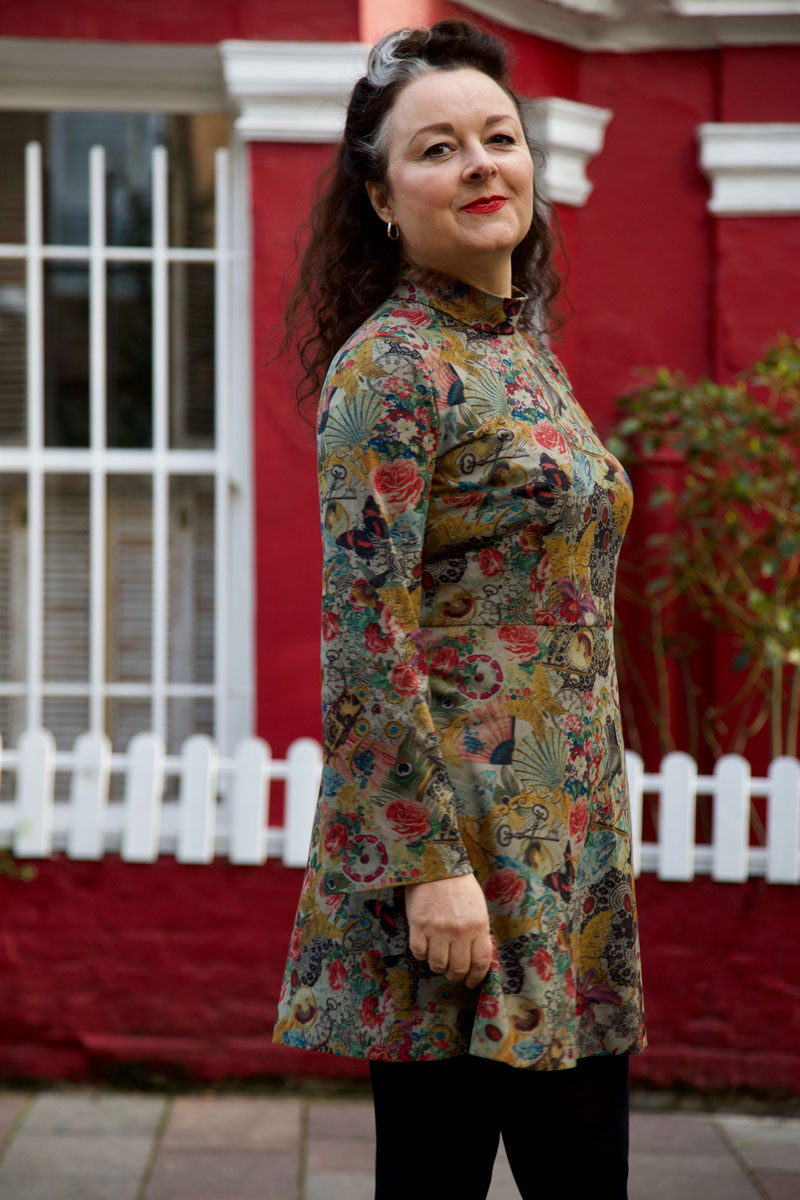
The thing I love most about sewing is the eternal learning curve. I will always be on a joyful journey of discovery because there is no chance I will ever learn it all in my lifetime but with every little milestone I reach I get a little buzz of excitement which propels me to the next level and this little dress is prime example of my progress.
It might not be the most ground-breaking, couture class garment you’ve ever seen but its mine, all mine – an ooobop original
I dreamt it, I drew it, I drafted it, I sewed it.
Love drawing the possibilites in my Fashionary sketchbook
For sure, I’ve sewed and drafted for other people but never as successfully for myself. I’ve been bouncing between lessons on Craftsy’s Blueprint and instructions from various pattern-making books but it transpires the reason it took me longer to fit myself was my own dishonesty. Denial of my actual measurements. Reluctance to accept the differing pattern shapes to the examples given. Even cheating my measurements knowing it would look better if I nipped in certain stats. Desperate. IKR!
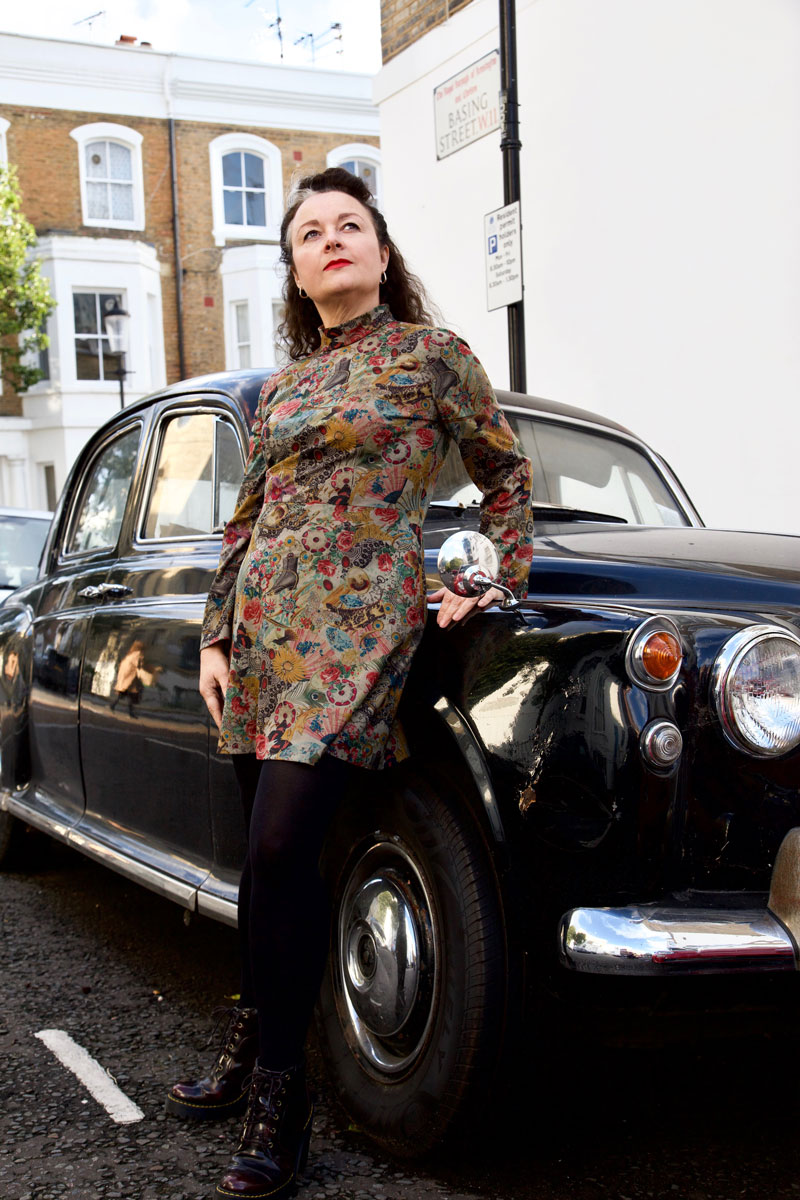
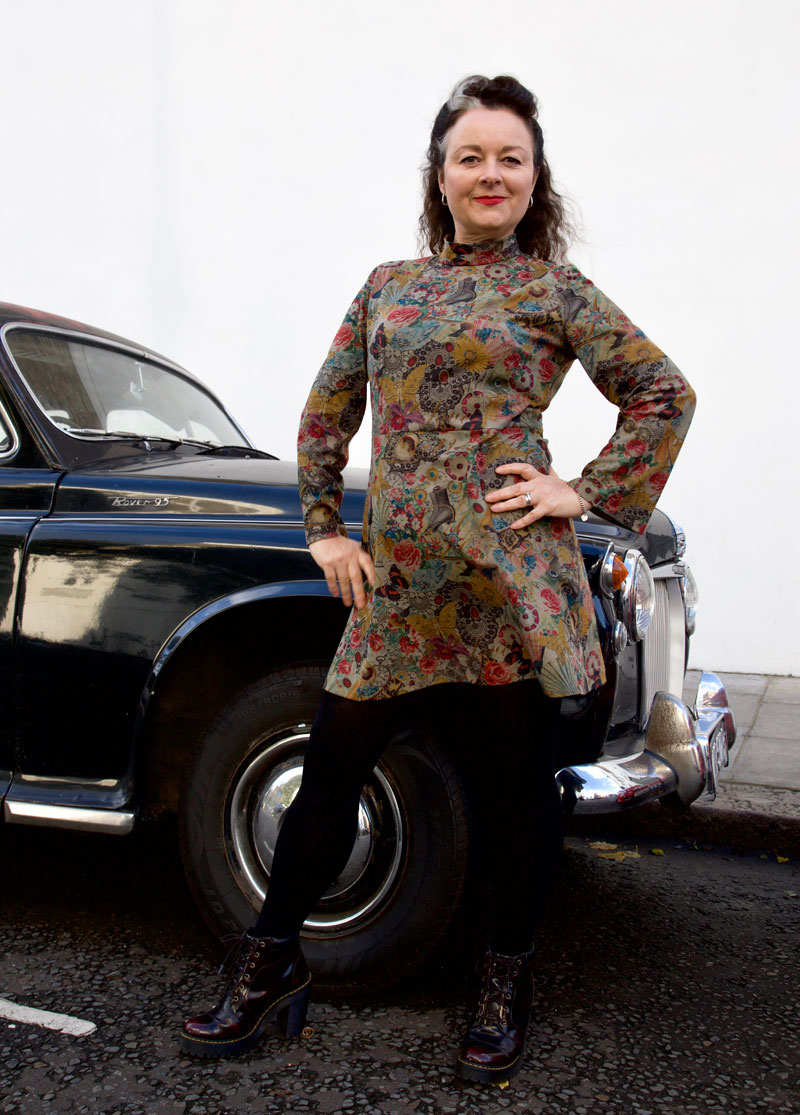
Striking a pose in Notting Hill
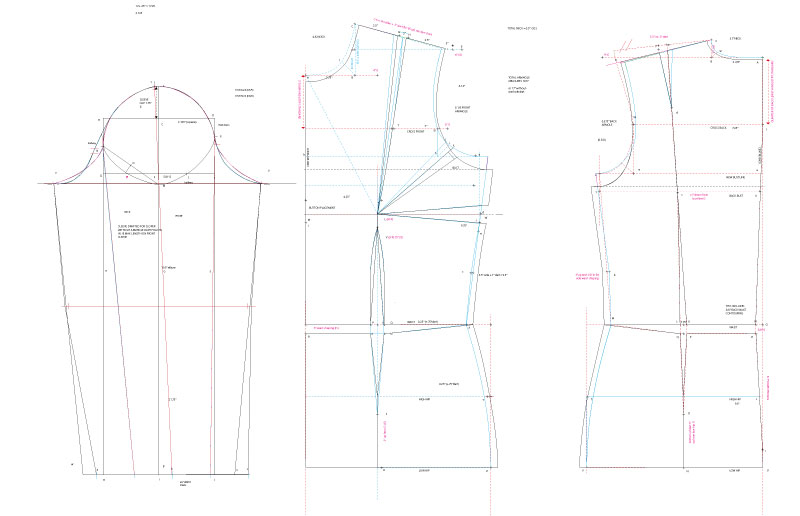
And it just goes to show that you can’t cheat at maths. On the fourth attempt at a moulage (a close fitting blue print from which one adds ease to create a master sloper ) it bloody worked! I was so happy . Literally danced around the room in nowt but a pair of pants and the moulage for a good half hour. And then it dawned on me all the possibilities.
Classic pose with a classic car
But first I had to add ease to create the sloper. Another milestone reached as I’m getting much quicker and more efficient at drafting in Adobe Illustrator. Luckily I use this programme for my job as a graphic designer and can justify the substantial Adobe Creative Suite subscription. But it makes it all the more satisfying that I am getting untold extra benefits from its use. My space is so limited at home and the prospect of getting out and putting away all the giant drafting materials is exhausting in itself, before I’ve even put pencil to paper. Drawing patterns using my laptop and being able to store them digitally thereafter is literally life changing, for me!
Sloper created using Adobe Illustrator
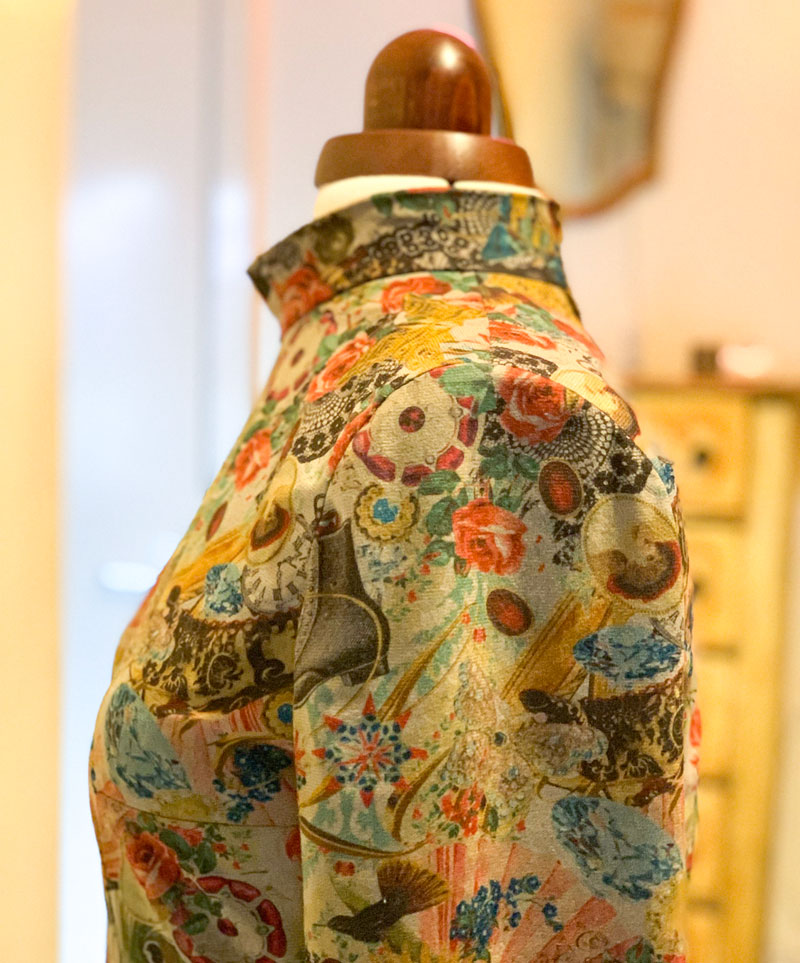
Once I’d drafted the sloper, the only other piece left to draft was the turtle-neck collar. That was a case of simply measuring the neckline and cutting a bias rectangle piece to that length and 6″ wide. It was sewn like a bias binding around the neckline. I left the back edges open to insert a zipper to the top of the neckline then folded the facing part of the collar to the inside and finished by hand.
I do love the simple silhouette of this dress
I had originally planned an extravagant bishop-style sleeve but I didn’t think I’d have enough fabric for such indulgence, so I settled on a slightly flared sleeve instead – slashing and spreading my sleeve sloper from wrist to sleeve cap.
And while on the subject of fabric, let me tell you how I came by such a perfectly suited piece. Every now and then I venture out on a little sewing people meet-up. One of my favourites is organised the London Stitchers Meet Up. The last one I attended was held at The Blue Boat in Fulham and involved a fabric swap. Such a great idea to downsize that stash and to swap a piece or two that might not have plan attached, for something that triggers an instant course of action. Interestingly enough I had no plans on bringing any fabric back home. I’m trying to use what I have and not buy/acquire anything new but the stars instantaneously aligned when glanced over Giorgia’s shoulder to see it sat wantingly in the corner. It was a beautifully soft baby needlecord (I think) with a vintage style montage print. I always maintain I’m more about texture than print but there are always exceptions to the rule. Thanks so much to Lauriane Loves Sewing for bringing it to the table. I do hope I’ve done it justice.
So why am I creating so much more work for myself when there are plenty nuff awesome patterns in the world? Each stage of sewing this dress confirmed what I good idea it was. The notches aligned perfectly. The bust darts hit where they were supposed to, the shoulders finished on my shoulder line. And I confess I stood and I stroked and I marvelled at how well they did, for quite some time. No puckers, nuffink.
Marvelling at the inset of my sleeve caps
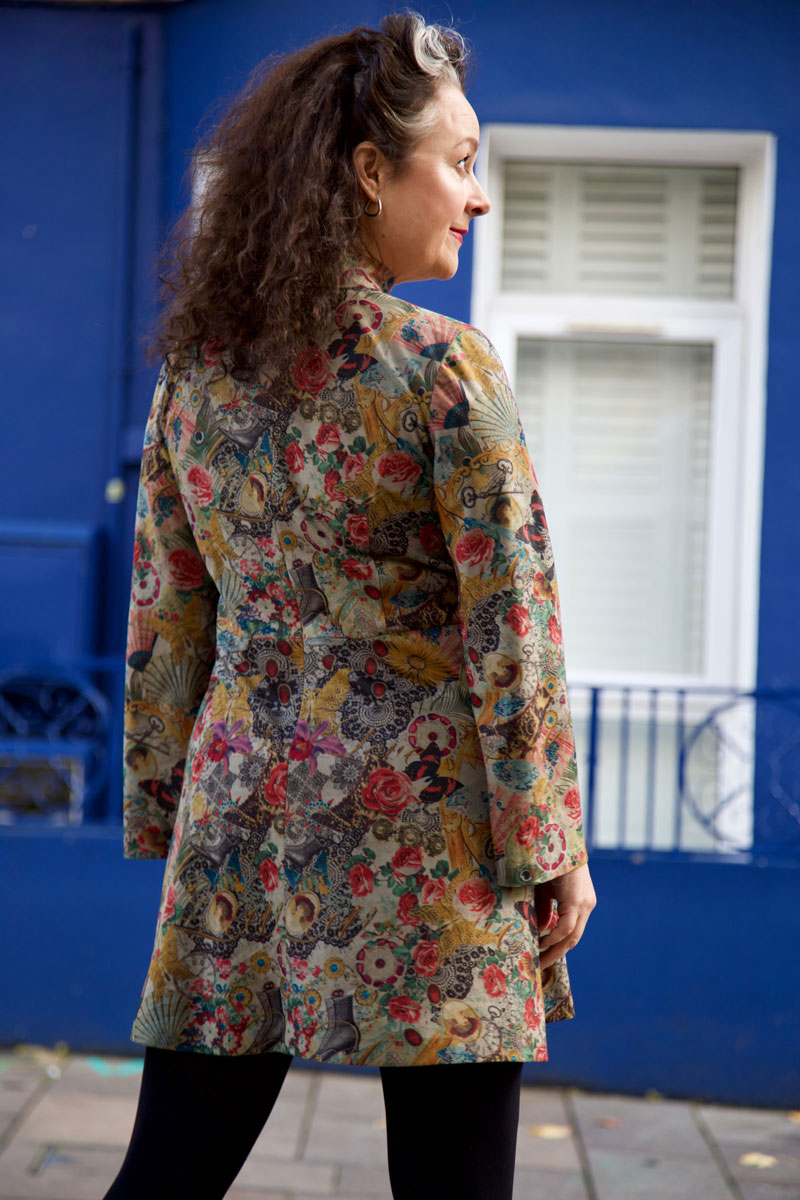
Add to that the waist sitting where it is meant to, no pooling in the small of my back and Bob is definitely my lobster! Gotta love it when an invisible zip becomes super evasive too!
Back view of dress with no pooling
Well I think that’s just enough of me blowing my own trumpet and time for me to big up the talents of my super lovely, supportive husband, Daniel. I’m always the first to run out of steam, just knowing there’ll be a hundred good shots even if I am pulling a stupid face in 50 percent of the contact sheet. But he always want’s just one more. And its always for good reason and I thank him from the bottom of my heart.
In response to ‘Just one More’!
And he’s available for booking. He loves an event. So good at capturing those off the cuff, journalistic poses. So if you have an upcoming event and in need of a trusty photographer please do check out his portfolio here or contact him at danieljamesphotographic@gmail.com.
Thanks for swinging by. Your readership and comments mean the world to me and add so much to my journey. Wishing you all a gloriously productive weekend. xxx