Vintage Simplicity 7527 and a fond farewell

simplicity 7527 1968 dress Bowie

That news announcement on Monday 11th January 2016 marked the beginning of another very sad week and another goodbye I totally wasn’t prepared for. My first true love, my ‘confidant’, my constant, my hero… my David Bowie.

I’ve always felt alone with my passion for this man but these last few days have seen everyone on my feed, saddened and some devastated as me. Just one of my friends dared to mock the fan hysteria with sarcasm but I’ve resisted the urge to argue and instead, silently felt sorry for him- (who-shall-not-be-named) in that he clearly didn’t experience the love as much as we all did.

David Bowie memorial Brixton

Since 13 years old, when I was accused of being a ‘weirdo’, not fitting into any of the usual cliques, I’ve hung onto his every word – after all, precious few wrote a song called Janine (He wasn’t very good at spelling ;-)) – I loved the fashions, going to most of his gigs: on shoulders of strangers, right at the front on the Serious Moonlight Tour 1983; watching him descend from the underbelly of a Glass Spider in 1987; and we even touched, albeit fingertips, at the Hanover Grand, 1997 when I won a pair of tickets from Capital Radio! I even went to the loo in his dressing room at the Royal Festival Hall 2002. Long story! There were others. And his inspiration is untold. But we never actually met. Something I was holding out for. But actually I’m not sure I could have kept my cool so it’s probably for the best that we didn’t.

simplicity 7527 1968 brixton

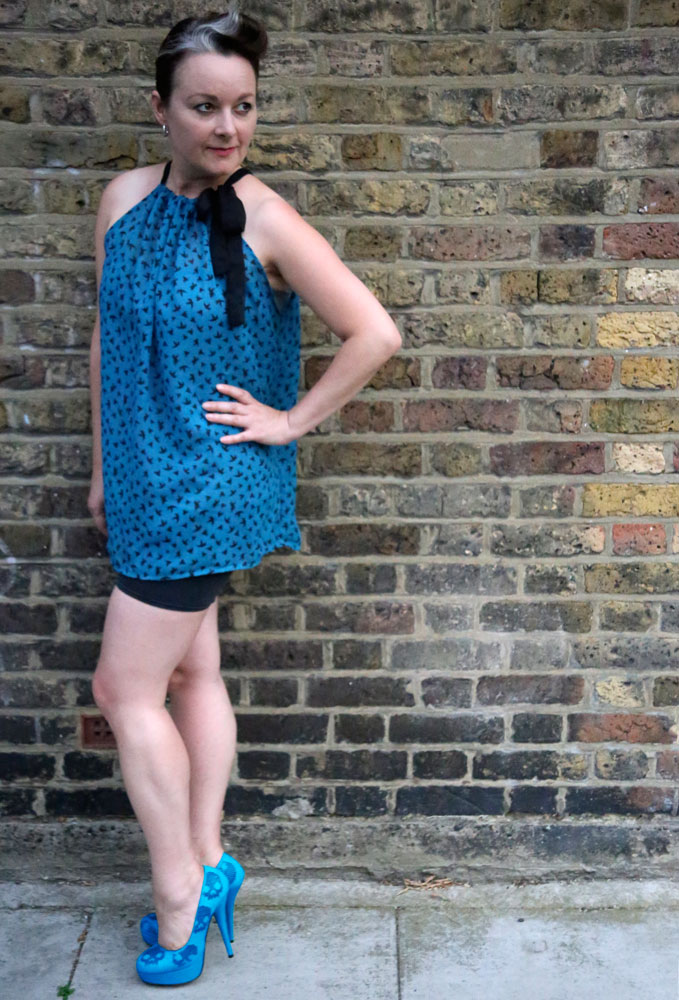
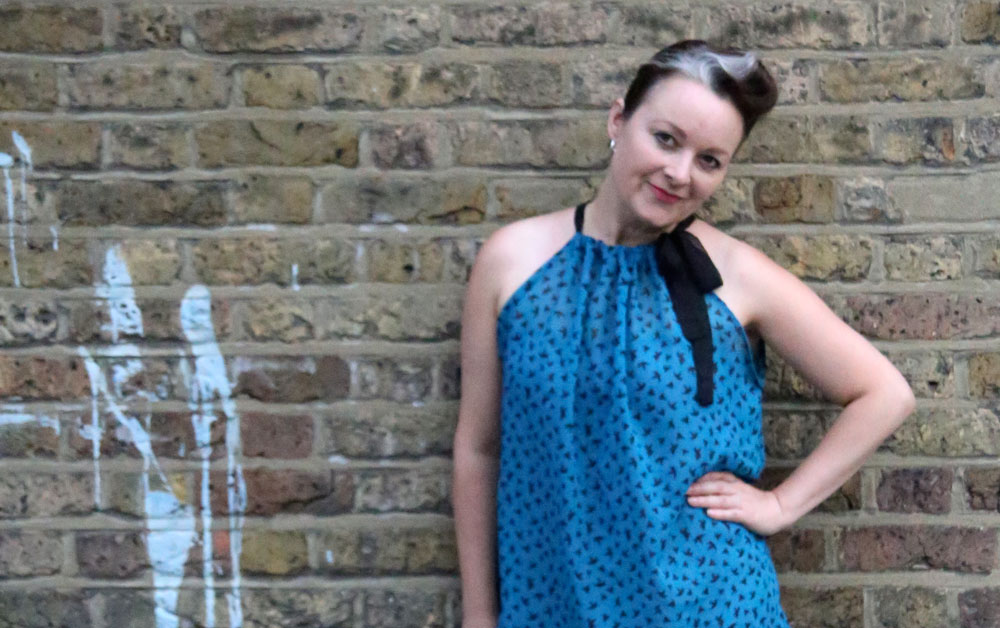
So when Mr O suggested Brixton, his birthplace, as a venue for my latest dress shoot it wasn’t questioned. Seemed wrong to pose in front of the memorial so we wandered off to the Village Market. Colder than a polar bear’s toes, it was. So we warmed up on some buckwheat galettes at Senzala Creperie. They were amazing – staff and food!

simplicity 7527 1968 dress

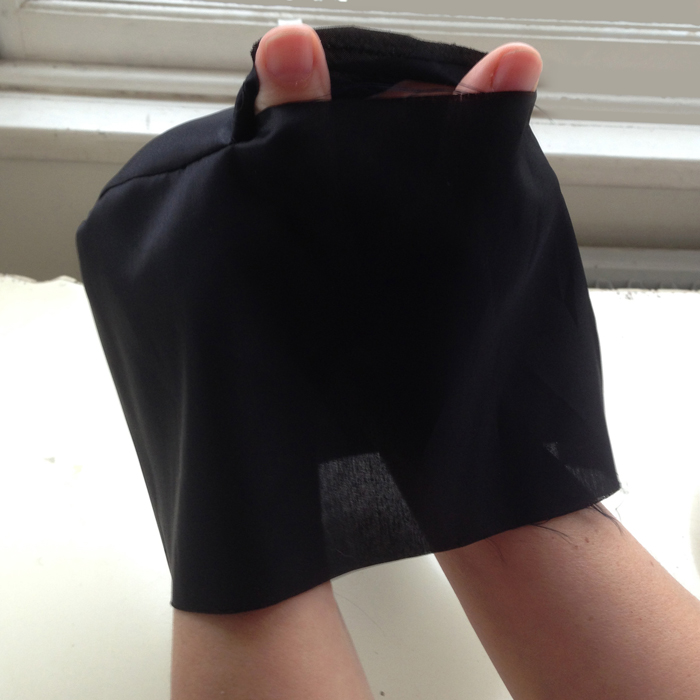
The dress is a vintage Simplicity pattern, no. 7527 from 1968. Another happy Ebay win about a year ago, if I remember rightly. It has been designed for wovens but I figured it would work just as well in a stretch jersey.

simplicity 7527 sewing pattern

Incidentally, this stretch jersey is black with red flecks and allegedly ex-Hobbs. I got it from Dalston Mill Fabrics in the Ridley Road Market, not really knowing then what it was going to be. But it was always going to be something!

simplicity 7527 1968 dress

I’m not sure of the content. But it is very, very stretchy and quite weighty. A burn test revealed a minute quantity of something natural, so I’m guessing a viscose blend as it does have a lovely smooth feel about it.

vintage simplicity 7527 1968 dress

I expected it to come up big, not only because the pattern size was bigger than my usual but because stretch fabric, well… it stretches! There was rather a lot to come off. Five inches to be precise, so I took it, rather dodgily from the sides and a little bit from the centre front and back seams. This is usually totally inadvisable but I was in a hurry and hey, it kinda worked! Wrists dutifully slapped, I’ve since noted how to grade it down properly  and will make another with proper adjustments next time.

vintage simplicity 7527 1968 dress

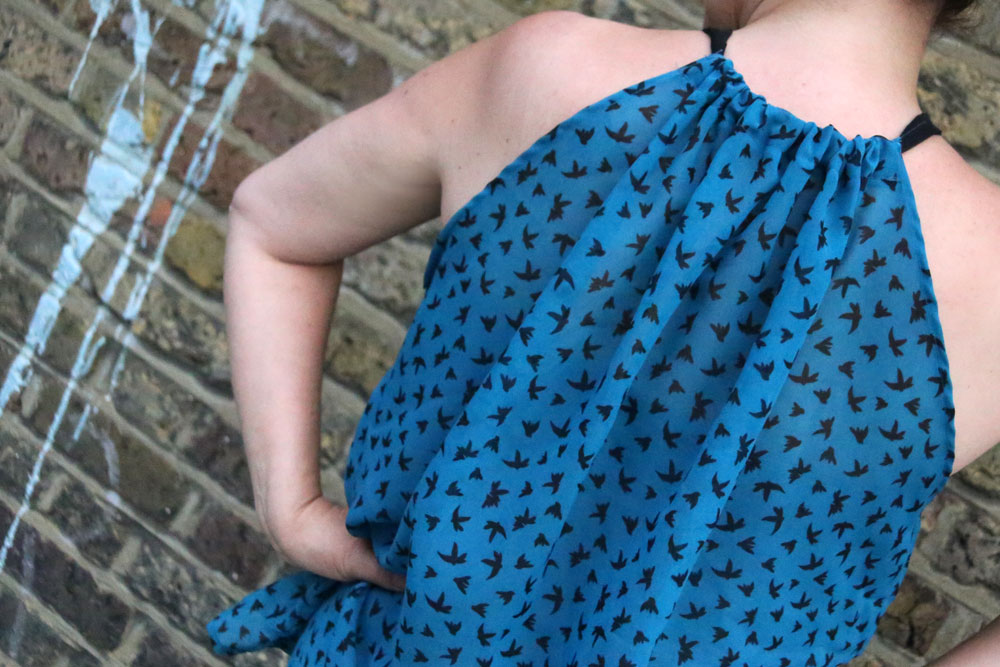
The best thing about making it in a stretch jersey is that it doesn’t need a closure. I made sure that the turtleneck did fit over my head before I sewed it for real. I tacked the whole thing with a long straight stitch before sewing with a shallow zigzag stitch on my ordinary machine, much the same as I did on my Agnes top. And then I finished the seams on my 3-thread overlocker.

vintage simplicity 7527 dress

I’m not kidding when I say this was a quick project. I cut it out on the Wednesday evening, sewed it on the Thursday evening after work, and wore it on the Friday to a funeral. Needs must when you find that you don’t own (or fit into) a single black dress! Doesn’t look really funeral appropriate in these photos but suffice to say, my goosebump-riddled arms were covered with a respectable jacket on the day.


Photography: Daniel Selway

Hat: Shepherds Bush Market
Shoes: Aldo 
Seamed tights: M&S


53-minute skirt for Red Nose Day

red skirt for red nose day

I’m just going to sneak in with a quick post about a speedy skirt I made last night.

Youngest dort announced on Wednesday evening that she needed a red skirt or some red leggings for Red Nose day on Friday.

“No problemo sweetipops,” I said. I happened to be working next to Westfield shopping centre on Thursday and I would have many a ladies clothes shop to bag an emergency red garment.

Famous last words. Would you believe that between five top ladies-wear shops, and one very large sports shop, there was not a red skirt or pair of leggings to be found. Has red gone out of fashion? There was pink, orange, coral and burgundy but not a glimpse of red in sight, save a few t-shirts!

I had already planned a night in with good chums and the Great British Sewing Bee final on Thursday after work. No way was I going to cancel that. There were ‘skanklets’ and everything!

Watching #GBSB final. #skanklette

A photo posted by Tilly Walnes (@tillybuttons) on

So I planned a speedy skirt on the way to Tilly’s and – fuelled by Prosecco and pizza and mini eggs – I raced back to my sewing table before the clock struck midnight. Proper little Cinders, me!

53 minutes later, in true Sewing Bee stylee, I’d made the pattern and stitched up a full circle skirt with an elasticated waist from some leftover red jersey. It scores nothing for couture but fulfilled the brief… and diverted a tantrum.

It’s going to take me a little longer to write and illustrate the tute but I’ll be back with one later, because I quite fancy one of these myself! Till then, have a wonderful weekend, all. Hope you get some quality sewing time in.

Make your own Zhivago-inspired fur hat: FREE pattern download

make your own fur hat free patternquick sewing projectHappy new year lovely followers!

I’m so delighted to share this pattern with you as my first post of 2015. It’s a timeless, vintage-style fur hat that will keep you warm and toasty in the most stylish way possible! And it’s a real quick project to sew up for that quick sewing fix when time isn’t on your side!

It really is so super easy to make. Just download and print out the FREE_fur_hat_pattern and follow these few simple instructions. The hardest thing about this hat will be to get your hands on some quality fur of the faux kind!

The pattern corresponds to my head size which is 22.5 inches or 57 cm.
You may need to adjust the pattern to personalise the fit.

You will need:

  • 1/4 m of faux fur (retailers will only usually sell you 1/2m at a time but its often worth an ask!)
  • 1/4 m of lining fabric (or find some scraps in your stash)
  • coordinating thread
  • a vacuum cleaner to hoover up all the fluff!

Instructions:

  • Make sure you print out your FREE_fur_hat_pattern at actual size, and check with the test square (on page 4 of the pdf) that it has printed correctly. Cut out and paste the sheets together to match the layout on page 1 of the pdf. Complete the hat band and crown sections as full pieces as instructed on the pattern then cut out.

NOTE: Before you pin the pattern to your fur fabric, think about what direction you prefer the fur to lie. On this particular hat I made, the pile strokes downwards on the band, from the top of the crown, down towards my eyebrows! On the top circular piece, it strokes from front to back. Incidentally, the centre back of the hat is where the band is seamed.

TIP: When cutting your fur pieces, cut on the reverse and just snip carefully through the backing fabric so as not to cut through to the actual fur on the right side. You will achieve a much better finish on the seams.

  • Pin the pattern to your fur pieces and cut out, paying heed to the tip above.
  • Pin and cut out your lining pieces. It doesn’t matter for the circular lining piece but make sure the band is cut on a straight grain to avoid stretching.
  • Take your fur band piece and fold in half, right sides together. Pin the short ends together, making sure the fur is tucked inside, and stitch using a 1.5 cm seam allowance following the direction of the fur.

seam fur band

TIP: When sewing fur fabric, Increase your stitch length a little so prevent thread tangling.

  • Finger-press the seam open and hold in place with a couple of tacking stitches top and bottom of seam.
  • Pin the fur circular crown piece to the hat band, making sure the fur is tucked in and checking the direction of the fur is correct. See note above. Sew the seam using a 1.5 cm seam allowance.
pin and stitch crown to band
Pin and stitch crown to band
  • Turn right side out. Using a long craft pin (a normal pin or needle will do) drag it along the seam allowance to free the fur that has got caught in the seam.
picked trapped fur from seam with pin
Pick trapped fur from seam with pin
  • Now take your lining piece for the band, pin the short edges together as above and stitch with a regular stitch length and a 1.5 cm seam allowance. Press seam open.
  • Stay stitch the circular lining piece within the seam allowance, to prevent stretching.
Stay-stitch circular lining piece
  • Pin the lining piece for the crown along one edge of the band and seam together, leaving a about 4 inches / 10cm open for turning.
leave opening in lining
Leave opening in lining
  • With right sides together pin the rims of the lining and the fur hat together. Effectively the fur hat will be sitting inside the lining. Pin together, matching the two centre back seams and stitch along the entire edge, securing the stitching, beginning and end.
Sew lining to outer fabric
Pin and sew lining to outer fabric
  • Turn the hat to the right side through the opening left in the lining, and you’re almost done!
Turn hat to the right side through this opening
  • Pin the lining opening together, tucking in the seam allowance, and slip-stitch closed. With matching thread, obvs!
Slip stitch the to close the opening in the lining
Slip stitch to close the opening in the lining. With matching thread obvs!

Now all that is left to do is to don your new fancy fur hat, step out in the snow and hum the theme tune to Doctor Zhivago!

Please shout if anything is unclear. I’d be delighted to hear how you get on.

Burda birdie drawstring top

blue bird drawstring top

I knew I’d make another one of these. I just needed another metre of fun chiffon and this little birdie print was perfect. All totally synthetic of course but I’m learning not to be such a fabric snob in my old age and hey… you can’t argue at £2.50 a metre!

I had a couple of issues with the last one I made, namely the size of the armholes. It transpires that this was partially due to the stretch in the other fabric because the alterations I made – namely ditching the side seam allowance and raising the underarm point by 1 inch – have made a larger difference than anticipated. But its all good and there will be no fashion faux pas when wearing this one!

blue bird drawstring top

Advisable to seam the sides with French seams. It gives a very satisfying finish but the instructions provided are otherwise very simple to follow.

Below is a pic of the back view as requested. Exactly the same as the front, in case you thought I might have the ability to rotate my head a whole 180 degrees! And you also get to see the print a bit better here too.

blue bird drawstring top back view

Actually. Maybe they’re not birdies. Maybe they are the little fluffy bits from a dandelion clock. Hey ho. Cute all the same!

Since my last post, the instructions for the pattern are free to download from Burdastyle here. It’s called the Summer Tank 05/2013. If you are not already a member I can assure you it’s worth the registration with this site. The gallery is constantly being updated with inspirational uploads from fellow sewists and there are plenty of other free pattern downlads available among the great ones you can purchase.

Thanks as always to Mr O for the great photography. He snapped these literally in seconds this evening. That birthday camera was worth its weight in gold! 😉