Portrait tote bag

personalised tote bag

What do you gift an incredibly lovely, clever, successful and well-travelled friend who doesn’t really care for ‘stuff’?

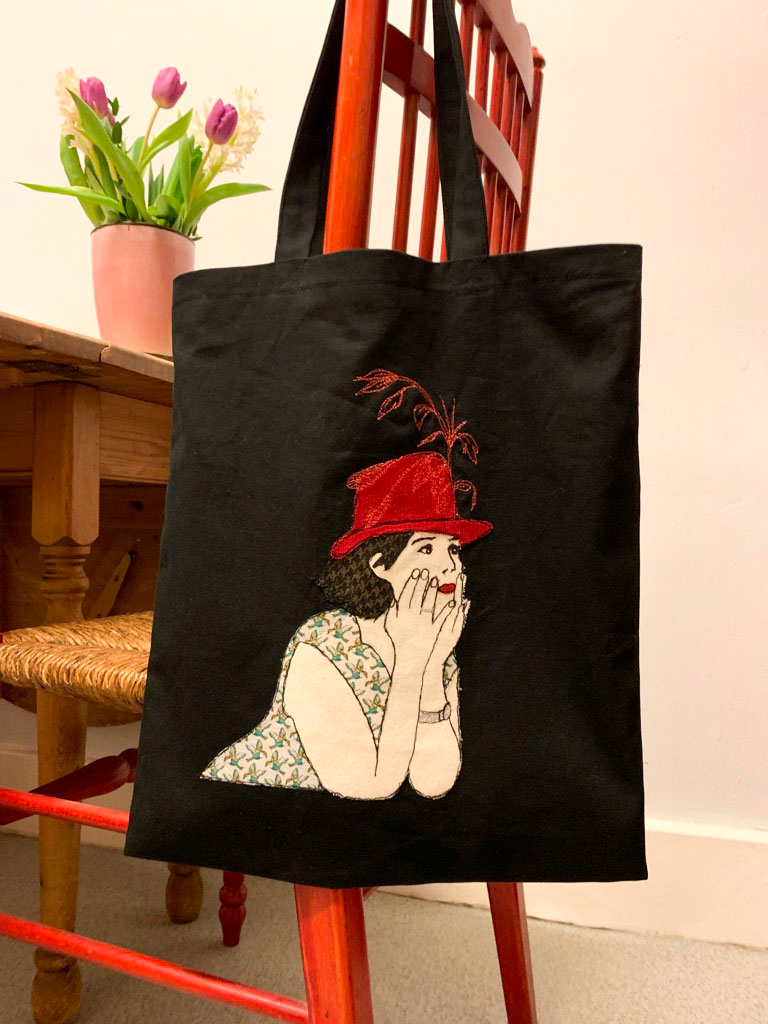
I didn’t know either but I figured something handmade and personalised would be the answer. So I set about creating a tote bag with an appliquéd portrait of the ‘birthday girl’ on the front.

To be fair I’m sure this bag still counts as ‘stuff’ but with a nod to usefulness at least!

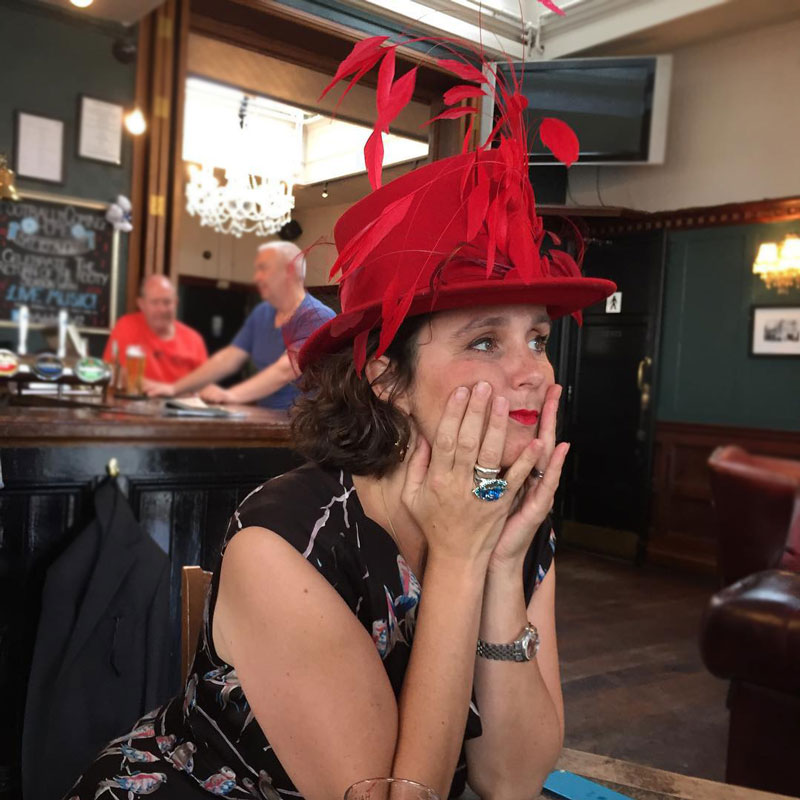
I took the photo of Katy at the pub where we met before we set off for the wedding of our mutual friends. She looked amazing in her gorgeous hat that was made by our amazing milliner friend, Jayne Hepsibah. And it seemed to me an all-round perfect pose for a stitched portrait.

portrait of Katy

This project has been on my reminder list for weeks. But (note to self) January is a ridiculously busy month in the world of children’s publishing and in my capacity as a freelancer this basically results in all work and absolutely no play. Read no sewing time at all!!

So, true to form, I started making it in the morning and had it ready for the party that evening!

It’s a pretty time-consuming but relatively simple process.

I enlarged the image to the correct size, on screen and then flipped it (so she was facing in the opposite direction) before printing out a copy on regular plain printer paper. I scribbled on the reverse with an HB pencil to create a carbon layer and then drew around the key areas of the image to leave a traced line onto the backing paper of some double-sided fusible webbing.

I cut around these pieces with extra allowance before ironing into the reverse of my selected fabric pieces. That way, when they were trimmed, each piece was as accurate as poss and the sticky bit reached to all the edges and points.

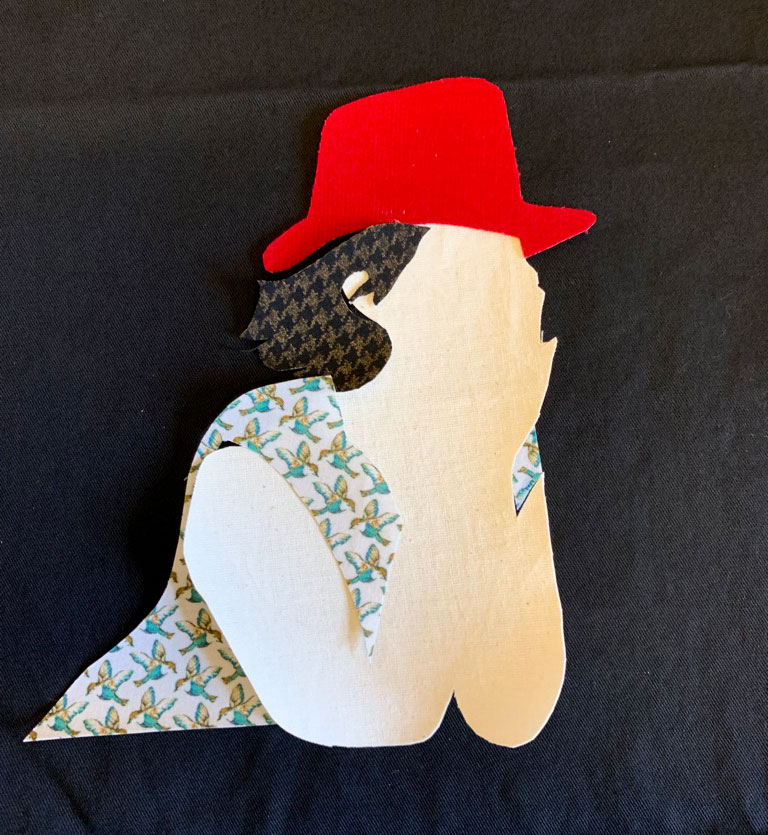
applique pieces arranged

Then I ironed them in position on the bag front piece  in order that there was a little overlap in places. It was so satisfying to see it come together at this point.

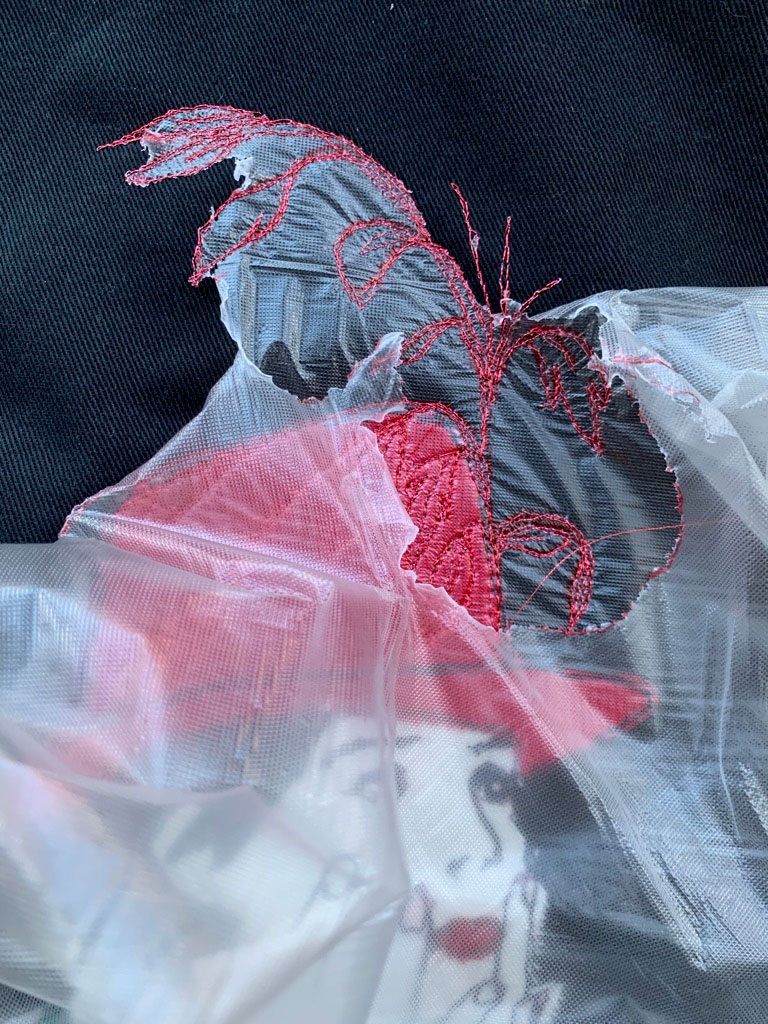
And then for the machine embroidery I used a regular black polyester thread. (Moon brand) with a white embroidery bobbin thread. I believe you can get it in black too but white seemed to work fine with no show-through. I also delighted in using some water-soluble stabiliser which is just amazing.

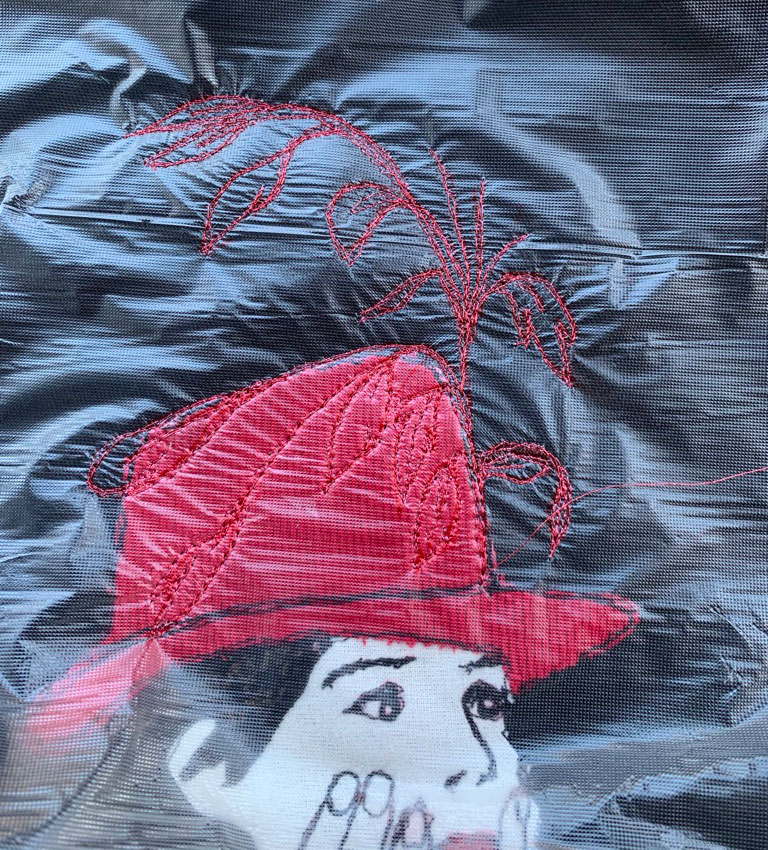
I used a Sharpie pen to draw the linework onto the stabiliser and then overlaid it onto the working area before sandwiching all into an embroidery hoop. Luckily my hoop just about fits under the presser foot so I could ‘draw’ all the finer detail using the freehand embroidery foot. Black thread  for the most part. And then silver metalic thread for the ring and watch, metallic red for the feathers. Worked a treat. No puckering. No skipped Stitches.

machine embroidery detail of feathers

Even more satisfying was the action of peeling away the stabiliser. The little remaining fragments are washed away with cold water. Like magic!

stabilizer peeled away

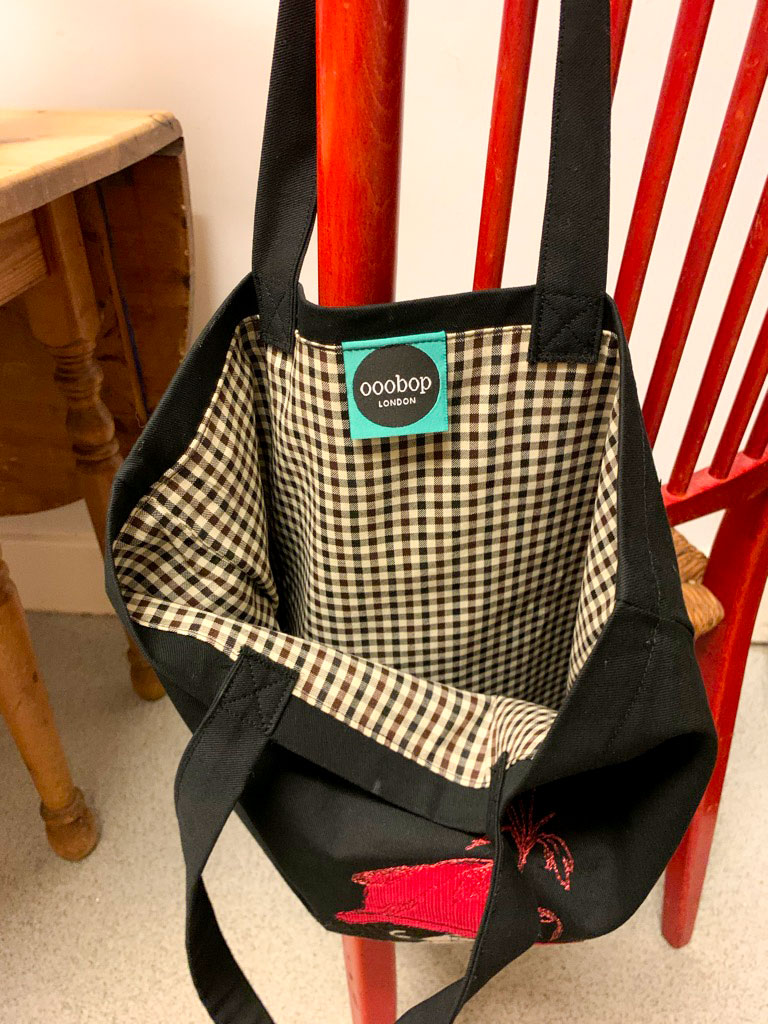
Once dried, I sewed up the bag using some black cotton twill from stash and included a gingham lining and an ooobop label of authenticity, of course!

inside of lined tote bag

I’m so pleased with the result. Not least of all because it documents  fond memory of a lovely day we spent together, but it includes some memories in the fabric, too:

The calico is from a toile of a favourite dress; the hat is leftover from the red corduroy dress I made for my granddaughter and the silk lips are from my memade 50th birthday dress. All small scraps I couldn’t bear to part with but that now have the best use!

I loved making this so so much. Guilt-ridden in fact, for the joy it’s given me in the process of creating and giving.  Add to that all the memories that bubbled to the surface along the way and you end up with a bag full of sentimentality.

Here’s to good friends, great parties and an eternal basket of spectacularly inspired sewing projects!

Other things I’ve created employing appliqué

Martini dress

Personalised bunting

More personalised bunting

Zipper pouch

Treasures for my Treasures

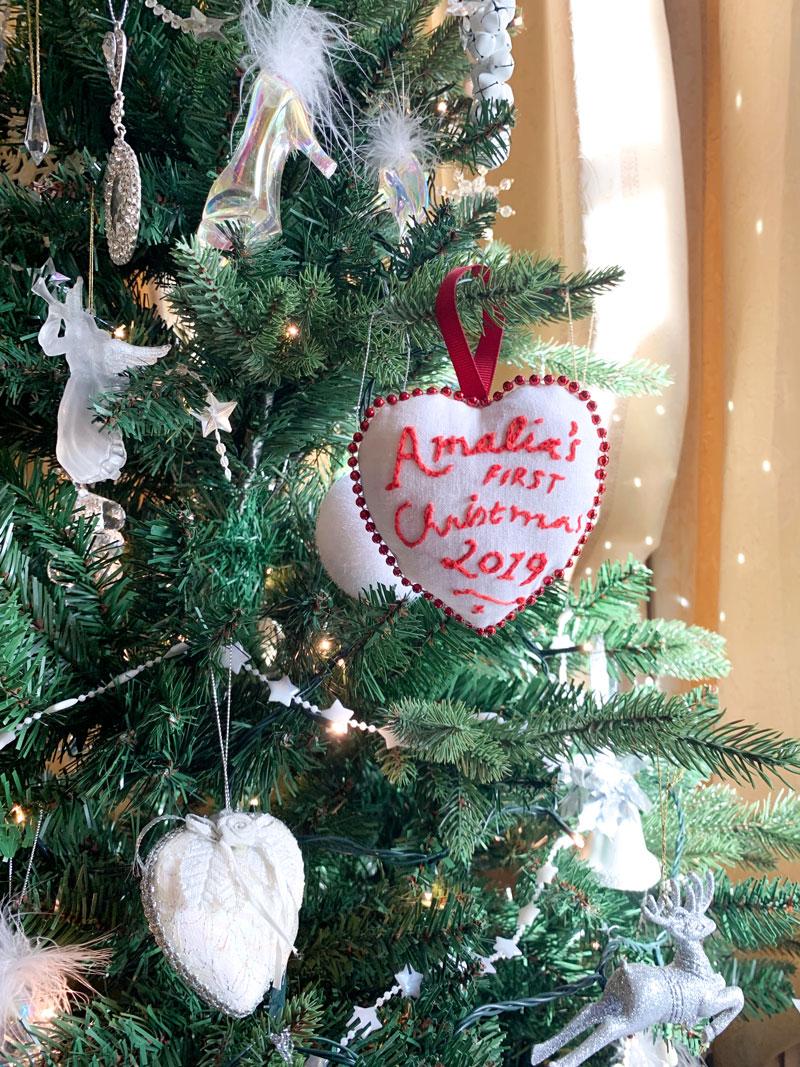
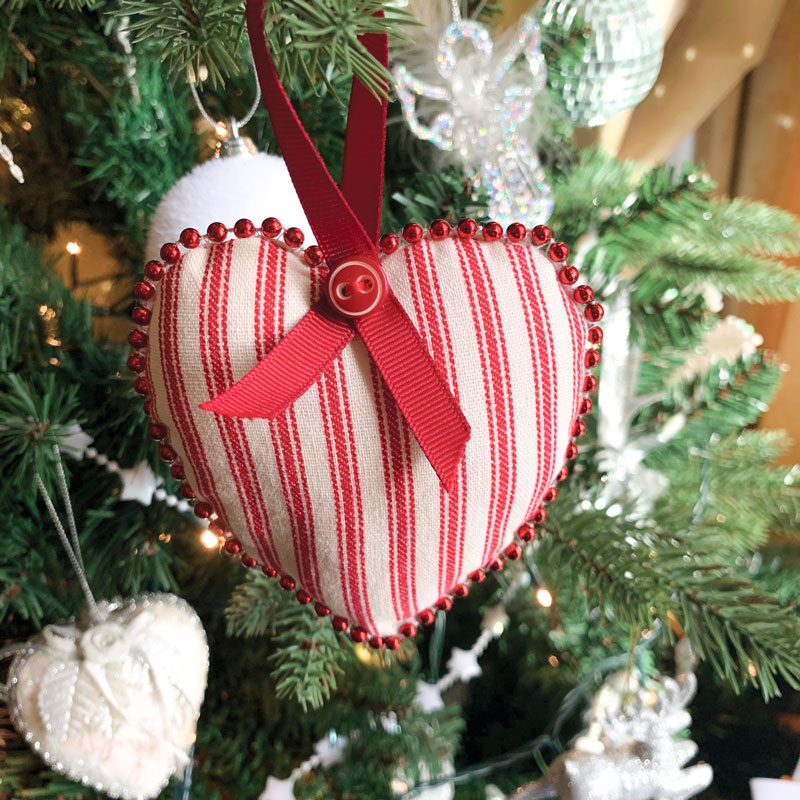
Amelias first tree decoration

In a few days time I’ll be wondering why on earth I didn’t make all my Christmas presents. All that joy that could have been had by hand-crafting beautifully personalised gifts for all my friends and family yet instead I chose to race around stinking hot, over perfumed shopping malls for expensive and ‘box-ticking’ presents. But as I sit, still with a work to-do list up to my ears, I’m currently fully aware why I didn’t quite get round to it!

I did at least manage to rustle up two little decorations for two of my favourite little people – my grandchildren!

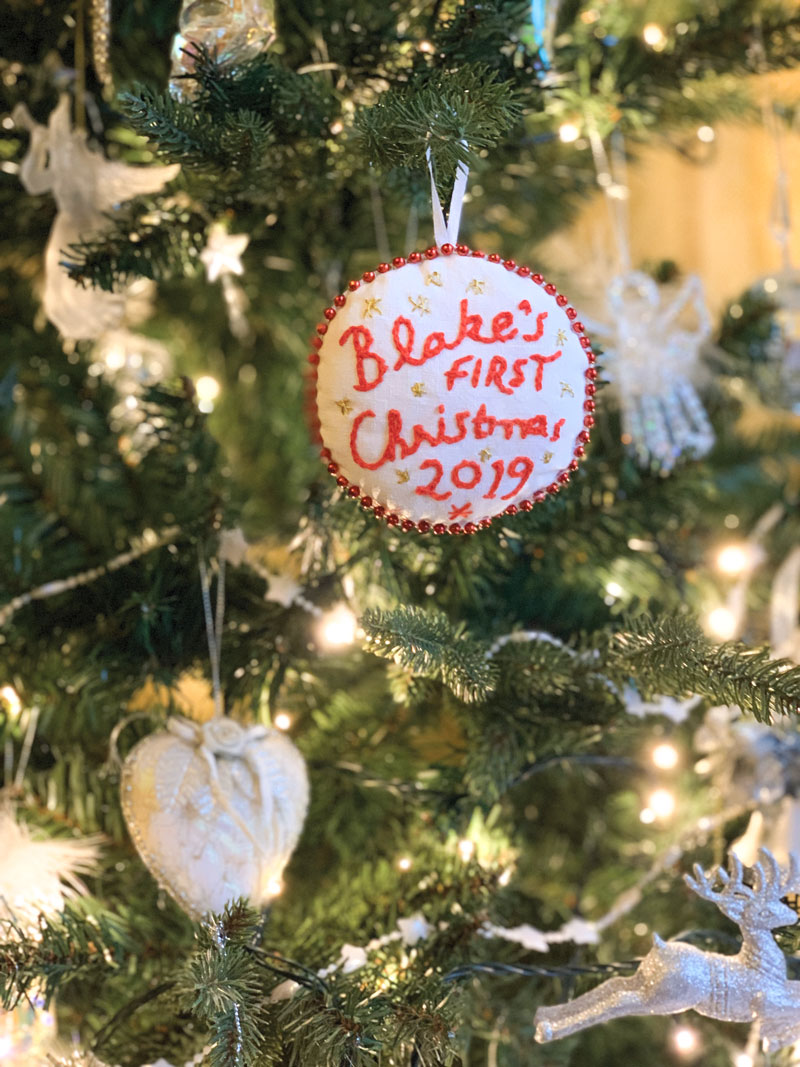
Blakes first christmas tree decoration

This is their first Christmas on planet earth and my first Christmas as a Nanna! And boy am I loving it!

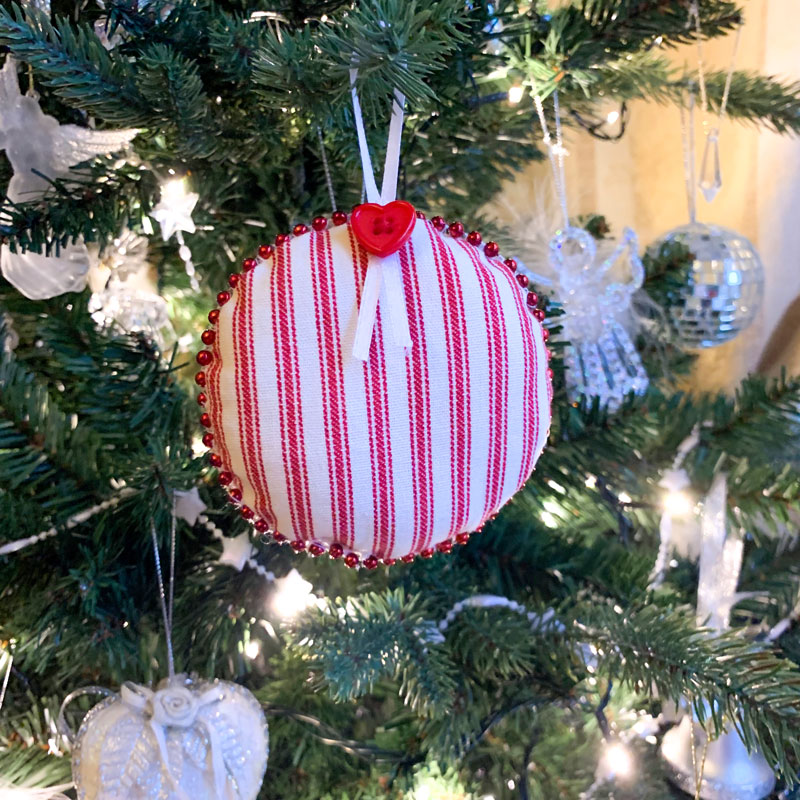
My Christmas tree is filled with decorations either gifted by others or that have been bought at Christmas Fayres in good company. And every year I dec the tree the memories all come flooding back. And I loved the thought that a personalised tree decoration might be a ritual of sorts or a cute keepsake at the very least for Amalia and Blake.

I’d love to report that I stuck to my sustainability guns for not buying new fabric and used leftovers instead. But that would be a complete lie. I couldn’t fight the the vision of lovely linen and festive …. ticking!  It just works, right?! I did reclaim some ribbon and rooted around the button tin for the perfect vintage buttons, though.

Amalia first Christmas memento reverse

And if you are interested in the process for these little decs …

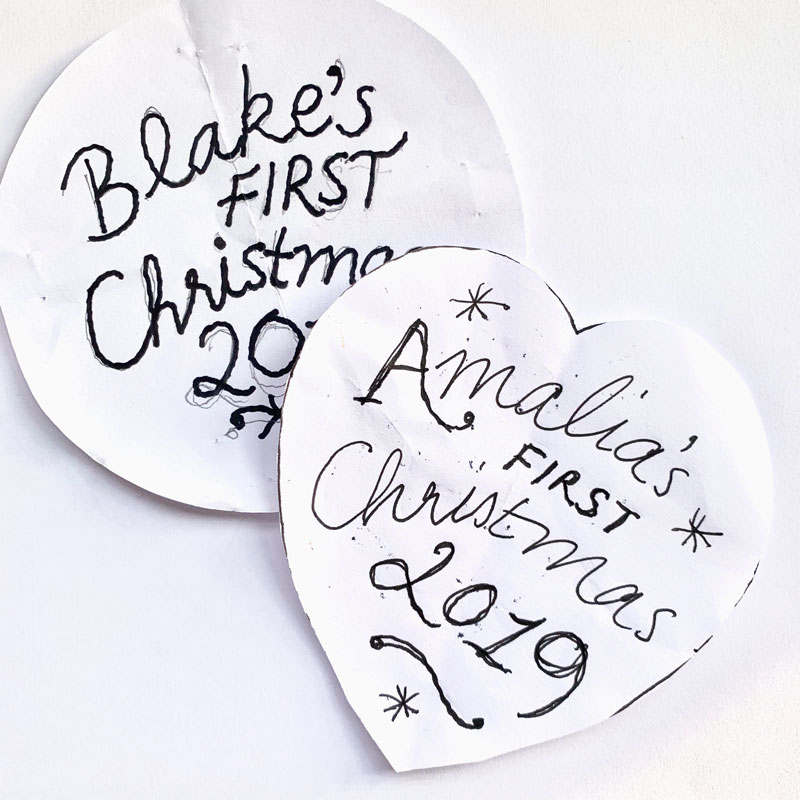
The lettering is my handwriting. I perfected it at first on paper within the confines of a heartshape for Amelia and a circle for Blake before tracing onto Solvy water soluble stabiliser. I love this stuff. It’s so much fun! There’s a link to buy this below but you could also use a transfer pencil if you had one to hand. That will wash away too. Anything that doesn’t leave a mark on the finished article.

template for lettering

I then placed the Solvy with the wording on top of the plain linen and then sandwiched them between the embroidery hoops, tightening enough so there is no movement but not too much to stretch the fabric. It just helps to achieve more even stitches and less puckers.

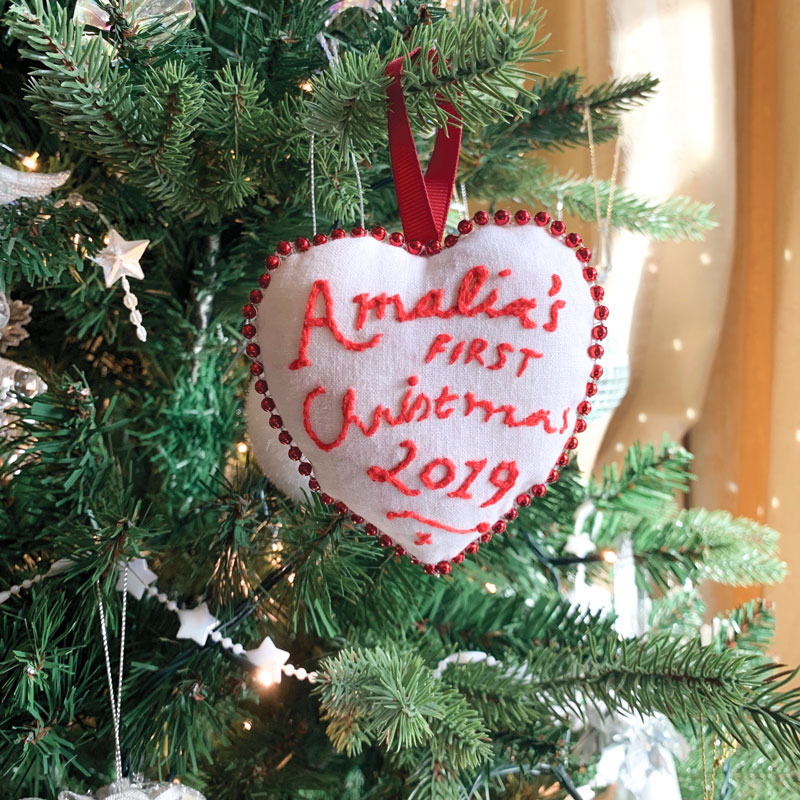
Mostly I used a chainstitch and stem stitches in places using 3 strands of red embroidery thread. Gold metalic embroidery thread for the stars on Blake’s one.

Front of Amalias tree decoration

Once the design was finished I washed away the stabiliser with cold water, patted dry with a tea-towel and finished the drying process by ironing.

My paper template then served as a pattern piece to centralise the design and cut the shape around the lettering allowing an extra quarter of an inch for seam allowance. I cut a matching piece for the reverse.

With right sides together I seamed all round, leaving a small gap for turning and clipped the seams for smoother curves.

Polyester toy filling was pushed into the seams before I steamed them for extra smoothness! One they were filled I slip-stitched the opening closed.

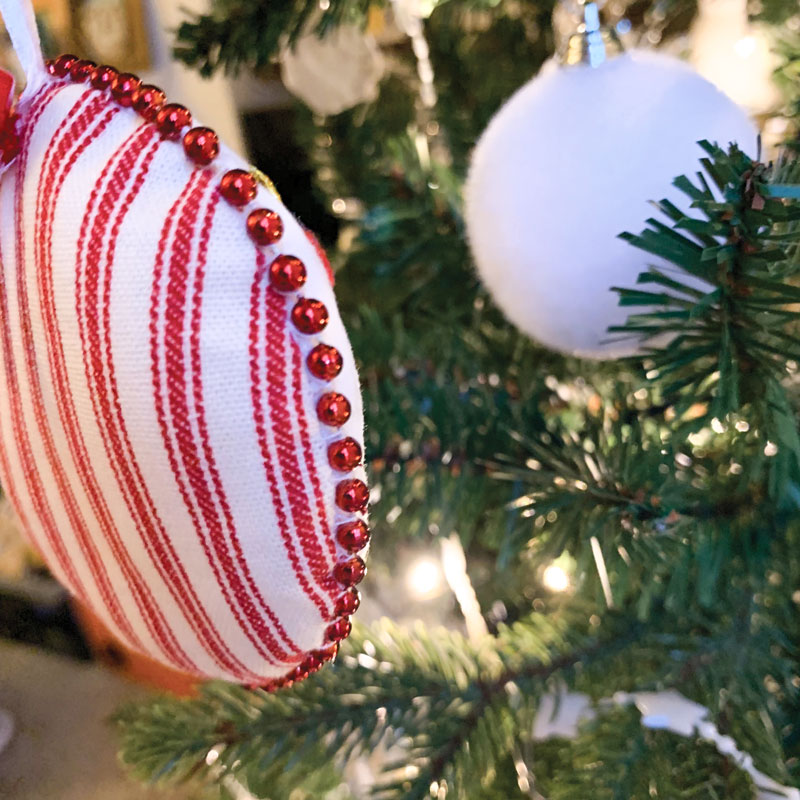
I found the red metallic beaded trim at Sarah’s Haberdashery stall in Shepherds Bush Market and I oversewed it along the seam line.

detail of the red metallic beading

Finally I used a length of ribbon for the loop and sewed it in position on the reverse, adding a little vintage button in both instances to cover the stitches.

I savoured every little wonky stitch of this project, as I reminisced at how much has happened this year. I’m so very proud of my children, and what they have become. And my heart is literally bursting with love for my ever increasing family (bffs included) and what they mean to me. I do hope my little treasures will cherish these as they grow older nearly as much as I’ve loved making them!

Reverse of circular decoration

So how did you all fare with making gifts this year? Or did you get caught up in the rat race like me? Let me know how you wrestle with your conscience and please give me tips how I can be more productive next year.

In the meantime I would like to thank each and every one of you for sticking with my sporadic posts. It means a lot to still have you reading them and I’m forever grateful for all your lovely comments and continuing support.

Wishing you all the very loveliest of Christmases and the bestest of New Years ever. See you on the other side!

Love Janene xxx

Materials mentioned (affiliate links):

Tools mentioned (affiliate links):

Personalised bunting

personalised bunting Maddie

When I’m busy at work, it’s so tricky to find sewing time or the energy sew when I get home! But it’s imperative that I fit some in at least, or I start to feel resentful about my day job and that’s a bit pointless because, hey… I need to pay the bills so I can at the very least keep a roof over my sewing table!

And so bunting was last week’s fix. One for baby Maddie and the other for her big brother, Charlie:

personalised_bunting_charlie

Bunting in itself isn’t very taxing to make: With right sides together, I sew the two diagonal sides of each triangle set, leaving the top edge open for turning; trim, turn right-sides out, and press. Once I have as many as I need, I pin and sew to a length of bias binding, allowing enough for ties at the ends.

But in order to personalise ones bunting it pays to have some double sided Bondaweb to hand. And do not sew the triangles together until you’ve appliquéd the letters.

I traced the individual letters from a printout onto the peel-off paper side of the Bondaweb – making sure the letters were first reversed. If you don’t do this the letters will read back to front!

I then ironed the tacky side to the reverse side of the fabric and cut out the letter shapes. You can then peel off the backing and iron the letter to the front side of the bunting to keep the letter shapes perfectly in position as you sew them on.

I happen to have a cool appliqué stitch on my sewing machine but a zigzag stitch is perfectly good enough. Just keep it nice and slow and pivot around any corners and curves.

personalised bunting applique

It’s also a good idea to tack the open top edges together before you pin and sew to the bias binding strip. Just keeps them nicely in position and stops any pesky puckers!

I find it strangely satisfying to have a pile of appliquéd bunting triangles on my table and admit to just sitting and admiring before I launch into attaching the bias binding!

personalised bunting for charlie

I just love browsing for fabrics that coordinate together. And if you happen to love them it makes sewing the bunting so much more satisfying. But it does make the giving-away part of it more difficult. Lucky it is personalised!

personalised bunting Maddie

So there you go. The joys of bunting. A mood-boosting, sewing fix of a lovely gift. What’s not to love?!

How do you cope when you are short on sewing time? Do you just accept the break or do you find smaller fixes too?

Make a PINsentry card reader case


Barclays PINsentry case

It’s one of those annoying but imperative things that live in the bottom of my handbag. Forced to live there because I need it, always: The PINsentry machine. But the trouble is, there’s all sorts of other stuff residing at the bottom of that bag too: bobby-pins, small coins, powder-puffs, crumbs… you get the picture. And these things are not conducive for a healthy device. It’ll get sick and at somepoint refuse to recognise my card at the most crucial time. Two previous ones have already met with their demise. In justified protest, no doubt.

So after all these years, I decided to do the honourable thing and replace the obligatory deflated bubble-wrap protector for something slightly more glamourous. And I have decided for the good of the nations PINsentry card readers to detail each step in the making so you can give yours a better future too.

Please note that this size fits the regular Barclays Bank PINsentry machine for other sizes you will need to adjust the template.

Materials:

  • 2 small pieces of fabric each measuring at least 320mm x 160mm
    (1 kind for the outer, 1 contrasting piece for the lining)
    I cut mine from Cath Kidston fat quarters
  • Small piece of wadding (final size: 212mm x 137mm)
  • Choice of closure: velcro, button or press stud
  • Matching thread

Step 1

Print out the template from the link here: PINsentry_machine_case_pattern (making sure you print it at actual size) and cut the following pieces from your fabric:
1 x case outer in main fabric
1 x case lining
1 x wadding piece
1 x flap outer in main fabric
1 x flap lining

pieces for pinsentry case

Step 2

With right sides together, sew flap pieces together with 1.5cm seam allowance, leaving the top edge open as shown in (A) below. Trim the edges close to the stitching (B).


Flap construction

Turn the right side out and press. Top-stitch a quarter inch from edge, all round, excluding top edge.

flap topstitched

Step 3

Position the flap with right sides facing to the outer fabric piece as shown below. The flap should sit 20mm in from the left side. Sew along the top, inside the seam allowance. About quarter inch from the top edge.

flap to outer

Step 4:

Now to make a ‘sandwich’ of all the pieces! Following the image below, first place the wadding on the bottom, then your outer case piece with the flap attached, and lastly your lining piece, face down on top.

Stitch all pieces together along the top edge as shown.

fabric sandwich


Fold back the lining piece  and give a good press.

top edge sewn

Trim the wadding so it doesn’t extend past the fabric edges. And also trim the wadding close to the stitching on the reverse seam as below, right.

trim the wadding

Step 5

Fold the assembled pieces over – right sides facing – to make one long tube with lining at one end and the wadding at the other as shown below.  Make sure the central seam matches:

fold over assembled pieces

Now stitch all round, leaving a gap to turn through in the bottom of the lining as shown by the black line below:

stitch all round

Trim seams all round, close to stitching but don’t trim the fabric above the opening (C).

Clip and then ‘box’ the corners of the end with the wadding, as show below (D). Just sew diagonally half a cm or so in from the point.

trim leave opening

Step 6

It’s getting exciting now! Turn through, give a light pressing and sew the open end of the lining closed. You can slip stitch by hand or just machine stitch over the end as no one will ever see inside!

turn through and close end

Push the lining inside the outer case and admire those box corners!

right side out

Step 7

All that’s left to do is to hand sew some velcro or closure of choice and snuggle your PINsentry machine safely inside.

velcro finish


Sure beats a dilapidated placcy bag!

PINsentry machine

Little things like this make me smile and this little thing is no exception. There’s something quite cleansing about stepping away from the larger projects (I’m looking at you, Boer War Jacket) to get a sewing hit from the smaller ones.

But don’t worry. I’m not ditching the bigger stuff. Oh no! Just procrastinating…. just a little! 😉


Make your own Zhivago-inspired fur hat: FREE pattern download

make your own fur hat free patternquick sewing projectHappy new year lovely followers!

I’m so delighted to share this pattern with you as my first post of 2015. It’s a timeless, vintage-style fur hat that will keep you warm and toasty in the most stylish way possible! And it’s a real quick project to sew up for that quick sewing fix when time isn’t on your side!

It really is so super easy to make. Just download and print out the FREE_fur_hat_pattern and follow these few simple instructions. The hardest thing about this hat will be to get your hands on some quality fur of the faux kind!

The pattern corresponds to my head size which is 22.5 inches or 57 cm.
You may need to adjust the pattern to personalise the fit.

You will need:

  • 1/4 m of faux fur (retailers will only usually sell you 1/2m at a time but its often worth an ask!)
  • 1/4 m of lining fabric (or find some scraps in your stash)
  • coordinating thread
  • a vacuum cleaner to hoover up all the fluff!

Instructions:

  • Make sure you print out your FREE_fur_hat_pattern at actual size, and check with the test square (on page 4 of the pdf) that it has printed correctly. Cut out and paste the sheets together to match the layout on page 1 of the pdf. Complete the hat band and crown sections as full pieces as instructed on the pattern then cut out.

NOTE: Before you pin the pattern to your fur fabric, think about what direction you prefer the fur to lie. On this particular hat I made, the pile strokes downwards on the band, from the top of the crown, down towards my eyebrows! On the top circular piece, it strokes from front to back. Incidentally, the centre back of the hat is where the band is seamed.

TIP: When cutting your fur pieces, cut on the reverse and just snip carefully through the backing fabric so as not to cut through to the actual fur on the right side. You will achieve a much better finish on the seams.

  • Pin the pattern to your fur pieces and cut out, paying heed to the tip above.
  • Pin and cut out your lining pieces. It doesn’t matter for the circular lining piece but make sure the band is cut on a straight grain to avoid stretching.
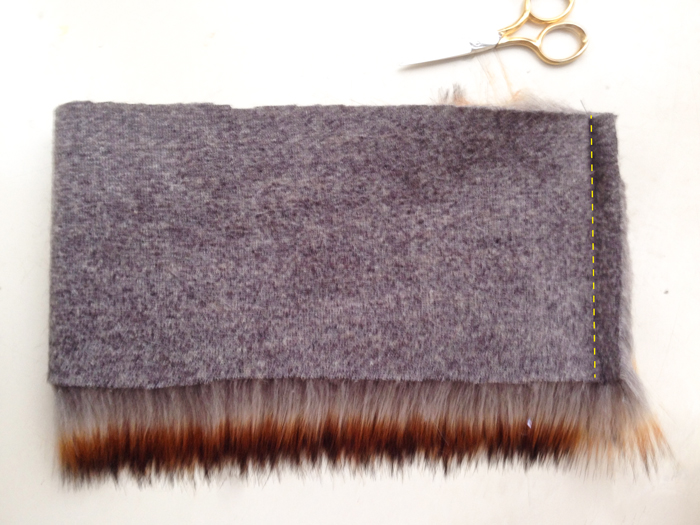
  • Take your fur band piece and fold in half, right sides together. Pin the short ends together, making sure the fur is tucked inside, and stitch using a 1.5 cm seam allowance following the direction of the fur.

seam fur band

TIP: When sewing fur fabric, Increase your stitch length a little so prevent thread tangling.

  • Finger-press the seam open and hold in place with a couple of tacking stitches top and bottom of seam.
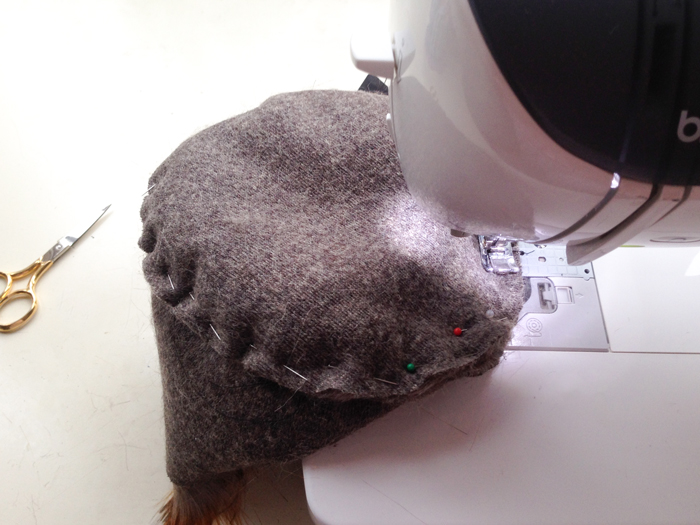
  • Pin the fur circular crown piece to the hat band, making sure the fur is tucked in and checking the direction of the fur is correct. See note above. Sew the seam using a 1.5 cm seam allowance.
pin and stitch crown to band
Pin and stitch crown to band
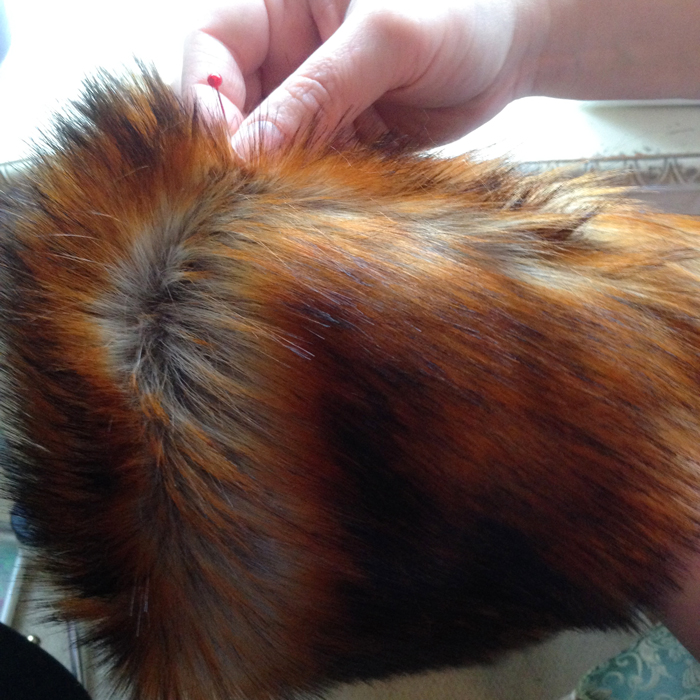
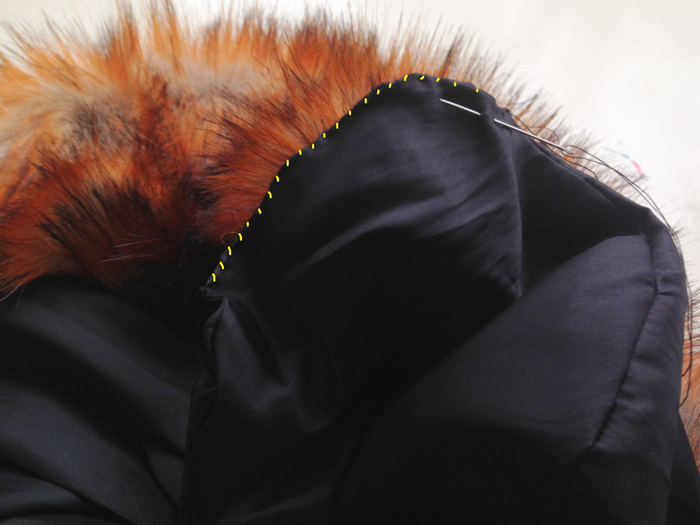
  • Turn right side out. Using a long craft pin (a normal pin or needle will do) drag it along the seam allowance to free the fur that has got caught in the seam.
picked trapped fur from seam with pin
Pick trapped fur from seam with pin
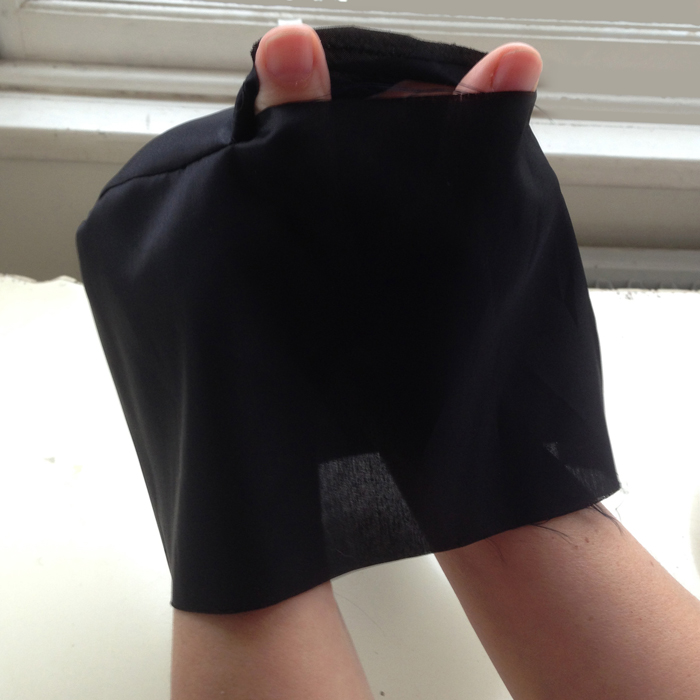
  • Now take your lining piece for the band, pin the short edges together as above and stitch with a regular stitch length and a 1.5 cm seam allowance. Press seam open.
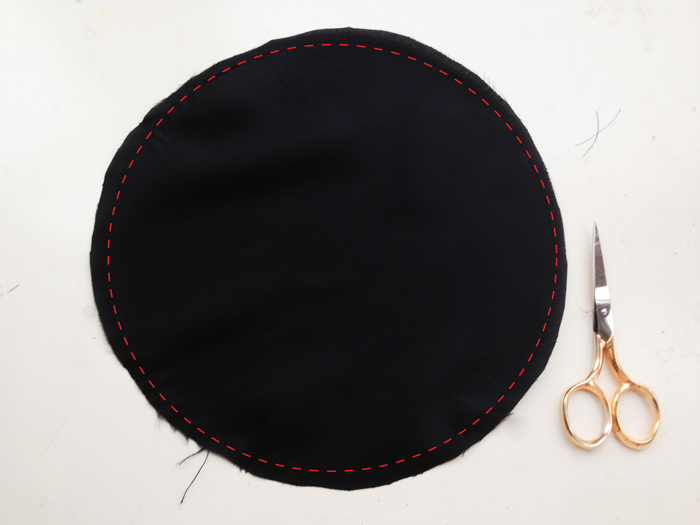
  • Stay stitch the circular lining piece within the seam allowance, to prevent stretching.
Stay-stitch circular lining piece
  • Pin the lining piece for the crown along one edge of the band and seam together, leaving a about 4 inches / 10cm open for turning.
leave opening in lining
Leave opening in lining
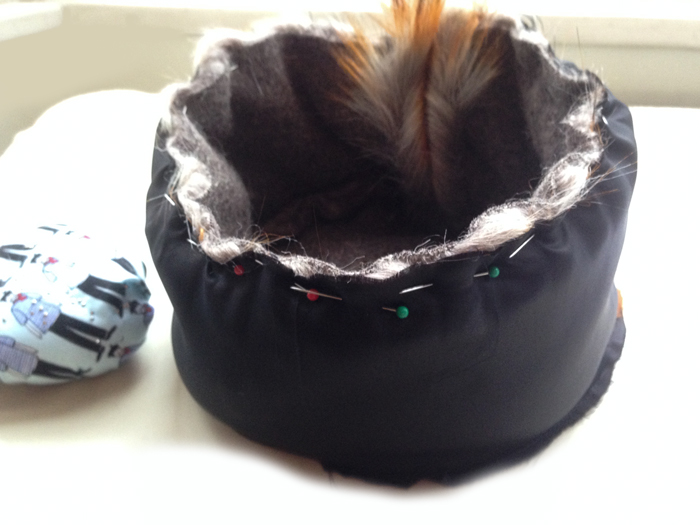
  • With right sides together pin the rims of the lining and the fur hat together. Effectively the fur hat will be sitting inside the lining. Pin together, matching the two centre back seams and stitch along the entire edge, securing the stitching, beginning and end.
Sew lining to outer fabric
Pin and sew lining to outer fabric
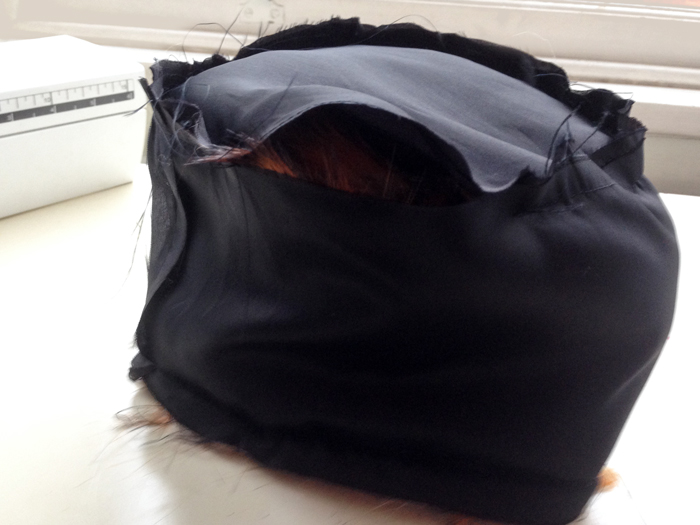
  • Turn the hat to the right side through the opening left in the lining, and you’re almost done!
Turn hat to the right side through this opening
  • Pin the lining opening together, tucking in the seam allowance, and slip-stitch closed. With matching thread, obvs!
Slip stitch the to close the opening in the lining
Slip stitch to close the opening in the lining. With matching thread obvs!

Now all that is left to do is to don your new fancy fur hat, step out in the snow and hum the theme tune to Doctor Zhivago!

Please shout if anything is unclear. I’d be delighted to hear how you get on.

Another hand made gift for Christmas

tilda rabbit in christmas tree

I’ve been toying with the idea of making everyone a hand made Christmas present, like forever! And I never get it together in time. But this year I made two!: The secret santa gold pleather bag for Emmie, and now this Linen Tilda rabbit for a special baby boy who’s name I can’t declare lest I give the surprise away!

I forgot how much fun these are to make. I made the last two so far back, the post has sadly gone missing. But here’s a picture of them at least:

Tilda rabbits

And here’s a link to the chicken I made from the same book which is called Crafting Springtime Gifts.

Crafting Springtime Gifts

I’d dutifully traced the patterns on to some cereal box card so I simply had to draw round the pieces on the linen, sew along the lines and then cut out with a small seam allowance.

I got a nice plump bag of polyester toy stuffing from the market. It’s amazing how much you need for just one wee bunnie!

The eyes are drawn on with a laundry marker which is always a scary thing to do as it’s the last thing you do once its all sewn up. I was pre-planning a bunnie with shades just in case my hand shook to much and screwed up the eyes!

The nose is embroidered. I didn’t have any pink embroidery thread so I sewed with 4 regular pink threads and achieved the same. Little bit on the wonk but all part of the handmade charm!

tilda rabbit head shot

This time round I used pink satin for the inner ears. What child doesn’t like to feel a bit of ‘silky’ when they are nodding off to sleep?!

I also left the buttons off and replaced with some embroidered crosses on the straps instead. Don’t want to be the cause of a terrible choking incident!

tilda rabbit profile

I have visions of this little fella being dragged around by one arm or leg in true old fashioned childlike stylee. And ending up pale and threadbare in his later years. That’s if baby approves and doesn’t banish him to the toy box forever!

I love sewing with linen and I love having the chance to employ a decorative stitch! Goodness knows why I only reserve it for toys though!

tilda rabbit decorative stitch

In other news. I’m thinking of making a new hat. Not sure I’ll get that done before Christmas though. That would be one massive miracle!

And that just leaves me to say, thank you so much for your continuing support and wonderful comments. Have a fabulous Christmas one and all, wishing you lots of love and good health for the coming year. xxx


Handmade Secret Santa pressies

gold bag on the railingsWhen I saw this bag in December’s Burda Style magazine, I just knew it was the one I’d been storing in my head for over a year! I’d seen a very similar 1940s Vogue pattern floating around on the web, time and again but never for sale, at least not with a reasonable sale ticket!

vogue bag hat pattern v9837
Source: http://vintagepatterns.wikia.com/wiki/Vogue_9837

I’d almost resigned to self-draft my own but couldn’t quite get my head around the order of sewing. Didn’t really try hard enough tbh! But Burda saved the day yet again with another simple well-drafted design.

burda pouch bag
Source: Burda Style magazine December 2014

And so when I found out I was to make a Secret Santa pressie for the adorable vintage-wearing Emmie Ink Fairy, it was a given!

The instructions suggested leather, which I did originally go looking for. And believe it or not there is such a great colour choice as well in the Goldhawk Rd! But even after a good rummage, I couldn’t find a gold piece big enough to fit the pieces. I thought two pieces of gold lamb was a bit excessive and then gave up on leather altogether when I couldn’t remember if Emmie was a veggie/vegan. That might have gone down like a lead flipper!

As always it was A1 Fabrics that presented me with a better fabric solution: some lovely soft, gold ‘pleather’. Perfect!
It was an education to work with. A leather needle made light work but boy did we have a fight to press the stuff! Didn’t really think that through properly.

Gold pouch bag

Pleather is plastic, fundamentally, and will melt if it comes into direct contact with a hot iron. I’m not that daft. I did use some parchment paper as a pressing cloth. But it just boinged back the minute I stopped pressing. The heat was being retained and making it too pliable. So I grabbed the nearest ‘clapper’ I could find, in the shape of a heavy book, to slap down on the fabric once I lifted the iron off. It did the job in cooling down the fabric quicker and so holding the press a bit better. Not nearly as well as a woven fabric would have pressed but better than a poke in the eye for sure!

gold pouch bag

Burda’s instructions stopped at a facing but I wanted neater than that, so I made a lining to attach to the bottom of the facing, and of course included an ooobop label! Not such a secret now but I liked it as a finishing touch!

inside gold pouch bag

I stupidly didn’t get a picture of Emmie with it adorning her wrist but it didn’t look out of place with her beautiful pink sparkly dress.

We were at a lovely Christmassy do hosted by the BHL girls. So honoured to be part of the evening with so many wonderfully familiar faces.

We dined and beered at a local-to-me Polish restaurant called Patio. I seriously don’t know how those girls catered so brilliantly for over 30 of us with so many different menu choices. They were amazing.

And look what some gorgeous and not-so-secret Santa made for me!

quilted cup and saucer

I seriously couldn’t believe that someone could have made this quilted cup and saucer but when I realised it was the uber talented Rachel Pinheiro, it all made blinding sense!!

What’s not to love about the colours, the french men in their Breton tops, the moustaches and the candy stripes? Perfect to keep all my sewing notions from rolling around the table while I’m sewing and also for sticking pins and needles in as I go.

Earlier in the day I had been to a work Christmas lunch. Yes I know, 2 Christmas do’s in one day. And I was still standing! One of my secret-santa friends bought me this gorgeous sewing pattern. She is so bloody clever and so thoughtful! I can totally see myself in this dress already!

Vogue V2410 vintage dress pattern

I consider myself truly spoilt. Not just with do’s and gifts but with the plethora of amazing friends that bring me so much joy and make me laugh so much. That’s got to be the best part of any time of the year.

Have you made any gifts this year or is it all just too much?


Drawstring party bags

ethical drawstring party bag

This weekend my youngest daughter celebrated her 10th birthday with a stand-up paddle boarding session down at Brentford Lock. And oh my did they have fun! The weather was perfect… 25 degrees C for all ye of little faith!

For those of you who haven’t heard of this newish craze, one stands on a board, much like a surf board, and paddles down the river!

paddle boarders on pontoon

They started on their knees and were up on their feet in seconds. Took to it like ducks to water, they did!

So what has this got to do with sewing, or the price of fish, I hear you ask. Well. Let me tell you. This week has been so stupidly busy. More stupidly busy than ever with Mr O working away in Monte Carlo; my work as manic as ever and children with stuff going on! So busy that I forgot to get the party bags. And I’d scare you silly if I described the look I got when I picked up LMO from netball last Friday and admitted that I hadn’t managed to get hold of any.

Don’t panic I said. I have a plan I said.
Which is? she growled.
We’ll make them I said… with a furrow of an eyebrow.
What? All 15 of them?
Why the devil not I said with amazing confidence given my state of pure exhaustion!

So after dinner was done and the plates cleared. Out came the machine and the pinking shears. And a little cottage industry was born. I measured, cut and sewed. LMO pinked and pressed and took charge of threading the cord.

2 hours later, 15 cute little drawstring party bags, fashioned from a second hand John Lewis duvet cover, with cool aeroplane print to boot, stood at ease for a photoshoot!


Instant gratification.

ethical party bags

Now it could be argued that this task was well over the call of duty. That costed out they would have commanded a stupid price. And that a cheap bunch of paper party bags would have totally saved me the bother (Had I remembered to get them). But what I got in exchange for this tiny sewing project was 2 hours of precious one-on-one time with my daughter. Not to mention a cool stash-bust. That cover has been in my fabric box for eons. Oh, and not forgetting the Brownie points for the ethical factor!

I loved teaching her and she loved learning how. We laughed and we sewed and we made ‘the best eco-friendly party bags ever’. That in itself is priceless!

Full party bags


Brigitte (over)exposed!

brigitte scarf at the brackenbury

I may have missed the party (sorry Tilly) but that doesn’t mean I was going to miss out all of the Brigitte action, oh no!

This is my animal-print chiffon version of the Brigitte Scarf from Tilly and the Buttons‘ gorgeous book: Love At First Stitch. I was so honoured to be invited to the book launch and get me a signed copy. (Managed to make that bash, obvs!) Seriously, if you haven’t invested in this book yet then I whole-heartedly advise you to do so, tout de suite. The photography is amazing, its got real patterns at the back and it goes without saying that the designs are to-Tilly-beautiful! (soz)

brigitte_exposed_3

I’m trying desperately to grow my hair out a bit. It’s taking an age. So while it’s at that God-awful in-between stage, it makes perfect sense to adorn said mop with a beautiful distraction. Cue Brigitte!

brigitte scarf

If it’s good enough for Bardot it’s most certainly good enough for me!

It truly, only took a jiffy! I cut it out and whipped it up while I was waiting for dinner to cook. The suspicious among you, on Twitter… yes I’m looking at you, O Doubting Thomasina – Ms Seams Odd Louise…. suspected dinner was being cooked for me. A girl can only wish but must also remember to be grateful for small mercies when your boyf already has the compulsory skills of music, dance, shoe-shopping and of course… photography!

Brigitte over exposed image

I adore these shots Dan took today. He was practicing an over-exposed technique and I personally think he hit that nail right on the head. No pesky wrinkles or blemishes and lovely bright colours to boot. More o’ these please Mr O!


And the winner of the mystery giveaway is . . . !

Before I deliver the news that you’ve all been so patiently waiting for, I must first thank you all so much for your wonderful comments. So many kind and inspirational words. Blushworthy to say the least. And big thank you’s also for the newbies who recently subscribed. A big lovely Oooboppie welcome to you all! 🙂

Ok. Get on with it. I hear you say. Well I guess you should know what was in that mystery black box . . .
giveaway prizeHere it is, in all it’s mysteriousness! The contents of which include:

Burda Magazine, May 2014 issue
Handy service kit for sewing machines and overlockers
3m of novelty London print fabric
2m of polka dot turquoise fabric
3m of black lace
3 spools of Moon thread
3 different coloured pencil chalks

In order to get some fairness and squareness going on, I needed a trusty assistant. And I could think of noone better than Little Miss Ooobop herself. She just got a new haircut so is looking extra cute too!
A little shake of the entries . . .
shaking the entries

A little blindfolded stirring of the entries . . .

blindfolded and stirring the entries

A winner is picked . . .

A winner is picked

And the winner is . . .

and the winner is

Congratulations lovely Simona from Sewing adventures in the attick
The goodies are all yours!

close up winner
I’ll Email you shortly to retrieve a delivery address and will deliver it post-haste!