
Not the most ground-breaking make but as usual, there is a continued method in my madness!
I have hundreds of really lovely vintage and modern dressmaking patterns and a serious desire to make and wear each one but every so often feel like I’m winging it too much. For sure I get there in the end and it looks great for the camera but as the maker, I know what secrets lie inside!
So I need to rehearse skills on basic garments such as this pencil skirt to improve technique and reassure myself that I am still improving!
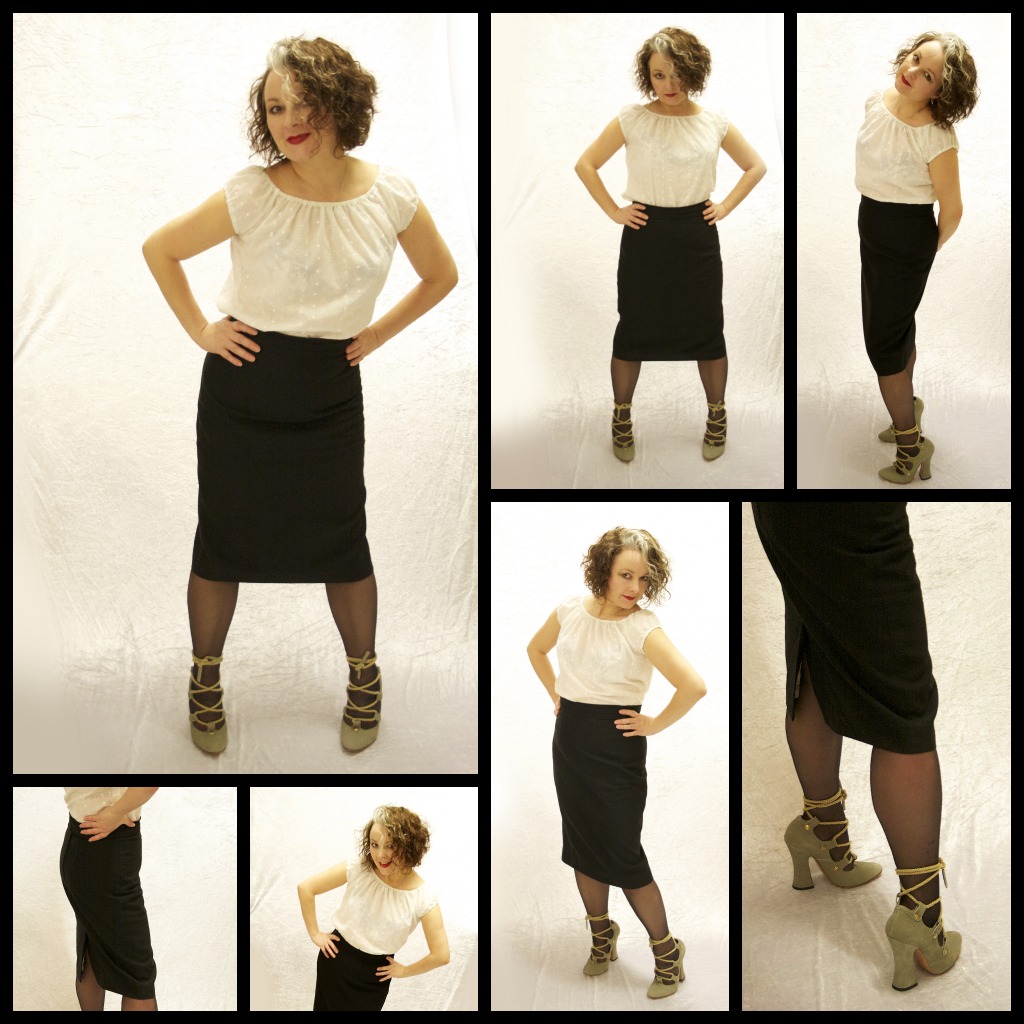
I really enjoy going back to the drawing board sometimes, quite literally! The pattern for this skirt is one I drafted back in August 2012. But I have made quite a few adjustments since then, which I really like, and I think make for a better fit.
- I moved the darts apart slightly on the front.
- I lengthened the skirt to below the knee (ooo get me and my bravery!)
- I tapered the skirt by about 2 inches either side for a more pencilled effect.
- I added a waistband.
- I included a PROPER vent including mitred corners!
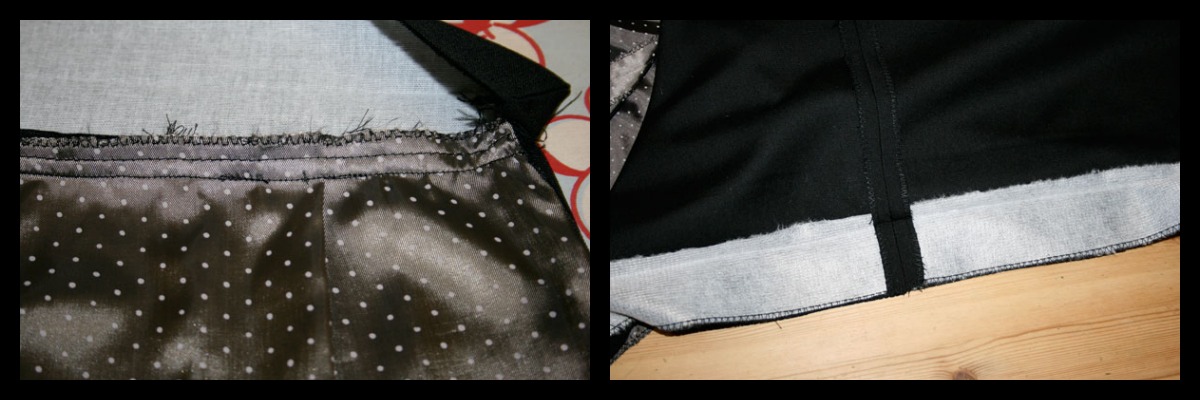
- I made a much better job of the lining and learned how to line the vent.
What I should also have included:
- a hand-picked zipper
- more overlap on the waistband to add a button along with the hook and bar.
On the subject of hook and bar, even that was a revelation. I first used hook and eyes thinking they would suffice. But they really didn’t! They kept coming undone it wouldn’t be too long before they bent out of shape. So I dutifully replaced them with a sew on hook and bar. It’s much better but even though I sewed it in from the edge of the overlap, it still shows, so I need to set it back a bit further.

Nearly didn’t make the effort to do a mitred corner on the vent, but jolly glad I did. Before hemming I sewed the lining, right sides together all the way down the vent edges. Before hemming the skirt outer fabric I carefully unpicked the thread using the eye end of a needle. I used that loose thread to sew invisible stitches to attach the remaining lining once I’d trimmed and hemmed it. Such a neat trick! (And a great excuse to show off my mitred corner!)
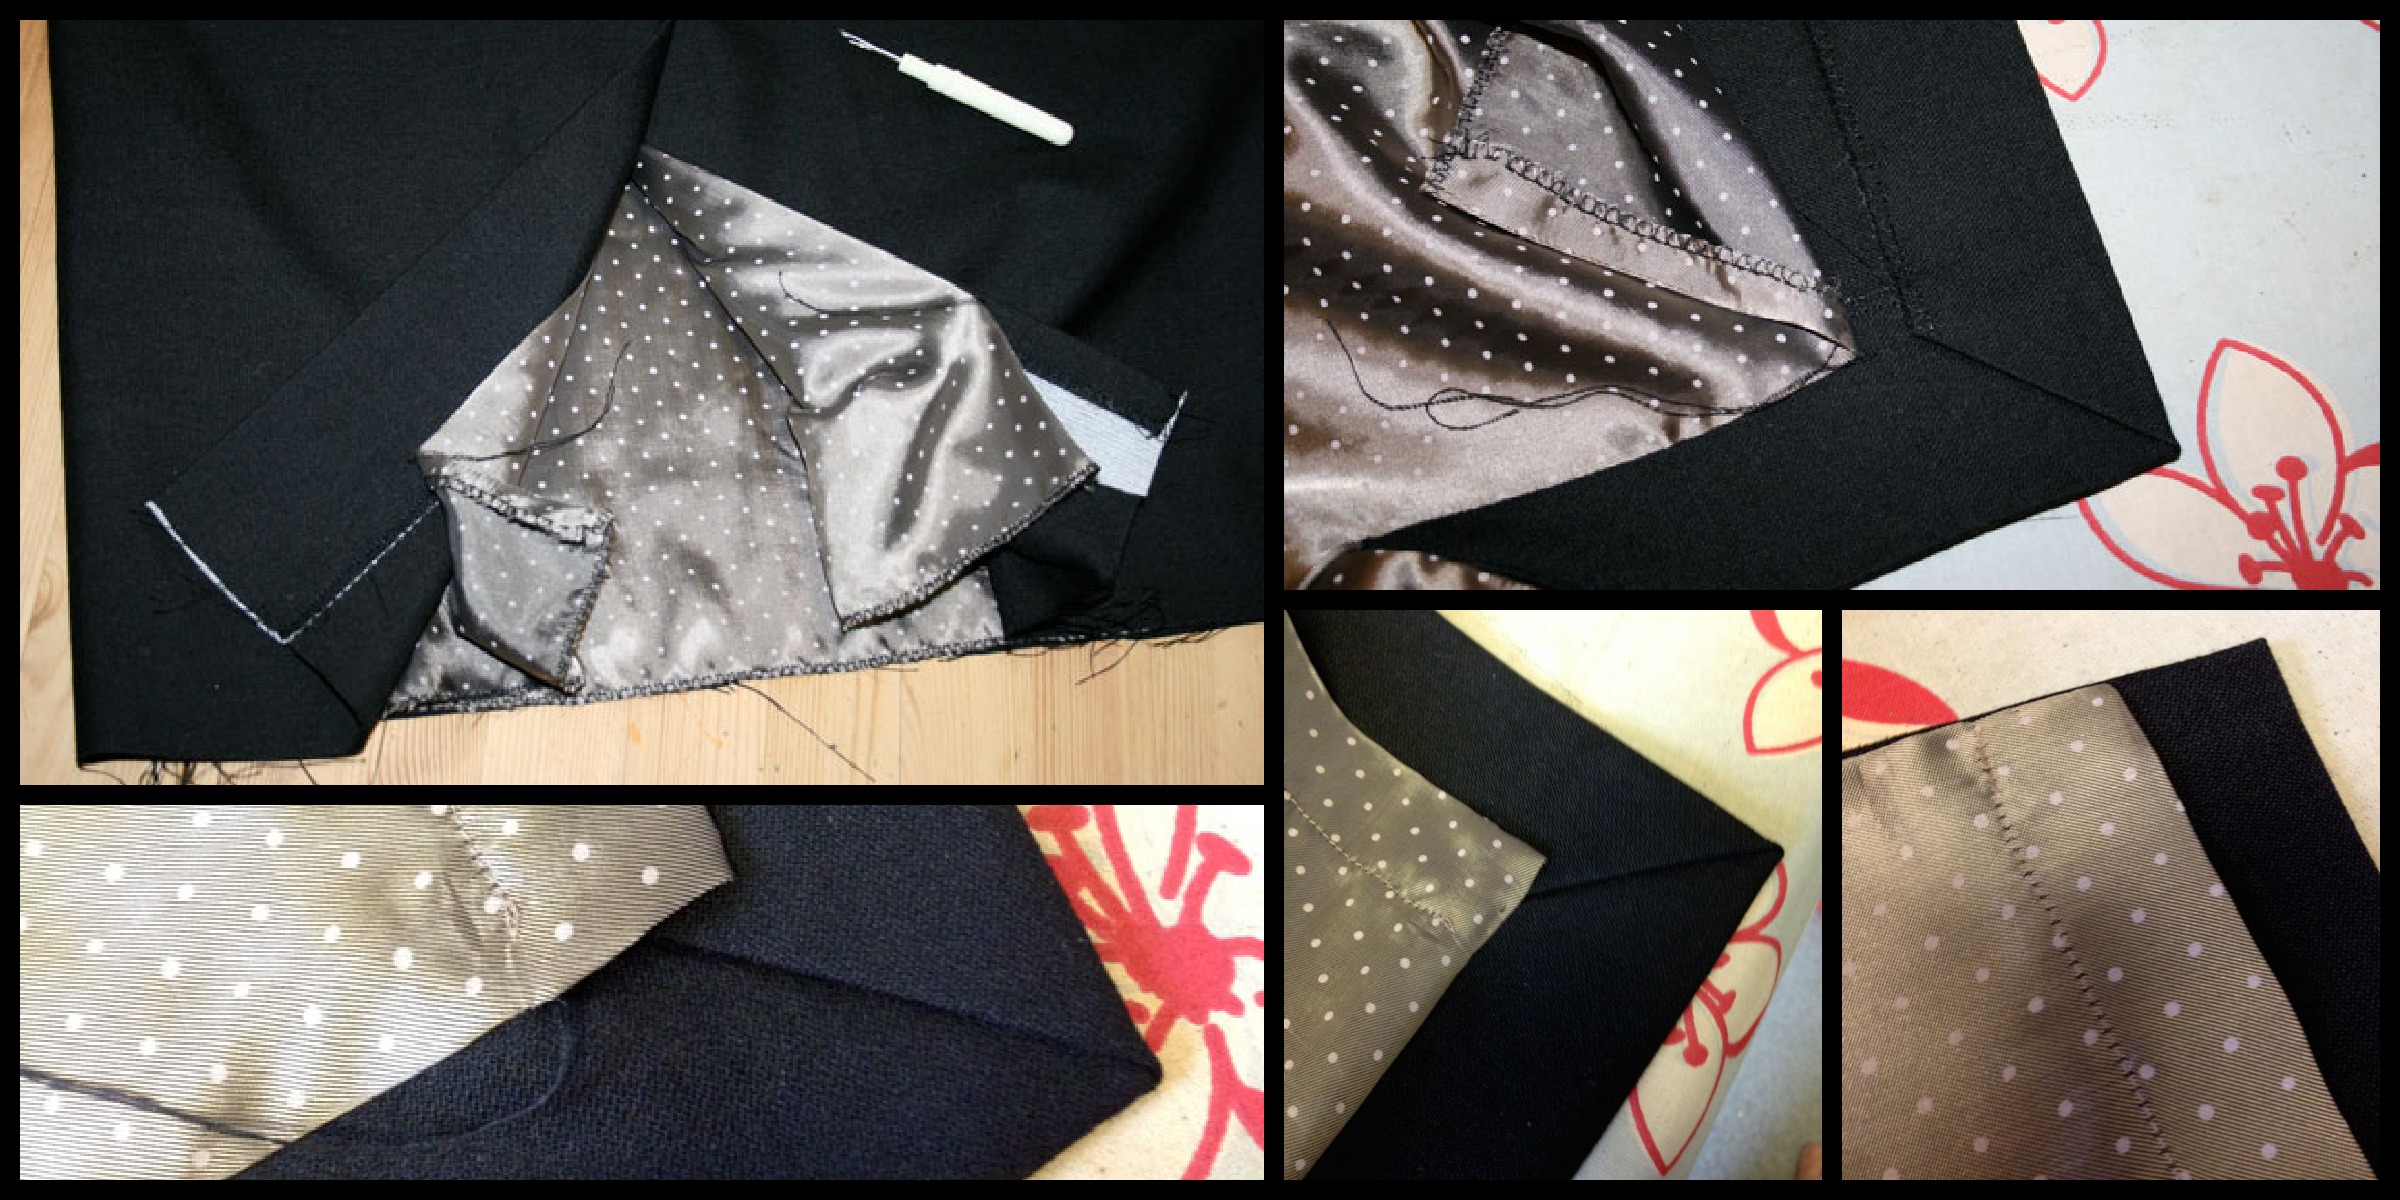
Interfaced waistband and hem using a lovely woven fusible interfacing. Nice and sturdy. Just the ticket!
I didn’t scrimp on the fabric for this skirt. I think you can afford to be a bit more frivolous when you only need a meter of fabric to play with. So I bought some quality British wool and boy does it feel good. A dream to sew up too.
I’m anticipating some questions on lining the vent, and I am really sorry I haven’t included it this time. A combination of no step by step photography and a serious lack of remembering exactly how I did it myself! I know it wasn’t that difficult and I hope to bring that part to you on the next one I make. And I will be making more because it was my original mission to make and own a pencil skirt for every day of the week. Different colours and styles. That would be so cool and not too unachievable!
CREDITS
Mr Ooobop! was of course, my lovely photographer for this and most posts.
Shoes by Vivienne Westwood… oh yes!
Top hand made peasant top that I didn’t get round to blogging!
Love those mitred corners; very smart looking indeed! Sometimes it is definitely worth making a basic garment really, really nicely! Your new skirt looks beautifully made and looks to fit like a dream.
Wowzers, that is CUTE!! I love it. Can you get a black hook and bar, then it won’t show as much 😉
Thanks Mrs! That would be a great idea. I might have a search online. My little market lady only had this kind. There is a no sew one too which I must seek out.
Gorgeous! I’m rather impressed by your mitred corner – very nicely done. 🙂
(And, as per usual, I want your shoes!!)
Thanks Kat… so am I, lol!! Shoes are gorgeous, quite old now but only ever worn indoors. I tried once but couldn’t make it as far as the tube before I had to hail a cab. Needless to say I sat down at the party all night!
I want your shoes too! Great skirt.
Thank you! lol… but you wouldn’t want to be in them! They are worth the pain though!
Hi! I’ve been following your blog for a wee while but wanted to say how very impressed I am with the inside of your skirt! And the outside too. It looks great!
And OOOOOH those shoes…
Awww… thanks so much! Yes I have to agree about the shoes!
Lovely skirt and I too would be interested if you remember that trick for lining the vent…. Will watch out for cleverness next time a skirt is made here :-).
Shoes. Yup.
Thank you CS. Will definitely document when I do the next one. Feel daft for not taking the photos. I think I was concentrating too much!
Well, if its any consolation I can’t remember what I had for breakfast yesterday!
hahaha…. yes it’s definitely consolation, thanks CS. I am hopeless at the moment. Like a proper granny! Now where did I put my specs?!
What a gorgeous skirt! I love the lining. Great photos too.
Thank you Kerry 🙂
You can’t go wrong with a classic style like that. It looks really good! Love the shoes too.
Thanks Catherine. I think a pencil skirt is one of the most timeless garms!
Ooobop! You look marvellous! AND THOSE SHOES!!! Your pencil skirt is gorgeous and the lining is so adorable. Good on you for drafting your own pattern and tweaking the fit – that will be resource for you for years to come! And thank you ever so much for you tute on mitring corners. I’m thinking of putting a vent in my cambie, so this will come in mighty handy. Great photos, complements to Mr. Ooobop! Love your red lippy too!
Thanks so much Kat. The lining was one of my best finds in a charity shop. Who would have given that away?! I do have to think what I’m doing each time I mitre a corner but essentially its very very easy and to great effect!
beautiful mitred corner. Impressive.
You might wish to consider doing a hand stitched loop instead of an eye in your hook and eye, some time, they can be double whipped and are less liable to undoing themselves, also you can, very gently, squeeze up your hook, with a pair of pliers, to make it more secure – lessons learnt on tutus!
and that is a lovely lining fabric, too!
Thanks so much Mammafairy. I think you might be right about the loop and button. MercuryHandmade suggested that to me too. And yes… good reminder. I really need to get me a pair of small pliers!
Your skirt block turned out really well! It really suits you are that length as well. I just learned to do the vent lining as well and it isn’t as hard as it seems once you get your head around it. And Yay for nice British wool! Very jealous 🙂
Thank you Alaamelia. I do like this length. Tempted to take it an inch longer next time too! I agree the vent lining wasn’t that tricky and I’m so happy I did it. Will try and take step by step photos next time 🙂
Gorgeous, super sexy, the skirt with those shoe’s, perfection!
That is a beautiful lining and vent and those corners! I’m in awe!
Gorgeous! It may be a wardrobe basic, but I am so impressed by the craftsmanship (womanship?) And I love the shoes.
Hey Amazing TaraCat! How are you?! Lovely to see you (?!) Thanks so much 🙂
Simple can be stunning x
A luscious creation! The mitred hem, invisible stitching and fabulous fabrics,.bar and clip, vent …purr….must feel as good as it looks! I totally toast your of a collection of pencil skirts! I made 7 of them 2 years ago when I first retuned to sewing and still wear every one of them regularly…however, know that I know a bit more about finishes and seeing your beautiful result …I am going to make more!
OMG!
I am obsessed with those shoes!
Cheers,
Laura
Beautiful skirt!
Looks great! You can’t go wrong with a beautiful, black pencil skirt, can you?
Stunning! Simply stunning! And I too would have those shoes in a heartbeat…although I’d never be able to walk in them. Who cares? 😉
You look great in that length. Quite brave you are!!! I’m looking to try my hand at a fitted sheath dress to try to improve my sewing skills. I’m usually pretty cavalier when sewing, but I need to be more precise for this project and I’m a little nervous about it.
Gorgeous! I’m a big BIG fan of deceptively simple garments because they show off the quality of workmanship so much better: your lining, the details, everything is just perfect here, and it’s definitely a big BIG win 😀 Love the shoes too 😉
This is lovely, can ‘t go wrong with the perfect fit skirt and those shoes….swoon 🙂
Love this, fancy making me a 1950’s all black wiggle dress? Off the shoulders and below the knee, added boning on the ribs would be lovely too… if you are up for the challenge talented lady! 🙂
Kudos for the sexy poses too during this shoot! hehe! x