The dress that nearly wasn’t

. . . but I’m so glad it is!

Spotty rose dress

Following on from the vintage rose print dress, I fully intended to make the next one from some gorgeous red rose cotton. But I knew I should improve on the fit of the bodice beforehand. I’ve turned once again to my trusty Elisalex bodice pattern. Why fix it if it’s not broke, I say!

I’ve taken the advice from the By Hand London site to perform a full bust adjustment. Something I never thought I would ever need to do for me. But on closer examination of my last version, and the one before, the upper bust was defo a tad too big whilst the fabric was more than snug over ‘the girls’. I’ve always gone by bust size and increased the waist, but never thought to go down a size and increase bust and waist. More than anything I plainly couldn’t be arsed! I must also learn to take bust measurements with whatever bra I mostly intend to wear!

Well. Big fat lesson learned. I now have a properly fitting bodice pattern that fits under arms, across chest, over bust and waist. Not bad for 2 years of (not) trying!
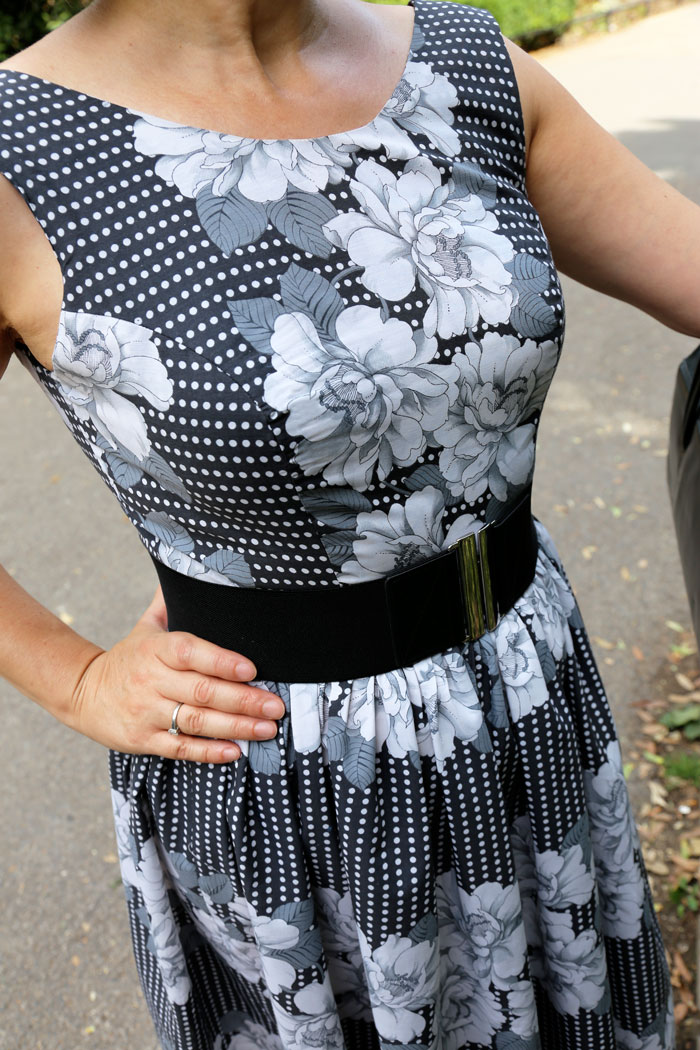
properly fitting bodiceAnyhows. This is not the reason that this particular dress didn’t happen. This spotty rose fabric has been sitting in the bottom of stash mountain for eons. I bought it from a charity shop and quickly decided it would only ever be suitable for a toile after doing a burn test.

Let’s just say I nearly burned down the kitchen in the process. Once the flames died down and the stinky fumes dispersed, my science test revealed that this fabric was totally synthetic and was never going to be acceptable in sweaty weather.

So I used it, with my dramatically altered bodice pattern to make a toile. Really not bothered if at first I didn’t succeed. I really didn’t want to cut into the lovely red fabric without knowing the alterations worked. But they did. Clearly. And all of a sudden I can forgive the fabric for being so unnatural! It’s amazing how blurred one’s vision gets when one is blinded by a darned good fit! I really must learn to be so snobby about fibre content!

front view of spotty rose dress

That said. I am still holding out for some 100% cotton gingham. How hard can it be? A sleeveless number in poly is fine but I can’t imagine having a sleeve, however short, in such close contact with my pits, in summer!

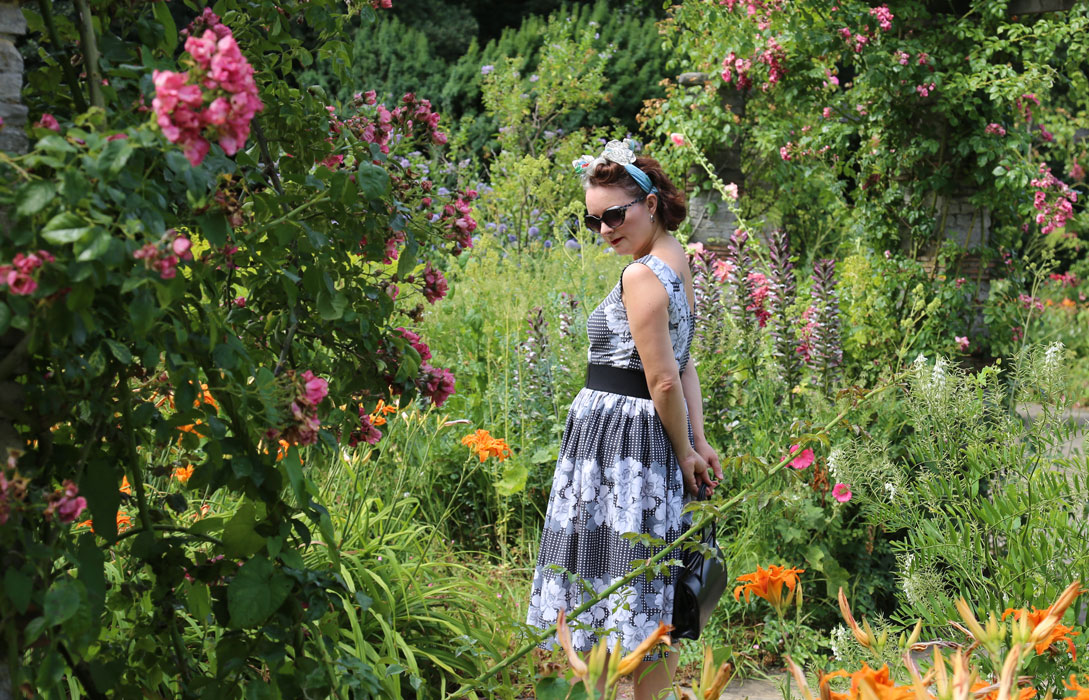
I wore it out to the park today in a sticky 26 degrees. Extreme test for a plastic dress. But because the skirt is so full and the fabric is so thin, it was remarkably cool.

Wearing the dress in Ravenscourt Park Gardens

Smelling the roses

I am still going to do the red rose version but I’m so pleased with this Brucey bonus one that I landed up with in the process! It has a 1950s vibe to it and of course is the perfect base dress to accessorise with a pair of crazy heels.

spotty rose dress

These heels being of the pink, furry leopard-print kind, of course!

sitting pretty on the doorstep

spotty rose dress

And I think you’ll agree that Mr Ooobop worked his magic as usual!

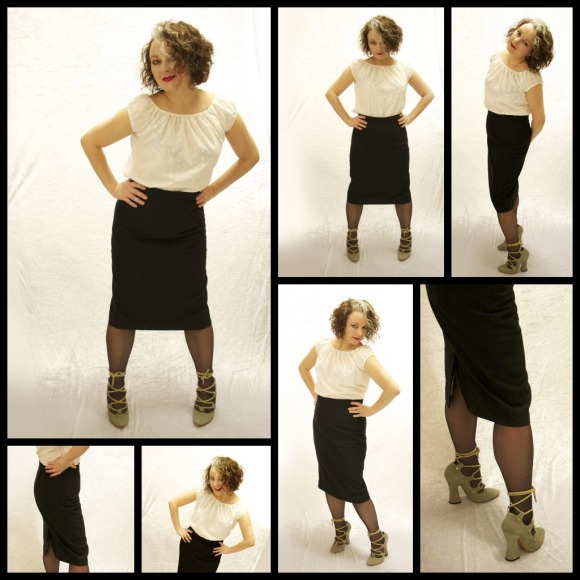
Black pencil skirt and a learning curve

Not the most ground-breaking make but as usual, there is a continued method in my madness!

I have hundreds of really lovely vintage and modern dressmaking patterns and a serious desire to make and wear each one but every so often feel like I’m winging it too much. For sure I get there in the end and it looks great for the camera but as the maker, I know what secrets lie inside!

So I need to rehearse skills on basic garments such as this pencil skirt to improve technique and reassure myself that I am still improving!

Image

I really enjoy going back to the drawing board sometimes, quite literally! The pattern for this skirt is one I drafted back in August 2012. But I have made quite a few adjustments since then, which I really like, and I think make for a better fit.

  • I moved the darts apart slightly on the front.
  • I lengthened the skirt to below the knee (ooo get me and my bravery!)
  • I tapered the skirt by about 2 inches either side for a more pencilled effect.
  • I added a waistband.
  • I included a PROPER vent including mitred corners!
  • I made a much better job of the lining and learned how to line the vent.

What I should also have included:

  • a hand-picked zipper
  • more overlap on the waistband to add a button along with the hook and bar.

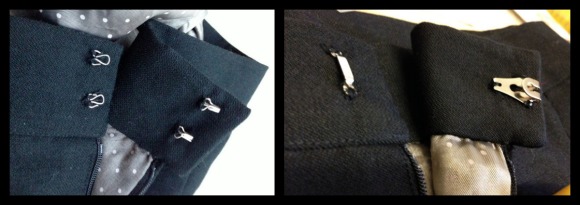
On the subject of hook and bar, even that was a revelation. I first used hook and eyes thinking they would suffice. But they really didn’t! They kept coming undone it wouldn’t be too long before they bent out of shape. So I dutifully replaced them with a sew on hook and bar. It’s much better but even though I sewed it in from the edge of the overlap, it still shows, so I need to set it back a bit further.

Image

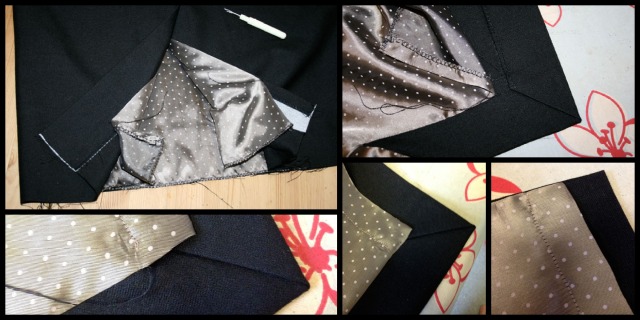
Nearly didn’t make the effort to do a mitred corner on the vent, but jolly glad I did. Before hemming I sewed the lining, right sides together all the way down the vent edges. Before hemming the skirt outer fabric I carefully unpicked the thread using the eye end of a needle. I used that loose thread to sew invisible stitches to attach the remaining lining once I’d trimmed and hemmed it. Such a neat trick! (And a great excuse to show off my mitred corner!)

vent lining

Interfaced waistband and hem using a lovely woven fusible interfacing. Nice and sturdy. Just the ticket!

Interfaced waistband and hem

I didn’t scrimp on the fabric for this skirt. I think you can afford to be a bit more frivolous when you only need a meter of fabric to play with. So I bought some quality British wool and boy does it feel good. A dream to sew up too.

I’m anticipating some questions on lining the vent, and I am really sorry I haven’t included it this time. A combination of no step by step photography and a serious lack of remembering exactly how I did it myself! I know it wasn’t that difficult and I hope to bring that part to you on the next one I make. And I will be making more because it was my original mission to make and own a pencil skirt for every day of the week. Different colours and styles. That would be so cool and not too unachievable!

CREDITS
Mr Ooobop! was of course, my lovely photographer for this and most posts.
Shoes by Vivienne Westwood… oh yes!
Top hand made peasant top that I didn’t get round to blogging!

Blue suede shoes… and no silly walks!

blue suede shoes

Well you could’ve knocked me down when I saw these in Clarks! And in the sale… and they’re wide fitting (for my stupidly square feet) and so blue and soooo incredibly comfy and now they are mine!

They go by the name of Camelia Kate and a bargain, methinks, at £34.99. Here’s a link if they make you go ‘ooo’ and you fancy a pair too!

More often than not I will go for quirk over comfort when it comes to shoes, and that usually rules out Clarks, but these little beauties ticked all boxes and were defo one for the money! They have little spongy bits to soothe the ball of your foot which means I don’t look like a member of the ‘Ministry of Silly Walks’ when I come home from work! (usually like the lady with the tea tray)

[youtube http://www.youtube.com/watch?v=9ZlBUglE6Hc]
And before you ask, no of course I don’t have anything for them to go with, that would be plain silly!