Vintage Butterick clutch cape

butterick 2556 clutch cape

Until I found the pattern for this I didn’t even realise there was such a thing let alone that I wanted one so much! On Googling ‘clutch cape’ one is presented with all manner of cape styles accessorised with a clutch bag but only one or two images of a vintage pattern oh and one fox fur version for a snip at $1,285.00! I can only assume it came into being and then disappeared from the world of fashion in a puff of smoke through lack of demand.

Well of course, that makes me love it even more!

butterick 2556 clutch cape pattern

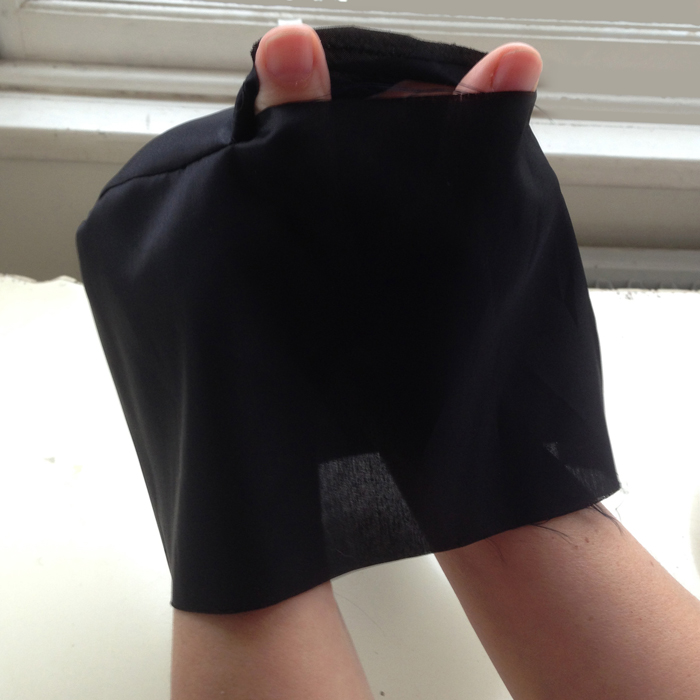
The idea is that you can rest your hands in the naturally forming pockets where the shawl collar meets the hem. It is also the only way of holding it on in gusty weather as there is no other system of closure. But even without such gusts it does sit in place quite nicely due to the shaping of the shoulders.

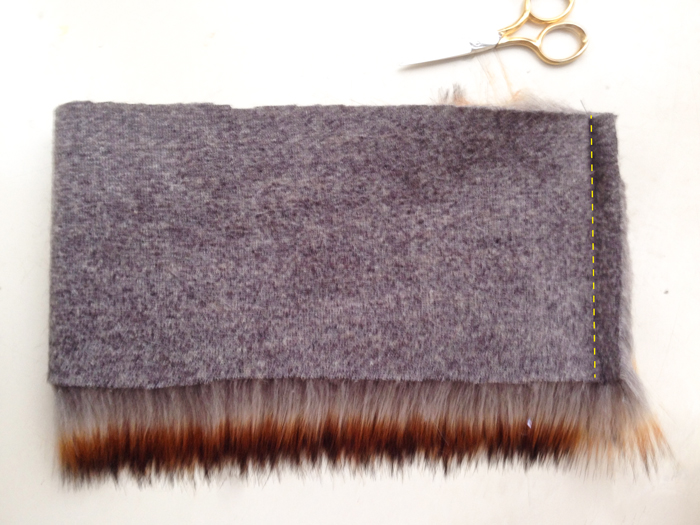
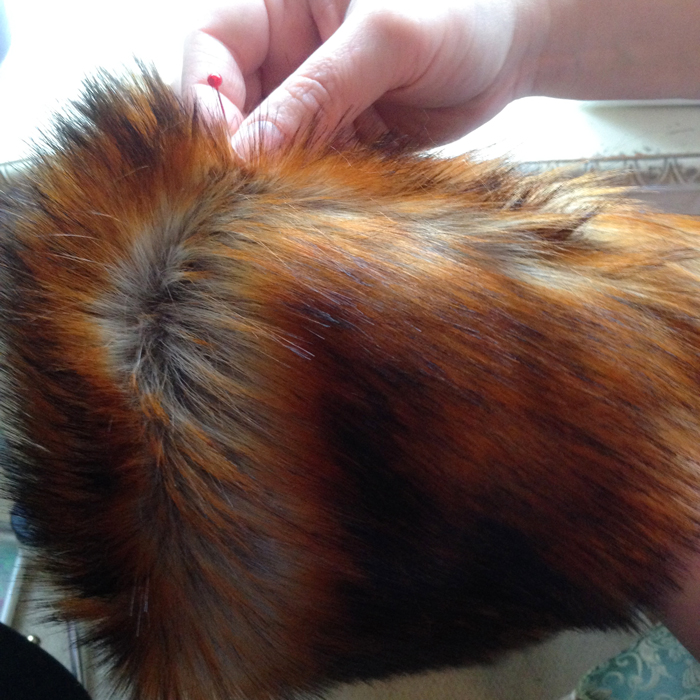
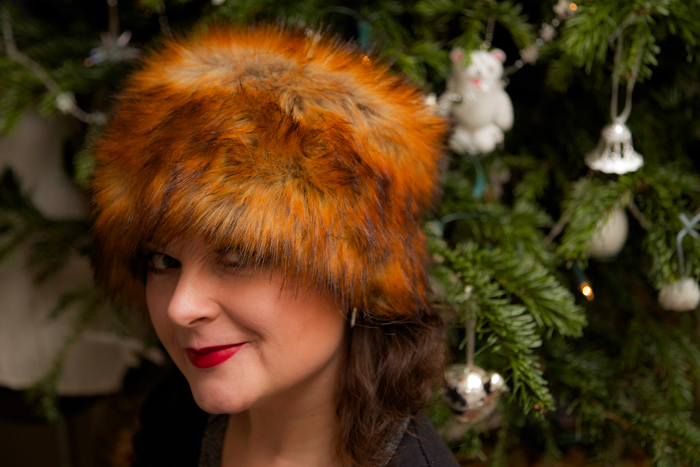
There’s not much choice to be had in the Goldhawk Road faux fur range at the moment. I am assured that it arrives in October. But I don’t have patience of saints and I settled on this textured black fur fabric at £14.99/m. It only takes 1.25 yds but I bought 1.25m to be on the safe side and it was plenty enough. I like the pattern of the texture and it is actually quite silky for being faux.

butterick 2556 clutch cape

There’s some dart shaping on the fronts and back piece which you wont be able to see of course. And there is interfacing sewn into the collar to give a little structure. And so that if I want to look like a wicked stepmother it will stand up and stay up!

Youngest daughter tried to halt plans by saying it was plain weird and even Mr O made noises about me looking like Basil Brush. But they know full well that those kind of comments just roll off my feathered back!

butterick 2556 clutch cape back view

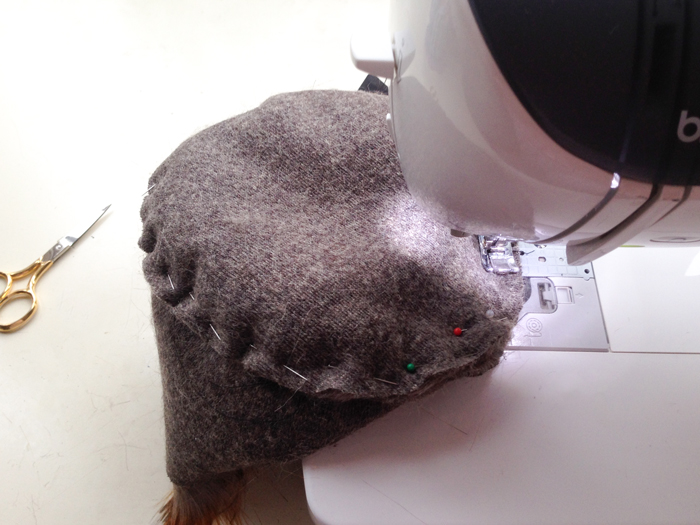
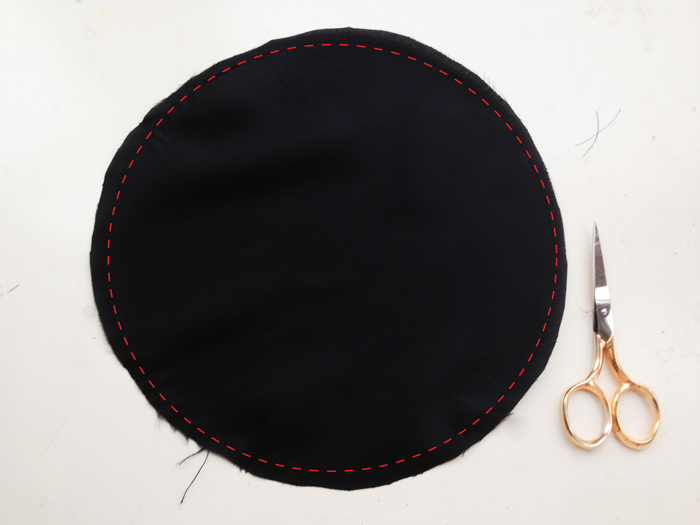
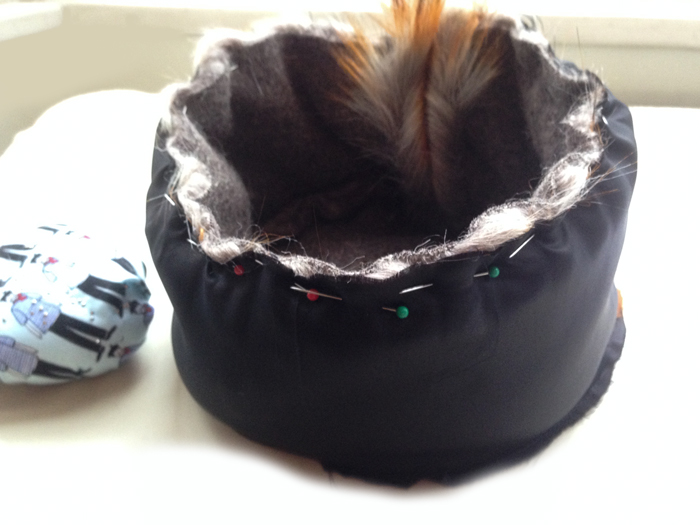
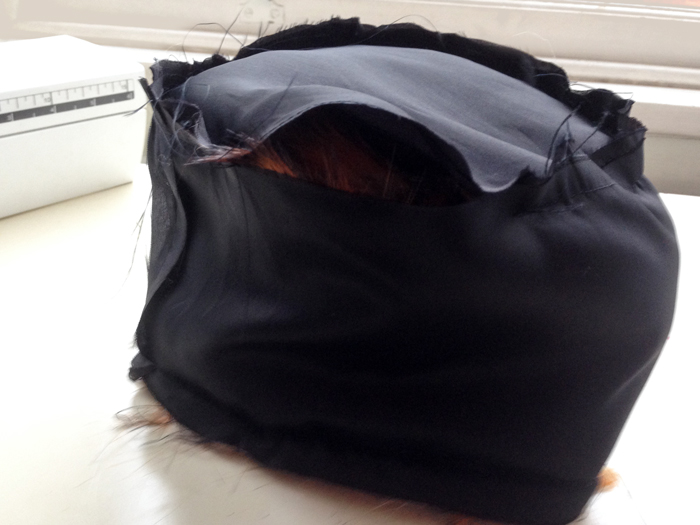
There is very little to construct and therefore it was very simple to make up, however I had to re-read the instructions to make sure I hadn’t missed anything re the lining insertion. The lining consists of the front and back pieces sewn in the same way; sewn together at the hemline, with right sides facing and then, having pressed the seam allowance all round, hand-stitched to the cape. Of course the problem that caused was that the lining was visible at the hemline. It needs to be shorter.

So, given my ever growing annoyance for things I’ve not done properly, I dutifully unpicked it (which is no mean feat if you’ve ever stitched lining to fur with small stitches!) and chopped off the seam allowance from the hemline and reattached. I could have gone half an inch more to be on the safe side but that seems to have done the trick.

It’s perfect for days like today, deceivingly sunny with a sneaky chill in the air. I haven’t begun any autumnal sewing yet and my polka dot Flora dress most certainly would not have got an outing today with bare shoulders. And it wouldn’t look out of place with an evening gown or ‘casualled’ down with a pair of jeans if that’s what takes your fancy.

butterick 2556 clutch cape front

In an effort to find a location with no gawping passers-by, these photos were taken down the side of Shepherds Bush Empire. I knew this building was quite old, built in 1903 in fact, but didn’t know that of all the acts performed there, Charlie Chaplin was one of them!

I was just saying to Mr O how sewing and blogging and photography has changed how we have taken notice of our surroundings. There is so much history to be had, right on our very doorstep!

Plans for this Boer War jacket

Boer War Jacket Project
This jacket has seen better days. Though it can be forgiven for it’s ripe old age of 110 years or so. It’s an authentic British, Boer War military jacket. And it’s in need of a bit of love. The owner assures me it sees him through many a British summer festival period and so a bodge job on the lining will do.

But I can’t do a bodge job, can I? Not like what he means. It’s not in me. It might be a bodge job as defined by the thousands of tailors and historians that are currently whispering plans to send me to sewing hell (if such a place exists). But I’m going to do my best.

I state ‘plans’ in the loosest sense of the word. I actually haven’t got much of a clue. But I’ve decided to fly in the face of criticism and go with gut.

Externally it’s grubby. Very grubby, but, that’s mostly it. That red wool is sturdy stuff! It’s incredibly dense and felted, I’m sure. And there is not a single tear or hole in it anywhere. The collar however, is mostly dilapidated and detached and there is an epaulet missing. I’ve got fingers crossed that it’s missing at the back of Kev’s wardrobe somewhere.

It’s the inside that’s a mess. The silk lining and parts of the padding is ripped to shreds and that is the main issue.

Incidentally, here’s an interesting fact for you. Did you know, that the reason these jackets were lined with silk, wasn’t to be all posh-like. It was so that if and when a soldier were to be stabbed with a sword or dagger, the silk lining would wrap itself around the blade as a barrier against infection. Clever eh?

Still makes me cringe a bit with some of the staines on this jacket. I’m hoping Kev made them more recently through cider or festival food spillage and that’s where the authenticity stops!

So, now I’ve put it out there, I’m duty bound to bloody well get on with it. I’ve been sweating about this for far too long. And it’s time for action.

This will be done in little shifts with lots of thinking and head-scratching in between and I’ll try and fill you in as I go along.

Ever bitten off more than you could chew?!

A 60s worky shirt-dress

simplicity 6772 shirtdress frontGood afternoon lovely readers. I trust you are having a lovely weekend. I love the peace and quiet of a Sunday afternoon. It’s especially quiet today since Mr O and both children are all out. Best blogging time I thought, but eeek, no photographer! So please excuse the awkward poses to the remote snaps! It’s hard to summon up the enthusiasm when there’s no one bossing you around.

This is the first draft of Simplicity 6772. A lovely fitted sheath dress with front button closing and notched collar. Or a shirt-dress to the layperson!

simplicity 6772 packet

I made version 3, with short sleeves, which buttons all the way down. And I used a £2.50/metre suiting fabric from Dave/Danielle the Drapers in Shepherds Bush Market. I did stop to ponder who might make such a crazy suit in gingham but images of capri trousers and cropped jackets a la Doris Day quickly sprung to mind, very nearly usurping the plans for this dress.

I love Dave the Draper fabric for test garments. I don’t think you can actually buy cheaper and even though the content and quality is an unknown, its always good enough. And generally speaking I end up with something wearable, in this case…. for a fiver!

simplicity 6772 sideThat said, I will be making some adjustments to the next one, which incidentally is already cut out! Namely: taking some of the ease out of the sleeves. They are practically puffed sleeves and it certainly didn’t warn me of that on the packet front. They are also a weird length. I made twice the suggested hem allowance, and turned them up! I’ll also be shaving a centimetre off each shoulder before I sew them in.

I did some proper grading on this pattern using the cut and spread method. A little added to the bodice, moreso added to the waist and hip with the side seams blended together. I remembered to add the extra to the collar and the sleeves, though I probably should have left the sleeves alone to avoid the puff!

Given that it’s suiting fabric it didn’t need a lining. I just overlocked the seams. Suiting is a joy to hem, especially on this kind of check. It’s so easy to pick a couple of threads and the stitches just disappear. It’s presses so easily too. It’s a wool blend of sorts. And I have totally gotten over my snobbery of synthetic/blended fabric, since it doesn’t need much ironing and doesn’t tend to crease when you’ve been sat down at an office desk all day.

I love a shirt-dress but have only made two before. The 1940s Shoe Dress and The Shirt Dress Revisited. Both from the same pattern, both with full skirts. I like how this one is more understated though. Would be completely utilitarian in a khaki! It certainly feels more worky than the other two. To be honest, I’m lucky enough to work in a creative environment where almost anything goes (as is often apparent!).

I was a little disappointed that I didn’t have a suitable set of red buttons but it was quite refreshing to be persuaded with blue ones. I toyed with green and checked ones but the winners were some gorgeous vintage buttons kindly inherited from my friend Nigel’s, aunt.

vintage blue buttons

There are a whopping twelve darts going on in this dress! Four long diamond ones in the front, four of the same in the back; two shoulder darts and two bust darts. And its all these ‘lovely’ darts that create the great shape to this dress. The back especially. And I love that little kick pleat. So glad I didn’t exchange it for a slit.

simplicity 6772 shirtdress back view

It would be crazy at this point not to mention the shoes. A more than happy find on my way back from work in the sale at Office. They are of course my favourite Lola Ramona shoes. These ones having pale green polka dots, a cream bow and purple heels. The thing I love most about these shoes is that they don’t go with anything but yet they look good with everything!!

lola ramona spotty bow shoes

I’ll be off now. The plan is to return shortly with a revised version of this shirt-dress. But you know what happens when you make plans. Well, when I make them, anyway!

TTFN x

On being bothered!

vintage simplicity pattern 6772

It’s been an eventful few days. Asides from the usual back to back workload, there was Holly Johnson on Thursday, Fleetwood Mac on Friday and a whole sunny day with the children at Pools on the Park in Richmond on Saturday.

I was therefore a little jaded last night. Like a hologram, in fact. a pink frazzled sleepy hologram! I wanted to sew. But the pattern I wanted to sew, typically wasn’t in my size, let alone relative to my proportions. I knew it needed some grading and it pained me to think I had to put some effort in before I could just sit and sew. I made another cup of tea. Did the washing up. Put a laundry load on. Flicked through Facebook. Made another cup of tea. I certainly could have graded and cut out the damned thing instead of doing all that, and by that time it was 9.30pm.

So I got cross with myself and my refusal to do what I’d arranged with myself to do. And set about it. The punishment being that if I fannied around anymore and didn’t put my mind to what was needed to be done I’d just lose more sleep-time. And I was tired, I can tell you!

So with the infamous Nike strapline loud and clear in my head, two back-to-back episodes of Eastenders lined up on iplayer, I got tracing and marking and cutting like a good’un. The bodice needed one set of grading, the skirt section another. And the darts needed redrawing and repositioning. I don’t know that I’ve ever employed the cut-and-spread method of grading so properly before. I’ve thought about doing it but it always seems like so much work. It really isn’t! No more winging it with adding a bit here and a bit there on the side seams!

graded pattern pieces

It’s a shirt dress by the way. Simplicity 6772 from the 1960s. I’m making version 3, the blue one on the right. Not my usual style of shirt-waist dress like the ones I made previously: the 1940s shirt dress and the shirt dress revisited, but a more casual, straight like shirt dress that buttons all the way down. I will skip those bound buttonholes though. The fabric is a suiting fabric, a lightweight wool-blend, confirmed by a burn test that revealed a crumbly kind of ash, signifying more poly than wool! So it doesn’t deserve such couture details. That’s my excuse and I’m sticking to it!

It’s Sunday afternoon and I’ve done the hockey run, put another wash-load on, seen my daughter off to the Park Club and had lunch with my son. Mr O is on his way to a wedding gig and I kid you not, I just actually heard a pin drop!

So now the pieces are cut out, darts marked and pinned and I’m now about to embark on the part I love the most. And fingers crossed, will be so pleased that I bothered to grade those pattern pieces. If it does work out good I will no longer have to miss out on those fabulous vintage pattern bids for being the wrong size.

vintage simplicity 6772 cut out

I won’t tempt fate. In fact I won’t waffle on any more as I now have a couple of hours of very valuable sewing time on my hands. Just have to avoid the distraction of the sun. Repeat. Just have to avoid the distraction of the sun!!


Retro Butterick ’57 halter-dress

butterick b4512 halter dress
I made this dress to wear at my sister’s wedding last month but ridiculously didn’t manage to get any full-length, blog-worthy pics. So yesterday, we took a lovely evening stroll down to Fulham Reach for these shots.

butterick b4512 halter dress

It took a bit of effort to ditch bags, change outfit, reapply slap and head straight back out after a long hot day at the office but I’m glad we did. The light was lovely – no jacket required, and it took no time at all to chill out on the banks of the Old Father Thames!

butterick b4512 halter dress

A swift G&T softened the self-concsious blow of twirling around like a loon in full view of passers-by. And it wasn’t till after we’d finished that I clocked a security guard behind a smoked glass door applauding from his ringside seat!

butterick b4512 halter dress

The pattern is Butterick B4512, a retro 1957 reprint. It’s a halter-neck bodice with optional collar/pussy bow. I cut my own circle skirt though I believe simplicity’s one is a circle too. I just didn’t want to split the front skirt section. It would have messed with my dots!

Butterick B4512 sewing pattern

butterick b4512 halter dress

I knew I might have issues with the fitting of the bodice but I was time short as always and used a lovely cherry print fabric for my first attempt. Alas it was too long overbust if that’s a thing. So I had to take an inch out horizontally. I could have gotten away with it, pesky kids or not, but my inner perfectionist nagged to get it right. So I adjusted the pattern pieces and re-cut in some stash polka dot. This fabric has subtle stretch which I knew would work with me!

butterick b4512 halter dress

Once I’d sorted the issues it really took no time at all. Only the bodice is lined. I think the most surprising thing was not even having to level the hem after letting it hang overnight. It didn’t distort at all!

butterick b4512 halter dress

We treated ourselves to a long overdue child-free dinner date at the Blue Boat afterwards. The same place where we shot my not so boring pencil skirt! I got lots of compliments at the bar. I didn’t feel like I had to justify why I was wearing it. After all, why save a party dress for best? On whose say so? Not mine!

butterick b4512 halter dress

I’d love to try this pattern in other fabrics, even a plain one. It’s kinda formal fancy Hepburn from the front but the backless feature and the swishy skirt make for party factor. The petticoat was a happy find in an Oxfam charity shop on the way home from work one day. I’ve been meaning to make myself one for ages, determined to make everything I wear, but couldn’t ignore this beauty for a fiver!

butterick b4512 halter dress

It’s very strange with youngest daughter being away this week (She’ll be tucked up in her sheep shorts now, no doubt) but at the same time so lovely to be spending some fun times with the Mister and his clever camera skills. Long may this sunshine and warm weather hang around. These evening strolls totally make me feel like I’m on holiday!

Vintage Simplicity 4687 to the rescue!

simplicity 4687 vintage dress

The look on Mr O’s face was a picture following my little I’ve-got-absolutely-nothing-to-wear tantrum on Friday evening. The undulating range of handmade dresses strewn across the floor and the bed said otherwise. It was Rachel’s hen night on Saturday. To be attended by various gorgeous sewing bloggers who would all be adorned with their own spectacular creations.

“So make one, then” was the ridiculous response.
“Er… It’s Friday. The hen do is tomorrow?” I replied, teenage-style, deepened yet rising in intonation.

A roll of the eyes. No sympathy. A simple shift dress appears in my head. Some crazy tropical fabric follows in the next mind scene. Mission Ooobop-new-dress are go!

I run upstairs dig out Simplicity 4687 from the neatly labelled ‘vintage 1950s’ box of sewing patterns (believe that and you’ll believe anything!) and following an exhausting rummage, retrieve said fabric from stash. I pinned and cut it out right there and then. Winging it. No adjustments. No time.

simplicity sewing pattern 4687

Saturday morning and I’m all over it like a nettle rash. One front, two backs, 3 facings 10 darts(!) and Bob was my uncle! Walkaway dress, eat your heart out!

"simplicityLack of lining, overlocker on form and an invisible zipper foot all helped to speed up the process. And thanks to the ample ease that Simplicity ensures, the only alteration I had to make was to loose a few inches on the bust. I took them out at the side seams just under the armhole. Next time I’ll be sure to grade it properly.

simplicity 4687 vintage dress

Incidentally this is the first time I’ve used my invisible zipper foot and I won’t be looking back as unanimously claimed by many a Twitter follower when I put the question of ‘was it worth it’ out for debate! I mostly referred to the price tag of £13 which seemed a bit hefty for a little foot. But boy does it make zip insertion a breeze. So quick and so neat. You’d never see any evidence at all if it wasn’t for lack of pattern matching! Certainly no time for that!

invisible zip

The hen do was a roaring success, thanks to the brilliant and selfless organising skills of the amazing Miss Demeanour. And Rachel looked amazing as evs as she boogied the night away, totally unfazed by us all wearing our Rachel masks and assuming the ‘Rachel signature pose’ at every given opportunity. I can assure you it was terrifying!

rachel hen night

As you can imagine, any photos taken last night of me in my new dress, would at best have been blurry but mostly ungainly so Mr O has come to my rescue by rustling up these photos today. I can tell you that the sunglasses are a necessary accessory!
simplicity 4687 vintage dressSo thank you to Daniel, not only for the photos but for raising that red rag to this bull and ensuring I had something to wear after all! 😉

Pattern testing: BHL Sophia

BHL Sophia dress

If you heard a rumour that there was a new BHL girl on the block, you heard right. And I can assure you that Sophia lives up to that By Hand London reputation of gorgeousness.

Victoria contacted me with an emergency test request. And despite my ongoing mega work load I couldn’t turn this one down.

By the drawings alone I knew I wanted this dress. I mean, check out those darts and oh that 50s style collar. Totally up my street with a little nod to vintage.
bhl_drawing_sophiaI chose the pencil skirt version as my vision involved ‘old man Prince of Wales check’ fabric! I was after a bit of structure backed up with office chic stylin’!

And so here is my first testing of the test pattern itself!

back_detail_front_full

And yes, call me crazy, but I did opt for checked fabric to test a pattern, and not for the first time. My thinking is that if it does turn out good then I haven’t wasted time. It happens… occasionally!

Truth is, not accounting for any amendments to the pattern that might be made by BHL in the meantime, I do need to make a few tweaks, including a small fba and to taper the skirt a bit. But that’s just personal preference.

bhl sophia collar detail

The fabric was from Dave the Drapers in Goldhawk Road. One of my faves. But lesson learned with cheap fabric: Even though the quality isn’t bad (its a wool mix) the grain is slightly off and that matters one helluva lot with checks! Well that’s my excuse, and I’m sticking to it!

I love the way the darts radiate from the central front and back seams. I’ve seen this approach in vintage design books but not on a pattern I own, vintage or modern. So it was a real treat to get to test how this works. I just have to figure out how to do an fba with this kind of dart. Presuming I swing to the side seam and proceed as normal but very open to suggestions if anyone knows of another way.

Sophia should be making her appearance in the BHL pattern shop soon So keep eyes peeled. Shes a good’un!


Churn Dash Quilt Block

quilt block churn dash

I am really good at procrastinating. I’m not so good at hurrying up a patchwork quilt. But who’s in a hurry, anyway?! Let’s not dwell on how much time it’s taken me to get to 25 blocks. Let’s not even spare a seconds-thought to how much longer before my amazing quilt will be ready to throw over my bed. Let’s just focus on the here and now!

This is a Churn Dash quilt block. Also known as a Churn Dasher or Roads to Berlin. The 25th block I’ve created to date and boy can you see how out of practice I am!

If I’d have retained momentum. I’m sure the inset seams would have been neater. Only one point matches up precisely. And I’m so pleased with that. But not pleased enough to unpick and sort out the other three!

It’s only that Mr O is away that I’m doing this otherwise I should truly be working on his waistcoat. So I should not spend a minute more on this. In any case. If I want that ‘handmade’ look about my quilt, it needs to have a couple of imperfections at least! The next one will be spot on, I’m sure.

Block Facts:

Name: ‘Churn Dash’ or ‘Churn Dasher’ or ‘Roads to Berlin’
History: Another 1930s favourite. One of many blocks inspired by 19th century domestic appliances! Works on its own or used as part of a more complex design.
Level: Set in seams require experience.
No. of pieces: 9

Progress report:

Block 1: The Double Four Patch
Block 2: The Whirlwind
Block 3: The Sailboat
Block 4: The Shoo-fly
Block 5: The Trafalgar
Block 6: The Windmill
Block 7: The Chequer Square
Block 8: The Diamond Square
Block 9: The Cactus Pot
Block 10: The Sawtooth Star
Block 11: To come!
Block 12: The Windmill Sails block
Block 13: The Basket of Flowers block
Block 14: Susannah
Block 15: Road to Oklhahoma
Block 16: Chequer Star
Block 17: Nelson’s Victory
Block 18: Fair and Square
Block 19: Diamond Pinwheel
Block 20: Whirligig
Block 21: Old Maid’s Puzzle
Block 22: Whirlwind Square
Block 23: Windblown Square
Block 24: Basket of Flowers block revisited
Block 25: Churn Dash

Make your own Zhivago-inspired fur hat: FREE pattern download

make your own fur hat free patternquick sewing projectHappy new year lovely followers!

I’m so delighted to share this pattern with you as my first post of 2015. It’s a timeless, vintage-style fur hat that will keep you warm and toasty in the most stylish way possible! And it’s a real quick project to sew up for that quick sewing fix when time isn’t on your side!

It really is so super easy to make. Just download and print out the FREE_fur_hat_pattern and follow these few simple instructions. The hardest thing about this hat will be to get your hands on some quality fur of the faux kind!

The pattern corresponds to my head size which is 22.5 inches or 57 cm.
You may need to adjust the pattern to personalise the fit.

You will need:

  • 1/4 m of faux fur (retailers will only usually sell you 1/2m at a time but its often worth an ask!)
  • 1/4 m of lining fabric (or find some scraps in your stash)
  • coordinating thread
  • a vacuum cleaner to hoover up all the fluff!

Instructions:

  • Make sure you print out your FREE_fur_hat_pattern at actual size, and check with the test square (on page 4 of the pdf) that it has printed correctly. Cut out and paste the sheets together to match the layout on page 1 of the pdf. Complete the hat band and crown sections as full pieces as instructed on the pattern then cut out.

NOTE: Before you pin the pattern to your fur fabric, think about what direction you prefer the fur to lie. On this particular hat I made, the pile strokes downwards on the band, from the top of the crown, down towards my eyebrows! On the top circular piece, it strokes from front to back. Incidentally, the centre back of the hat is where the band is seamed.

TIP: When cutting your fur pieces, cut on the reverse and just snip carefully through the backing fabric so as not to cut through to the actual fur on the right side. You will achieve a much better finish on the seams.

  • Pin the pattern to your fur pieces and cut out, paying heed to the tip above.
  • Pin and cut out your lining pieces. It doesn’t matter for the circular lining piece but make sure the band is cut on a straight grain to avoid stretching.
  • Take your fur band piece and fold in half, right sides together. Pin the short ends together, making sure the fur is tucked inside, and stitch using a 1.5 cm seam allowance following the direction of the fur.

seam fur band

TIP: When sewing fur fabric, Increase your stitch length a little so prevent thread tangling.

  • Finger-press the seam open and hold in place with a couple of tacking stitches top and bottom of seam.
  • Pin the fur circular crown piece to the hat band, making sure the fur is tucked in and checking the direction of the fur is correct. See note above. Sew the seam using a 1.5 cm seam allowance.
pin and stitch crown to band
Pin and stitch crown to band
  • Turn right side out. Using a long craft pin (a normal pin or needle will do) drag it along the seam allowance to free the fur that has got caught in the seam.
picked trapped fur from seam with pin
Pick trapped fur from seam with pin
  • Now take your lining piece for the band, pin the short edges together as above and stitch with a regular stitch length and a 1.5 cm seam allowance. Press seam open.
  • Stay stitch the circular lining piece within the seam allowance, to prevent stretching.
Stay-stitch circular lining piece
  • Pin the lining piece for the crown along one edge of the band and seam together, leaving a about 4 inches / 10cm open for turning.
leave opening in lining
Leave opening in lining
  • With right sides together pin the rims of the lining and the fur hat together. Effectively the fur hat will be sitting inside the lining. Pin together, matching the two centre back seams and stitch along the entire edge, securing the stitching, beginning and end.
Sew lining to outer fabric
Pin and sew lining to outer fabric
  • Turn the hat to the right side through the opening left in the lining, and you’re almost done!
Turn hat to the right side through this opening
  • Pin the lining opening together, tucking in the seam allowance, and slip-stitch closed. With matching thread, obvs!
Slip stitch the to close the opening in the lining
Slip stitch to close the opening in the lining. With matching thread obvs!

Now all that is left to do is to don your new fancy fur hat, step out in the snow and hum the theme tune to Doctor Zhivago!

Please shout if anything is unclear. I’d be delighted to hear how you get on.

Faux Zhivago: handmade retro-style fur hat

handmade fur hat

I watched the film, Doctor Zhivago lots of years ago, snuggled up on the sofa with my mum. Can’t say I remember much about the plot but the music and the coats and the hats stayed with me for sure!

So when I found a crazy retro-style furry black hat in Oxfam, I knew I could and should shamelessly copy and create one of my own even if I didn’t have the lips to pull of a sultry pout, Julie Christie style.

So here is the Ooobop faux fur, Zhivagoesque, vintage-style hat that will laugh in the face of any Russian-style snowfall that threatens over the next few days.

handmade vintage style fur hat

I care not if my children walk ten paces behind me.

I care not if Mr O likens me to Rab C Nesbitt’s Wife.

And I care even less for all those sideways glances in the high street. They are just jealous eyes!

My ears are warm. My bad hair day is irrelevant. And Lara’s Theme tune is on loop!

handmade fur hat Doctor Zhivago style

The faux fox fur – I keep having to state faux because it actually feels too real to be faux! – was a bit pricey but it was a justified birthday spend up gifted by my lovely mum. I got it in A-One Fabrics in the Goldhawk Road and it is such good silky quality. Only needed half a metre and that was enough for a trial one that went wrong, this one which didn’t, and perhaps a matching fur muff to come! Do people even wear those nowadays?

I probably don’t need to declare that it was Mr O that took these fab photos – late last night, with next to no light but one of those god-awful energy saving bulbs and a few fairy twinkles. I certainly wouldn’t have had the patience. Very happy to sit with a glass of bubbly under the Christmas tree while he worked it though!

I was hoping to have a little tute prepared for you to accompany this post but that was serious wishful thinking on my behalf! Working on it nonetheless. And for anyone who fancies a furry head warmer like mine I’ll be posting a pattern and a tute next post, post-haste!

Till then lovely followers, I wish you all the loveliest of wishes; Wrap up warm, keep safe and beware the nutters on the road!  x

handmade fur hat