A little alteration. No fear!

Acne Studios dress
Acne Studios dress

I normally steer well clear of other people’s alterations. Mostly through fear of screwing up and from past experience, lack of self-belief has led to an incredibly frustrating and stressful process. I’d sooner stick with making from scratch to fit from the off.

But I got brave last week. I succumbed to the pleading eyes of my friend who’d bought a posh dress (see above) that didn’t fit properly and she needed it urgently for a do! Classic baggy armhole syndrome! It fitted like a glove elsewhere, helped by the cut and the give of the lovely viscose crepe but in turn, that’s what highlighted the poor fit around the armscyes.

I don’t have a before or after picture of my friend wearing the dress I’m afraid, so you will have to bear with and picture the problem.

I went in with an open mind, ready to admit defeat if I thought I couldn’t fix it, but instantly set about pinning the excess to see what would happen. About 3/4 inch under the arms and 1 cm off the right shoulder – interestingly enough – et voilà!

We’re still not sure if the dress was made on the wonk or if my friend actually has one sloping shoulder. She used to be a personal shopper and regularly carried bags on her shoulder so it is a distinct possibility I guess!

The armholes and neckline were faced and the dress fully lined so I had to unpick the dress from the facing and pull the internal side seams through the hole to mark the adjustment before sewing. For RTW I was dead impressed at finding a French seam inside the lining! Though that flummoxed me a bit in terms of how I would sew it! I just sewed it anyhows and pressed the seam to the same side it sat originally. I took in the same amount from the facing. That had an open seam so it pressed nice and flat once I’d unpicked the original line of stitching. To finish, I pinched the edges together and did a tiny ladder stitch to ensure no stitches were visible.

underarm alteration
Left: inside of underarm alteration. You can see where I left excess in the lining. Right: Crepe hides a multitude of sins. In this case you can barely see where I pressed the new seam to the back despite it being 3/4 inch wider at the armhole edge.

The shoulder seam was completed in much the same way apart from an added opening I made in the shoulder seam lining to make the stitching easier. Everything was ladder-stitched up good and proper afterwards.

shoulder seam
Inside shoulder seam

I also took 1 1/4 inch off the bottom. I marked and cut 3/4inch off, then made a small 1/4 inch double hem.

quarter inch hem
Quarter inch double-hem

The only thing I’m jolly glad I didn’t do before I tackled this little project was to Google it. I hadn’t heard of Acne Studios but having been suitably impressed with the quality of this dress, I went off to investigate further. Their range is mostly not my cup of tea but there are some very stylish numbers going on… and some very hefty price tags to boot. The dress was nearly £500! And I know that she was stung for £60 duty too. So what if I’d messed up?!  What if the iron had been too hot? What if I’d missed a stitch and made a hole with seam ripper? What if I’d snagged the fabric? Doesn’t bear thinking about!

Any hows. Its done. No screw ups. One very happy friend off to a very posh do. And a few more added strings to bow… phew!

Have you overcome any sewing fears recently?

It’s all about Mimi, and me!

Mimi blouse from Love at First StitchI’m sure you are all very familiar with Tilly and the ButtonsLove at First Stitch book. It comes very recommended if you haven’t got it already. Well this is the Mimi blouse from said gorgeous book.

Mimi was indeed love at first sight and I (shamefully) started working on it way back in September last year before it landed on the to-do pile!  But it’s finished now and it’s fab, and I love it so that’s all that matters, right?!

The fabric is viscose, I’m sure, and was a great charity shop find a couple of years ago. Don’t you just love it when you already ‘just happen to have’ that perfect fabric for the job. Better still when it only cost a couple of quid. And better more still when that couple of quid goes to a good cause.

It gathered well, presses beautifully, yet doesn’t crease. Magic, that is!

mimi blouse and love at first stitch book

It was lovely working from the book instead of a giant fold out set of instructions. The steps are crystal clear and the photography is so so beautiful. Inspiration counts for a lot these days, when I’m run ragged at the end of the day. It completely takes you by the hand and leads you into a dreamworld of having more hours than you actually have and makes sewing possible! And that really is magic!

The buttons are properly vintage and are the same that I used for my vintage wrap blouse. I’ve used all but one now. Best save that for an emergency button loss!

mimi blouse buttons

I wondered if they were a bit big but I do like the way they contrast and don’t go MIA among the spots.

The collar is definitely my favourite part. Much like the one on my By Hand London Sophia dress. And I love the little tucks on the sleeves. Which incidentally are finished perfectly with a facing.

Despite all the pretty pictures and faultless instructions I did manage to make a booboo though. Totally my fault. Instead of just going with my usual body measurements, I first checked out the finished garment measurements which seem huge if you don’t take into consideration the gathering, which I didn’t. And so I went down a size. It isn’t blatantly obvious. Only when I put my arms up or shoulders back do the gathers on the yoke poof out a bit. I don’t practise the best posture tbh so I think I’ll get away with it!

Tilly and the Buttons Mimi Blouse

I’m all for tucking a shirt in usually but I like that this one can be a little more casual. It has a great shape and is everso comfy whilst retaining a bit of retro chic methinks!

mimi blouse back view

All the above photos were taken by my lovely Daniel who never ever complains. Even when he has things to do himself. He took these with minutes to spare before he rushed off to his soundcheck. And all I had to do in exchange was sew a button on his coat. Best I finish his waistcoat soon, hey?! You can see more of his pics here. They’re not all about me!

But today was totally all about me. This morning I went for an actual run. I say ‘actual’ because it usually amounts to a fast walk! I ran the fastest and the furthest in 3 weeks of practising and it felt amazing.

I then got to shoot my Mimi with Daniel and had lunch with my little family before everyone left the house for the day on separate missions. I found myself unexpectedly home alone.

So I uploaded my lovely Mimi photos and considered going to see Alexander McQueen’s Savage Beauty exhibition at the Victoria and Albert museum. Twitter warned of long queues but I went anyway. Because I could! And on my own, which was blissful and meant I could read and absorb every word and gaze longingly for a long time and hang around as long as I liked. And I did! With only 2 minutes max of queueing time. Oh the power of a V&A membership card and the joy of living in London.

I will definitely be going again, and again and probably again. So I will spare you the breathtaking detail as I’m sure that many of you will want to experience that yourselves.

I am home now with tea and I have blogged too. And that makes me happier still.


53-minute skirt for Red Nose Day

red skirt for red nose day

I’m just going to sneak in with a quick post about a speedy skirt I made last night.

Youngest dort announced on Wednesday evening that she needed a red skirt or some red leggings for Red Nose day on Friday.

“No problemo sweetipops,” I said. I happened to be working next to Westfield shopping centre on Thursday and I would have many a ladies clothes shop to bag an emergency red garment.

Famous last words. Would you believe that between five top ladies-wear shops, and one very large sports shop, there was not a red skirt or pair of leggings to be found. Has red gone out of fashion? There was pink, orange, coral and burgundy but not a glimpse of red in sight, save a few t-shirts!

I had already planned a night in with good chums and the Great British Sewing Bee final on Thursday after work. No way was I going to cancel that. There were ‘skanklets’ and everything!

Watching #GBSB final. #skanklette

A photo posted by Tilly Walnes (@tillybuttons) on

So I planned a speedy skirt on the way to Tilly’s and – fuelled by Prosecco and pizza and mini eggs – I raced back to my sewing table before the clock struck midnight. Proper little Cinders, me!

53 minutes later, in true Sewing Bee stylee, I’d made the pattern and stitched up a full circle skirt with an elasticated waist from some leftover red jersey. It scores nothing for couture but fulfilled the brief… and diverted a tantrum.

It’s going to take me a little longer to write and illustrate the tute but I’ll be back with one later, because I quite fancy one of these myself! Till then, have a wonderful weekend, all. Hope you get some quality sewing time in.

Pattern testing: BHL Sophia

BHL Sophia dress

If you heard a rumour that there was a new BHL girl on the block, you heard right. And I can assure you that Sophia lives up to that By Hand London reputation of gorgeousness.

Victoria contacted me with an emergency test request. And despite my ongoing mega work load I couldn’t turn this one down.

By the drawings alone I knew I wanted this dress. I mean, check out those darts and oh that 50s style collar. Totally up my street with a little nod to vintage.
bhl_drawing_sophiaI chose the pencil skirt version as my vision involved ‘old man Prince of Wales check’ fabric! I was after a bit of structure backed up with office chic stylin’!

And so here is my first testing of the test pattern itself!

back_detail_front_full

And yes, call me crazy, but I did opt for checked fabric to test a pattern, and not for the first time. My thinking is that if it does turn out good then I haven’t wasted time. It happens… occasionally!

Truth is, not accounting for any amendments to the pattern that might be made by BHL in the meantime, I do need to make a few tweaks, including a small fba and to taper the skirt a bit. But that’s just personal preference.

bhl sophia collar detail

The fabric was from Dave the Drapers in Goldhawk Road. One of my faves. But lesson learned with cheap fabric: Even though the quality isn’t bad (its a wool mix) the grain is slightly off and that matters one helluva lot with checks! Well that’s my excuse, and I’m sticking to it!

I love the way the darts radiate from the central front and back seams. I’ve seen this approach in vintage design books but not on a pattern I own, vintage or modern. So it was a real treat to get to test how this works. I just have to figure out how to do an fba with this kind of dart. Presuming I swing to the side seam and proceed as normal but very open to suggestions if anyone knows of another way.

Sophia should be making her appearance in the BHL pattern shop soon So keep eyes peeled. Shes a good’un!


Make your own Zhivago-inspired fur hat: FREE pattern download

make your own fur hat free patternquick sewing projectHappy new year lovely followers!

I’m so delighted to share this pattern with you as my first post of 2015. It’s a timeless, vintage-style fur hat that will keep you warm and toasty in the most stylish way possible! And it’s a real quick project to sew up for that quick sewing fix when time isn’t on your side!

It really is so super easy to make. Just download and print out the FREE_fur_hat_pattern and follow these few simple instructions. The hardest thing about this hat will be to get your hands on some quality fur of the faux kind!

The pattern corresponds to my head size which is 22.5 inches or 57 cm.
You may need to adjust the pattern to personalise the fit.

You will need:

  • 1/4 m of faux fur (retailers will only usually sell you 1/2m at a time but its often worth an ask!)
  • 1/4 m of lining fabric (or find some scraps in your stash)
  • coordinating thread
  • a vacuum cleaner to hoover up all the fluff!

Instructions:

  • Make sure you print out your FREE_fur_hat_pattern at actual size, and check with the test square (on page 4 of the pdf) that it has printed correctly. Cut out and paste the sheets together to match the layout on page 1 of the pdf. Complete the hat band and crown sections as full pieces as instructed on the pattern then cut out.

NOTE: Before you pin the pattern to your fur fabric, think about what direction you prefer the fur to lie. On this particular hat I made, the pile strokes downwards on the band, from the top of the crown, down towards my eyebrows! On the top circular piece, it strokes from front to back. Incidentally, the centre back of the hat is where the band is seamed.

TIP: When cutting your fur pieces, cut on the reverse and just snip carefully through the backing fabric so as not to cut through to the actual fur on the right side. You will achieve a much better finish on the seams.

  • Pin the pattern to your fur pieces and cut out, paying heed to the tip above.
  • Pin and cut out your lining pieces. It doesn’t matter for the circular lining piece but make sure the band is cut on a straight grain to avoid stretching.
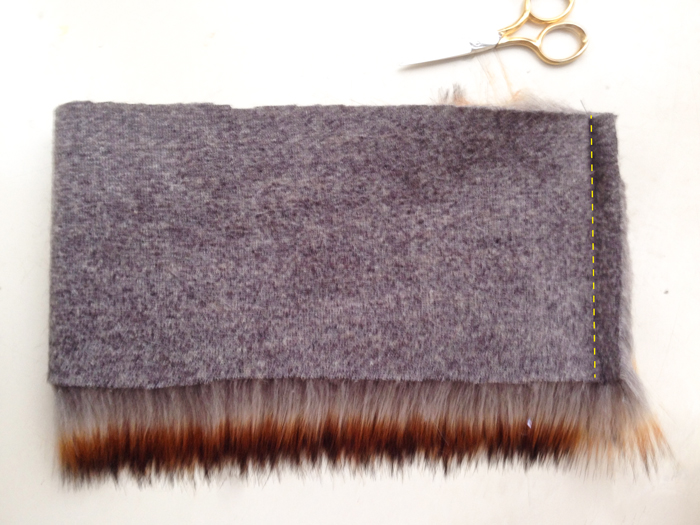
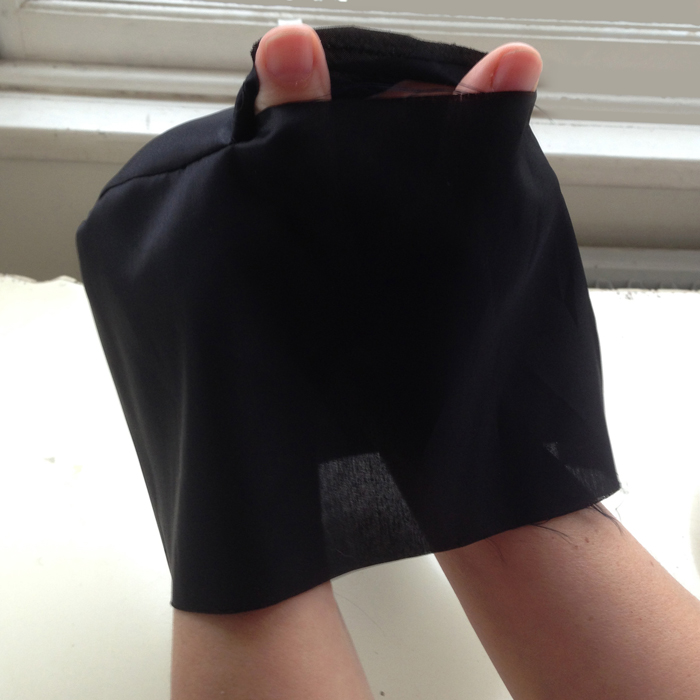
  • Take your fur band piece and fold in half, right sides together. Pin the short ends together, making sure the fur is tucked inside, and stitch using a 1.5 cm seam allowance following the direction of the fur.

seam fur band

TIP: When sewing fur fabric, Increase your stitch length a little so prevent thread tangling.

  • Finger-press the seam open and hold in place with a couple of tacking stitches top and bottom of seam.
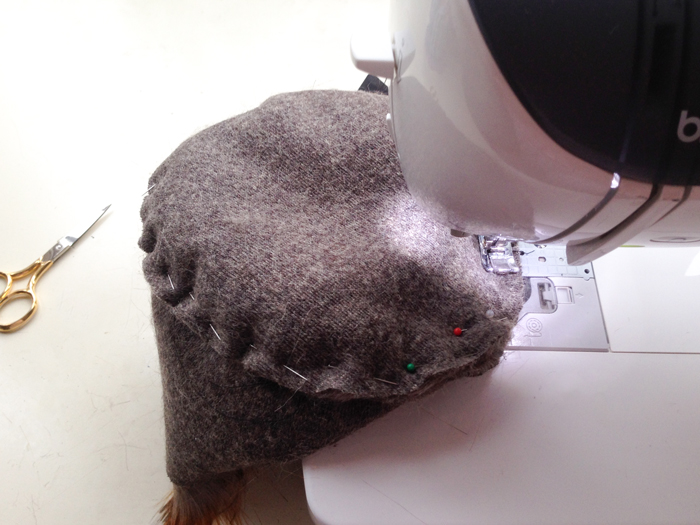
  • Pin the fur circular crown piece to the hat band, making sure the fur is tucked in and checking the direction of the fur is correct. See note above. Sew the seam using a 1.5 cm seam allowance.
pin and stitch crown to band
Pin and stitch crown to band
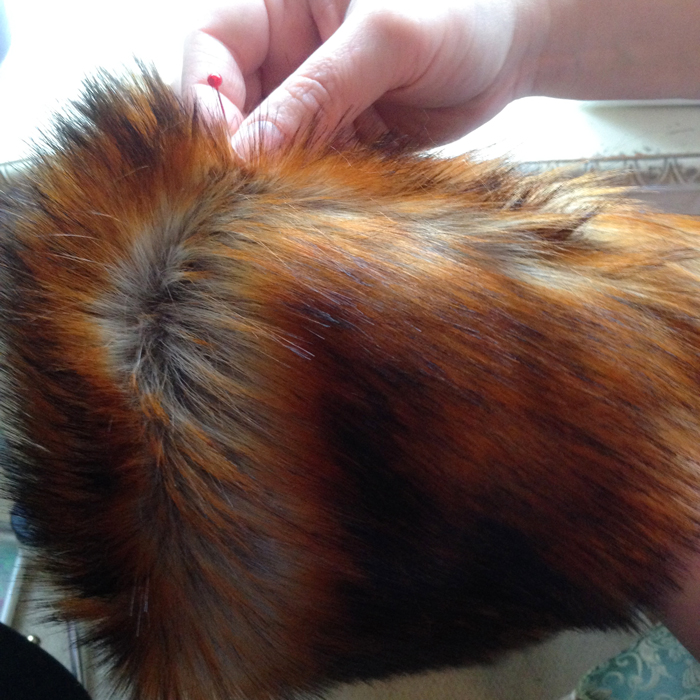
  • Turn right side out. Using a long craft pin (a normal pin or needle will do) drag it along the seam allowance to free the fur that has got caught in the seam.
picked trapped fur from seam with pin
Pick trapped fur from seam with pin
  • Now take your lining piece for the band, pin the short edges together as above and stitch with a regular stitch length and a 1.5 cm seam allowance. Press seam open.
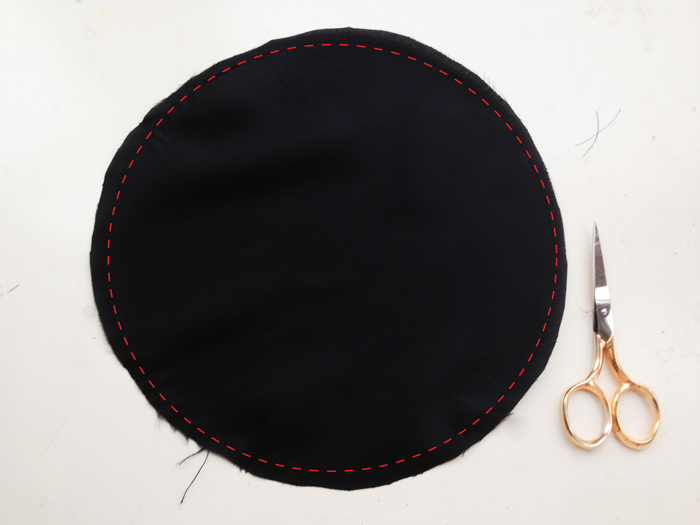
  • Stay stitch the circular lining piece within the seam allowance, to prevent stretching.
Stay-stitch circular lining piece
  • Pin the lining piece for the crown along one edge of the band and seam together, leaving a about 4 inches / 10cm open for turning.
leave opening in lining
Leave opening in lining
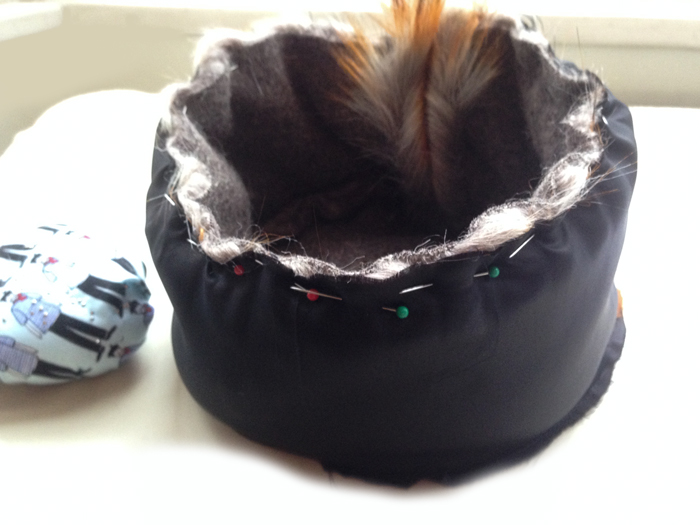
  • With right sides together pin the rims of the lining and the fur hat together. Effectively the fur hat will be sitting inside the lining. Pin together, matching the two centre back seams and stitch along the entire edge, securing the stitching, beginning and end.
Sew lining to outer fabric
Pin and sew lining to outer fabric
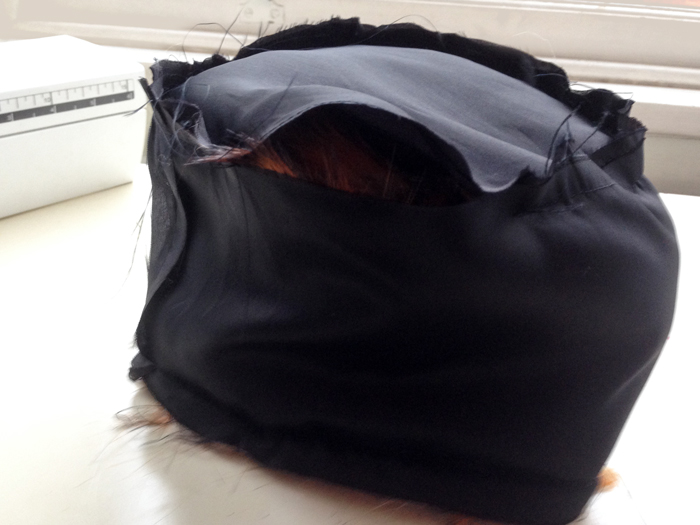
  • Turn the hat to the right side through the opening left in the lining, and you’re almost done!
Turn hat to the right side through this opening
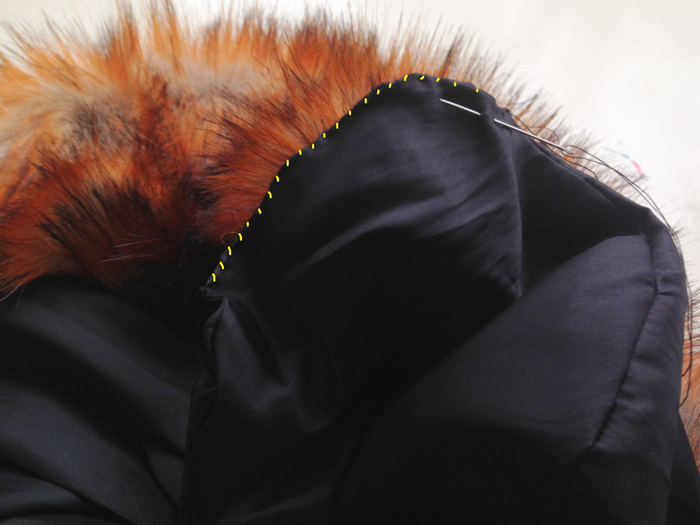
  • Pin the lining opening together, tucking in the seam allowance, and slip-stitch closed. With matching thread, obvs!
Slip stitch the to close the opening in the lining
Slip stitch to close the opening in the lining. With matching thread obvs!

Now all that is left to do is to don your new fancy fur hat, step out in the snow and hum the theme tune to Doctor Zhivago!

Please shout if anything is unclear. I’d be delighted to hear how you get on.

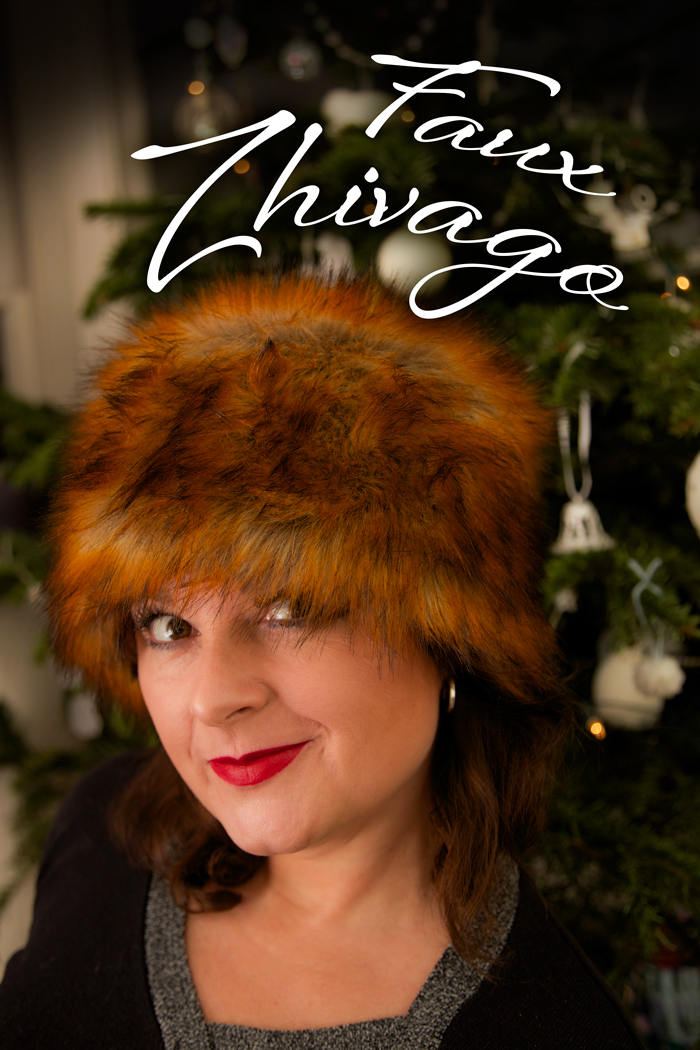
Faux Zhivago: handmade retro-style fur hat

handmade fur hat

I watched the film, Doctor Zhivago lots of years ago, snuggled up on the sofa with my mum. Can’t say I remember much about the plot but the music and the coats and the hats stayed with me for sure!

So when I found a crazy retro-style furry black hat in Oxfam, I knew I could and should shamelessly copy and create one of my own even if I didn’t have the lips to pull of a sultry pout, Julie Christie style.

So here is the Ooobop faux fur, Zhivagoesque, vintage-style hat that will laugh in the face of any Russian-style snowfall that threatens over the next few days.

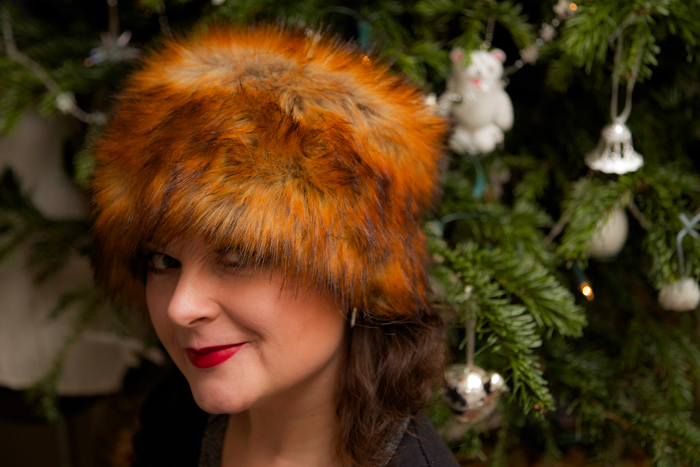
handmade vintage style fur hat

I care not if my children walk ten paces behind me.

I care not if Mr O likens me to Rab C Nesbitt’s Wife.

And I care even less for all those sideways glances in the high street. They are just jealous eyes!

My ears are warm. My bad hair day is irrelevant. And Lara’s Theme tune is on loop!

handmade fur hat Doctor Zhivago style

The faux fox fur – I keep having to state faux because it actually feels too real to be faux! – was a bit pricey but it was a justified birthday spend up gifted by my lovely mum. I got it in A-One Fabrics in the Goldhawk Road and it is such good silky quality. Only needed half a metre and that was enough for a trial one that went wrong, this one which didn’t, and perhaps a matching fur muff to come! Do people even wear those nowadays?

I probably don’t need to declare that it was Mr O that took these fab photos – late last night, with next to no light but one of those god-awful energy saving bulbs and a few fairy twinkles. I certainly wouldn’t have had the patience. Very happy to sit with a glass of bubbly under the Christmas tree while he worked it though!

I was hoping to have a little tute prepared for you to accompany this post but that was serious wishful thinking on my behalf! Working on it nonetheless. And for anyone who fancies a furry head warmer like mine I’ll be posting a pattern and a tute next post, post-haste!

Till then lovely followers, I wish you all the loveliest of wishes; Wrap up warm, keep safe and beware the nutters on the road!  x

handmade fur hat

Vintage wrap-blouse

vintage wrap blouse

In the olden days I used to worry that I wouldn’t have enough to blog about but now it seems I’m capable of even forgetting that I’ve made stuff to blog about!

This lovely pattern was generously gifted to me by Anne of Mercury Handmade. Not only did she post me a much-wanted, missing copy of Burda Style magazine back in August but she also enclosed two surprise gorgeous vintage patterns. This being one of them. If you’ve not caught up with Anne yet, I seriously advise you to pop over to her blog for all the inspiring and perfectly made clothes she makes for herself and her two lucky daughters

Bestway D.3,109 blouse pattern

The pattern is Bestway D.3,109. One of those mail order sorts, by the looks of it. And I’m thinking early 1950s.

I love the flattering neckline and the extended sleeves. The back is just one piece which incorporates the sleeves and there are interesting yoke pieces which incorporate them on the front. The ‘collar’ lays flat, sitting on the collar bone to create that lovely opening. And its beautifully shaped to nip in at the waist.

It’s held closed with just two vintage buttons. The third is for decorational purposes but at some point I would add an internal button or snap to keep the under-wrap in position. For the time being I generally tuck it into my pants!

lighthouse blouse buttons

I used a nice crisp cotton from the goldhawk road. It’s printed with lighthouses which seemed a perfect choice for this blouse.

vintage lighthouse blouse

I love wearing vintage style blouses. There’s always something a little bit quirky about them. And they are so easily paired up with a circle or pencil skirt. I’m slowly getting away from the easy-to-wear jersey tops that I used to wear all the time. Just need to make a couple more so I can ditch the rest of my tatty go-tos!

vintage lighthouse blouseAnd in case any of you are wondering. I wouldn’t ordinarily be out in December without a coat. It is winter as I post this and it is very, very nippy out! We just ran across the road while the sun was out to take these shots and ran back in before the goosebumps set in!!

I’m now about to add about 10 more layers and head out into the wild and crazy world of Christmas shoppers! I’ve not even scratched the surface yet. Please don’t tell me you’ve all done yours!


Handmade Secret Santa pressies

gold bag on the railingsWhen I saw this bag in December’s Burda Style magazine, I just knew it was the one I’d been storing in my head for over a year! I’d seen a very similar 1940s Vogue pattern floating around on the web, time and again but never for sale, at least not with a reasonable sale ticket!

vogue bag hat pattern v9837
Source: http://vintagepatterns.wikia.com/wiki/Vogue_9837

I’d almost resigned to self-draft my own but couldn’t quite get my head around the order of sewing. Didn’t really try hard enough tbh! But Burda saved the day yet again with another simple well-drafted design.

burda pouch bag
Source: Burda Style magazine December 2014

And so when I found out I was to make a Secret Santa pressie for the adorable vintage-wearing Emmie Ink Fairy, it was a given!

The instructions suggested leather, which I did originally go looking for. And believe it or not there is such a great colour choice as well in the Goldhawk Rd! But even after a good rummage, I couldn’t find a gold piece big enough to fit the pieces. I thought two pieces of gold lamb was a bit excessive and then gave up on leather altogether when I couldn’t remember if Emmie was a veggie/vegan. That might have gone down like a lead flipper!

As always it was A1 Fabrics that presented me with a better fabric solution: some lovely soft, gold ‘pleather’. Perfect!
It was an education to work with. A leather needle made light work but boy did we have a fight to press the stuff! Didn’t really think that through properly.

Gold pouch bag

Pleather is plastic, fundamentally, and will melt if it comes into direct contact with a hot iron. I’m not that daft. I did use some parchment paper as a pressing cloth. But it just boinged back the minute I stopped pressing. The heat was being retained and making it too pliable. So I grabbed the nearest ‘clapper’ I could find, in the shape of a heavy book, to slap down on the fabric once I lifted the iron off. It did the job in cooling down the fabric quicker and so holding the press a bit better. Not nearly as well as a woven fabric would have pressed but better than a poke in the eye for sure!

gold pouch bag

Burda’s instructions stopped at a facing but I wanted neater than that, so I made a lining to attach to the bottom of the facing, and of course included an ooobop label! Not such a secret now but I liked it as a finishing touch!

inside gold pouch bag

I stupidly didn’t get a picture of Emmie with it adorning her wrist but it didn’t look out of place with her beautiful pink sparkly dress.

We were at a lovely Christmassy do hosted by the BHL girls. So honoured to be part of the evening with so many wonderfully familiar faces.

We dined and beered at a local-to-me Polish restaurant called Patio. I seriously don’t know how those girls catered so brilliantly for over 30 of us with so many different menu choices. They were amazing.

And look what some gorgeous and not-so-secret Santa made for me!

quilted cup and saucer

I seriously couldn’t believe that someone could have made this quilted cup and saucer but when I realised it was the uber talented Rachel Pinheiro, it all made blinding sense!!

What’s not to love about the colours, the french men in their Breton tops, the moustaches and the candy stripes? Perfect to keep all my sewing notions from rolling around the table while I’m sewing and also for sticking pins and needles in as I go.

Earlier in the day I had been to a work Christmas lunch. Yes I know, 2 Christmas do’s in one day. And I was still standing! One of my secret-santa friends bought me this gorgeous sewing pattern. She is so bloody clever and so thoughtful! I can totally see myself in this dress already!

Vogue V2410 vintage dress pattern

I consider myself truly spoilt. Not just with do’s and gifts but with the plethora of amazing friends that bring me so much joy and make me laugh so much. That’s got to be the best part of any time of the year.

Have you made any gifts this year or is it all just too much?


Georgia the party squeeze!

BHL georgia dress

Meet party girl, Georgia! She was meant to be my party dress for last Christmas. But well, you know what happens. I make a plan… and then I make another plan!

But nevertheless, here she is for this season’s line up of parties. Kicked off at London’s Bob Bob Ricard’s no less, for my good friend’s 50th birthday celebrations. I even had the foresight to ensure I coordinated perfectly with the lavish decor of black and gold.

Mr Ooobop wasn’t available to do his paparazzi bit, so many thanks to the lovely @Alphabeckles for this impromptu snap.

Georgia dress at bob bob ricard

The pattern and instructions for the BHL Georgia dress are dead easy to follow. And the online sewalong is a great back up for the finer points.

I made some personal pattern adjustments that included a little FBA, a little shortening of the straps, and a not so little gradation from a 12 at the top to a 16 at the hip (Well that certainly was a surprise!).

I dutifully made the above alterations to a toile but the age old problem was that my toile fabric, although relatively the same weight as my chosen fabric, had a little more give. My gold and black heavy silk-like, embroidered viscose brocade had absolutely none, zilch, diddly-squat!

Yes I know! I know damned well the By Hand London ladies recommended a fabric with a little stretch so please don’t remind me that I totally ignored their perfectly perfect advice!! But you see I got sucked in by the gorgeous tartan version that Sally Bee made! And she used a woven with no stretch!

It must be mentioned that although I was exceedingly honest with my measurements for this dress: over bust, full bust, waist and hip. I neglected to take into consideration my underbust measurement. I think I have a disproportionate bird rib cage to be fair!

And so once I realised that I was going to twist my spine out of alignment or at best pull a muscle doing up the side zip of the actual dress, (which actually wasn’t going anywhere above waist level anyway) I figured I’d have to gain an inch at least from somewhere. So I claimed half inch from each side seam of the skirt side panels and accounted for that in the side-seams of the bodice too.

It fitted. Boy did it fit. No room for sharp intakes of breath but it looked pretty damned good, even though I say it myself.

I grinned and beared it… all day (yes I wore it to work before hand!) and all night.

But at some fateful point over that corsetted period I acquired a little uninvited breathing space!

BHL Georgia rip

This happened of course because I had left the teensiest of seam allowances to glean my inch and although I serged the tiny seam edge, it frayed from the strain!

Lucky I wore a ‘modesty jacket’! Which incidentally was a panic dirty rtw purchase the day before, from Monsoon. I say dirty, not because it is, it’s very clean and lovely in fact, but because there is an element of shame that I broke my routine of only hand made clothes for at least two years. I’ve only allowed myself underwear and cardi purchases from the high street. Anything else to be bought from charity shops. I could so easily have made this jacket. It’s not dissimilar to the Victoria Blazer. But time was not on side and nobody needs to see those fleshy underarm bits in daylight hours!

The jacket did it’s job and clearly hid the naughty side split until I got home too!

So now my dilemma. I want to wear this to at least 2 more parties which are coming up soon. Like next week… eeek! Do I patch it up or do I re-cut two new panels taking new seam allowances into consideration? I do actually have enough fabric.

TBH, I don’t actually know how I’d patch it up. So I think I know the answer. Unless of course anyone has any an amazingly good solution…. please?


ooobop! review: Burda Style December 2014

Burda Style Magazine December 2014 issue
Over the last few months I’ve been having a spot of bother getting a copy of my favourite mag from my local WHSmiths. Well from any Smiths actually. They are getting slack in their orders of big quantities or sometimes any orders at all!

But last month and this month, I decided to order it from an online newsagent and I think this is the way forward for me. It costs an extra £1.60 for post but I get notification of it’s arrival date and it is delivered within 2 days. I love the sound of the thud of the post landing on the mat and I certainly don’t miss the queues to the awful automated cash desks at Smiths!!

So here we are. Although not overly festive. But that’s ok.

The opening section, although very monochrome displays some lovely structure with a touch of shimmer.

Burdastyle December 2014 art deco section

A: Described as a long blazer but I think more a classy occasional coat. I love the asymmetry and I’ve seen some gorgeous silk-like viscose fabric that would work amazingly well. Could really do with one of these. I don’t have any party outer-layers! Burda suggests it could be a mini dress too.

B: I didn’t join the ‘peplum gang’ when they first got fashionable. But I might be persuaded by this one. I really line the clean lines of this top. It’s got a midriff that has sold me and I like the slit at the neckline.

C: A classic sparkly sequin jacket. But not for me I’m afraid. Too shapeless. Too scratchy. And I can just imagine all the cat fluff that would get stuck around the sequins!

D: Quite like this dress. Very classic and very flattering. It’s actually an extension of top B. But I would question that choice of fabric. Impossible to pattern match and so the optical illusion draws attention to a pokey out belly even when the model doubtfully has one!

E: Probably not that clear from this little pic but this is a sparkly turtle neck top with blouson sleeves and a lovely wide cuff. Love the silhouette and for me it’s a perfect work to night out top. There’s a tute to help the process. This one’s on the list!

F: There’s that peplum again! I’m not that enamoured with it but I like the idea of mashing some interesting fabrics together: Pinstripe suiting, lace and embroidered something!

G: This is a great skirt. The fabric choice is stunning. Graphic and structured. You can’t really see the detail but involves a hip yoke and a deep pleat at the centre front.

H: This outfit isn’t my thing. I don’t like the silhouette. I don’t do culottes or drawstring waists. Not on the list!

I: This lacy top looks so pretty in the picture. You’d never be sold by the line drawing. It looks really wide and strange but the draping effect is a winner.

The next section gets some red in with some festive flair!

There’s some cute little girls garments here but only up to age 10. LMO is 10 but wearing age 14 clothes so as much as I’d like to make her coat B, I’ll have to sort my grading skills out or just admire them on the page.

Burda december 2014 festive flair

A: Lovely simple dress with a structured skirt and a petticoat underneath. None too girly but still with a pretty fitted silhouette.

B: Double breasted child’s coat with cute peter pan collar. Sewn up in top notch wool it is truly a classic forever coat. Well at least the child grows out of it! I think I like the grown up dress too. Love the simplicity, the red, the deep pleat and the neckline. But the sleeves are worrying me. They look kind of too big at the top.

C: A raglan blouse (or peasant top in my book!) and an extended version as a dress. Like both. And they would be very simple to make for presents. Don’t have to be too precise with the sizing either.

D: Scarf blouse and skirt with ties says it all. Too much flounce for me. They are both made in crepe too. Maybe that’s what is putting me off asides from the dipped pink and coral combo all clingy like that. Proper girly Christmas wrapping!

E: But just in case that scarf business appeals, here’s another variation on a dress with longer ties to tie in two places. Genius. But not on the list!

F: I think this is the same little girls dress as A but without sleeves. I don’t mind mums semi fitted brocade number but it does look a tad mumsy at that length to be honest.

G: They lost me at ‘loose cut’! And drawstring!

H: Boxy jackets always look good on children! The simplicity of the style can make way for some statement fabric.

A departure from girly to freestyle. Some very interesting fabric combos. And I like that.

Burdastyle December 2014 Free Style

 A: Hopefully you can just about make out the giant underbust fringe! It’s a maxi top sewn in a crushed jersey knit with an asymmetrical draped collar. I don’t wear strides but if ever I did I may have to pair up with one of these. Just because!

B: This is indeed a master piece! Military made beautiful. Slightly fitted wool coat with trumpet sleeves, asymmetric collar and buttoning. And that gorgeous design you can see up one side is appliquéd lace no less. I’m still revelling in my coat from February but I can totes see myself in this. Maybe next year!

C: Described as a bell skirt. Nothing much to see here but some lovely overlaid fabric and trim has planted some seeds for sure.

D: Gotta love a cape. Proper sturdy one too. I do want a cape but not this one with its belts and panels and epaulettes. It looks a bit overly involved for me. Don’t dislike it though.

E: There’s that top again. Same as E in the first section but in a totally different fabric. Making it more jumper than blouse for a more casual approach. You wont be able to see from the little pic but the seams are ‘outwardly open’! Why? Imagine how irritating when everyone and their aunt asks if your top is inside out!

F: In interesting patched shirt using patched stretch jersey, stretch faux leather and wool. You could use any kind of combo but I’m finding this all a bit too much. I do very much like the leathery sleeves though. The skirt looks more interesting than the pencil skirt it is but even though it is relatively straight I think that top needs to be worn with a much less interfering bottom half!

G: Pretty sure this is repeated from the festive section but I love how much more retro it appears with a shorter hemline.

H: Tube dress with rolled collar in a stretch knit lace. Great on the right bod. But not on mine!

I: I like this dress. Lovely defined bodice and flouncy skirt in an overlaid lace tulle. Sold on the colour too. Eliminates girly girly and makes it more day time. I can’t decide whether I like the sporty grosgrain straps or not. Actually I do!

J: I’ve been thinking of a poncho. Not like the one my mum made me wear in the 70s but something understated like this one. In truth I’m being lazy so as not to have to get involved in a cape! Its just a rectangle with minimal sewing, yay!

Burda’s designer pattern this month comes with a nod to Jean-Charles de Castelbajac. I love these little insights into the lives of designers. JC professes to be inspired by love andcuriosity. I like that! Just as much as I like this straight cut mini-dress with its massive pocket details and topstitched standing collar. burda december 2014 JC de castelbajac dress

I’ve made pj bottoms for 3 other members of my family but never for myself. It’s just occurred to me that I’ve got the most raggedy selection of nightwear and that things must change. Here’s some pretty things and one seriously crazy pair of pj bottoms!

Burda december 2014 nightwear

 A: Cutesy bustier and French knicker set. Piping, ruffles the lot!

B: Isn’t the idea of a boyfriend shirt that you just nick one off your boyfriend? I’m not sure I can afford to invest that much time into making a proper nightshirt. Piped collar, inverted back pleat, button placket, breast pocket with embroidered monogram and inseam pockets too!

C: Lovely little ballerina slippers. Could be a lovely little Christmas present perhaps.

D&E: A traditional set of pjs. What’s not to like? Love the cool crisp blue.

F: This is a knitted coat and I want it! I don’t want to knit it though. I’d be bored of it before I finished it, I’m that slow. But I’m sure someone out there would love to whip this up.

G: And theres those crazy palazzo trouser pjs! Can’t do those. I’d get myself in a pickle for sure.

H: Camisole and French knickers. Now you’re talking. Maybe this is my Christmas present to me!

I: This nightdress is pretty too. Ruffles top and bottom are a bit cake-like for me but I like the elasticated empire line.

As is traditional, it’s the plus fashions that bring the party to the fore.

Burda December 2014 plus fashion

A: Long jacket and pencil skirt. A classy pairing. The jacket comes with an optional belt but I’d leave that out unless you want the dressing gown look!

B: Low cut V-neck tunic top. I love the contrasting black band around the neckline. Very feminine and perfect with pencils and skinnies.

C: Bit odd this ‘volant’ tunic. Burda’s word not mine! Longer at the back than the front with ruffly bits. Not really my cup of tea.

D: Described as a peplum dress but someone more sophisticated than that I feel by the way that the centre point extends. Very jewel-like indeed. I’m not keen on the colours but greens and blues would do it for me. Or blacks and reds! A lot of precision sewing though. Only for the more patient among us!

E: Ah! There’s that long jacket with the belt. See.

F: Can’t make my mind up about this skirt. Its fundamentally a pencil with satin bands that run down the back. Apparently they make the bottom look slimmer. Are big butts out now then?

G: In the right drapey material this tunic dress would be gorgeous. I’d prefer not to look like a galaxy but I do like the contrast of the black bands and a busy print.

H: This colour-blocked peplum blouse is a no from me. Too much like hard work. Too much going on in such a small space. But I bet somewhere out there, there is a quilter who is itching to get going on it!!

Well that just about wraps things up. I hope you enjoyed the sneak peek. I failed in every way to make this a shorter exercise but no regrets. I thoroughly enjoyed spending the time to look closer at each garment. And of course it always makes for a great record to come back to.

Enjoy the rest of your weekend x