Roll over taggy blankets, there’s a new taggy T- in town!

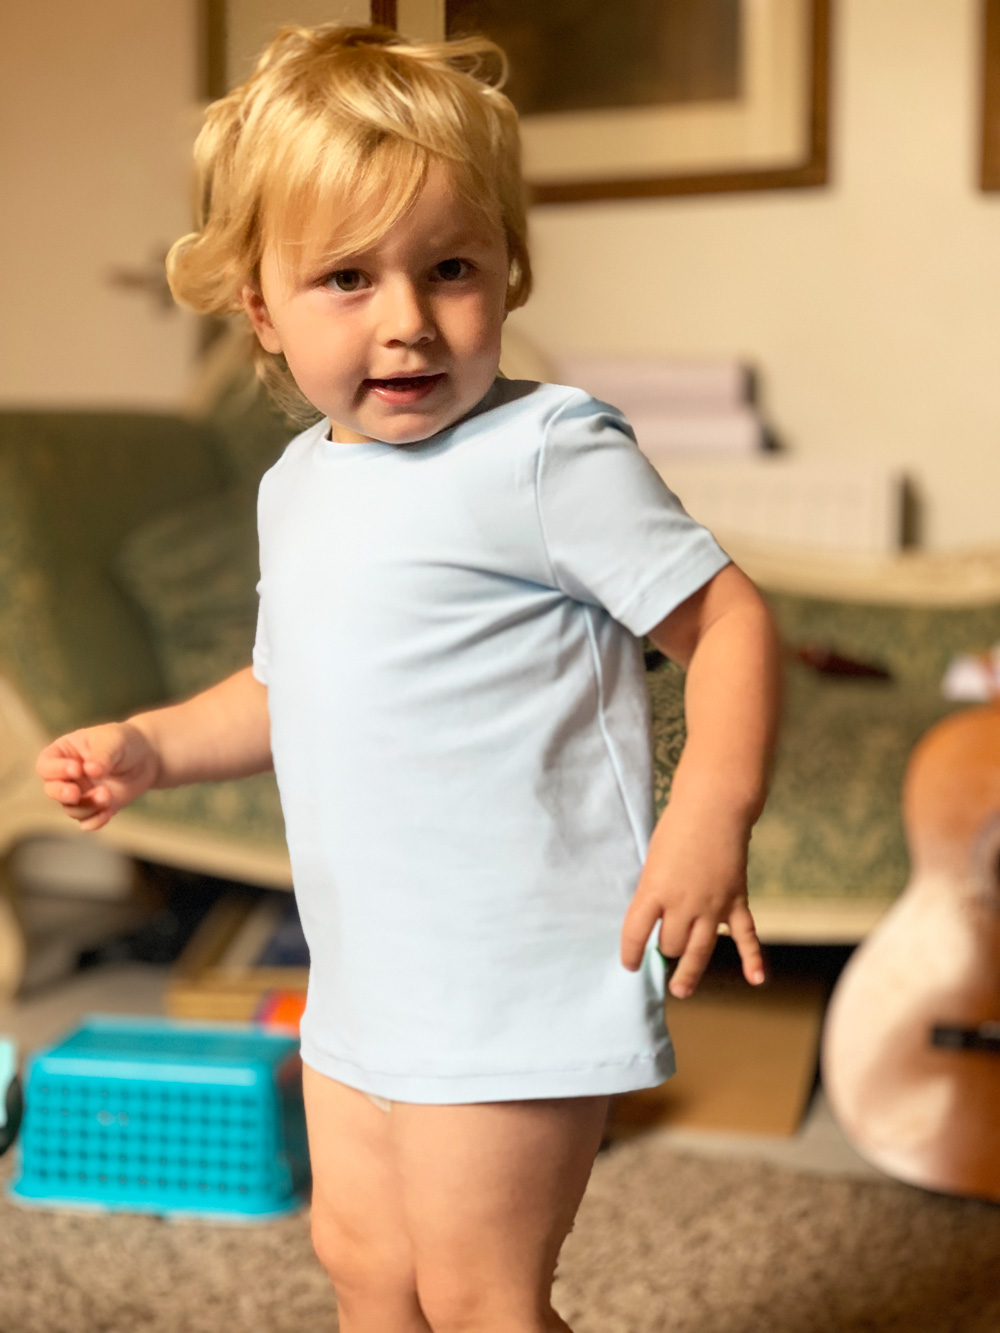
Let’s face it. There’s not much gratification to get from making children’s clothes – So much effort for such a few amount of wears, if any. And I’ve recently refrained, until a request for my grandson came in: My son cannot find plain unbranded quality cotton toddler T-shirts that don’t have stupid slogans, or images on them and wondered if I’d care to oblige.

At first I was reluctant, especially after recently refusing a similar request for a grown up. But then I realised I could add a very tiny but genius design feature here which would tick two boxes, and make this project more worthwhile.

Anyone else know a toddler with a silky label obsession? I mean, that’s kind of what the taggy blanket (afflink) was invented for (for anyone who doesn’t know, a taggy blanket has lots of silky ribbon loops sewn around the edge of a small piece of fleece fabric and serves as a comforter. ) Or perhaps this is what is responsible for the silky label obsession to start with. Who knows?!

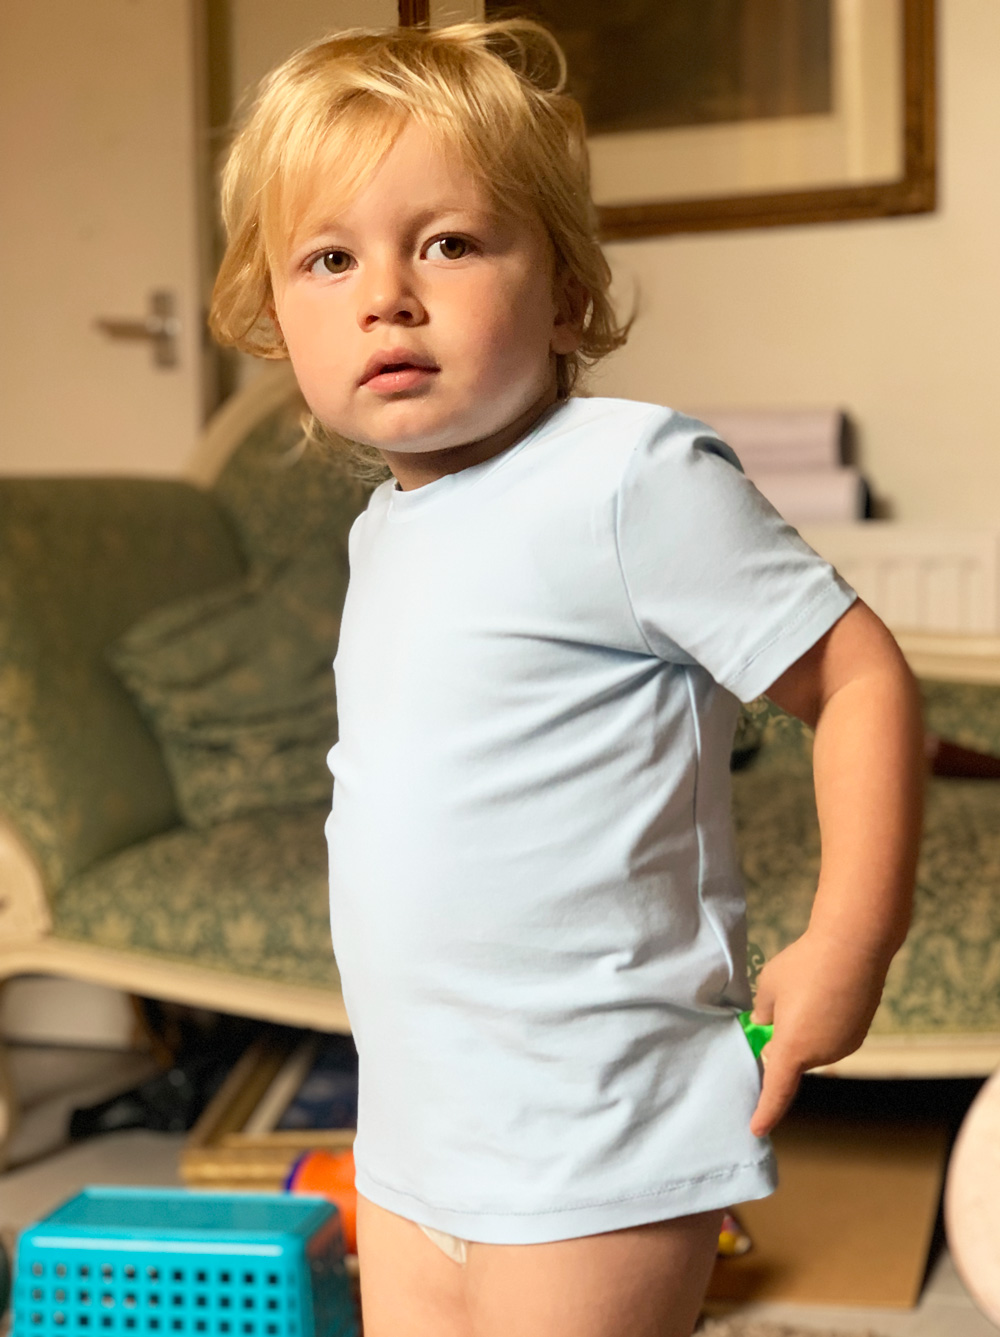
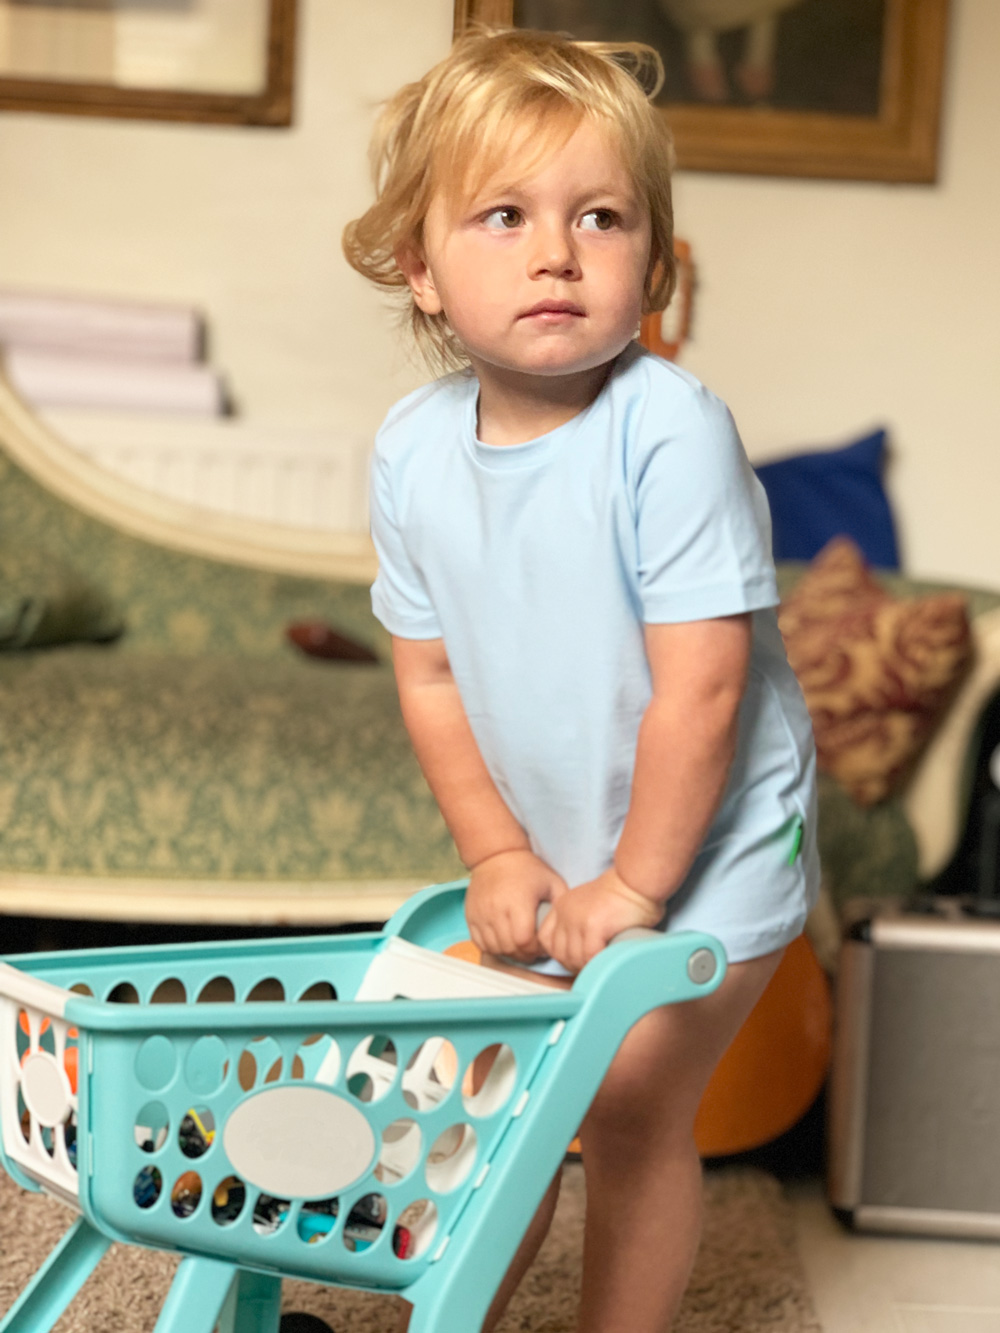
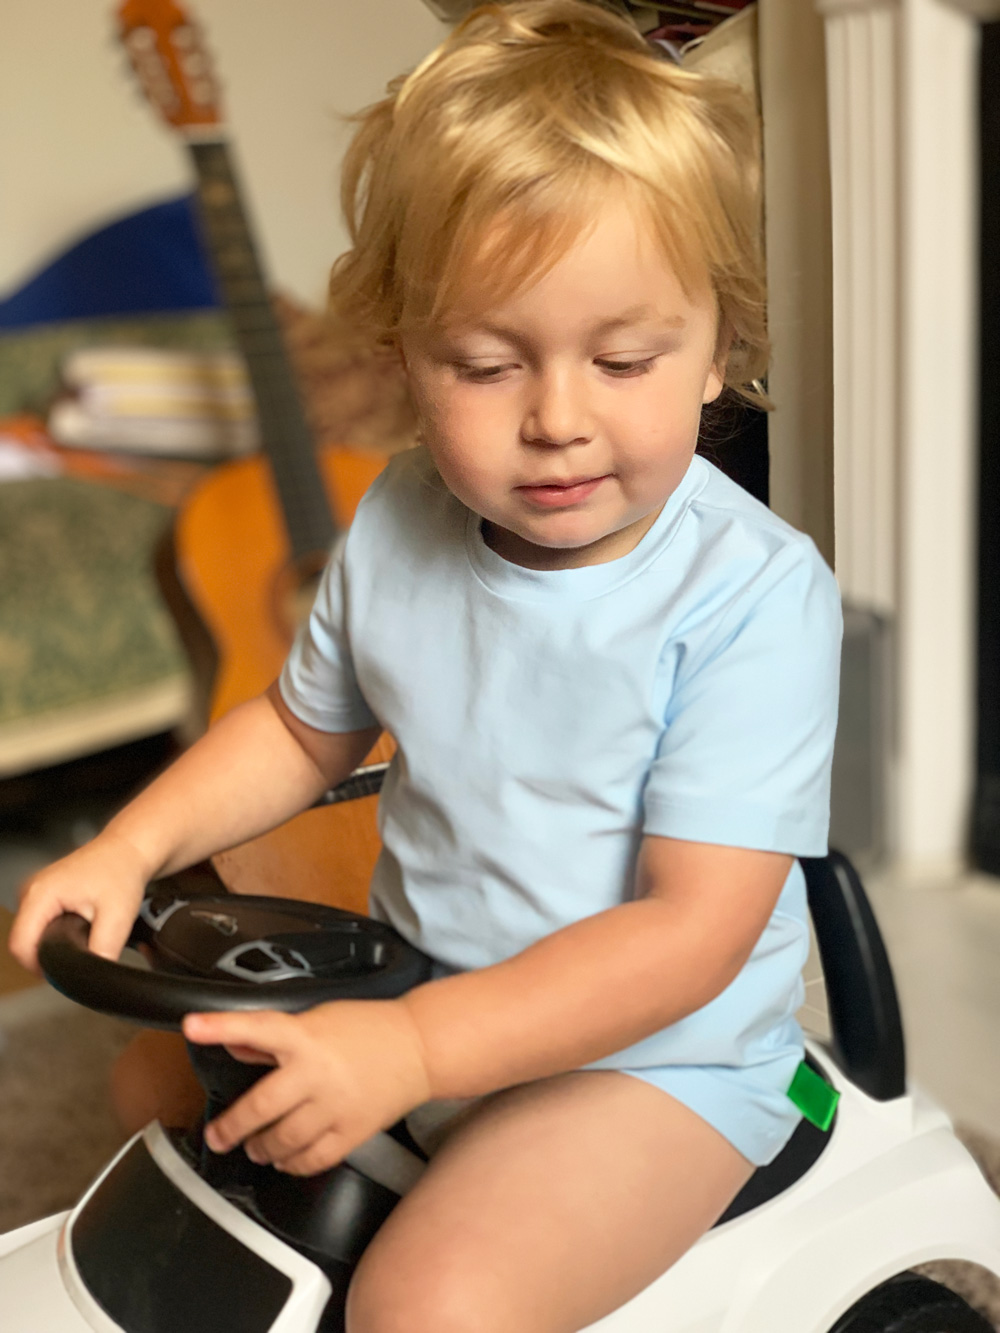
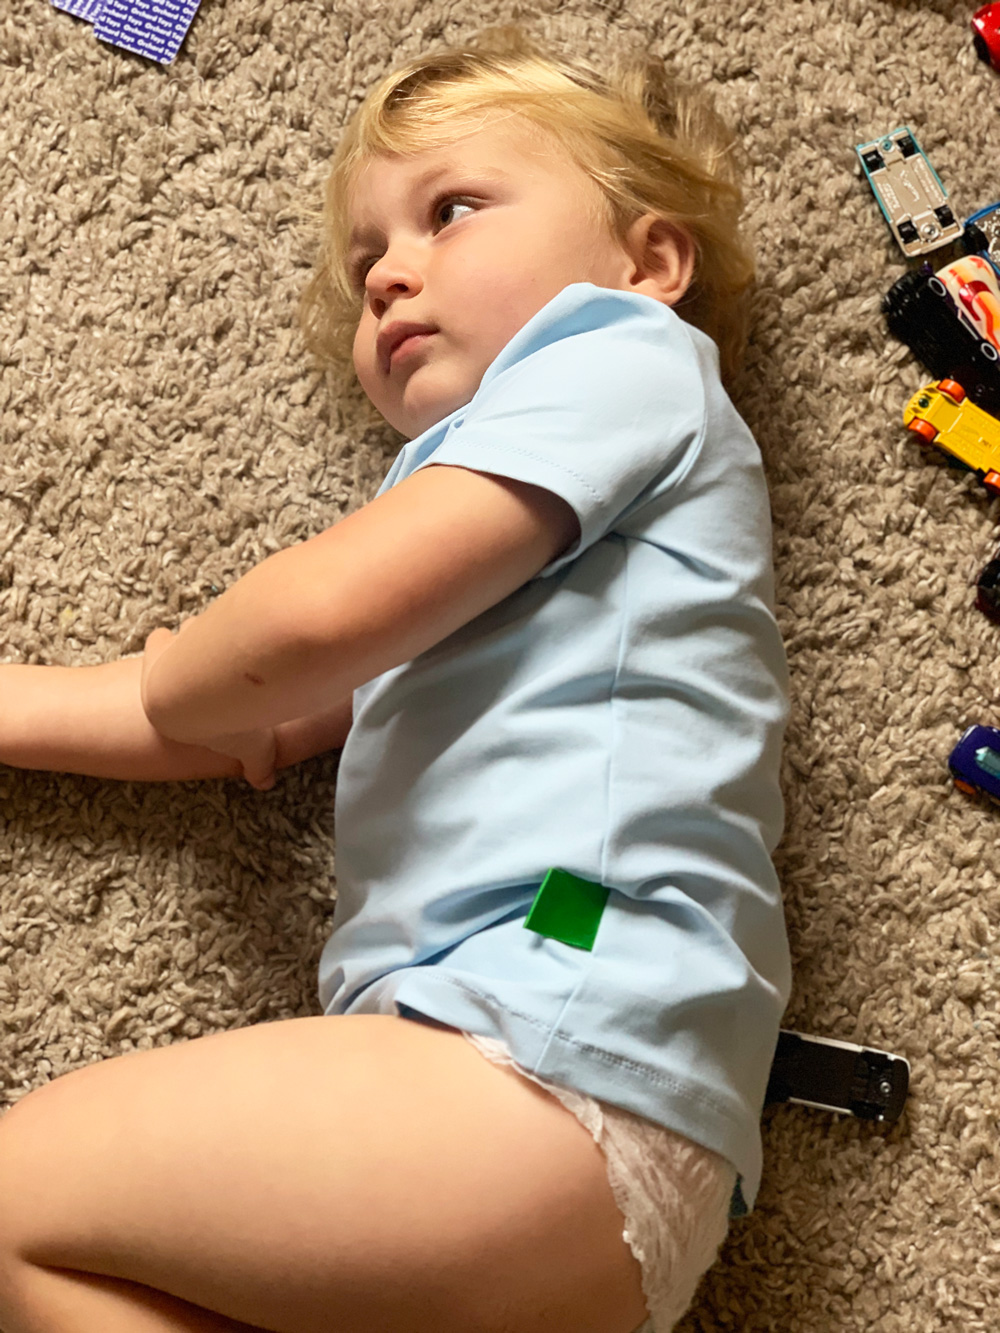
Blake is no exception and loves a label. He’ll find them every where – blankets, cushions, stuffed toys and especially on his own clothes. Trouble is they are always on the inside and he insists on pulling up his top to get at them.

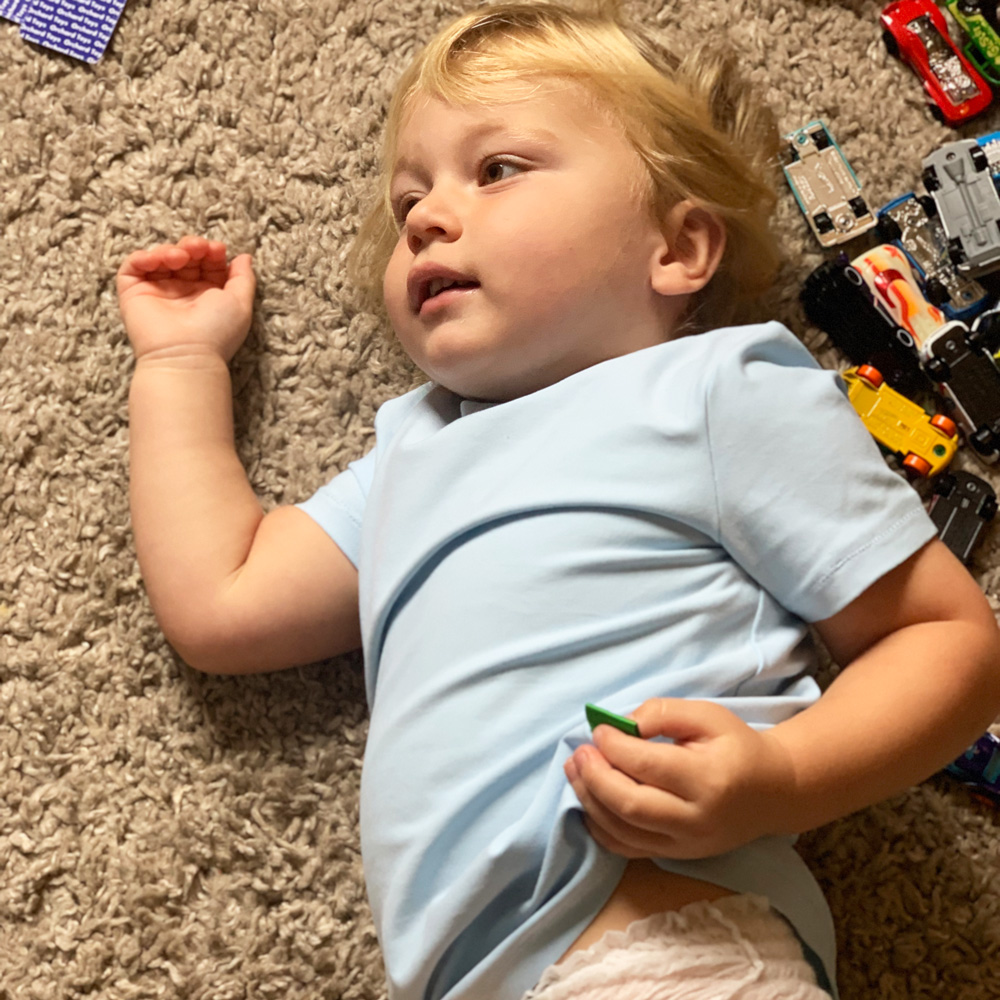
I had a flash of inspiration when I was at the Crafty Sewing Camp, as I sewed my sweary label to the outside of my Ankara dress – far too good to hide inside – that I should sew a label to the outside of his T-shirts! Its kind of like a toddler taggy T- with less chance of a draught, especially with colder months coming up.

For the T-shirt , a quick Google led me to Diby Club and a great free pattern with lots of style variations with very detailed instructions. Such a lot of work invested to give for free. It made me a bit suspicious tbh but I knew proof would be in the making of it and there was zero chance of me wasting any amount of time, drafting a pattern in any case.

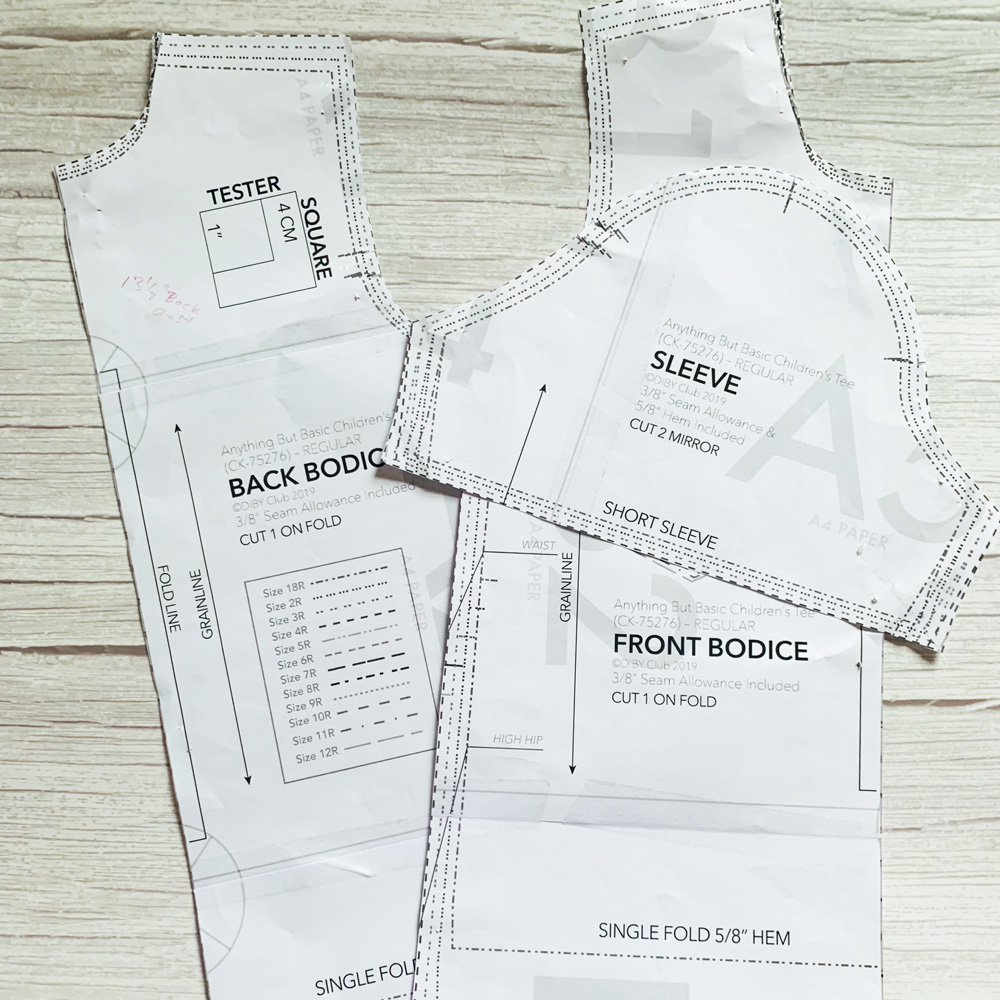
I didn’t need to refer to the instructions as I’ve sewn various tops and T’s but I did take heed of the measurements for the neckband as clearly it had been tried and tested on a fabric with the same suggested amount of stretch.

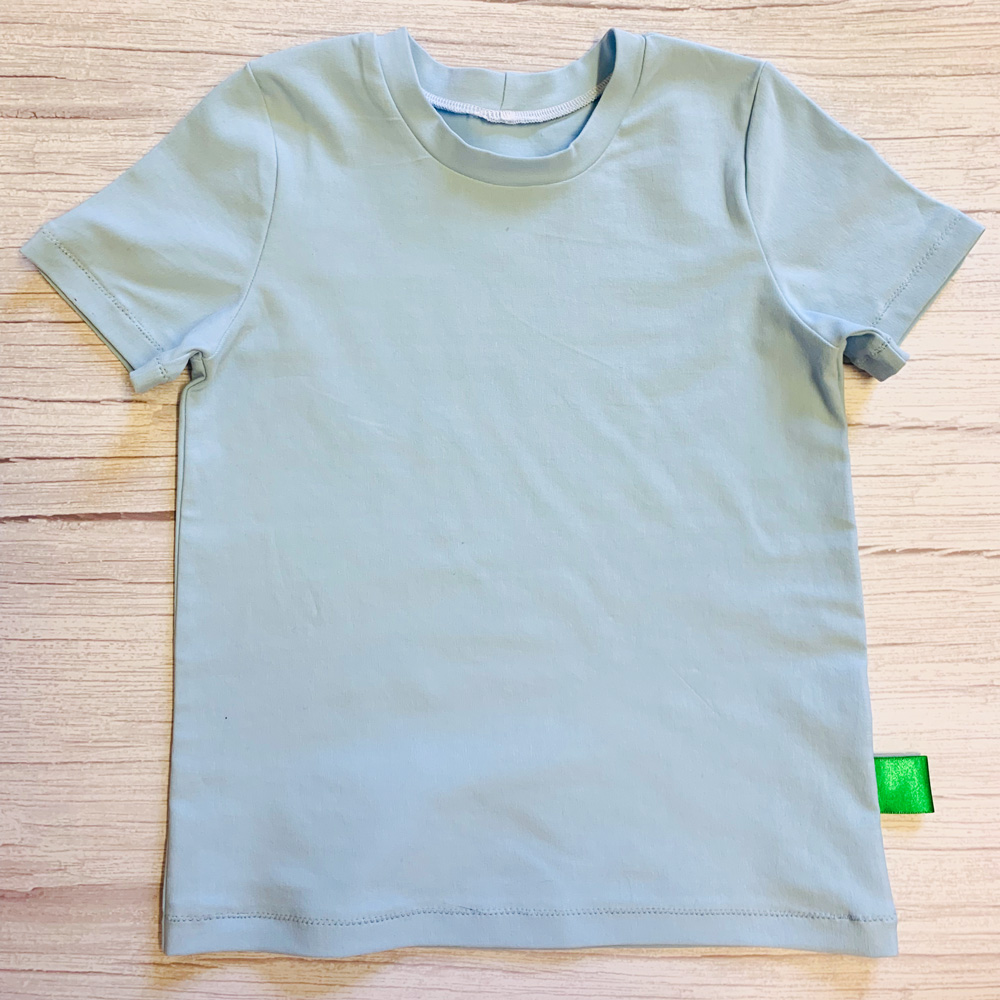
I sewed most of it on the overlocker and was quite excited about doing a blind hem on the body and sleeve section with the overlocker too, until I tested it on a scrap. It was a bit of a heavy finish for such a small garment, especially in this amazing premium cotton jersey. So I just overlocked the edges and hemmed with a zigzag on my regular machine. Again, too lazy to set up the twin needle but its just as cute and I’ve had no complaints! Incidentally I bought this fabric from Minerva. It washes beautifully, presses and recovers well. Lots of different colour options, too.

Blake wasn’t very impressed when I asked him to try it on but when I pointed out the label, there was no hesitation and within seconds of his arms pulling through, went into his little silky stroking trance mode which is generally an indication of nap time! One happy customer and one very happy Nanna who ultimately enjoyed making such a boring project and also seeing it appreciated in real life. You know what? I might even make another!

It was a fantastic little no-brainer of a project to palette cleanse and gear me up for something a little more involved and with #SewVintageSeptember here already, best I get cracking with my next project.

Do you ever sew for little ones or sew something really boring before starting a more complicated project?

Treasures for my Treasures

Amelias first tree decoration

In a few days time I’ll be wondering why on earth I didn’t make all my Christmas presents. All that joy that could have been had by hand-crafting beautifully personalised gifts for all my friends and family yet instead I chose to race around stinking hot, over perfumed shopping malls for expensive and ‘box-ticking’ presents. But as I sit, still with a work to-do list up to my ears, I’m currently fully aware why I didn’t quite get round to it!

I did at least manage to rustle up two little decorations for two of my favourite little people – my grandchildren!

Blakes first christmas tree decoration

This is their first Christmas on planet earth and my first Christmas as a Nanna! And boy am I loving it!

My Christmas tree is filled with decorations either gifted by others or that have been bought at Christmas Fayres in good company. And every year I dec the tree the memories all come flooding back. And I loved the thought that a personalised tree decoration might be a ritual of sorts or a cute keepsake at the very least for Amalia and Blake.

I’d love to report that I stuck to my sustainability guns for not buying new fabric and used leftovers instead. But that would be a complete lie. I couldn’t fight the the vision of lovely linen and festive …. ticking!  It just works, right?! I did reclaim some ribbon and rooted around the button tin for the perfect vintage buttons, though.

Amalia first Christmas memento reverse

And if you are interested in the process for these little decs …

The lettering is my handwriting. I perfected it at first on paper within the confines of a heartshape for Amelia and a circle for Blake before tracing onto Solvy water soluble stabiliser. I love this stuff. It’s so much fun! There’s a link to buy this below but you could also use a transfer pencil if you had one to hand. That will wash away too. Anything that doesn’t leave a mark on the finished article.

template for lettering

I then placed the Solvy with the wording on top of the plain linen and then sandwiched them between the embroidery hoops, tightening enough so there is no movement but not too much to stretch the fabric. It just helps to achieve more even stitches and less puckers.

Mostly I used a chainstitch and stem stitches in places using 3 strands of red embroidery thread. Gold metalic embroidery thread for the stars on Blake’s one.

Front of Amalias tree decoration

Once the design was finished I washed away the stabiliser with cold water, patted dry with a tea-towel and finished the drying process by ironing.

My paper template then served as a pattern piece to centralise the design and cut the shape around the lettering allowing an extra quarter of an inch for seam allowance. I cut a matching piece for the reverse.

With right sides together I seamed all round, leaving a small gap for turning and clipped the seams for smoother curves.

Polyester toy filling was pushed into the seams before I steamed them for extra smoothness! One they were filled I slip-stitched the opening closed.

I found the red metallic beaded trim at Sarah’s Haberdashery stall in Shepherds Bush Market and I oversewed it along the seam line.

detail of the red metallic beading

Finally I used a length of ribbon for the loop and sewed it in position on the reverse, adding a little vintage button in both instances to cover the stitches.

I savoured every little wonky stitch of this project, as I reminisced at how much has happened this year. I’m so very proud of my children, and what they have become. And my heart is literally bursting with love for my ever increasing family (bffs included) and what they mean to me. I do hope my little treasures will cherish these as they grow older nearly as much as I’ve loved making them!

Reverse of circular decoration

So how did you all fare with making gifts this year? Or did you get caught up in the rat race like me? Let me know how you wrestle with your conscience and please give me tips how I can be more productive next year.

In the meantime I would like to thank each and every one of you for sticking with my sporadic posts. It means a lot to still have you reading them and I’m forever grateful for all your lovely comments and continuing support.

Wishing you all the very loveliest of Christmases and the bestest of New Years ever. See you on the other side!

Love Janene xxx

Materials mentioned (affiliate links):

Tools mentioned (affiliate links):

Liberty dresses and a little self doubt

Bridesmaid dresses by ooobop
Photo by Arina Photography

When Yasmin told me she was going to get married my squeal was enough to summon the local hounds. When she asked me if I would make dresses for her bridesmaids, I squeaked a more fearful ‘yes’… Silk, tafetta, yards of it. Pale expensive fabrics poofed up all over my… kitchen table? Not to mention the pressure of producing something nothing less than perfect for such an important occasion for such a special couple! My head was racing with all the awful possibilities…’Of course, I’d be delighted and honoured,’ surfed my quivered reply on the outbreath.


I’d been dreading the day someone asked me to make a bridesmaid dress. Not quite as much as being asked to make a wedding dress. But still, nothing more than fear of not being able to come up with the nothing-more-than-perfect goods. Nothing more than I deal with every day as a designer tbh. Isn’t self-doubt a wonderful thing?!

Liberty bridesmaid dresses by ooobop
Photo by Arina Photography

Cut to a coffee date and handover of a bag load of the prettiest Liberty Tana Lawn, Betsy D fabric in turquoise. I should have known better. No prom-girl-meets-fancy-princess dresses on the guestlist here. Instead three classic pretty little girl dresses were the order of the day. Something the girls could run around and happily play in and wear again afterwards.

pompom trim detail
Photo by Jessica Tingley

I was so impressed with Yasmin’s vision, not to mention her wedding dress find at a vintage wedding fair. A gorgeous original 1940’s number with very little alteration needed. And the deco details she found on Ebay re the Jenny Packham hair accessory and the dress clips. Who knew about dress clips? Such a beautiful thing. Just. So. Yas!

So of course the bridesmaid dresses needed to be simple, floaty, proper little girl dresses with a polite nod to vintage. And before I got pen to paper, Yas had it in the bag and downloaded the patterns already: These pretty angel sleeve dresses from an indie seller on Etsy – Aesthetic Nest. Quite the perfect stage for Betsy D!

angel sleeve dress ooobop

The ages of the girls were 7, 8 and 10. Having had two girls of my own I felt the need to raise a possible issue about potential tantrums should there be any objection to such prettiness. The last thing you want on your big day is a scowling child, head sucked into shoulders, begrudgingly following you up the aisle, curled toes gouging tram tracks in the parquet en route.

So, on consultation, the 10 year old unsurprisingly wanted something a bit cooler! But that was fine because the the alternative was gorgeous too. A little halter dress from Simplicity 8064, with peter pan collar and bow.

I didn’t get to meet the girls, and it was logistically impossible for the older one given she lives in the US but by the power of technology and good old Royal Mail we managed a virtual overseas fitting which thankfully only threw up the need to take some excess out of the back.


simplicity 8064 dress ooobop
Photo by Arina Photography

The style of the Angel sleeve dresses meant no real fitting dramas at all, save the length. Incidentally this pattern comes up really long and would have swamped the little ones. I sent a toile by post and it was returned with a safety pinned hem of 5 or more inches!

So when all alterations were factored in, I made the dress version of the angel sleeve dress for one of the girls and the top and skirt version for the other. So happy that they chose a slight difference in style. We couldn’t help but be persuaded by the addition of some pink pom pom trim found in the Goldhawk Road.

angel sleeve blouse skirt ooobop

bridesmaid dress ooobop
Photo by Arina Photography

There was just enough to add to the ends of a blindfold for Piñata fun and games too!

pinata_blinfold ooobop

The halter dress commanded no such pompom fun but instead a carefully selected vintage button and some coral pink cotton trim to frame the Liberty print so  perfectly.

simplicity 8064 ooobop

But I’m assured there was no lack of fun to be had whilst wearing it!

simplicity 8064 dress made by ooobop
Photo by Jessica Tingley

Oh the pride when Yas sent me the photos. It’s so good to look back on something with fresh eyes. I so admire her determination not to have felt the need to comply with convention – the word in itself is so boring and automated – and instead, that every little personally sourced, perfectly chosen, and lovingly stitched item added all the more personality and meaning to her very special day.

I am so chuffed to have been asked to make these dresses and even moreso to have kicked self-doubt into touch!

bridesmaid dress by ooobop
Photo by Jessica Tingley


Personalised baby bunting banner

Lucas bunting banner

Welcome to the world, baby Lucas – our new gorgeous nephew!

I got a sneak preview of the nursery before he was born so I already knew the colour scheme. And he has cool rock ‘n’ roll parents so skull and crossbones were totally acceptable!

I attached the letters with double-sided bondaweb as I did before on Maddie and Charlie’s bunting but this time, instead of using the appliqué stitch, I used a regular straight stitch, quite close to the edge, to secure the letters in black. Appliqué stitch on my machine is slow and unless its visible – in a slightly or fully contrasting colour – there’s not much need to waste time or thread!

bunting banner stitching

There was a slight contrast issue with the letters against the background fabrics. So I sewed another line of white stitching around the letters to make them stand out more.

Lucas with his mum and dad, live across the waters in the sunnier climes of Florida (not jealous, much!) and so I was delighted to receive this picture of the bunting in situ, not long after posting the parcel.

lucas banner bunting in the nursery

Fancy that. My handiwork travelling all that way to hang in an American nursery! And incidentally, no longer bearing the name ‘bunting’. It’s now called a banner! Bunting in the US is more akin to a baby’s snowsuit. Interesting to compare the search results for ‘bunting’ on Amazon.com v Amazon.co.uk! Learn something new everyday!

The Pencil Atelier at the Port Eliot Festival

port eliot wardrobe dept
The quiet before the storm!

I have just recently returned from the most exciting and inspiring 4 days away at the most amazing festival, ever – The Port Eliot Festival in Cornwall, UK.

Lucky old me was asked to join the Pencil Team to fuel the 80s theme and bash out some rara skirts for lots of festival goers who would then participate in the fashion show finale at the end of the week. It all seemed a little bit daunting at first, not least of all because raras aren’t the quickest things to whip up and with minimal resources and in a tent!

ooobop sewing at Port Eliot festival

But we did have leccy and we did have good fabric. Boy did we have a substantial stash! Sponsored by Chloe no less. No expense spared for our budding fashionistas!

fabric sponsored by Chloe

So the afternoon before the first session we arrived at a prototype. For Paul! A willing and most encouraging volunteer who was delighted to be my model and first happy customer!

rara_skirt_for_paul_1

The order of the day was raw and ready! Overlockers didn’t get a look in and hey, who needs a hem anyway?! We had 2 shifts a day–one for each rara–at the very least, times 7 sewists: 4 fashion students from the Glasgow Clyde college; 1 amazing consultant stylist; one very wonderful experienced seamstress/mother/grandma to everyone… and me!

Bumble teaching sewing

To emphasise the ‘raw’, we barely used scissors, save to snip the ends of the fabric before ripping near-as-dammit lengths for main skirt and flounce sections. I accounted for double waist measurement for the width and measured just above the knee for length. The measurements for the layers were guessed… and hoped!

lanyas rara skirt

So we started flat, gathering the flounces from bottom to top. But not a gathering thread in sight. Way too much faffing! We just pinched and manipulated those strips under foot and zigzagged into position, covering each layer of stitching with the next flounce above.

rara skirt in progress

When sufficient layering was complete, we stretched and sewed the waist elastic (measured comfortably stretched against the body) to the top edge of the skirt using a wide zigzag stitch – making a casing was taking too much time. If there was any excess fabric beyond the end of the elastic, it was simply trimmed off. Then there was just one back seam to stitch up.

Each skirt took about an hour and a half on the whole, including a lot of chatting and demonstrating and getting the children to have a go. Some were willing. Some were quite happy to sit and chat and have a bespoke skirt made before their very eyes. I know I would be!

rara skirts

Little Miss O was in charge of printing the designer labels!

designer Pencil Atelier labels

Every customer had their own ideas. How many flounces, what fabric combo and whether or not there were additional ribbons and bows. In fact it seemed the younger the customer the more determined they were to inject their own creativity. However much we tried to push the gold mesh it often got declined! They wanted pinks and blues and yellows. And oh the relief when only one frill was requested!

port_eliot_amelia

I can, hand on heart, say that the most amazing music to my ears was hearing that most of the pre-teen children I sat with knew how, or regularly operated a sewing machine. Mostly of their own! How refreshing is that. No surprise that it wasn’t from the teaching of schools or after-school clubs, but by the willingness of their fabulous grandmas. It really was so encouraging to hear. Sewing isn’t disappearing anytime soon, fellow sewingistas! There are grannies out there championing this all-important and special skill that so needs to be nurtured and that makes me sooooo happy.

These twin sisters were a prime example. They love making their own dolls clothes and hope to make their own clothes one day. Fashion student, Megan made the skirt on the left and I made the one on the right, independently, guided by each allocated twin.

The twins wearing their rara skirts

And the results were fascinatingly, coordinated!

rara skirts for the twins

The sewing sessions were fast and furious but no less creative and fun. So much so that immediately after each one we stayed behind when everyone had left to make use of the fabric and whip up our own outfits.

after hours sewing in the tent

It was such a delight to meet these Scottish student beauties. So much energy and passion for sewing and fashion. And so much fun to have around.

Fashion student outfits

Whilst rara skirts flew off the sewing machines at one end of the tent, hand-painted slogan T-shirts were being pegged up at a rate of knots! A massive resurgence of 80s brilliance.

And then, when the last session finished, and the chilled dandelion and burdock tins where handed out (ok, so maybe there was an odd swig of the strong stuff!) then it was time for the fashion show. Paints were cleared, and in their place, a spray of silk flowers were jiggled into a jug, and the models were prepped by Jenny, Ruler of Pencil!

Jenny Dyson backstage ready for show
Shot by amazing society phogotraher, Darren Gerrish – port Eliot Official

Just check out these amazing head-dresses made at one of Piers Atkinsons workshops! The single only downer for working at the festival was that I didn’t get to make one due to clashing of classes!

headdress by Piers Atkinson

head wear by Piers Atkinson

They were all so excited. rehearsing their moves: A flick of the hair, crossed arms, over the shoulder attitude, pouts galore, working those raras and T’s!

Hay bales outlined the catwalk and the music began. It was simply brilliant!

Pencil Atelier fashion show

pencil atelier fashion show

I felt a wave of emotion once the children danced off. And moreso when one came back to hug me and thank me and tell me it was her most favourite skirt in the whole world. I properly cried!

But moods surged the next day whilst taking photos at the Rubbish Olympics. Another amazing concept drummed up by Jenny! Human dressage, Egg and spoon race without said egg and spoon, pencil tossing, Zoolander musical statues and more. Quite difficult to photograph when you are splitting your sides laughing but here is one of my faves. They were ‘Best in Show’ of course!

Human Dressage
Human Dressage

Such a glorious place, such amazing creative people, such talents and inspiration. Port Eliot is such a magical place. I truly hope it returns next year. And I think you should all come too.

ooobop review: Burda Style August 2015

Burda Style August 2015 cover

Grab yourself a cuppa, some delicious snacks and pull up a chair. This may take some time. The little gasp of joy I inhaled when I picked up the latest issue of Burdastyle is about to manifest itself as an exhalation of excitable word spray!

That said, the cover is probably the least inspiring of images. I don’t know, something to do with a grubby looking pink jumper teamed with a skirt that doesn’t make much sense but don’t diss that skirt till you see it later on…

The first section is titled ‘Call of the Wild’. It’s mostly about animal print but get behind that if it scares you, to see some of the sophisticated lines that are very camouflaged by it.

Burda Style August 2015 magazine
For instance this sheath dress (A). The print totally hides it’s streamlined seamlines but what a shape. Further on you’ll see some colour blocking to illustrate them. I love the neckline. Not too dissimilar to the BHL Flora dress which we all know and love. Skirt (B) is a classic pencil with gold buttons along the front two dart lines as far as I can make out. They are kind of hidden in that print too but it’s a nice detail all the same.

The choice of contrasting blue pleated panel with the print on dress (C) is a little mind boggling to say the least. I don’t hate it, I don’t think. Just not really sure about it. It’s an add-on rather than an inset. I much prefer the version that comes later.

Animal print parka (D) I can deal with though. This one’s made from polyester poplin so it’s very lightweight and it’s got lots of pockets too!

I’m loving the contrast of ribbing against animal print chiffon in this shirt (E). I’m loving that it’s described as easy to put together too!

So here is that skirt from the cover (F), teamed with a top that also has ‘an enhanced added panel’. It makes much more sense altogether, if you like that sort of thing. Definitely better balanced. But perhaps still a little odd!

Not so keen on this flared jacket (G) though. I think I’d prefer a more cropped look like the Vogue jacket I made (and have since lost… I’m so gutted!!). It kind of looks a bit maternity at this length.

Next section is Western. Fringe, kilim, wool and leather. Not generally my style but there are still some lovely things going on here.

Burda August 2015 Western

I can just picture the envy of all my camping buddies if I were to turn up in that blanket coat (H) Its made of Jacquard and leather. A most special kind of parka!

The dress (I) is all a bit too much for me. The kilim design and the long bodice. I’m sure if the accented rib knit sat on the actual waistline it might appeal more. In a different fabric though.

This funny little garment (J) is classed as a waistcoat. It’s not for me, I’m afraid. But the urban western leather suit (K) totally is! I’ve only ever done an alteration on a leather skirt, never sewn one from scratch so all the topstitching on those panels scares me but excites me in the same breath! There’s a sewing class included for the jacket too.

And could this tailored blazer (L) be any more stylish if it tried? I properly love this jacket!! And I don’t even mind the ruffles that poke out on the little top (M) Though I foresee a nightmare and an expensive tantrum if 100% silk chiffon were indeed to be used! The ruffles on top (N) only decorate the front.  but looking at the back view, I quite like the way that only the sleeves are ruffled.

Loving the dropped hem on this midi skirt (O) and especially how the centre front seam is embraced with diagonal stripes. A cotton/wool mix – I bet this skirt feels amazing.

The Timeless Beauty section brings forth polished cuts, sophisticated fabrics and delicate colours…

Burda August 2015 Timeless Beauty

Here’s that funny little waistcoat again (P). A little more classically acceptable in leather, wouldn’t you agree? But I don’t like ruffles enough to deal with a full length dress worth of them! This dress  (Q) just says ‘pain in the backside from beginning to end’ or ‘patience of a saint’ however you look at it!

Here’s another version of that top and skirt (R). A touch more casual but still very elegant. The sweater/slacks combo (S) is not really my thing though.

And just look how much more elegant that kilim dress gets to be in grey poly crepe (T)!

Shirt with accent and skirt with buttons (U) are a good office combo and I even like the variation on that blazer in velvet with details (V). Or do I?! Maybe it is a bit odd. But the classic sheath dress (W) is not only good as a classic staple, it’s designed for tall sizes too. This issue is definitely teaching me that there is sophistication to be found in plain colour dresses. Step away from the print!

There’s some cute little Cowgirl tunics and dresses in this issue. Some lovely details going on and I adore the fox purse. Surely that’s not for children alone?!

Burda August 2015 Cowgirls

The next section is called The Art of Colour. Lots of colour blocking with high tech fabrics.

Burda Style August 2015 Colour

For instance you can now see some of those seamlines in that first sheath dress that were previously hidden by animal print, in this colour blocked version (1). It’s made from a high-tech reversable jersey, though you’d have to have darned neat seamwork to reverse this I would have thought! I find the blocking of this top (3) is quite jarring and unnecessary. It’s like one of those optical illusion vase pictures where you’re not sure whether to look at the black or the white bits. But, strange as it still is, because of the different colours employed, I’m quite diggin’ the weird pleated panel on this dress (4) now.

Whilst dress with no pleats is refreshingly, classically simple (5).

The giant pleat of fabric in the teal top (7) quite appeals now. Just with that contrasting neckline. Turns a very ordinary T shirt into something far more interesting.

There’s a lovely choice in the Plus Fashion section this month.

Burda Style August 2015 plus fashion

Who doesn’t love a shirt-waist dress (9) ? I’m currently working on a second version of the 60s shirt dress I made but I’ve already got sleeve and pocket envy, looking at this one.

The pretty cape collar dress (10) is so pretty but this fabulous bohemian knitted coat (11) is a total winner. Just imagine how cosy that would be in Astrakhan (71% new wool, 19% mohair).

I love the lace cuffs on that blouse too (13). Guipure lace in case you can’t see. Totally poshes up a peasant blouse! That neckline is repeated on the tunic dress (15) and the short sleeved version (16) too which incidentally works beautifully with leather strides. I think I want some.

And that just about wraps it up as far as this months gorgeous garments are concerned.

Did you get your issue yet? Any thoughts? Any faves?

Bugsy’s showgirl and a lot of tears.

Bugsy Malone Bangles

Friday was my daughter’s last day as a primary school child. The final school pick up was an emotional one to say the least. There’s been 8 years of to-oing and fro-ing from that lovely little school, including those spent there by my son. And in those 8 years both Dan and I have accumulated as many good friends and memories as our children. Tears were inevitable!

The last couple of weeks have been jam-packed full of parties and celebrations. Back to back, I kid you not! And last week the year 6 children, directed and inspired by their fabulous drama teacher Arwen from Dramatic Dreams, performed an amazing version of Bugsy Malone.They turned all this around in the space of about a week. Pure magic, I can tell you. And I can also tell you how much of a relief it was when I remembered I’d already made a flapper-style dress for my neighbour’s daughter a couple of years ago. So no stressful last minute sewing for this performance… hoorah! Little Miss Ooobop was Bangles.

Bangles sitting on edge of stage

The dress was a simple design. There’s not much hip definition in a year 6 child or a requirement for such in a flapper dress for that matter, so a tube of lycra it was, with a nifty box pleat at the front and back neckline. The rows of fringing were a little more challenging. Sewn on with a zig-zag stitch to retain the stretch but careful not to stretch the fabric too much as I went along.

Waitress in Bugsy Malone

I properly squealed when I found the lovely stretchy sequin trim. It finished the neckline beautifully and was perfect for the feather headband too. Long live Shepherds Bush Market!

Bugsy Malone show girls

The photos you see are of a now-not-so-little girl who not so long ago wouldn’t have been seen dead on stage. She hated any amount of attention and the idea of people watching her on stage made her feel positively sick. I’m so glad that she took those after school drama classes and I’m so proud of her for jumping high over those hurdles. It seriously bought a tear to my eye watching her confidence soar on stage in front of parent-packed audience.

Bangles in Bugsy Malone

It’s true to say I am so very proud of ALL of the children. All singing, dancing, performing, netballing, chess-playing, footballing, maths and English prize-winning activities aside, they are a truly amazing bunch of kind, caring and gorgeous children and there is no doubt in my mind that each and every one of them is destined for an amazing future.

Bugsy Malone show girls

Oh good Lord. I’m off again!!! 🙁

Bugsy Malone show girls

This may be good bye to primary school years but I’m sure it won’t be goodbye to costume making. Besides the Dorothy dress and the Wild Thing for World Book Day, I also made a Poison Ivy cape for my eldest daughter who left school a long time ago!

All credit for these beautiful photos goes to Michelle Moradi.

Sheep shorts for a French trip

My little girl is going on a school trip to France next week and I can’t tell you how excited she is. She started packing 2 weeks ago, against a detailed checklist and soon came to the conclusion that she was a couple of pairs of pyjamas short. The thought being that she can’t possibly allow her friends see her in the same pair twice! But rather than add them to the shopping list she asked me to make them for her so that she could choose the fabric herself. Oh how I love watching my obsession rub off!

Finding good quality cotton jersey in a cool print wasn’t as easy as I’d thought, even with the Goldhawk Road up the road. But we struck sheep after a while and both fell in love with it. Especially at £3.99 a metre, which is all that’s needed for 2 pairs.

And here is the first pair:

pyjama shorts in sheep printI used the stretch stitch throughout and overlocked the seams afterwards. I used a zig zag stitch for the hem as I still haven’t attempted to try the double needle!

And Little Miss Ooobop chose the cute pink buttons which worked a treat.

pyjama shorts fly buttonsThe pattern used was Simplicity 2317. Both pattern and instructions were simple enough though I’m not sure why the basting on the fly was meant to be unpicked. It’s not an operational fly. The buttons are purely for decoration.

And yes, it is an adult pattern! Despite being only 10 years old, she’s long and thin and on my eye-level. So a size 10 was perfect. Wow. How did that happen?!

Simplicity 2317 pyjama pattern

The only thing to watch is that the waistband is deeper than the 1″ elastic so before you stitch to secure in the side seams, make sure the elastic is positioned at the top of the casing.

This is such a great little project for a time-short sewing fix and I loved making them. Next pair is scheduled for this weekend. And I may just have to seek out some more fabric to make me some too!


53-minute skirt for Red Nose Day

red skirt for red nose day

I’m just going to sneak in with a quick post about a speedy skirt I made last night.

Youngest dort announced on Wednesday evening that she needed a red skirt or some red leggings for Red Nose day on Friday.

“No problemo sweetipops,” I said. I happened to be working next to Westfield shopping centre on Thursday and I would have many a ladies clothes shop to bag an emergency red garment.

Famous last words. Would you believe that between five top ladies-wear shops, and one very large sports shop, there was not a red skirt or pair of leggings to be found. Has red gone out of fashion? There was pink, orange, coral and burgundy but not a glimpse of red in sight, save a few t-shirts!

I had already planned a night in with good chums and the Great British Sewing Bee final on Thursday after work. No way was I going to cancel that. There were ‘skanklets’ and everything!

Watching #GBSB final. #skanklette

A photo posted by Tilly Walnes (@tillybuttons) on

So I planned a speedy skirt on the way to Tilly’s and – fuelled by Prosecco and pizza and mini eggs – I raced back to my sewing table before the clock struck midnight. Proper little Cinders, me!

53 minutes later, in true Sewing Bee stylee, I’d made the pattern and stitched up a full circle skirt with an elasticated waist from some leftover red jersey. It scores nothing for couture but fulfilled the brief… and diverted a tantrum.

It’s going to take me a little longer to write and illustrate the tute but I’ll be back with one later, because I quite fancy one of these myself! Till then, have a wonderful weekend, all. Hope you get some quality sewing time in.

Another hand made gift for Christmas

tilda rabbit in christmas tree

I’ve been toying with the idea of making everyone a hand made Christmas present, like forever! And I never get it together in time. But this year I made two!: The secret santa gold pleather bag for Emmie, and now this Linen Tilda rabbit for a special baby boy who’s name I can’t declare lest I give the surprise away!

I forgot how much fun these are to make. I made the last two so far back, the post has sadly gone missing. But here’s a picture of them at least:

Tilda rabbits

And here’s a link to the chicken I made from the same book which is called Crafting Springtime Gifts.

Crafting Springtime Gifts

I’d dutifully traced the patterns on to some cereal box card so I simply had to draw round the pieces on the linen, sew along the lines and then cut out with a small seam allowance.

I got a nice plump bag of polyester toy stuffing from the market. It’s amazing how much you need for just one wee bunnie!

The eyes are drawn on with a laundry marker which is always a scary thing to do as it’s the last thing you do once its all sewn up. I was pre-planning a bunnie with shades just in case my hand shook to much and screwed up the eyes!

The nose is embroidered. I didn’t have any pink embroidery thread so I sewed with 4 regular pink threads and achieved the same. Little bit on the wonk but all part of the handmade charm!

tilda rabbit head shot

This time round I used pink satin for the inner ears. What child doesn’t like to feel a bit of ‘silky’ when they are nodding off to sleep?!

I also left the buttons off and replaced with some embroidered crosses on the straps instead. Don’t want to be the cause of a terrible choking incident!

tilda rabbit profile

I have visions of this little fella being dragged around by one arm or leg in true old fashioned childlike stylee. And ending up pale and threadbare in his later years. That’s if baby approves and doesn’t banish him to the toy box forever!

I love sewing with linen and I love having the chance to employ a decorative stitch! Goodness knows why I only reserve it for toys though!

tilda rabbit decorative stitch

In other news. I’m thinking of making a new hat. Not sure I’ll get that done before Christmas though. That would be one massive miracle!

And that just leaves me to say, thank you so much for your continuing support and wonderful comments. Have a fabulous Christmas one and all, wishing you lots of love and good health for the coming year. xxx