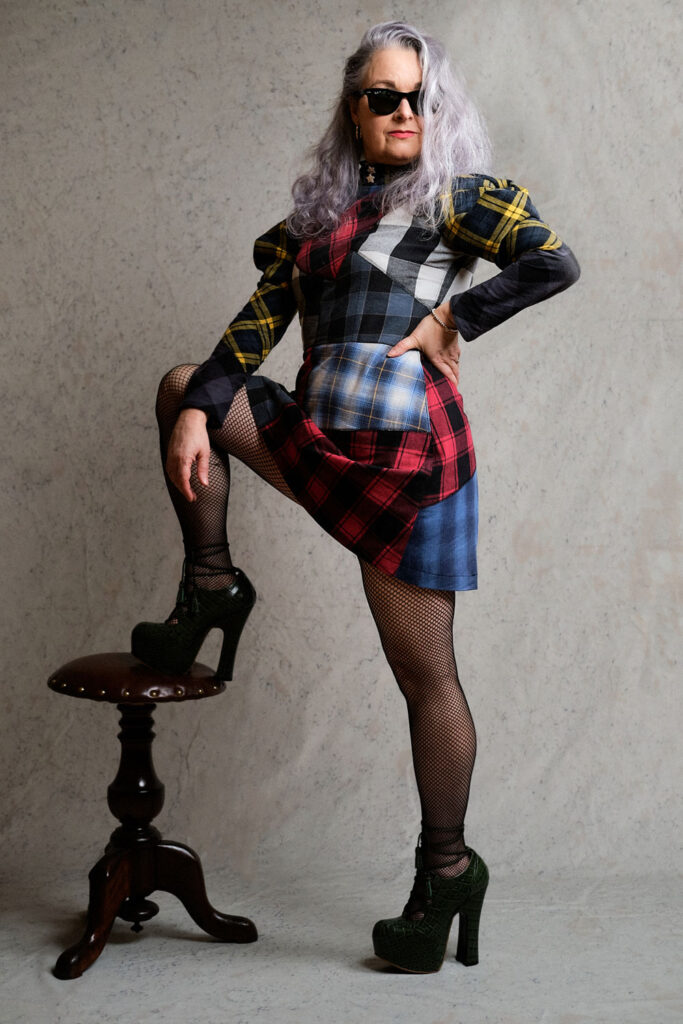
A patchwork dress made of sleeves!

Yes you read that right! This is a dress made entirely of sleeves – those that were cut off of Dan’s RTW shirts after he got fed up with how tight and annoying they were when he was working in them!

I intercepted his route to the bin when I spied a couple of them poking out of the bag. And there then ensued a tussle, with Dan persisting that I had quite enough fabric already. What does that even mean – ‘quite enough fabric’?!
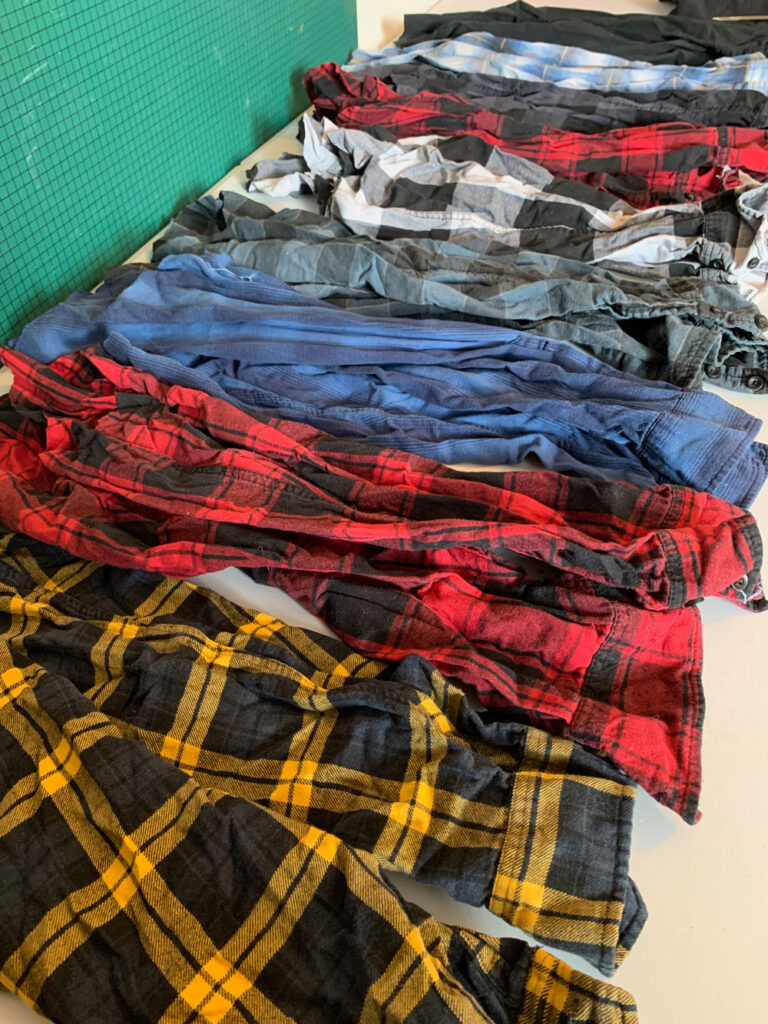
He laid the gauntlet, firmly before me – challenged me that unless I could cite good use, they should not be added to the peak of ‘stash mountain’ !

‘A dress!’ Was my comeback ‘A cool patchwork dress!’ It raised an eyebrow of disbelief but I grabbed that bag and literally ran to the studio with it and hid it under the cutting table. 
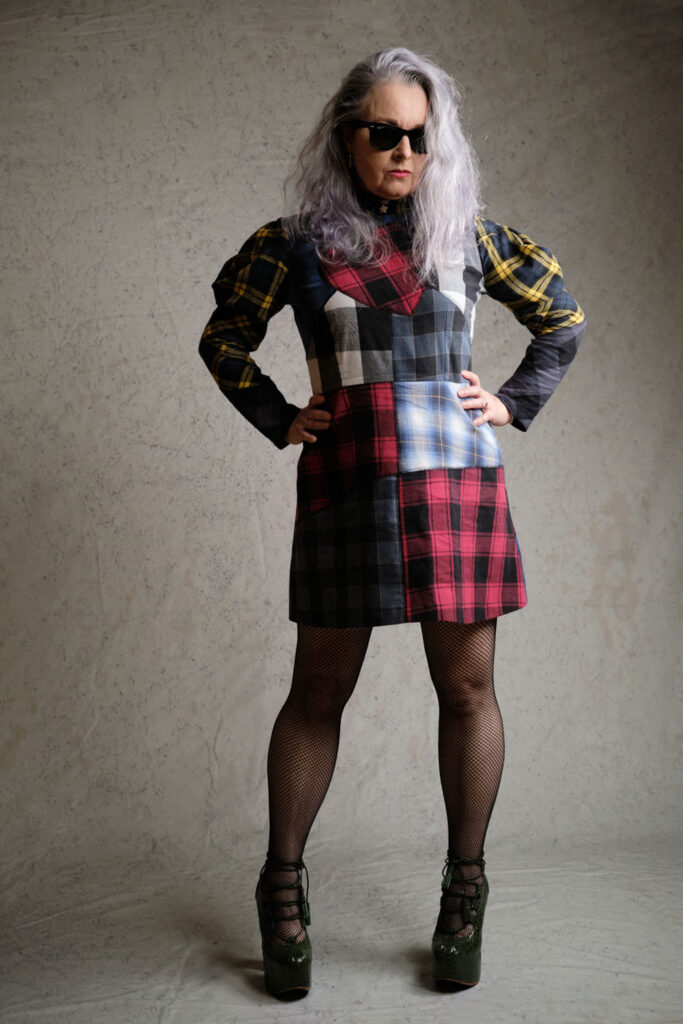
It remained there for quite a while, mostly because I had other projects going on, but in that safe space of time I was able to hatch a plan in my head. I didn’t want a crafty kind of patchwork dress. I mean they can look cool and boho but that isn’t me. And lumberjack plaid certainly doesn’t lend that vibe! I spent hours dividing up sketched outlines of dresses with small squares, big squares and randomly sized squares. None floated my boat. 

Then I tried random shapes to really over complicate a simple idea and then I realised it was the persistence of the vertical and the horizontal lines that were irritating me.
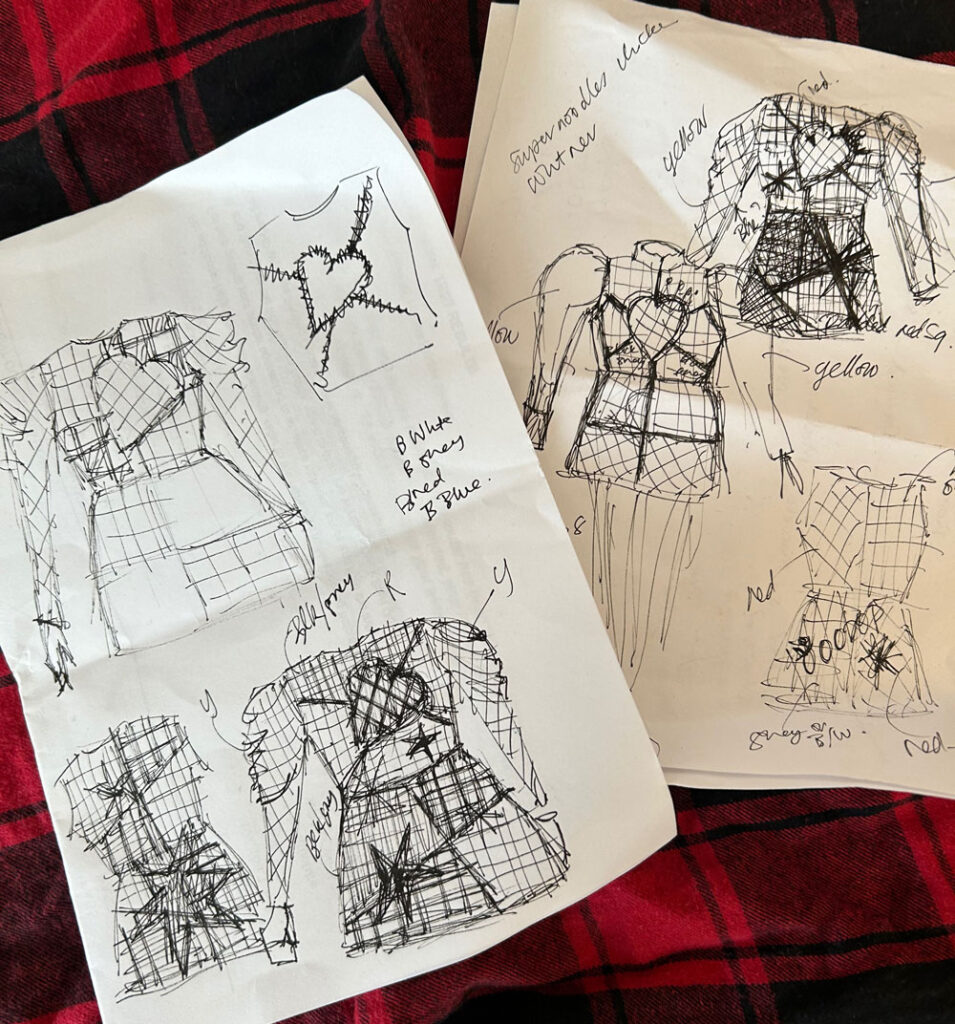
So I tried with some angular shapes and I was beginning to get somewhere. I already knew a heart was going to feature. It is after all a nod to Westwood. Someone who totally wore her heart on sleeve. And I’d be lying if I said I wasn’t inspired by her. She taught me it was ok to dress differently, not to care (so much) about what anyone else thinks and to do it boldly. To buy less and choose well and to take care of our planet. 

‘Fashion is very important. It is life-enhancing and, like everything that gives pleasure, it is worth doing well’ – Vivienne Westwood

I don’t always sew as sustainably as I could but I like to reuse and recycle and rewear whenever I can. Read to the end for some more of my sustainable projects.

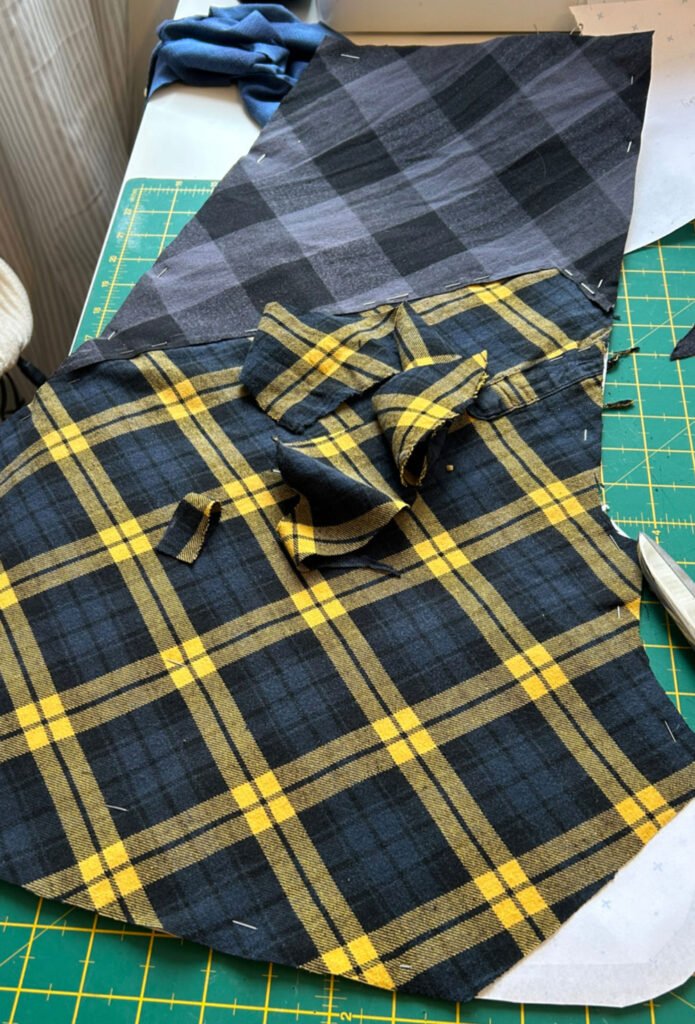
Once the sketch was finalised, I pondered how I was going to sew them together. These sleeves are made of cotton – a flannel I think – and they are soft and drapey. That was going to work wonderfully for the bias cowl sleeve I had in mind but not so well for the actual body of the dress. So it had to be stabilised somehow. I considered using a double sided fusible interfacing but I really didn’t want the extra weight so I simply sewed the pieces onto some black cotton I had in stash. I used a self-drafted pattern from my baby cord dress and cut the black cotton pieces first, before mounting the cutout shapes. I made sure to overlap them slightly and I zigzagged, first on the absolute edge and then again each side of each piece to make sure it was secured but also to make the black lines of stitching look intentional and a little like stained glass panels.
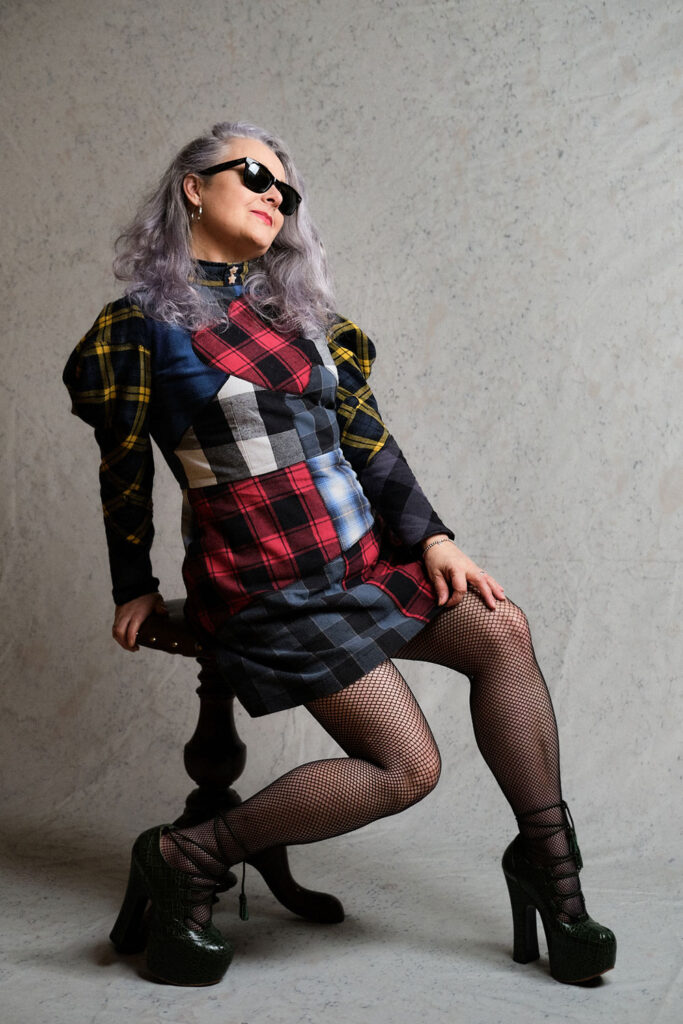
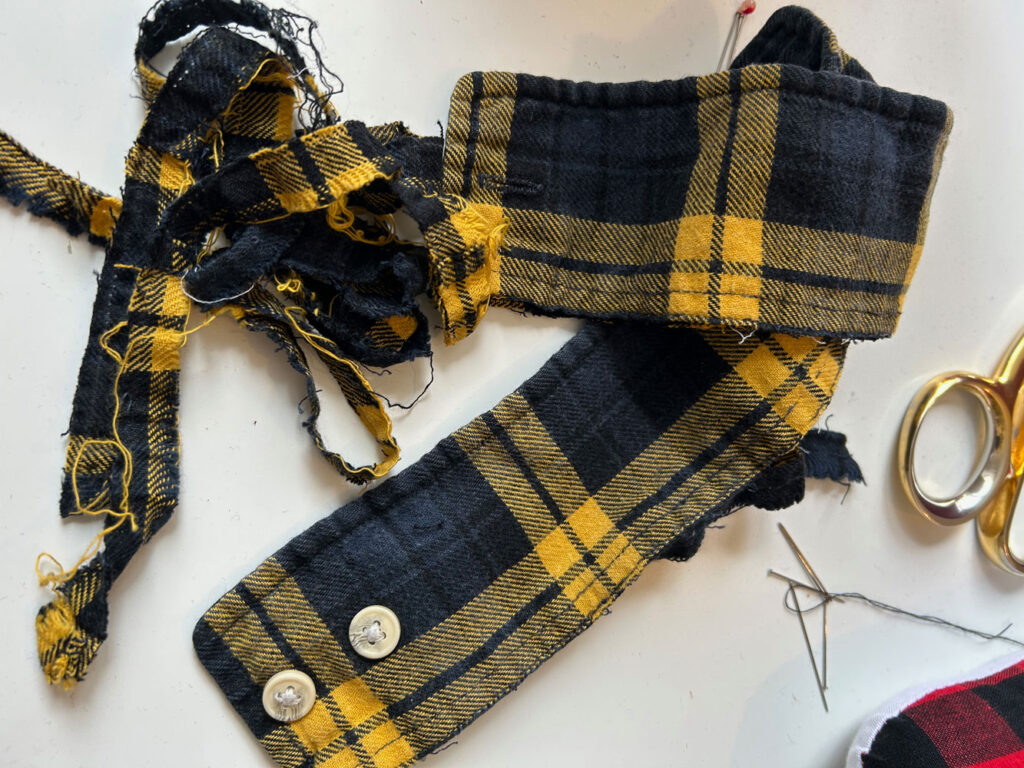
I managed to glean all the fabric I needed from 9 shirts worth of sleeves. I came a bit unstuck on the actual sleeves because I was so intent on featuring the yellow ones with as much coverage as possible. And that meant including the sleeve plackets! I’ve left the buttons on for context and again to make it intentional.

The collar is made from the cuffs of the yellow sleeves. Two of them, buttoned up, fitted perfectly around the necline. Again I was going to use the original buttons, but the Pigeon Wishes star buttons were cooing me. Loudly!
I considered making this dress sleeveless in the beginning. Oh the irony! But reconsidered at the prospect of not wasting any of those sleeves, to create one with statement sleeves instead. I took a draping class a while back with Mr O and he taught us how to draft a cowl sleeve, I’ve tried a few sleeve-drafting tutorials in the past but his was so much simpler and I’m slowly learning that long-winded old school methods aren’t always the best – controversial, I know!

I winced at the prospect of having to patch in some small pieces at the top of the sleeve but actually it adds to the punky charm and I love it. It feels like I’ve broken a whole heap of rules in the making of this dress, yet at the same time, none!
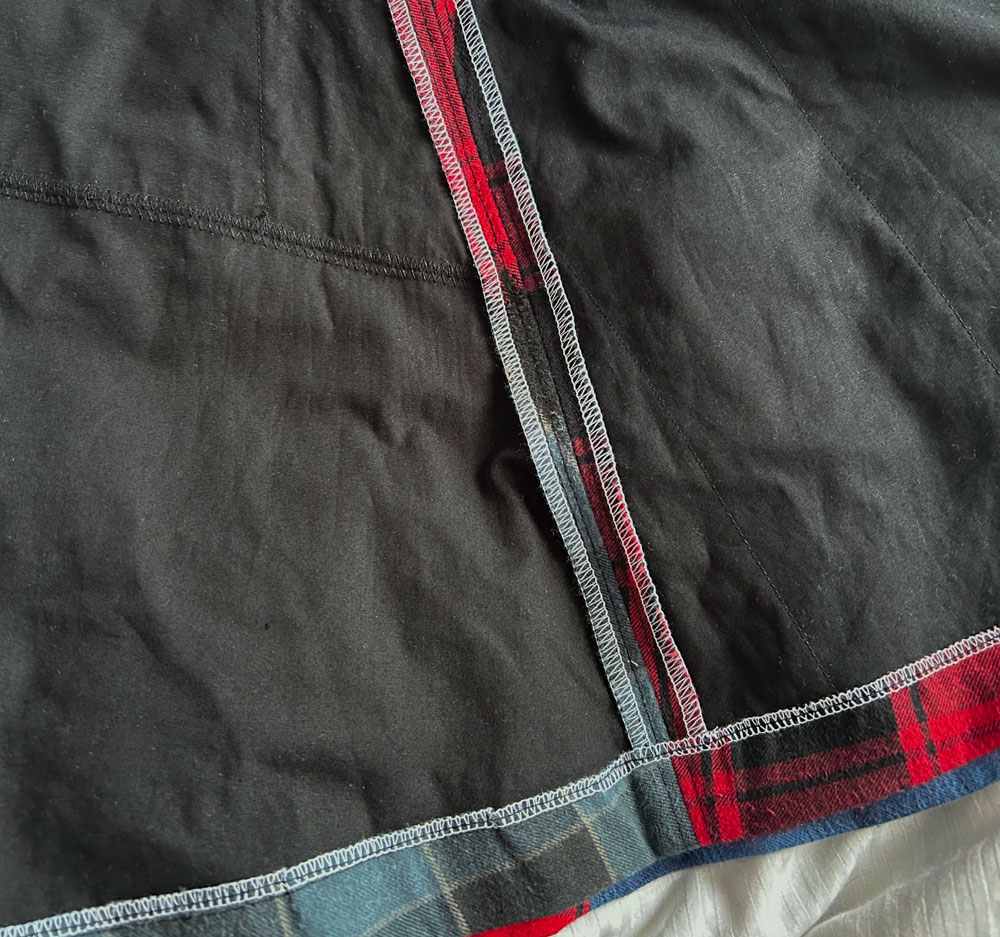
The good thing about having mounted all those pieces on black fabric is that the insides are clean (ish) and everything hangs as it should. Once I sewed up the side-seams, the shoulders, the skirt to the waist-seam and inserted the sleeves, I pressed open the overlocked seams on the inside so everything laid perfectly flat. (Couldn’t be arsed to change the thread from white to black but hey, who is going to see?!) I really must invest in some rainbow overlock thread. I think that would have looked even better to be fair. 
The collar went on next. I just had to cut off the seam bulk but of course the interfacing and the topstitching along the top and front edges was already in place – bonus!

And then I sewed in an invisible zipper. Also from stash. I made sure to align the waist seam before sewing up the second side of the zip because as punk as this is, I have standards you know, haha!
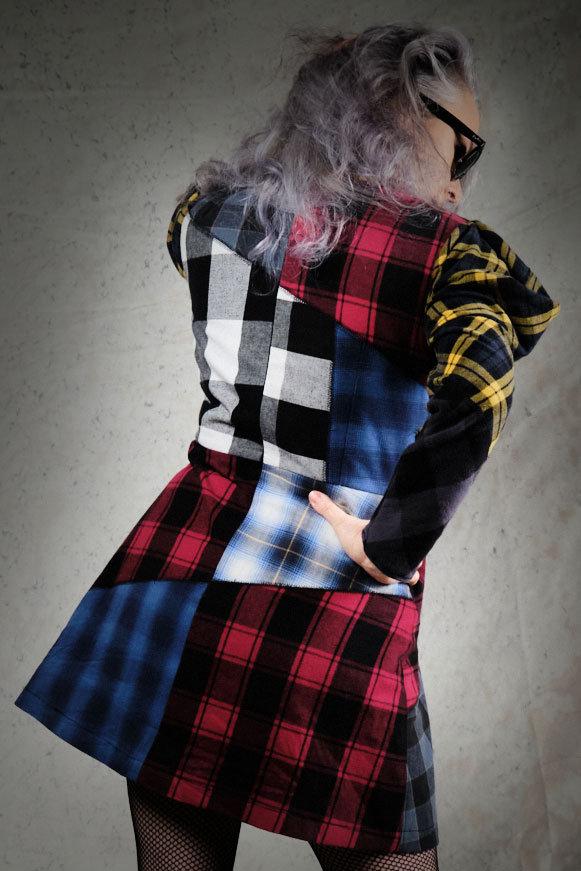
Having said that, standards went a bit out of the window with machined hemming. I toyed with hand-sewed ones, but… well… hours in the day and all that!

Dan was in the studio with me when it was all sewed up and finished. And suggested we shoot it that same night. So we went back home for tea grabbed some tights, shoes, shades and a skateboard (of course!) and just went for it. No time for a hair wash – just scruffed it up, just as I did in the 80s. And it couldn’t have gone better.
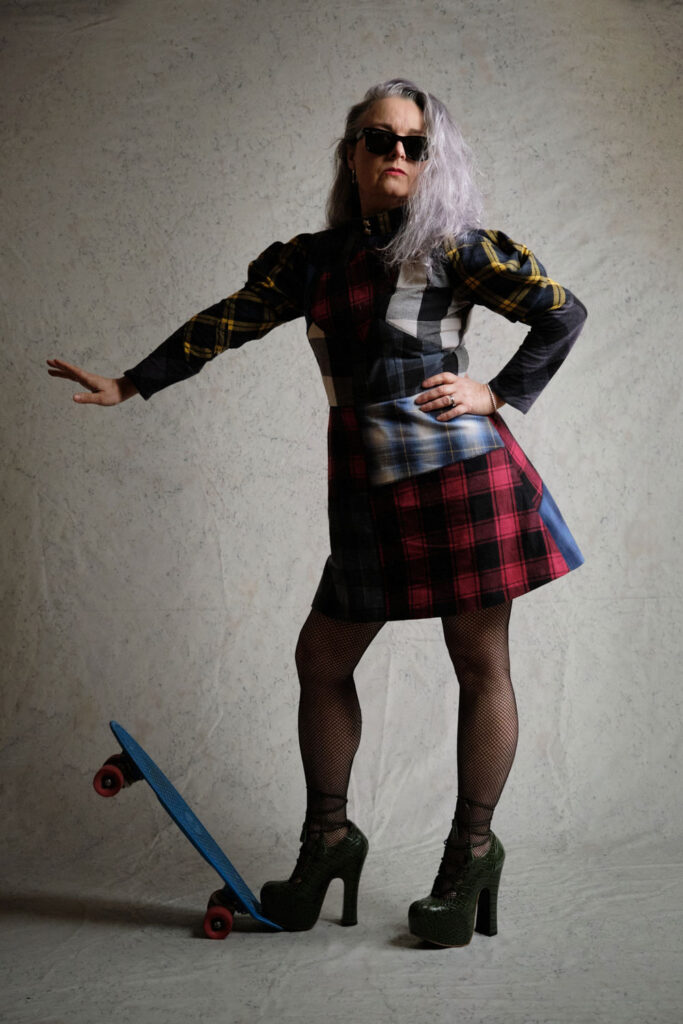
I am so over the moon with the shots that he took. He has forever championed my creations and has been so obliging with photographing them over the years – often more eagerly than me! But he totally knocked it out of the park this time. Do look him up if you are ever thinking of getting some professional shots done at danieljamesphotographic. I know I’m biased and all but he is bloody good!
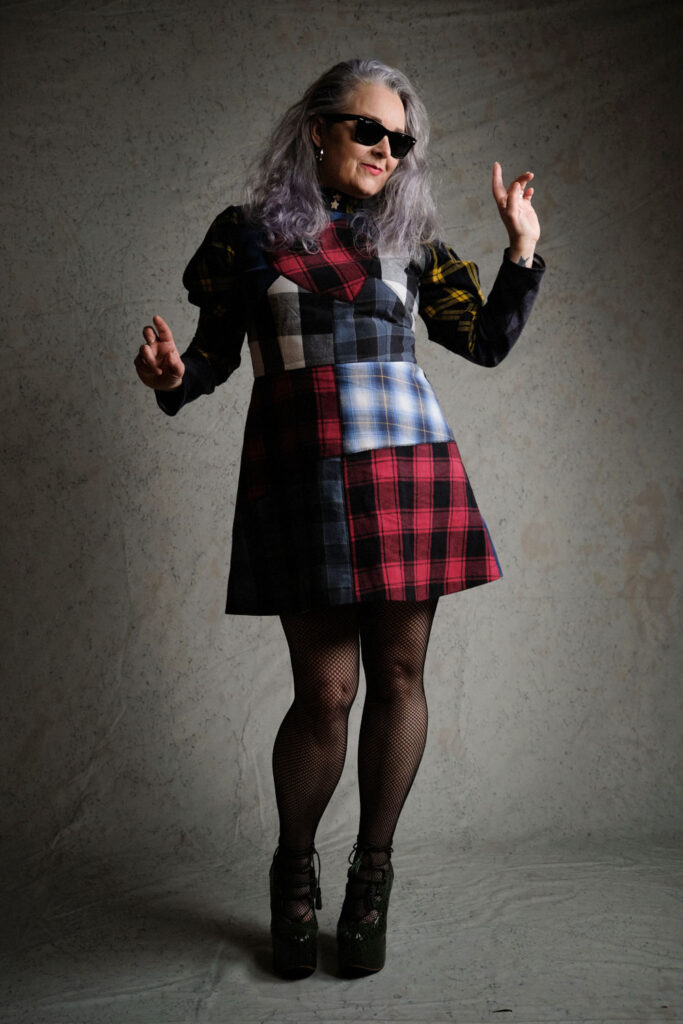
I posted some of them on Instagram a few days ago and the comments have been both humbling and mindblowing. It feels so good to have created something that is all me. Well, a bit of Dan and a bit of Viv too! And to have it appreciated by so many. I am so very very grateful and the whole process from bin-interception to reception of the photos has been incredible. And It’s just made me want to do more of the same. 
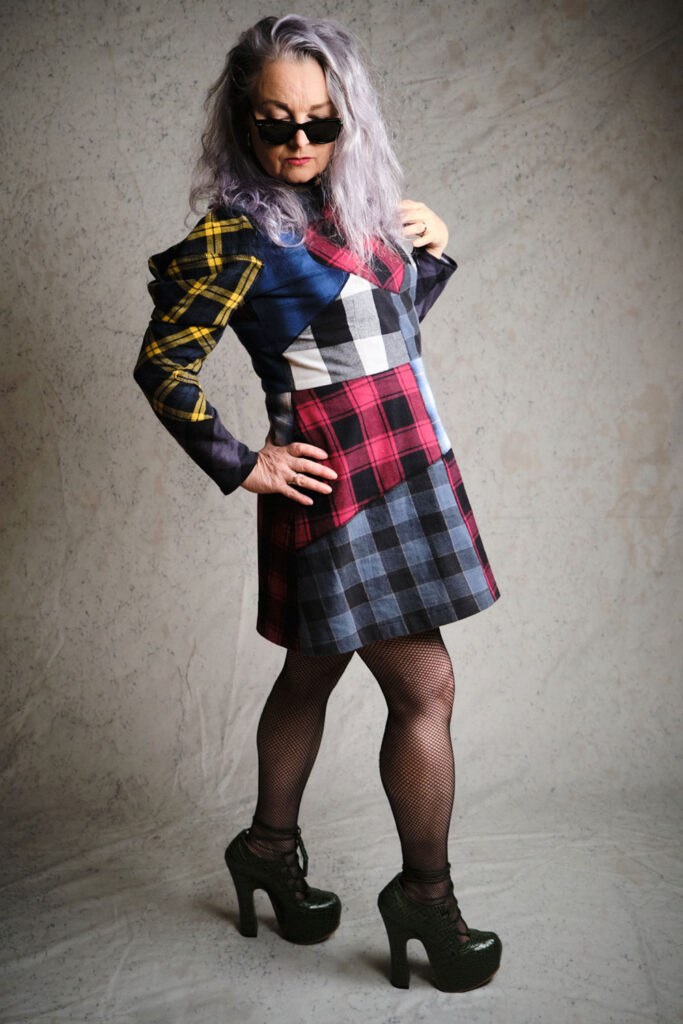
I have some really small scraps left over. I didn’t throw any cut-offs away. (Don’t tell Dan!) And I have another cool little project in mind so watch this space or follow along on Insta to find out more, soon.

Other favourite upcycled makes:
Dressmakers ball gown
Martini dress
Romper suit
Portrait tote bag
Lacroix Roman blinds
Ooobop Original jumper

Double Pinwheel quilt block

Double Pinwheel quilt block


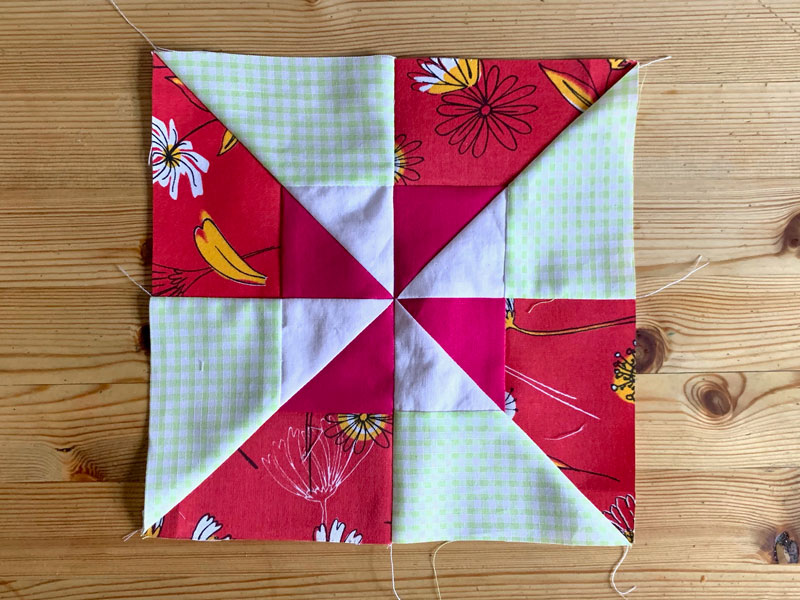
This is my latest quilt block from The Art of Quiliting magazine, issue33. This is the Double Pinwheel or Beginner’s Joy. There appears to be a few different designs of the same name when I did an online search but the fundamental  elements of a small pinwheel within a larger pinwheel remains constant.

Switching the dark and light toned fabrics allegedly makes the sails revolve in opposing directions although I can’t really see it in this one!

The order of events were to stitch together the green gingham patches with the small white triangles and then stitch the red floral pieces to the small crimson triangles. These triangles were then joined along their diagonal edges to make the four quarters of the block. The four quarters are laid in their final positions so that the pinwheel appears to be rotating clockwise and then pinned together and sewn in two pairs along the centre seams. Finally the two halves are sewn together with the final seam pressed open.

I fully intended to show this one as step by step process but completely forgot. Will try to do that with the next block – block 27 which is  a simple but cute nine-patch and a little rest from all those points!

Name: Double Pinwheel or Beginner’s Joy
History: Beginners Joy was first recorded in the early 20th century and apparently reflects the maker’s delight in joining the 16 pieces together accurately… I get that!
No. of pieces: 16

Progress report:

Block 1: The Double Four Patch
Block 2: The Whirlwind
Block 3: The Sailboat
Block 4: The Shoo-fly
Block 5: The Trafalgar
Block 6: The Windmill
Block 7: The Chequer Square
Block 8: The Diamond Square
Block 9: The Cactus Pot
Block 10: The Sawtooth Star
Block 11: To come!
Block 12: The Windmill Sails block
Block 13: The Basket of Flowers block
Block 14: Susannah
Block 15: Road to Oklhahoma
Block 16: Chequer Star
Block 17: Nelson’s Victory
Block 18: Fair and Square
Block 19: Diamond Pinwheel
Block 20: Whirligig
Block 21: Old Maid’s Puzzle
Block 22: Whirlwind Square
Block 23: Windblown Square
Block 24: Basket of Flowers block revisited
Block 25: Churn Dash
Block 26: Windmill Square
Block 29: The Windmill Sails block
Block 30:  Double Pinwheel

Windmill Sails quilt block v2

Windmill Sails or Louisiana quiilt block
Windmill Sails or Louisiana block

I began making these quilt blocks when my very lovely neighbour bought me a subscription to the Art of Quilting magazine… about 7 years ago now – and it has remained a WIP for some time since. But progress has been resurrected thanks to New Crafthouse #sewyourselfsustainable and Sewisfaction #seweverdayseptember Instagram challenges. They both prompted a declaration of #slowestmake and I can’t think of anything else that would ever take me as long!

I’m pretty sure the reason I’m dragging my heels is because my love for sewing dresses is tenfold more, but I don’t want this quilt to remain as an unfinished pile of blocks in a basket, pretty as they are. I want it strewn across my bed like this:

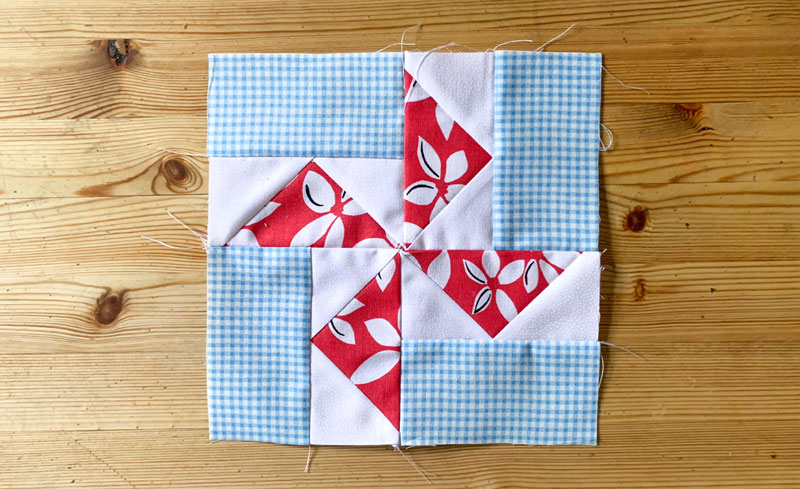
So this lovely block is another colourway of the Windmill Sails or Louisiana block. The magazine usually gives a short history of each design but there wasn’t one included this time. Presumably because its exactly the same as block no. 12 and they might have hinted at a repeat! A bit cheeky of the publication really. They’ve just sold me the same template with different fabrics! There is, however, an additional template included for a Dresden Plate cushion cover. But hey I’ve got a quilt to make, don’t need any further distractions!

You’ll note I’ve skipped blocks 27 and 28. I’m guessing at some point I separated them out of the pile to encourage me to crack on but I haven’t a Scooby where I might have put them.

Luckily Hachette are still selling back issues and I’ve just ordered the missing ones at a reduced rate here. Just in case they are lost in the ether.

So fingers crossed I am back on track and the next one will appear soon!


Name: Windmill Sails or ‘Louisiana’
History: Each of the fifty states that make up the USA has its own emblematic quilt block. This represents the southern state of Louisiana
No. of pieces: 16

Progress report:

Block 1: The Double Four Patch
Block 2: The Whirlwind
Block 3: The Sailboat
Block 4: The Shoo-fly
Block 5: The Trafalgar
Block 6: The Windmill
Block 7: The Chequer Square
Block 8: The Diamond Square
Block 9: The Cactus Pot
Block 10: The Sawtooth Star
Block 11: To come!
Block 12: The Windmill Sails block
Block 13: The Basket of Flowers block
Block 14: Susannah
Block 15: Road to Oklhahoma
Block 16: Chequer Star
Block 17: Nelson’s Victory
Block 18: Fair and Square
Block 19: Diamond Pinwheel
Block 20: Whirligig
Block 21: Old Maid’s Puzzle
Block 22: Whirlwind Square
Block 23: Windblown Square
Block 24: Basket of Flowers block revisited
Block 25: Churn Dash
Block 26: Windmill Square
Block 29: The Windmill Sails block

Basket of Flowers quilt block revisited

basket of flowers quilt block

It’s been a very long time since I sewed a quilt block! Almost a year to be precise! But hey, I’m not going to beat myself up about it!

This is the 24th block I’ve created to date and it’s another version of the Basket of Flowers design, which I make first time round here.

I much prefer the pretty fabrics in this block but I wasn’t so hot on those points!

It doesn’t pay to have a long break from quilting. I am so out of practice and I could easily have made another pair of pj’s in the time it took me to put this little fella together.

I’ve acquired some extra tools in the meantime… a quilting ruler, a new rotary cutter and a larger self-healing cutting mat. Can’t imagine how much longer still, it would have taken without those!

Incidentally, do not ever place your cutting mat on your ironing board, lest you forget that rubber and hot irons aren’t the best of friends! I came to my senses at the crucial moment!

Block Facts:

Name: ‘Basket of Flowers’ or ‘Lily Basket’ or ‘Flower Basket’
History: This design was ideally suited to the dress and feedsack prints of 1930s America, where it was a particular favourite
Level: Set in seams require experience.
No. of pieces: 13

Progress report:

Block 1: The Double Four Patch
Block 2: The Whirlwind
Block 3: The Sailboat
Block 4: The Shoo-fly
Block 5: The Trafalgar
Block 6: The Windmill
Block 7: The Chequer Square
Block 8: The Diamond Square
Block 9: The Cactus Pot
Block 10: The Sawtooth Star
Block 11: To come!
Block 12: The Windmill Sails block
Block 13: The Basket of Flowers block
Block 14: Susannah
Block 15: Road to Oklhahoma
Block 16: Chequer Star
Block 17: Nelson’s Victory
Block 18: Fair and Square
Block 19: Diamond Pinwheel
Block 20: Whirligig
Block 21: Old Maid’s Puzzle
Block 22: Whirlwind Square
Block 23: Windblown Square
Block 24: Basket of Flowers block revisited

Windblown Square quilt block

Windblown Square quilt block

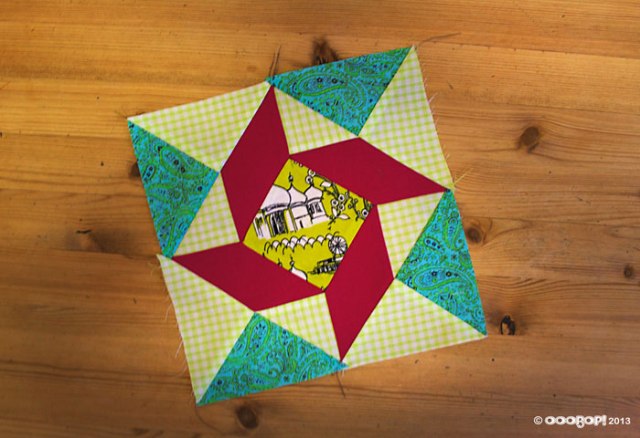
Now we are getting interesting… if you like this sort of thing! Meet the Windblown Square block. Number 23 from issue 25, The Art of Quilting.

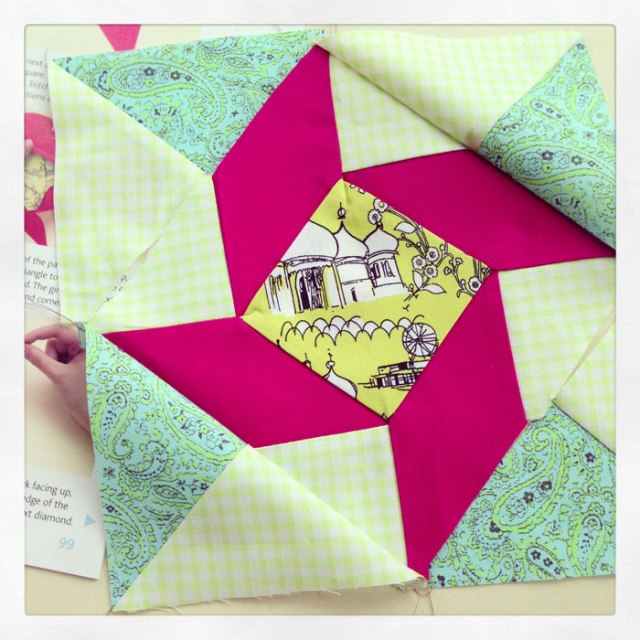
It required all of the techniques that have been employed in the previous blocks. Diamonds were sewn along each edge of the Brighton Pavilion square, then the small green gingham triangles were inset in between the red diamonds to make a square. The remaining large triangles were joined in pairs and then sewn to the outside edges of the block to make a larger square… simples! Or not… if you try and rush it.

I completely forgot that I had previously cut these pieces out, so all I had to do was whip them up. But as the old saying goes, more haste, less speed. Indeed! I sewed the outer pairs the wrong way round which resulted in the gingham pieces sitting together. I thought I might get away with it but it would have been a forever niggle. So I unpicked, albeit sulkily!

windblown square quilt block wrong

Apart from concentrating to make sure all the right pieces are sewn on the right way, you also need to be so accurate and consistent with those seams. One wayward line of stitching and it all goes belly up!

Block Facts:

Name: Windblown Square or Star.
History: Also known as Balkan Puzzle. Nancy Cabot recorded this name in the Chicago Tribune in the 1930s. Thought to reflect the complex politics of Eastern Europe in the early 20th century.
Level: Straightforward to assemble but accuracy with set in seams is a must.
No. of pieces: 17

Progress report:

Block 1: The Double Four Patch
Block 2: The Whirlwind
Block 3: The Sailboat
Block 4: The Shoo-fly
Block 5: The Trafalgar
Block 6: The Windmill
Block 7: The Chequer Square
Block 8: The Diamond Square
Block 9: The Cactus Pot
Block 10: The Sawtooth Star
Block 11: To come!
Block 12: The Windmill Sails block
Block 13: The Basket of Flowers block
Block 14: Susannah
Block 15: Road to Oklhahoma
Block 16: Chequer Star
Block 17: Nelson’s Victory
Block 18: Fair and Square
Block 19: Diamond Pinwheel
Block 20: Whirligig
Block 21: Old Maid’s Puzzle
Block 22: Whirlwind Square
Block 23: Windblown Square

Whirlwind Square quilt block

whirlwind square quilt block

Happy new year all! And boy am I glad to be back. Not that I’ve actually been anywhere. Just glad to be back in my sewing seat after a whole week of being struck down by a virus. All those sewing plans… all that time off… I really didn’t account for being totally useless for all that time. I have to say, my mojo is still not motoring as normal but I’m getting there. And this was the perfect little project to ease me back in gently.

This quilt block is called the Whirlwind Square, a variation of the whirlwind block I did here. It is block number 22 from issue 24 ‘Art of Quilting’. 

In a nutshell: The small white triangles are paired with the tapered rectangles to make 4 triangles. All four of those triangles are seamed to make the central pinwheel (the final seam being pressed open). Then the blue polka dot triangles are sewn to each edge to frame the central block.

No major issues in making this little fellow up. A simple operation but great practice for making sure those points line up.

Block Facts:

Name: Whirlwind Square
History: Traditionally found on mid-19th century quilts
Level: Some experience needed to ensure that seams and points meet accurately.
No. of pieces: 12

Progress report:

Block 1: The Double Four Patch
Block 2: The Whirlwind
Block 3: The Sailboat
Block 4: The Shoo-fly
Block 5: The Trafalgar
Block 6: The Windmill
Block 7: The Chequer Square
Block 8: The Diamond Square
Block 9: The Cactus Pot
Block 10: The Sawtooth Star
Block 11: To come!
Block 12: The Windmill Sails block
Block 13: The Basket of Flowers block
Block 14: Susannah
Block 15: Road to Oklhahoma
Block 16: Chequer Star
Block 17: Nelson’s Victory
Block 18: Fair and Square
Block 19: Diamond Pinwheel
Block 20: Whirligig
Block 21: Old Maid’s Puzzle
Block 22: Whirlwind Square

Old Maid’s Puzzle quilt block

Old Maids Puzzle Quilt Block

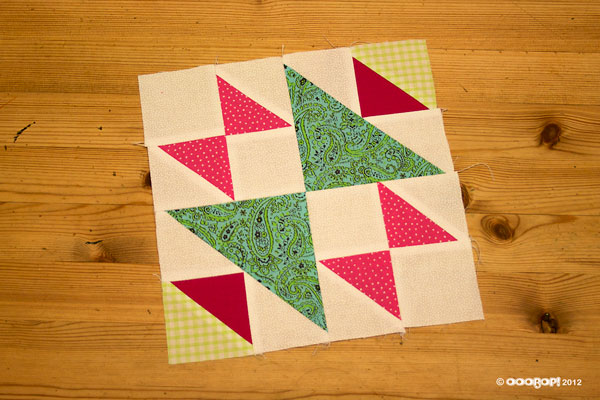
This quilt block is called Old Maid’s Puzzle, though also more recently known as the Bachelorette. It is block number 21 from issue 23 ‘Art of Quilting’. 

This is the first of my blocks, so far that incorporate a classic ‘bow’ effect, formed by the points of paired triangles touching centrally.

Though there are lots of pieces, there are no inset seams and so it was pretty straightforward. The only problem I encountered was the triangle points being drawn down into the feed dog a couple of times. I have had this issue before. Not sure how to stop it happening but it seems to happen most if I reinforce the stitch at the beginning. It kind of gets chewed up.

In a nutshell: the pink dotty and white triangles are joined along their diagonals, as are the pomegranate and lime gingham triangles. They are ‘chained’ to make 6  squares. After clipping apart they are given a good pressing. The white squares are seamed alongside the pink dotty sides of the made up squares. Then the rectangles are paired to make ‘bows’. The remaining white triangle pieces are sewn to the pomegranate and lime gingham squares to form a larger triangle and then this triangle is seamed to the larger green paisley triangle. Finally the 4 larger blocks are joined together and the final central seam pressed open.

As with most of the blocks, I’m sure they will work much better when they are in position but I do think this one is one of the more interesting ones. A bit wonky on the edges but I’m sure I can cheat that when I come to do the edging!

Block Facts:

Name: Old Maid’s Puzzle or Bachelorette
History: This block features in 19th century Amish quilts
Level: Some experience needed to create neat joins where the triangles meet
No. of pieces: 22

Progress report:

Block 1: The Double Four Patch
Block 2: The Whirlwind
Block 3: The Sailboat
Block 4: The Shoo-fly
Block 5: The Trafalgar
Block 6: The Windmill
Block 7: The Chequer Square
Block 8: The Diamond Square
Block 9: The Cactus Pot
Block 10: The Sawtooth Star
Block 11: To come!
Block 12: The Windmill Sails block
Block 13: The Basket of Flowers block
Block 14: Susannah
Block 15: Road to Oklhahoma
Block 16: Chequer Star
Block 17: Nelson’s Victory
Block 18: Fair and Square
Block 19: Diamond Pinwheel
Block 20: Whirligig
Block 21: Old Maid’s Puzzle

Whirligig quilt block

whirligig quilt block

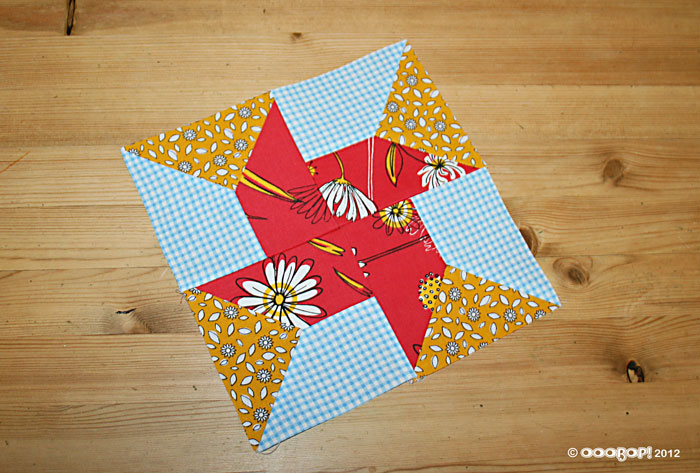
I have been seriously neglecting my quilt blocks of late. Am more behind than ever but heyho… I will have a lovely quilt on my bed one day. Just not some day soon!

Introducing the Whirligig block, number 20 from issue 22 ‘Art of Quilting’. Though issue 21 supplies the batting and instructions on how to join the first 6 blocks, I feel the need to get a few more blocks underway first.

Inset seams are second nature now. Not so daunting any more. Which is lucky because there are a few involved here!

The ‘orange blossom’ triangles are first sewn to the gingham pieces. Important to mark the 6mm seam allowance on the triangles before making the first seam. Then you know at what point to stop, where the seams meet. The ‘red daisy’ pieces are then joined to the triangles and then the final seam to the blue gingham completes a quarter of the main block. Once they have been arranged in position, the bottom two quarters are seamed together and then the top two. They can be chained and then snipped apart. Finally the two halves are joined together and the centre seam pressed open with the ‘toe’ of the iron.

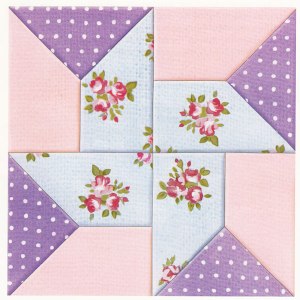
I have to say this is my least favourite block so far. I think its the fabric colours. They create such a clumsy shape. I did consider selecting different fabrics but I wanted it to be consistent with the rest. The design is meant to be characteristic of the propeller look but it is very interesting how the design changes with use of pretty vintage pastels with more contrasting triangles, which seem to draw the eye more to the centre pinwheel.

whirligig block in pastel colours

Block Facts:

Name: Whirligig
History: The combination of printed fabric and gingham is very typical of the feedsack quilts of the 1930s.
Level: Some experience needed to create neat set-in seams
No. of pieces: 16

Progress report:

Block 1: The Double Four Patch
Block 2: The Whirlwind
Block 3: The Sailboat
Block 4: The Shoo-fly
Block 5: The Trafalgar
Block 6: The Windmill
Block 7: The Chequer Square
Block 8: The Diamond Square
Block 9: The Cactus Pot
Block 10: The Sawtooth Star
Block 11: To come!
Block 12: The Windmill Sails block
Block 13: The Basket of Flowers block
Block 14: Susannah
Block 15: Road to Oklhahoma
Block 16: Chequer Star
Block 17: Nelson’s Victory
Block 18: Fair and Square
Block 19: Diamond Pinwheel
Block 20: Whirligig

Diamond Pinwheel quilt block

diamond pinwheel quilt block

Ooo… get me with my two posts in a day! I didn’t actually make them both this morning, I hasten to add! 

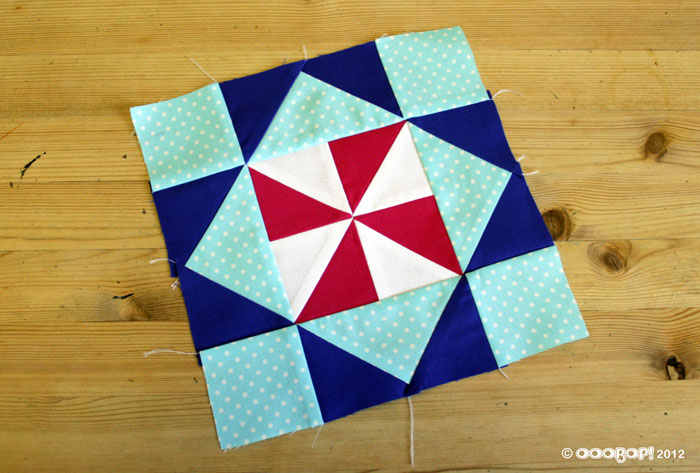
This is the Diamond Pinwheel block, number 19 from issue 20 ‘Art of Quilting’. Joining triangles to make a square is one of the first lessons in patchwork and a great way to use up tiny scraps. The central pinwheel is best achieved with contrasting colours such as the red and the white used here, and if you swap the position of dark and light pieces, the pinwheel will appear to rotate in the opposite direction.

Again, not particularly complicated but perhaps a little more time consuming owing to more pieces and pressing in between. Oh and of course the dreaded matching of all those points! The central seam is pressed open to help it to lie flat.

Block Facts:

Name: Diamond Pinwheel
History: This design has been seen on quilts dating back to the late 1700s, though it would not have been named until much later.
Level: Some experience needed to match the triangle points neatly
No. of pieces: 24

Progress report:

Block 1: The Double Four Patch
Block 2: The Whirlwind
Block 3: The Sailboat
Block 4: The Shoo-fly
Block 5: The Trafalgar
Block 6: The Windmill
Block 7: The Chequer Square
Block 8: The Diamond Square
Block 9: The Cactus Pot
Block 10: The Sawtooth Star
Block 11: To come!
Block 12: The Windmill Sails block
Block 13: The Basket of Flowers block
Block 14: Susannah
Block 15: Road to Oklhahoma
Block 16: Chequer Star
Block 17: Nelson’s Victory
Block 18: Fair and Square
Block 19: Diamond Pinwheel

Fair and Square quilt block

fair and square quilt block

Fair and Square is block 18 from issue 19 ‘Art of Quilting’. The name reflects its pleasingly balanced appearance and its adaptability.

This block is also known as Diamond in a Square and indeed a variant of the Diamond Square I made here.

I found this one a breeze to put together. No inset seams. Just straight lines and simple pieces. In a nut shell, the four white triangles were stitched to the sides of the central daisy diamond. Two orange blossom rectangles are then sewn, one each side. And then two strips are made by sewing a daisy square to each end of the remaining two rectangles, which are then sewn top and bottom to complete the block.

I do like the colour combo of this one too. Red and orange and black… all pertaining to my fiery fire-sign no doubt!

Block Facts:

Name: Fair and Square
History: This geometric design and its variations have been found on Amish quilts made in 19th century Pennsylvania. Commonly used as a singular central piece but also as an all-over design.
Level: Some experience needed to match seams neatly, otherwise relatively simple.
No. of pieces: 13

Progress report:

Block 1: The Double Four Patch
Block 2: The Whirlwind
Block 3: The Sailboat
Block 4: The Shoo-fly
Block 5: The Trafalgar
Block 6: The Windmill
Block 7: The Chequer Square
Block 8: The Diamond Square
Block 9: The Cactus Pot
Block 10: The Sawtooth Star
Block 11: To come!
Block 12: The Windmill Sails block
Block 13: The Basket of Flowers block
Block 14: Susannah
Block 15: Road to Oklhahoma
Block 16: Chequer Star
Block 17: Nelson’s Victory
Block 18: Fair and Square