A little alteration. No fear!

Acne Studios dress
Acne Studios dress

I normally steer well clear of other people’s alterations. Mostly through fear of screwing up and from past experience, lack of self-belief has led to an incredibly frustrating and stressful process. I’d sooner stick with making from scratch to fit from the off.

But I got brave last week. I succumbed to the pleading eyes of my friend who’d bought a posh dress (see above) that didn’t fit properly and she needed it urgently for a do! Classic baggy armhole syndrome! It fitted like a glove elsewhere, helped by the cut and the give of the lovely viscose crepe but in turn, that’s what highlighted the poor fit around the armscyes.

I don’t have a before or after picture of my friend wearing the dress I’m afraid, so you will have to bear with and picture the problem.

I went in with an open mind, ready to admit defeat if I thought I couldn’t fix it, but instantly set about pinning the excess to see what would happen. About 3/4 inch under the arms and 1 cm off the right shoulder – interestingly enough – et voilà!

We’re still not sure if the dress was made on the wonk or if my friend actually has one sloping shoulder. She used to be a personal shopper and regularly carried bags on her shoulder so it is a distinct possibility I guess!

The armholes and neckline were faced and the dress fully lined so I had to unpick the dress from the facing and pull the internal side seams through the hole to mark the adjustment before sewing. For RTW I was dead impressed at finding a French seam inside the lining! Though that flummoxed me a bit in terms of how I would sew it! I just sewed it anyhows and pressed the seam to the same side it sat originally. I took in the same amount from the facing. That had an open seam so it pressed nice and flat once I’d unpicked the original line of stitching. To finish, I pinched the edges together and did a tiny ladder stitch to ensure no stitches were visible.

underarm alteration
Left: inside of underarm alteration. You can see where I left excess in the lining. Right: Crepe hides a multitude of sins. In this case you can barely see where I pressed the new seam to the back despite it being 3/4 inch wider at the armhole edge.

The shoulder seam was completed in much the same way apart from an added opening I made in the shoulder seam lining to make the stitching easier. Everything was ladder-stitched up good and proper afterwards.

shoulder seam
Inside shoulder seam

I also took 1 1/4 inch off the bottom. I marked and cut 3/4inch off, then made a small 1/4 inch double hem.

quarter inch hem
Quarter inch double-hem

The only thing I’m jolly glad I didn’t do before I tackled this little project was to Google it. I hadn’t heard of Acne Studios but having been suitably impressed with the quality of this dress, I went off to investigate further. Their range is mostly not my cup of tea but there are some very stylish numbers going on… and some very hefty price tags to boot. The dress was nearly £500! And I know that she was stung for £60 duty too. So what if I’d messed up?!  What if the iron had been too hot? What if I’d missed a stitch and made a hole with seam ripper? What if I’d snagged the fabric? Doesn’t bear thinking about!

Any hows. Its done. No screw ups. One very happy friend off to a very posh do. And a few more added strings to bow… phew!

Have you overcome any sewing fears recently?

It’s all about Mimi, and me!

Mimi blouse from Love at First StitchI’m sure you are all very familiar with Tilly and the ButtonsLove at First Stitch book. It comes very recommended if you haven’t got it already. Well this is the Mimi blouse from said gorgeous book.

Mimi was indeed love at first sight and I (shamefully) started working on it way back in September last year before it landed on the to-do pile!  But it’s finished now and it’s fab, and I love it so that’s all that matters, right?!

The fabric is viscose, I’m sure, and was a great charity shop find a couple of years ago. Don’t you just love it when you already ‘just happen to have’ that perfect fabric for the job. Better still when it only cost a couple of quid. And better more still when that couple of quid goes to a good cause.

It gathered well, presses beautifully, yet doesn’t crease. Magic, that is!

mimi blouse and love at first stitch book

It was lovely working from the book instead of a giant fold out set of instructions. The steps are crystal clear and the photography is so so beautiful. Inspiration counts for a lot these days, when I’m run ragged at the end of the day. It completely takes you by the hand and leads you into a dreamworld of having more hours than you actually have and makes sewing possible! And that really is magic!

The buttons are properly vintage and are the same that I used for my vintage wrap blouse. I’ve used all but one now. Best save that for an emergency button loss!

mimi blouse buttons

I wondered if they were a bit big but I do like the way they contrast and don’t go MIA among the spots.

The collar is definitely my favourite part. Much like the one on my By Hand London Sophia dress. And I love the little tucks on the sleeves. Which incidentally are finished perfectly with a facing.

Despite all the pretty pictures and faultless instructions I did manage to make a booboo though. Totally my fault. Instead of just going with my usual body measurements, I first checked out the finished garment measurements which seem huge if you don’t take into consideration the gathering, which I didn’t. And so I went down a size. It isn’t blatantly obvious. Only when I put my arms up or shoulders back do the gathers on the yoke poof out a bit. I don’t practise the best posture tbh so I think I’ll get away with it!

Tilly and the Buttons Mimi Blouse

I’m all for tucking a shirt in usually but I like that this one can be a little more casual. It has a great shape and is everso comfy whilst retaining a bit of retro chic methinks!

mimi blouse back view

All the above photos were taken by my lovely Daniel who never ever complains. Even when he has things to do himself. He took these with minutes to spare before he rushed off to his soundcheck. And all I had to do in exchange was sew a button on his coat. Best I finish his waistcoat soon, hey?! You can see more of his pics here. They’re not all about me!

But today was totally all about me. This morning I went for an actual run. I say ‘actual’ because it usually amounts to a fast walk! I ran the fastest and the furthest in 3 weeks of practising and it felt amazing.

I then got to shoot my Mimi with Daniel and had lunch with my little family before everyone left the house for the day on separate missions. I found myself unexpectedly home alone.

So I uploaded my lovely Mimi photos and considered going to see Alexander McQueen’s Savage Beauty exhibition at the Victoria and Albert museum. Twitter warned of long queues but I went anyway. Because I could! And on my own, which was blissful and meant I could read and absorb every word and gaze longingly for a long time and hang around as long as I liked. And I did! With only 2 minutes max of queueing time. Oh the power of a V&A membership card and the joy of living in London.

I will definitely be going again, and again and probably again. So I will spare you the breathtaking detail as I’m sure that many of you will want to experience that yourselves.

I am home now with tea and I have blogged too. And that makes me happier still.


53-minute skirt for Red Nose Day

red skirt for red nose day

I’m just going to sneak in with a quick post about a speedy skirt I made last night.

Youngest dort announced on Wednesday evening that she needed a red skirt or some red leggings for Red Nose day on Friday.

“No problemo sweetipops,” I said. I happened to be working next to Westfield shopping centre on Thursday and I would have many a ladies clothes shop to bag an emergency red garment.

Famous last words. Would you believe that between five top ladies-wear shops, and one very large sports shop, there was not a red skirt or pair of leggings to be found. Has red gone out of fashion? There was pink, orange, coral and burgundy but not a glimpse of red in sight, save a few t-shirts!

I had already planned a night in with good chums and the Great British Sewing Bee final on Thursday after work. No way was I going to cancel that. There were ‘skanklets’ and everything!

Watching #GBSB final. #skanklette

A photo posted by Tilly Walnes (@tillybuttons) on

So I planned a speedy skirt on the way to Tilly’s and – fuelled by Prosecco and pizza and mini eggs – I raced back to my sewing table before the clock struck midnight. Proper little Cinders, me!

53 minutes later, in true Sewing Bee stylee, I’d made the pattern and stitched up a full circle skirt with an elasticated waist from some leftover red jersey. It scores nothing for couture but fulfilled the brief… and diverted a tantrum.

It’s going to take me a little longer to write and illustrate the tute but I’ll be back with one later, because I quite fancy one of these myself! Till then, have a wonderful weekend, all. Hope you get some quality sewing time in.

ooobop review: Burda Style March 2015

Burda Style March 2015 cover

Can you feel that spring sunshine, desperately trying to squeeze though your bedroom window in the morning? Well if that isn’t happening, the March 2015 issue of Burda Style magazine will do it’s best to brighten your days.

There’s some lively goings-on this month, with all sorts of asymmetric, geometrical, hankerchief-hemmed and draped goodness!

Beach Pearls sets some scenes for a summer wardrobe: I just love that maxi dress (A). It’s not dissimilar to the viscose jersey one I made here, but the bust detail is right on the money! A lot more support I would think and what a flattering silhouette!.

beach pearls burda march 2015

It also translates into a lovely strappy top (B).

Now I like where the asymmetrical skirt (C) is coming from but not quite where it landed up! Way too much like a sack tied round the middle for me. Further on it is redeemed with some better styling, I can assure you.

Nice Jumpsuit (C), btw. If jumpsuits are your thing. You might want to add some ‘fashion tape’ to the list of required notions, though. Click here: Hollywood Fashion Tape if you’re interested in buying any from Amazon!

Flared trouser suits (E)? mmm…and bat wing empire-lines (F)? double mmm… Lets move on to the shirtwaist dress with ‘maxitail in the right seam’ (G). I do like that. And I love the biker-meets-Mao jacket too (H)!

Uh oh. There’s that batwing-empire-line again (I). Swiftly moving on to the Flowers and Stripes section!

Flowers and stripes burda style march 2015

I’ve never made or owned a pair of culottes (A). But I bet they’re a far safer than a full skirt on a windy day. And looks lovely in a largish print. If you like that sort of thing.

And there’s that shirt-waist dress (B) again with ‘cut-on-dipped hem’ like last time! It would be better to use a fabric that has a reverse as good as the good side, I would have thought.

Look how that lovely maxi translates to a cute beach dress too (C).

This month features a chic wrap dress (D). There is some assurance of a button at the side and concealed snap fasteners to keep the wrap in place. Potential for a Bucks Fizz moment there!

The peasant top addict in me (see two of them here and here) is quite drawn to this ‘relaxed tunic’ (E)! Would need a fine drapey jersey to pull off with any sophistication I would have thought.

And there’s some more geometric delight in the shape of a simple v-neck dress with symmetrical ‘cut-on tails’ (F)!

Any weddings occurring this year? Loving both these bridal party dresses (A) in The Big Day section.

The Big Day Burda March 2015

The bride’s dress (B) is the same as (A) with a flowy underskirt of crêpe chiffon. That’s if you haven’t been put off by the chiffon adventures in The Great British Sewing Bee recent episode.

Can’t help thinking this dress (C) is a bit cake-like with all the tiers an’ all.

And although I usually embrace a bit of invention, I still wouldn’t want to look like I’d been dragged behind the wedding car, en-route in this dress (D)!

This fairytale dress (E) is far simpler and much more sophisticated though. Just get rid of the batwing-empire-maid who’s ruining the photo!

Oh this is much better (F). Lovely wide-dipped hem again. Bust darts for shape. Cotton lace overlay, crepe satin underlay. I’d wear it with cowboy boots. Or even DM’s. Or is that just the hippy in me?!

Now there’s that asymmetric skirt again (centre, G), styled much more favourably with a gorgeous jacket: standing collar and 50s style winged lapels. See, it does have potential to work. Nice suit on the right too!

I’ve picked out the following three from the Reader Favourites section:

reader favourites burda march 2015

Jumpsuit (A) made short for all you lovely long-legged people!

Lovely floor-length dress (B) in striped jersey with side slits and a ‘hankerchief hem’. I can definitely feel some more maxi’s coming on this year.

And a cute little dress (C) based on the short lace wedding party dress design. Not my cuppa tea fabric-wise, but I’m always sold on a midriff piece!

Not overly inspired by the plus section this month I’m afraid, though the trench coat is rather amazing, I must say.

plus size trench coat burda march 2015

But, there is cuteness for small people at the back.

Childrens section burda style march 2015

The best design and the garment most fitting to the Colour Splash section by far, is the paint-spattered dress (A) with tying bands that resemble the sleeves of another garment. Hands up who wants an adult version? Genius!

Pattern testing: BHL Sophia

BHL Sophia dress

If you heard a rumour that there was a new BHL girl on the block, you heard right. And I can assure you that Sophia lives up to that By Hand London reputation of gorgeousness.

Victoria contacted me with an emergency test request. And despite my ongoing mega work load I couldn’t turn this one down.

By the drawings alone I knew I wanted this dress. I mean, check out those darts and oh that 50s style collar. Totally up my street with a little nod to vintage.
bhl_drawing_sophiaI chose the pencil skirt version as my vision involved ‘old man Prince of Wales check’ fabric! I was after a bit of structure backed up with office chic stylin’!

And so here is my first testing of the test pattern itself!

back_detail_front_full

And yes, call me crazy, but I did opt for checked fabric to test a pattern, and not for the first time. My thinking is that if it does turn out good then I haven’t wasted time. It happens… occasionally!

Truth is, not accounting for any amendments to the pattern that might be made by BHL in the meantime, I do need to make a few tweaks, including a small fba and to taper the skirt a bit. But that’s just personal preference.

bhl sophia collar detail

The fabric was from Dave the Drapers in Goldhawk Road. One of my faves. But lesson learned with cheap fabric: Even though the quality isn’t bad (its a wool mix) the grain is slightly off and that matters one helluva lot with checks! Well that’s my excuse, and I’m sticking to it!

I love the way the darts radiate from the central front and back seams. I’ve seen this approach in vintage design books but not on a pattern I own, vintage or modern. So it was a real treat to get to test how this works. I just have to figure out how to do an fba with this kind of dart. Presuming I swing to the side seam and proceed as normal but very open to suggestions if anyone knows of another way.

Sophia should be making her appearance in the BHL pattern shop soon So keep eyes peeled. Shes a good’un!


Churn Dash Quilt Block

quilt block churn dash

I am really good at procrastinating. I’m not so good at hurrying up a patchwork quilt. But who’s in a hurry, anyway?! Let’s not dwell on how much time it’s taken me to get to 25 blocks. Let’s not even spare a seconds-thought to how much longer before my amazing quilt will be ready to throw over my bed. Let’s just focus on the here and now!

This is a Churn Dash quilt block. Also known as a Churn Dasher or Roads to Berlin. The 25th block I’ve created to date and boy can you see how out of practice I am!

If I’d have retained momentum. I’m sure the inset seams would have been neater. Only one point matches up precisely. And I’m so pleased with that. But not pleased enough to unpick and sort out the other three!

It’s only that Mr O is away that I’m doing this otherwise I should truly be working on his waistcoat. So I should not spend a minute more on this. In any case. If I want that ‘handmade’ look about my quilt, it needs to have a couple of imperfections at least! The next one will be spot on, I’m sure.

Block Facts:

Name: ‘Churn Dash’ or ‘Churn Dasher’ or ‘Roads to Berlin’
History: Another 1930s favourite. One of many blocks inspired by 19th century domestic appliances! Works on its own or used as part of a more complex design.
Level: Set in seams require experience.
No. of pieces: 9

Progress report:

Block 1: The Double Four Patch
Block 2: The Whirlwind
Block 3: The Sailboat
Block 4: The Shoo-fly
Block 5: The Trafalgar
Block 6: The Windmill
Block 7: The Chequer Square
Block 8: The Diamond Square
Block 9: The Cactus Pot
Block 10: The Sawtooth Star
Block 11: To come!
Block 12: The Windmill Sails block
Block 13: The Basket of Flowers block
Block 14: Susannah
Block 15: Road to Oklhahoma
Block 16: Chequer Star
Block 17: Nelson’s Victory
Block 18: Fair and Square
Block 19: Diamond Pinwheel
Block 20: Whirligig
Block 21: Old Maid’s Puzzle
Block 22: Whirlwind Square
Block 23: Windblown Square
Block 24: Basket of Flowers block revisited
Block 25: Churn Dash

Using Evernote to catalogue patterns & fabric stash

vintage sewing patterns

In my head, I’m a very organised and methodical person. In reality I’m not!

Actually, that’s not entirely fair. I do put things in piles labelled ‘to action’, ‘to file’, ‘to put away’ and I have even been known to put things in boxes but there remains an ongoing issue with finding things!

My precious sewing patterns, new and old, are safely filed put away in boxes. I love to get them out and look through them every now and then, just for that warm fuzzy feeling. And sometimes I even put them to work. But with the ever growing tower of pattern boxes it is true to say that I often forget what I’ve got.

But last week I discovered Evernote! I cannot claim to be the authority on this app because, by all accounts, it does so much. However, I can tell you how it has revolutionised the organisation of my sewing pattern collection.

How Evernote works for me

  • Firstly, it’s on my phone which means when I find myself in a fabric shop, I can instantly find out how much fabric/what notions I need, or if a particular fabric is suitable for the job just by scrolling through my instantly available files.
Evernote screenshot
How my sewing pattern list appears on my phone screen
  • Equally if I’m in a charity shop and there’s an amazing remnant of fabric shouting out I can see if it matches up to the requirements.
  • I can instantly check to see if I already own the pattern or not – Despite my tower of patterns equalling my own height, I still get a little buzz from an Ebay bargain!
  • You can share your ‘notes’ on social networks or via message or Email which will be a handy way of me creating a new pinboard on Pinterest or consulting fellow sewists via Twitter or Facebook.
  • You can also print straight from your device. Assuming you’d need a wireless system for that though.
  • You can tag the patterns making for a brilliant search system. I generally tag mine with: size, bust-size, era, garment style, pattern name/number and exact date of publication if I can find it.
  • You can also stack notebooks. So for instance:
    1 ‘note’ effectively consists of front and back of pattern envelope plus any notes I’ve made from previous experience.
    ‘Notes’ are grouped together to form a ‘notebook’, for instance one ‘notebook’ could be titled Vintage another could be Modern.
    ‘Notebooks’ can then be stacked under a title of Sewing patterns.
    I am currently just putting all ‘notes’ (individual patterns) in one ‘notebook’ called Sewing patterns and tagging them for easy searching. I like being able to scroll down a long list.
  • You can view each pattern as a thumbnail with it’s title alongside. It’s a little bit diddy, even on a larger than average phone screen but it syncs perfectly online and I find this is an easier way of viewing and editing from the comfort of a desk and the luxury of a larger screen.

Evernote online

And the best thing about Evernote?

  • It’s absolutely FREE! I haven’t felt the need to upgrade to a premium version yet. The benefits of which include: more space allocation, an offline editing option, multiple author permission, and pdf search facility. But even if and when I feel I’m ready to upgrade, its only about £35 per year!

Evernote is so easy to use

To upload a pattern I simply take a photo of the cover using the inbuilt camera and then take a ‘document’ shot of the back cover text. This text can be enlarged for perfect readability even on a tiny screen. I then give it a title: The pattern company and number reference. And then I tag it so It can be searched for. I currently only have the one notebook titled, Sewing Patterns and I make sure they live in there but if you had other notebooks you’d just have to check it’s in the right place.

Evernote phone screenshot
This is what the pattern cover image looks like within a ‘note’


Evernote screen shot scroll down
This is what the screen looks like when I scroll down for further info
Evernote zoomed in
This is what the back cover info looks like, zoomed-in on my phone

Teething problems with Evernote

I have only come up against a couple of teething problems. No biggies but worth bearing in mind to save you from pulling out your hair!

I did get excited when I saw the ‘Location’ entry box. But longitude and latitude won’t help me to find where the actual pattern is so I guess I will have to add the location to the file name (ie box 1 etc)

For a short while I didn’t understand how Evernote randomly selected an image to use as the cover thumbnail. It doesn’t select them according to first in the list, moreover the largest image.
So just make sure that the cover image is larger than the back cover document image. I do this by taking a close up of the pictorial cover and holding the camera a bit further away when I shoot the back cover. When using the document shooting facility it will naturally crop into the document text area and automatically exclude external background content, which keeps it smaller.

Using Evernote to catalogue fabric mountain

Once I’ve finished cataloguing my sewing patterns, I’m thinking of filing my fabric stash too. By taking a photo of the fabric and adding some notes and searchable tags relating to size, fabric content and potential usage. But one thing at a time, hey?!

Has anybody else tried Evernote? Are there any features I’ve missed? Or do you use another filing system?

For anyone interested in getting this app, you can either download it from the App Store or let me know, and I’ll Email you a link. Another great feature is that if you recommend a friend you earn points to upgrade for free! So once you are signed up for the free app don’t forget to recommend Evernote to your friends too.

Footnote: This is not a sponsored post, despite my enthusiasm. It is an honest review of a product that works very well for me and my purposes.

Make your own Zhivago-inspired fur hat: FREE pattern download

make your own fur hat free patternquick sewing projectHappy new year lovely followers!

I’m so delighted to share this pattern with you as my first post of 2015. It’s a timeless, vintage-style fur hat that will keep you warm and toasty in the most stylish way possible! And it’s a real quick project to sew up for that quick sewing fix when time isn’t on your side!

It really is so super easy to make. Just download and print out the FREE_fur_hat_pattern and follow these few simple instructions. The hardest thing about this hat will be to get your hands on some quality fur of the faux kind!

The pattern corresponds to my head size which is 22.5 inches or 57 cm.
You may need to adjust the pattern to personalise the fit.

You will need:

  • 1/4 m of faux fur (retailers will only usually sell you 1/2m at a time but its often worth an ask!)
  • 1/4 m of lining fabric (or find some scraps in your stash)
  • coordinating thread
  • a vacuum cleaner to hoover up all the fluff!

Instructions:

  • Make sure you print out your FREE_fur_hat_pattern at actual size, and check with the test square (on page 4 of the pdf) that it has printed correctly. Cut out and paste the sheets together to match the layout on page 1 of the pdf. Complete the hat band and crown sections as full pieces as instructed on the pattern then cut out.

NOTE: Before you pin the pattern to your fur fabric, think about what direction you prefer the fur to lie. On this particular hat I made, the pile strokes downwards on the band, from the top of the crown, down towards my eyebrows! On the top circular piece, it strokes from front to back. Incidentally, the centre back of the hat is where the band is seamed.

TIP: When cutting your fur pieces, cut on the reverse and just snip carefully through the backing fabric so as not to cut through to the actual fur on the right side. You will achieve a much better finish on the seams.

  • Pin the pattern to your fur pieces and cut out, paying heed to the tip above.
  • Pin and cut out your lining pieces. It doesn’t matter for the circular lining piece but make sure the band is cut on a straight grain to avoid stretching.
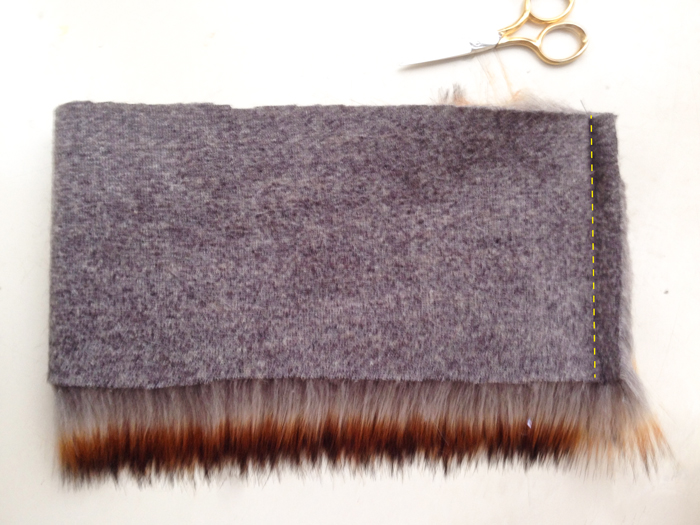
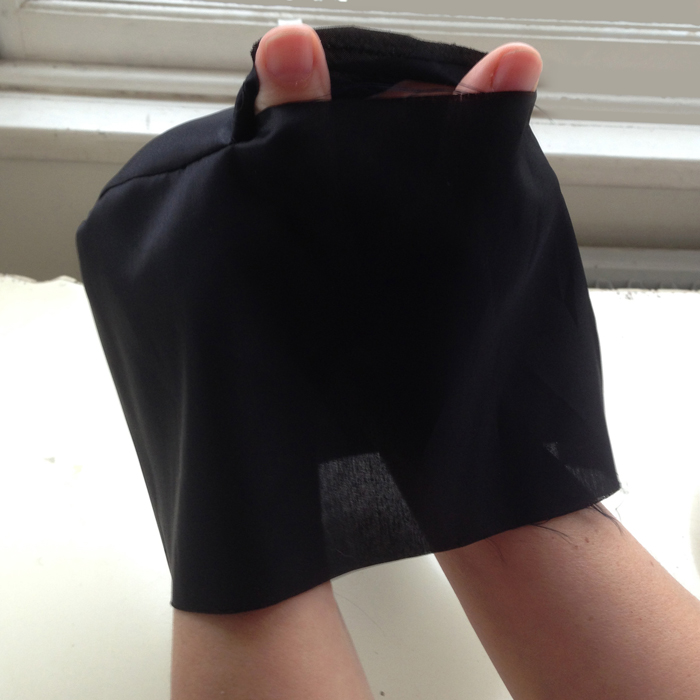
  • Take your fur band piece and fold in half, right sides together. Pin the short ends together, making sure the fur is tucked inside, and stitch using a 1.5 cm seam allowance following the direction of the fur.

seam fur band

TIP: When sewing fur fabric, Increase your stitch length a little so prevent thread tangling.

  • Finger-press the seam open and hold in place with a couple of tacking stitches top and bottom of seam.
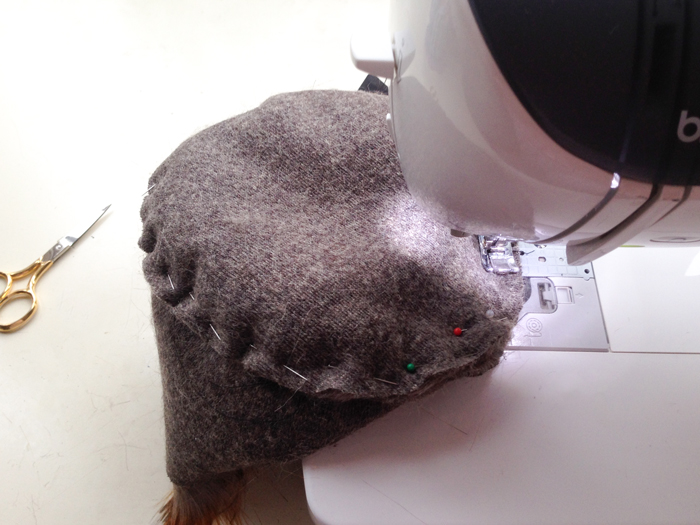
  • Pin the fur circular crown piece to the hat band, making sure the fur is tucked in and checking the direction of the fur is correct. See note above. Sew the seam using a 1.5 cm seam allowance.
pin and stitch crown to band
Pin and stitch crown to band
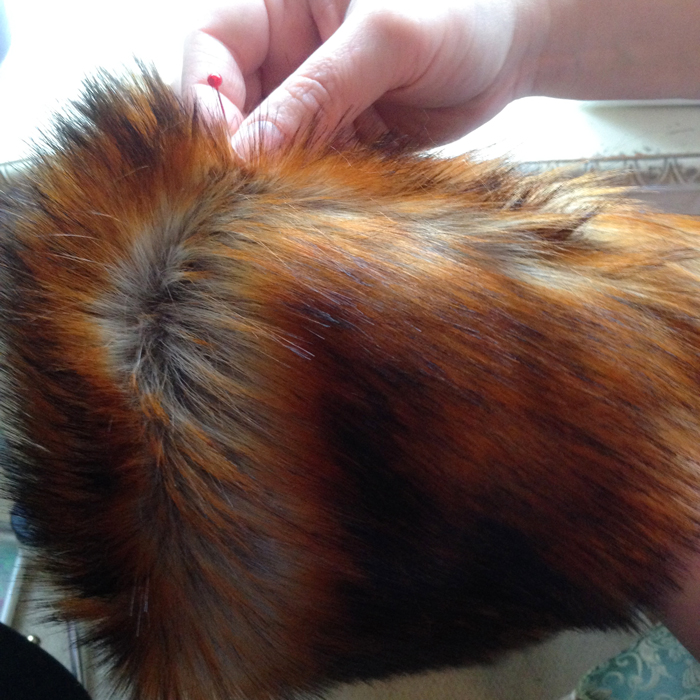
  • Turn right side out. Using a long craft pin (a normal pin or needle will do) drag it along the seam allowance to free the fur that has got caught in the seam.
picked trapped fur from seam with pin
Pick trapped fur from seam with pin
  • Now take your lining piece for the band, pin the short edges together as above and stitch with a regular stitch length and a 1.5 cm seam allowance. Press seam open.
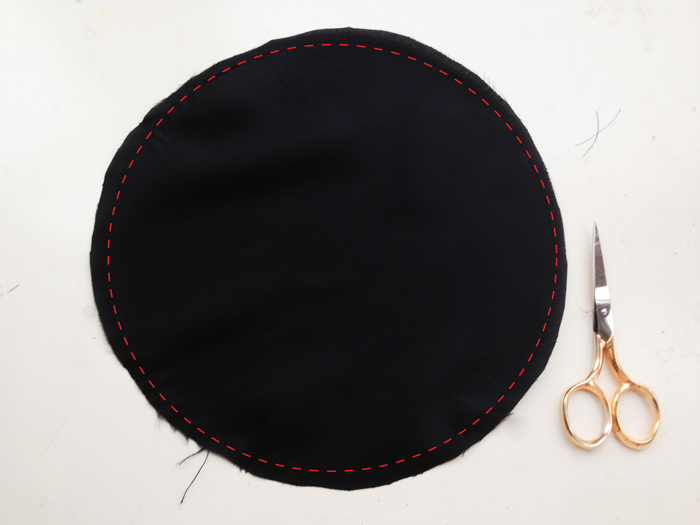
  • Stay stitch the circular lining piece within the seam allowance, to prevent stretching.
Stay-stitch circular lining piece
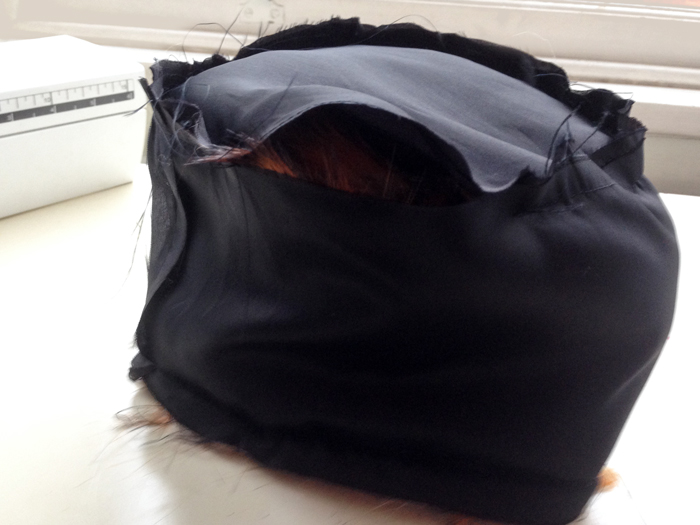
  • Pin the lining piece for the crown along one edge of the band and seam together, leaving a about 4 inches / 10cm open for turning.
leave opening in lining
Leave opening in lining
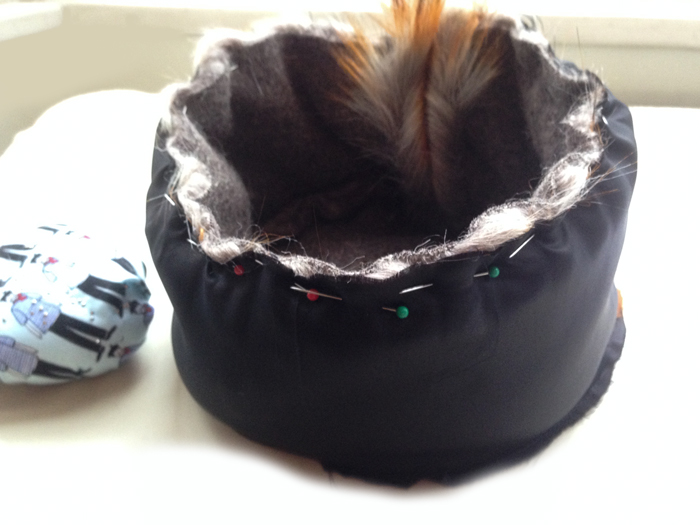
  • With right sides together pin the rims of the lining and the fur hat together. Effectively the fur hat will be sitting inside the lining. Pin together, matching the two centre back seams and stitch along the entire edge, securing the stitching, beginning and end.
Sew lining to outer fabric
Pin and sew lining to outer fabric
  • Turn the hat to the right side through the opening left in the lining, and you’re almost done!
Turn hat to the right side through this opening
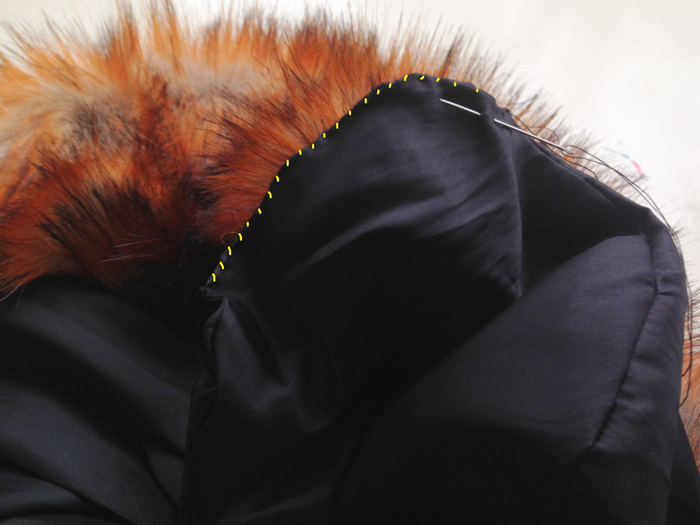
  • Pin the lining opening together, tucking in the seam allowance, and slip-stitch closed. With matching thread, obvs!
Slip stitch the to close the opening in the lining
Slip stitch to close the opening in the lining. With matching thread obvs!

Now all that is left to do is to don your new fancy fur hat, step out in the snow and hum the theme tune to Doctor Zhivago!

Please shout if anything is unclear. I’d be delighted to hear how you get on.

Faux Zhivago: handmade retro-style fur hat

handmade fur hat

I watched the film, Doctor Zhivago lots of years ago, snuggled up on the sofa with my mum. Can’t say I remember much about the plot but the music and the coats and the hats stayed with me for sure!

So when I found a crazy retro-style furry black hat in Oxfam, I knew I could and should shamelessly copy and create one of my own even if I didn’t have the lips to pull of a sultry pout, Julie Christie style.

So here is the Ooobop faux fur, Zhivagoesque, vintage-style hat that will laugh in the face of any Russian-style snowfall that threatens over the next few days.

handmade vintage style fur hat

I care not if my children walk ten paces behind me.

I care not if Mr O likens me to Rab C Nesbitt’s Wife.

And I care even less for all those sideways glances in the high street. They are just jealous eyes!

My ears are warm. My bad hair day is irrelevant. And Lara’s Theme tune is on loop!

handmade fur hat Doctor Zhivago style

The faux fox fur – I keep having to state faux because it actually feels too real to be faux! – was a bit pricey but it was a justified birthday spend up gifted by my lovely mum. I got it in A-One Fabrics in the Goldhawk Road and it is such good silky quality. Only needed half a metre and that was enough for a trial one that went wrong, this one which didn’t, and perhaps a matching fur muff to come! Do people even wear those nowadays?

I probably don’t need to declare that it was Mr O that took these fab photos – late last night, with next to no light but one of those god-awful energy saving bulbs and a few fairy twinkles. I certainly wouldn’t have had the patience. Very happy to sit with a glass of bubbly under the Christmas tree while he worked it though!

I was hoping to have a little tute prepared for you to accompany this post but that was serious wishful thinking on my behalf! Working on it nonetheless. And for anyone who fancies a furry head warmer like mine I’ll be posting a pattern and a tute next post, post-haste!

Till then lovely followers, I wish you all the loveliest of wishes; Wrap up warm, keep safe and beware the nutters on the road!  x

handmade fur hat

Another hand made gift for Christmas

tilda rabbit in christmas tree

I’ve been toying with the idea of making everyone a hand made Christmas present, like forever! And I never get it together in time. But this year I made two!: The secret santa gold pleather bag for Emmie, and now this Linen Tilda rabbit for a special baby boy who’s name I can’t declare lest I give the surprise away!

I forgot how much fun these are to make. I made the last two so far back, the post has sadly gone missing. But here’s a picture of them at least:

Tilda rabbits

And here’s a link to the chicken I made from the same book which is called Crafting Springtime Gifts.

Crafting Springtime Gifts

I’d dutifully traced the patterns on to some cereal box card so I simply had to draw round the pieces on the linen, sew along the lines and then cut out with a small seam allowance.

I got a nice plump bag of polyester toy stuffing from the market. It’s amazing how much you need for just one wee bunnie!

The eyes are drawn on with a laundry marker which is always a scary thing to do as it’s the last thing you do once its all sewn up. I was pre-planning a bunnie with shades just in case my hand shook to much and screwed up the eyes!

The nose is embroidered. I didn’t have any pink embroidery thread so I sewed with 4 regular pink threads and achieved the same. Little bit on the wonk but all part of the handmade charm!

tilda rabbit head shot

This time round I used pink satin for the inner ears. What child doesn’t like to feel a bit of ‘silky’ when they are nodding off to sleep?!

I also left the buttons off and replaced with some embroidered crosses on the straps instead. Don’t want to be the cause of a terrible choking incident!

tilda rabbit profile

I have visions of this little fella being dragged around by one arm or leg in true old fashioned childlike stylee. And ending up pale and threadbare in his later years. That’s if baby approves and doesn’t banish him to the toy box forever!

I love sewing with linen and I love having the chance to employ a decorative stitch! Goodness knows why I only reserve it for toys though!

tilda rabbit decorative stitch

In other news. I’m thinking of making a new hat. Not sure I’ll get that done before Christmas though. That would be one massive miracle!

And that just leaves me to say, thank you so much for your continuing support and wonderful comments. Have a fabulous Christmas one and all, wishing you lots of love and good health for the coming year. xxx