Vintage Simplicity 4687 to the rescue!

simplicity 4687 vintage dress

The look on Mr O’s face was a picture following my little I’ve-got-absolutely-nothing-to-wear tantrum on Friday evening. The undulating range of handmade dresses strewn across the floor and the bed said otherwise. It was Rachel’s hen night on Saturday. To be attended by various gorgeous sewing bloggers who would all be adorned with their own spectacular creations.

“So make one, then” was the ridiculous response.
“Er… It’s Friday. The hen do is tomorrow?” I replied, teenage-style, deepened yet rising in intonation.

A roll of the eyes. No sympathy. A simple shift dress appears in my head. Some crazy tropical fabric follows in the next mind scene. Mission Ooobop-new-dress are go!

I run upstairs dig out Simplicity 4687 from the neatly labelled ‘vintage 1950s’ box of sewing patterns (believe that and you’ll believe anything!) and following an exhausting rummage, retrieve said fabric from stash. I pinned and cut it out right there and then. Winging it. No adjustments. No time.

simplicity sewing pattern 4687

Saturday morning and I’m all over it like a nettle rash. One front, two backs, 3 facings 10 darts(!) and Bob was my uncle! Walkaway dress, eat your heart out!

"simplicityLack of lining, overlocker on form and an invisible zipper foot all helped to speed up the process. And thanks to the ample ease that Simplicity ensures, the only alteration I had to make was to loose a few inches on the bust. I took them out at the side seams just under the armhole. Next time I’ll be sure to grade it properly.

simplicity 4687 vintage dress

Incidentally this is the first time I’ve used my invisible zipper foot and I won’t be looking back as unanimously claimed by many a Twitter follower when I put the question of ‘was it worth it’ out for debate! I mostly referred to the price tag of £13 which seemed a bit hefty for a little foot. But boy does it make zip insertion a breeze. So quick and so neat. You’d never see any evidence at all if it wasn’t for lack of pattern matching! Certainly no time for that!

invisible zip

The hen do was a roaring success, thanks to the brilliant and selfless organising skills of the amazing Miss Demeanour. And Rachel looked amazing as evs as she boogied the night away, totally unfazed by us all wearing our Rachel masks and assuming the ‘Rachel signature pose’ at every given opportunity. I can assure you it was terrifying!

rachel hen night

As you can imagine, any photos taken last night of me in my new dress, would at best have been blurry but mostly ungainly so Mr O has come to my rescue by rustling up these photos today. I can tell you that the sunglasses are a necessary accessory!
simplicity 4687 vintage dressSo thank you to Daniel, not only for the photos but for raising that red rag to this bull and ensuring I had something to wear after all! 😉

Nothing boring about a pencil skirt.

pencil skirt
New pencil skirt, handmade pinstripe jacket and Lola Ramona shoes

I’m standing in a post office queue, assuming a vintage Vogue packet pose. Right foot slightly forward, knee turned inwards, right hand resting limply on the barrier, opposite hip cocked. Left elbow is tucked just above cocked hip with forearm projecting at 45 degrees. Cheap handbag rests in crook of arm. Left palm is face up with index finger extended accusingly. I’ve practiced this before. In the mirror. But not in the post office And not in this skirt.

pencil skirt close up
Much like the aforementioned pose but in better surroundings!

It’s a new skirt. A boring pencil skirt. Least that’s what I thought I was making when I started cutting it out it 3 weeks ago. It’s a self-drafted pencil skirt which makes it bespoke. But without any fancy detail, no flounce, no welts or clever rouching just the standard double darts front and back. That’s why it tooks 3 whole weeks to finish. Countless 10 minute-intervals of boring sewing was more than enough time to ensure I didn’t actually die of  boredom. Absolutely nothing to whet my enthusiasm here. It’s proper boring knee-length too. Not short and sexy, not longer to deserve a vintage vibe. Just a normal length. The kind of length that abides by school rules. Where’s the excitement in that?

But now its finished and its hugging my hips and I’ve had some thinking time in the queue I’m coming round to the idea that perhaps I’ve not given this skirt enough credit.

The fabric is pure quality. A linen wool mix I think. (I’m never totally sure about fabric content), In shades of indigo, black and speckled with ivory, so soft it moulds perfectly to my frame but with enough body to keep a tailored shape. Karen kindly bought it for me as a gift from Mood Fabrics, New York so long ago I can’t remember when. I knew it was destined for a pencil skirt but my inner fashion designer head is always craving an off-the-wall statement garment. Who knows what’s stopping me?

pencil skirt at Harrods Depository
On the riverside near Harrods Furniture Depository

But if post office queues are good for anything – apart from gleefully acknowledging that everyone else’s huffing and puffing indicates that they are far more stressed than you – it’s got to be thinking time. Not to be wasted. A valuable moment to contemplate. There’s not much time for that at any other point in the day. And so, after a little contemplation I conclude:  My new skirt is actually not as boring as I initially made out.

Resuming my pose, I’m reassured that this skirt is after all, classic. It’s timeless, sexy even, regardless of standardised length and it smacks of quality.  It’s also classy which is why I’m standing like a 50s illustration on a sewing packet. It deserves the justice of a proper showcase. Moreso, given that no ‘Big Four’ pattern helped me out here nor did this skirt have a shady RTW past. It was born of my own fair hand, and my sewing machine. You can tell by the standard 2 inch hand-stitched hem and the perfectly lined vent if you want proof. And hey, it perfectly matches my Spencer jacket that I made years ago! My pride is my therapy right now. And no up-and-down stare from any one of these crazy old ladies is going to take it away.

Pencil skirt back view
I just love a pair of stripy heels!

I leave the sighs of the post office behind me, lowering my pretend vintage sunglasses from my head to my nose, and wiggle-walk to work like a Mad Men extra.

On entering  the office, the first thing my  colleague says is, “oooh… lovely skirt. Is that new?! I love the colour, it fits so good and the length is perfect!” She doesn’t sew. She just says all the right things and I love her!

Please note: The photos were clearly not taken in the post office – that would be truly boring – but instead, by the riverside, Hammersmith, by my ever trusty photographer, Daniel. We went for lunch at the Blue Boat. A relatively new establishment on the river. ‘Poncey’ as aptly described by the waiter (when he sincerely apologised for not having Gordons or Schweppes on the drinks list) but nonetheless brilliant in service, and the food was bloody gorgeous!

Posing outside the Blue Boat
Outside the Blue Boat restaurant, Hammersmith

Make your own Zhivago-inspired fur hat: FREE pattern download

make your own fur hat free patternquick sewing projectHappy new year lovely followers!

I’m so delighted to share this pattern with you as my first post of 2015. It’s a timeless, vintage-style fur hat that will keep you warm and toasty in the most stylish way possible! And it’s a real quick project to sew up for that quick sewing fix when time isn’t on your side!

It really is so super easy to make. Just download and print out the FREE_fur_hat_pattern and follow these few simple instructions. The hardest thing about this hat will be to get your hands on some quality fur of the faux kind!

The pattern corresponds to my head size which is 22.5 inches or 57 cm.
You may need to adjust the pattern to personalise the fit.

You will need:

  • 1/4 m of faux fur (retailers will only usually sell you 1/2m at a time but its often worth an ask!)
  • 1/4 m of lining fabric (or find some scraps in your stash)
  • coordinating thread
  • a vacuum cleaner to hoover up all the fluff!

Instructions:

  • Make sure you print out your FREE_fur_hat_pattern at actual size, and check with the test square (on page 4 of the pdf) that it has printed correctly. Cut out and paste the sheets together to match the layout on page 1 of the pdf. Complete the hat band and crown sections as full pieces as instructed on the pattern then cut out.

NOTE: Before you pin the pattern to your fur fabric, think about what direction you prefer the fur to lie. On this particular hat I made, the pile strokes downwards on the band, from the top of the crown, down towards my eyebrows! On the top circular piece, it strokes from front to back. Incidentally, the centre back of the hat is where the band is seamed.

TIP: When cutting your fur pieces, cut on the reverse and just snip carefully through the backing fabric so as not to cut through to the actual fur on the right side. You will achieve a much better finish on the seams.

  • Pin the pattern to your fur pieces and cut out, paying heed to the tip above.
  • Pin and cut out your lining pieces. It doesn’t matter for the circular lining piece but make sure the band is cut on a straight grain to avoid stretching.
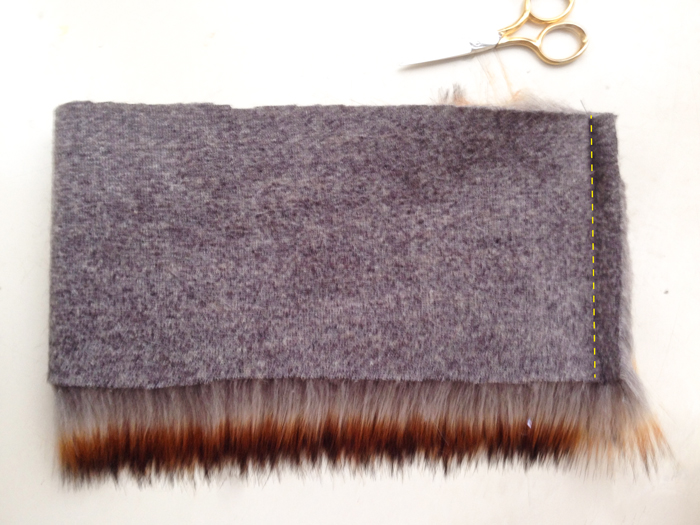
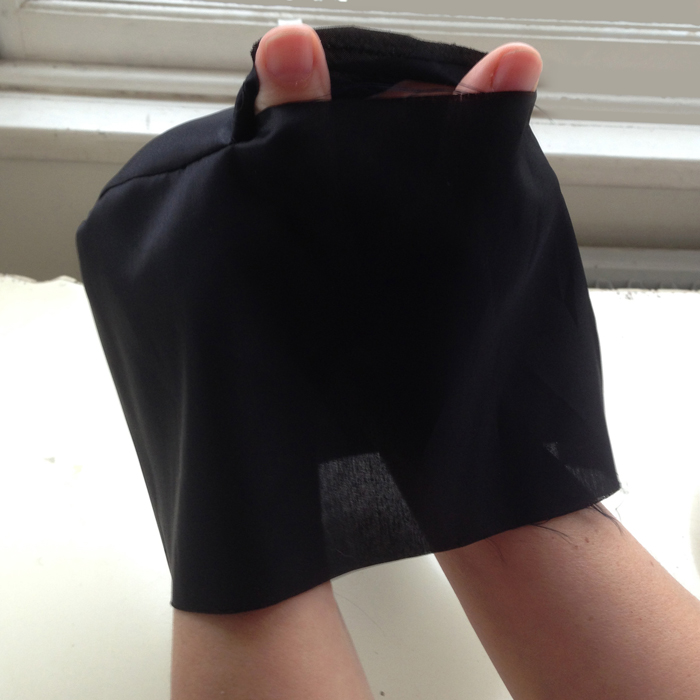
  • Take your fur band piece and fold in half, right sides together. Pin the short ends together, making sure the fur is tucked inside, and stitch using a 1.5 cm seam allowance following the direction of the fur.

seam fur band

TIP: When sewing fur fabric, Increase your stitch length a little so prevent thread tangling.

  • Finger-press the seam open and hold in place with a couple of tacking stitches top and bottom of seam.
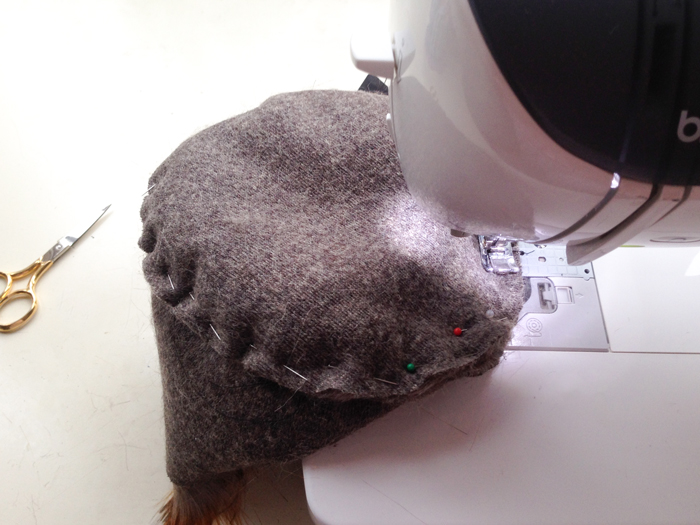
  • Pin the fur circular crown piece to the hat band, making sure the fur is tucked in and checking the direction of the fur is correct. See note above. Sew the seam using a 1.5 cm seam allowance.
pin and stitch crown to band
Pin and stitch crown to band
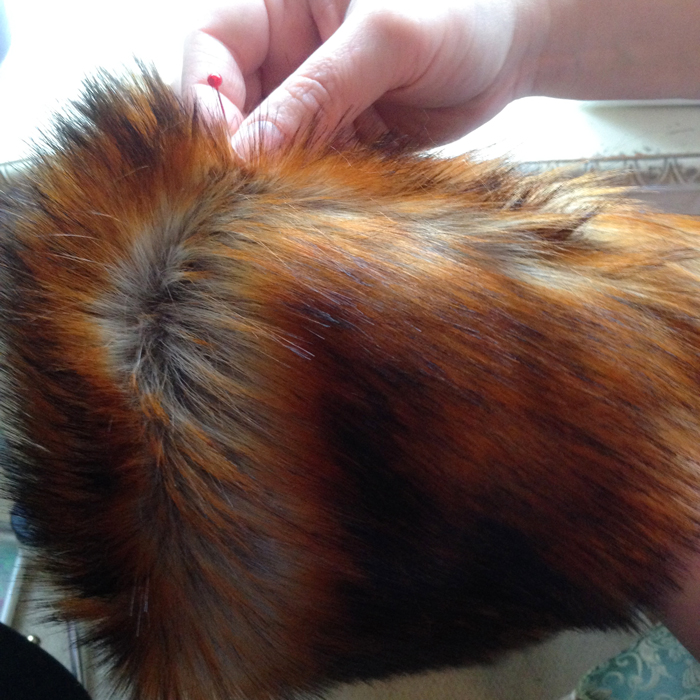
  • Turn right side out. Using a long craft pin (a normal pin or needle will do) drag it along the seam allowance to free the fur that has got caught in the seam.
picked trapped fur from seam with pin
Pick trapped fur from seam with pin
  • Now take your lining piece for the band, pin the short edges together as above and stitch with a regular stitch length and a 1.5 cm seam allowance. Press seam open.
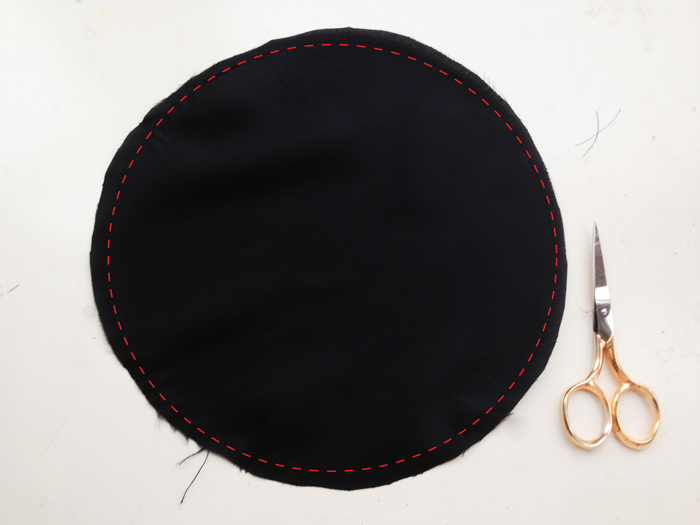
  • Stay stitch the circular lining piece within the seam allowance, to prevent stretching.
Stay-stitch circular lining piece
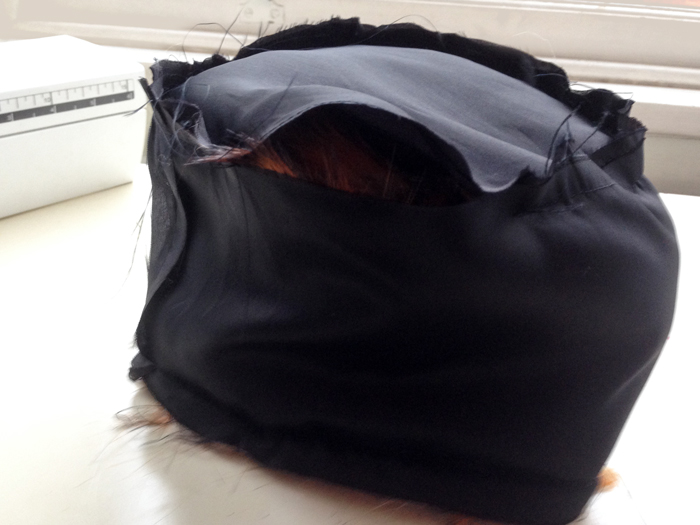
  • Pin the lining piece for the crown along one edge of the band and seam together, leaving a about 4 inches / 10cm open for turning.
leave opening in lining
Leave opening in lining
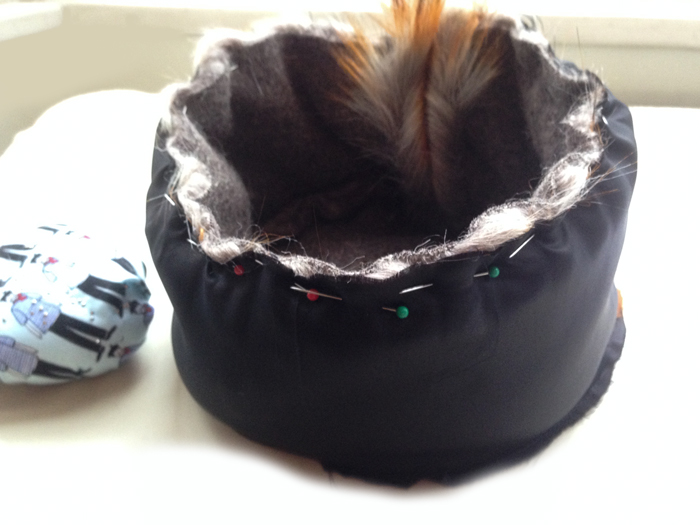
  • With right sides together pin the rims of the lining and the fur hat together. Effectively the fur hat will be sitting inside the lining. Pin together, matching the two centre back seams and stitch along the entire edge, securing the stitching, beginning and end.
Sew lining to outer fabric
Pin and sew lining to outer fabric
  • Turn the hat to the right side through the opening left in the lining, and you’re almost done!
Turn hat to the right side through this opening
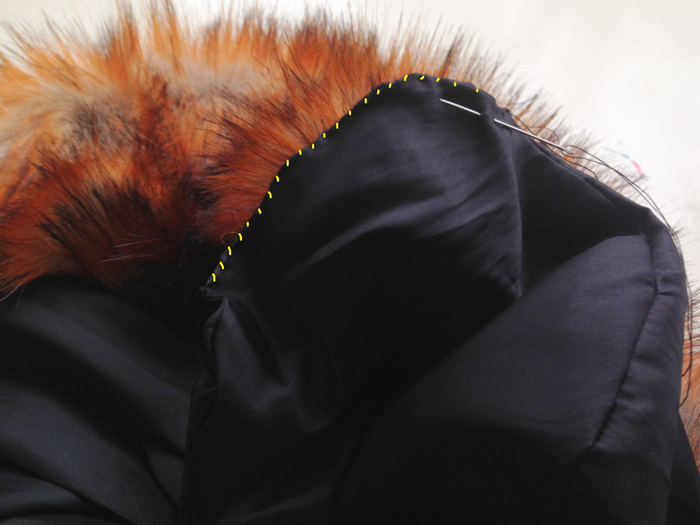
  • Pin the lining opening together, tucking in the seam allowance, and slip-stitch closed. With matching thread, obvs!
Slip stitch the to close the opening in the lining
Slip stitch to close the opening in the lining. With matching thread obvs!

Now all that is left to do is to don your new fancy fur hat, step out in the snow and hum the theme tune to Doctor Zhivago!

Please shout if anything is unclear. I’d be delighted to hear how you get on.

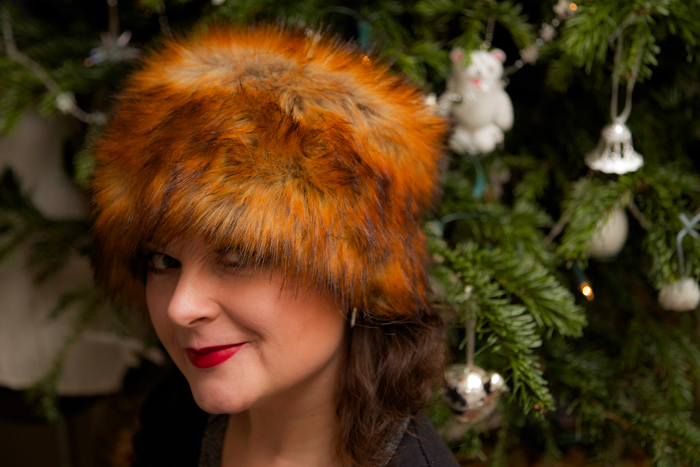
Faux Zhivago: handmade retro-style fur hat

handmade fur hat

I watched the film, Doctor Zhivago lots of years ago, snuggled up on the sofa with my mum. Can’t say I remember much about the plot but the music and the coats and the hats stayed with me for sure!

So when I found a crazy retro-style furry black hat in Oxfam, I knew I could and should shamelessly copy and create one of my own even if I didn’t have the lips to pull of a sultry pout, Julie Christie style.

So here is the Ooobop faux fur, Zhivagoesque, vintage-style hat that will laugh in the face of any Russian-style snowfall that threatens over the next few days.

handmade vintage style fur hat

I care not if my children walk ten paces behind me.

I care not if Mr O likens me to Rab C Nesbitt’s Wife.

And I care even less for all those sideways glances in the high street. They are just jealous eyes!

My ears are warm. My bad hair day is irrelevant. And Lara’s Theme tune is on loop!

handmade fur hat Doctor Zhivago style

The faux fox fur – I keep having to state faux because it actually feels too real to be faux! – was a bit pricey but it was a justified birthday spend up gifted by my lovely mum. I got it in A-One Fabrics in the Goldhawk Road and it is such good silky quality. Only needed half a metre and that was enough for a trial one that went wrong, this one which didn’t, and perhaps a matching fur muff to come! Do people even wear those nowadays?

I probably don’t need to declare that it was Mr O that took these fab photos – late last night, with next to no light but one of those god-awful energy saving bulbs and a few fairy twinkles. I certainly wouldn’t have had the patience. Very happy to sit with a glass of bubbly under the Christmas tree while he worked it though!

I was hoping to have a little tute prepared for you to accompany this post but that was serious wishful thinking on my behalf! Working on it nonetheless. And for anyone who fancies a furry head warmer like mine I’ll be posting a pattern and a tute next post, post-haste!

Till then lovely followers, I wish you all the loveliest of wishes; Wrap up warm, keep safe and beware the nutters on the road!  x

handmade fur hat

Another hand made gift for Christmas

tilda rabbit in christmas tree

I’ve been toying with the idea of making everyone a hand made Christmas present, like forever! And I never get it together in time. But this year I made two!: The secret santa gold pleather bag for Emmie, and now this Linen Tilda rabbit for a special baby boy who’s name I can’t declare lest I give the surprise away!

I forgot how much fun these are to make. I made the last two so far back, the post has sadly gone missing. But here’s a picture of them at least:

Tilda rabbits

And here’s a link to the chicken I made from the same book which is called Crafting Springtime Gifts.

Crafting Springtime Gifts

I’d dutifully traced the patterns on to some cereal box card so I simply had to draw round the pieces on the linen, sew along the lines and then cut out with a small seam allowance.

I got a nice plump bag of polyester toy stuffing from the market. It’s amazing how much you need for just one wee bunnie!

The eyes are drawn on with a laundry marker which is always a scary thing to do as it’s the last thing you do once its all sewn up. I was pre-planning a bunnie with shades just in case my hand shook to much and screwed up the eyes!

The nose is embroidered. I didn’t have any pink embroidery thread so I sewed with 4 regular pink threads and achieved the same. Little bit on the wonk but all part of the handmade charm!

tilda rabbit head shot

This time round I used pink satin for the inner ears. What child doesn’t like to feel a bit of ‘silky’ when they are nodding off to sleep?!

I also left the buttons off and replaced with some embroidered crosses on the straps instead. Don’t want to be the cause of a terrible choking incident!

tilda rabbit profile

I have visions of this little fella being dragged around by one arm or leg in true old fashioned childlike stylee. And ending up pale and threadbare in his later years. That’s if baby approves and doesn’t banish him to the toy box forever!

I love sewing with linen and I love having the chance to employ a decorative stitch! Goodness knows why I only reserve it for toys though!

tilda rabbit decorative stitch

In other news. I’m thinking of making a new hat. Not sure I’ll get that done before Christmas though. That would be one massive miracle!

And that just leaves me to say, thank you so much for your continuing support and wonderful comments. Have a fabulous Christmas one and all, wishing you lots of love and good health for the coming year. xxx


Vintage wrap-blouse

vintage wrap blouse

In the olden days I used to worry that I wouldn’t have enough to blog about but now it seems I’m capable of even forgetting that I’ve made stuff to blog about!

This lovely pattern was generously gifted to me by Anne of Mercury Handmade. Not only did she post me a much-wanted, missing copy of Burda Style magazine back in August but she also enclosed two surprise gorgeous vintage patterns. This being one of them. If you’ve not caught up with Anne yet, I seriously advise you to pop over to her blog for all the inspiring and perfectly made clothes she makes for herself and her two lucky daughters

Bestway D.3,109 blouse pattern

The pattern is Bestway D.3,109. One of those mail order sorts, by the looks of it. And I’m thinking early 1950s.

I love the flattering neckline and the extended sleeves. The back is just one piece which incorporates the sleeves and there are interesting yoke pieces which incorporate them on the front. The ‘collar’ lays flat, sitting on the collar bone to create that lovely opening. And its beautifully shaped to nip in at the waist.

It’s held closed with just two vintage buttons. The third is for decorational purposes but at some point I would add an internal button or snap to keep the under-wrap in position. For the time being I generally tuck it into my pants!

lighthouse blouse buttons

I used a nice crisp cotton from the goldhawk road. It’s printed with lighthouses which seemed a perfect choice for this blouse.

vintage lighthouse blouse

I love wearing vintage style blouses. There’s always something a little bit quirky about them. And they are so easily paired up with a circle or pencil skirt. I’m slowly getting away from the easy-to-wear jersey tops that I used to wear all the time. Just need to make a couple more so I can ditch the rest of my tatty go-tos!

vintage lighthouse blouseAnd in case any of you are wondering. I wouldn’t ordinarily be out in December without a coat. It is winter as I post this and it is very, very nippy out! We just ran across the road while the sun was out to take these shots and ran back in before the goosebumps set in!!

I’m now about to add about 10 more layers and head out into the wild and crazy world of Christmas shoppers! I’ve not even scratched the surface yet. Please don’t tell me you’ve all done yours!


Handmade Secret Santa pressies

gold bag on the railingsWhen I saw this bag in December’s Burda Style magazine, I just knew it was the one I’d been storing in my head for over a year! I’d seen a very similar 1940s Vogue pattern floating around on the web, time and again but never for sale, at least not with a reasonable sale ticket!

vogue bag hat pattern v9837
Source: http://vintagepatterns.wikia.com/wiki/Vogue_9837

I’d almost resigned to self-draft my own but couldn’t quite get my head around the order of sewing. Didn’t really try hard enough tbh! But Burda saved the day yet again with another simple well-drafted design.

burda pouch bag
Source: Burda Style magazine December 2014

And so when I found out I was to make a Secret Santa pressie for the adorable vintage-wearing Emmie Ink Fairy, it was a given!

The instructions suggested leather, which I did originally go looking for. And believe it or not there is such a great colour choice as well in the Goldhawk Rd! But even after a good rummage, I couldn’t find a gold piece big enough to fit the pieces. I thought two pieces of gold lamb was a bit excessive and then gave up on leather altogether when I couldn’t remember if Emmie was a veggie/vegan. That might have gone down like a lead flipper!

As always it was A1 Fabrics that presented me with a better fabric solution: some lovely soft, gold ‘pleather’. Perfect!
It was an education to work with. A leather needle made light work but boy did we have a fight to press the stuff! Didn’t really think that through properly.

Gold pouch bag

Pleather is plastic, fundamentally, and will melt if it comes into direct contact with a hot iron. I’m not that daft. I did use some parchment paper as a pressing cloth. But it just boinged back the minute I stopped pressing. The heat was being retained and making it too pliable. So I grabbed the nearest ‘clapper’ I could find, in the shape of a heavy book, to slap down on the fabric once I lifted the iron off. It did the job in cooling down the fabric quicker and so holding the press a bit better. Not nearly as well as a woven fabric would have pressed but better than a poke in the eye for sure!

gold pouch bag

Burda’s instructions stopped at a facing but I wanted neater than that, so I made a lining to attach to the bottom of the facing, and of course included an ooobop label! Not such a secret now but I liked it as a finishing touch!

inside gold pouch bag

I stupidly didn’t get a picture of Emmie with it adorning her wrist but it didn’t look out of place with her beautiful pink sparkly dress.

We were at a lovely Christmassy do hosted by the BHL girls. So honoured to be part of the evening with so many wonderfully familiar faces.

We dined and beered at a local-to-me Polish restaurant called Patio. I seriously don’t know how those girls catered so brilliantly for over 30 of us with so many different menu choices. They were amazing.

And look what some gorgeous and not-so-secret Santa made for me!

quilted cup and saucer

I seriously couldn’t believe that someone could have made this quilted cup and saucer but when I realised it was the uber talented Rachel Pinheiro, it all made blinding sense!!

What’s not to love about the colours, the french men in their Breton tops, the moustaches and the candy stripes? Perfect to keep all my sewing notions from rolling around the table while I’m sewing and also for sticking pins and needles in as I go.

Earlier in the day I had been to a work Christmas lunch. Yes I know, 2 Christmas do’s in one day. And I was still standing! One of my secret-santa friends bought me this gorgeous sewing pattern. She is so bloody clever and so thoughtful! I can totally see myself in this dress already!

Vogue V2410 vintage dress pattern

I consider myself truly spoilt. Not just with do’s and gifts but with the plethora of amazing friends that bring me so much joy and make me laugh so much. That’s got to be the best part of any time of the year.

Have you made any gifts this year or is it all just too much?


UK v Germany: A Burda-off! PLUS a tiny feature

Burda UK v Germany covers

I’ve been an avid collector of Burda Style Magazines for three years or more. It’s my monthly inspirational treat and over the years the collection has become my now go-to library for instant pattern pieces and reference. I just love a sit down with a cuppa and a mag and a pile of Burdas at my feet. A perfect way to unwind, recharge and replace my head-soup with a wishlist of sewing plans.

Before ooobop ever was an idea, I used to drool over the projects on Burdastyle.com, wishing I hadn’t given up sewing; jealous of all the lovely contributors and the time they’d dedicated to create such amazing garments. (At the same time, wondering how the heck they found time to maintain such a hobby around work and ‘smalls’.) Then one day I could stand it no longer. I bit the bullet, signed up and submitted my first project in July 2010. I was so proud of that little jump dress. Even moreso that I made the pattern myself. It still hangs in my daughter’s wardrobe. I’d like to believe she is proud of it too and that it’s not just a case of pre-empting a breakdown if mummy sees it in the bin!

The realisation that I could make clothes that created joy for me and my daughter at an outlay of 75p was encouragement enough to carry on. I have to be honest and declare that the outlay has increased somewhat over the years but then so has my confidence and ability. And it is really so wonderful taking some time out today to look back at where I started and how things have moved on. And how I did find time.

There have been a few proud moments along the way where individual projects have been featured on the site but recently I got an Email from an editor of the German printed Burdastyle magazine who asked if she could feature this skirt and my shorts in the November issue. I have to be honest, I thought it was a spam Email at first so I didn’t reply straight away. But then I checked out the links and a little chuffed warm-glow filled my boots! Of course, I would be most incredibly delighted and honoured! Transpires they couldn’t feature the skirt because I’d self-drafted it but I submitted a photo of the shorts and here it is on the printed page!

Burda Germany shortsWhen the magazine arrived in the post I was more distracted by the quality of the magazine and quite forgot that I was in it! The German version is so much more glamorous. It is ‘perfect-bound’ as opposed to ‘saddle-stitched’. Those are the proper publishing terms but in lay-person terms that means that the German one feels more posh as it has feels more substantial and has a spine like all the high end glossy fashion mags. More substantial because there are more pages and because the pattern section is separately bound inside with it’s own cover. Saddle-stitched meaning stapled!

pattern section

This pattern section is perforated so that presumably, you can remove and keep it separately. There are images on the inside front and back cover of that section so you would have reference of the finished garments but personally I like the full page fashion shots to fire me up and therefore I would have a need to keep the two together.

Overall, the content is the same. The fashion shots identical. Though I bet the instructions are clearer in the Mütter tongue! Some of those translated terms in the UK edition have me head-scratching and reading ten times over before I’ve got whats going on. But there are additional features on accessories and a few full page glossy ads which ironically enough give it more of an upmarket feel. That’s not a hint by the way, Burda! You’ll not sell me anything via an ad in a mag!

I’m pre-empting some comments regarding my absence from Burda reviews of late, so I’ll apologise up front. I’m considering a return but need to find a quicker way. It takes so much time. That time I’ve since allocated to actual sewing but I have selfishly realised how much I rely on my own reviews when it comes to planning my next makes – far quicker and easier to track back a blog post on the hop than to wait for an opportune ‘sit-down with a mag moment’! So don’t hold your breath. I’m planning a return.

However, I shall leave you with some of November’s shots in case you didn’t get hold of a copy. See. I just can’t resist!!

Burda November 2014 Black and White

Burda November 2014 Black and White

Burda November 2014 High Society

Viva La Diva Burda Nov 2014

Viva La Diva Burda Nov 2014

Key Note Burda Nov 2014

Key Note Burda November 2014

Burda Baby Clothes Nov 2014

Homewear burda November 2014

Plus Homewear Burda November 2014

Happy Bonfire Night, peeps. I’m off to watch the fire in the sky… in the rain! Keep safe.

Love ooobop x

Bombshells and Seashells

bombshell swimsuit

Try as I may I can never skip the post-holiday blues. But hey, the sky in London town today is so blue and cloudless and sunny so at least we can be gently and pleasantly eased bashell 3ck in to our daily duties. seashell

But before I stick my head into that stinky case to launder the smalls, I’d like to present a long overdue blog post. About my bombshell swimsuit. With me in it!

bombshell swimsuit in the pool

I wasn’t sure whether I’d be brave enough to do this and my nerve was duly questioned by work colleagues and family alike, but I have to say, it’s a lot easier when you’re posing on a lovely Spanish beach and not at your local city pool! And made easier still when the cozzie is so modest and flattering. If you Google Closet Case Files Bombshell Swimsuit I hope you will agree that it is such a wickedly clever design that looks great on everyone, any size, any age. So thank you Heather Lou for your great pattern and for eliminating the usual cringe-factor from my holiday snaps!

bombshell halter swimsuit

As near as I live to, and search as I may, I could not find the right cozzie fabric in the Goldhawk Road. One or two shops tried to sell me some spandex but there wasn’t much colour choice and none of the necessary extras I needed, like swimsuit elastic and swimsuit lining. So I braved the rave of the Fabricland website. Go there if you dare (for a fab selection of lycra and spandex), but beware flashing lights and neon starbursts upon every scroll… you have been warned! That said, the service was spot on. I ordered by phone one afternoon, from a lovely, helpful lady and it was delivered the next day.

bombshell swimsuit front and back

I was busy as some bees leading up to the holiday so I had to make this cozzie in small bite-sized shifts. And I’d be lying if I said I found it a breeze. Stress head and senility probably plorange shellayed a part in the confusion but I did find it difficult following instructions for one version whilst looking at pictures for the other.

The rouching was a bit fiddly and tbh I didn’t really know what I was doing until it all came together, if you know what I mean! It’s not my greatest work. There are flaws, namely in the consistency of the zigzagging. Incidentally, unlike some other lucky sewists who breezed through with an overlocker, my vintage overlocker is of the three-thread kind that just neatens edges and doesn’t sew the seam, so I chose to use the zig zag stitch on my machine instead. This works absolutely fine but leaves the insides looking a bit rageddy. Or maybe I’m just not used to working with stretchy swimsuit garments. Gimme French seams and flat fells anytime!

shellI sewed cups into the halters. I did that just by encasing them and then with some tiny hand stitches to secure them in place. I just knew the icy waters would leave an unwelcome impression on the photos, otherwise!

bombshell swimsuit splash

I couldn’t say how long exactly this took me to make, because I did it over three or four days or more but I would guess about 5 hours. Longer than I’d anticipated. But worth it. I bought some black swimsuit fabric to make another but just didn’t get enough time to make the two. The red and white polka dot seemed more apt for a Spanish holiday in any case.  shell 3seashell

I will make another and I will make a few changes. Namely: making the elastic a bit tighter round the leg holes and adding a little bit of length to the body. I will also take more care with the topstitching, especially round the front, where it notices. And I will probably overlock the stitching after I’ve sewn the pieces together.

Dan was of course the fantastic photographer but my son took these next two which are priceless. Oh the glamour. Oh how he laughed!

bombshell swimsuit photo by Alfie

We were staying in the pretty town of Denia, just south of Valencia, on the east coast of Spain. The locals were lovely and very patient with our pigeon Spanish! It was very very peaceful. Out of season, I guess. And I really didn’t expect the weather to be so fab. 24-28 degrees mostly. It’s amazing how much better I feel for some sun on my skin… and a week of no work. Dan got up at silly o’clock most mornings to climb Mount Montogó so that he could get some pics of the sun rising over the sea. He wasn’t disappointed. For anyone who’s interested, I’ll be sure to point you to them once he has selected his favourites.

OK. I think my time is up. Thanks for visiting. Cozzie’s off. Apron’s on. Hasta la próxima, mis amigos!

Sabrina, checked and tested!

Remember Sabrina Duncan? She was my favourite Charlie’s Angel. She was the leader, the rebellious one. Not the one who spent any amount of time on her flicks. Nor ever to be heard complaining about a broken fingernail and her martial arts skills were unrivalled and unhampered by flares. So cool.

What’s that got to do with the price of fish you may well ask… Well this is my Sabrina dress. This is By Hand London’s latest lady and my new go to dress. Not named in honour of my Sabrina as far as I know but in a roundabout way she led the slightly unorthodox approach to this dress.

Sabrina dress in kensington

When I was asked if I’d like to pattern-test this one it was a no-brainer. Not only was the dress named after one of my childhood heroines, it had princess seams that presented a perfect project to utilise some of that inspiration that I sucked from the JPG exhibition. A clash of the Tartans!

Not anywhere near as edgy as JPG himself but I love it all the same.
A great chance to kick start the Autumn wardrobe too.

Minerva kindly supplied the fabric and I knew exactly where I was heading to search for the cloth in question. I’d been trawling recently and had seen these two tartans together. Blackwatch and Royal Stewart – such a great contrast that had to work.

Incidentally this is a poly viscose blend. Apparent from the prewash that future laundering of this dress would be a breeze; Hardly creases; A joy to iron. In fact if hung up to dry properly you could almost get away with not ironing at all.

bhl sabrina dress kensington station

I have a few nitpicky personal fitting issues to sort, namely a sway back adjustment and since studying the photos, I think there is some excess in the upper bust. Even though I made a muslin – I was never going to cut right into that fabulous fabric without testing the waters first!– I didn’t pay proper attention to a perfect fit. Plus its quite tricky when you are up late on your own and don’t have eyes in the back of your head. So with that aside, I made this dress straight from the packet. from one size, no adjustments.

It does fray, this fabric, especially when over handled. But given how the seams are pressed sideways, trimmed and overlocked seams were defo the way forward.

You may well ask why I would want to take on the added pressure of pattern-testing. After all, its not like I’ve got any spare time on my hands. Kids and all the outside school activities that get involved in, full time plus overtime self employedness, and contrary to the belief of my kids I don’t employ fairies to cook clean and bottle-wash and of course my night time activities are sewing! It’s not like it’s paid and its not like I’m given any lead time. And so I have even asked myself the same question. But in writing up this post the ‘why” suddenly presented itself to me in a duh sort of way.

sabrina dress stained glass

I have a list longer than both arms of projects I want to sew. Dresses, jackets, suits and hats. Mostly all of them are inspired by a ready-made pattern that have a ready-made image on the front or in the mag. It’s quite difficult to think outside the box when you are presented with something that fundamentally works already. But when you are given a computer generated line drawing or better still a rough fashion sketch of a dress that isn’t even invented yet, that’s more than enough to shake up all those creative juices and set my brain on fire with ideas, mostly above my station I might add. Leather, feathers, fur, gold lame. It doesn’t matter that most of these aren’t realised. They will be in time. It matters that I’m focussing on the textile rather than the design. That bit has already been done for me in this case by the By Hand London Ladies. So I can concentrate on what fabric will work best which will have greater structure, beautiful drape or sharp enough edges to carry it off properly. It excites me. That is all.

bhl sabrina dress phonebox

I don’t think I pushed the boat out too far with this dress but its a start on my journey of discovery. When I presented my Photoshopped image to Vicki at Minerva she was really excited to see the end result and said she’d never seen those two fabrics put together before.

I’d like to try some leather in place of the Blackwatch in the future but even a pvc might be as good. I think Ms Duncan is calling for some added tomboy!

The dress itself is such a flattering and simple shape. Nicely fitted to the waist and charmingly flared to just above the knee. Its also a great base for incorporating a collar, changing a neckline adding some bodice detail.

sabrina dress tube stn

It sews up real quick. Just be careful around the bust shape and watch out for puckers. That happened on my muslin.

It’s unlined. Just has a bodice facing which is all you need really for a medium weight woven. Doesn’t stick to my tights either!

The hem should be kept small to avoid gathering the excess in the flare and I would say that was the trickiest bit.

I kid you not its had more wears than any dress in my wardrobe and it’s the newest!

The above shots were taken in and around South Kensington and at the Victoria and Albert museum. That’s my favourite London hangout too by the way!

sabrina dress, victoria and albert museum

We were child- and fancy-free and popped in to see the Horst exhibition. Perfect inspiration for some glamourous dresses and stunningly lit fashion photography. Just Google Horst photographs for an eyeful of awesomness!

sabrina dress at the victoria and albert museum

Photography Daniel James Photographic
Shoes Lola Ramona
Handbag: FARA Ealing