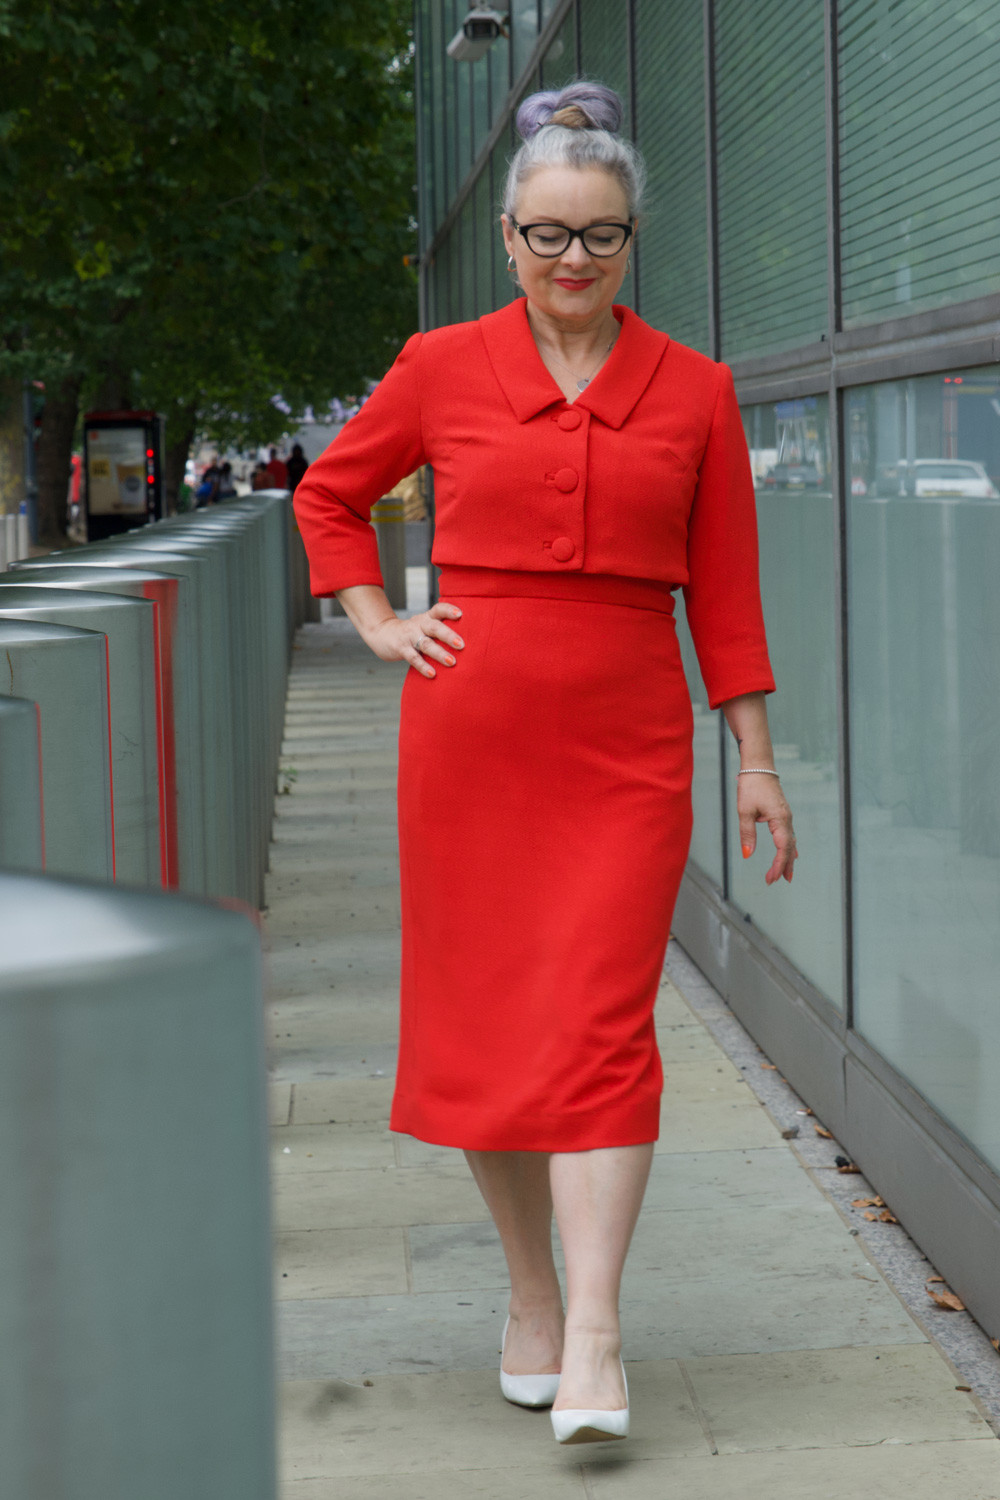
I’ve wanted to make a classic dress suit for as long as I can remember. And I own very, many original vintage patterns that would have been perfect, believe me. But an overriding anticipated disappointment in the result always held me back.
In fact its true to say I’ve altogether strayed away from vintage styles more recently, favouring an urge to be a bit more experimental instead. But I’ve never lost love for the classics. And when Lisa asked if I’d model for Sew Over It’s Vintage Dreaming collection I had to pinch myself. Every single garment of that Ebook is divine but the one look that took my breath away was Lisa in the pale blue polka dot Miriam set and Chantelle in the raspberry linen version. And I wanted it too!
There was something massively nostalgic about Sew Over It making a return to vintage. Because that’s where they were at when I discovered them, when indie pattern companies were brand new and it felt so refreshing to have exciting options outside of ‘the Big 4’ pattern companies, and is exactly the point at which I was keen on sewing all things 50s and 60s. The main benefits of modern vintage-style patterns are the more realistic and modern proportions of the body measurements and also the inclusion of multiple size options so you can grade very easily between 2 or more lines to get a perfect fit. Most of my 1950s patterns are generally an unprinted tissue template for a singular size only. And generally speaking don’t fit straight out of the packet!
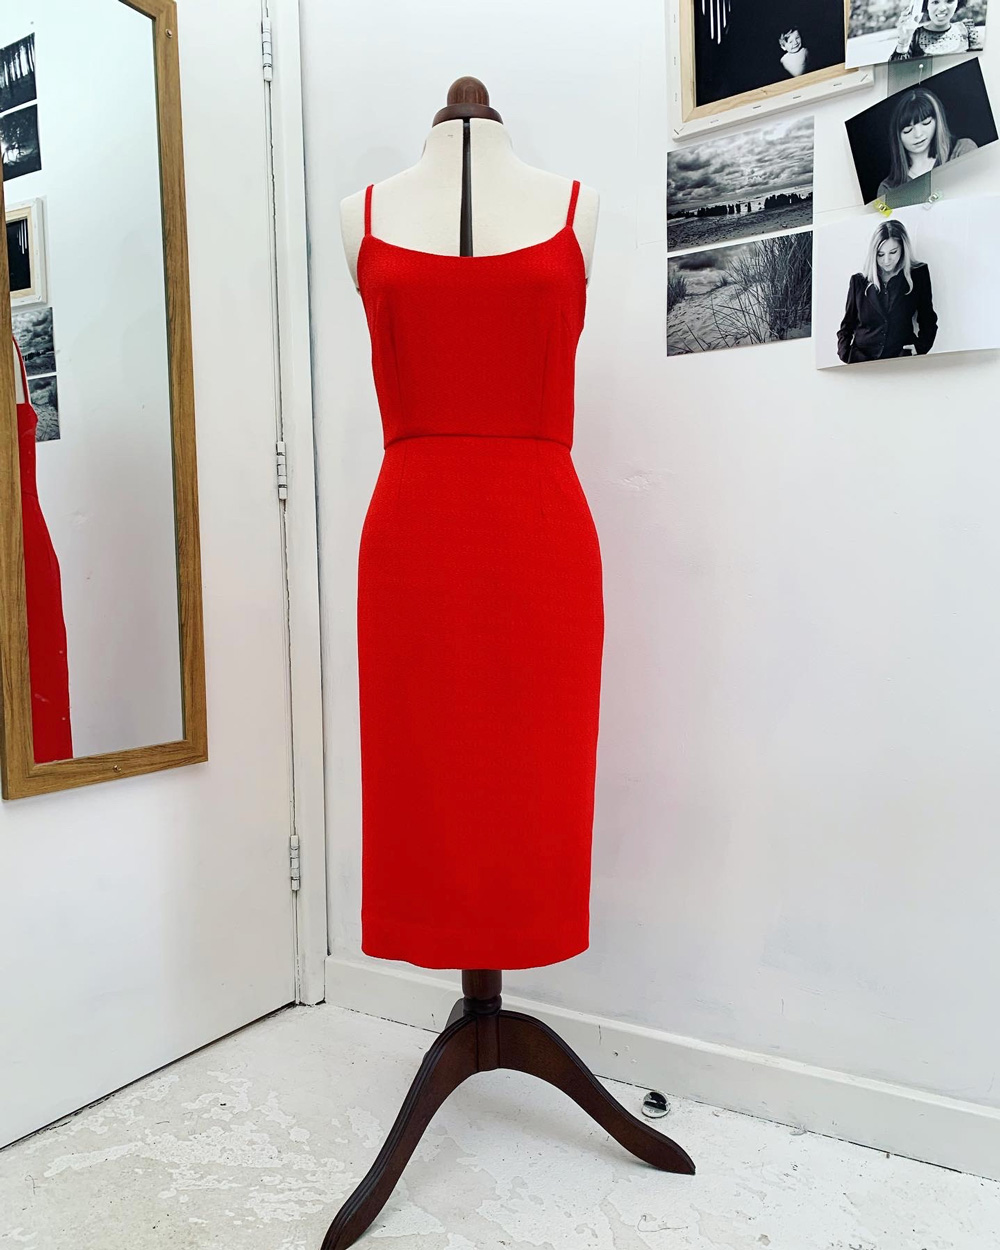
And so it was such a joy to cut a straight size 12 for the Miriam set with no fitting adjustments at all!
The dress came together so easily and relatively quickly. This is largely due to the simplicity of the design, but also the instructions are very clear and concise. The only step I skipped was for the adjustable straps. I just made sure the straps were exactly in the right place and the right length by pinning and trying on and adjusting … about 15 times before finally sewing in place!
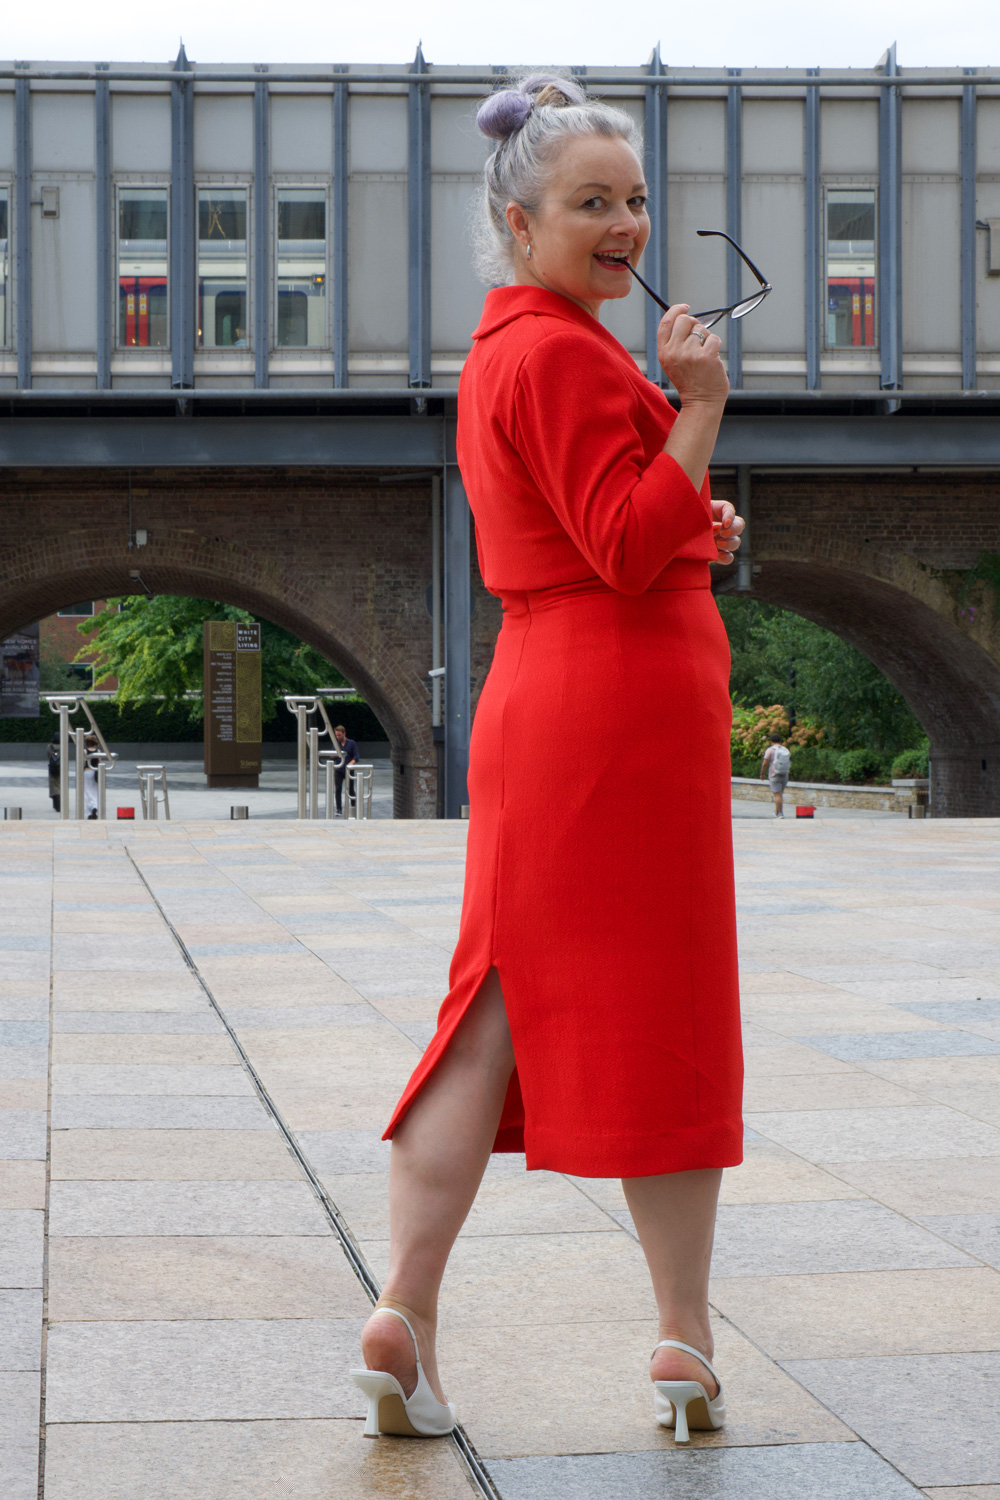
I used a medium weight, red textured crepe from New Crafthouse (always delighted to use deadstock) bought with a voucher I won back in April at the Spring Fling party. Also delighted that I’ve used it up relatively quickly and it’s not languished in stash! I’m trying so hard to create better habits recently regarding my fabric choices, sources and usage. More about that soon.
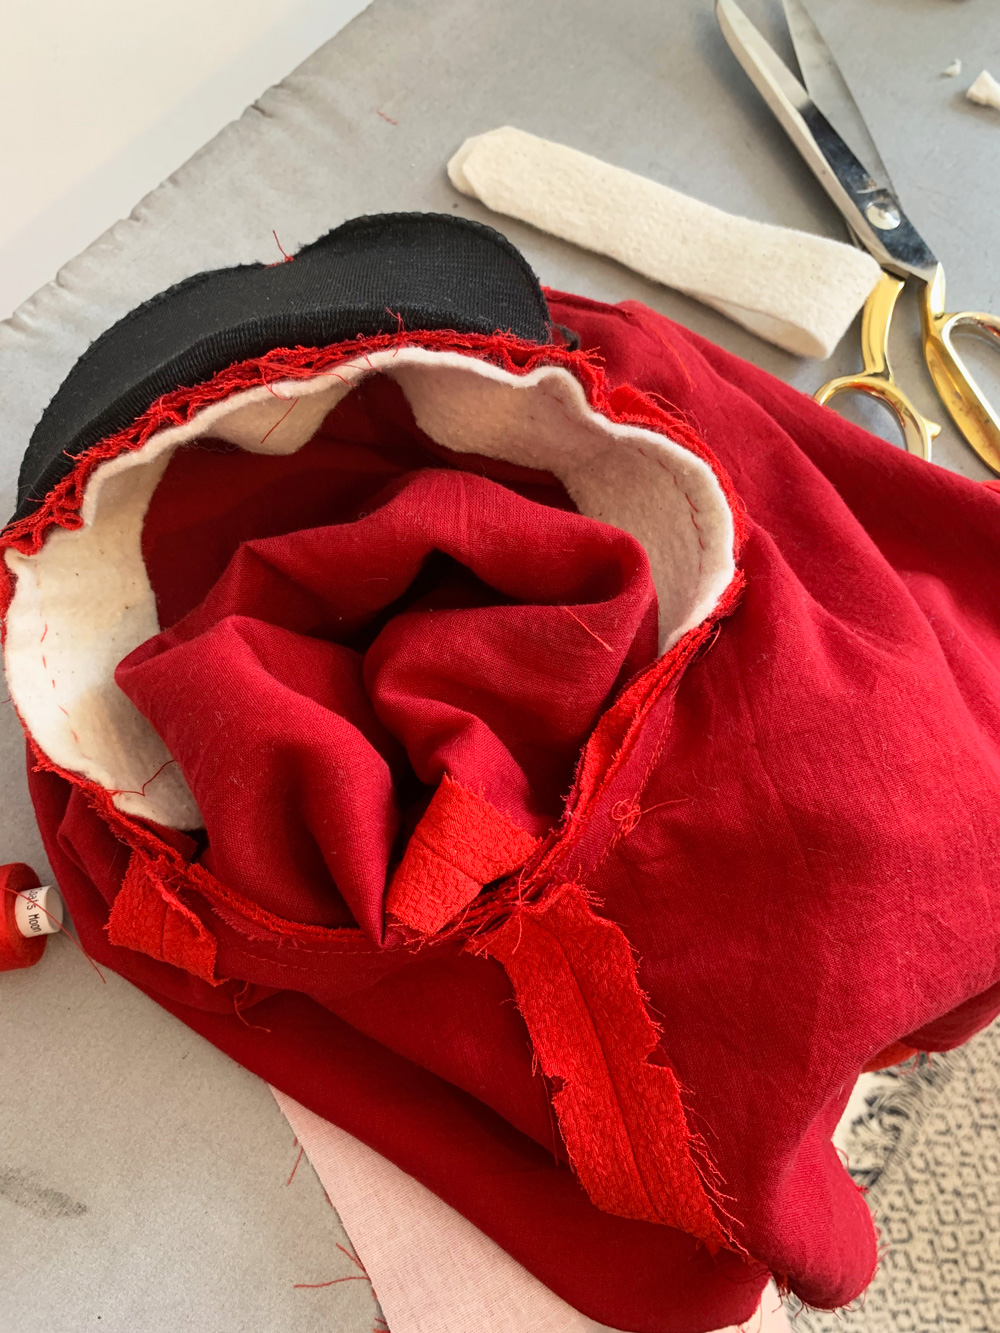
The jacket involved a bit more work. But that was mostly my fault! Although the fabric was great for the dress – it’s got great drape and is very huggy at the same time – I had a feeling it wasn’t going to have quite enough structure for a jacket so I needed to employ some extra techniques.
For starters, I underlined all the pieces with a red cotton voile – a great suggestion by SOI. I also padded the shoulders and added some strips of cotton fleece for the sleeve heads. I remembered to take a photo of the inner workings this time. Not quite so pretty though!
I had a horrible feeling that machine buttonholes were going to give me grief. I couldn’t bear to get to ‘almost finished’ stage only to ruin it all with raggedy buttonholes so I set about making old-school bound ones. And boy did I forget quite how faffy they are to do. I trialled some before I did the real ones. Worth it in the long run but I think I near fainted by holding my breath through the entire process.
Its worth noting the importance of having those welt sections on grain. They will fold better and press straighter and give a much better finish.
And once I’d finished the button holes it made total sense to make covered buttons too. Luckily I had inherited a bag of the button bases and the rubber pressing tool a while back. The size was a little larger than suggested but it worked just fine.
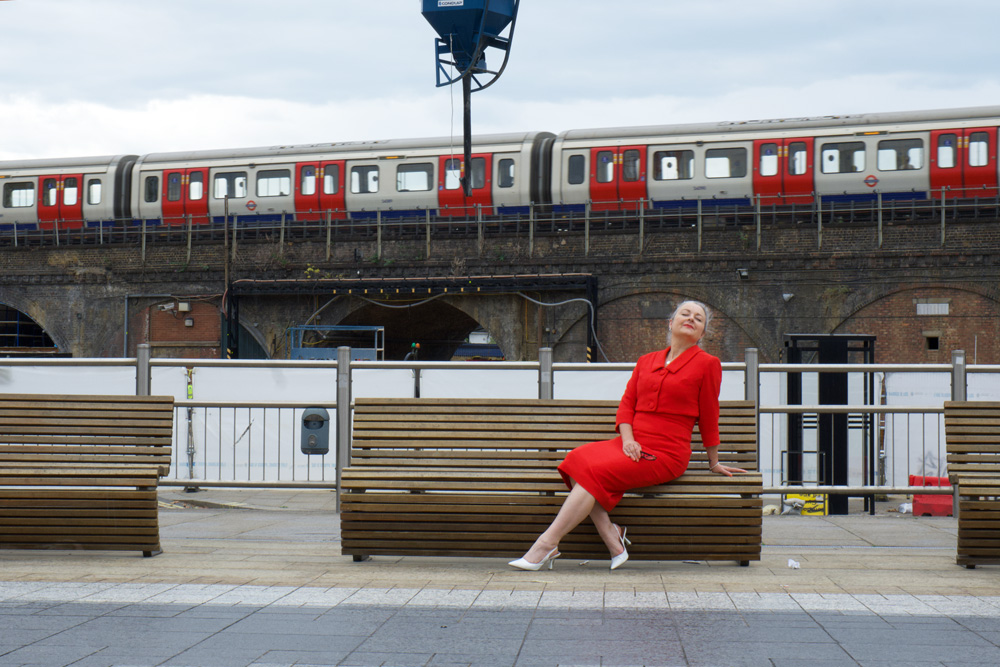
I completed the outfit in the nick of time to wear to my niece’s wedding and was so preoccupied I didn’t get any full length photos so all the thanks to Dan who took the time out to shoot these for me in and around where we work.
I just love how this suit makes me feel: mostly so grown up and properly dressed! It makes me walk tall and fills me with confidence. I got so many lovely comments from passing people, and that added to the feel good factor too! This is already a wardrobe bestie. And most probably will be for years to come.
I managed a good few years of dressmaking without a dressform… tailors dummy… dressmakers mannequin… whatchamacallit! I didn’t consider myself at all worthy of such a professional tool. I don’t have room enough to swing a mouse in my house let alone space to accommodate an extra lodger, with a price tag.
But one day I took surprise delivery of a delightful pair of such assistants – one male and one female. Mr O had sought to surprise me with this very generous gift. Strings attached of course.
I’d always contested that it would be too tricky to make him shirts what with him being the illusive musician and the need for checking fit and all. So hats off to his persistence and problem solving skills!
I did make him a few shirts. Years ago, mind. And the tailors dummy was great for checking all the aspects of shirtmaking. It’s become a little redundant of late though.
But the female dressmaker stand was dressed and draped repeatedly and undoubtedly earned her keep. The main issues I had with the female one were the colour and all the plastic bits. When I stood back from the mannequin and looked at my displayed work I couldn’t help wishing she was more classy – more graceful and more like those neutral coloured dressmaker stands with the tiny wooden ‘heads’ that didn’t distract from the garment and had better pinnability to boot! I also had illusions of practicing draping techniques to create some crazy unique styles and I just wasn’t inspired to work on this blue, now-rickety dressform.
She didn’t age well. The adjustment cogs became stiff. I think they were quite tight to start with. The covering got a bit patchy and loose in places. it wasn’t particularly padded, was difficult to pin to and the hem gauge accessory at the bottom just broke off one day. I never managed to use that part of it to be honest. Ended up with a more wiggly line than I would have created without it!. Instead I would stand her on a table and measure the hemline up from the table with a metal ruler, turning as I went.
But that in itself was a bit of a disaster one day when I realised the body had become loose on the stand and was spiralling down as I turned it.
She almost got her marching orders that day but guilt set in when the more caring me realised how ungrateful and wasteful I was being. She did the job… but she wasn’t nice to work with. That’s all. But that’s such a thing!
Well they do say ‘be careful what you wish for’. (I wished so much to have a nicer dressform, I can’t tell you.) One fateful day earlier this year my ‘delightful’ son had a proper tantrum and vented spleen on blue lady dressform. Rather her than me to be honest, though to be fair, the ensuing bisection was way more of a shock to him than it was me. He had no idea I was upstairs and had witnessed the attack and that I spied on him as he tried to reassemble the twisted wreck, quite-rightly panic-stricken.
Oh the joy on two counts of asking ‘does anyone know how my dressform came to be broken?’. He fessed up, with shameful apology and offered to contribute to a new one. I couldn’t take his dosh. I was too happy that I now had an excuse for a replacement.
May I introduce Adjustoform FG202 | Lady Valet Small 8-Part Adjustable Dressmaker’s Dummy. Naked as the day she arrived. And almost perfect in every way…
I first caught sight of her at John Lewis Department store. And I know you shouldn’t judge on looks but that is definitely what drew me in for a closer inspection. The adjustment wheels turned easily – way easier than my previous model. The wooden stand is way more attractive and sturdier than the flailing metal legs of before and the ecru body covering is much easier on the eye and conducive to shooting garments of all colours. Best of all it has boobs!
Well, kind of… I do exaggerate! But there is definitely more boob than I had before which helps immensely when checking, shooting or simply displaying a garment. As expected there is no means to change a cup size so a good workaround is a bra stuffed with a pair of two of secret socks! Or I have seen more accurate ways of padding the body with batting to create a more closely replicated size.
Although I was sold already, I’ve learned to reccy online and resist an impulse buy. In any case it wasn’t available to buy in store at the Westfield branch so I found one – a whole £40 cheaper – on Amazon. I took full advantage of the free delivery with my Amazon Prime subscription and she arrived box fresh the following day.
Assembly was a doddle. I didn’t question that there was no instruction booklet, deeming it superfluous to requirement in any case: The body slots into the pole and is tightened with a screw and the feet slot into the base.
I later found said booklet under the flap of the box as I crushed it for recycling. But I’m glad I did as I would have never guessed to rotate the metal device at the base of the stand to hold the feet on. If you don’t do this the feet fall out of their slots when you pick up the dummy!
So was it worth the investment I hear you ask?
Yes is the short answer. I definitely needed one since more often I am dressmaking professionally. I can leave a circle skirt to hang for the bias to drop, I can achieve a level hem in the absence of a client. I can stand back and see how the garment looks and hangs and I can rotate the body to see how it works at all angles.
The only shred of doubt in my mind is that I know that my Adjustoform Lady Valet is only a slight upgrade, mostly for aethetic reasons and will never be a substitute for a real person’s proportions
This isn’t a one size fits all. And so even with padding will only ever be as near as dammit. Only when I progress to super successful fashion designer extraordinaire status (in my dreams) can I afford the space and the expense of an army of models in varying sizes.
There is better padding on this dressform compared to the blue one but only of marginal difference. You still hit underlying plastic unless you go in at an angle with those pins.
The gaps in the adjustment areas not conducive for draping. For the records I haven’t ventured down that road properly yet. I tend to work with existing or self-drafted flat patterns, but if I wanted to drape and pin a design I would be better off with one of those other kinds of dressform/tailors dummy/mannequin/dressmaker’s stand things with collapsable shoulders like they had on the Great British Sewing Bee.
Do you use one of the aforementioned? What are your views? And pray tell… what on earth do you call it?
Special thanks to Bloomsbury Publishing and Fairchild books for providing such a great giveaway prize in association with #Blazerof2016 and thank you to every one who left such lovely comments. I’ve really enjoyed reading about what you are all getting up to. Remember you can still get hold of Classic Tailoring Techniques for Menswear at Fairchild Books along with a whole host of fabulous fashion books. My copy is already proving to be my best friend already.
In other news I finished a 3rd By Hand London Sabrina dress, yesterday. And it fits! So I’ll be back sometime soon this week, hopefully, with some pictures and a post. Oh I do love a bank holiday!
Today I would like to share a review of a great book that is already my best friend and bible for #Blazerof2016. The lovely people of Bloomsbury Publishing have not only sponsored me this fabulous book but have also sent an extra copy for one other lucky reader!
The title of the book is Classic Tailoring Techniques for Menswear: A Construction Guide. And this is the 2nd edition written by Roberto Cabrera and Denis Antoine since it first published in 1983.
My bookshelves are home to all sorts of sewing literature but when it came to ventures in proper tailoring techniques, none of them books scratched that itch, if you know what I mean.
I am a woman on a mission with a man’s jacket to make before June is out. Jamie has already completed his stunning plaid blazer and panic was beginning to set in fast. But now I have my trusty guide I feel the journey will be easier.
If ever I was doubting the ‘why’ of tailoring, the short and concise intro reassures the reader of the unsurpassable techniques over faster more modern ways to achieve that impeccable finish. It gives a brief but insightful history that inspires a preparation for a very slow but satisfying journey ahead!
The contents include the following chapters: Tailoring; The Pattern; The Fit; The Fabric; Layout and Cutting; The Jacket; The Pants; The Vest; and Alterations.
There then follows an extended table of contents which allows the reader to go straight to the finer points within each chapter. The Jacket is clearly my primary concern and so when I come to pockets, I now have all the necessary information to create a welt, cash, patch, double-piped or double-piped pocket with flap should I choose to add one… or all of them!
As a book designer myself I’m very particular about presentation and I am a stickler for levels of information. So I’m very happy to report that I found the inside layout to be very clean and concise. The font is classic and unfussy, a good size with comfortable space and set in good readable chunks.
I must admit, at first I was disappointed by the black and white photography. It does appear take away some visual interest but on further inspection, all becomes very apparent. The hand-stitches which are crucial to the tailoring process along with other key marked areas are highlighted in red against the greyscale photography and therefore are easily recognised without distraction. It’s a more sophisticated approach than the sole use of line-drawn illustrations and diagrams which can sometimes be too graphic and disassociated with the real thing. Colour photography would have looked lovely – especially to see some of those coloured tweedy fibres – but style over substance would have been useless in this instance. I’m after good, clear and immediate instruction and this is what this book delivers.
The reality of the photography delivers on other levels too: you can identify the lay of the fabric, how it ripples, how it rolls, how it behaves. You’d never get that across with any amount of linework!
That said. This book also displays some fine line drawings which hone in on the tiniest details.
All the tailoring and understructure supplies you will need are clearly listed and defined along with necessary techniques and hand-stitches. And there is a very well explained section on how to take measurements. The repeated photo of the man in white pants is a little distracting but as I mentioned before, far more preferable to a line drawing. It’s easier to see exactly where on the body those measurements should be taken. Nothing left to the imagination here!
And fitting is obviously a major part of the process. This section does good to address posture and body imbalance and how to identify the issues. I’m focussing on the jacket here and where wide shoulders and a stooped posture adjustment might come in dead handy, but should I venture into tailoring trousers in the future I’ll be ready for any amount of bow-legs, knock-knees and flat bottoms!
There is brief but great insight into the world of wool fabrics that are used in tailoring. The weights, the textures and the usages; naps, shrinkage and how to straighten a grain. This section may have benefitted from some colour just to see those checks and stripes pop, but again. It’s just the information I need. I can go see and stroke any amount of fabrics up the Goldhawk Road for that kind of fix!
Laying and Cutting Out covers exactly how the professionals do it. Great to see the hands at work and of course a vital section on matching plaids/checks and stripes.
When I got to the Jacket section I was a bit overwhelmed. So much stuff to learn. But that is the whole point. I want to learn. And I want to have reference to it all. I want to get good at this and there is no fast track way. Just slowly and properly and remembering to enjoy each little step-by-step instruction. I’m really looking forward to making some shoulder pads. There’s a great how-to with a pattern at the back of the book. Incidentally there are also traceable patterns included for a French fly and a French tab and some other elements that I’m not going to pretend I know what they are yet!
The Trousers and Waistcoat sections are just as detailed. Covering the classic tailored processes for each stage. No stone unturned, it would seem.
The final section covers Alterations, which will prove invaluable if I ever I fancied some more unselfish sewing further down the line. And already I am inspired to pick up on the advice for relining a jacket. Something I have been putting off for so long (see this Boer War jacket). It is so simply and brilliantly explained that it makes me feel daft for every doubting my capabilities! And if you ever need to alter a pair of trousers for the man who has muscular inner thighs, look no further.
In fact, it’s all there: what you need, and what exactly you need to do to achieve each stage of a perfectly classic tailored jacket, waistcoat or pair of trousers. Brilliantly presented and clearly explained… in black and white (and red)!
Or if you fancy winning yourself a FREE copy, simply leave a comment below and let me know how you are getting on with #Blazerof2016 or indeed any other tailored garment you have plans for. Entries will be drawn on 30th April and the winner announced on 1st May 2016. It really is a fabulous prize – good luck!
Both the review and the giveaway copyies of Classic Taloring Techniques for Menswear were kindly given to me free of charge by Bloomsbury Publishing. All opinions expressed are my own.
Welcome to life in the slow lane and my first toile for Mr O’s #Blazerof2016. As anticipated in my last update, the instructions were indeed minimal, which is ok if you’ve done this kind of thing before but I haven’t! When I look at the finished toile I’m wondering what I found so difficult – time is a healer I guess!
It was wholly necessary to make a toile. I already knew the largest size of the pattern wouldn’t be big enough but there was a method in my madness. I wanted to test the construction more than anything and didn’t want to waste time making any preliminary changes to the pattern. Now that it’s made and the process understood I can see exactly what I need to do. I can also see some issues that will need further investigation.
First thing I will need to do is to grade it up a whole size. I will use the traditional cut and spread method. The sleeves need some extra room at the bicep (That news was met with a wry smile!) and I may also need to lengthen the sleeves but that will be confirmed once the 2nd toile is made and the shoulder pads are factored in.
The thing that surprised me most about this design was the lining. Fundamentally, there isn’t much of one but it is a summer blazer so it can be forgiven for half measures! there is a kind of butterfly section that overlaps on the inside back, joining the front facings around the armholes, if that makes sense.
A fine excuse to choose some fun lining fabric I think. The sleeves will be fully lined and the remaining exposed seams finished with binding. Might be nice to make some custom binding to match the butterfly lining. I’m not sure that’s what it’s technically called by the way!
I was a bit concerned about the sleeve caps. There seemed to be more gathering and less ease involved here. Then I read Male Devon Sewing’s post on setting in sleeves where he advises to steam-shrink the eased area of the sleeve caps before sewing in. That will help on the real deal, I’m sure. I’ll see what happens 2nd time round before I properly address this but I may also need to start and finish the ease stitches slightly further apart.
The assembly of the collar and collar stand properly had me confused. I really couldn’t make sense of sewing two concave seams together. But it makes sense now that it adds the roundy shape. The black stitching is where the pressed open joining seam will be topstitched.
The topstitching wont be seen in any case once the collar is folded down. Thinking I should use some red melton or similar for the collar stand. It seems to be a feature on some of Mr O’s other jackets. That wont be seen much of either of course. But the joy of knowing it is under there excites me a little bit already!
The one construction instruction that still didn’t translate was attaching the collar to the lapel. The instructions said to sew all round the edge of the collar to a point, trim and turn right side out. It allows nothing to sink into the top of the lapel seam so unless I find instructions somewhere else, I’m going to stop the stitching further back so I can insert the whole 1.5cm seam allowance of the collar, snuggly in place. You can see in the picture below where I’ve unpicked the stitches already to see if that would work.
Burda gives no clue as to how I line the vents on the sleeve cuffs but luckily I read up about ‘fake’ vents on sleeves and so there’ll be no unnecessary fiddlesome lining going on here, hooray!
I’ve enjoyed the process of making a toile, especially getting to write notes all over it so I know what to change and what to remember next time. And I’ve learned so much already, before I’ve even started on the real thing!
So now I’m all set to do some cutting and spreading and will be back with a 2nd toile soon.
While you’re waiting for me, do hop over to see some of Male Devon Sewing‘s amazingly detailed posts for #Blazerof2016. They really are very helpful.
So this week, I finally chose what pattern to use for #Blazeof2016. I’ve decided to make it extra difficult for myself by going for the minimal instructions of the Burda Style magazine pattern from February 2016 issue, and I’ve just got as far as tracing the pieces. It took most of Saturday afternoon but that’s ok because I had an empty house save Phryne Fisher and Jack Robinson to keep me company!
The tracing took longer than usual not just because of all the pieces but because I was aware of how easy it would be to miss a notch or a mark of instruction. So I was like a detective myself, scanning the spaghetti lines with eagle eyes! I want this jacket to work so I need to make sure every detail is attended to. It didn’t help that the red lines on the pattern sheet I was following clashed with the red pattern pieces of the featured ladies blouse. This could wind up a very interesting hybrid ‘blouzer’, but let’s hope not!
For anyone who’s daunted by the tracing of Burda patterns – and let’s face it, that’s most of us – the following might be of help:
Top tips for tracing Burda patterns
Work on a large clean flat area
Use pattern weights or similar to hold your papers in place as you trace
Refer to the Pattern Overview to ensure you capture every notch, seam number, slit mark and grainline arrow
Tick off each piece in the list as you go
Pattern Overview and Cutting Out list
Label all of your pieces with Model No., size and piece description / number
Remember seam allowances are not included so write that clearly on your pattern pieces too OR add them to your pieces and mark that they are included*
Photocopy the image to file with your pattern envelope if storing separately
*I will be making size adjustments to the pattern so I have left the seam allowance off. It’s way easier to play around with minus SA. And then I will either add it at the end or mark it directly onto the fabric when the pattern is pinned on.
Incidentally, the fabric we’ve decided on is a gorgeous traditional boating stripe from Yorkshire Fabrics. 100% wool, made in England which raises a little smile every time I see that selvedge! Doesn’t come cheap so I’ve wrapped it up like a precious swaddled baby and put it away for safe keeping until the calico version is made good. No chances being taken here!
I really am in the slow lane here but there is a distinct advantage to this. Have you seen how MaleDevonSewing is steaming ahead with his amazing tailoring skills? For anyone else who is pootling along like me, he has posted some cool construction photos and instructions. Most of which I’ve never heard of. All of which I will be employing!
Di Kendall has shared the progress of the lovely striped blazer on her blog and it’s great to see lots more activity from other participants of #Blazerof2016 on Twitter too. Keep posting your progress… I need all the help I can get!! 😉
Thank you so much to everyone for your lovely words of support for #Blazerof2016 and especially to those who have signed up. And for anyone who’s teetering on the edge of joining in there’s still bags of time!
Typically my working-week has been busier than expected and there’s been no room for sewing but I did manage a little recce of potential sewing patterns that I’d like to share with you. Don’t hold your breath though. It won’t take long!
This little scout round the web – and to be fair, it was a little scout – has had some surprising results. When MaleDevonSewing suggested that menswear only represented 6% of sewing patterns, he wasn’t exaggerating!
Searching through the contemporary and classics of the Big 4‘s, this is all I came up with:
Of course there are only so many variations a man’s jacket might display, for example: the pockets, the lapel shape, the vent, if any, button cuffs or not, lined or not etc. No Westwood meeting McQueen with crazy shoulder shapes and asymmetric cross body lapels but that’s ok. We’ll make it interesting in our own way, right?!
So Burda gets the prize not just for the most patterns found but also for their jacket patterns featured in this month’s Burda Style magazine. What were the chances of that?
Patterns found in Burdastyle 2/2016
How are you getting on with your pattern searching? Have you found any designs by independent sewing pattern companies or have you gone vintage? There certainly seems to be more of those floating around. However, Mr O has a broader chest than most of those 50’s men it seems, hence my Big4 search. But to be fair, to find anything larger than a 44 chest in a modern day pattern is pretty rare too, it seems. Unfairly represented in more ways than one, then!
I think I’ll be going with the pattern on the left hand page of Burda Style magazine. I’m a bit nervous of the minimal instructions but I’ll be calling Jamie to the rescue if I get stuck! So calico at the ready I hope to be tracing and toiling sometime soon.
It’s amazing where a bit of Tweeting lands you up.
Not for the first time, I recently made friends with another great sewing blogger, Jamie from Male Devon Sewing. He tweeted for suggestions on what he should make next and I cheekily replied that he should make a man’s blazer so I could watch his every move and pick up all his tips! He liked the idea of making a summer jacket and I was genuinely looking forward to watching his every step but then the sewing-table turned and Jamie suggested we have a Blazer-off of sorts! Me and my big mouth!
Mr O has been begging me to make him a blazer for absolutely ages and if I’m honest, I’ve been plain terrified of not being able to follow it through! And if I’m really honest there’s a bit of selfish in me that would rather be making me another (easy) dress!
But what am I actually terrified of?Why would it be so much different to sew than ladies wear? I’ve made a jacket for me before, not the best of fitting and the stripes don’t line up on the shoulders but it’s a jacket all the same and I’m sure I could rectify those issues with a bit of care and attention. And If I didn’t, would it really be the end of the world?
Jamie and I put heads together and supposed because of a lack of menswear being sewn out there that there might just be a fair few of you also fearing how difficult it might be or maybe you’re just plain uninspired. Let’s face it, there’s not much in the way of menswear patterns compared to the plethora of womens’ out here. Like 6% apparently! And so #Blazerof2016 was born as a kick up the butt, so to speak to inject some much needed inspiration and promote a growth in the sewing of menswear!
Source: Bespoke Suit
Although I’ve been sewing for a few years, this is something that is definitely lacking in my repertoire so I’ll definitely be learning on the job, sharing all that I learn along the way. And if you check out Jamie’s jackets you’d be forgiven for thinking he has heaps of experience but he literally only sewed his first jacket a year ago! So we can all hold hands together – and steal all Jamie’s tips! By using the hashtag, #Blazerof2016 and tagging @ooobop and @maledeveonsewing on Twitter we can put out pleas for help as well as posting tips and progress photos. Nothing like a dive into the deep end, hey?!
Make one for your fella, your dad, your best mate, your brother or your son. Lets do it. Lets make someone’s day, add some more skills to our toolbox, encourage more sewing of menswear and more than anything, lets have some fun. Pinstripe, tweed or floral . . . let’s go crazy with colour and print. It doesn’t have to be boring! We’ll be regularly posting inspirational photos and techniques along the way so stay tuned for tailoring fun!
source: alux.com
We have a good six months before submission day which is good for me because, like most things, I’m going to have to do this outside of work and children! I’ll do my best to blog as many stages of mine as I can and I’ll encourage you to do the same so we can show everyone how cool and satisfying it is to sew a fabulous piece of menswear.
So who’s up for joining us on our quest to scatter some menswear among the dresses of the sewing community? The rules are simple:
Make a Man’s blazer/jacket using any pattern of your choice, or draft your own, it MUST be a piece of menswear though!
Your choice of fabric suitable for a jacket.
Can be fully lined, part lined or unlined (although if unlined the seams need to be suitably finished).
Must have some sort of pockets (your choice again: Patch, Flap, Welt).
Your choice of vent at the back, either single or double.
Your choice to have opening/buttoned cuffs.
Jacket to be completed by June.
Please note this is not a scheduled sewalong. This challenge should you choose to accept, is to be completed in your own way, at your own pace, within the 6 months allowed of course.
Leave a comment below with either me or Jamie so we can see who’s in and please add the badge to your blog to spread the word.
First I must thank you all for your lovely comments on my initial post about the finished jacket. I’m so touched and I love that warm and fuzzy feeling I get when they find their way into my mailbox!
So as promised, here is some nitty gritty detail from the project for those that might be considering this jacket for the first time.
Burda jacket #131 11/2012
Though I am pleased overall, with the results. I can’t help being niggled that more tailoring techniques weren’t employed. I’ve only myself to blame. I could have researched them myself but there’s always a next time!
The jacket is cut from pieces #131, Burda Style magazine 11/2010 but the construction details are from #130. The only difference being that I chose the full length sleeves with vents… and proper working buttonholes… glutton for punishment, me!
I made the toile back in February and was intending to make adjustments to the waist only. But I got worried about it’s ‘snugness’ and just went up a size in the end. A little bit chicken perhaps, but also concerned that I was more likely to be wearing a few layers underneath in the colder months!
It is essential that you make a toile. There is so much work involved in this, you don’t want to get to the end to find it doesn’t fit!!!
My first slip up, that I DIDN’T clock until I got round to dealing with it, was the back vent. I am so used to adding the statutory 15mm seam allowance to each edge that I clean forgot to add 4cm as specified, to the vent openings. Doh. I could kick myself. It doesn’t look so bad in the photos but I know that it isn’t created properly. It is intended as a ‘split’ but would have been so much neater with an interfaced proper allowance. So please remember to do this if and when you cut yours! I would even go as far as to make it a vent rather than a split. But that opens another can of worms with the lining!
back split that really wants to be a vent!
The miniature pattern layouts indicate what pieces are to be interfaced with fusible interfacing. I did toy with the idea of sewing traditional interfacing. I liked the idea of employing some traditional skills but I agreed with myself that I was embarking on a big enough journey and that the fusible stuff would be just as good for what I was trying to achieve.
And so the interfaced pieces included: centre front; side front; outer collar stand; under collar; back facing; outer pocket flap; neck and armhole edge of centre back.
The main construction of the body came together very easily. Darts seams and pressing.
But then came my reality check. Welt pockets with flaps. Needless to say I practiced these before the real thing. You can see how I got on with this here. Well worth checking out YouTube or the Burda site for instructions. I challenge anyone to get the gist of welt pockets from the following instructions!! Or it could be just me!!
I am over the moon at how they turned out in the finished fabric. I don’t intend to put anything in the pockets, for goodness sakes, don’t want to misshapen them! But I am so proud when I slip my hand inside. Feels so special! And no one gets to see that lovely welt under the flap, except moi! Though I have pointed it out to a few of my friends who smile loyally with raised eyebrows!
welt pocket
peek at the pocket lining
Next up was the notched collar. This was actually not as scary as I was anticipating. I did pin and I did baste before stitching and it all worked out just fine. The stitches sank invisibly into the wool when I machined the seam so I didn’t want to risk having to unpick at any point! Neat trimming and clipping is essential and it is also important to take care when you ‘push out your points’ Very easy to push a pointed implement through the point of the lapel, (especially if you are using soft wool) and ruin everything. It’s worth being slow and patient with this part because it is such a lovely sharp feature. You’ll be really chuffed when it comes together at this point.
pointy lapel and notched collar
There was a suggestion to sew the pointed lapels to the underside of the collar to keep them in place but I didn’t really feel this was necessary for the weight of the fabric I used. I like being able to turn up the collar when its chilly!
Now shall we talk mitred corners? I’m so glad these were included. It makes so much sense and makes such neat corners. Nothing else will ever do from now on! Of course it goes without saying that you won’t survive with these instructions, especially if this is your first time…!
I mitred the sleeve vents and the back vent in the same way. Though I had created a bit of a monster on the back vent by forgetting the extra allowance. Please don’t forget this!!!
not enough SA on the vent but check out those mitred corners baby!
When I came to set in the sleeves I realised I had clean forgot a couple of notches. You will never work out how to inset those sleeves if you forget the notches, I can tell you. Mostly because I tried… and failed… 3 times!!! Till I relented and placed the pattern pieces over the made up sleeves and marked them.
Once I’d put the shoulder pads in, I tried it on and grinned from ear to ear. I was definitely on the home straight! But one niggling factor was that I didn’t like how the sleeve just ‘hung limp’ off the shoulder. I had heard mention of sleeve headings before but obviously never had to take full notice. So I found this little tute in my book Readers Digest: New Complete Guide to Sewing. This book has been so useful and really didn’t let me down this time.
Make a sleeve heading:
Cut 2 pieces of 3 x 5 in (7.3 x 12.5 cm) pieces of lamb’s wool, flannel, or polyester fleece. I had some leftover cotton flannel from my son’s pyjamas. Probably not as weighty or as poofy as lamb’s wool but it was better than nothing!
sleeve cap pieces
Make a 1 in (2.5 cm) fold on long side of each piece. How lucky is this. My fabric had 1 in square pattern!
sleeve cap fold
Centre and pin heading to wrong side of sleeve cap with fold against seamline, wider half of heading against sleeve.
sleeve cap pinned in position
Whipstitch fold of sleeve heading to sleeve seamline. Heading now supports and rounds out sleeve cap.
without sleeve cap
The difference is subtle but is hugely important for my self satisfaction!
with sleeve cap
Before I lined the jacket I neatened and pressed all the seams. I did wonder if you have to neaten the raw edges, after all they wont show but I was worried about it fraying inside with wear and if it might eventually have a knock on effect to the seams coming apart. Probably over worrying but better to be safe than sorry was my own conclusion. But here presented my next concern. As much as I pressed this gorgeous wool, the seams would not lie perfectly flat throughout and I knew that would affect the overall shape and create a lumpy lining. And who would want lumpy lining?!
So I decided to stitch the seams down, like a good tailor lady. But hey! Guess what little tailoring trick was missing. NO UNDERLINING!!! Not that I have ever had to underline anything to date. But I have heard about it. I have wondered why you would want to but now it was blindingly obvious. My fabric was sturdy enough to live without it but how much easier would it have been to sew the seams down flat onto an underlining. I will definitely underline next time I make a jacket and I wholly advise you to do this even if you think your fabric is sturdy enough. It makes sense you know!! Fortunately my fabric was quite thick with a forgiving texture!
stitching seams down sans underlining
I found it was much easier to do, over my knee, whilst watching The Paradise! And also safer to stitch onto the interfaced pieces.
stitching seams down on interfaced sections
Hemming was easy with this fabric but be aware that a curvy hemline is naturally created with all those shaped pieces. To take in that excess fabric I just made a couple of tucks either side of the vent, symetrically positioned so that the finished shape was uniform. You’ll notice here that there is no evidence of interfacing. After I hemmed I remembered I was supposed to interface the hems. So I dutifully unpicked all that hand stitching, cut some strips of fusible interfacing, fused it on and re-hemmed. BUT do remember to interface the hem sections of your pieces from the start and NOT at this stage. You know it makes sense 😉
wavy hemline
So then came the lining. I had pondered a silk lining but the lilac poly satin I found was so lush I looked no further. So long as you remember your ‘ease pleat’ in the centre back, you can’t go far wrong. I can’t give to much advice about this stage because I kind of winged it!!! But what I did remember to do was to push the lining up to the hemline of the outer fabric and roll it down over itself to create more ease and allow for shrinkage. Not that poly lining shrinks but I think its general practice! I did the same on the sleeves. I’m not sure I lined the vents on the sleeves properly but it works… of a fashion!
The buttons were a lucky find, though I was gutted I couldn’t find smaller coconut shell buttons. The two pictured here were way to big even for the front! So sparkly resin shank buttons it was. Lucky to find them in 2 different sizes at Shepherds Bush market. 20p each… a snip!
I WILL find a perfect use for those coconut shell buttons!
I created the buttonholes on the machine. Holding my breath as I did so. You know how it is. There’s always a chance of a wayward buttonhole! But next time I would love to try bound buttonholes. Karen did such a beautiful job with hers and I bet it feels far more special to button up with bound ones!
Well here ends my waffly post of niggles. I hope to have been of some help and not too much of a waffling bore!
Well, from the very beginning would probably be a good idea! I started this jacket way back in February but was wearing it in my head from the first time I saw it in Burdastyle mag 11/2012! I completely ignored the number of coloured circles which indicate level of difficulty. Half a circle short of the most difficult… how difficult would that be?!
It transpires that it wasn’t particularly difficult, once I’d deciphered the 2 magazine columns of instructions, though my strops might have suggested differently. I really don’t respond well to written instructions as much as pictorial ones!
I will do a follow up post with all the niggly construction bits but for now I am so happy to present the finished jacket that was kindly and so brilliantly shot by Mr Ooobop! today. Kensington Gardens provided an amazing autumnal backdrop, despite the lack of sunshine and we had a lovely stroll while Little Miss Ooobop! went to a bowling party at All Star Lanes.
These were taken at the Italian Fountains near Lancaster Gate. It was lovely and misty but still the colours of the trees were beautiful.
Despite the lack of blue sky, my trusty photographer was determined to make use of the gorgeous colours and he got some great detail shots too.
I’m so loving the sparkly raspberry buttons!
Besides being so happy to have finished and be wearing my jacket, today also proved how we take for granted all the beautiful open spaces that London has to offer. So many on our doorstep. Must get out more often!
Wishing you all a wonderful weekend. I’m off to find a tiny project!