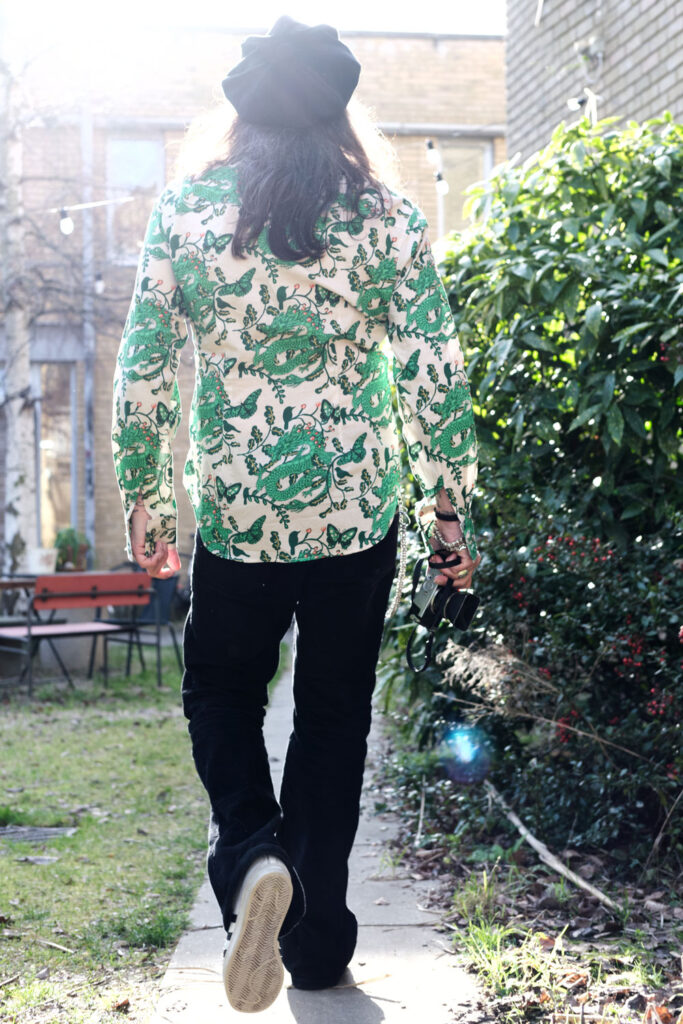
The making of a Serpentine shirt for Mr O

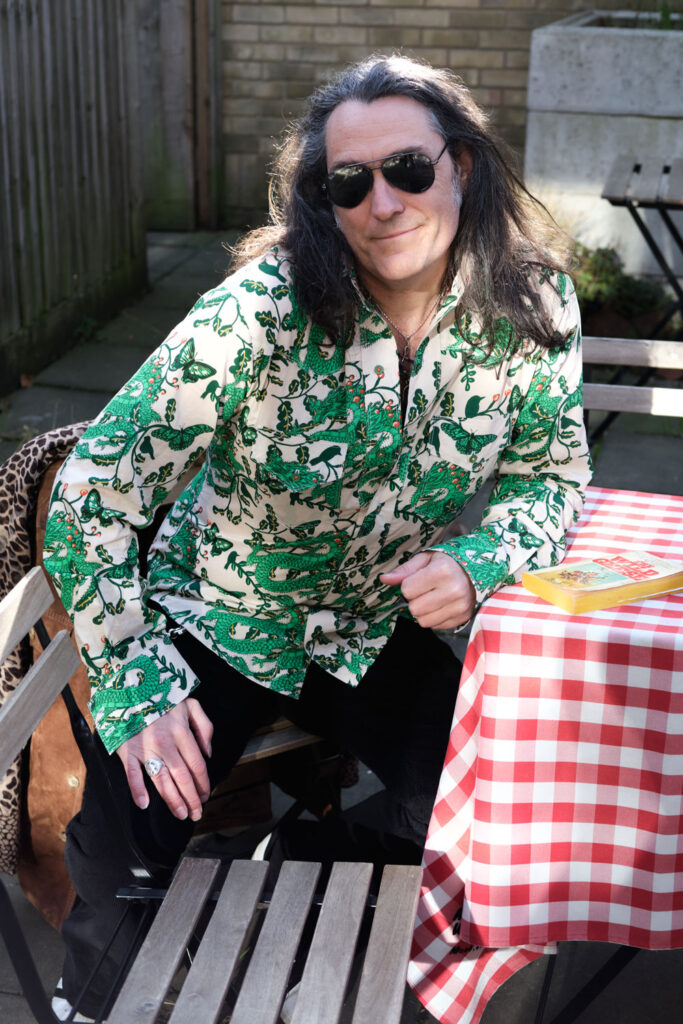
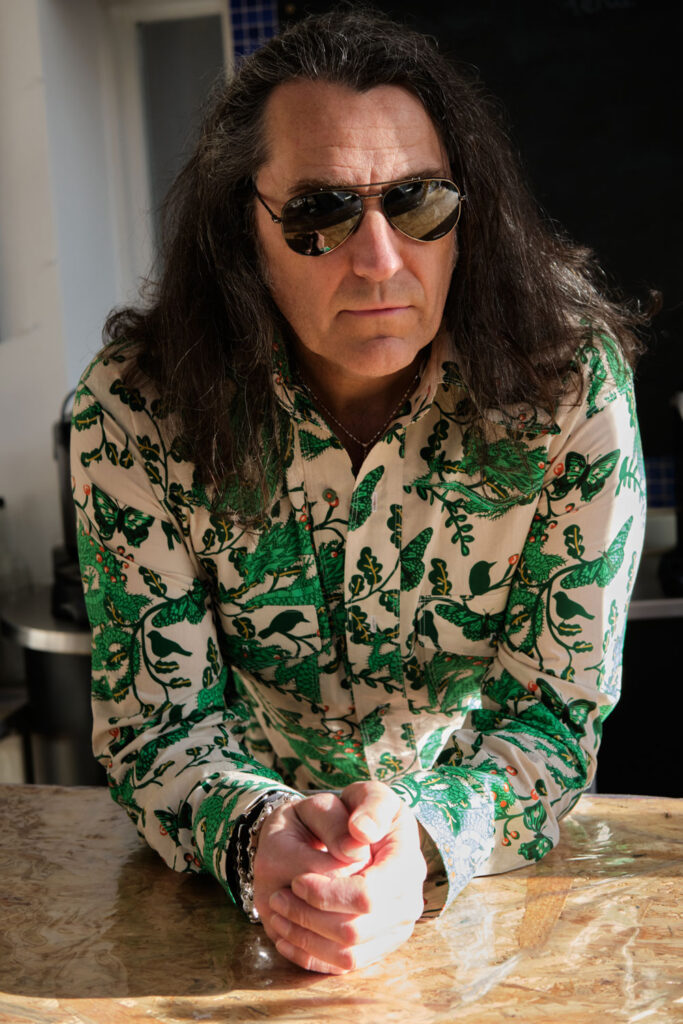
On waving this wonderful Serpentine fabric in front of Mr O, and declaring that I wasn’t sure what I should make with it, my foot suffered an instant shot. “A shirt for me” he said, with no hesitation. Doh! I had no quick comeback! It was a perfect suggestion, of course. 

Fabric Godmother were so kind in forwarding on my goody bag, when I was unable to attend one of their events last year and this fabric was one of the treats inside. I thought on first feel that it was a cotton lawn but it turns out it’s a viscose sateen – a new one on me – and it is gorgeous to the touch and super to sew with. Presses beautifully too. 

I reused vintage Butterick 5007, (western shirt pattern) for the 4th time – definitely less daunting this time round. The only things I still fear about it are the buttonholes because I know for a fact that at least one will mess up and I’ll have to deal with the nasty task of unpicking it. And that is exactly what happened. Is there actually anything more annoying?

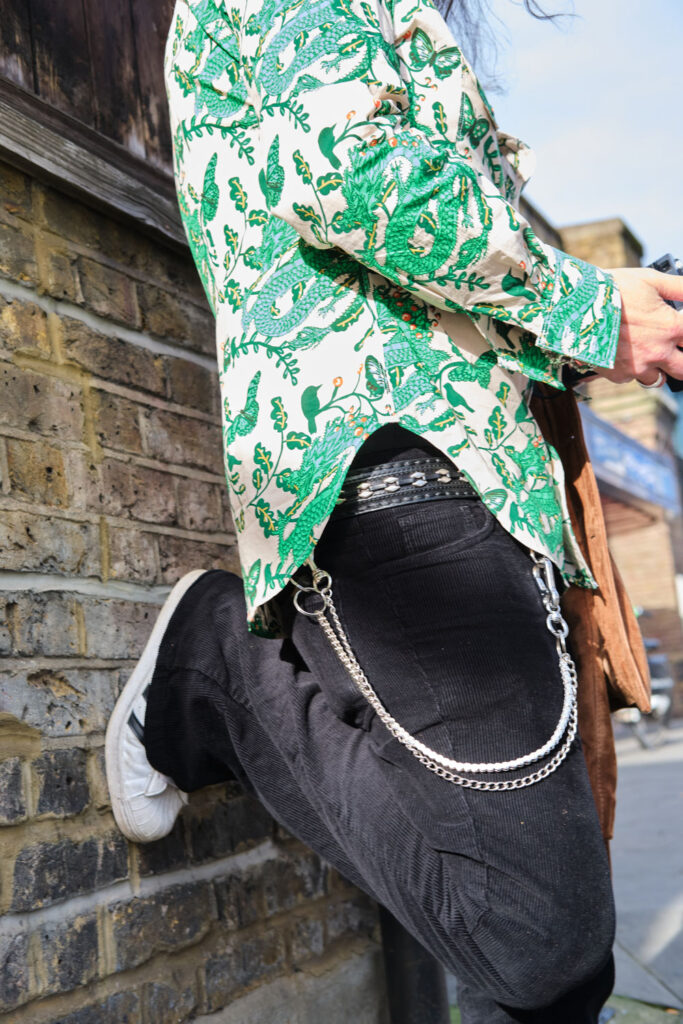
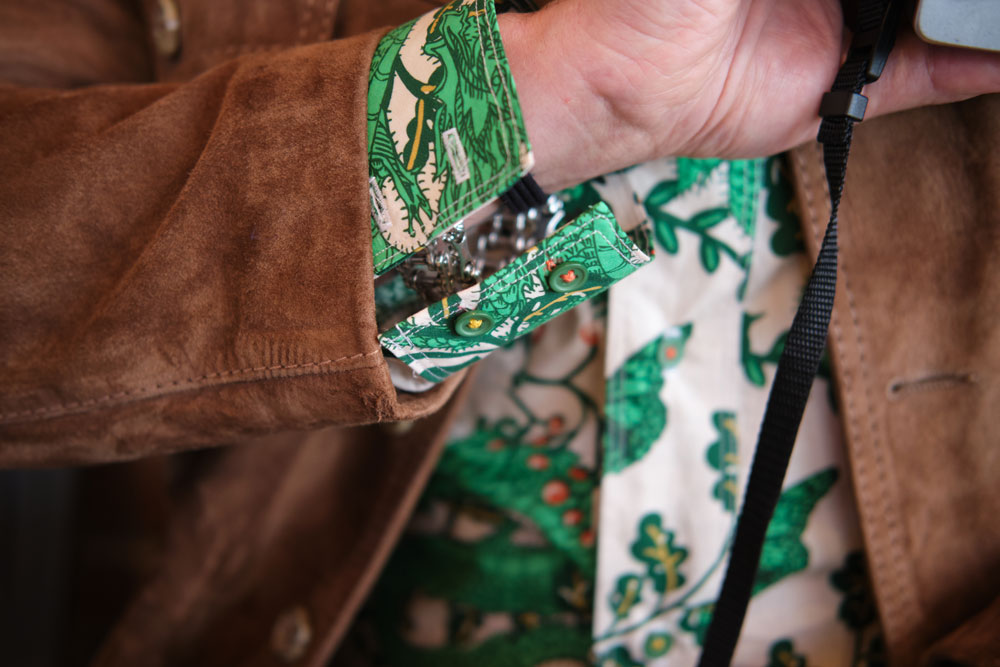
It takes time to put this shirt together, mostly due to all the neat details: curved yokes, rounded hemline; pleats and darts on the cuffs; diamond darts for slim fitting and every single piece has 2 parallel rows of topstitching. But weirdly, I really like the process. The main section comes together pretty quickly and its a great one for sewing in stages if time is short. Which it is the story of my actual life!

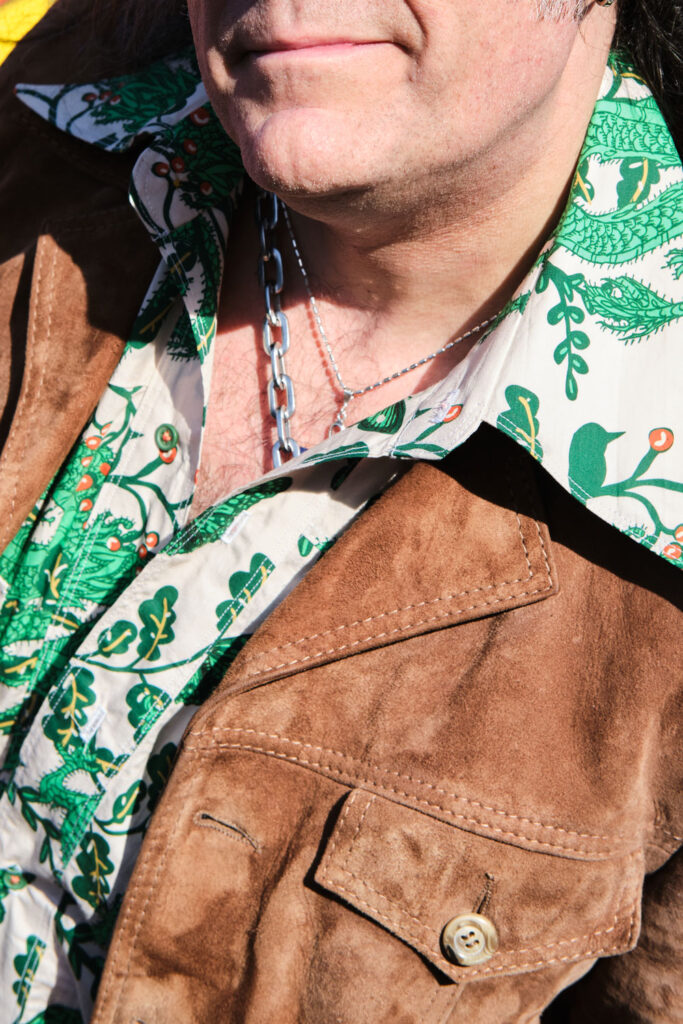
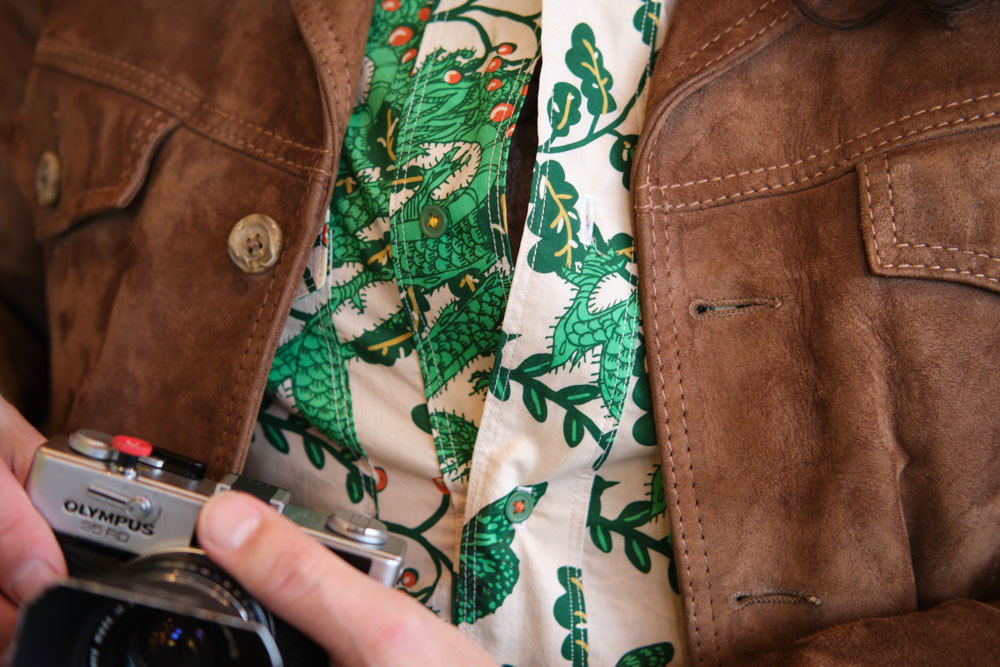
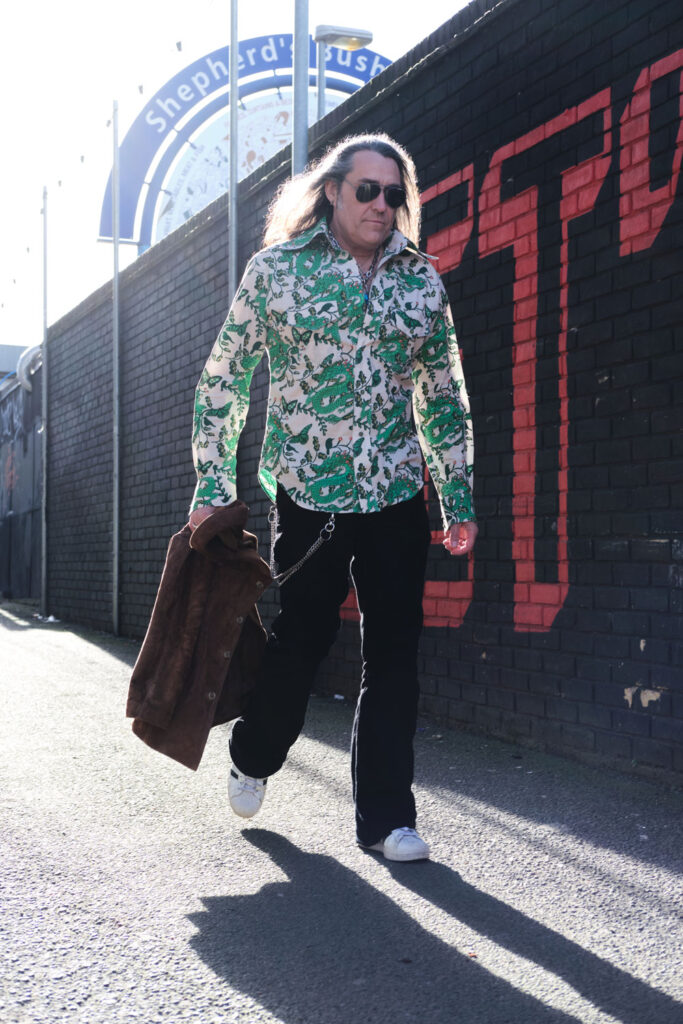
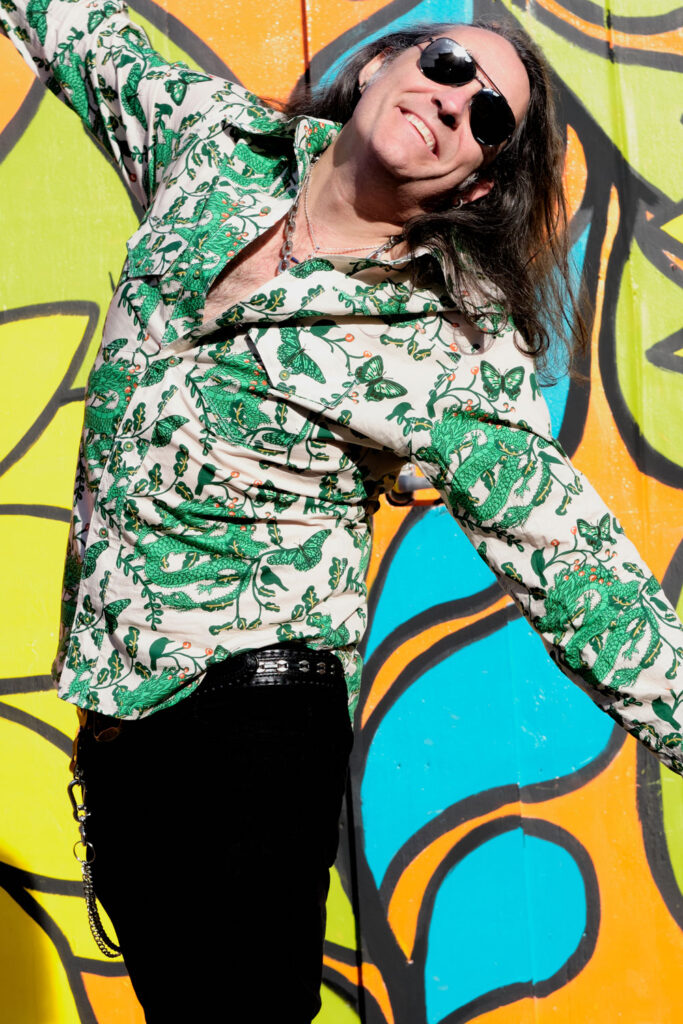
It also has some serious statement collar action going on which Mr O loves. I personally couldn’t carry them off but I think he rocks these aeroplane wings, styled up with his 70s jacket and hat. 

I didn’t make any attempt to pattern match as you can see. I only had 2m to work with – the exact amount required – and there would have been so much waste if I had even tried. That is my excuse and one I am firmly sticking to!

Even though I enjoyed the process, I properly ran out of steam when it came to sewing on the buttons. So I successfully managed to delegate the sourcing and sewing of, to Dan. And he did a fabulous job – giving way more attention to detail than I’d have given – he sewed with alternate orange and yellow threads throughout to complement the colours in the design and it looks simply awesome.

This is definitely not the last time I will use this pattern. I just noticed that Fabric Godmother has a Navy version of the same fabric on sale on their site, and made the mistake of showing Dan!

But he’s going to have to wait a wee while – I’ve got a lovely little commission I need to crack on with and also I want a new coat!

Photos are by me this time. But I think you probably guessed that already, haha! I think I’ll stick to my day job!

Previous versions I made are here and here

And the winner is…

winner classic tailoring techniques for menswear

Congratulations Evie Jones!

Special thanks to Bloomsbury Publishing and Fairchild books for providing such a great giveaway prize in association with #Blazerof2016 and thank you to every one who left such lovely comments. I’ve really enjoyed reading about what you are all getting up to. Remember you can still get hold of Classic Tailoring Techniques for Menswear at Fairchild Books along with a whole host of fabulous fashion books. My copy is already proving to be my best friend already.

In other news I finished a 3rd By Hand London Sabrina dress, yesterday. And it fits! So I’ll be back sometime soon this week, hopefully, with some pictures and a post. Oh I do love a bank holiday!

TTFN x


Classic Tailoring Techniques for Menswear: book review and Giveaway!

classic tailoring techniques for menswear

Today I would like to share a review of a great book that is already my best friend and bible for #Blazerof2016. The lovely people of Bloomsbury Publishing have not only sponsored me this fabulous book but have also sent an extra copy for one other lucky reader!

The title of the book is Classic Tailoring Techniques for Menswear: A Construction Guide. And this is the 2nd edition written by Roberto Cabrera and Denis Antoine since it first published in 1983.

My bookshelves are home to all sorts of sewing literature but when it came to ventures in proper tailoring techniques, none of them books scratched that itch, if you know what I mean.

I am a woman on a mission with a man’s jacket to make before June is out. Jamie has already completed his stunning plaid blazer and panic was beginning to set in fast. But now I have my trusty guide I feel the journey will be easier.

If ever I was doubting the ‘why’ of tailoring, the short and concise intro reassures the reader of the unsurpassable techniques over faster more modern ways to achieve that impeccable finish. It gives a brief but insightful history that inspires a preparation for a very slow but satisfying journey ahead!

classic tailoring for menswear intro

The contents include the following chapters: Tailoring; The Pattern; The Fit; The Fabric; Layout and Cutting; The Jacket; The Pants; The Vest; and Alterations.

There then follows an extended table of contents which allows the reader to go straight to the finer points within each chapter. The Jacket is clearly my primary concern and so when I come to pockets, I now have all the necessary information to create a welt, cash, patch, double-piped or double-piped pocket with flap should I choose to add one… or all of them!

As a book designer myself I’m very particular about presentation and I am a stickler for levels of information. So I’m very happy to report that I found the inside layout to be very clean and concise. The font is classic and unfussy, a good size with comfortable space and set in good readable chunks.

I must admit, at first I was disappointed by the black and white photography. It does appear take away some visual interest but on further inspection, all becomes very apparent. The hand-stitches which are crucial to the tailoring process along with other key marked areas are highlighted in red against the greyscale photography and therefore are easily recognised without distraction. It’s a more sophisticated approach than the sole use of line-drawn illustrations and diagrams which can sometimes be too graphic and disassociated with the real thing. Colour photography would have looked lovely – especially to see some of those coloured tweedy fibres – but style over substance would have been useless in this instance. I’m after good, clear and immediate instruction and this is what this book delivers.

The reality of the photography delivers on other levels too: you can identify the lay of the fabric, how it ripples, how it rolls, how it behaves. You’d never get that across with any amount of linework!

That said. This book also displays some fine line drawings which hone in on the tiniest details.

All the tailoring and understructure supplies you will need are clearly listed and defined along with necessary techniques and hand-stitches. And there is a  very well explained section on how to take measurements. The repeated photo of the man in white pants is a little distracting but as I mentioned before, far more preferable to a line drawing. It’s easier to see exactly where on the body those measurements should be taken. Nothing left to the imagination here!

classic tailoring taking measurements

And fitting is obviously a major part of the process. This section does good to address posture and body imbalance and how to identify the issues. I’m focussing on the jacket here and where wide shoulders and a stooped posture adjustment might come in dead handy, but should I venture into tailoring trousers in the future I’ll be ready for any amount of bow-legs, knock-knees and flat bottoms!

There is brief but great insight into the world of wool fabrics that are used in tailoring. The weights, the textures and the usages; naps, shrinkage and how to straighten a grain. This section may have benefitted from some colour just to see those checks and stripes pop, but again. It’s just the information I need. I can go see and stroke any amount of fabrics up the Goldhawk Road for that kind of fix!

Laying and Cutting Out covers exactly how the professionals do it. Great to see the hands at work and of course a vital section on matching plaids/checks and stripes.

classic tailoring for menswear

When I got to the Jacket section I was a bit overwhelmed. So much stuff to learn. But that is the whole point. I want to learn. And I want to have reference to it all. I want to get good at this and there is no fast track way. Just slowly and properly and remembering to enjoy each little step-by-step instruction. I’m really looking forward to making some shoulder pads. There’s a great how-to with a pattern at the back of the book. Incidentally there are also traceable patterns included for a French fly and a French tab and some other elements that I’m not going to pretend I know what they are yet!

The Trousers and Waistcoat sections are just as detailed. Covering the classic tailored processes for each stage. No stone unturned, it would seem.

The final section covers Alterations, which will prove invaluable if I ever I fancied some more unselfish sewing further down the line. And already I am inspired to pick up on the advice for relining a jacket. Something I have been putting off for so long (see this Boer War jacket). It is so simply and brilliantly explained that it makes me feel daft for every doubting my capabilities! And if you ever need to alter a pair of trousers for the man who has muscular inner thighs, look no further.

In fact, it’s all there: what you need, and what exactly you need to do to achieve each stage of a perfectly classic tailored jacket, waistcoat or pair of trousers. Brilliantly presented and clearly explained… in black and white (and red)!

If this little review of Classic Tailoring Techniques for Menswear has whetted your appetite, click here to be taken to Fairchild Books – an imprint of Bloomsbury Publishing– where you can buy one for yourself and peruse all the other amazing fashion titles they have on offer.

Or if you fancy winning yourself a FREE copy, simply leave a comment below and let me know how you are getting on with #Blazerof2016 or indeed any other tailored garment you have plans for. Entries will be drawn on 30th April and the winner announced on 1st May 2016. It really is a fabulous prize – good luck!

Both the review and the giveaway copyies of Classic Taloring Techniques for Menswear were kindly given to me free of charge by Bloomsbury Publishing. All opinions expressed are my own.
 

#Blazerof2016: The first toile

blazerof2016 toile front

Welcome to life in the slow lane and my first toile for Mr O’s #Blazerof2016. As anticipated in my last update, the instructions were indeed minimal, which is ok if you’ve done this kind of thing before but I haven’t! When I look at the finished toile I’m wondering what I found so difficult – time is a healer I guess!

It was wholly necessary to make a toile. I already knew the largest size of the pattern wouldn’t be big enough but there was a method in my madness. I wanted to test the construction more than anything and didn’t want to waste time making any preliminary changes to the pattern. Now that it’s made and the process understood I can see exactly what I need to do. I can also see some issues that will need further investigation.

First thing I will need to do is to grade it up a whole size. I will use the traditional cut and spread method. The sleeves need some extra room at the bicep (That news was met with a wry smile!) and I may also need to lengthen the sleeves but that will be confirmed once the 2nd toile is made and the shoulder pads are factored in.

The thing that surprised me most about this design was the lining. Fundamentally, there isn’t much of one but it is a summer blazer so it can be forgiven for half measures! there is a kind of butterfly section that overlaps on the inside back, joining the front facings around the armholes, if that makes sense.
blazerof2016 toile lining

A fine excuse to choose some fun lining fabric I think. The sleeves will be fully lined and the remaining exposed seams finished with binding. Might be nice to make some custom binding to match the butterfly lining. I’m not sure that’s what it’s technically called by the way!

I was a bit concerned about the sleeve caps. There seemed to be more gathering and less ease involved here. Then I read Male Devon Sewing’s post on setting in sleeves where he advises to steam-shrink the eased area of the sleeve caps before sewing in. That will help on the real deal, I’m sure. I’ll see what happens 2nd time round before I properly address this but I may also need to start and finish the ease stitches slightly further apart.

puckers on the sleeve cap

The assembly of the collar and collar stand properly had me confused. I really couldn’t make sense of sewing two concave seams together. But it makes sense now that it adds the roundy shape. The black stitching is where the pressed open joining seam will be topstitched.

back collar up

The topstitching wont be seen in any case once the collar is folded down. Thinking I should use some red melton or similar for the collar stand. It seems to be a feature on some of Mr O’s other jackets. That wont be seen much of either of course. But the joy of knowing it is under there excites me a little bit already!

back collar folded down

The one construction instruction that still didn’t translate was attaching the collar to the lapel. The instructions said to sew all round the edge of the collar to a point, trim and turn right side out. It allows nothing to sink into the top of the lapel seam so unless I find instructions somewhere else, I’m going to stop the stitching further back so I can insert the whole 1.5cm seam allowance of the collar, snuggly in place. You can see in the picture below where I’ve unpicked the stitches already to see if that would work.

collar notch

Burda gives no clue as to how I line the vents on the sleeve cuffs but luckily I read up about ‘fake’ vents on sleeves and so there’ll be no unnecessary fiddlesome lining going on here, hooray!

I’ve enjoyed the process of making a toile, especially getting to write notes all over it so I know what to change and what to remember next time. And I’ve learned so much already, before I’ve even started on the real thing!

So now I’m all set to do some cutting and spreading and will be back with a 2nd toile soon.

While you’re waiting for me, do hop over to see some of Male Devon Sewing‘s amazingly detailed posts for #Blazerof2016. They really are very helpful.


#Blazerof2016 and tips for tracing Burda patterns

So this week, I finally chose what pattern to use for #Blazeof2016. I’ve decided to make it extra difficult for myself by going for the minimal instructions of the Burda Style magazine pattern from February 2016 issue, and I’ve just got as far as tracing the pieces. It took most of Saturday afternoon but that’s ok because I had an empty house save Phryne Fisher and Jack Robinson to keep me company!

Burda blazer pattern trace


The tracing took longer than usual not just because of all the pieces but because I was aware of how easy it would be to miss a notch or a mark of instruction. So I was like a detective myself, scanning the spaghetti lines with eagle eyes! I want this jacket to work so I need to make sure every detail is attended to. It didn’t help that the red lines on the pattern sheet I was following clashed with the red pattern pieces of the featured ladies blouse. This could wind up a very interesting hybrid ‘blouzer’, but let’s hope not!

For anyone who’s daunted by the tracing of Burda patterns – and let’s face it, that’s most of us – the following might be of help:

Top tips for tracing Burda patterns

  • Work on a large clean flat area
  • Use pattern weights or similar to hold your papers in place as you trace
  • Refer to the Pattern Overview to ensure you capture every notch, seam number, slit mark and grainline arrow
  • Tick off each piece in the list as you go

Burda pattern overview
Pattern Overview and Cutting Out list

  • Label all of your pieces with Model No., size and piece description / number
  • Remember seam allowances are not included so write that clearly on your pattern pieces too OR add them to your pieces and mark that they are included*
  • Photocopy the image to file with your pattern envelope if storing separately

*I will be making size adjustments to the pattern so I have left the seam allowance off. It’s way easier to play around with minus SA. And then I will either add it at the end or mark it directly onto the fabric when the pattern is pinned on.

Incidentally, the fabric we’ve decided on is a gorgeous traditional boating stripe from Yorkshire Fabrics. 100% wool, made in England which raises a little smile every time I see that selvedge! Doesn’t come cheap so I’ve wrapped it up like a precious swaddled baby and put it away for safe keeping until the calico version is made good. No chances being taken here!

boating stripe fabric

I really am in the slow lane here but there is a distinct advantage to this. Have you seen how MaleDevonSewing is steaming ahead with his amazing tailoring skills? For anyone else who is pootling along like me, he has posted some cool construction photos and instructions. Most of which I’ve never heard of. All of which I will be employing!

Di Kendall has shared the progress of the lovely striped blazer on her blog and it’s great to see lots more activity from other participants of #Blazerof2016 on Twitter too. Keep posting your progress… I need all the help I can get!! 😉

Sew Menswear: Blazer of 2016!

blazer of 2016

It’s amazing where a bit of Tweeting lands you up.

Not for the first time, I recently made friends with another great sewing blogger, Jamie from Male Devon Sewing. He tweeted for suggestions on what he should make next and I cheekily replied that he should make a man’s blazer so I could watch his every move and pick up all his tips! He liked the idea of making a summer jacket and I was genuinely looking forward to watching his every step but then the sewing-table turned and Jamie suggested we have a Blazer-off of sorts! Me and my big mouth!

Mr O has been begging me to make him a blazer for absolutely ages and if I’m honest, I’ve been plain terrified of not being able to follow it through! And if I’m really honest there’s a bit of selfish in me that would rather be making me another (easy) dress!

McQeen Feather print blazer
Source: upscalehype.com

But what am I actually terrified of?  Why would it be so much different to sew than ladies wear? I’ve made a jacket for me before, not the best of fitting and the stripes don’t line up on the shoulders but it’s a jacket all the same and I’m sure I could rectify those issues with a bit of care and attention. And If I didn’t, would it really be the end of the world?

Jamie and I put heads together and supposed because of a lack of menswear being sewn out there that there might just be a fair few of you also fearing how difficult it might be or maybe you’re just plain uninspired. Let’s face it, there’s not much in the way of menswear patterns compared to the plethora of womens’ out here. Like 6% apparently! And so #Blazerof2016 was born as a kick up the butt, so to speak to inject some much needed inspiration and promote a growth in the sewing of menswear!

Quadrophenia style blazer
Source: Bespoke Suit

Although I’ve been sewing for a few years, this is something that is definitely lacking in my repertoire so I’ll definitely be learning on the job, sharing all that I learn along the way. And if you check out Jamie’s jackets you’d be forgiven for thinking he has heaps of experience but he literally only sewed his first jacket a year ago! So we can all hold hands together – and steal all Jamie’s tips! By using the hashtag, #Blazerof2016 and tagging @ooobop and @maledeveonsewing on Twitter we can put out pleas for help as well as posting tips and progress photos. Nothing like a dive into the deep end, hey?!

Make one for your fella, your dad, your best mate, your brother or your son. Lets do it. Lets make someone’s day, add some more skills to our toolbox, encourage more sewing of menswear and more than anything, lets have some fun. Pinstripe, tweed or floral . . . let’s go crazy with colour and print. It doesn’t have to be boring! We’ll be regularly posting inspirational photos and techniques along the way so stay tuned for tailoring fun!

clue check blazer
source: alux.com

We have a good six months before submission day which is good for me because, like most things, I’m going to have to do this outside of work and children! I’ll do my best to blog as many stages of mine as I can and I’ll encourage you to do the same so we can show everyone how cool and satisfying it is to sew a fabulous piece of menswear.

So who’s up for joining us on our quest to scatter some menswear among the dresses of the sewing community? The rules are simple:

  • Make a Man’s blazer/jacket using any pattern of your choice, or draft your own, it MUST be a piece of menswear though!
  • Your choice of fabric suitable for a jacket.
  • Can be fully lined, part lined or unlined (although if unlined the seams need to be suitably finished).
  • Must have some sort of pockets (your choice again: Patch, Flap, Welt).
  • Your choice of vent at the back, either single or double.
  • Your choice to have opening/buttoned cuffs.
  • Jacket to be completed by June.

Please note this is not a scheduled sewalong. This challenge should you choose to accept, is to be completed in your own way, at your own pace, within the 6 months allowed of course.

Leave a comment below with either me or Jamie so we can see who’s in and please add the badge to your blog to spread the word.

blazer or 2016

I’m off to study patterns. Good luck every one!

Vintage western shirt #3… of the linen kind


70s shirt Butterick 5007

It’s been a while since I made Mr Ooobop something. Quite shameful really for all the lovely photos he takes for me. So I’m delighted to have finally finished his latest shirt. And he loves it, thankfully!

The hardest bit for me was being back behind the camera again. Well out of practice I was. But luckily Dan has more patience than me and was very obliging as I got him to mill around on Barnes common!

This is the third version I’ve made from the same pattern – Butterick 5007 – A 70s men’s western shirt.  The kind of shirt you have to imagine beyond the pattern pic:

butterick 5007 pattern cover

Mr O is quite good at that. Non-conformist to a T for Taurus he is, and believes very firmly that if it ain’t broke, don’t fix it. So all that needed to be altered this time was the choice of fabric. The flowery fabric used in the last shirt I made him was gorgeous but faded so quickly in the wash. Such a shame. So he chose this gorgeous black linen with embroidered details.

butterick 5007 shirt

When we came to buy the fabric. I didn’t think I would have a problem with pattern matching because the little embroidered motifs were quite sparse but that’s where I massively slipped up. Didn’t really consider placement, did I…doh!

Placement isn’t really that difficult if you take time and consider each piece and where it’s going to sit with the adjoining pieces, of course, but when you’ve purchased only just enough fabric for the job and it was end of roll, it creates a problem or ten.

You can move the pieces around to work as much as you like but sometimes that ain’t very economical and you end up short of material for all the pieces. Luckily enough I had some spare plain black linen floating around because what was left didn’t leave suitable areas for the cuffs, collar stands and one of the pockets. I also used some of the plain stuff for the underside of the pocket flaps.

butterick 5007 mens shirt

It’s a close-fitting shirt, which required a bit of fitting but that was done on the first version, which incidentally has disappeared from my blog but here’s a pic of it. I just love the vintage Laura Ashley curtain fabric I rescued here. The beard, not so much!

B5007 with double bass

In all cases, the pointed collar is large. He likes it that way. But I did include a stiffer facing this time so it is even more exaggerated!

The back and front yokes are cut on the bias. Fine for the back but I did some serious head-scratching on the placement decisions for the front yokes. In my head I wanted the design flipped and symmetrical. Why my brain couldn’t let it lie I have no idea!

70s shirt back yoke

70s shirt front yokes

I love how the above picture shows the texture of the linen. It is one of my favourite fabrics to work with. And I’m told it feels great and is dead comfy to wear too! Also shows up some of the painstaking topstitching. I had clearly forgotten just how long this takes. It can’t be rushed. And I couldn’t do it at night-time. Sewing black on black with stupid crap low energy ethical lightbulbs is not good for anyone’s health. So I’m glad I waited for weekend daylight hours to get a neat job.

You can’t see from these photos, and you probably wouldn’t have noticed in real-life and close up either, but I interfaced the cuffs and button band in a white fusible woven interfacing. French stuff. Great quality in fact. But when I cut the button holes it was a little irritating to see the white edges. So I got my Sharpie out and coloured them in… shhhh!

The buttons aren’t an exact match for the blue in the embroidery which bugs a bit but I’m keeping eyes peeled for a closer colour. They can always be replaced at a later date. But I so wish I’d put the buttons on the other side of the cuff. Mr O doesn’t often do his cuffs up so you don’t get to see them side on!

70s shirt shaped hemline

He also doesn’t like to tuck a shirt in much. And so it’s great that the shaped hemline gets a showcase. I used a bias tape to finish the edge because I forgot to lengthen it again I much prefer how it looks.

B5007 in black linen

It was really lovely to catch an hour or so of the sunshine in Barnes, today and especially lovely to spend a little time with this fella. We’ve been like passing ships lately. And he’s off again now to do a gig in Kent! So what’s a girl to do? Crack open a bottle and crank up the sewing machine I guess! Tough life on a Sunday afternoon, hey!

70s western shirt for men

Happy sewing, everyone!