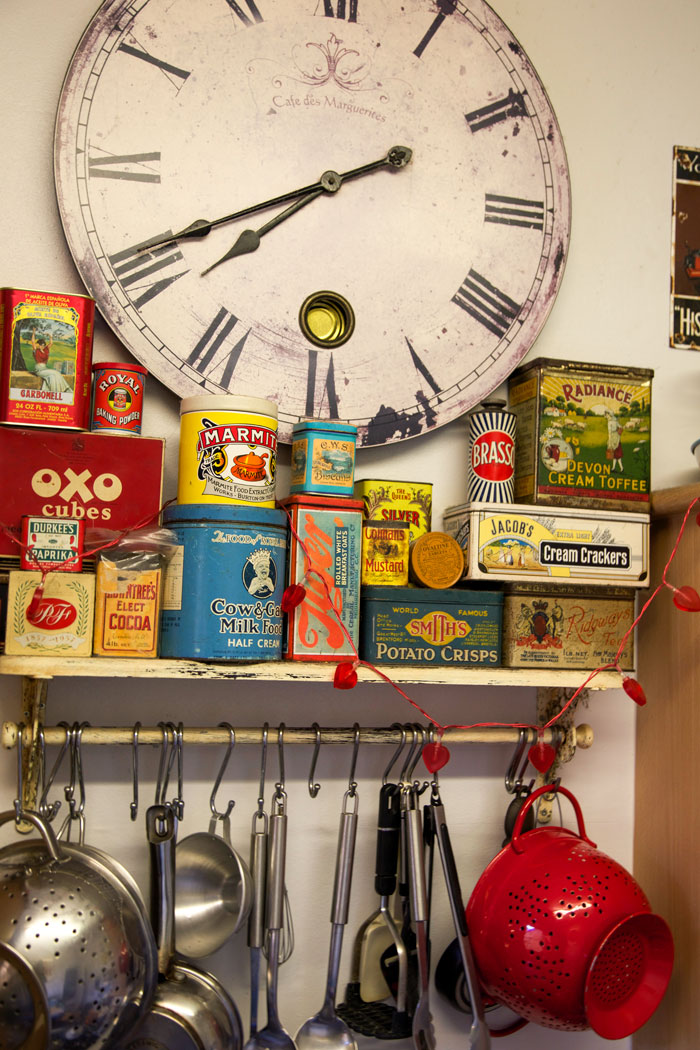
And here is the long awaited tutorial. Sorry I took so long. I completely underestimated how long it would take to put together! Despite the lengthy post, this really is a simple sewing project, involving jus a few lines of straight line sewing. Please do a mock up first to check I haven’t given you a bum-steer! And please do point out anything that is unclear or needs adding.
It does, however require some very careful measuring and a few calculations.
No corners must be cut. The accuracy in the measurements will ensure perfectly fitting and super smooth operating blinds.
Remember: Measure twice (at least!) and cut once!

You will need:
Furnishing weight fabric for the outer
Curtain lining for the backing.
Nylon cord. As a guide I used 9m but yours may be more or less.
Small plastic rings
4 screw eyes
Cleat
Acorn / cord pull.
Strong self adhesive velcro. The width of your window frame or baton.
Wooden doweling or synthetic rods cut to size.
1. Calculate the size and cut your main fabric 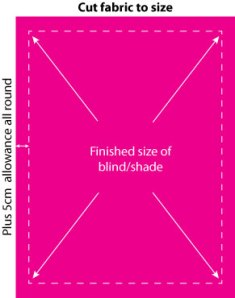
Measure the size that you want your finished blind to be.
Add 5cm side turnings and hem allowances on all sides, to this measurement, and cut your fabric.
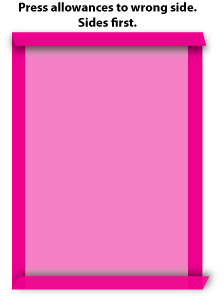 2. Press Allowances
Press the allowances all round. You could even mitre the corners if you wanted to be really clever… er…I didn’t!
No need to stitch in place at this point. All will become clear!
 3. Now to prepare your lining… and some serious sums!
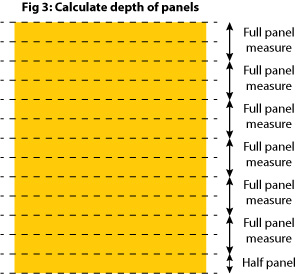
Start with the measurement of the finished size of your blind. This will include allowances of 2.5cm all round.
First work out how many sections/folds you want to incorporate into your blind.
I chose to have 7.
The bottom panel must be half the depth of the others which are equidistant.
To calculate this I doubled 7 (panels) to make 14 and deducted 1 to make 13 and divided this into the finished depth of the blind (150cm in my case)
so:
7 x 2 – 1 = 13
150cm / 13 = 11.5
11.5 is the half size panel at the bottom
The remaining 6 full size panels will be double that at 23cm (see fig 3)
You will also need to accommodate the dowels so extra fabric will be needed to allow for the casings.
Measure the circumference of your dowels and allow a couple of milimeters extra, otherwise you will struggle to get the dowels in the casings.
My casings were 12mm.
12mm x 7 panels = 84mm (8.4cm to be added to the final depth of the lining fabric)
So the finished measurement of the lining fabric to be cut is 80cm (width) x 158.4 (150+8.4)
Always measure twice and cut once!
You can now cut your lining to size.
4. Mark the positions of the panels then hem all round
Mark the positions of the panels, starting with the bottom one, in my case, 11.5cm from the bottom. I chose to mark on the right side with chalk to make the lines easier to follow.
Mark up from this point, the depth of the casing, in my case 12mm. From that point, mark the next full size panel up, in my case, 23cm
Mark the depth of the casing and from that point the next full size panel. Repeat the markings for the rest of the panel.
The side turnings and hem allowance is 2.5cm all round. Fold and press in position.
Sew all round close to the edges of the lining fabric so the rods wont get caught in the seams.
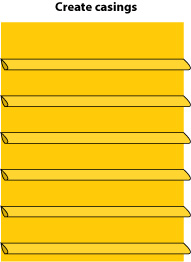 5. Create casings for rods
With wrong sides together and guide lines matching, fold in between the casing lines and press.
Sew accurately on the marked lines from edge to edge.
Repeat this for the remaining casings.
Your lining is now complete and ready to attach to the main fabric.
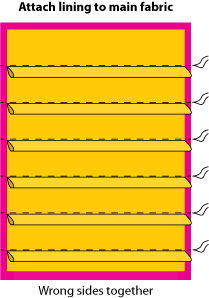 6. Attach prepared lining to main fabric
Lay the main fabric, as prepared in step 2, wrong side up on a flat surface.
Lay the prepared lining, wrong sides down, on top of the main fabric, making sure it sits 2.5cm in from each edge.
Making sure both layers are perfectly flat, pin together along the casings, so the casings are facing down towards the bottom hem.
Use as many pins as it takes to secure your two pieces together with no bubbles or creases!
Sew neatly and carefully from one side to the other, directly above the casings, sewing both lining and main fabric together.
Hand sew the top edge of the lining to the main fabric. Or machine stitch if you prefer.
7. Attaching the velcro
Stick the loop side (the fluffy side) of the velcro to the top edge of your blind.
Stick the hook side (the spiky side) of the velcro to the top edge of your baton or window.
NB. I used the strongest adhesive velcro I could find, which worked beautifully but to ensure it didn’t separate from the fabric I also hand stitched it.
This is very difficult but worth the effort to strengthen the bond. Do not under any circumstances try to sew it on the machine. The adhesive will totally ruin the needle and get stuck!
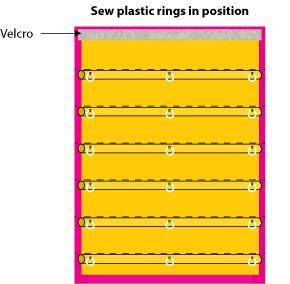 8. Insert the rods and sew on the rings
Inset a rod into the hem of the main fabric and hand sew the hem of the main fabric to encase it.
This helps to give the base of the blind a bit of weight and keeps it hanging nice and straight.
Hand sew the lining hem over the main fabric hem.
Insert the other rods into the casings and hand stitch the ends closed to stop the dowels falling out.
Hand sew 3 plastic rings to the centre of each dowel casing, one at each end and one in the middle.
It is important that the rings are perfectly aligned with each other.
 9. Attaching the cords
Screw 3 screw-eyes into the the underside of your baton or window frame.
They must be aligned with the rings you have attached to your dowel casings.
Attach the 4th screw eye to the side of the window frame, in line with the others.
Attach 3 lengths of nylon cord to the bottom 3 rings. Ensure the knots are tied securely.
Assuming your pull cord is going to be on the right hand side of the window,
run the first length of nylon cord up through the right hand set of rings. It will need to be long enough to do this and then run along the top 3 screw eyes and the side screw eye, down to the cleat, plus a little bit more!
Then run the middle cord up through the rings and allow enough to run through the centre and right hand screw eye, and the side screw eye, down to the cleat, plus a little bit more!
The final cord runs up the rings in the same way, through the top right hand screw eye, through the side screw eye and down to the cleat plus a little bit more!
NB: The screw eyes will sit below the velcro in real life!
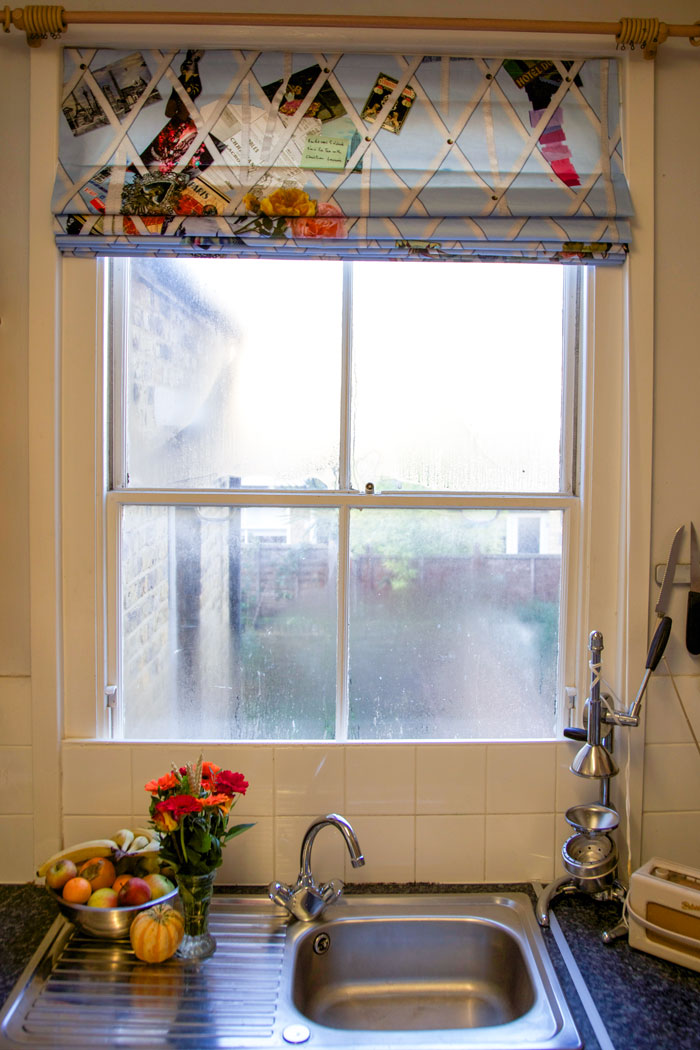
10. Attach the blind to the window
You can now attach your blind to the window by pressing the velcro edges together firmly.
Thread the cords as detailed above.
With the blind at the lowered position, carefully make sure that the cords are neatly and precisely lined up. Gently pull on them individually and secure all three cords together at the ends with an ‘acorn’ or cord-pull.
Attach your cleat, proudly raise your blind, marvel at the magical way it folds up and wrap the cord around your cleat. Or lower it and raise it a few more times just for the joyfulness of it all!