Vogue 2494 for Mother of the Bride

V2454 Vintage Vogue evening gown

Special occasions call for special dresses and I don’t think I’ve had call to make anything more special than a mother-of-the-bride dress for my daughter’s wedding.

But what would it be? I had a whole years notice but in true ooobop to-the-wire styleee, I left myself a couple of weeks before the big day.

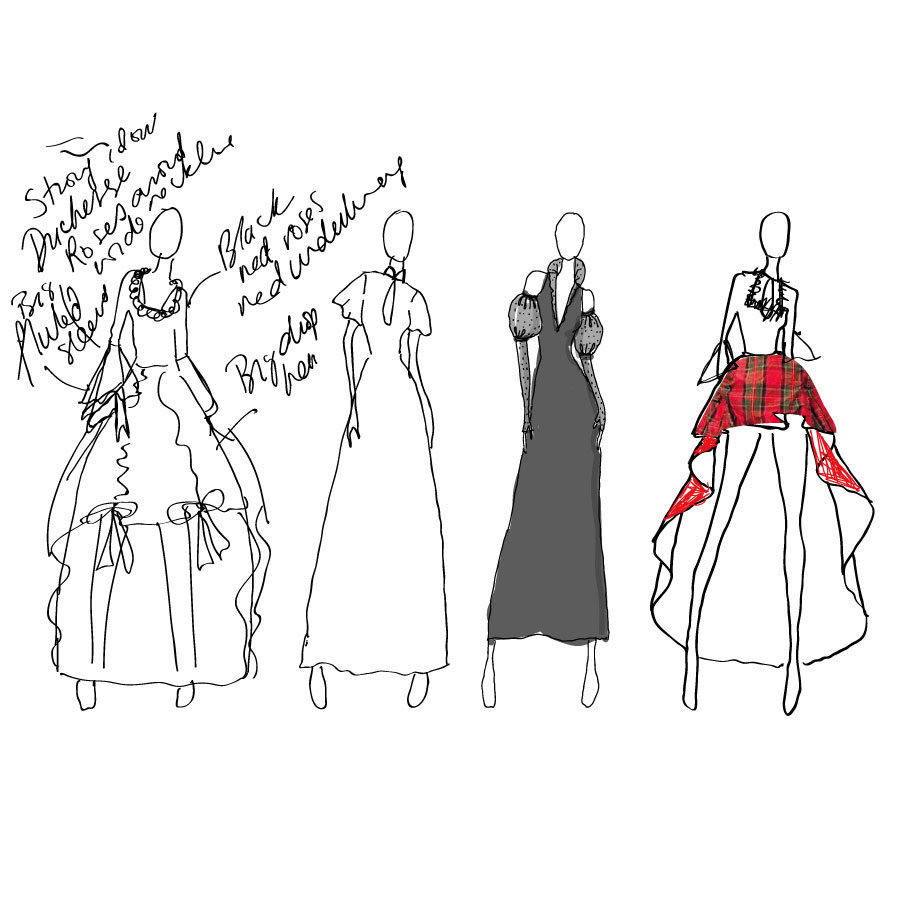
That’s not to say I spent days and weeks and months googling and mulling, dreaming and virtually making in my head, the hundreds of possiblilites.

I really didn’t know what I wanted. But I did know I didn’t want to look like a run-of-the-mill MOTB.

Have you ever googled to see the expected format? Pastel shades, sensible knee-length skirt, coordinating jacket with statutory three-quarters of a sleeve, satin and lace, obligatory big hat, and nude tights… Would I conform? Not a chance!

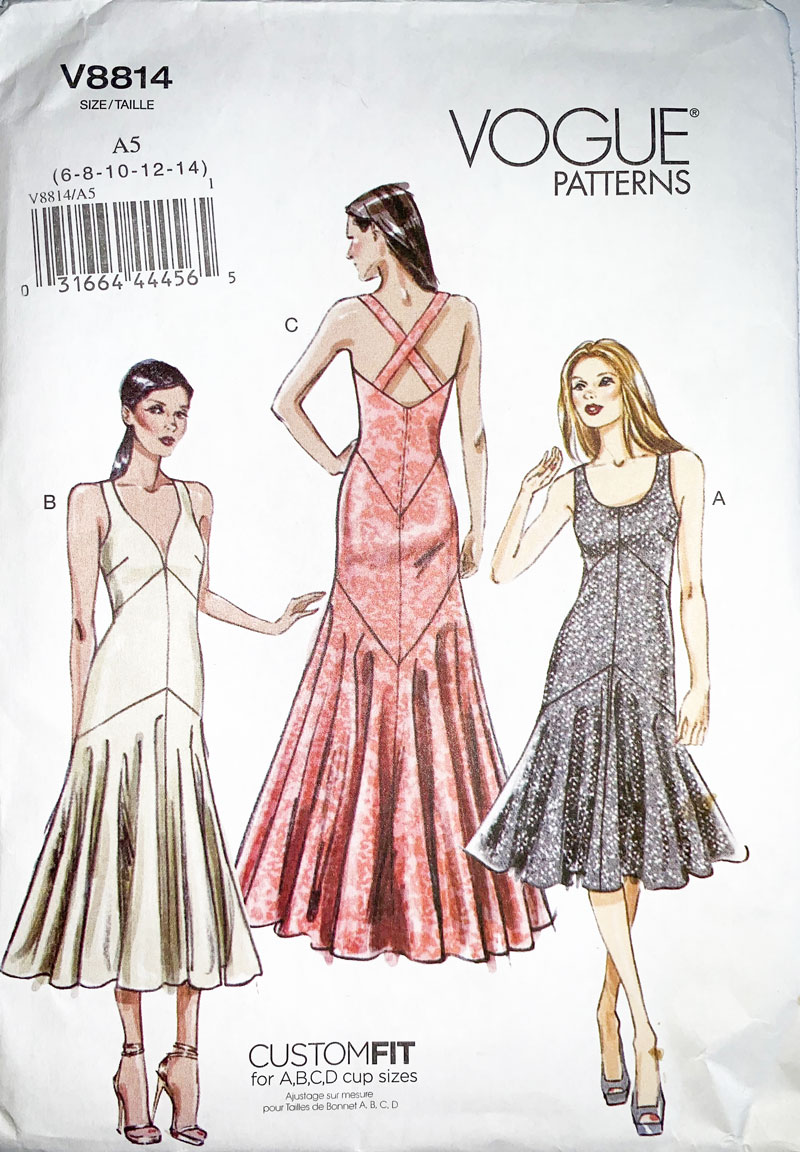
And then I remembered this gorgeous vintage Vogue pattern that I’d bought before I even knew what kind of special occasion it was going to be for!

Vintage Vogue V2494 sewing pattern

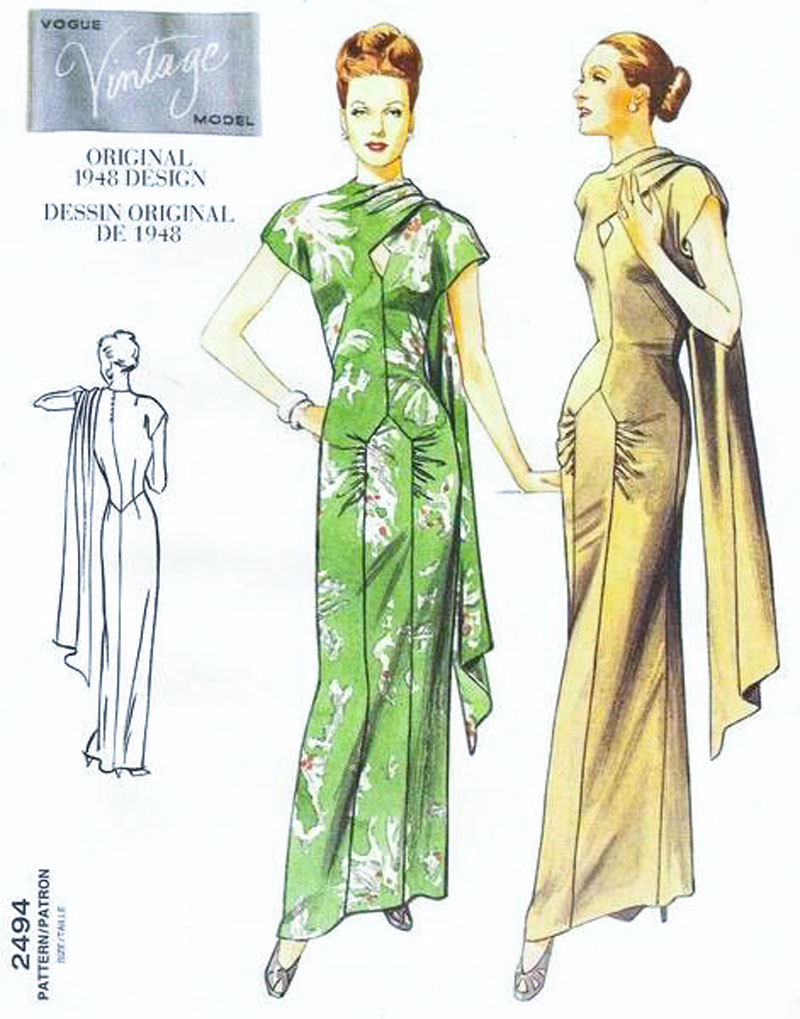
It’s an original 1948 design. Full of elegance and style. Wasn’t too sure that a five foot four sausage shape could work it as well as the cover girls but the vision was strong and I was so delighted to have made a decision at last. Just had to root through a million other patterns to find it!

The only experience I’ve had sewing vintage Vogue patterns before was the V2934 jacket which I made twice, first here and again (after I lost the first one) here, and more recently the Vogue Designer Original 1486. Interestingly all have the cut-on sleeve element and each of them reasonably uncomplicated to sew.

I anticipated a rocky ride with with the construction and fit of this dress though, especially as I’d left no time at all to properly test it but the beauty of this pattern is that it has ACTUAL body measurements printed on the pieces. And I can’t tell you how grateful I am for this small mercy.

I had full intention of toiling, especially as the plan was to go full on lavish silk satin. Not every day your daughter gets married. I knew the price was going to be hefty. This dress only calls for 3m so I knew at the very least I was looking to spend around £100. But I did the sensible thing of looking around before I committed to the first fabric I found.

V2494 full length dress

John Lewis’ haberdashery department at Westfield, White City had not long opened and so I headed to check out their stock. Got chatting to a lovely sales assistant who was mesmerised by my pattern choice and eager to show me some ‘just-in’ peachskin fabric. I’d heard of it but never had the pleasure of a feel. It draped beautifully and suddenly the option of a more forgiving matt appearance became instantly more appealing, moreover the price of just £8 per metre! It was only available in red. But hey. That was ok. Kind of a no-brainer, really!

The making up of this dress was deceivingly simple. It was down to my haste that markings were confused and I’m so glad I rehearsed that little diamond opening on a different fabric. As you can imagine, there are a fair few positional points on that front piece and my first attempt saw me reposition it some distance lower than it was meant!

V2494 detail of peephole

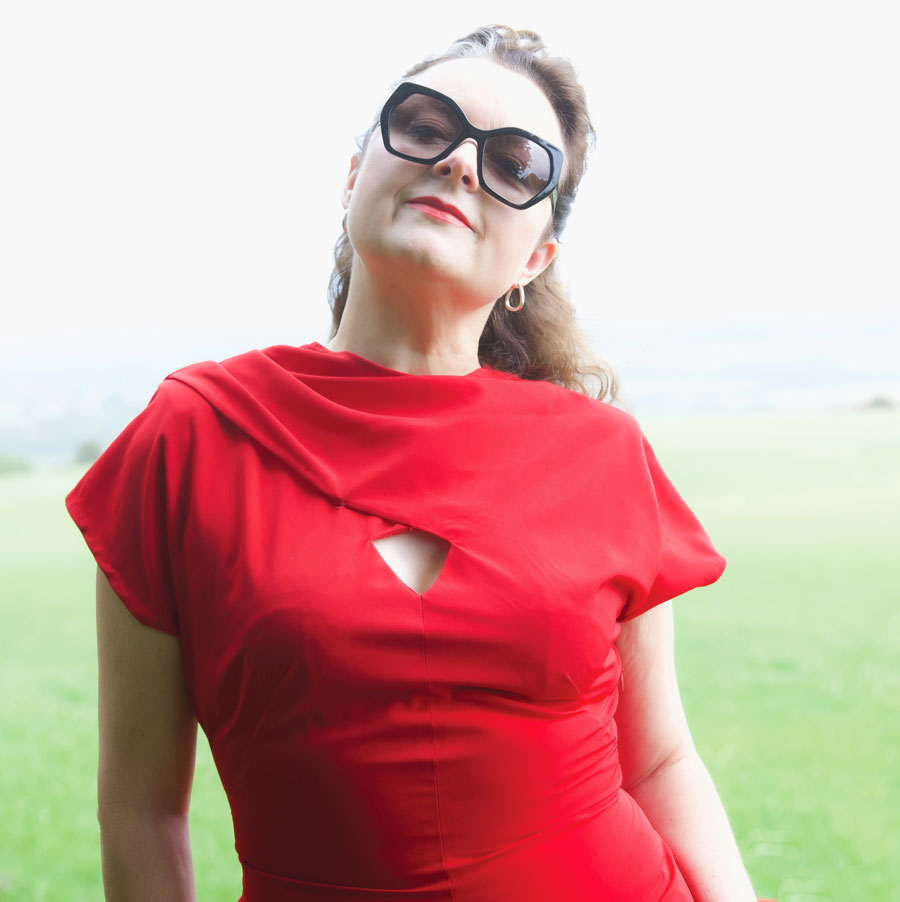
Despite the tricky diamond peephole and that lovely inset panel the front, the rest of the construction was a breeze: There is no lining. So the peachskin was a perfect weight to not warrant an underlayer.

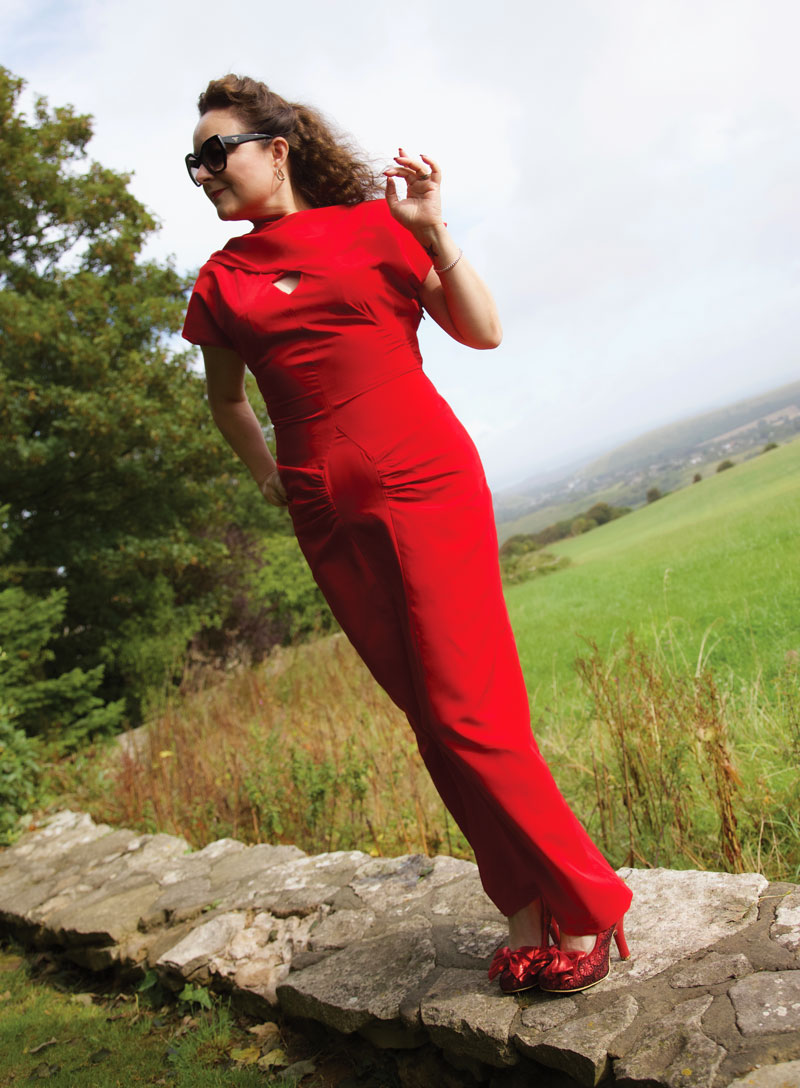
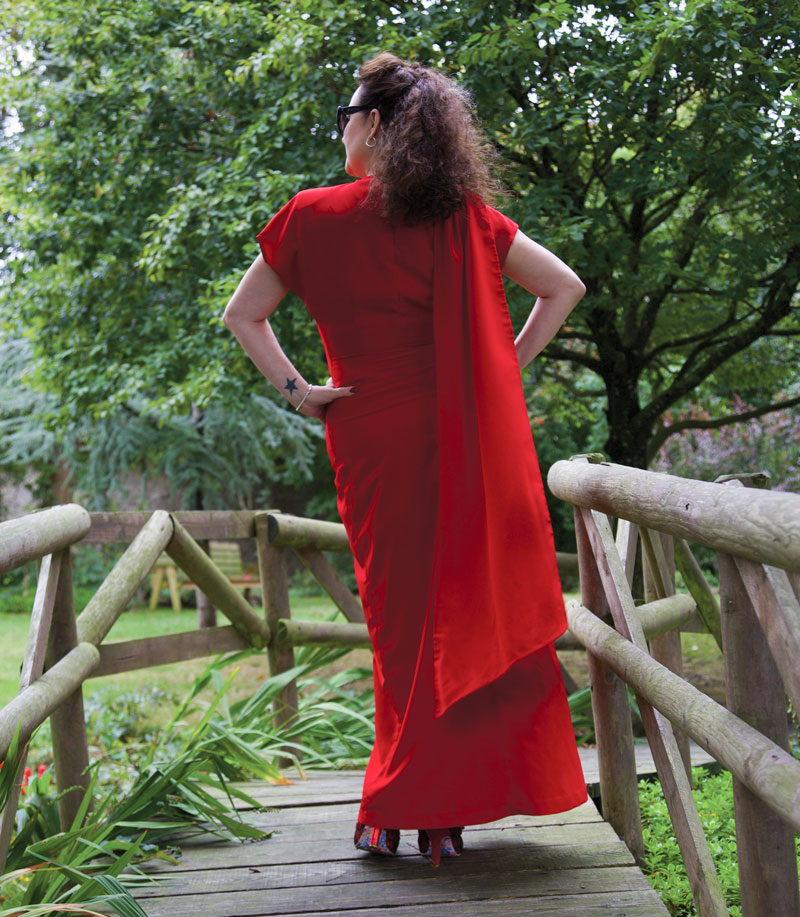
The sleeves are cut on, negating any need for tricky easing or setting in of sleeve caps. And that beautiful drape at the back is connected to the shoulder seam and simply hand tacked to the shoulder once the pleats have been arranged.

There was hand finishing of course: The hem at the hemline, as standard, and the hem of the drapey bit. I knew this would have to be neat as it clearly states on the pattern: “single-layered drape, (wrong side shows)”. So I just took little slip stitches in matching thread all the way round. This is where the fabric let me down a little bit as it syntheticicity wouldn’t allow a decent press and it resembled more of a rolled, rolled hem. But it was ok. Just a little bit annoying. Silk in this instance would have behaved a whole lot better I’m sure.

V2494 back view of dress and over the shoulder drape

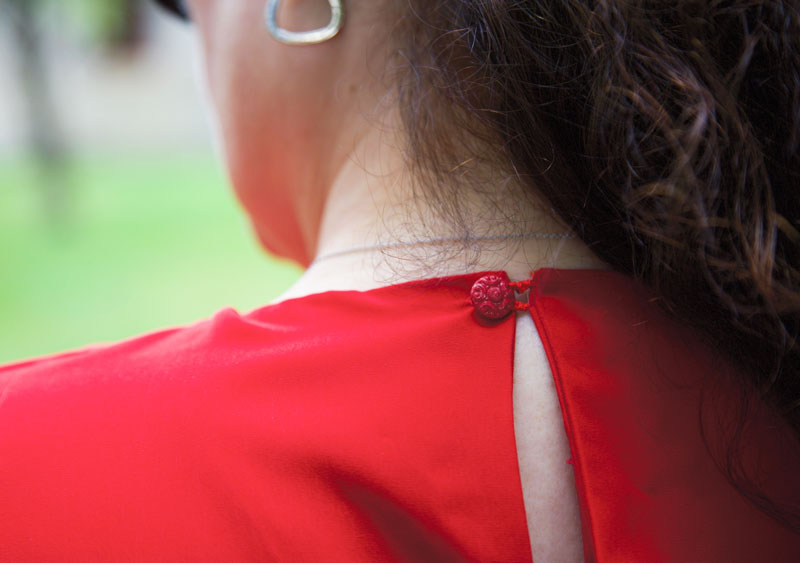
I confess I didn’t fully finish this dress until the morning of the day. Early hours of the morning I was still finishing the hemming and sewing a button loop (rather badly) on the back. I always intended to have just the one little button as opposed to a whole line of them as suggested but still managed to make it wonky! I do love that little vintage button though. It was just waiting for this dress.

V2494 Vogue dress button and loop
V2494 detail of button and button-loop

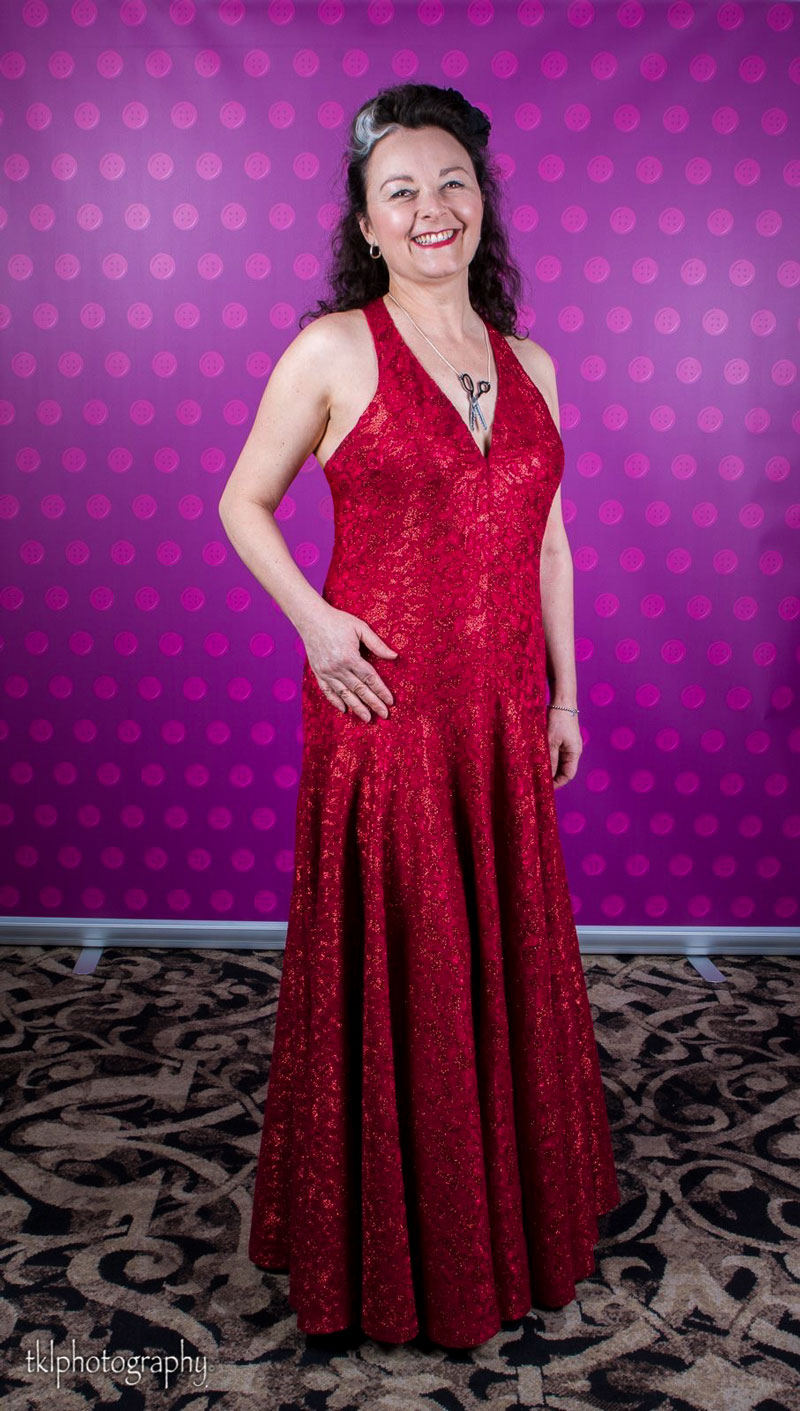
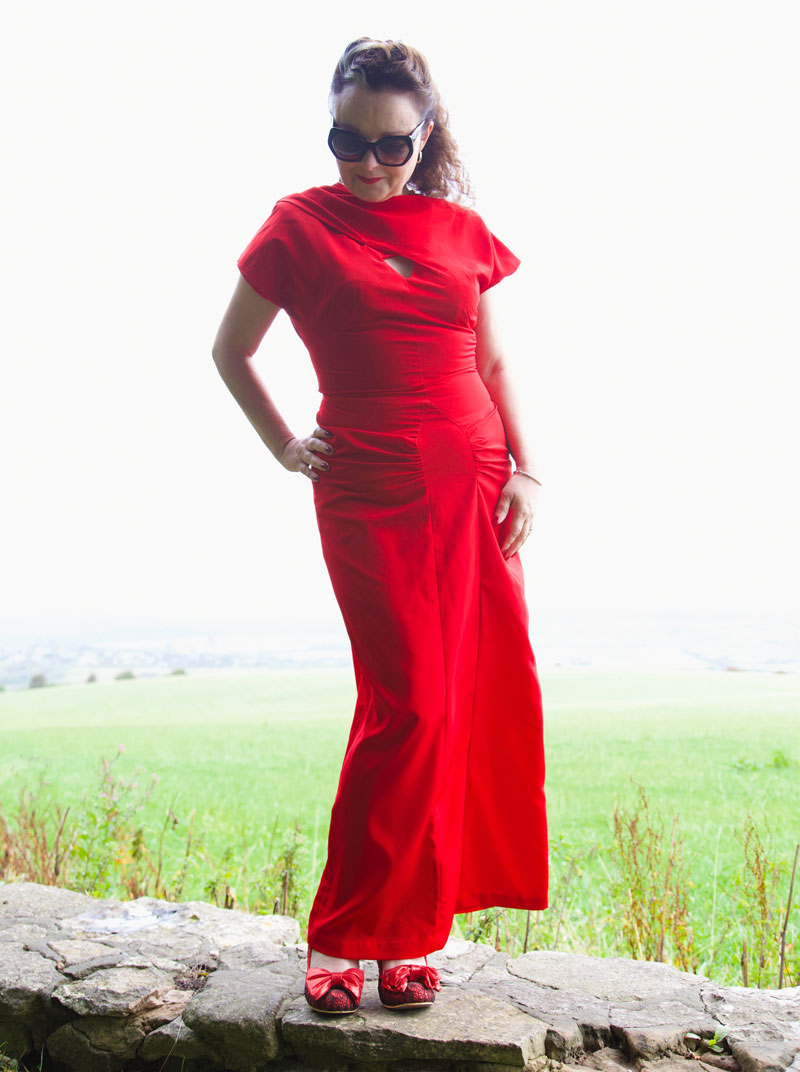
I didn’t manage to get any suitable full length shots of it on the day hence a reshoot by Daniel almost a year later! It’s a bit tighter on me now than it was on the big day but that’s no surprise as my nerves ensured a low cal intake on the lead up! And to be fair I’m not entirely sure when I’d wear this again. So it’s on with a dress cover and resigned to the back of the ‘drobe until a suitable situation arises.

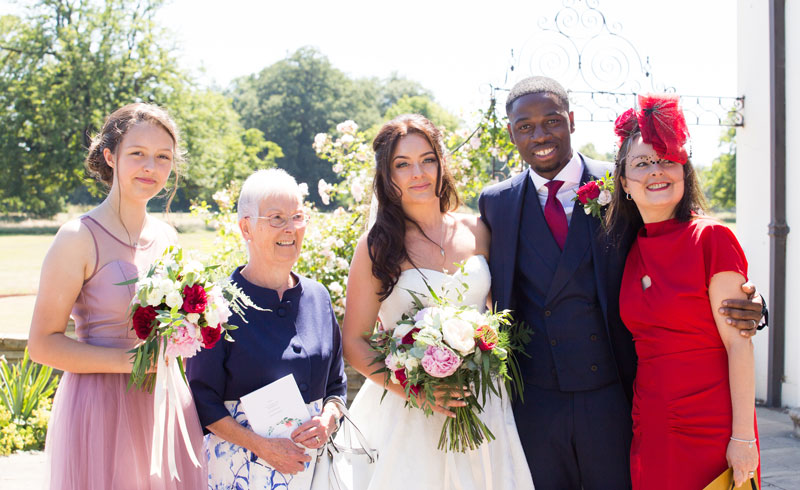
However there was one shot in particular that just about sums up how stylishly and elegantly I carried off that dress – and pretty much sums up the non conformity of our fam! Brilliantly captured by Daniel of course.

V2494 Mother of the bride with bride
V2494 Mother of the bride with bride © danieljamesphotographic

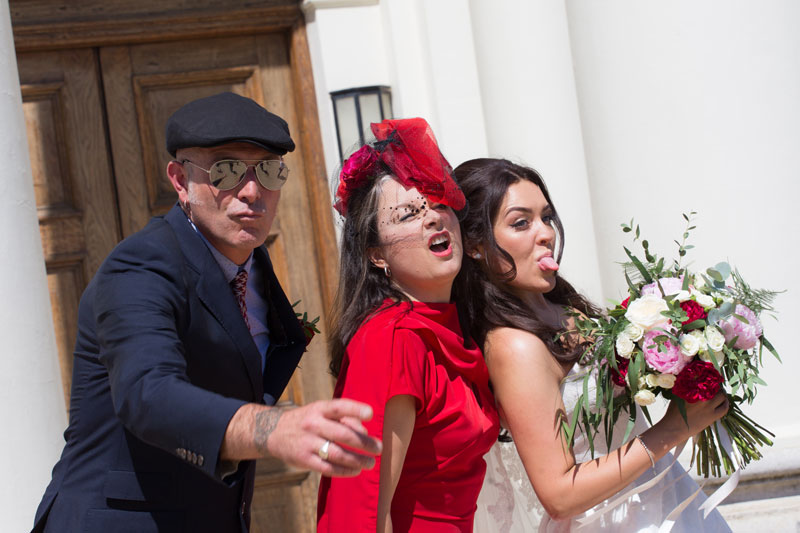
Note that I did succumb to wearing a hat. Not just any old hat, mind – an exquisite and original ‘piece of art’ that was beautifully handmade by my wonderful milliner friend Jayne at Hepsibah Gallery in Hammersmith. Again, I’m not sure I did it as much justice as it deserved but it certainly felt wonderful to wear and made me feel so very important!

From left: Youngest dort, Samaria, my mum (also wearing handmade) my daughter Stephanie, her husband Daniel and me!
Shoes: Irregular Choice (old)

What I wore to the Dressmaker’s Ball 2019

ooobop wearing V8814 dress

‘Get me to the Ball!
‘There is a Disco at the Palace!
‘The rest have gone and I am jealous!’

Just like Roald Dahl’s Revolting Rhyme about Cinderella when she was stropping out about a lack of invite, this is exactly how I was feeling when I learned too late about the first dressmakers ball in 2017.

Needless to say I subscribed to all the hashtags and signed up to get news of the next one and snapped up that ticket as soon as it was live.

The event is organised by team Crafty Sew and So and this year’s was at The City Rooms in Leicester.

The minute I had that ticket secured, my head flooded with all the possibilities for a free range, self drafted no holds barred gown of dreams, all for me. Elizabethan ruffs, balloon organza sleeves. Crinoline skirt. Bustle perhaps? I had a year after all.

designs for ooobop ballgownTruth be told and no surprises here, I decided on the dress with just over 10 days to go. You know how it goes ~ work, family, work and more work. And I’m a little bit sad to say that my all time avant-garde number ended up straight out of a packet.

Vogue pattern V8814

A lovely pattern for sure but the proof was in the making: No toile time. No anything time. Time? Definitely a thing of the past. Enjoy it while you can kiddos. It passes you by on the blink of an eye with every added birthday.

Now let’s discuss this slinky Vogue number V8814. I chose floor length, version C. I was going to a ball after all and visions of slow-mo sweeping skirt-motions danced in my head. I opted for the one with plunging neckline and crossover straps at the back. The bodice is snug to the hips and then all the volley is in the circular skirt.

I am so grateful to those pattern companies who display the finished sizes on the pattern pieces. Lord only knows why quite so much ease has to be added. I’d have swum in the suggested size according to actual stats!

And I am so delighted to have chanced upon a pattern that for all it’s sophistication was a total breeze to put together! The only area that needed fixing was the neckline which gaped a little so I hand-sewed some 5mm wide elastic along the inside of the neckline, stretching slightly to pull it in more to the chest. And the only tricky bit was convincing Pants I didn’t need his help!

Pants the cat helping me sew

I’d bought a singular ticket to the ball just because I worry about making plans with people and then have to cancel due to work commitments. Plus I knew that I would meet people there. The sewing community is such a welcoming and fun place, of that I was certain.

But that didn’t stop me from being self-conscious in front of the photographer. I’m so spoilt by Mr O’s awesome willingness to oblige my blog shots that I forget what it’s like to stand and pose in front of someone you don’t know! Thank you TKL Photography for bearing with me and thank you Tamsin, for posing with me and making me feel a little less awkward!

ooobop with Tamsin from Pimp my Curtains

We decided upon fishbowls of gin to relax us even more!

Tamsin and ooobop drinking gin

It was such an amazing evening. A ballroom brimming with stunning guests all adorned in bespoke, handmade attire, dancing to some really cool covers by a brilliant live jazz band. I spent most of the evening gawping at stunning outfits and discussing them, clinking and raising a glass at every opportunity to the brilliant hosts and the awesome sewing community.

And look who else I found: Marie from A Stitching Odyssey and Amy, blogger at Almond Rock and editor of Love Sewing Magazine.

judges at the dressmakers ball 2019

Not at all trying to fraternise with the judges before the catwalk competition – honest, guv!

So why have I taken so long to blog about this dress?

In short.

The fabric.

I’m ashamed by my panic purchase of glittery fabric.

‘I want a dress! I want a coach!
‘And earrings and a diamond brooch!
‘And silver slippers, two of those!
‘And lovely nylon panty hose!

Perfectly weighty and with great drape for the skirt, I chanced upon it in the Goldhawk Road. It appears to be a red lace bonded over a synthetic satin with glitter glued in the gaps of the lace.  I joked about the fire-hazzard potential should I stand too close to a candle, given the probability of not a single natural fibre involved. But it was met with a straight face. The seller was already was unhappy that my need for five yards meant discarding the first couple of metres on the roll as the lace was clearly bonded in sections. Lucky I noticed the join because he sure as hell wasn’t going to point it out!

But I did not question the glitter. 

Recently, my day job has involved lots of work relating to the harmful effects of plastic on the environment, and though I haven’t come across any reference to glitter in the books as yet, this quote by Alice Horton, a research associate at the UK’s Centre for Ecology and Hydrology, jumped out at me and touched a nerve:

“While there is currently no evidence specifically on glitter being bad for the environment, it is likely that studies on glitter would show similar results to those on other microplastics”.

And now I feel bad. For not thinking it through. For the trail of glitter I literally left behind. I don’t exaggerate when I say that I left a red glittery bum shape on my seat when I stood up after dinner. And I’m sorry for anyone who sat in my place afterwards and took a little piece of me home with them.

To this day I’m finding that damned stuff on my shoes, in the carpet, on the cat… It’s never going to go away. And then it’ll end up in the sea and all the poor fishes will be lunching on it.

And I know I can’t un-do it. But I can not-do it again. No more more glitter for me. I need to think before I buy. I just can’t cope with the guilt! Or do you think I’m over-reacting?

Self-drafted wax print dress

wax cotton dress side view
I’m not entirely sure how this post got shot and written today. We arrived home from Glastonbury Festival at 6am this morning – a little tired and emotional to say the least! Thank goodness for a great set of shades picked up for a tenner on site, from a pop up vintage shop (ironically, usually based in Portobello… just up the road from me!)

So, the dress… It’s mine, all mine! No pattern, vintage or otherwise was used in the making-of and I’m just a little bit proud.

I really wanted a new dress but without any faff. I really, really wasn’t in the mood for trialling various test versions – I’m getting so impatient in my old age! – And then I remembered that somewhere, in some pile or other, there was a pre-existing bodice block from a class I took about 3 years ago. To date I’ve only used it once, for a retro-style top, which is madness. Because it fits!

I only wanted a sleeveless bodice for the top, nothing fancy so it seemed daft to reinvent the wheel. I simply lowered the armscye and the neckline. Luck was on my side because this resulted in precious little gaping as often happens without any contouring. But I will nip a bit off the upper back neckline next time.

wax cotton dress self-drafted

My usual sway-back adjustment was already done and most importantly the bust area was a perfect fit.

Whilst we focus on that area, can we just talk placement? I’d love to be able to claim absolute intentions but the truth is, I was led my a small issue of just the right amount of fabric and nothing more, so I can only claim a happy accident – the likes of which Madonna would champion, I’m sure!

I just love this wax fabric. And I knew there would be further adventures when I made Lucy’s jumpsuit and Amelia’s baby dress.

wax print dress back

One of the most incredible things about this fabric is the price. A 6 yard bolt of Wax cotton can vary in price between £10 and £150, depending on quality, print, manufacturer etc. That said, this lovely red cloth was just £10 and retained all colour and structure after a regular 40° cycle and spin in the machine and it was so satisfying to sew with. More importantly I landed a fabulous handmade dress for a fiver!

The skirt section is simply a half circle, the same self-drafted pattern I used for my black and my blue crepe skirts.

african wax print dress skirt

The zipper is inserted on the left side, like most of my vintage-style dresses but also because I didn’t want the seam of the skirt to go down the front with the focus on broken up print. No excess for pattern matching either!

The belt I’m wearing was a steal from Oxfam at £1.50 and does a perfect job of hiding the connecting waist seam which obviously is interrupted and mismatched but I’m not so sure there’d be any way round that anyway. It’s not actually that bad but still annoys the pants of me enough to cover it up!

wax print dress side view

Daniel came up trumps again with these fantastic photos. They were taken at Freemasons’ Hall in Covent Garden, today. Such an awesome building with a massive star on the steps for me to stand in the middle of! I can’t believe how he gathered up the energy to do this after that long drive back. Or how he made me look so respectable after nought hours of sleep. He is such a superstar. So supportive. I am one lucky lady!


Significant birthday dress


ooobop party dress front

Mostly I sew from patterns. Vintage ones, Burda ones, any of the big-four, independent ones, any that take my fancy, really. But when it came to finding a pattern befit of a significant birthday party dress, I was stumped. I searched through the hundreds I owned, I trawled through plenty more online and still I didn’t come up trumps until a visit to the hairdressers presented this beauty in one of their glossy mags.

dior inspiration

Who was I kidding?! But a girl can dream right?!

With a couple of months to go and so many people asking what I was going to wear, the pressure was on and almost too much to bear. I even considered RTW as a get out clause! But following more procrastination and now only 6 weeks to go, cool words of advice from Sally of Charity Shop Chic, put me back on track and sold it to me as a simple circle puffball attached to a bodice of choice.

ooobop creeping through the woods

I just needed a prompt, a bit of pressure and some added faith, obviously!

With all that poompf in the skirt section going on, the quest was for a simple bodice. One I could toile and fit with not much time on my hands. It also had to fit in with a busy work load leading up to Christmas, and be sewn in the the evenings so black was totally out of the question too!

ooobop party dress front view

I remember ear-marking this vintage Weldons pattern as a potential party dress some time back and when I rifled through my patterns for the umpteenth time, it shouted out all the reasons it should be chosen. Simple to fit, no sleeves to insert, flattering neckline, small amount of fabric required and a perfect yoke for a string of cockerel feathers!

weldons pattern 3833

The small amount of fabric issue was quite an issue at this point as I’d already decided that silk was the only way forward. The only way I was going to get a classy, crumpled look and not just wind up looking like a discarded crisp packet!

ooobop in the woods

The skirt section is a greedy full circle with an added 16 inches around the waist to accommodate 4 box pleats: Two at the front and two at the back. The full hem is then gathered onto an a-line, mini underskirt which I self-drafted by closing the waist darts on a self-drafted skirt block, and adding a little flare. Both are attached to the waist seam.

party dress back sunrise

The wonderful Sew Busy Lizzy gifted me the polka-dot taffeta some time back. I love that it found a special use. Not so shiny that it caused static, strong enough to support all that silk whilst adding a cheeky secret air of Moulin Rouge!

polka dot taffeta lining

Having toiled the whole thing in calico beforehand, it transpired I needed 5 metres of dupion silk. Pricey at £25 a metre if one shops in Broadwick Street, London. But £12 if you’re lucky, in Goldhawk Road. I say lucky because I pretty much went in all the shops to get the right colour – a two-tone black & red. And the last one I tried had not only the best colour but offered the best price too.

back view of party dress

For all my fretting, Sally was absolutely right of course. It really didn’t take long to sew. The indecision and worrying took way longer! And fears about working with silk were laughed off when I made the first cut. Literally like cutting into butter. And it behaved and sewed up brilliantly.

And so the finished article partied hard to the band and the DJ with a hall full of amazing family and friends. It went way too quickly though, and I so wish I could press replay so I could get round to spending more time with everyone who came. But I guess thats the downside of hosting ones own!

Mr O aka Daniel Selway took these amazing shots for me this morning. Nothing wrong with a party shot but lets just say there’s a definite improvement of photographic quality in the sober light of day!

party shoes

Happy new year to you all. Wishing you a peaceful, healthy, and joyous 2017 xxx

1940s shirt dress revisited

1940s red shirt dress

I always wondered why, with all the patterns in the world, would I ever make one twice? In the case of my peasant tops, here and here, I can only say it was because they were dead easy and required little brainpower, perfect for a late night sew. But in the case of this dress, the rationale was purely because I’ve never had a dress I feel so at home in! I had in my head, that I was a simple shift dress girl but actually I think I’m more of a shirt-dress girl!

1940s red shirt dress

Without the association of the pattern, I wonder if anyone would guess it dated back to the 1940s? Do you think it’s obvious? Or have I been looking at vintage patterns for so long now, I think they are the norm?! Perhaps if I were to style it with appropriate accessories: hat, bag and gloves, it might give the game away, but – dressed traditionally sporting wellies and a brolly – I think it also crosses over as a modern shirt dress too.

I’d like to tell you what this fabric is but I have no idea! It’s red and it’s 100% cotton for sure. Kind of like a cheesecloth seersucker but not, and vaguely reminiscent of my candlewick beadspread I had as a child… without the little soft threads that pulled out oh-so satisfyingly easily! I thought it might be ribbed cotton. I’ve heard that mentioned before but I really haven’t a clue. It was kindly donated to me by a friend who desperately needed to get rid of a big bag of fabric… I could never be like that! And I knew what ‘the red’ was destined for immediately.

1940s shirt dress detail

It came together sweetly as before with the addition of a few minor changes. I added a third button just because I love the little ‘targets’ and two didn’t showcase them enough. They cost £2.45 for six, bought at the London Vintage Fashion, Textiles and Accessories Fair, September 2011 and I think they are vey happy on this dress!

target button detail

I made it an extra inch longer, but really could have gone for 2 inches… oooh, I am getting brave in my old age!

length of skirt

I also added an extra inch around the midriff, knowing the struggle I have to get the dress on, over my head and judging by the photos of the last dress, it does look a bit snug. But it was highly unnecessary on this version. The mystery fabric, unlike the shoe fabric, has a lot more give and resulted in little poofy bits at the sides. I put it on the mannequin and looked at it for a few days, wondering if I could get away with it. I probably could have done, but it would have annoyed the hell out of me!

dress before alteration

And so… I sensibly turned the dress inside out and chalked and basted where I wanted the new line of stitching to be. Namely half an inch in from the original seam, starting from just above the waist, in a straight line up to the armscye. I tried it on again and was much happier with the silhouette.

Dutifully, I removed the basting and unpicked the topstitching where the midriff meets the bodice. I sewed the new side seams on the bodice over the chalkines. Sewed the new side seam on the right side of the midriff section and trimmed the left side opening to match (where the zipper goes).

I must be getting better at this. I would never have had the patience to do that a few years ago! But it was of course, worth it and now I am a happier bunny!

Here is a picture of the zip in the side seam. Once I’d sewn one size of the zipper in place, I made sure to make chalk marks where the midriff needed to line up. I pinned the second side of the zip to those marks first and then pinned the rest. Worked like a treat!

zipper detail

I opted for longer sleeves this time. Not full length, just three quarters. Mr Ooobop! thinks they will annoy me being so fitted and I have a little tendency to agree but I wanted to see how it affected the overall look.

I’m intrigied by the construction of the sleeve with darts to shape the lower arm. I guess this is a vintage thing because, to date, I have not come across these in a modern pattern.

vintage sleeve darts

Allowing for adjustments, this dress did seem to take longer than the first. About 5 evenings after work, spread over a couple of weeks. I have been really keen to see it finished but not so keen that I wanted to rush it and ruin it! And in any case I had to wait for Mr Ooobop! to be around to do his usual photo magic . . . and for the sun to come out! Well, we gave up waiting for the sunshine!

1940s red dress in the rain

I’m sure that this little revisitation wont be the last but I do have an incredibly long list of other ‘wannamakes’ to tend to first, so its back into the envelope and into the box ’til next time!

Do you like to revisit a favourite pattern or do you prefer to try something new every time?

back of dress

butterick 2638