A patchwork dress made of sleeves!

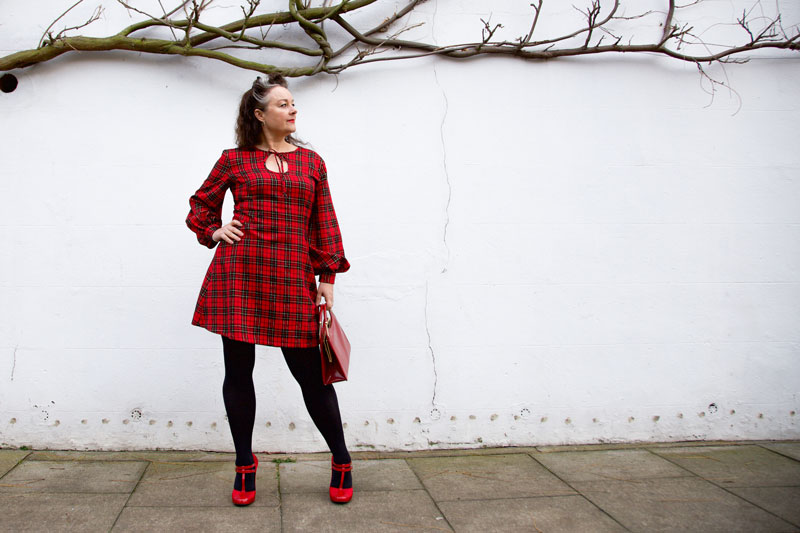
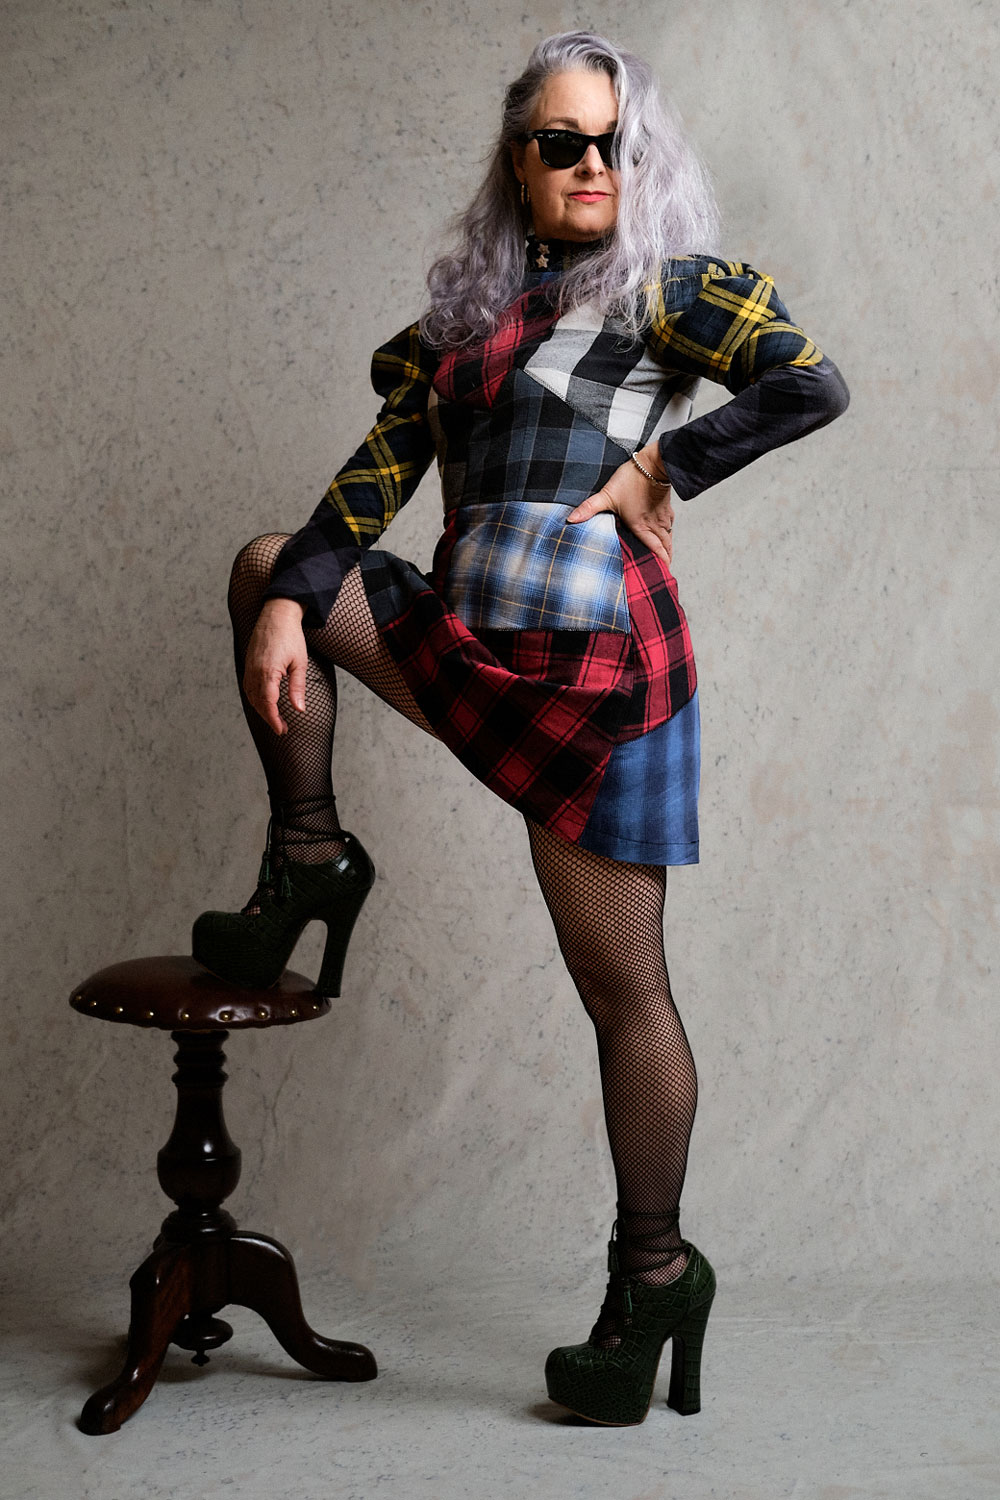
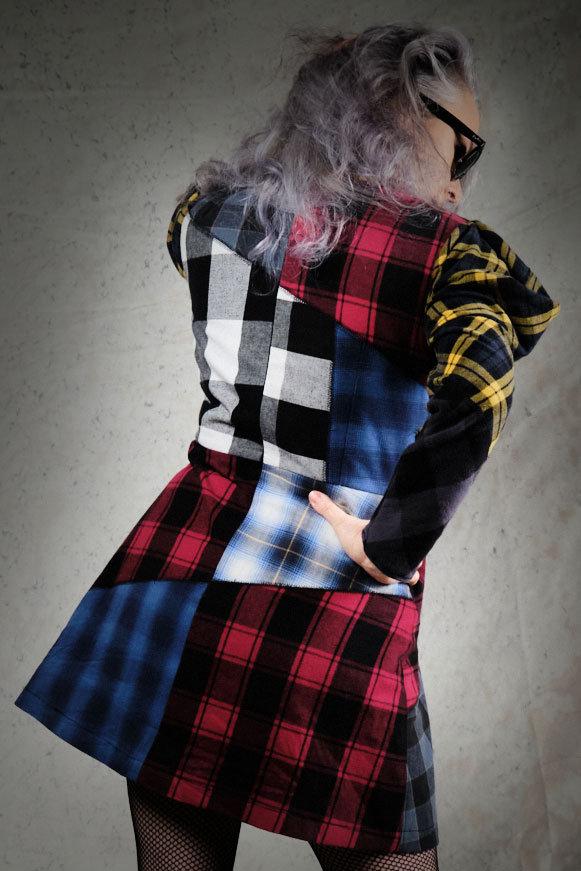
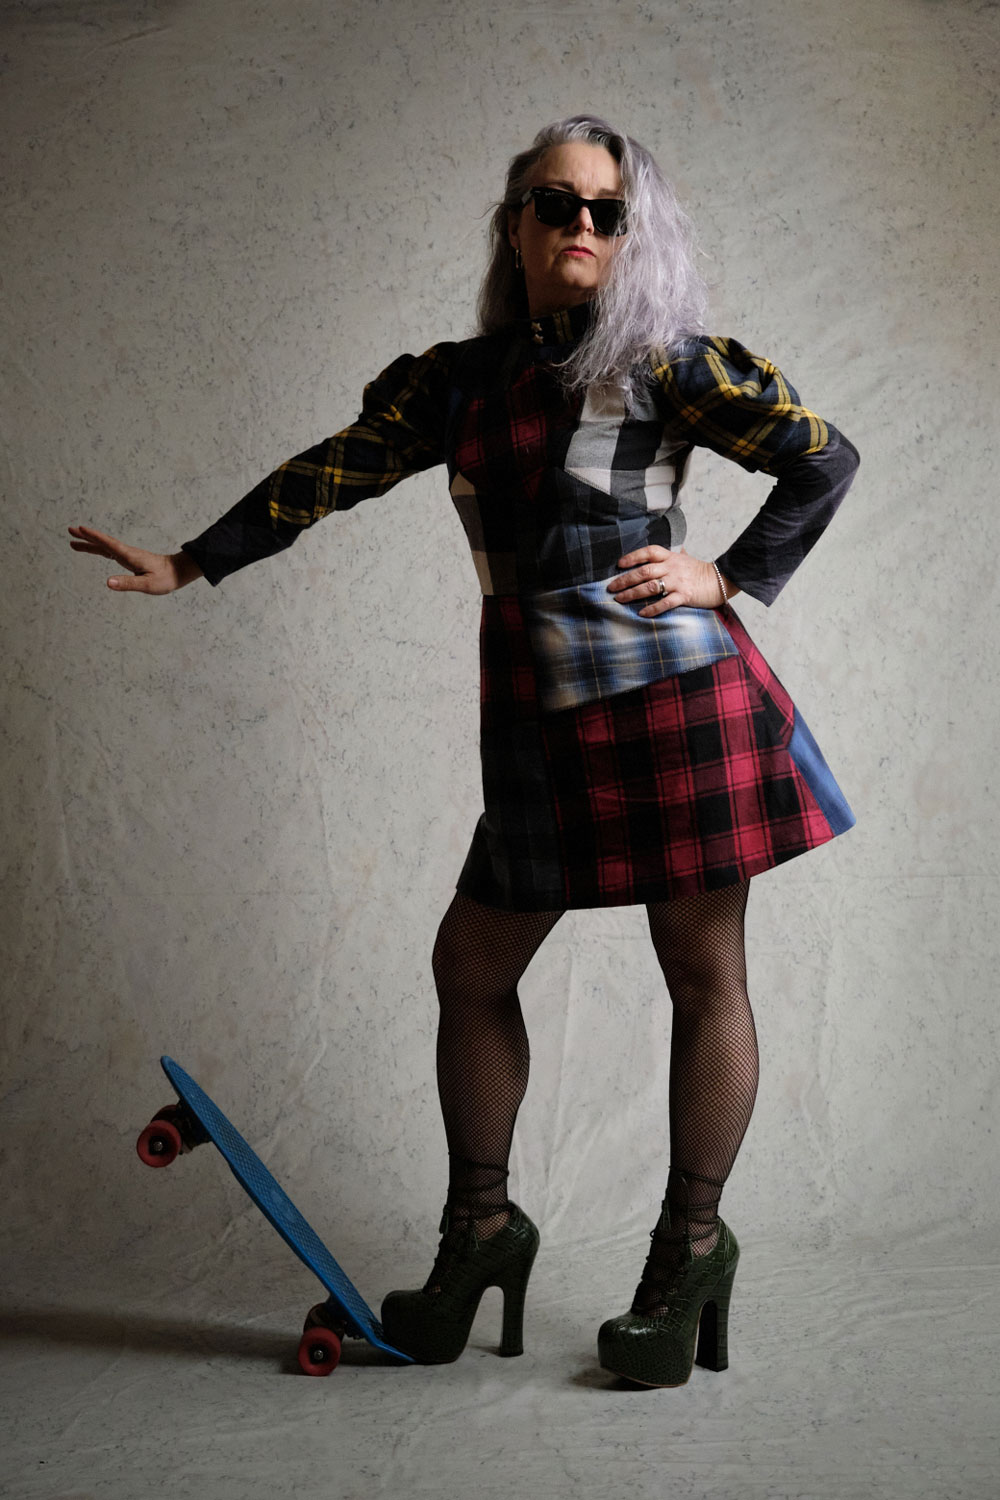
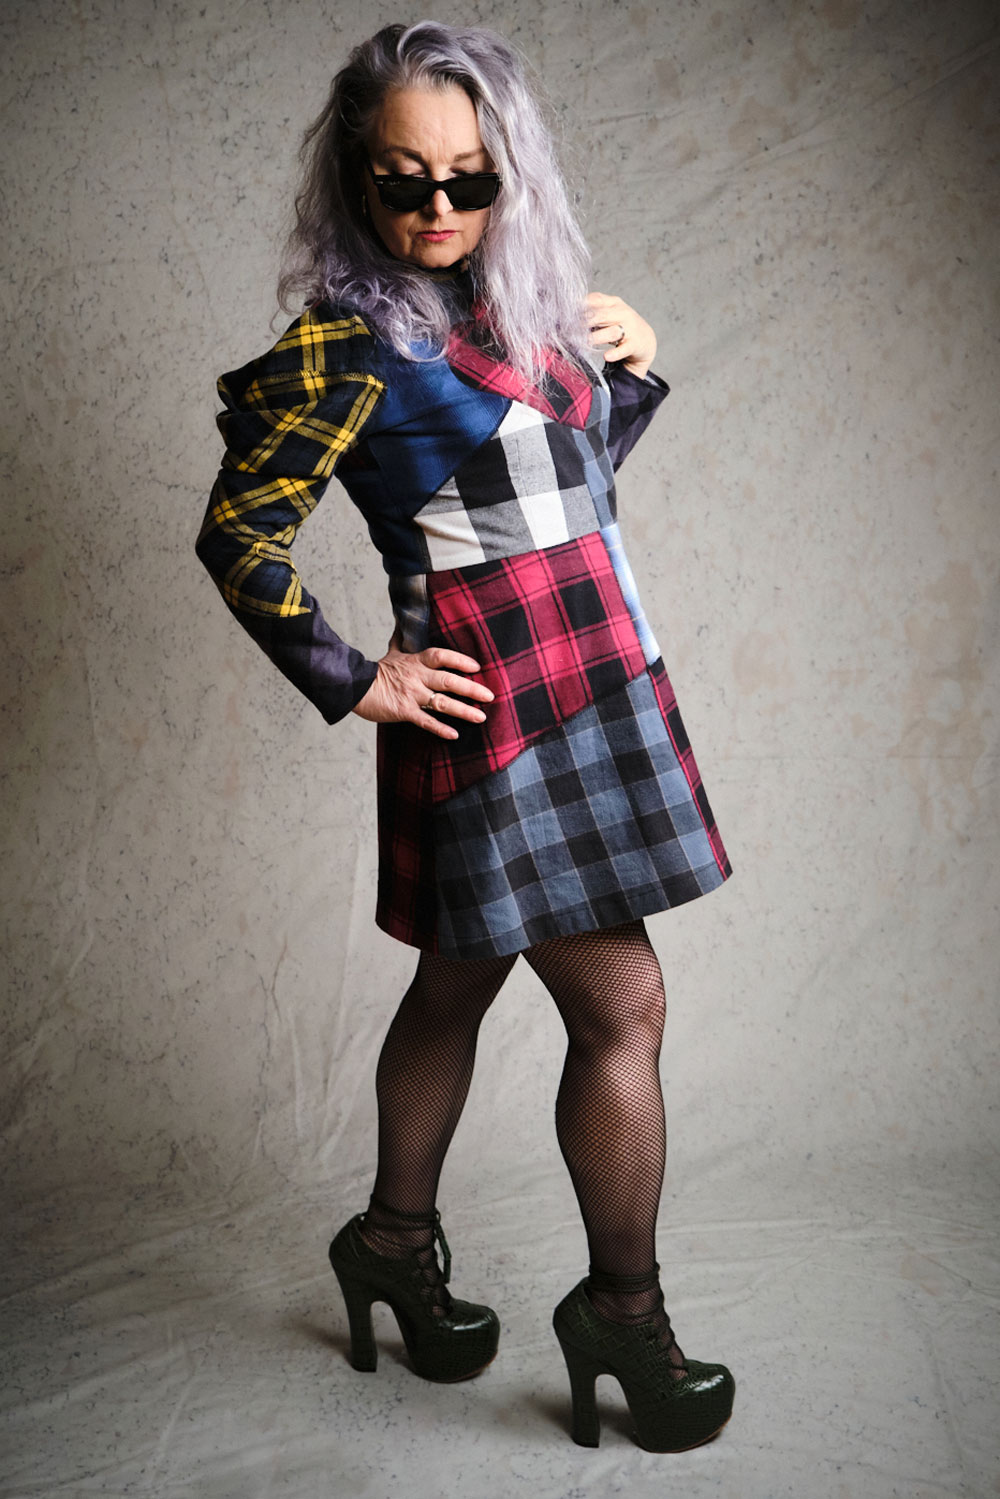
Yes you read that right! This is a dress made entirely of sleeves – those that were cut off of Dan’s RTW shirts after he got fed up with how tight and annoying they were when he was working in them!

I intercepted his route to the bin when I spied a couple of them poking out of the bag. And there then ensued a tussle, with Dan persisting that I had quite enough fabric already. What does that even mean – ‘quite enough fabric’?!

He laid the gauntlet, firmly before me – challenged me that unless I could cite good use, they should not be added to the peak of ‘stash mountain’ !

‘A dress!’ Was my comeback ‘A cool patchwork dress!’ It raised an eyebrow of disbelief but I grabbed that bag and literally ran to the studio with it and hid it under the cutting table. 

It remained there for quite a while, mostly because I had other projects going on, but in that safe space of time I was able to hatch a plan in my head. I didn’t want a crafty kind of patchwork dress. I mean they can look cool and boho but that isn’t me. And lumberjack plaid certainly doesn’t lend that vibe! I spent hours dividing up sketched outlines of dresses with small squares, big squares and randomly sized squares. None floated my boat. 

Then I tried random shapes to really over complicate a simple idea and then I realised it was the persistence of the vertical and the horizontal lines that were irritating me.

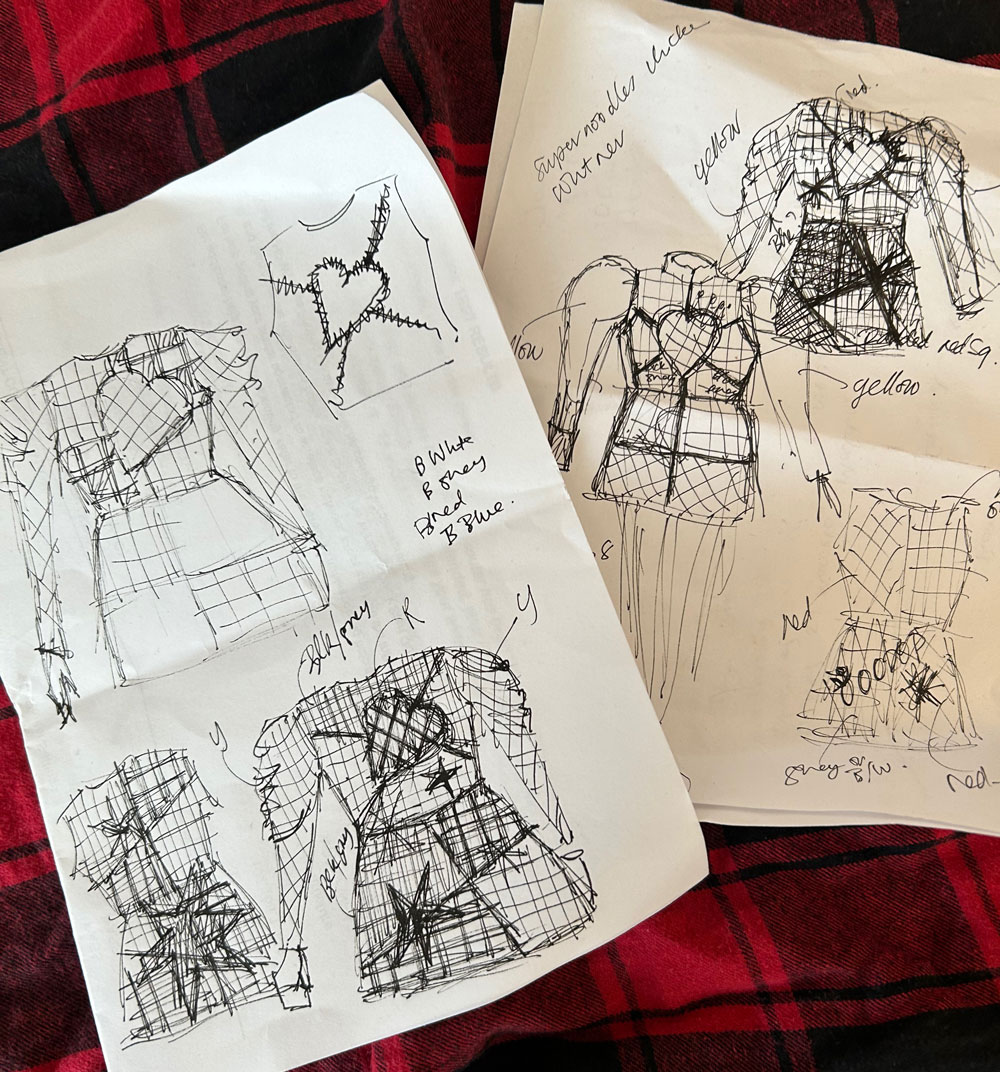
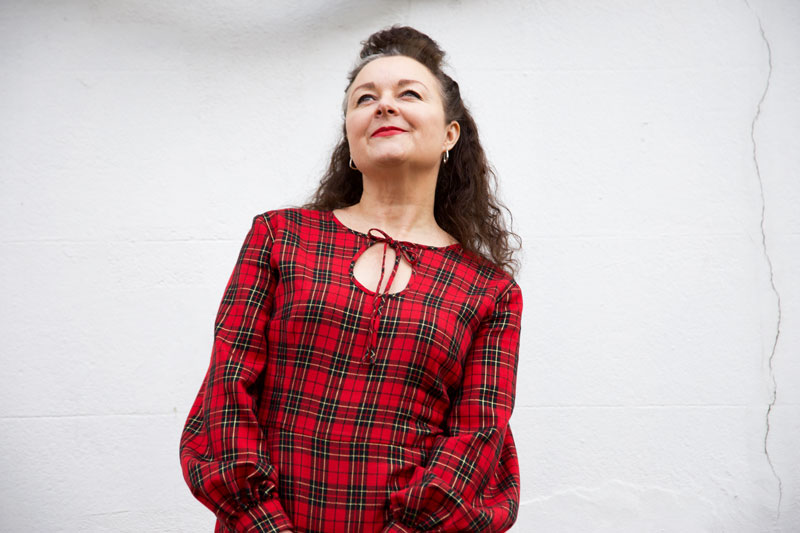
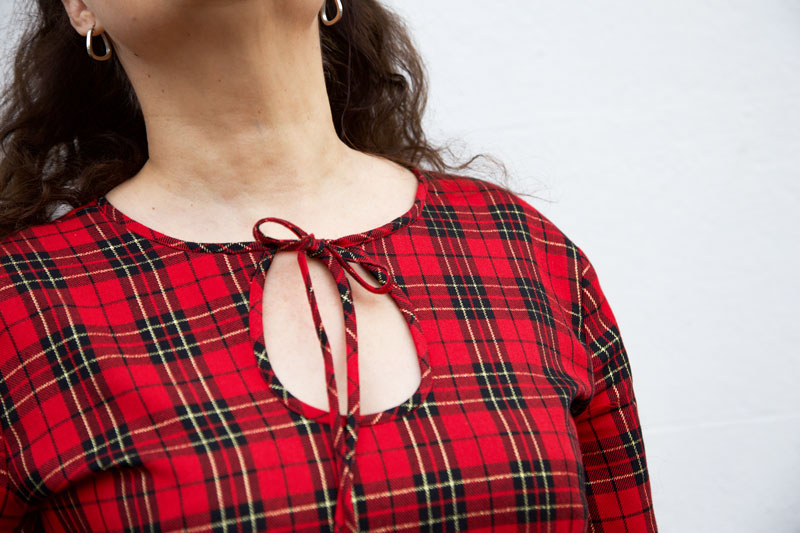
So I tried with some angular shapes and I was beginning to get somewhere. I already knew a heart was going to feature. It is after all a nod to Westwood. Someone who totally wore her heart on sleeve. And I’d be lying if I said I wasn’t inspired by her. She taught me it was ok to dress differently, not to care (so much) about what anyone else thinks and to do it boldly. To buy less and choose well and to take care of our planet. 

‘Fashion is very important. It is life-enhancing and, like everything that gives pleasure, it is worth doing well’ – Vivienne Westwood

I don’t always sew as sustainably as I could but I like to reuse and recycle and rewear whenever I can. Read to the end for some more of my sustainable projects.

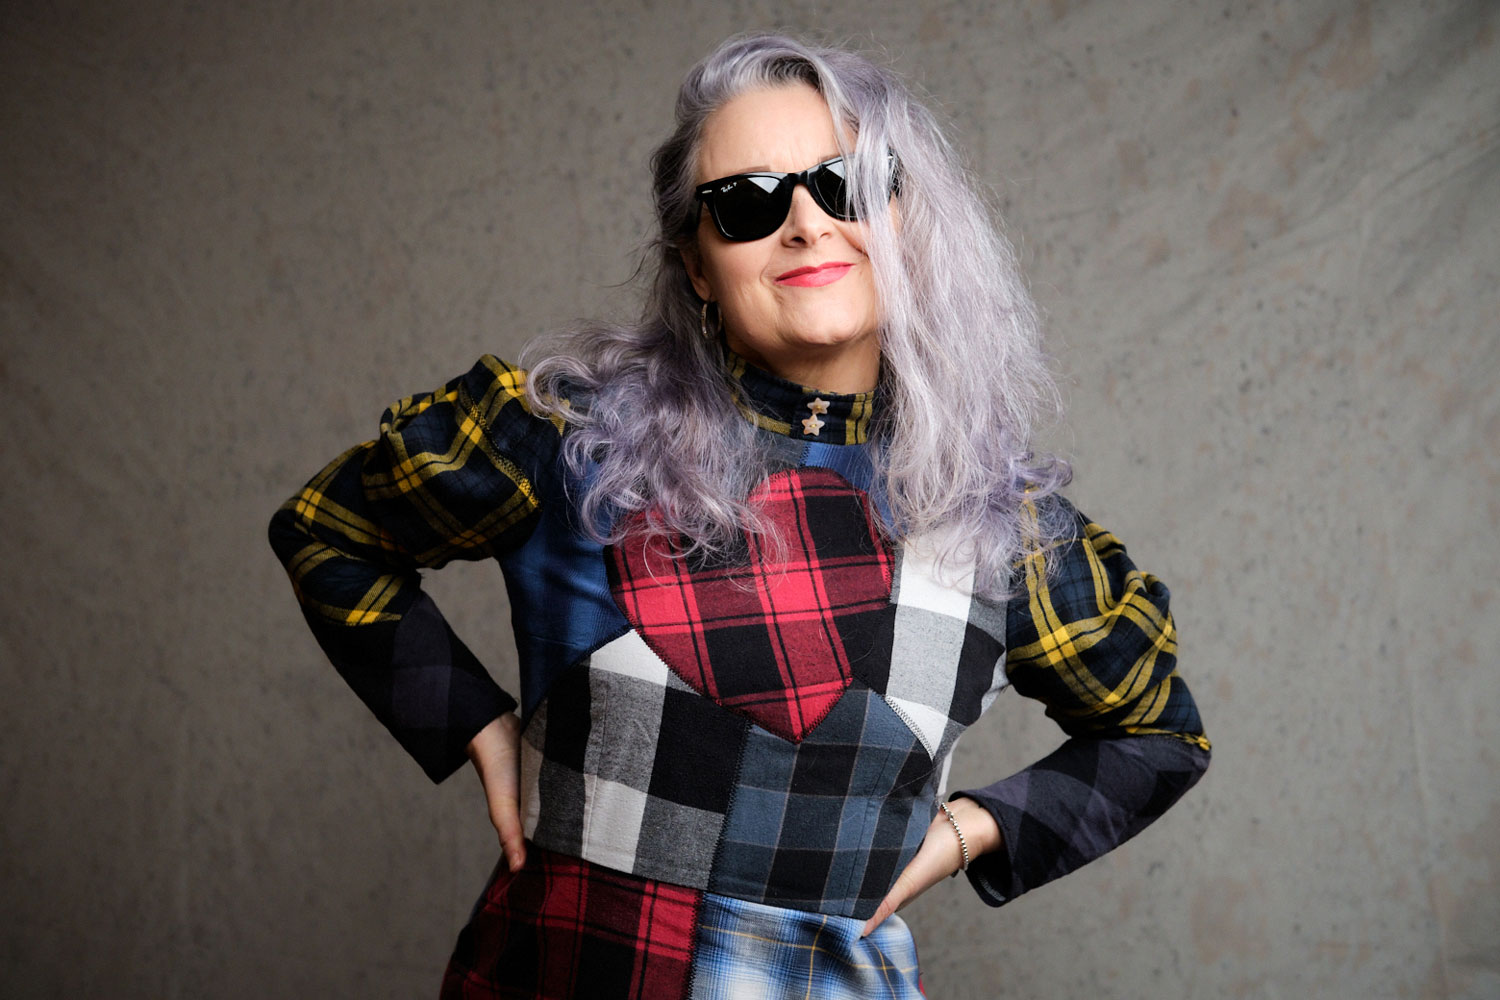
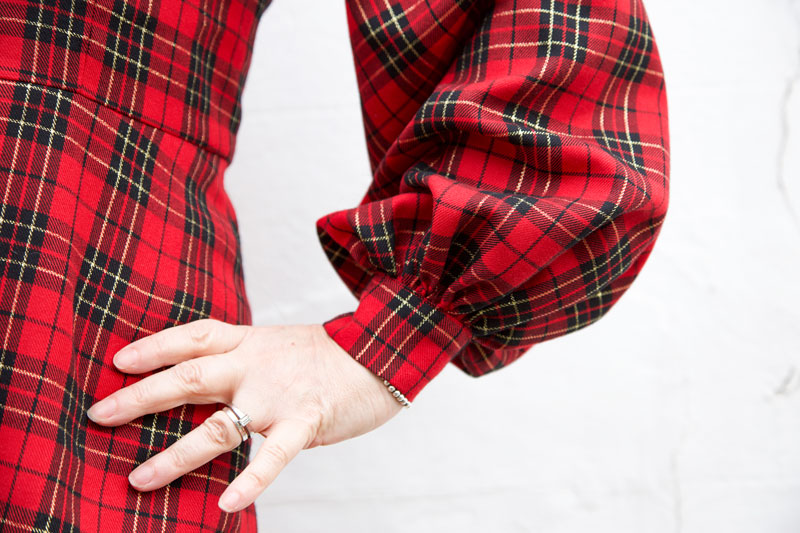
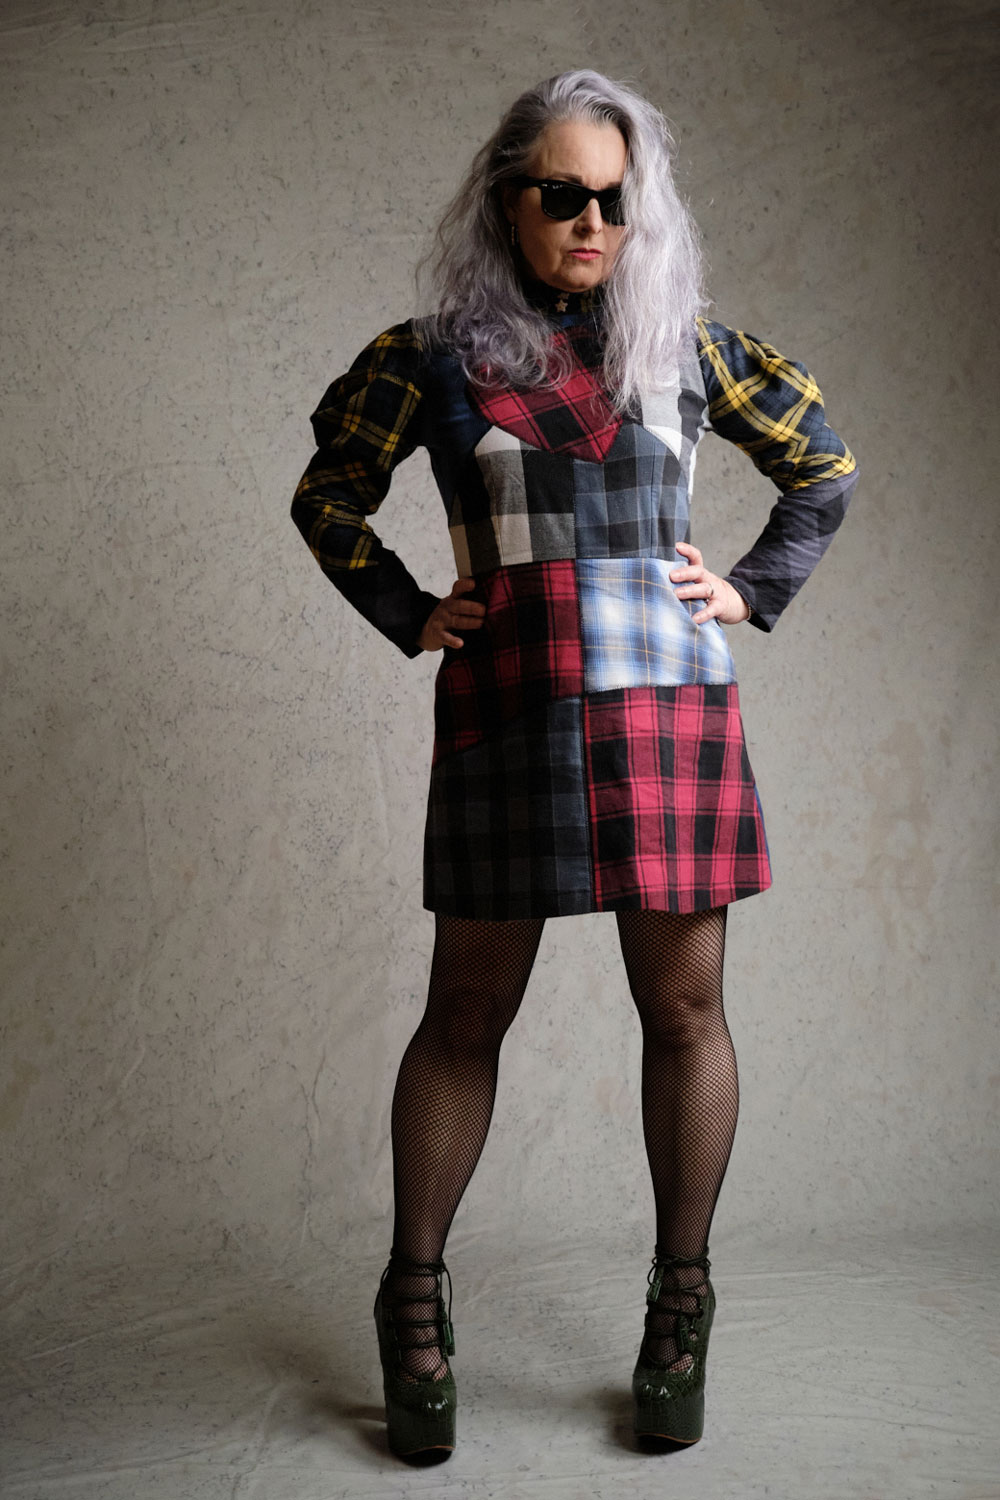
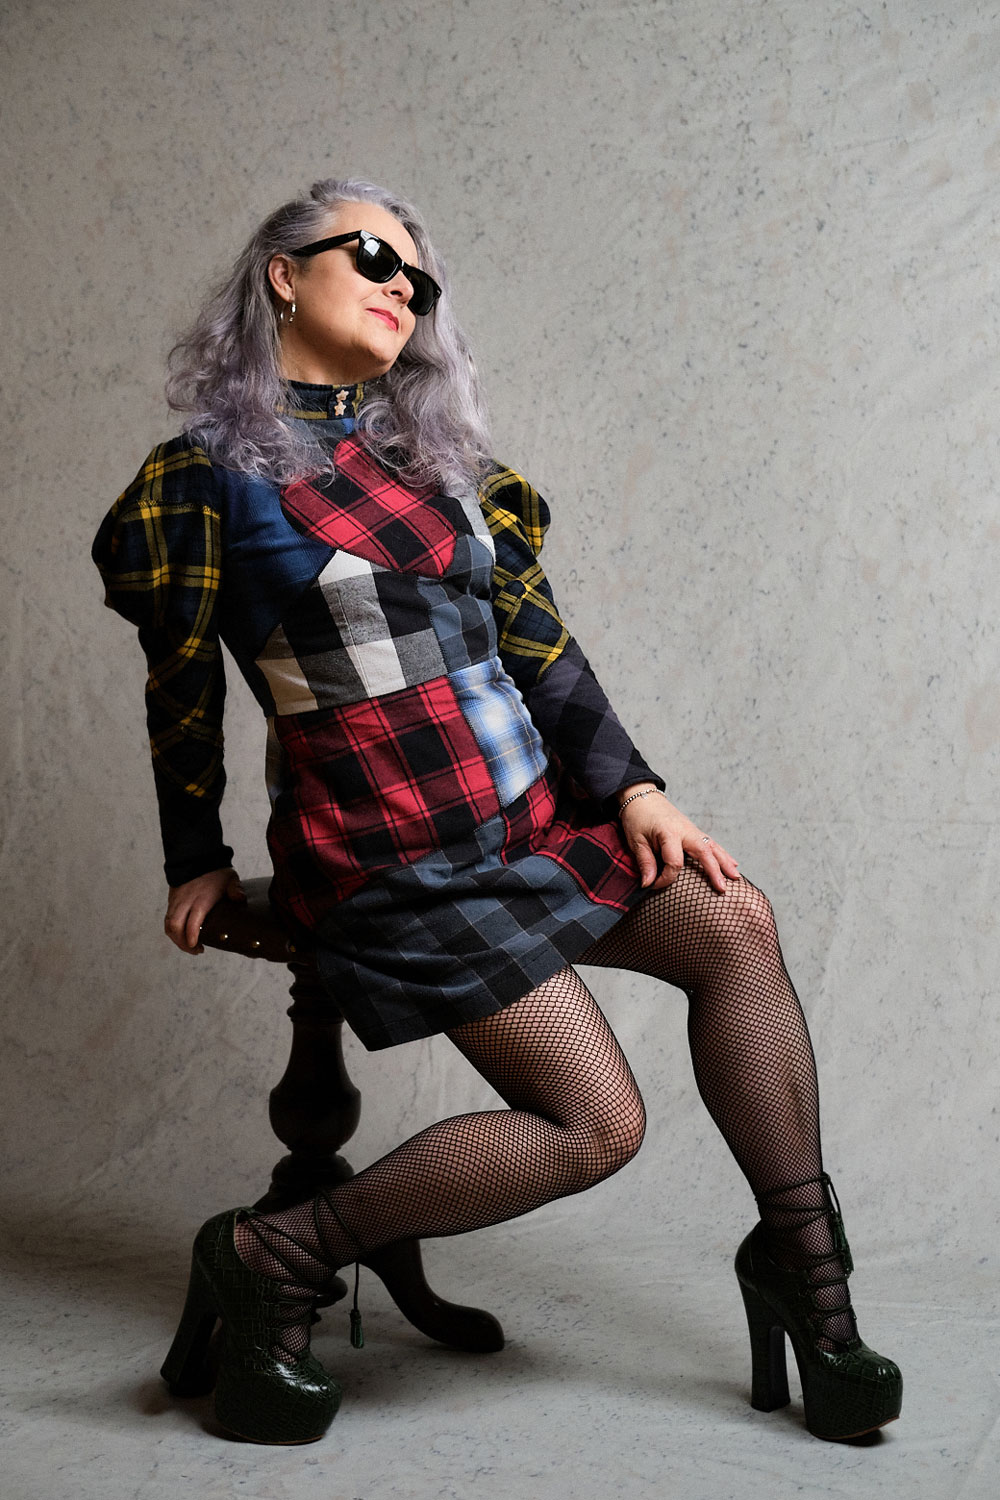
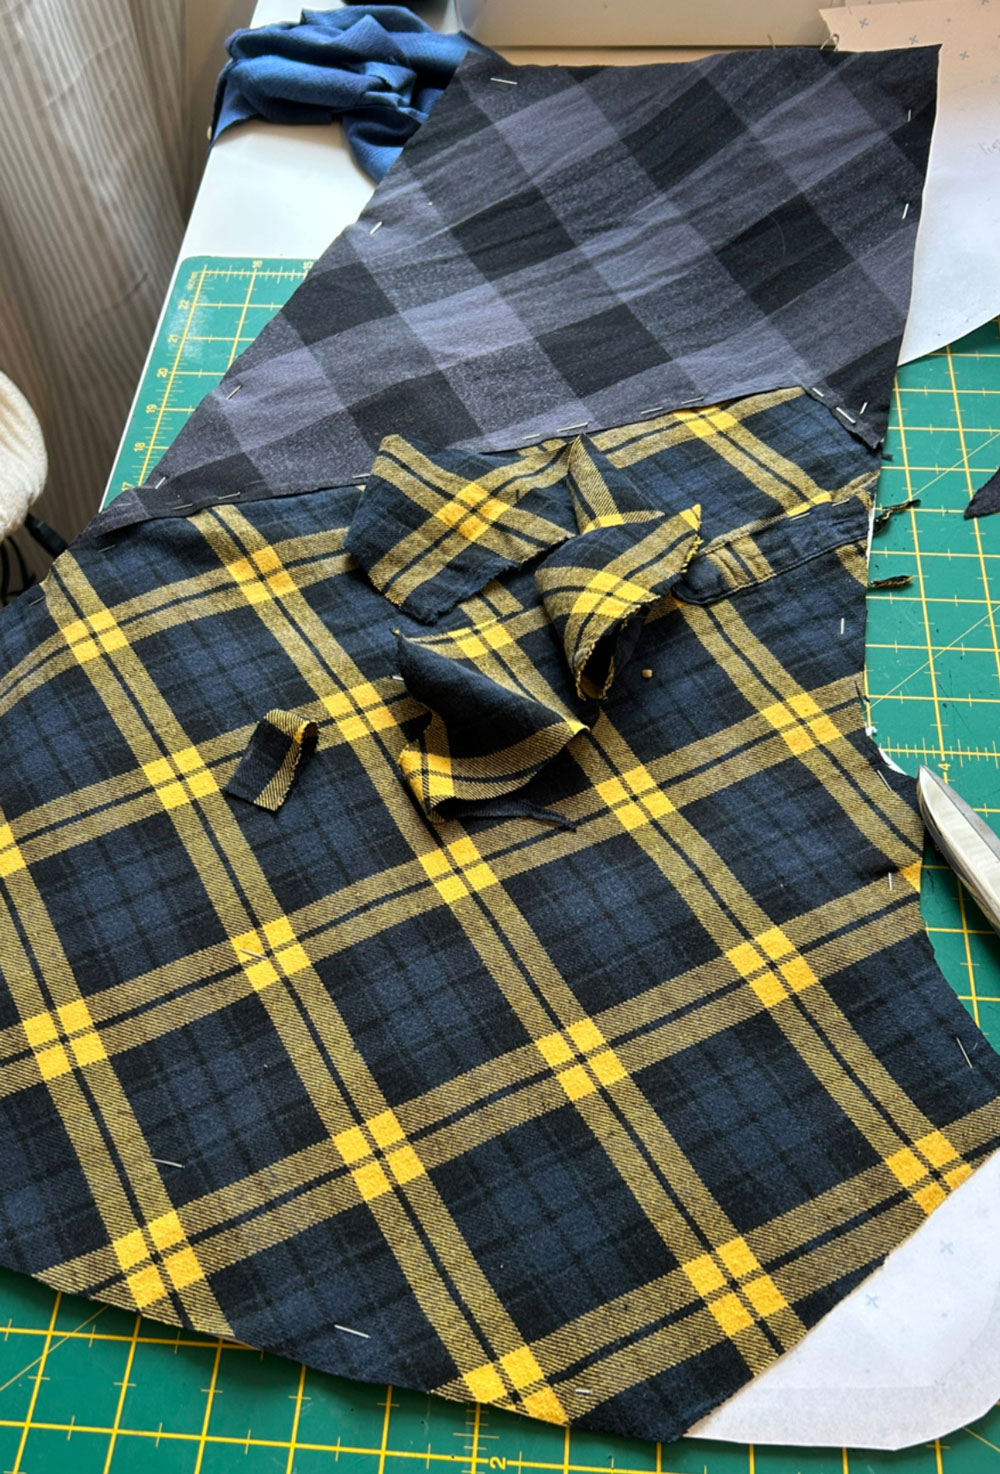
Once the sketch was finalised, I pondered how I was going to sew them together. These sleeves are made of cotton – a flannel I think – and they are soft and drapey. That was going to work wonderfully for the bias cowl sleeve I had in mind but not so well for the actual body of the dress. So it had to be stabilised somehow. I considered using a double sided fusible interfacing but I really didn’t want the extra weight so I simply sewed the pieces onto some black cotton I had in stash. I used a self-drafted pattern from my baby cord dress and cut the black cotton pieces first, before mounting the cutout shapes. I made sure to overlap them slightly and I zigzagged, first on the absolute edge and then again each side of each piece to make sure it was secured but also to make the black lines of stitching look intentional and a little like stained glass panels.

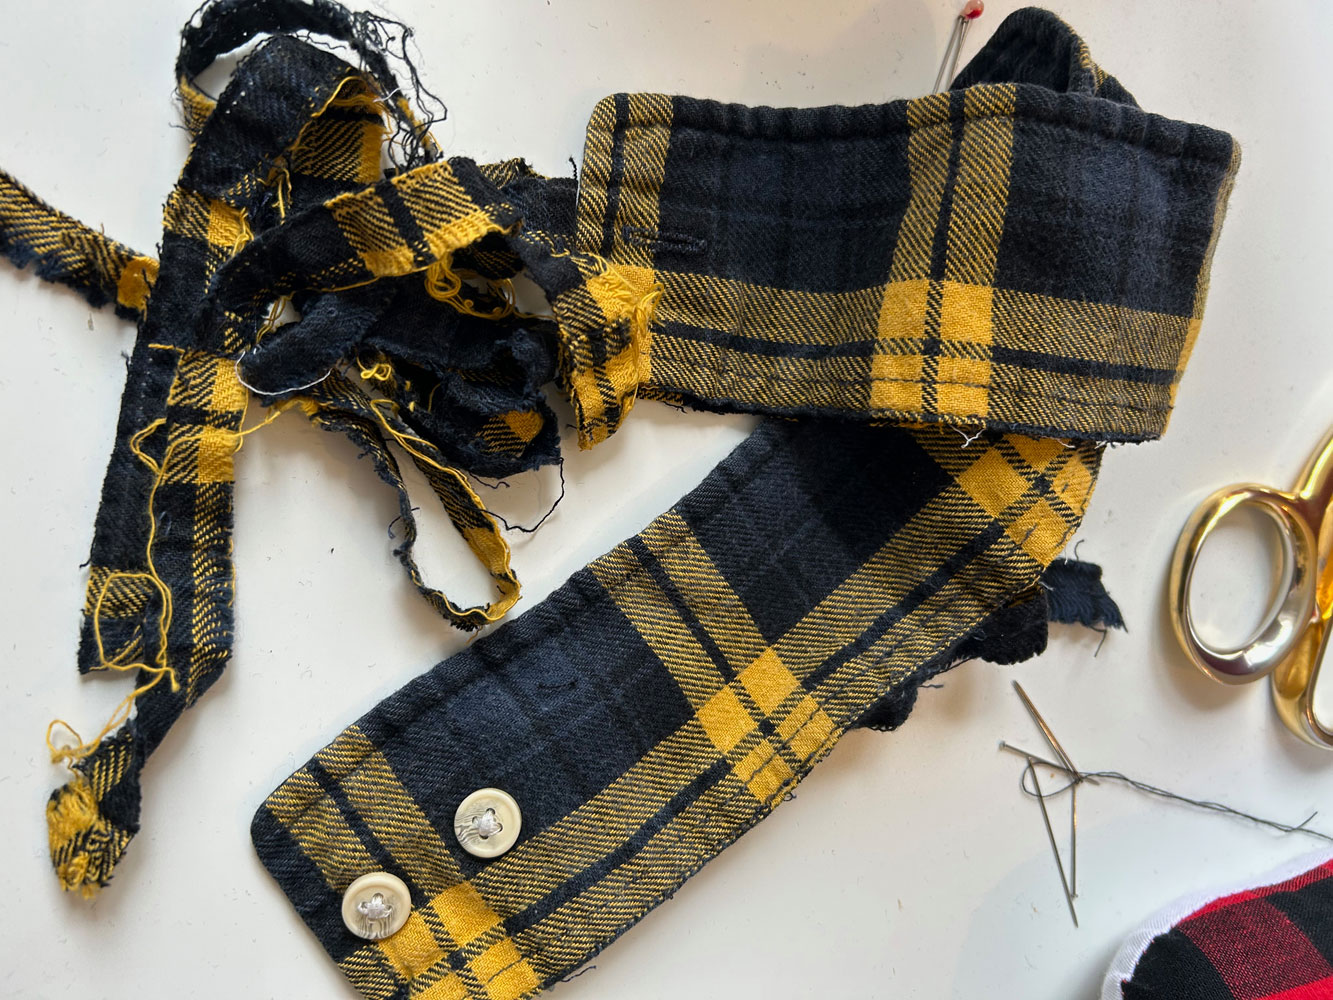
I managed to glean all the fabric I needed from 9 shirts worth of sleeves. I came a bit unstuck on the actual sleeves because I was so intent on featuring the yellow ones with as much coverage as possible. And that meant including the sleeve plackets! I’ve left the buttons on for context and again to make it intentional.

The collar is made from the cuffs of the yellow sleeves. Two of them, buttoned up, fitted perfectly around the necline. Again I was going to use the original buttons, but the Pigeon Wishes star buttons were cooing me. Loudly!

I considered making this dress sleeveless in the beginning. Oh the irony! But reconsidered at the prospect of not wasting any of those sleeves, to create one with statement sleeves instead. I took a draping class a while back with Mr O and he taught us how to draft a cowl sleeve, I’ve tried a few sleeve-drafting tutorials in the past but his was so much simpler and I’m slowly learning that long-winded old school methods aren’t always the best – controversial, I know!

I winced at the prospect of having to patch in some small pieces at the top of the sleeve but actually it adds to the punky charm and I love it. It feels like I’ve broken a whole heap of rules in the making of this dress, yet at the same time, none!

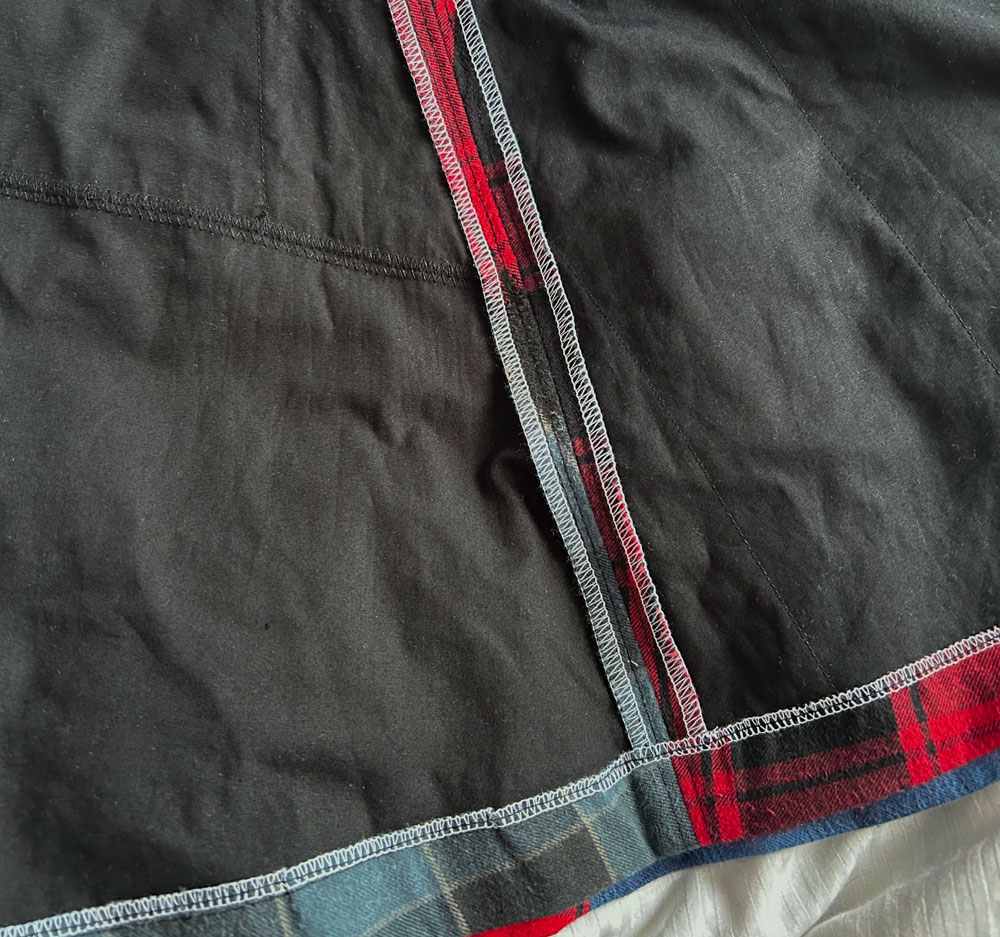
The good thing about having mounted all those pieces on black fabric is that the insides are clean (ish) and everything hangs as it should. Once I sewed up the side-seams, the shoulders, the skirt to the waist-seam and inserted the sleeves, I pressed open the overlocked seams on the inside so everything laid perfectly flat. (Couldn’t be arsed to change the thread from white to black but hey, who is going to see?!) I really must invest in some rainbow overlock thread. I think that would have looked even better to be fair. 

The collar went on next. I just had to cut off the seam bulk but of course the interfacing and the topstitching along the top and front edges was already in place – bonus!

And then I sewed in an invisible zipper. Also from stash. I made sure to align the waist seam before sewing up the second side of the zip because as punk as this is, I have standards you know, haha!

Having said that, standards went a bit out of the window with machined hemming. I toyed with hand-sewed ones, but… well… hours in the day and all that!

Dan was in the studio with me when it was all sewed up and finished. And suggested we shoot it that same night. So we went back home for tea grabbed some tights, shoes, shades and a skateboard (of course!) and just went for it. No time for a hair wash – just scruffed it up, just as I did in the 80s. And it couldn’t have gone better.

I am so over the moon with the shots that he took. He has forever championed my creations and has been so obliging with photographing them over the years – often more eagerly than me! But he totally knocked it out of the park this time. Do look him up if you are ever thinking of getting some professional shots done at danieljamesphotographic. I know I’m biased and all but he is bloody good!

I posted some of them on Instagram a few days ago and the comments have been both humbling and mindblowing. It feels so good to have created something that is all me. Well, a bit of Dan and a bit of Viv too! And to have it appreciated by so many. I am so very very grateful and the whole process from bin-interception to reception of the photos has been incredible. And It’s just made me want to do more of the same. 

I have some really small scraps left over. I didn’t throw any cut-offs away. (Don’t tell Dan!) And I have another cool little project in mind so watch this space or follow along on Insta to find out more, soon.

Other favourite upcycled makes:
Dressmakers ball gown
Martini dress
Romper suit
Portrait tote bag
Lacroix Roman blinds
Ooobop Original jumper

Operation Christmas Dress complete!

handmade tartan dress with teardrop opening

Hopes were fading to get this dress finished on time for Christmas Day. But the sewing gods were looking down on me, somewhat favourably and I sewed them cuff poppers on quite literally at the stroke of midnight on Christmas Eve.

Oh how I love ‘the night before Christmas’ – When all the shops are shut and there’s nothing more to be got. The street outside is quiet; the Christmas tree lights twinkle at their brightest and that sweet little shot of sherry slips slowly down the hatch! Perfect time of year to have some hand sewing going on in front of a festive telly-box movie, too!

Tartan Christmas dress front

This dress is most definitely worthy of an ooobop original issue number 2. The turtle neck dress I recently made almost had a tear drop neckline but in an effort to walk before I could run, I saved it for this time.

The process was exactly the same:

  • I dreamt the design
  • I drew it in my Fashionary sketch book
  • I self-drafted the pieces from my previously created blocks, using Adobe Illustrator
  • Printed and tiled the pattern pieces
  • And sewed up the finished article.

This is proving to be my favourite method of dressmaking to date! That said, I’ve got so much still to learn and I’m anticipating some frustrating times ahead so I’ll still be checking out Indi and vintage sewing patterns when I need some respite!

To edge the teardrop – thus avoid lining or facing – I dug out and dusted off the bias tape maker. To be fair I don’t think its much quicker than the manual ironing method but it’s a bit more fun… when it works!

Close up detail of teardrop opening

I’ve messed up many a time binding edges so this time I knew to start with sewing the right side of the binding to the wrong side of edge of the teardrop opening. I used my quarter inch foot for a consistent seam and took it real slow. Any unevenness is corrected when the binding is pressed in position to the front. (It doesn’t matter if it’s a bit wonky on the back because it won’t be seen. The entire reason for starting on the back!) I then clipped the seam in the curved areas before slowly and carefully top-stitching close to the edge on the right side to finish the binding, where it does matter! That final press is so satisfying.

I then used two more folded bias strips to bind the neckline from back to front, concealing the top edges of the teardrop, and continuing the topstitch to the ends to form the ties. I sewed across the ends of the ties to prevent too much fraying. I’m happy for it to fray a little.

Now lets talk bishop sleeves – Lovely big billowy bishop sleeves! They’re a bit trendy at the moment but to be fair they’ve never been out of favour in my fashion world!

close up of sleeve and cuff

I took my sleeve block piece and similarly to how I flared it last time, created 4 slash points and spread the pieces till the width was a little more than thrice my cuff measurement. I didn’t deduct the length of the cuff from the sleeve as I wanted the fullness to overlap the cuff which it kind of does but the structure in the fabric doesn’t really make it perform as it did in my head!

The cuff is sewn akin to the binding to hide the seam and there’s a small overlap for the poppers.

Walking in my new dress

I really want to rehearse another, even more fuller bishop sleeve on a blouse made with a lighter viscose. Just to see how differently it behaves. I really want to add some lovely button loops and buttons to the cuffs too which I didn’t do here mostly because of time restraints, hence the poppers!

The rest of the dress is constructed the same as the turtle neck one: inserting an invisible zip in the back. And I must add how chuffed I was at just how invisible it turned out with all those checks matching up either side.

Back view of dress

After all that work I didn’t wear it on Christmas Day. I decided to spare it from the cooking splashes and wine spillages and wore it out on Boxing Day instead. Despite it’s festive feel, I will be wearing this dress at every other time of the year and occasion for when tights and sleeves are necessary. The fabric is 100% cotton except for the metallic gold thread and is so comfy to wear. Not surprising that I debated using the fabric for PJs initially!

striding out in my new tartan dress

It carries a lovely little memory too as I purchased the fabric on a sewing blogger meet up organised by @ClaireSews for when @liblib came to visit all the way from Austraila. We chatted over coffee and shopped our little hearts out in the Goldhawk Road. I wasn’t supposed to be buying more but @ella_yvonne convinced me it had my name on it! Always such a treat to meet like-minded sewists IRL.

I’m not holding much hope for completing anything new before New Year so I’ll take this opportunity to wish you all a fabulous, creative and healthy 2020.

All the very best of wishes and lots of love from Janene xxx

The 4-birds-with-one-stone plaid shorts!

plaid shorts simplicity 2659A little bit of sunshine was all it took to inspire these shorts. Don’t panic! I’m not about to get those pasty pins out just yet! I much prefer to wear shorts as spring attire with a pair of 60 dernier tights and the trusty Docs! That photo will have to wait until I can grab Mr Ooobop! to work his photographic magic. In the meantime, I’m afraid we’ll have to make do with my boring pics.

The 4-birds-ness came about as follows:

  1. After my recent pleasure working with and deciding to invest in better fabric (re the audition dress) I also made a conscious decision to wade into ‘stash mountain’ for practice projects and toiles rather than buy any more substandard material. This plaid/tartan fabric was quite a large piece left over from my vintage plaid dress. Its totally synthetic, I’m sure, but it was a good weight for these shorts and so minor stash bust #1 achieved!
  2. I’ve been hearing the words ‘lapped zipper’ on other peoples blogs and in sewing mags quite a lot recently. And I figured it should be something I should know how to do by now. Since getting the hang of the ‘invisible one’ (after some practice, mind) I have kind of forgotten that there is any other way of inserting a zip. Of course I headed straight to YouTube as my first love of demos. I am far more receptive to watching someone demonstrate it for real! Turns out that this was the perfect kind of zipper for these shorts. I think I did it properly. Well, the zip goes up and down and the lapped bit covers the teeth so that’ll do me and will also tick the box of having mastered a new (for me) zip technique.
    plaid shorts side zip
  3. Plaid matching has always been a bit flooky for me, I have to say, and using this fabric on a small, uncomplicated project gave me the chance to practice matching up those seams. Both left and right side seams are as near as dammit and at least across the front and the butt the horizontal stripes line up. Shame I couldn’t do the maths on the side seam of the cuff. I have to say though, having the checks line up across the zipper had me doing a little dance round the ironing board!
    plaid shorts side
  4. And finally the fourth birdie was the mere fact that I have never made a pair of shorts before. This pattern is Simplicity 2659 and I’m pretty sure it came free with an issue of Sew magazine. I’m not sure I would ever make the dress. I can make my belly stick out without any extra help thank you very much, but the top could be cute and I’m sure the bolero would work with a classic dress! Anyhows, one baby step closer to making a pair of trousers but its defo a baby step I am very likely to repeat with some different fabric.
    simplicity 2659 pattern

The cuffs of these shorts are my favourite addition. I love that they are separate and cut on the bias. I wasn’t expecting that as the turn ups on the sleeves I did for my wing collar blouse were technically a very deep hem, turned back on itself. The bias of any sort of checked/plaid/tartan fabric is fabulous against a straight grain of its own kind and I think it really looks neat. Finishes off the hem inside perfectly too.

plaid shorts cuff

I would say that I lost big points on the waist finishing. I have never finished a waist without facing or waistband before and this pattern called for the use of twill tape at the inner waist edge. Very simple to understand and to achieve but I really must remember to stitch from the top when I’m doing things like this. That way I will get a much neater and straighter line. It won’t get noticed, I know, as my children will be horrified if I start tucking my tops into shorts but I know I could have done better. I just find it very amusing, and everso slightly annoying, that a little bit of topstitching is my main cause for concern on this tiny project!

plaid shorts waist

I highly recommend this shorts pattern for anyone wanting a little project to run up in an evening. I’m sure they would look great (on someone else) in a more summery linen or gingham… ooo gingham… imagine the cuffs!