Churn Dash Quilt Block

quilt block churn dash

I am really good at procrastinating. I’m not so good at hurrying up a patchwork quilt. But who’s in a hurry, anyway?! Let’s not dwell on how much time it’s taken me to get to 25 blocks. Let’s not even spare a seconds-thought to how much longer before my amazing quilt will be ready to throw over my bed. Let’s just focus on the here and now!

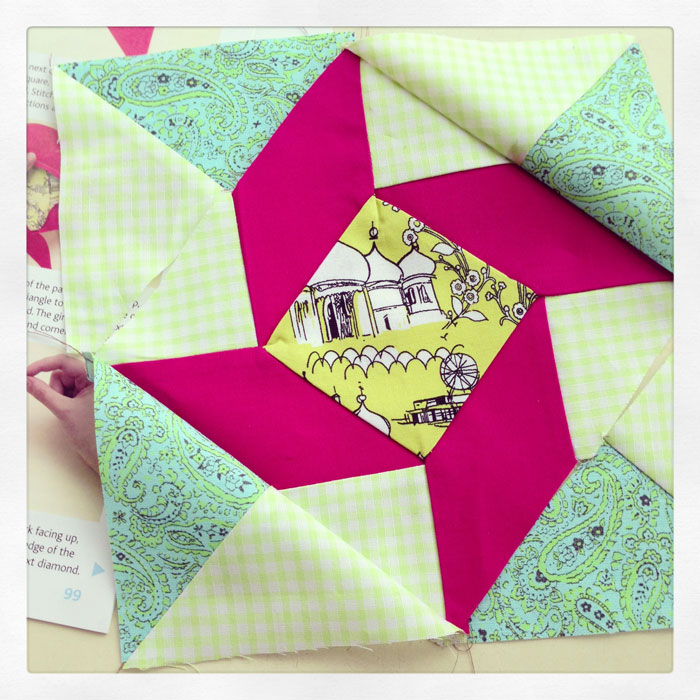
This is a Churn Dash quilt block. Also known as a Churn Dasher or Roads to Berlin. The 25th block I’ve created to date and boy can you see how out of practice I am!

If I’d have retained momentum. I’m sure the inset seams would have been neater. Only one point matches up precisely. And I’m so pleased with that. But not pleased enough to unpick and sort out the other three!

It’s only that Mr O is away that I’m doing this otherwise I should truly be working on his waistcoat. So I should not spend a minute more on this. In any case. If I want that ‘handmade’ look about my quilt, it needs to have a couple of imperfections at least! The next one will be spot on, I’m sure.

Block Facts:

Name: ‘Churn Dash’ or ‘Churn Dasher’ or ‘Roads to Berlin’
History: Another 1930s favourite. One of many blocks inspired by 19th century domestic appliances! Works on its own or used as part of a more complex design.
Level: Set in seams require experience.
No. of pieces: 9

Progress report:

Block 1: The Double Four Patch
Block 2: The Whirlwind
Block 3: The Sailboat
Block 4: The Shoo-fly
Block 5: The Trafalgar
Block 6: The Windmill
Block 7: The Chequer Square
Block 8: The Diamond Square
Block 9: The Cactus Pot
Block 10: The Sawtooth Star
Block 11: To come!
Block 12: The Windmill Sails block
Block 13: The Basket of Flowers block
Block 14: Susannah
Block 15: Road to Oklhahoma
Block 16: Chequer Star
Block 17: Nelson’s Victory
Block 18: Fair and Square
Block 19: Diamond Pinwheel
Block 20: Whirligig
Block 21: Old Maid’s Puzzle
Block 22: Whirlwind Square
Block 23: Windblown Square
Block 24: Basket of Flowers block revisited
Block 25: Churn Dash

Basket of Flowers quilt block revisited

basket of flowers quilt block

It’s been a very long time since I sewed a quilt block! Almost a year to be precise! But hey, I’m not going to beat myself up about it!

This is the 24th block I’ve created to date and it’s another version of the Basket of Flowers design, which I make first time round here.

I much prefer the pretty fabrics in this block but I wasn’t so hot on those points!

It doesn’t pay to have a long break from quilting. I am so out of practice and I could easily have made another pair of pj’s in the time it took me to put this little fella together.

I’ve acquired some extra tools in the meantime… a quilting ruler, a new rotary cutter and a larger self-healing cutting mat. Can’t imagine how much longer still, it would have taken without those!

Incidentally, do not ever place your cutting mat on your ironing board, lest you forget that rubber and hot irons aren’t the best of friends! I came to my senses at the crucial moment!

Block Facts:

Name: ‘Basket of Flowers’ or ‘Lily Basket’ or ‘Flower Basket’
History: This design was ideally suited to the dress and feedsack prints of 1930s America, where it was a particular favourite
Level: Set in seams require experience.
No. of pieces: 13

Progress report:

Block 1: The Double Four Patch
Block 2: The Whirlwind
Block 3: The Sailboat
Block 4: The Shoo-fly
Block 5: The Trafalgar
Block 6: The Windmill
Block 7: The Chequer Square
Block 8: The Diamond Square
Block 9: The Cactus Pot
Block 10: The Sawtooth Star
Block 11: To come!
Block 12: The Windmill Sails block
Block 13: The Basket of Flowers block
Block 14: Susannah
Block 15: Road to Oklhahoma
Block 16: Chequer Star
Block 17: Nelson’s Victory
Block 18: Fair and Square
Block 19: Diamond Pinwheel
Block 20: Whirligig
Block 21: Old Maid’s Puzzle
Block 22: Whirlwind Square
Block 23: Windblown Square
Block 24: Basket of Flowers block revisited

Windblown Square quilt block

Windblown Square quilt block

Now we are getting interesting… if you like this sort of thing! Meet the Windblown Square block. Number 23 from issue 25, The Art of Quilting.

It required all of the techniques that have been employed in the previous blocks. Diamonds were sewn along each edge of the Brighton Pavilion square, then the small green gingham triangles were inset in between the red diamonds to make a square. The remaining large triangles were joined in pairs and then sewn to the outside edges of the block to make a larger square… simples! Or not… if you try and rush it.

I completely forgot that I had previously cut these pieces out, so all I had to do was whip them up. But as the old saying goes, more haste, less speed. Indeed! I sewed the outer pairs the wrong way round which resulted in the gingham pieces sitting together. I thought I might get away with it but it would have been a forever niggle. So I unpicked, albeit sulkily!

windblown square quilt block wrong

Apart from concentrating to make sure all the right pieces are sewn on the right way, you also need to be so accurate and consistent with those seams. One wayward line of stitching and it all goes belly up!

Block Facts:

Name: Windblown Square or Star.
History: Also known as Balkan Puzzle. Nancy Cabot recorded this name in the Chicago Tribune in the 1930s. Thought to reflect the complex politics of Eastern Europe in the early 20th century.
Level: Straightforward to assemble but accuracy with set in seams is a must.
No. of pieces: 17

Progress report:

Block 1: The Double Four Patch
Block 2: The Whirlwind
Block 3: The Sailboat
Block 4: The Shoo-fly
Block 5: The Trafalgar
Block 6: The Windmill
Block 7: The Chequer Square
Block 8: The Diamond Square
Block 9: The Cactus Pot
Block 10: The Sawtooth Star
Block 11: To come!
Block 12: The Windmill Sails block
Block 13: The Basket of Flowers block
Block 14: Susannah
Block 15: Road to Oklhahoma
Block 16: Chequer Star
Block 17: Nelson’s Victory
Block 18: Fair and Square
Block 19: Diamond Pinwheel
Block 20: Whirligig
Block 21: Old Maid’s Puzzle
Block 22: Whirlwind Square
Block 23: Windblown Square

Whirlwind Square quilt block

whirlwind square quilt block

Happy new year all! And boy am I glad to be back. Not that I’ve actually been anywhere. Just glad to be back in my sewing seat after a whole week of being struck down by a virus. All those sewing plans… all that time off… I really didn’t account for being totally useless for all that time. I have to say, my mojo is still not motoring as normal but I’m getting there. And this was the perfect little project to ease me back in gently.

This quilt block is called the Whirlwind Square, a variation of the whirlwind block I did here. It is block number 22 from issue 24 ‘Art of Quilting’. 

In a nutshell: The small white triangles are paired with the tapered rectangles to make 4 triangles. All four of those triangles are seamed to make the central pinwheel (the final seam being pressed open). Then the blue polka dot triangles are sewn to each edge to frame the central block.

No major issues in making this little fellow up. A simple operation but great practice for making sure those points line up.

Block Facts:

Name: Whirlwind Square
History: Traditionally found on mid-19th century quilts
Level: Some experience needed to ensure that seams and points meet accurately.
No. of pieces: 12

Progress report:

Block 1: The Double Four Patch
Block 2: The Whirlwind
Block 3: The Sailboat
Block 4: The Shoo-fly
Block 5: The Trafalgar
Block 6: The Windmill
Block 7: The Chequer Square
Block 8: The Diamond Square
Block 9: The Cactus Pot
Block 10: The Sawtooth Star
Block 11: To come!
Block 12: The Windmill Sails block
Block 13: The Basket of Flowers block
Block 14: Susannah
Block 15: Road to Oklhahoma
Block 16: Chequer Star
Block 17: Nelson’s Victory
Block 18: Fair and Square
Block 19: Diamond Pinwheel
Block 20: Whirligig
Block 21: Old Maid’s Puzzle
Block 22: Whirlwind Square

Old Maid’s Puzzle quilt block

Old Maids Puzzle Quilt Block

This quilt block is called Old Maid’s Puzzle, though also more recently known as the Bachelorette. It is block number 21 from issue 23 ‘Art of Quilting’. 

This is the first of my blocks, so far that incorporate a classic ‘bow’ effect, formed by the points of paired triangles touching centrally.

Though there are lots of pieces, there are no inset seams and so it was pretty straightforward. The only problem I encountered was the triangle points being drawn down into the feed dog a couple of times. I have had this issue before. Not sure how to stop it happening but it seems to happen most if I reinforce the stitch at the beginning. It kind of gets chewed up.

In a nutshell: the pink dotty and white triangles are joined along their diagonals, as are the pomegranate and lime gingham triangles. They are ‘chained’ to make 6  squares. After clipping apart they are given a good pressing. The white squares are seamed alongside the pink dotty sides of the made up squares. Then the rectangles are paired to make ‘bows’. The remaining white triangle pieces are sewn to the pomegranate and lime gingham squares to form a larger triangle and then this triangle is seamed to the larger green paisley triangle. Finally the 4 larger blocks are joined together and the final central seam pressed open.

As with most of the blocks, I’m sure they will work much better when they are in position but I do think this one is one of the more interesting ones. A bit wonky on the edges but I’m sure I can cheat that when I come to do the edging!

Block Facts:

Name: Old Maid’s Puzzle or Bachelorette
History: This block features in 19th century Amish quilts
Level: Some experience needed to create neat joins where the triangles meet
No. of pieces: 22

Progress report:

Block 1: The Double Four Patch
Block 2: The Whirlwind
Block 3: The Sailboat
Block 4: The Shoo-fly
Block 5: The Trafalgar
Block 6: The Windmill
Block 7: The Chequer Square
Block 8: The Diamond Square
Block 9: The Cactus Pot
Block 10: The Sawtooth Star
Block 11: To come!
Block 12: The Windmill Sails block
Block 13: The Basket of Flowers block
Block 14: Susannah
Block 15: Road to Oklhahoma
Block 16: Chequer Star
Block 17: Nelson’s Victory
Block 18: Fair and Square
Block 19: Diamond Pinwheel
Block 20: Whirligig
Block 21: Old Maid’s Puzzle

Whirligig quilt block

whirligig quilt block

I have been seriously neglecting my quilt blocks of late. Am more behind than ever but heyho… I will have a lovely quilt on my bed one day. Just not some day soon!

Introducing the Whirligig block, number 20 from issue 22 ‘Art of Quilting’. Though issue 21 supplies the batting and instructions on how to join the first 6 blocks, I feel the need to get a few more blocks underway first.

Inset seams are second nature now. Not so daunting any more. Which is lucky because there are a few involved here!

The ‘orange blossom’ triangles are first sewn to the gingham pieces. Important to mark the 6mm seam allowance on the triangles before making the first seam. Then you know at what point to stop, where the seams meet. The ‘red daisy’ pieces are then joined to the triangles and then the final seam to the blue gingham completes a quarter of the main block. Once they have been arranged in position, the bottom two quarters are seamed together and then the top two. They can be chained and then snipped apart. Finally the two halves are joined together and the centre seam pressed open with the ‘toe’ of the iron.

I have to say this is my least favourite block so far. I think its the fabric colours. They create such a clumsy shape. I did consider selecting different fabrics but I wanted it to be consistent with the rest. The design is meant to be characteristic of the propeller look but it is very interesting how the design changes with use of pretty vintage pastels with more contrasting triangles, which seem to draw the eye more to the centre pinwheel.

whirligig block in pastel colours

Block Facts:

Name: Whirligig
History: The combination of printed fabric and gingham is very typical of the feedsack quilts of the 1930s.
Level: Some experience needed to create neat set-in seams
No. of pieces: 16

Progress report:

Block 1: The Double Four Patch
Block 2: The Whirlwind
Block 3: The Sailboat
Block 4: The Shoo-fly
Block 5: The Trafalgar
Block 6: The Windmill
Block 7: The Chequer Square
Block 8: The Diamond Square
Block 9: The Cactus Pot
Block 10: The Sawtooth Star
Block 11: To come!
Block 12: The Windmill Sails block
Block 13: The Basket of Flowers block
Block 14: Susannah
Block 15: Road to Oklhahoma
Block 16: Chequer Star
Block 17: Nelson’s Victory
Block 18: Fair and Square
Block 19: Diamond Pinwheel
Block 20: Whirligig

Diamond Pinwheel quilt block

diamond pinwheel quilt block

Ooo… get me with my two posts in a day! I didn’t actually make them both this morning, I hasten to add! 

This is the Diamond Pinwheel block, number 19 from issue 20 ‘Art of Quilting’. Joining triangles to make a square is one of the first lessons in patchwork and a great way to use up tiny scraps. The central pinwheel is best achieved with contrasting colours such as the red and the white used here, and if you swap the position of dark and light pieces, the pinwheel will appear to rotate in the opposite direction.

Again, not particularly complicated but perhaps a little more time consuming owing to more pieces and pressing in between. Oh and of course the dreaded matching of all those points! The central seam is pressed open to help it to lie flat.

Block Facts:

Name: Diamond Pinwheel
History: This design has been seen on quilts dating back to the late 1700s, though it would not have been named until much later.
Level: Some experience needed to match the triangle points neatly
No. of pieces: 24

Progress report:

Block 1: The Double Four Patch
Block 2: The Whirlwind
Block 3: The Sailboat
Block 4: The Shoo-fly
Block 5: The Trafalgar
Block 6: The Windmill
Block 7: The Chequer Square
Block 8: The Diamond Square
Block 9: The Cactus Pot
Block 10: The Sawtooth Star
Block 11: To come!
Block 12: The Windmill Sails block
Block 13: The Basket of Flowers block
Block 14: Susannah
Block 15: Road to Oklhahoma
Block 16: Chequer Star
Block 17: Nelson’s Victory
Block 18: Fair and Square
Block 19: Diamond Pinwheel

Fair and Square quilt block

fair and square quilt block

Fair and Square is block 18 from issue 19 ‘Art of Quilting’. The name reflects its pleasingly balanced appearance and its adaptability.

This block is also known as Diamond in a Square and indeed a variant of the Diamond Square I made here.

I found this one a breeze to put together. No inset seams. Just straight lines and simple pieces. In a nut shell, the four white triangles were stitched to the sides of the central daisy diamond. Two orange blossom rectangles are then sewn, one each side. And then two strips are made by sewing a daisy square to each end of the remaining two rectangles, which are then sewn top and bottom to complete the block.

I do like the colour combo of this one too. Red and orange and black… all pertaining to my fiery fire-sign no doubt!

Block Facts:

Name: Fair and Square
History: This geometric design and its variations have been found on Amish quilts made in 19th century Pennsylvania. Commonly used as a singular central piece but also as an all-over design.
Level: Some experience needed to match seams neatly, otherwise relatively simple.
No. of pieces: 13

Progress report:

Block 1: The Double Four Patch
Block 2: The Whirlwind
Block 3: The Sailboat
Block 4: The Shoo-fly
Block 5: The Trafalgar
Block 6: The Windmill
Block 7: The Chequer Square
Block 8: The Diamond Square
Block 9: The Cactus Pot
Block 10: The Sawtooth Star
Block 11: To come!
Block 12: The Windmill Sails block
Block 13: The Basket of Flowers block
Block 14: Susannah
Block 15: Road to Oklhahoma
Block 16: Chequer Star
Block 17: Nelson’s Victory
Block 18: Fair and Square

Nelson’s Victory quilt block

nelsons victory quilt block

Nelson’s Victory is block 17 from issue 18 ‘Art of Quilting’. Only 12 pieces but boy did those little pieces cause trouble!

This block is a variation of the Trafalgar Block which I made back in March. I had trouble with that one too but to be honest, I would gladly make another 20 of those before I made another one of these!

Nelson’s Victory was  included as an opportunity to practice the set-in seam technique. I really haven’t mastered it fully yet. When I can do it in less than an hour without holding my breath once, I will let you know!

In-set seams really have to be accurate. finishing the next seam at exactly the point of the previous one finishing. In a nutshel: The blue spotty and Brighton print tapered rectangles are sewn together first, along their diagonal sides, from the edge of the pointy bit to 6mm short of the other end. Then the pink spotty squares are in-set, first seamed to the blue and then to the Brighton edge. Then all four little blocks are seamed together to make the finished block.

All was going swimmingly until I sewed the final centre seam to find that all that breath-holding and tongue-poking (I’m so glad no one watches me when I sew) was in vain, and the points only matched up in half the places they should!

Oh well… what’s the point in it looking perfect? No one will recognise its handmadeness otherwise!

Block Facts:

Name: Nelson’s Victory
History: Dates back to 1906 to commemorate the Battle of Trafalgar (which took place a century earlier)  in honour of Lord Nelson’s flagship, HMS Victory, which led the British fleet.
Level: Some experience needed for the set in corners… just a bit!
No. of pieces: 12

Progress report:

Block 1: The Double Four Patch
Block 2: The Whirlwind
Block 3: The Sailboat
Block 4: The Shoo-fly
Block 5: The Trafalgar
Block 6: The Windmill
Block 7: The Chequer Square
Block 8: The Diamond Square
Block 9: The Cactus Pot
Block 10: The Sawtooth Star
Block 11: To come!
Block 12: The Windmill Sails block
Block 13: The Basket of Flowers block
Block 14: Susannah
Block 15: Road to Oklhahoma
Block 16: Chequer Star
Block 17: Nelson’s Victory