Whirlwind Square quilt block

whirlwind square quilt block

Happy new year all! And boy am I glad to be back. Not that I’ve actually been anywhere. Just glad to be back in my sewing seat after a whole week of being struck down by a virus. All those sewing plans… all that time off… I really didn’t account for being totally useless for all that time. I have to say, my mojo is still not motoring as normal but I’m getting there. And this was the perfect little project to ease me back in gently.

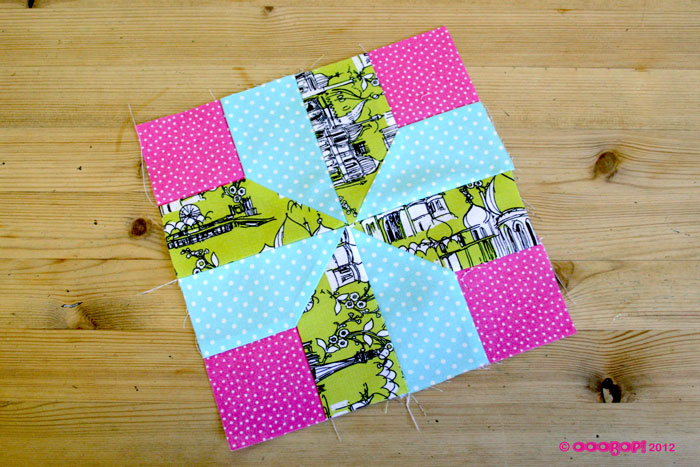
This quilt block is called the Whirlwind Square, a variation of the whirlwind block I did here. It is block number 22 from issue 24 ‘Art of Quilting’. 

In a nutshell: The small white triangles are paired with the tapered rectangles to make 4 triangles. All four of those triangles are seamed to make the central pinwheel (the final seam being pressed open). Then the blue polka dot triangles are sewn to each edge to frame the central block.

No major issues in making this little fellow up. A simple operation but great practice for making sure those points line up.

Block Facts:

Name: Whirlwind Square
History: Traditionally found on mid-19th century quilts
Level: Some experience needed to ensure that seams and points meet accurately.
No. of pieces: 12

Progress report:

Block 1: The Double Four Patch
Block 2: The Whirlwind
Block 3: The Sailboat
Block 4: The Shoo-fly
Block 5: The Trafalgar
Block 6: The Windmill
Block 7: The Chequer Square
Block 8: The Diamond Square
Block 9: The Cactus Pot
Block 10: The Sawtooth Star
Block 11: To come!
Block 12: The Windmill Sails block
Block 13: The Basket of Flowers block
Block 14: Susannah
Block 15: Road to Oklhahoma
Block 16: Chequer Star
Block 17: Nelson’s Victory
Block 18: Fair and Square
Block 19: Diamond Pinwheel
Block 20: Whirligig
Block 21: Old Maid’s Puzzle
Block 22: Whirlwind Square

Old Maid’s Puzzle quilt block

Old Maids Puzzle Quilt Block

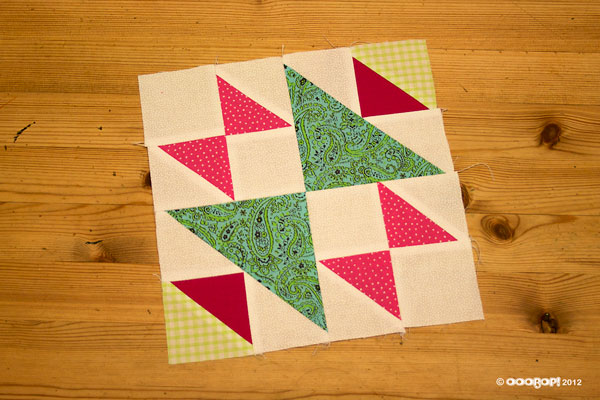
This quilt block is called Old Maid’s Puzzle, though also more recently known as the Bachelorette. It is block number 21 from issue 23 ‘Art of Quilting’. 

This is the first of my blocks, so far that incorporate a classic ‘bow’ effect, formed by the points of paired triangles touching centrally.

Though there are lots of pieces, there are no inset seams and so it was pretty straightforward. The only problem I encountered was the triangle points being drawn down into the feed dog a couple of times. I have had this issue before. Not sure how to stop it happening but it seems to happen most if I reinforce the stitch at the beginning. It kind of gets chewed up.

In a nutshell: the pink dotty and white triangles are joined along their diagonals, as are the pomegranate and lime gingham triangles. They are ‘chained’ to make 6  squares. After clipping apart they are given a good pressing. The white squares are seamed alongside the pink dotty sides of the made up squares. Then the rectangles are paired to make ‘bows’. The remaining white triangle pieces are sewn to the pomegranate and lime gingham squares to form a larger triangle and then this triangle is seamed to the larger green paisley triangle. Finally the 4 larger blocks are joined together and the final central seam pressed open.

As with most of the blocks, I’m sure they will work much better when they are in position but I do think this one is one of the more interesting ones. A bit wonky on the edges but I’m sure I can cheat that when I come to do the edging!

Block Facts:

Name: Old Maid’s Puzzle or Bachelorette
History: This block features in 19th century Amish quilts
Level: Some experience needed to create neat joins where the triangles meet
No. of pieces: 22

Progress report:

Block 1: The Double Four Patch
Block 2: The Whirlwind
Block 3: The Sailboat
Block 4: The Shoo-fly
Block 5: The Trafalgar
Block 6: The Windmill
Block 7: The Chequer Square
Block 8: The Diamond Square
Block 9: The Cactus Pot
Block 10: The Sawtooth Star
Block 11: To come!
Block 12: The Windmill Sails block
Block 13: The Basket of Flowers block
Block 14: Susannah
Block 15: Road to Oklhahoma
Block 16: Chequer Star
Block 17: Nelson’s Victory
Block 18: Fair and Square
Block 19: Diamond Pinwheel
Block 20: Whirligig
Block 21: Old Maid’s Puzzle

Whirligig quilt block

whirligig quilt block

I have been seriously neglecting my quilt blocks of late. Am more behind than ever but heyho… I will have a lovely quilt on my bed one day. Just not some day soon!

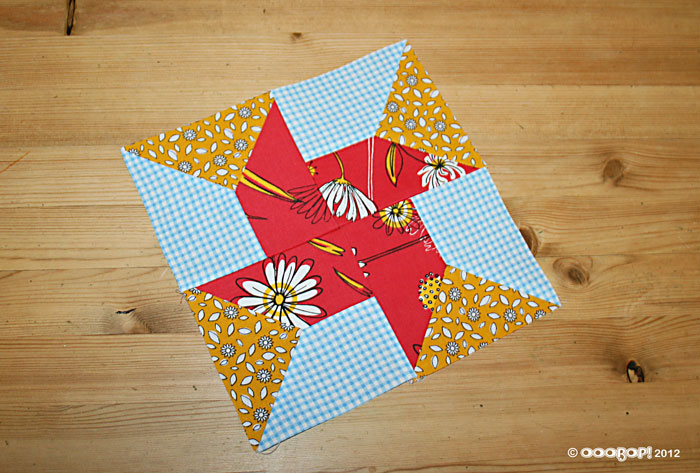
Introducing the Whirligig block, number 20 from issue 22 ‘Art of Quilting’. Though issue 21 supplies the batting and instructions on how to join the first 6 blocks, I feel the need to get a few more blocks underway first.

Inset seams are second nature now. Not so daunting any more. Which is lucky because there are a few involved here!

The ‘orange blossom’ triangles are first sewn to the gingham pieces. Important to mark the 6mm seam allowance on the triangles before making the first seam. Then you know at what point to stop, where the seams meet. The ‘red daisy’ pieces are then joined to the triangles and then the final seam to the blue gingham completes a quarter of the main block. Once they have been arranged in position, the bottom two quarters are seamed together and then the top two. They can be chained and then snipped apart. Finally the two halves are joined together and the centre seam pressed open with the ‘toe’ of the iron.

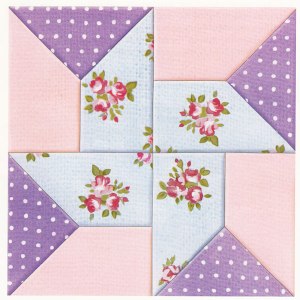
I have to say this is my least favourite block so far. I think its the fabric colours. They create such a clumsy shape. I did consider selecting different fabrics but I wanted it to be consistent with the rest. The design is meant to be characteristic of the propeller look but it is very interesting how the design changes with use of pretty vintage pastels with more contrasting triangles, which seem to draw the eye more to the centre pinwheel.

whirligig block in pastel colours

Block Facts:

Name: Whirligig
History: The combination of printed fabric and gingham is very typical of the feedsack quilts of the 1930s.
Level: Some experience needed to create neat set-in seams
No. of pieces: 16

Progress report:

Block 1: The Double Four Patch
Block 2: The Whirlwind
Block 3: The Sailboat
Block 4: The Shoo-fly
Block 5: The Trafalgar
Block 6: The Windmill
Block 7: The Chequer Square
Block 8: The Diamond Square
Block 9: The Cactus Pot
Block 10: The Sawtooth Star
Block 11: To come!
Block 12: The Windmill Sails block
Block 13: The Basket of Flowers block
Block 14: Susannah
Block 15: Road to Oklhahoma
Block 16: Chequer Star
Block 17: Nelson’s Victory
Block 18: Fair and Square
Block 19: Diamond Pinwheel
Block 20: Whirligig

Diamond Pinwheel quilt block

diamond pinwheel quilt block

Ooo… get me with my two posts in a day! I didn’t actually make them both this morning, I hasten to add! 

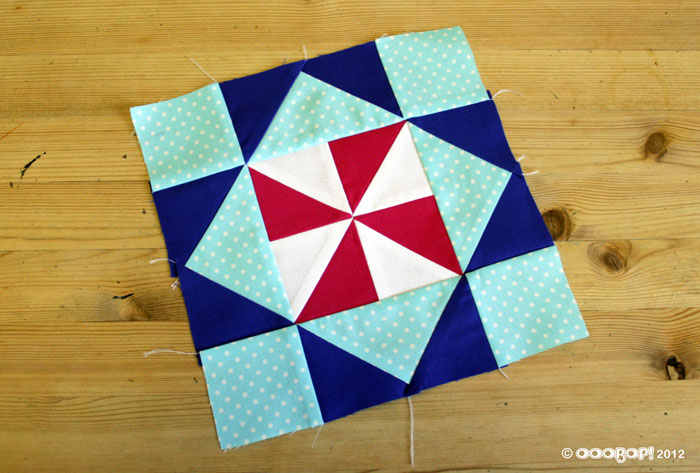
This is the Diamond Pinwheel block, number 19 from issue 20 ‘Art of Quilting’. Joining triangles to make a square is one of the first lessons in patchwork and a great way to use up tiny scraps. The central pinwheel is best achieved with contrasting colours such as the red and the white used here, and if you swap the position of dark and light pieces, the pinwheel will appear to rotate in the opposite direction.

Again, not particularly complicated but perhaps a little more time consuming owing to more pieces and pressing in between. Oh and of course the dreaded matching of all those points! The central seam is pressed open to help it to lie flat.

Block Facts:

Name: Diamond Pinwheel
History: This design has been seen on quilts dating back to the late 1700s, though it would not have been named until much later.
Level: Some experience needed to match the triangle points neatly
No. of pieces: 24

Progress report:

Block 1: The Double Four Patch
Block 2: The Whirlwind
Block 3: The Sailboat
Block 4: The Shoo-fly
Block 5: The Trafalgar
Block 6: The Windmill
Block 7: The Chequer Square
Block 8: The Diamond Square
Block 9: The Cactus Pot
Block 10: The Sawtooth Star
Block 11: To come!
Block 12: The Windmill Sails block
Block 13: The Basket of Flowers block
Block 14: Susannah
Block 15: Road to Oklhahoma
Block 16: Chequer Star
Block 17: Nelson’s Victory
Block 18: Fair and Square
Block 19: Diamond Pinwheel

Fair and Square quilt block

fair and square quilt block

Fair and Square is block 18 from issue 19 ‘Art of Quilting’. The name reflects its pleasingly balanced appearance and its adaptability.

This block is also known as Diamond in a Square and indeed a variant of the Diamond Square I made here.

I found this one a breeze to put together. No inset seams. Just straight lines and simple pieces. In a nut shell, the four white triangles were stitched to the sides of the central daisy diamond. Two orange blossom rectangles are then sewn, one each side. And then two strips are made by sewing a daisy square to each end of the remaining two rectangles, which are then sewn top and bottom to complete the block.

I do like the colour combo of this one too. Red and orange and black… all pertaining to my fiery fire-sign no doubt!

Block Facts:

Name: Fair and Square
History: This geometric design and its variations have been found on Amish quilts made in 19th century Pennsylvania. Commonly used as a singular central piece but also as an all-over design.
Level: Some experience needed to match seams neatly, otherwise relatively simple.
No. of pieces: 13

Progress report:

Block 1: The Double Four Patch
Block 2: The Whirlwind
Block 3: The Sailboat
Block 4: The Shoo-fly
Block 5: The Trafalgar
Block 6: The Windmill
Block 7: The Chequer Square
Block 8: The Diamond Square
Block 9: The Cactus Pot
Block 10: The Sawtooth Star
Block 11: To come!
Block 12: The Windmill Sails block
Block 13: The Basket of Flowers block
Block 14: Susannah
Block 15: Road to Oklhahoma
Block 16: Chequer Star
Block 17: Nelson’s Victory
Block 18: Fair and Square

Nelson’s Victory quilt block

nelsons victory quilt block

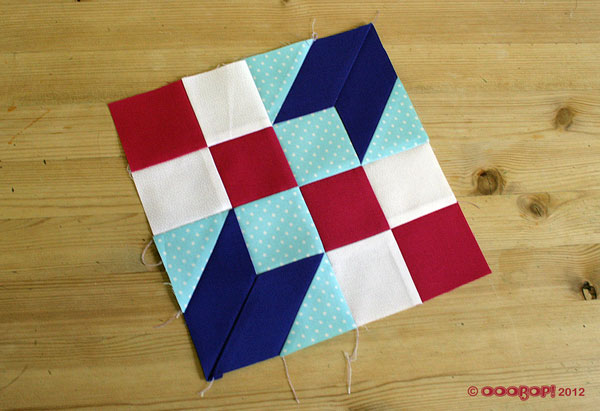
Nelson’s Victory is block 17 from issue 18 ‘Art of Quilting’. Only 12 pieces but boy did those little pieces cause trouble!

This block is a variation of the Trafalgar Block which I made back in March. I had trouble with that one too but to be honest, I would gladly make another 20 of those before I made another one of these!

Nelson’s Victory was  included as an opportunity to practice the set-in seam technique. I really haven’t mastered it fully yet. When I can do it in less than an hour without holding my breath once, I will let you know!

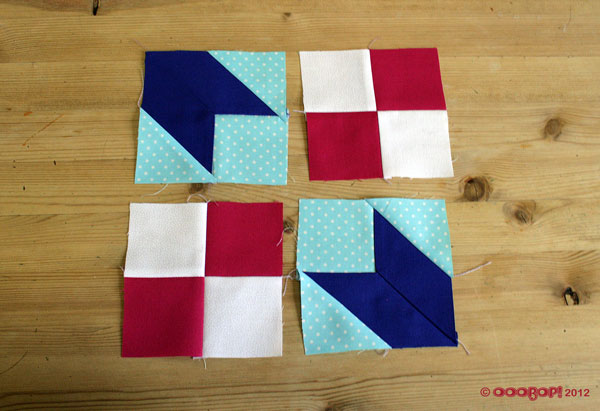
In-set seams really have to be accurate. finishing the next seam at exactly the point of the previous one finishing. In a nutshel: The blue spotty and Brighton print tapered rectangles are sewn together first, along their diagonal sides, from the edge of the pointy bit to 6mm short of the other end. Then the pink spotty squares are in-set, first seamed to the blue and then to the Brighton edge. Then all four little blocks are seamed together to make the finished block.

All was going swimmingly until I sewed the final centre seam to find that all that breath-holding and tongue-poking (I’m so glad no one watches me when I sew) was in vain, and the points only matched up in half the places they should!

Oh well… what’s the point in it looking perfect? No one will recognise its handmadeness otherwise!

Block Facts:

Name: Nelson’s Victory
History: Dates back to 1906 to commemorate the Battle of Trafalgar (which took place a century earlier)  in honour of Lord Nelson’s flagship, HMS Victory, which led the British fleet.
Level: Some experience needed for the set in corners… just a bit!
No. of pieces: 12

Progress report:

Block 1: The Double Four Patch
Block 2: The Whirlwind
Block 3: The Sailboat
Block 4: The Shoo-fly
Block 5: The Trafalgar
Block 6: The Windmill
Block 7: The Chequer Square
Block 8: The Diamond Square
Block 9: The Cactus Pot
Block 10: The Sawtooth Star
Block 11: To come!
Block 12: The Windmill Sails block
Block 13: The Basket of Flowers block
Block 14: Susannah
Block 15: Road to Oklhahoma
Block 16: Chequer Star
Block 17: Nelson’s Victory

Chequer Star quilt block

chequer star quilt block

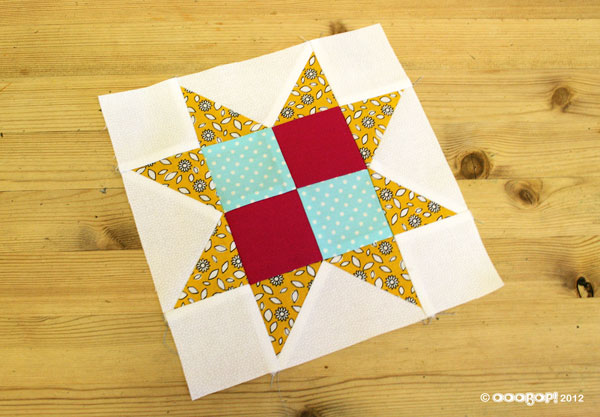
Chequer Star, also known as Scrappy Star, is block 16 (of 80!) from issue 17 ‘Art of Quilting’. 20 pieces no less! This one is a close relative of the Sawtooth Star block, the only difference being the single square in the centre. It is a favourite design with quilters as it utilises the smallest scraps and offcuts.

It wasn’t particular tricky but did take some ‘get up and go’ to even get started! The weather is far too beautiful in London to be sitting in and sewing, as much as I love it. I am seriously going to have to come up with some outdoor-friendly projects. Perhaps some traditional hand quilting. Does anyone else craft al fresco?

Block Facts:

Name: Chequer Star
History: This block dates from the 1900s.
Level: Some experience needed to line up the triangle points with the square seams.
No. of pieces: 20

Progress report:

Block 1: The Double Four Patch
Block 2: The Whirlwind
Block 3: The Sailboat
Block 4: The Shoo-fly
Block 5: The Trafalgar
Block 6: The Windmill
Block 7: The Chequer Square
Block 8: The Diamond Square
Block 9: The Cactus Pot
Block 10: The Sawtooth Star
Block 11: To come!
Block 12: The Windmill Sails block
Block 13: The Basket of Flowers block
Block 14: Susannah
Block 15: Road to Oklhahoma
Block 16: Chequer Star

Road to Oklahoma quilt block

road to oklahoma quilt block

Road to Oklahoma is my latest quilt block from issue 16 ‘Art of Quilting’. A grand total of 18 pieces involved in this little one. I think that’s quite enough pieces for one block, don’t you?!

Seems like ages ago that I did one of these and it goes without saying that I am still eons away from the finished article. But these little fellas are always a good filler of time. Today a mini thunderstorm hit to remind us that one should not get complacent with days of glorious sunshine as it is so not the norm! Mini showers did not dampen spirits though, and gave rise to a couple of hours of quilt making instead!

This block is very similar in design and fabric choice to the first block I made, the Double Four-patch, but just involved a little variation. You can see how it breaks down into four smaller blocks here:

road to oklahoma quilt block

It did take a little longer than the others. Wasn’t timing I’m afraid. I try not to clock watch when I’m sewing nowadays. I do enough of that in my day job!

Of course there is always someone who will try and get in on the action. I mostly don’t post photos of Socksy as she is always hidden underneath the dressmaking fabric or the pattern paper but here she is trying to pretend she doesn’t know what the problem is!

socksy sitting on the oklahoma block

Block Facts:

Name: Road to Oklahoma
History: This block first appeared in print in 1897, but it predates that record by several decades. It is also known as Arkansas Crossroads and New Four Patch; the latter name reflects its similarity to the classic Four Patch block. It produces a pattern of stars and squares when repeated and recalls the early days of quilting in America and the pioneer trail towards the west.
Level: Set in seams require experience.
No. of pieces: 18

Progress report:

Block 1: The Double Four Patch
Block 2: The Whirlwind
Block 3: The Sailboat
Block 4: The Shoo-fly
Block 5: The Trafalgar
Block 6: The Windmill
Block 7: The Chequer Square
Block 8: The Diamond Square
Block 9: The Cactus Pot
Block 10: The Sawtooth Star
Block 11: To come!
Block 12: The Windmill Sails block
Block 13: The Basket of Flowers block
Block 14: Susannah
Block 15: Road to Oklhahoma

Susannah quilt block

quilt block susannah

Say hello to Susannah, my latest quilt block from issue 15 ‘Art of Quilting’. She looked to be a little complicated from the instructions but as with most things it made sense when the pieces were cut and under the foot!

This was another opportunity to practice those set-in seams. To begin with, the green gingham rectangles and the red floral tapered rectangles were joined in pairs to make the four double patches that occupy the corners. The first double patch was sewn to one side of the orange central square. Then the next double patch is sewn to the first, and again to the central square.

Before sewing I marked the 6mm seam line on the wrong side of the central square to ensure that the set in seams started and finished from the point of seamlines crossing and not the edge of the fabric like the other seams.

All went swimmingly until the last and final seam, which simply didn’t match up. Took me a while to figure but it was easily resolved by unpicking a couple of stitches and restitching to fit. I’d over stepped the corner seam and it had thrown out the position of the last piece!

This seemed like such an easy one from the start, and it is, really, but a lot of care is needed to make it work accurately.

Block Facts:

Name: Susannah
History: This is a variation of a block known as ‘Oh Susannah’, the popular song which was first published in America in 1848.
Level: Set in seams require experience.
No. of pieces: 9

Progress report:

Block 1: The Double Four Patch
Block 2: The Whirlwind
Block 3: The Sailboat
Block 4: The Shoo-fly
Block 5: The Trafalgar
Block 6: The Windmill
Block 7: The Chequer Square
Block 8: The Diamond Square
Block 9: The Cactus Pot
Block 10: The Sawtooth Star
Block 11: To come!
Block 12: The Windmill Sails block
Block 13: The Basket of Flowers block
Block 14: Susannah

Basket of Flowers quilt block

basket of flowers quilt block

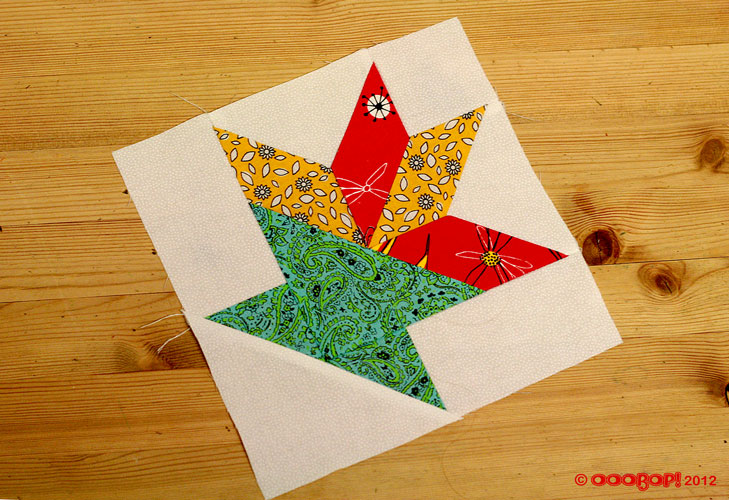
Introducing the Basket of Flowers block, from issue 14 ‘Art of Quilting’. And what a little trickster this was! Just when you get the hang of ‘chaining’ and running seams from top to bottom, this little bunch of pieces involved set-in seams, meaning the seams meet at the same point rather than the lines of stitching crossing over.

Though my quarter inch foot is still my best friend when it comes to quilting, in this instance it is also advisable to draw on the seam lines so you can accurately pin point where the seams will meet.

The red flower diamond shape and the orange daisy diamond shape are seamed together, starting and ending at the seam points. This is repeated for the second set.

The small white triangles are then positioned between the diamond pairs, and each side sewn from edge to seam point.

These two sets are then joined along the long edges of the diamonds from seam point to edge.

The white square then is inserted between the two sets, being careful to meet at the seam points.

Then it starts to get a little easier as the big green paisley triangle is sewn along the long edge. No seam points to meet just edge to edge seam.

The little green paisley triangles are then seamed to the white rectangles and seamed to each side.

One last big white triangle to sew across the bottom… a good old press … et voilà!

This one did take a little more time than the others but it was still a pleasure to make and its a lovely one to add to the set.

Block Facts:

Name: ‘Basket of Flowers’ or ‘Lily Basket’ or ‘Flower Basket’
History: This design was ideally suited to the dress and feedsack prints of 1930s America, where it was a particular favourite
Level: Set in seams require experience.
No. of pieces:13

Progress report:

Block 1: The Double Four Patch
Block 2: The Whirlwind
Block 3: The Sailboat
Block 4: The Shoo-fly
Block 5: The Trafalgar
Block 6: The Windmill
Block 7: The Chequer Square
Block 8: The Diamond Square
Block 9: The Cactus Pot
Block 10: The Sawtooth Star
Block 11: To come!
Block 12: The Windmill Sails block
Block 13: The Basket of Flowers block