Have you heard about the Big Vintage Sewalong hosted by Butterick, yet?
It was launched just last week as a fun way to raise some awareness and some funds for a worthwhile cause – The Eve Appeal Charity: to date, the only cancer research charity focussed on improving detection, risk prediciton and prevention of all five gynaecological cancers.
From March to October this year, sewists from across the UK will be encouraged to sew one of the featured vintage dressmaking patterns, ranging from the 1930’s to the 1960’s. Money raised from the sale of each pattern will go to the The Eve Appeal Charity. The selection is amazing, but then I’m hugely biased – I’m a sucker for a vintage pattern! You can browse and purchase yours by clicking on the images below or from the official website:www.vintagesewalong.co.uk
And there will be plenty of opportunity to share your finished garments and follow others using hashtag #bvsewalong and copying in @McCallpatternUK on Twitter or @McCallpatternUK on Instagram.
1930s
1940s
1950s
1960s
To support the campaign there’ll be vintage workshops, events in store, a vintage tea party, a special supplement in Love Sewing Magazine and a blogger tour. That’s where I come in – scheduled for June 24th, to reveal my chosen vintage garment from the selection above. Can’t let the cat out of the bag just yet but I can reveal that it will come hand in hand with a giveaway of the self same pattern so be sure to keep tuned for details, because it’s a goodie!!
The Foldline have posted about it here and to keep up to date with all things Big Vintage Sewalong be sure to visit the official website at:www.vintagesewalong.co.uk
Let me know what ones tickle your fancy and if you have an inkling what my chosen pattern might be!
I am really good at procrastinating. I’m not so good at hurrying up a patchwork quilt. But who’s in a hurry, anyway?! Let’s not dwell on how much time it’s taken me to get to 25 blocks. Let’s not even spare a seconds-thought to how much longer before my amazing quilt will be ready to throw over my bed. Let’s just focus on the here and now!
This is a Churn Dash quilt block. Also known as a Churn Dasher or Roads to Berlin. The 25th block I’ve created to date and boy can you see how out of practice I am!
If I’d have retained momentum. I’m sure the inset seams would have been neater. Only one point matches up precisely. And I’m so pleased with that. But not pleased enough to unpick and sort out the other three!
It’s only that Mr O is away that I’m doing this otherwise I should truly be working on his waistcoat. So I should not spend a minute more on this. In any case. If I want that ‘handmade’ look about my quilt, it needs to have a couple of imperfections at least! The next one will be spot on, I’m sure.
Block Facts:
Name: ‘Churn Dash’ or ‘Churn Dasher’ or ‘Roads to Berlin’ History: Another 1930s favourite. One of many blocks inspired by 19th century domestic appliances! Works on its own or used as part of a more complex design. Level: Set in seams require experience. No. of pieces: 9
It’s been a while since I sewed a proper vintage dress and when I spied 5 gorgeous yards of pretty blue and white print fabric in a charity shop for a fiver, it was a sure sign to unwrap one of my favourite patterns. I bought the fabric thinking that if I screwed up, a fiver was worth the risk. But actually I loved the fabric so much I used some other polycotton, from stash mountain, to rehearse a toile for the bodice first.
Very few alterations were needed. I did a slight FBA to add a bit of shape and added an extra inch to the waistline. I think it fair to say that I manage to pack away a few more calories than those svelte 30s women!
The pattern is a vintage original from 1939: Simplicity 3302. And the condition of the pieces was impeccable. Factory folded and clean. Such an honour to be working with such precious pieces that are 75 years old!
The most surprising thing about this dress is that it takes 5 yards of fabric. At 35 inches wide that is. But it really doesn’t look that extravagant. I’m used to 50s style dresses taking up miles of fabric but the skirt section of this one isn’t even a full circle!
I kept to the instructions, like the good GTS I am, and I created a neck facing instead of lining. I also decided against overlocking the seams. It somehow seemed wrong! The fabric behaved beautifully and frayed very little so I opted for a spot of pinking! Feels far more authentic and it pressed beautifully flat.
I’m not totally sure what the fabric content is. But on doing a burn test, I was left with a very silky white dust. So the consensus is that it is 100% natural fibre and top notch quality I reckon! It has quite a good drape going on and doesn’t crease too much either which makes me wonder if it is cotton or not. I made a decision not to line it. Mostly because of the gorgeously warm weather we’ve been experiencing but also because it always seems a bit mad to line a natural fabric with a synthetic lining. And I wasn’t about to splash out on silk!
Having said that. I did use a silk organza for the sleeve stiffeners. You didn’t think those puffs stick out like that, unaided did you?! Quite a clever little trick that involves a circular piece of fabric like tafetta or flannel or organza, folded in half and sewn to the sleeve head before the gathering is done.
It looks a bit comical until you press the seam onto the sleeve and not onto the bodice which I did at first. Didn’t get a shot of that but the look on Dan’s face was priceless!
There is also an inverted pleat that is topstitched at the hem of the sleeve. So neat.
I’d like to say it all went swimmingly but I made quite a big boo boo when I inadvertently cut the back as two pieces and not on the fold. Very easily done when patterns of that era are unprinted, but, regardless, I needed a quick solution as it would have come up too small once I’d seamed it and also, I didn’t have a large enough leftover piece to cut another back piece. Quite a big issue when you get your hands on a unique piece of fabric from a charity shop. It’s not like you can go back and bag another metre!
So… This is a bit bodgie… I made an inch wide length of bias tape from a 2 inch strip that I’d rescued from the selvedge, using my trusty Simplicity Bias Tape Maker Machine. And with half inch seam allowance I sewed it on each centre seam of the back. That effectively joined the back pieces together where they would have sat had there had been a fold!
Luckily the seams are disguised by the busy print so I think I got away with it!
I know my hair do isn’t strictly 1930s and the shoes are far from authentic but it needed a little bit of vintage styling to pull it off. Especially as youngest dort decided it was ‘lovely but very 80s!!’
I love the sweetheart neckline. So discreet and so pretty. It doesn’t have any added interfacing so I’m surprised it holds so well. I did clip into those curves good and proper though!
I wrestled a bit with the zip. I knew I didn’t want an invisible zip. That seemed a bit wrong too so I opted for a lapped style zip insert. But could I get my head around it… No I bloomin’ couldn’t! I can do it with my eyes closed in the back of a pencil skirt but for some reason I just couldn’t pull it off. So I went for a straightforward zip insertion whereby I basted the seam shut, centred the zip and sewed to seam allowance. I did however prick stitch close to the teeth on the right side.
I reluctantly wore my new dress a to a party on Sunday. I didn’t know any of the guests and was a bit worried I’d stick out like a sore thumb (in my 80s dress…. thanks dort!). But my assumptions were way off. Such wonderful food and great music and the most amazing people. My ‘wallflower status’ was upheld!
With Candy from Black Dwarf Designs
Oh and hats off to my wonderful fella, Daniel Selway who took the photos and who now finally has a site to host his pictures. Right here, in fact!
It’s been a very long time since I sewed a quilt block! Almost a year to be precise! But hey, I’m not going to beat myself up about it!
This is the 24th block I’ve created to date and it’s another version of the Basket of Flowers design, which I make first time round here.
I much prefer the pretty fabrics in this block but I wasn’t so hot on those points!
It doesn’t pay to have a long break from quilting. I am so out of practice and I could easily have made another pair of pj’s in the time it took me to put this little fella together.
I’ve acquired some extra tools in the meantime… a quilting ruler, a new rotary cutter and a larger self-healing cutting mat. Can’t imagine how much longer still, it would have taken without those!
Incidentally, do not ever place your cutting mat on your ironing board, lest you forget that rubber and hot irons aren’t the best of friends! I came to my senses at the crucial moment!
Block Facts:
Name: ‘Basket of Flowers’ or ‘Lily Basket’ or ‘Flower Basket’ History: This design was ideally suited to the dress and feedsack prints of 1930s America, where it was a particular favourite Level: Set in seams require experience. No. of pieces: 13
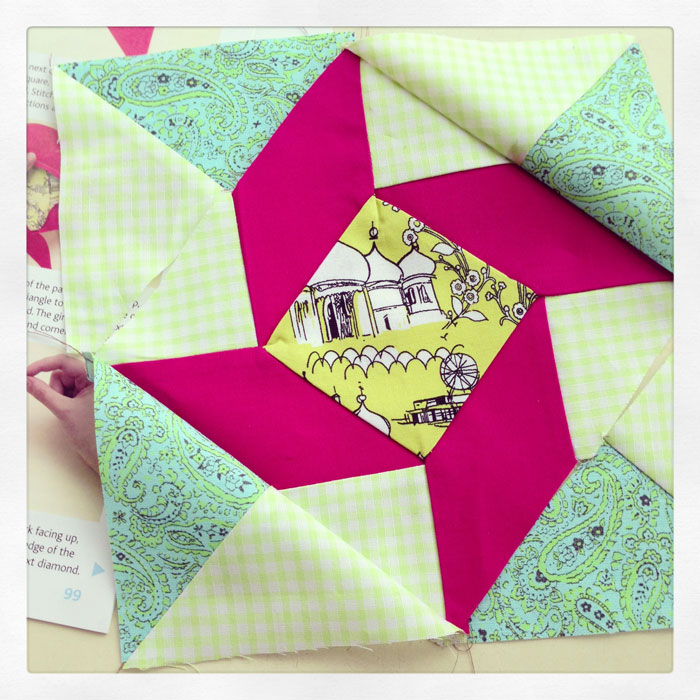
Now we are getting interesting… if you like this sort of thing! Meet the Windblown Square block. Number 23 from issue 25, The Art of Quilting.
It required all of the techniques that have been employed in the previous blocks. Diamonds were sewn along each edge of the Brighton Pavilion square, then the small green gingham triangles were inset in between the red diamonds to make a square. The remaining large triangles were joined in pairs and then sewn to the outside edges of the block to make a larger square… simples! Or not… if you try and rush it.
I completely forgot that I had previously cut these pieces out, so all I had to do was whip them up. But as the old saying goes, more haste, less speed. Indeed! I sewed the outer pairs the wrong way round which resulted in the gingham pieces sitting together. I thought I might get away with it but it would have been a forever niggle. So I unpicked, albeit sulkily!
Apart from concentrating to make sure all the right pieces are sewn on the right way, you also need to be so accurate and consistent with those seams. One wayward line of stitching and it all goes belly up!
Block Facts:
Name: Windblown Square or Star. History: Also known as Balkan Puzzle. Nancy Cabot recorded this name in the Chicago Tribune in the 1930s. Thought to reflect the complex politics of Eastern Europe in the early 20th century. Level: Straightforward to assemble but accuracy with set in seams is a must. No. of pieces: 17
Happy new year all! And boy am I glad to be back. Not that I’ve actually been anywhere. Just glad to be back in my sewing seat after a whole week of being struck down by a virus. All those sewing plans… all that time off… I really didn’t account for being totally useless for all that time. I have to say, my mojo is still not motoring as normal but I’m getting there. And this was the perfect little project to ease me back in gently.
This quilt block is called the Whirlwind Square, a variation of the whirlwind block I did here. It is block number 22 from issue 24 ‘Art of Quilting’.
In a nutshell: The small white triangles are paired with the tapered rectangles to make 4 triangles. All four of those triangles are seamed to make the central pinwheel (the final seam being pressed open). Then the blue polka dot triangles are sewn to each edge to frame the central block.
No major issues in making this little fellow up. A simple operation but great practice for making sure those points line up.
Block Facts:
Name: Whirlwind Square History: Traditionally found on mid-19th century quilts Level: Some experience needed to ensure that seams and points meet accurately. No. of pieces: 12
This quilt block is called Old Maid’s Puzzle, though also more recently known as the Bachelorette. It is block number 21 from issue 23 ‘Art of Quilting’.
This is the first of my blocks, so far that incorporate a classic ‘bow’ effect, formed by the points of paired triangles touching centrally.
Though there are lots of pieces, there are no inset seams and so it was pretty straightforward. The only problem I encountered was the triangle points being drawn down into the feed dog a couple of times. I have had this issue before. Not sure how to stop it happening but it seems to happen most if I reinforce the stitch at the beginning. It kind of gets chewed up.
In a nutshell: the pink dotty and white triangles are joined along their diagonals, as are the pomegranate and lime gingham triangles. They are ‘chained’ to make 6 squares. After clipping apart they are given a good pressing. The white squares are seamed alongside the pink dotty sides of the made up squares. Then the rectangles are paired to make ‘bows’. The remaining white triangle pieces are sewn to the pomegranate and lime gingham squares to form a larger triangle and then this triangle is seamed to the larger green paisley triangle. Finally the 4 larger blocks are joined together and the final central seam pressed open.
As with most of the blocks, I’m sure they will work much better when they are in position but I do think this one is one of the more interesting ones. A bit wonky on the edges but I’m sure I can cheat that when I come to do the edging!
Block Facts:
Name: Old Maid’s Puzzle or Bachelorette History: This block features in 19th century Amish quilts Level: Some experience needed to create neat joins where the triangles meet No. of pieces: 22
I have been seriously neglecting my quilt blocks of late. Am more behind than ever but heyho… I will have a lovely quilt on my bed one day. Just not some day soon!
Introducing the Whirligig block, number 20 from issue 22 ‘Art of Quilting’. Though issue 21 supplies the batting and instructions on how to join the first 6 blocks, I feel the need to get a few more blocks underway first.
Inset seams are second nature now. Not so daunting any more. Which is lucky because there are a few involved here!
The ‘orange blossom’ triangles are first sewn to the gingham pieces. Important to mark the 6mm seam allowance on the triangles before making the first seam. Then you know at what point to stop, where the seams meet. The ‘red daisy’ pieces are then joined to the triangles and then the final seam to the blue gingham completes a quarter of the main block. Once they have been arranged in position, the bottom two quarters are seamed together and then the top two. They can be chained and then snipped apart. Finally the two halves are joined together and the centre seam pressed open with the ‘toe’ of the iron.
I have to say this is my least favourite block so far. I think its the fabric colours. They create such a clumsy shape. I did consider selecting different fabrics but I wanted it to be consistent with the rest. The design is meant to be characteristic of the propeller look but it is very interesting how the design changes with use of pretty vintage pastels with more contrasting triangles, which seem to draw the eye more to the centre pinwheel.
Block Facts:
Name: Whirligig History: The combination of printed fabric and gingham is very typical of the feedsack quilts of the 1930s. Level: Some experience needed to create neat set-in seams No. of pieces: 16
I thought you might like a look in more detail at that Ebay haul I won in July.
Their arrival was a little ungainly to say the least. Not damaged in any way but clearly hurriedly bundled and tied up in… a Morrison’s bag. Not that there’s anything wrong with Morrison’s. But I did have a moment of OMG have I just bought a sack full of rubbish?! Surely these antique patterns deserved a carriage with a little more style!
I gingerly untied the knotted handles. Actually that’s a lie. I completely tore the bag apart because I couldn’t wait a minute more. Was a bit whiffy to say the least! But I can totally forgive the smell, the packaging and the wait.
I think I am still gobsmacked.
For starters, almost all of them are my bust size which means the only alterations will be to the waist and hip. So much less faffing. Even the few that are too small will be worth the adjustments. And I tell no lies when I say that each and every one was a doozy. Most of them unused and uncut.
The first little beauty that caught my eye was this cut out cover of Home Notes. A delight in itself but what was the chance of the patterns for these beauties being inside?
Every little lovely chance. I had guessed 1940s by the styling but in fact this unused and perfectly preserved pattern is nicely dated October 7th 1939:
Love the bit about: “Other sizes… obtainable FREE on application”. Can you imagine that happening nowadays?
I can’t find dates on most of the patterns but all are truly vintage and very beautiful. This is the first I’ve heard of Economy Design patterns. And I feel pretty damned lucky to have landed these lovelies:
Economy design patterns 161, 197, 198
Next up is a more familiar name, Simplicity. These stylish little numbers have all their pieces in tact, despite the damage to the envelopes. In fact the one on the right had some very interesting accompanying material!
Simplicity patterns 3979, 4494, 8488
Whoever Mrs Poole was – the name on most of the mail order pattern envelopes – she was a lady of very fine taste with impeccable organisational skills. In the envelope with Simplicity 8488 (above right) there was this cutting:
Great to see these vintage patterns in ‘real life’ photos. And it makes me love the ensemble even more! Also inside the envelope (from Readers Digest) was each copied piece of the pattern, traced and labelled with precision onto a 1960s edition of the Daily Express. This is one of the reasons that all these patterns are in such great condition and seemingly unused. Mrs Poole has dutifully copied them and kept the originals factory folded. This has given me a fine source of entertainment too, reading all the snippets of the papers. This one quite topical: “Billie Holmes, 24 year old Hull engineer, won the first Olympic cycling road race trial yesterday – by ONE inch. And this victory, over 96 miles near Chesham, Buckinghamshire, strengthens his claim for Rome spot……”
Thank you Mrs P.
Leach Way Patterns is a new one on me too. Any one heard of these? The dress pattern was still in it’s original mail order envelope which is date stamped 1949, so I might be inclined to date the coat and the suit around that time too. Needless to say, all three in perfect condition.
Leach way patterns 12375, 12536, 12963
Weldons is a name I recognise. I have a couple in my collection already and I love how they are always so incredibly stylish and yet a little bit quirky.
Weldons patterns 143 and 151
Now I am assuming ‘Womans Day’ was a womans magazine and this was a supplement… correct me if I’m wrong:
womans day gift book
But even better still, than this cheeky little gift book, the blouses featured on the cover and in centre spread are an exclusive Norman Hartnell pattern and all the appropriate pieces are present and correct in this gorgeous little pattern envelope:
Normal Hartnell blouse patterns
I love this 40s (?) McCalls suit. It is so reminiscent of the suits my grandma used to wear:
McCall 6780
And who could resist running up a few slips and bloomers for under their vintage dresses?
Style 4469 slips and bloomers
Woman’s Realm was defo one of my mum’s reads. So these conjure up a bit of nostalgia. I love the first dress. It’s numbered WR.1. I wonder if that is the first ever dress pattern issued by Woman’s Realm? The middle one is far too small for me in any case but the wedding dress with a few adjustments, I’m sure would be really flattering. I do like an empire waistline.
Womans Realm patterns
Here’s a classy Dior number from Woman’s Journal:
Womans Journal Dior pattern
There’s a couple of other great coat patterns too. One from Odhams and the other from Woman’s Own magazine. I am thinking of making a coat. Just thinking, for now!!
Odhams and Woman’s Own coat patterns
I think Mrs P was too as there were various cuttings of coat images too:
It’s amazing that all the pieces seem to be present for these Du Barry patterns. Whatever their pattern envelopes were made of they certainly disintegrate in a big brittlesome way. But look how Mrs P (I presume) has lovingly recreated the image herself. Don’t you just love the sharpness of these suits and frocks?
Du Barry patterns
I do like a shirtwaist dress and was delighted to find this one from Woman’s Weekly in the bundle. Woman’s Weekly was another of my mum’s reads. I distinctly remember the pink header and the elongated type on the cover:
Woman’s Weekly B170
Here’s a smart little dress suit from The People. One day, one day!:
The People 794
There was one little girls pattern included in the bundle. I would love my youngest daughter to wear little vintage dresses but I think there is some chance and no chance of that ever happening 🙁
Butterick 9161
Most of the other patterns were from Woman magazine. Another of the larger format mags if I rightly remember. And what a fine selection we have here:
Woman patterns
And imagine how excited I got when this one jumped out at me:
Woman Hardy Amies exclusive pattern
With all supporting cuttings once again:
I love the collar and the buttoned hip pockets. Not to mention the self covered buttons all the ways down, ooo… and the self covered belt. How amazing would that be?!
I am soooo making that Hardy Amies number!
And this wrap dress from Woman looks so much more inspirational in the mag too:
Woman 479 wrap dress
And, if ever I am going to make a pair of ‘Trews’, it is going to be this pair! I love that they are called ‘trews’. I thought that was a term only used and made up by my mum!
Woman p132 Trews
Apart from the masses of cuttings that I still have to sift through – believe me, there are stacks of pattern pieces cut out from really old newspapers – the above are without edits, the most amazing collection of patterns ever. Not one duff one among them. Well…. there was this strange one…
Woman p131 bed-jacket, bolero, hats and duck
…which has to win the prize of most random pattern ever!!


 It looks a bit comical until you press the seam onto the sleeve and not onto the bodice which I did at first. Didn’t get a shot of that but the look on Dan’s face was priceless!