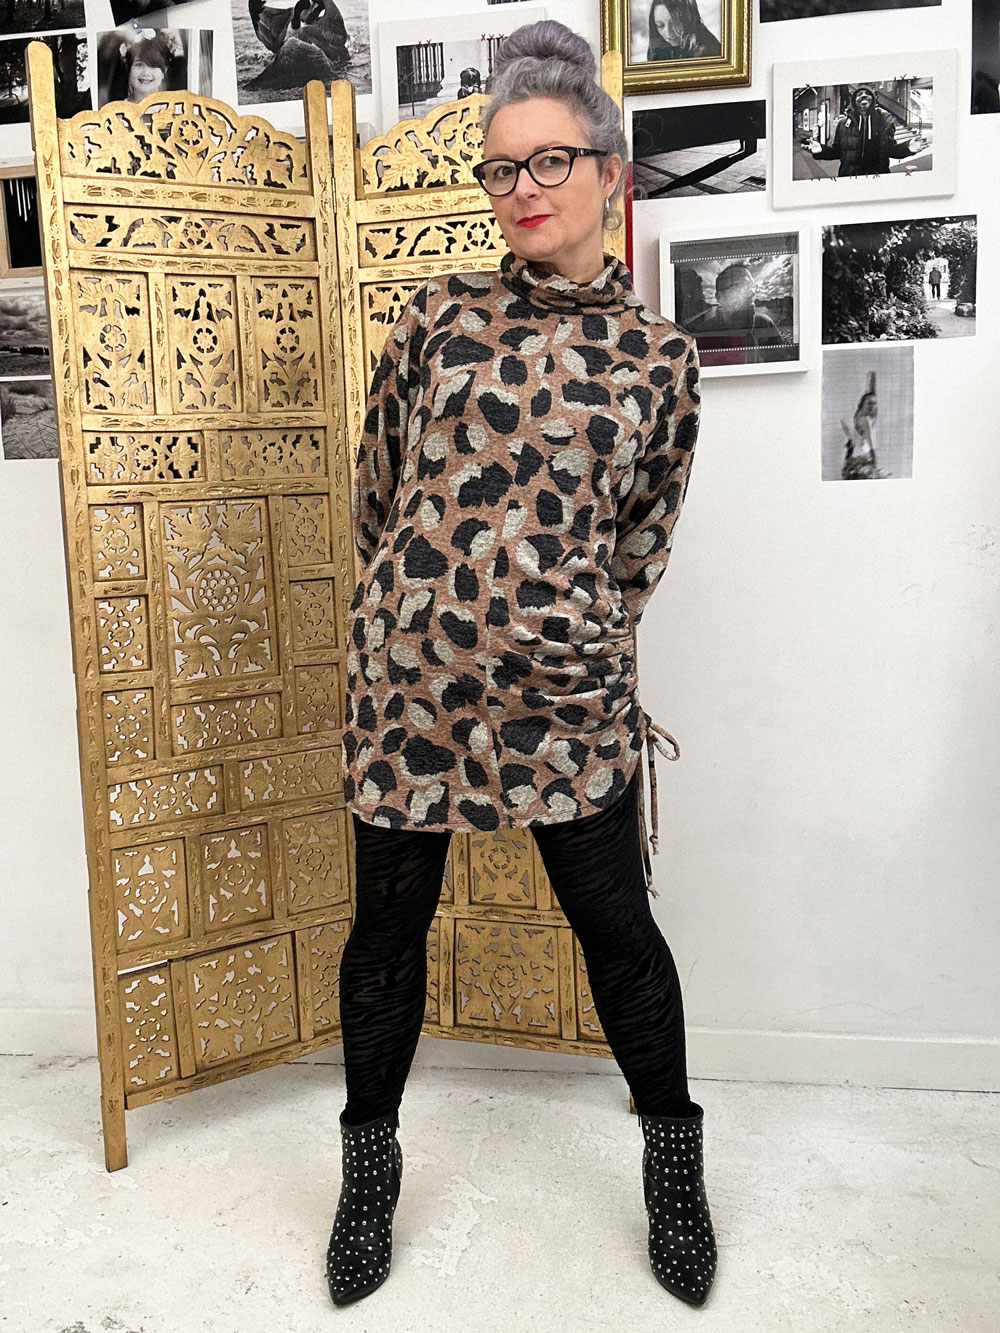
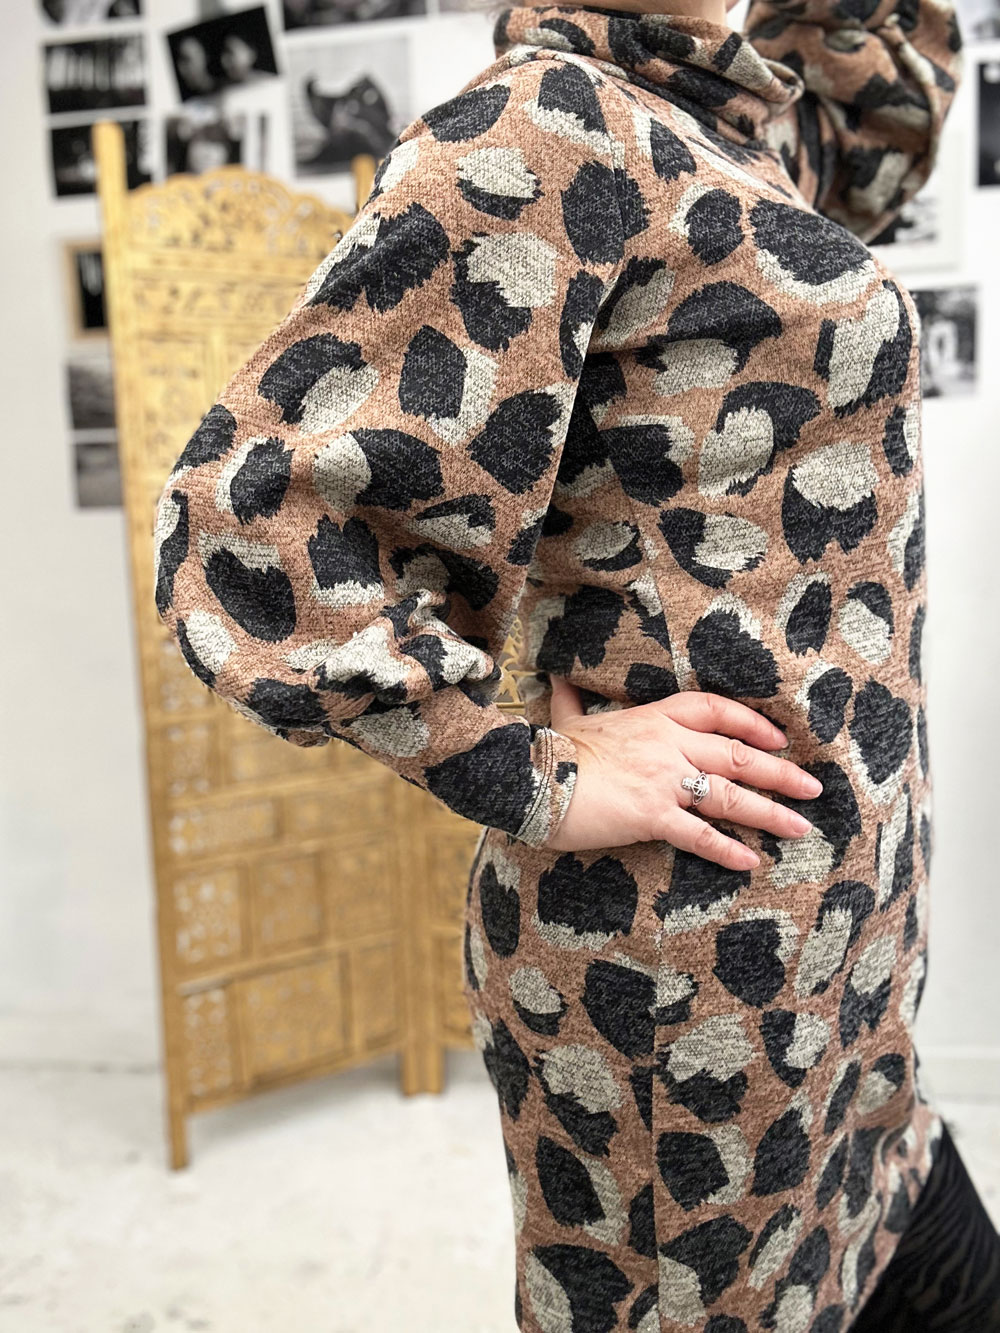
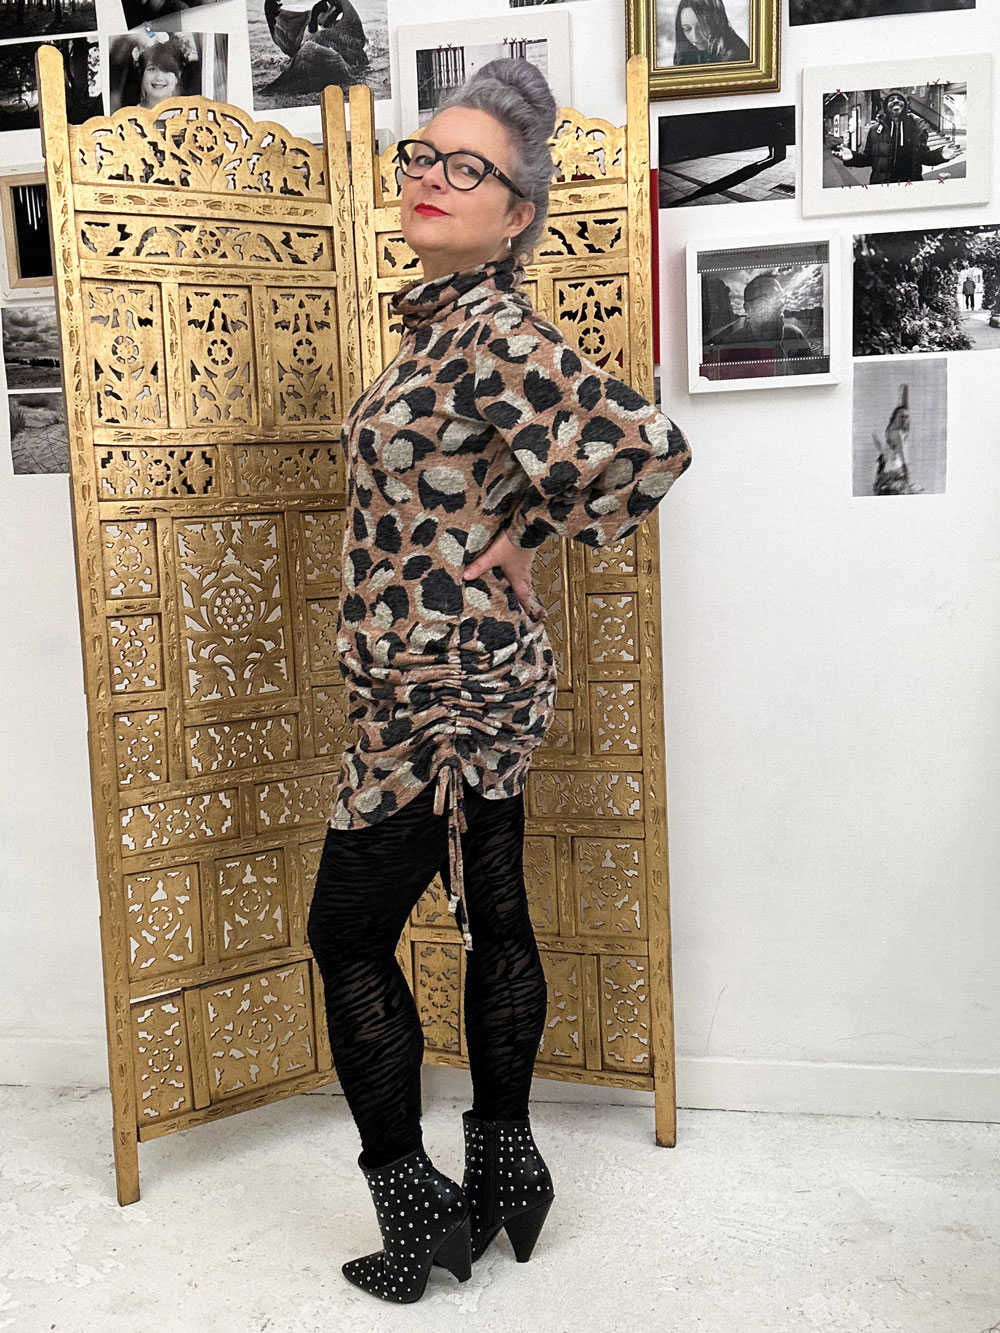
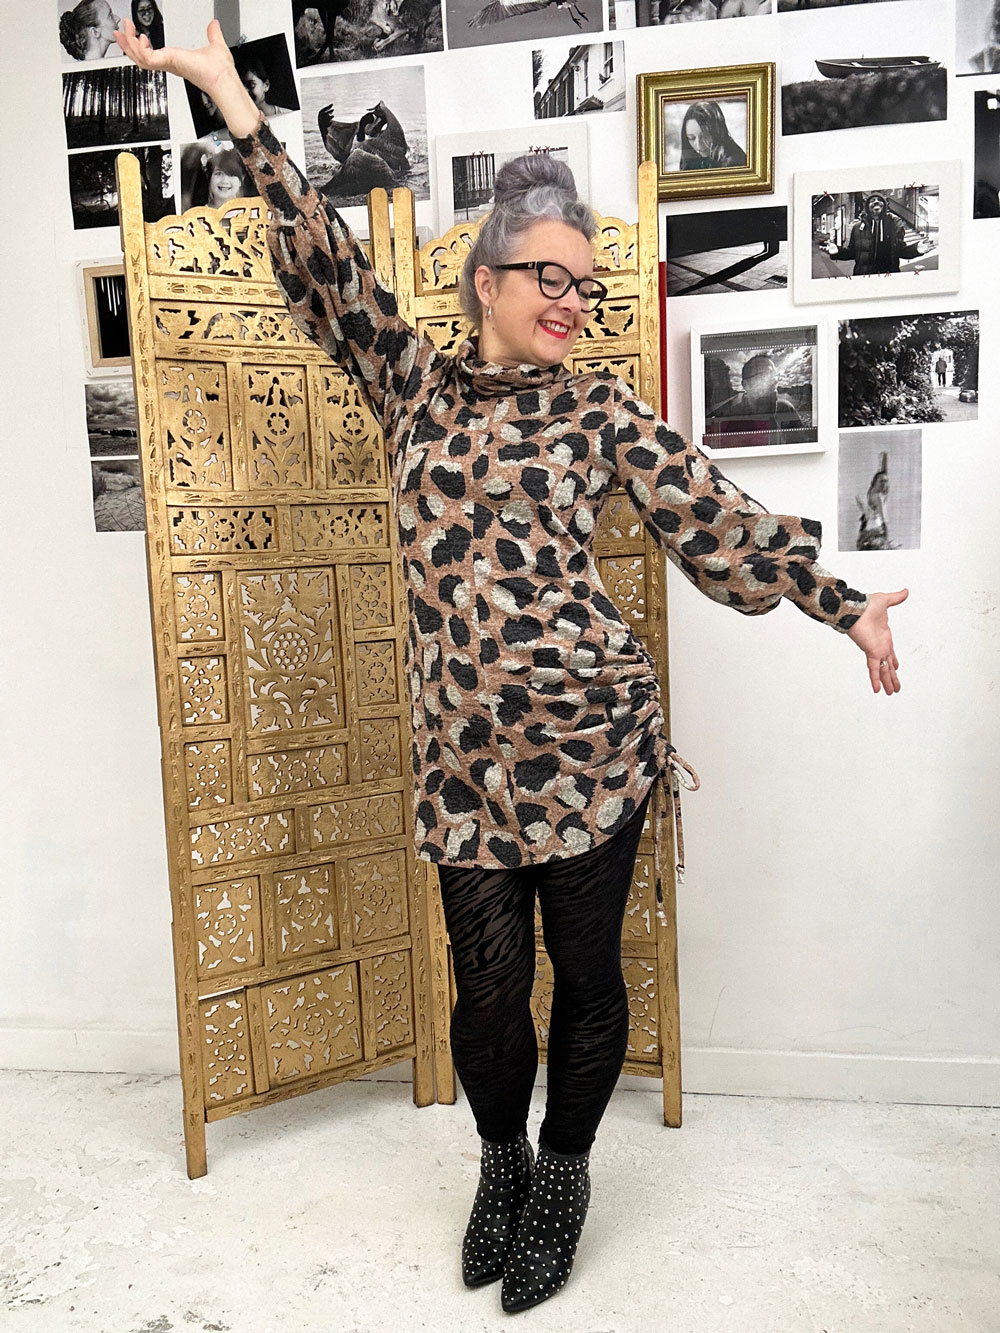
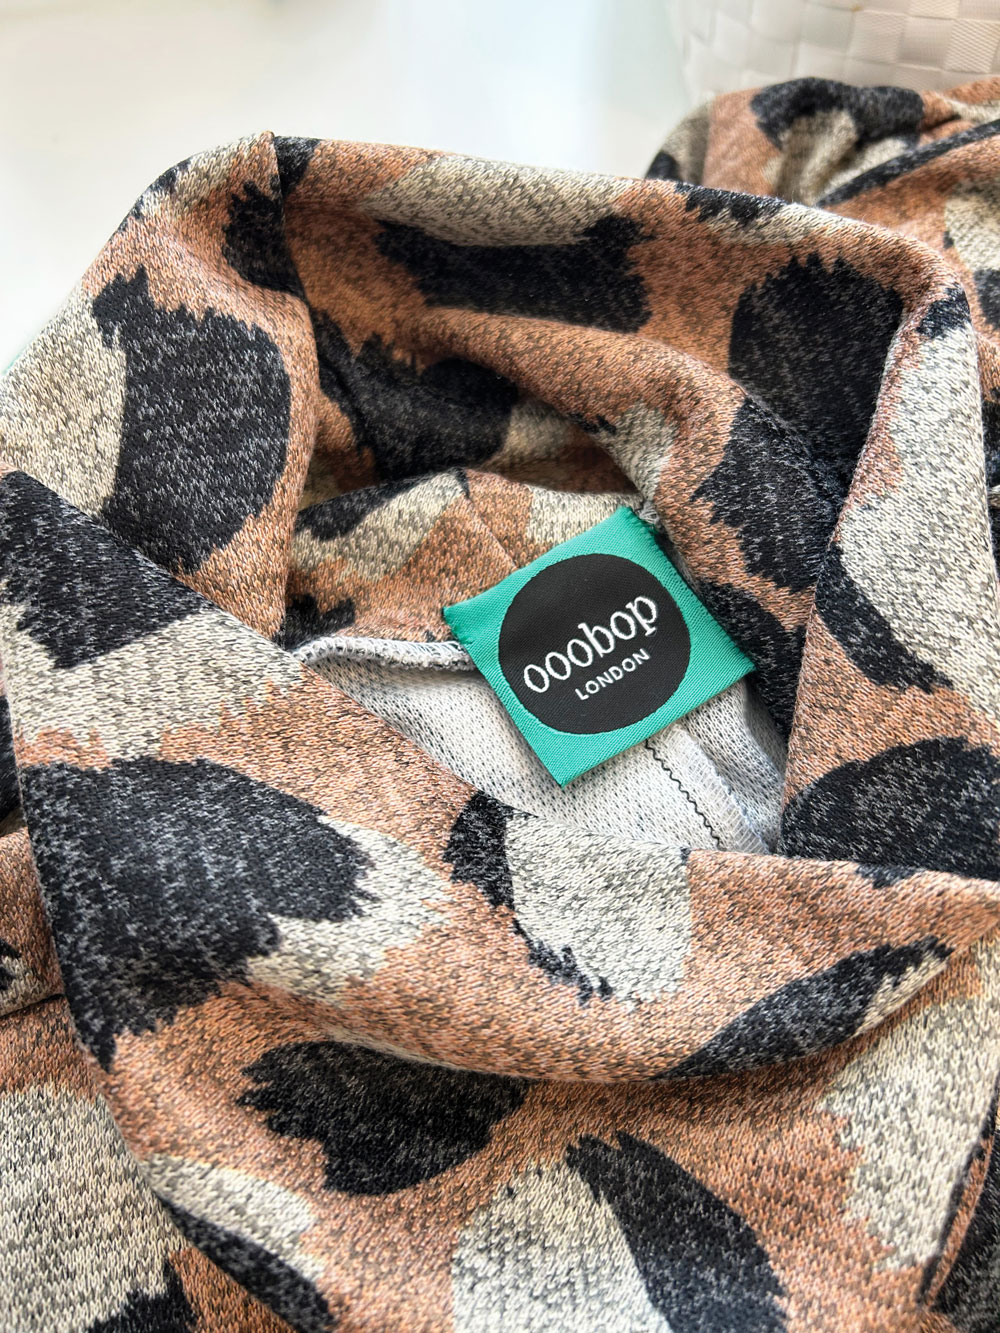
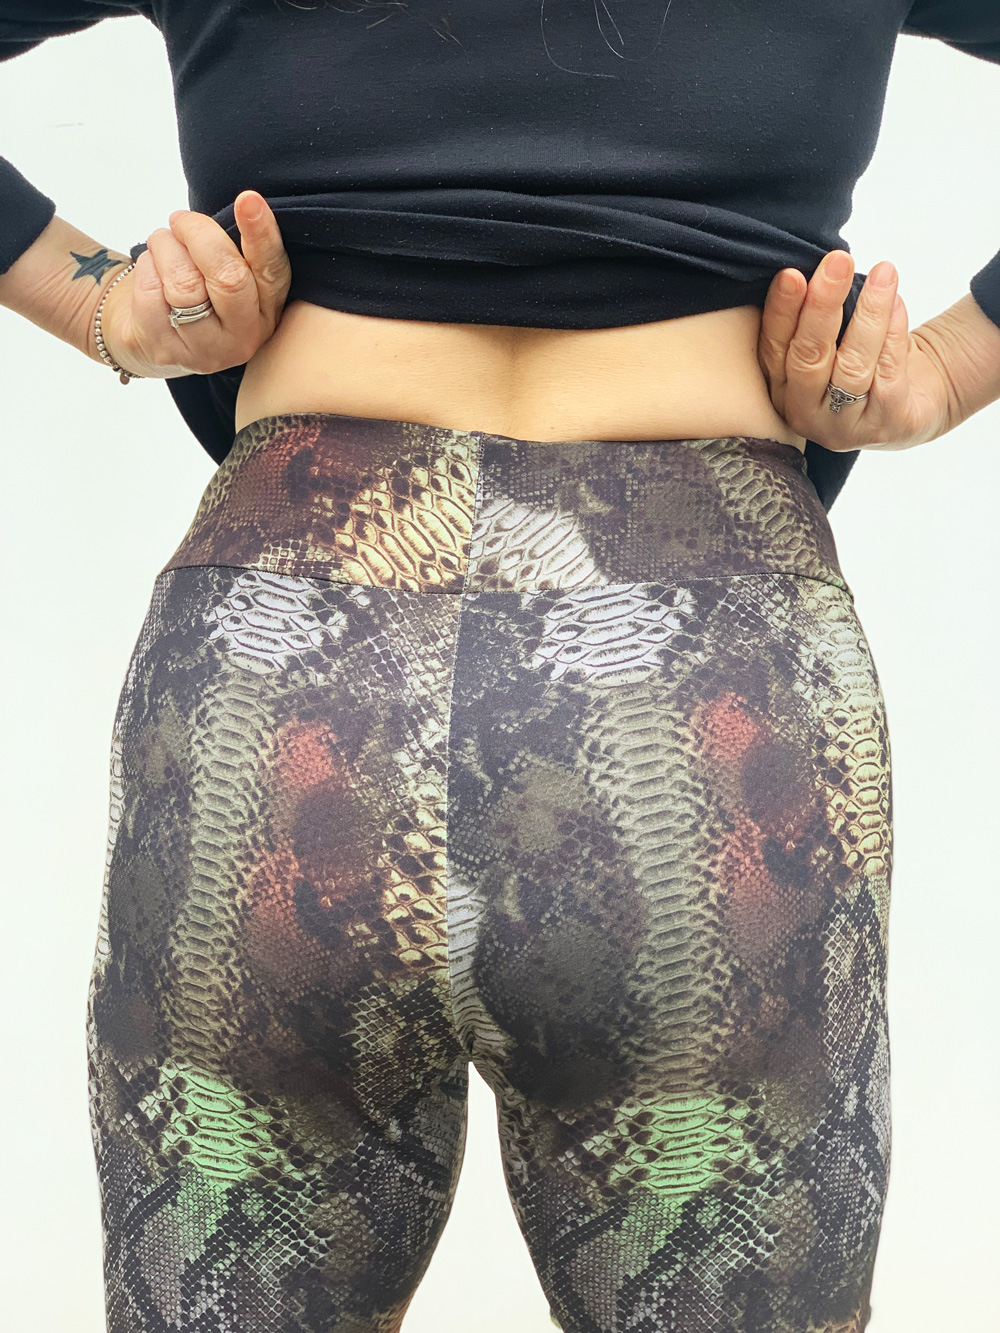
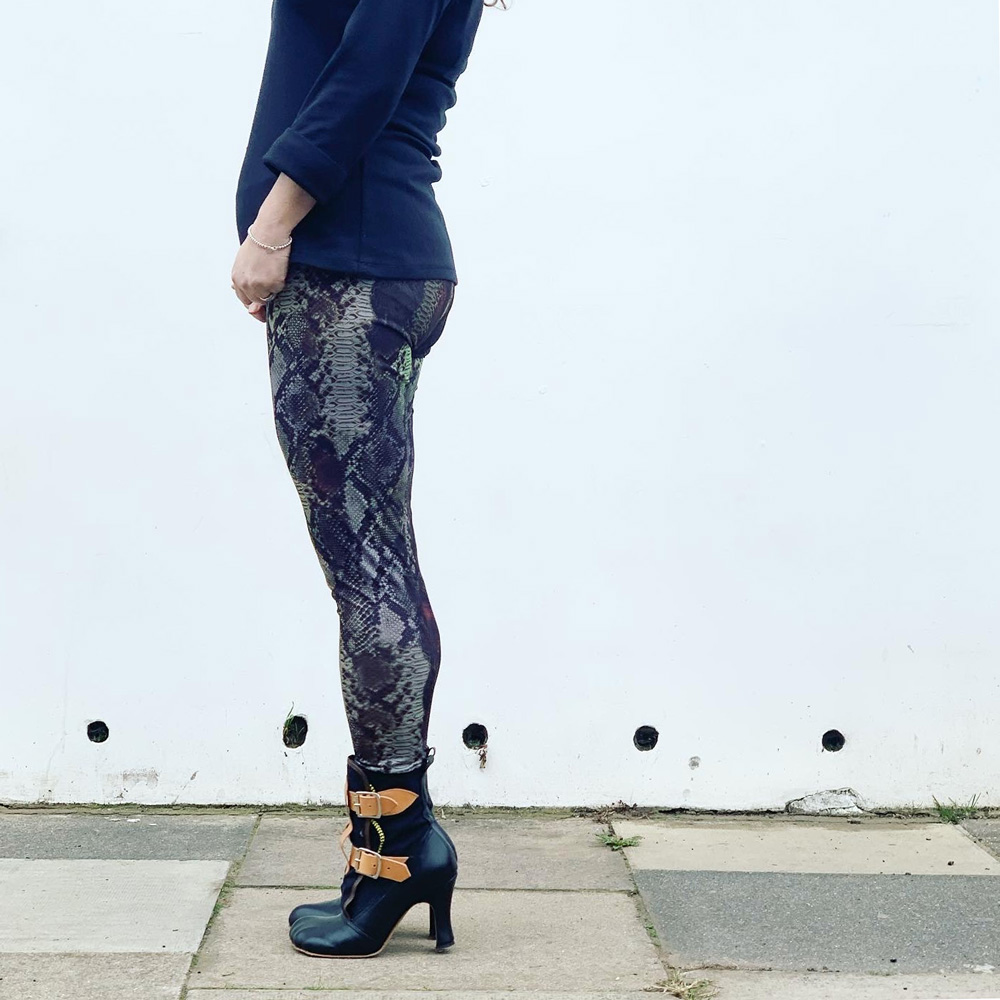
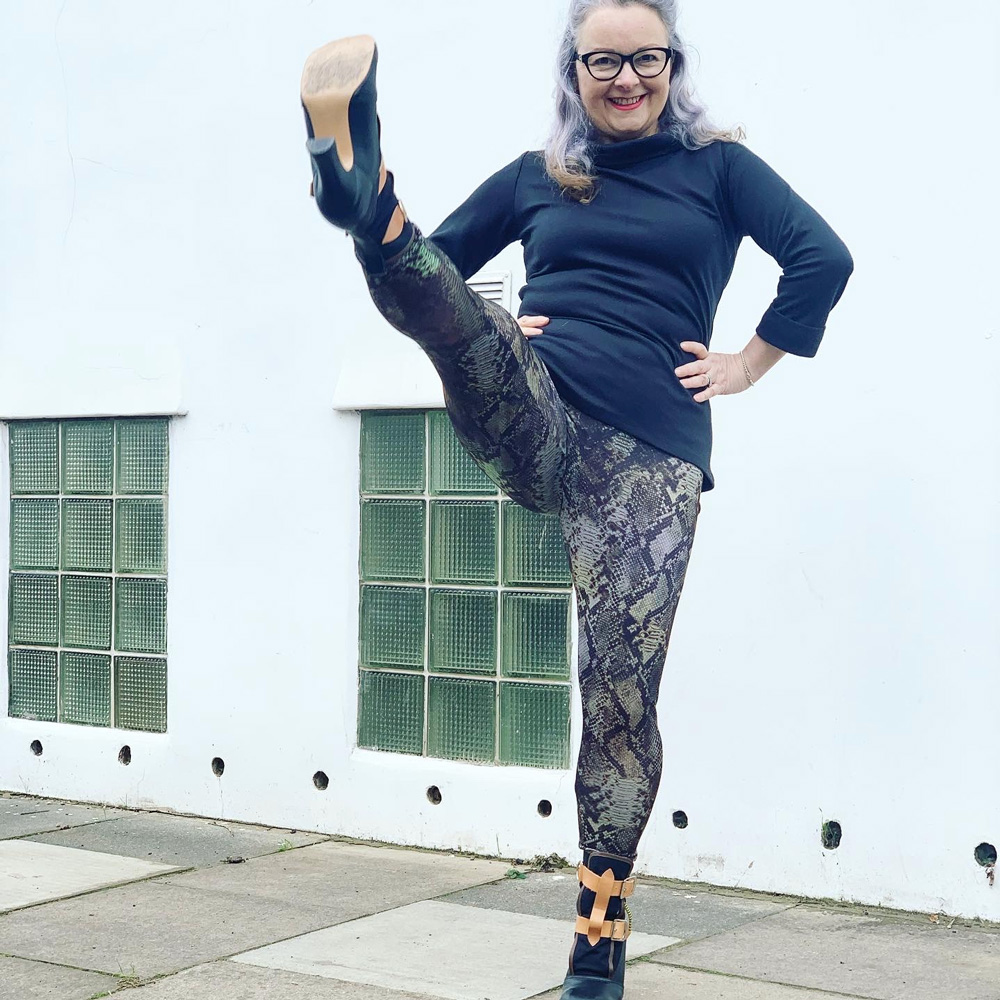
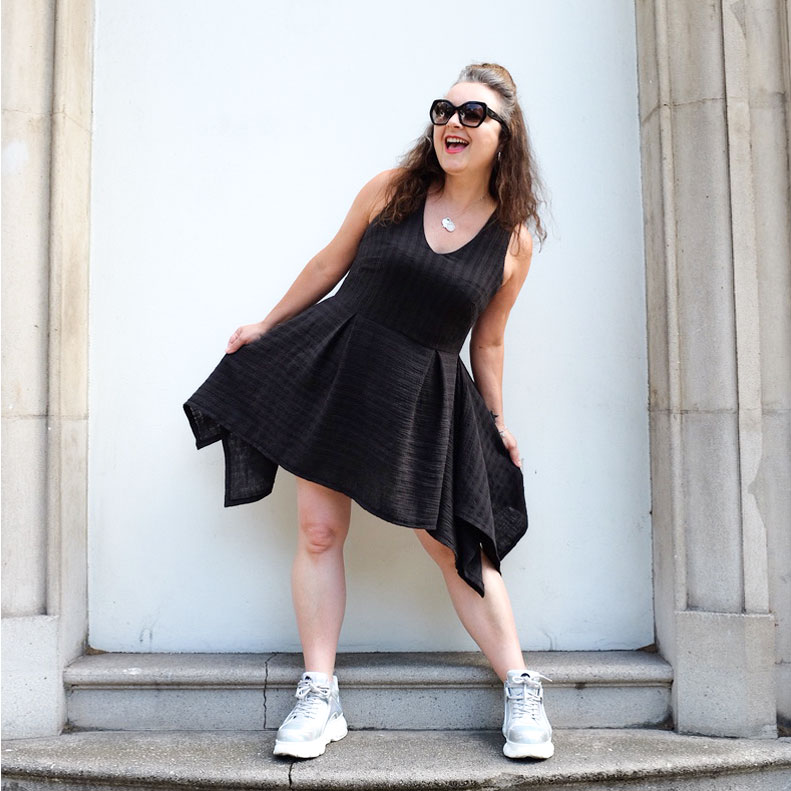
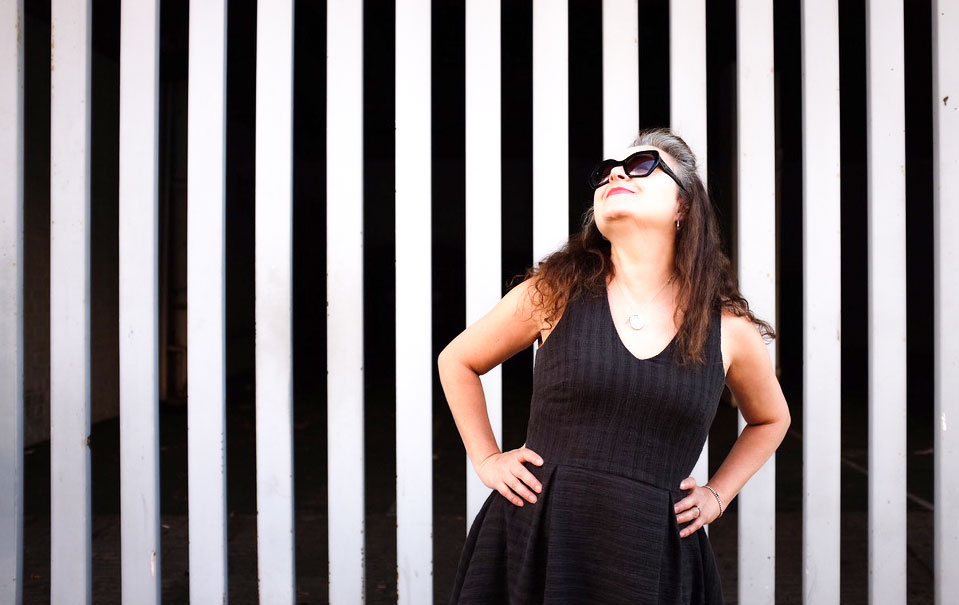
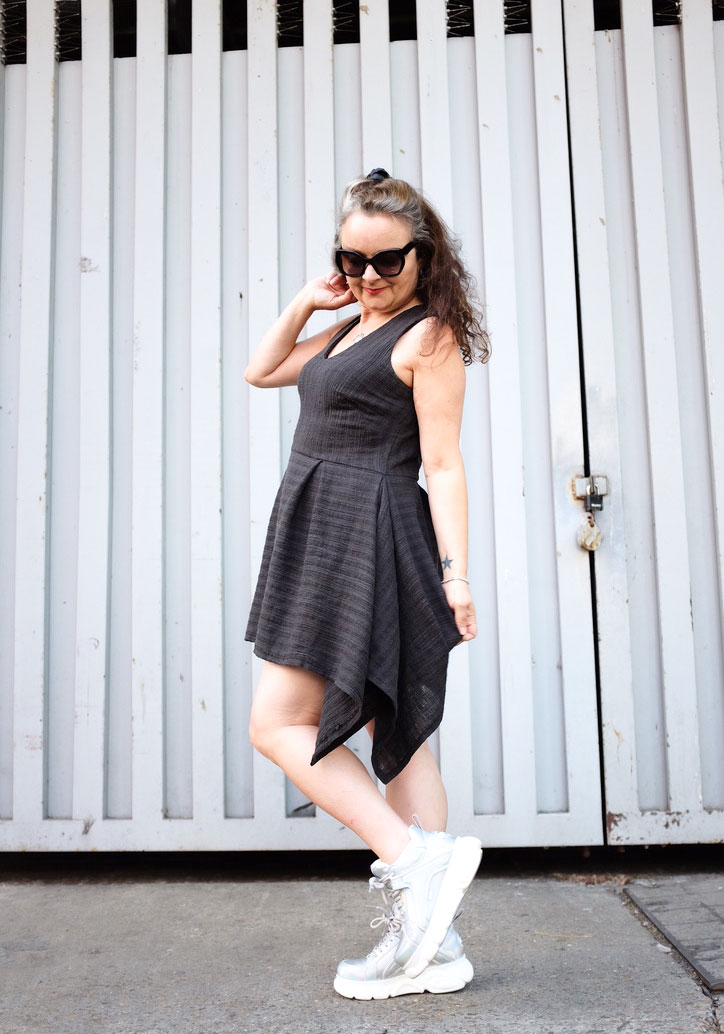
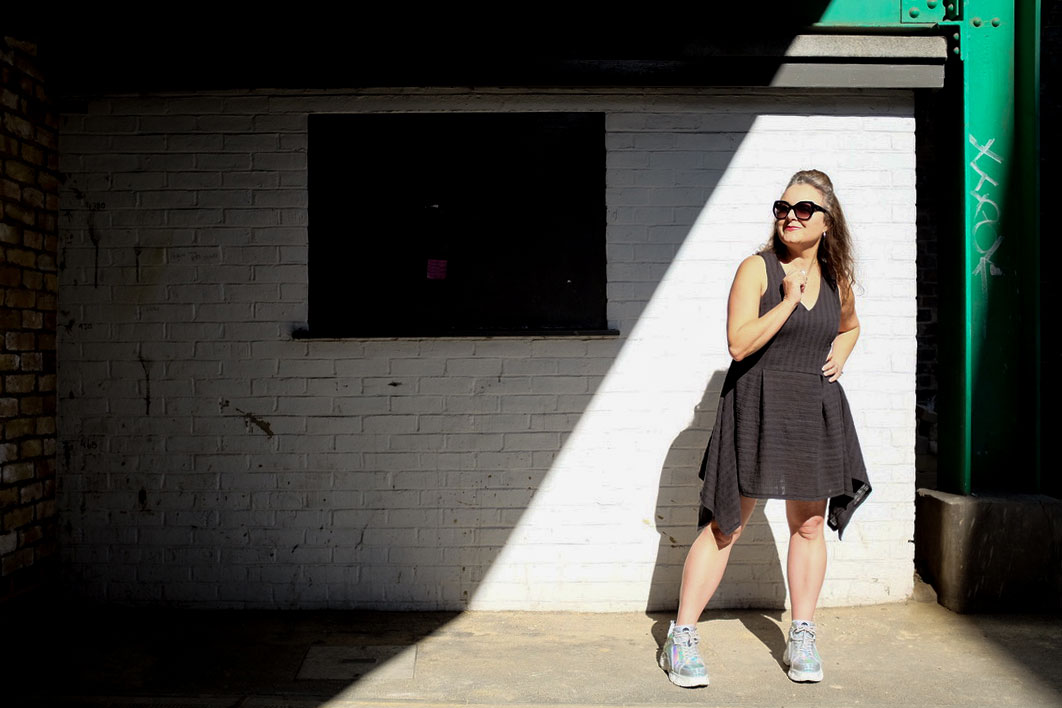
When Minerva presented their range of exclusive sweater knits to me I was very curious to know what they were like and when this piece of brushwork/giant animal print arrived I wasn’t disappointed. It’s a generous medium weight, very soft and super smooth to touch.
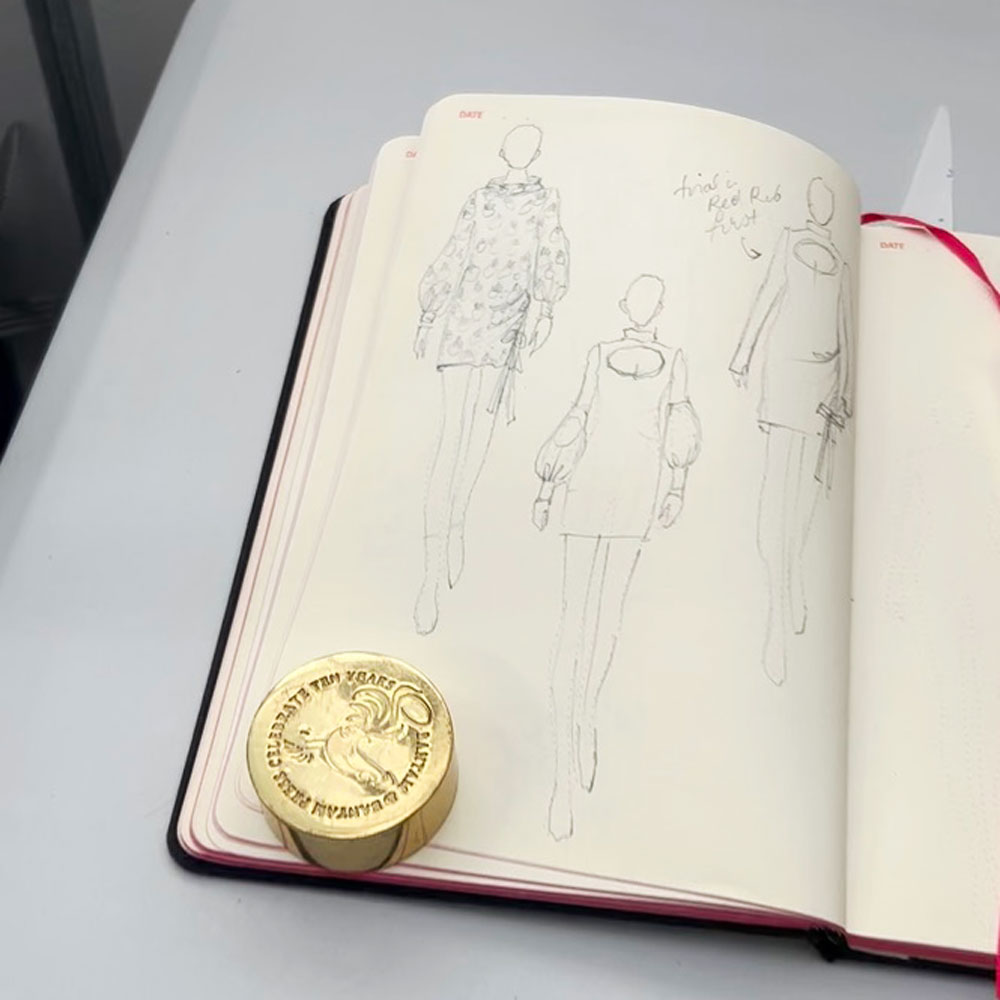
It was definitely worthy of a unique design so I got sketching in my Fashionary book. It’s fair to say that the natural drape of this fabric is what inspired the design. I wanted something cosy with long sleeves and and a high neck for chillier days. My skirts get shorter in the winter so I can embrace statement tights but I wanted a cheeky side detail to make it something other than just a fitted sweater dress.
I made a test garment before cutting into the lovely new fabric and I usually make the tester in the same or similar material at least but I had to settle for a cotton jersey as I couldn’t find anything remotely similar in my usual local shops. And needless to say, it didn’t behave in quite the same way. Luckily the Minerva fabric was much more conforming to my design, especially when it came to the funnel neck. I wanted it to crumple down, to reflect the draping at the left hip and it worked sooo much better than on the test version!
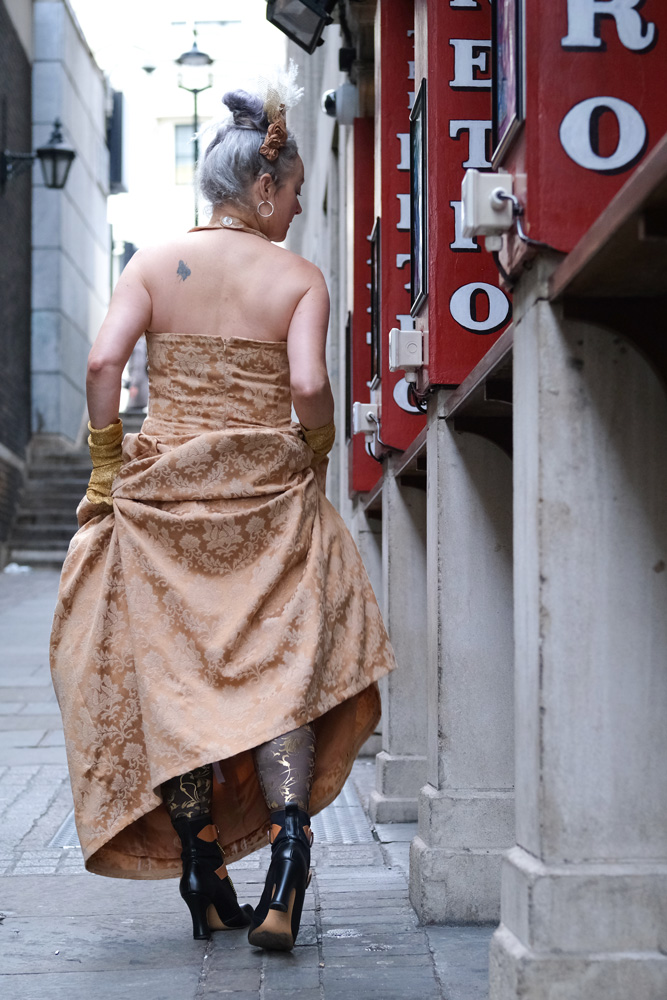
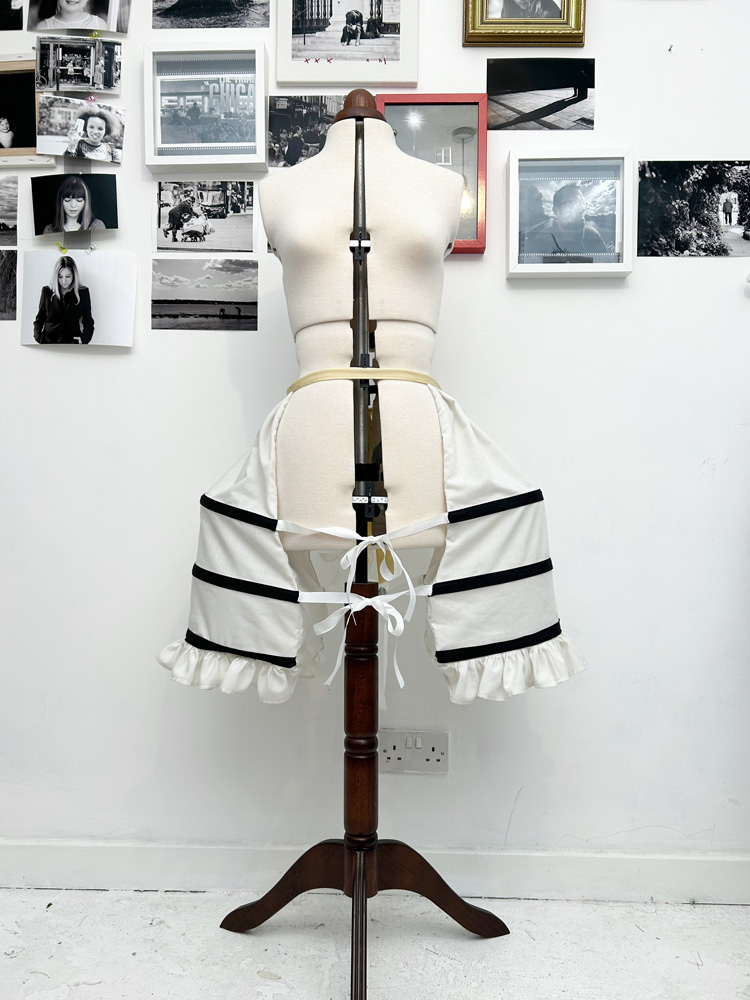
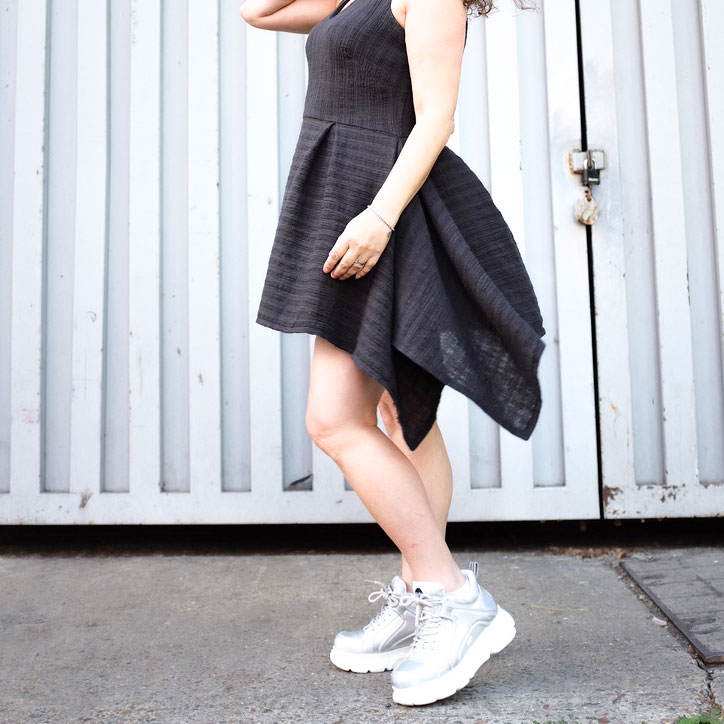
To achieve the side drapes, I created channels on the inside for two parallel ties which I secured at the tops. They are simply pulled and tied at the bottom which creates the draped look across the left front and across my left butt cheek! The ties were instrumental in creating an intentional detail rather than a look of ‘I simply haven’t pulled my dress down properly’!
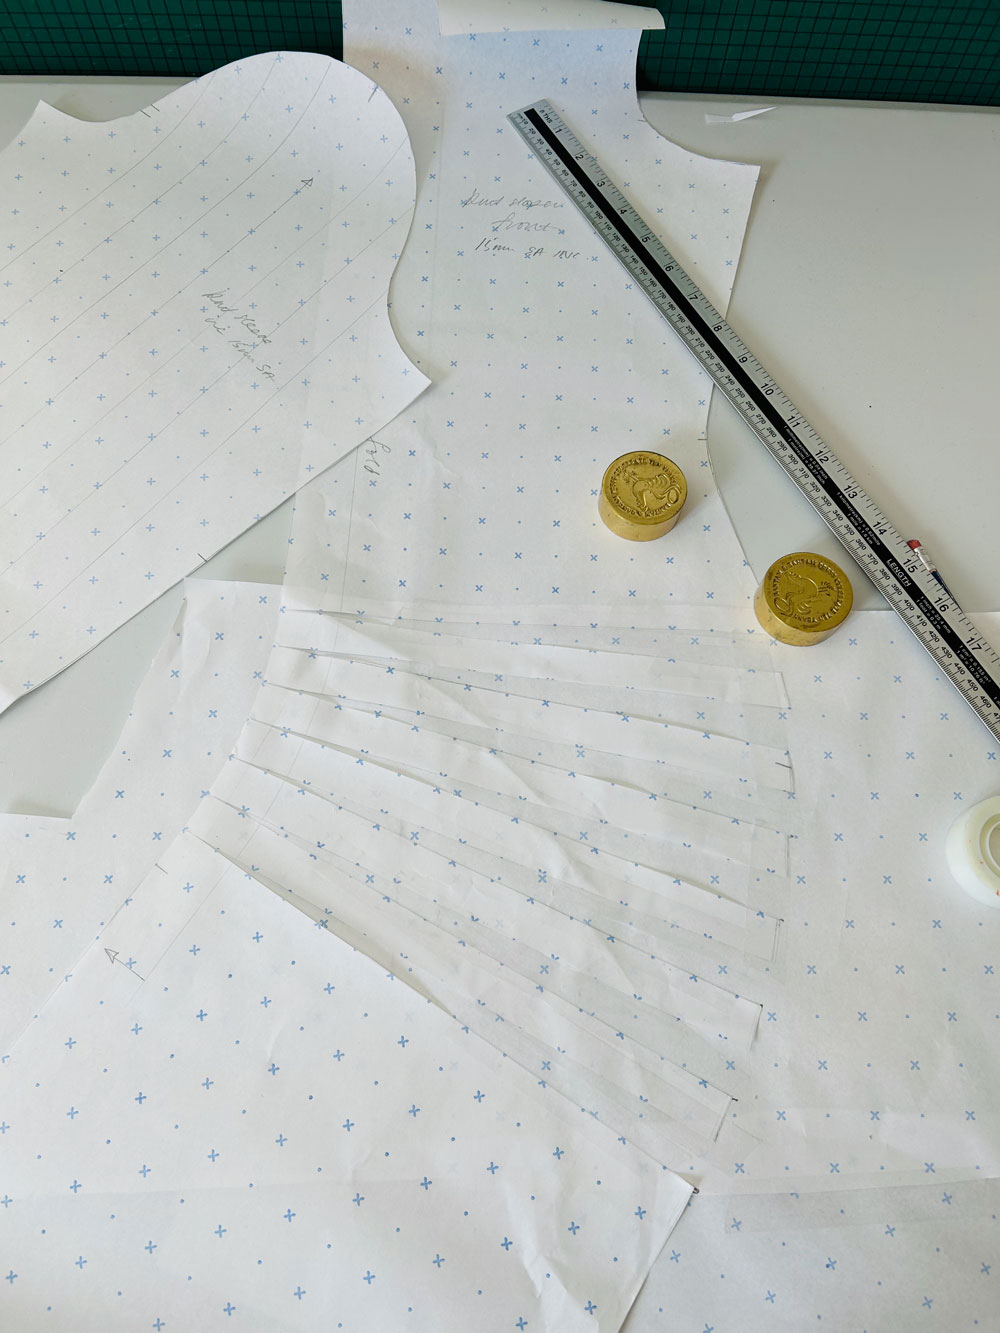
I knew I wanted a statement sleeve of sorts but I didn’t want to go large on the shoulders so bishop sleeves were the best option and this fabric performed perfectly for the job. Incidentally I realised I hadn’t changed my sewing machine needle to a ball point one half way through and that a regular size 80 had done the job just as well. Having said that, the advice is to use a ball-point so best not do as I did, just in case!
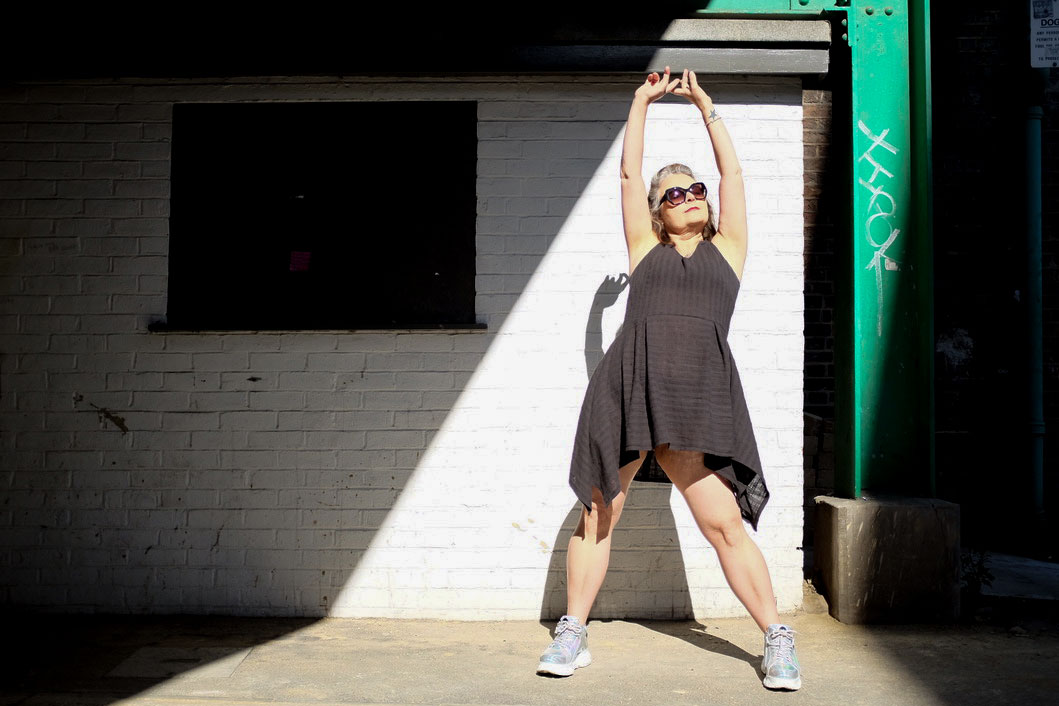
I sewed the whole dress with a combo of a wide zigzag and the lightning bolt stitch. All seams were serged afterwards. I find it’s easier to make fit adjustments if needed this way. Although now I’ve nailed the fit, chances are I’ll sew it all up on the overlocker next time for an extra speedy sewing fix!
The hems including sleeves got special treatment with a twin stretch needle. Although, as always that didn’t come without grief! I’ve never managed to make a neat job of it first time. I’ve always ended up with a knotty bobbin thread or clunky stitches. But I was super determined not to end up with a lamo zigzag hem this time. So I addjusted the foot pressure, changed up the stitch length and basically threaded and unthreaded about sixteen times before it finally worked. And I’m so glad I persevered because it looks so much more finished.
I’m so happy with the result. And I’m warm and toasty and very proud of my exclusive self drafted dress. So much so that it bears not only my ooobop seal of approval label but the lovely Minerva Maker label too! Thanks Minerva. This fabric was such a treat to sew!
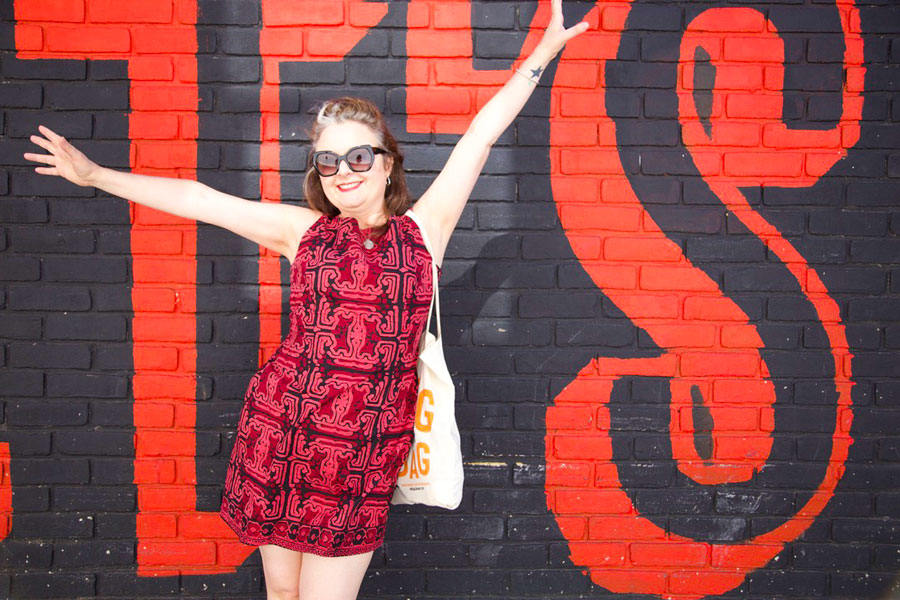
The Dressmaker’s Ball is an amazing annual event hosted by Crafty Sew and So in Leicester and presents a perfect opportunity to sew and wear whatever you damn like.
A free brief is pretty much unheard of in my work as a graphic designer. There are always rules – a style guide and house styles to abide by at the very least and so it is very refreshing indeed to be granted such freedom to create. Until of course, you start weighing up the possibilities which are endless!
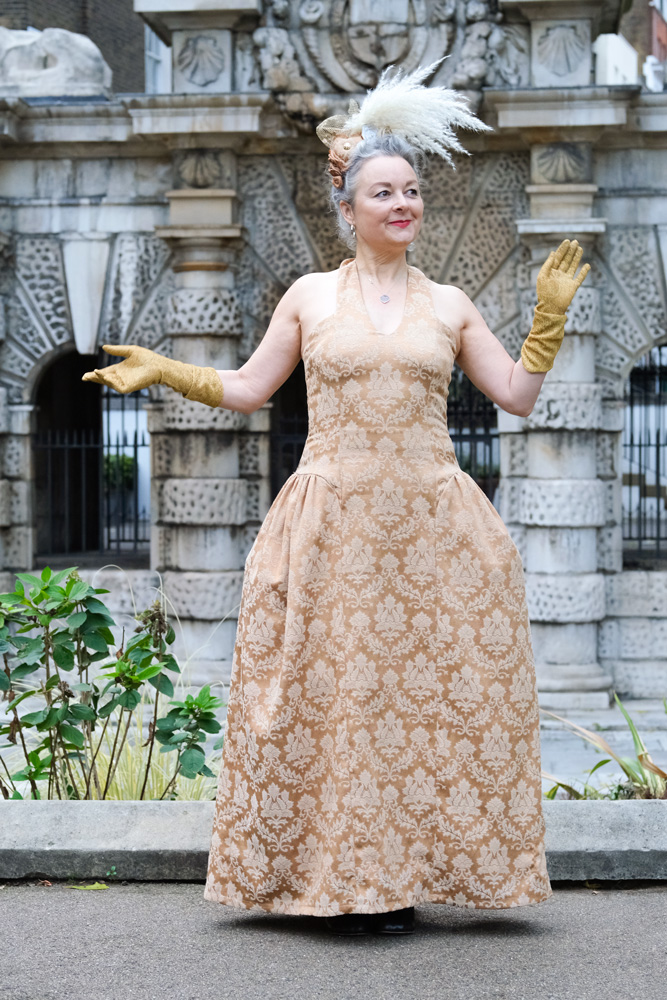
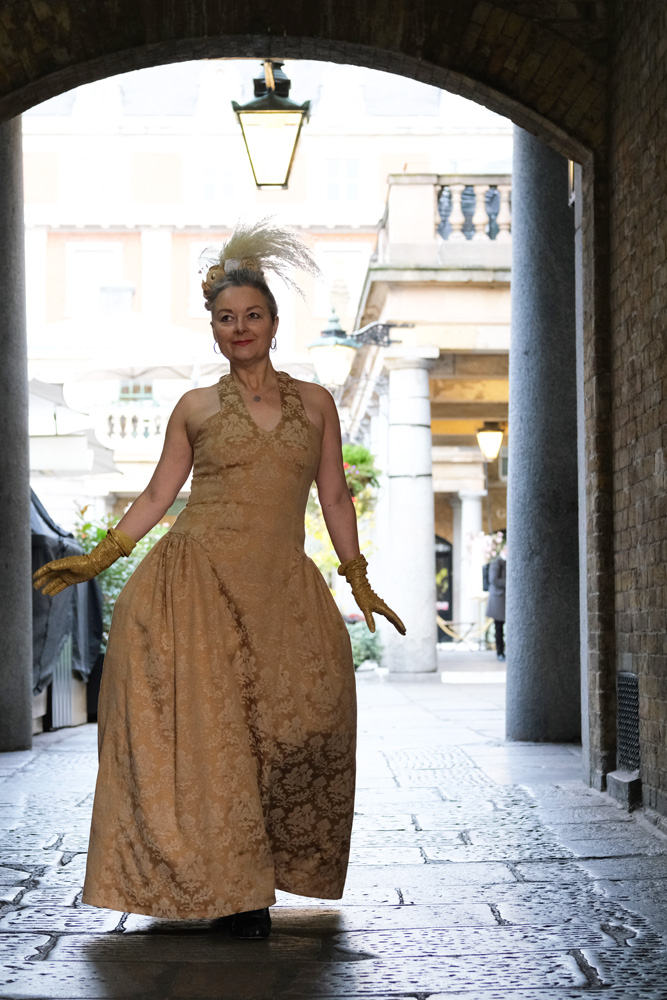
Gold damask ballgown front of York Watergate
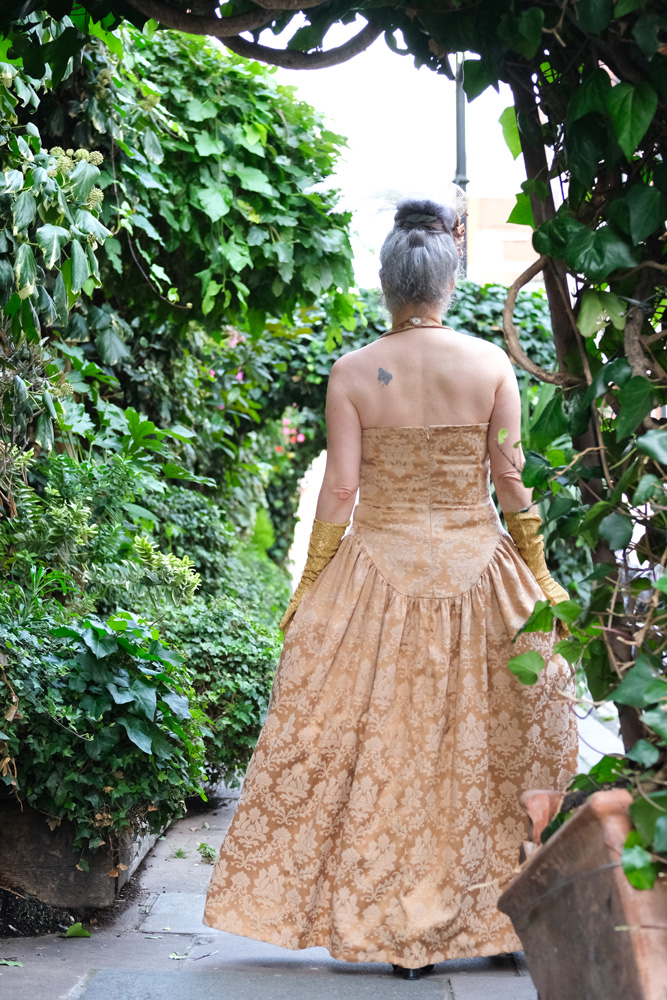
One thing I was sure of was that mine was going to be self-drafted. I decided earlier this year that if I’m ever to get really good at designing and pattern-drafting, I would need to practise it a lot more – figures, right?! So that narrowed things down a bit (not)! Secondly, knowing the chances of me going to another ball quite so soon after, or even wanting to wear the same dress twice in any chase, were pretty slim, I wanted to make sure my fabric choice was a sustainable one.
Weirdly enough as I sketched out my design, I did imagine a damask curtaining of sorts. I just didn’t know I was literally going to strike gold in my local charity shop!
One pair of vintage gold damask curtains = £6 – Just enough fabric for a ball gown it transpires!
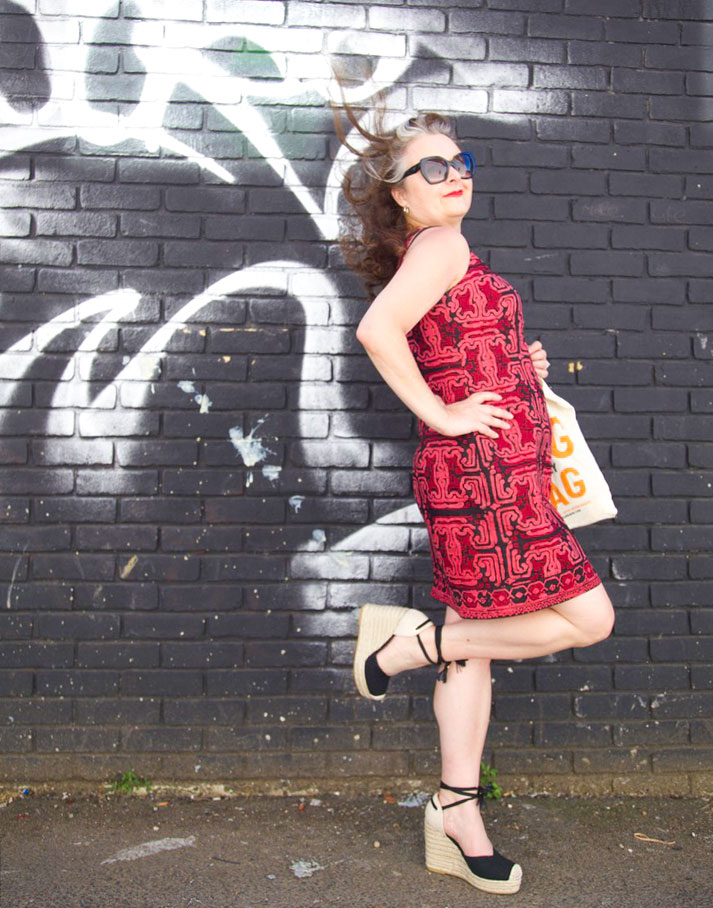
The design started out as a summer halter neck dress which I designed and made last year. I basically hacked the hip sections to create a silhouette similar to dresses of the 1700s. I can’t tell you why. I just did! Although if there was ever a wardrobe I could covet, it would most definitely belong to Marie Antoinette!
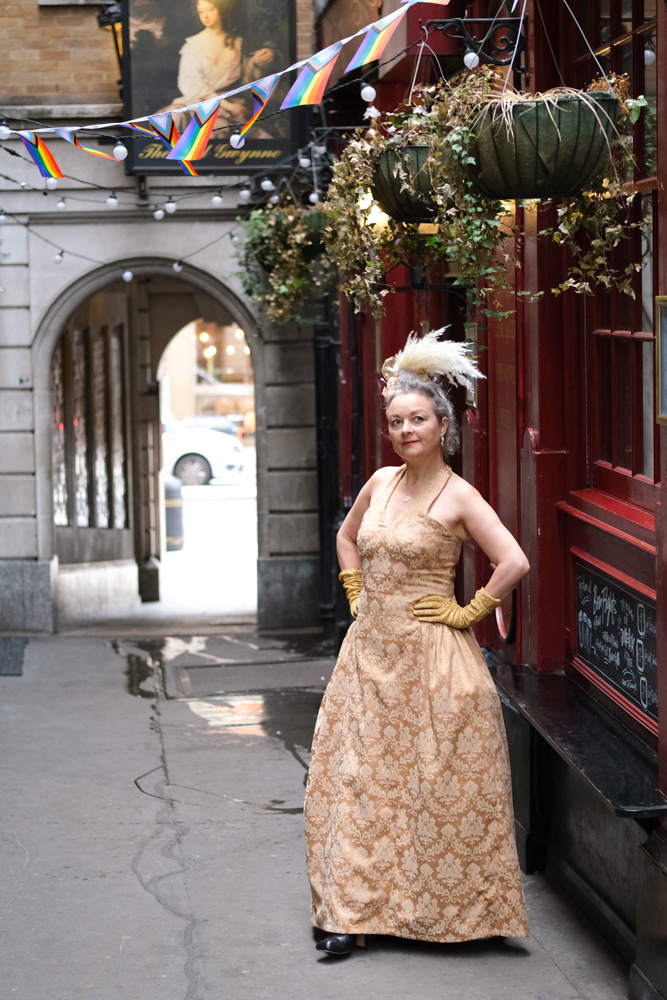
Gold damask ballgown outisde The Nell Gwynne Tavern
The styling of the dress was nailed quite soon and sewing it up was a relatively simple task, too but it was evident I needed some ‘scaffolding’ of sorts to make great shapes. There’s a lot of weight hinging on that halter neck and from past experience wearing my summer version, the back sags with its lack of support. So I created boning channels on the back and side seams to help it stay upright. I used plastic coated steel bones for no other reason other than I wanted to try something other than Rigilene. And I think I made totally the right choice. It felt very grown up to be cutting and filing them and sliding them in place. And I’m sure I’ll be finding more excuses to use them again soon.
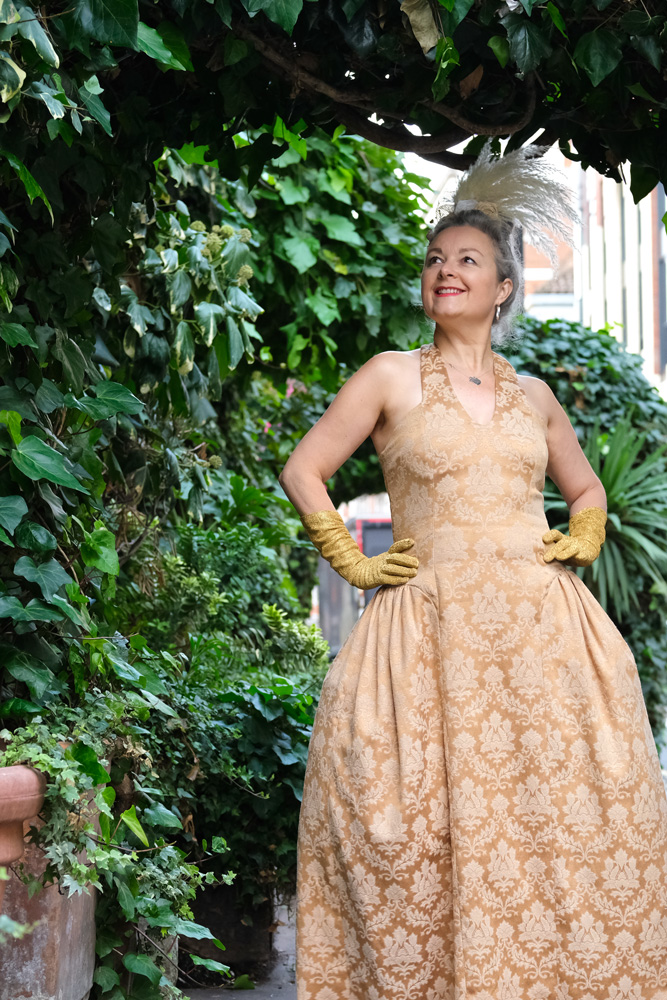
Gold damask ballgown in Covent Garden
And then of course I had to find a way to give some body to those hip sections!
I first tried to gather some doubled-over strips of double organza and sewed to the curved upper seam, in a similar way that I did with the puffed sleeves on my Alice in Wonderland dress. I didn’t get round to blogging that but here’s a link to my Insta reel which explains it a little. This method gave a little boost but ultimately, the weight of the curtain fabric just flattened it down.
The second experiment was very nearly the one I settled on, which was to use sections of crinoline. I found it in Classic Textiles in Goldhawk Road – I had no idea you could buy it by the metre. And I wasn’t entirely sure this was what it was for, but I tried to make gathered side panels again to sew along that top curved edge of the side sections. It was in need of boning too.
I mean it was ok but made the dress very difficult to fold without hard-creasing the crin. Plus, it was very scratchy and would need another layer of lining at least. I just knew I could do better. There had to be a way. And then the penny dropped that I just had to go trad with full on 18th century panniers!
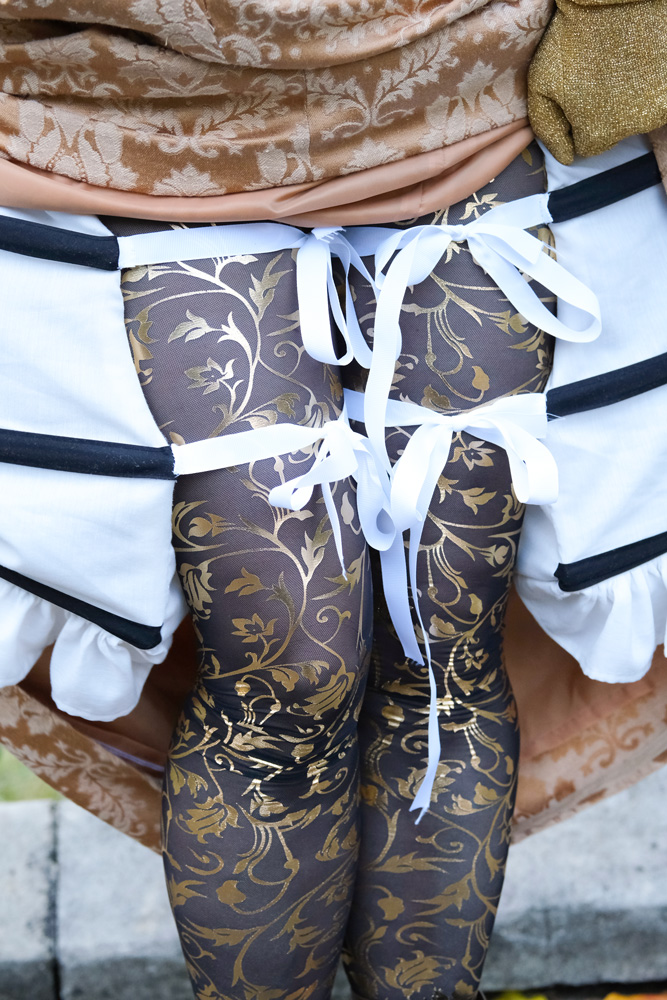
I Googled and YouTubed until I’d gleaned enough know-how to draft and sew a pair of pannier pockets from the leftover lining of the curtains. I already had some black bias binding, some white ribbon and some herringbone tape in stash so I thankfully didn’t have to fork out for any more materials. Not that I spent much on the curtains anyway!
There are three horizontal boning channels formed by the black tape, the top one is slightly shorter to create a gradual slope up to the hip and the whole ‘device’ ties around my waist and around each leg. Well, to be fair, it was Dan who suggested I tie the ribbons round my legs because for the do itself, I tied the front ones in front and the back ones in the back and it worked fine but restricted movement a little, especially going up and down the stairs but toilet trips were infinitely easier with this method!
I did end up lining the skirt section. And Im glad I did because it created a little buffer between the understructure and the fabric, smoothing out some lines and also made it feel more special to swoosh about in. I attached the section seams of the lining to the main fabric with French tacks to keep it from twisting round. That was a fun thing to do in the hotel room earlier in the day!
Gold damask ballgown in Covent Garden
The panniers are collapsible by the way, and fold flat which made for easy transportation to the ball and the dress itself didn’t even need an iron when I took it out of the case
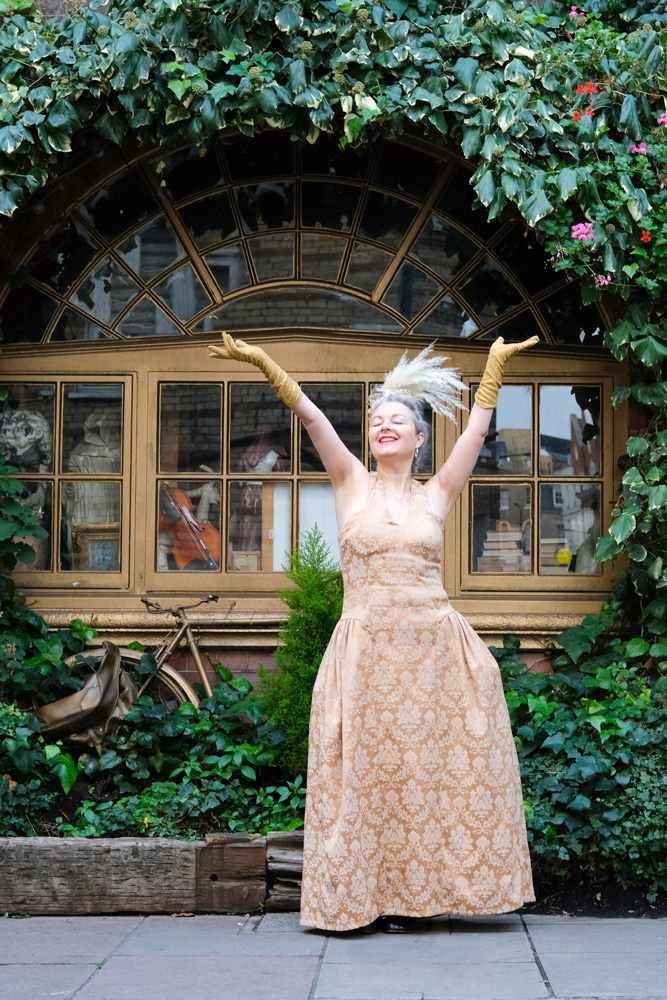
Gold damask ballgown outside the Sarastro
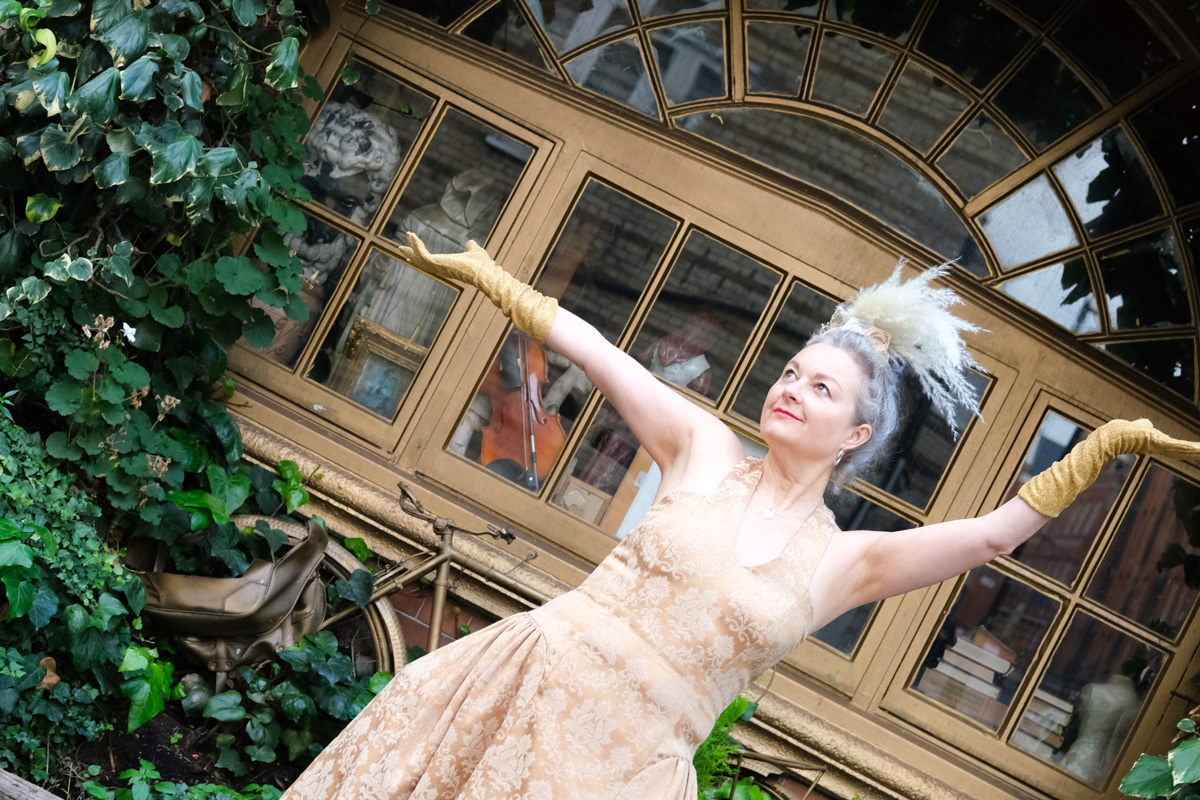
I’ve shown a few in situ photos on insta and I’m sure the official event shots will be ready soon but I so wanted `Dan to do a separate London Shoot and I’m so pleased I manage to grab him for a session before he went away for work again and we are so very lucky that London presents so many wonderful locations for us to choose from. It turned out to be quite the history lesson too!
Gold damask ballgown outside the Sarastro
The first location was in front of York Watergate, once the river entrance to the Duke of Buckingham’s London mansion, and now stranded some distance from the water in Victoria Embankment Gardens. The impressive watergate is just a short walk into the gardens from Embankment tube station and was built in 1626.
The second, outside the Nell Gwynne Tavern: Built on the site of the Old Bull Inn, It was named after the infamous mistress of Charles II. Nell, born and raised in the locality at St Martin in the Fields, sold fruit in the nearby Covent Garden market before gaining fame as an actress on the Drury Lane stage. Samuel Pepys describes seeing “the mighty pretty Nell” on his way to the Strand in 1667.
Next we went to Covent Garden which has been in existence since the early 1600s too!
Gold damask ballgown outside the Sarastro
The leafy shots above were taken outside Sarastro restaurant in Drury Lane. I went there years ago and it was an amazing feast for the eyes! Outside presents curiosity shop styled windows, framed in gold. Inside is the stuff of theatre dreams!
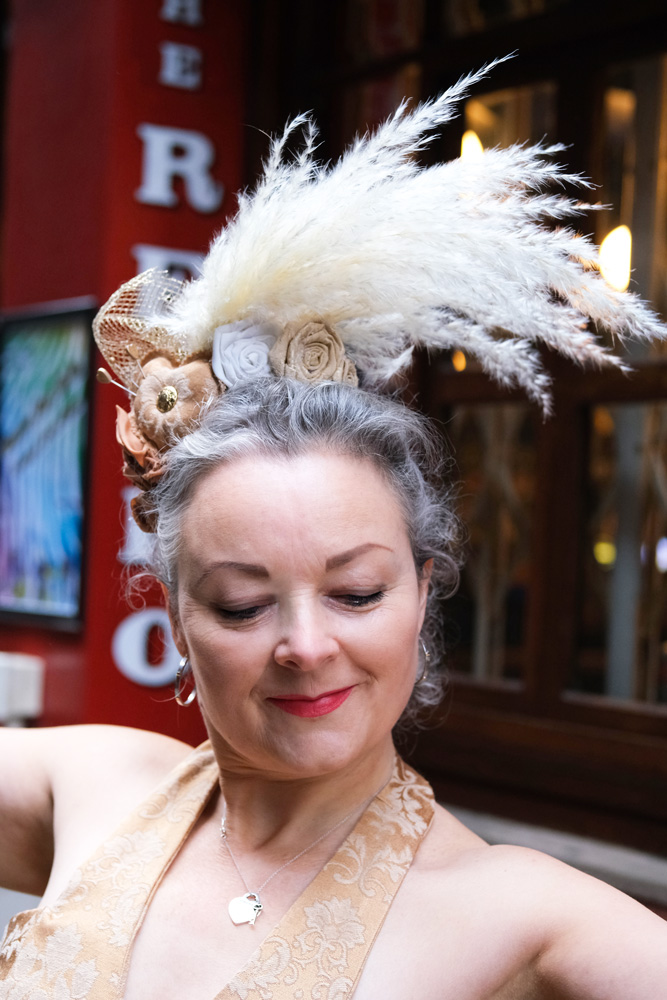
Before I sign off I must also mention my headpeice, hat, fascinator… I still don’t know the correct way to adddress it. But I made it. And I’m proud of it. And it was also formed from materials I already had to hand, ticking that sustainability box once more!
The plume is actually a piece of Pampass grass that I snaffled from the studio garden! The heart shaped pincushion is made from the leftover scraps of the dress, stuffed with overlocked offcuts and adorned with a gold lonesome vintage button from stash. I sprayed the pin heads gold, of course. The remaining flowers are made from scraps of the dress and lining fabric and the gold netting is also reclaimed.
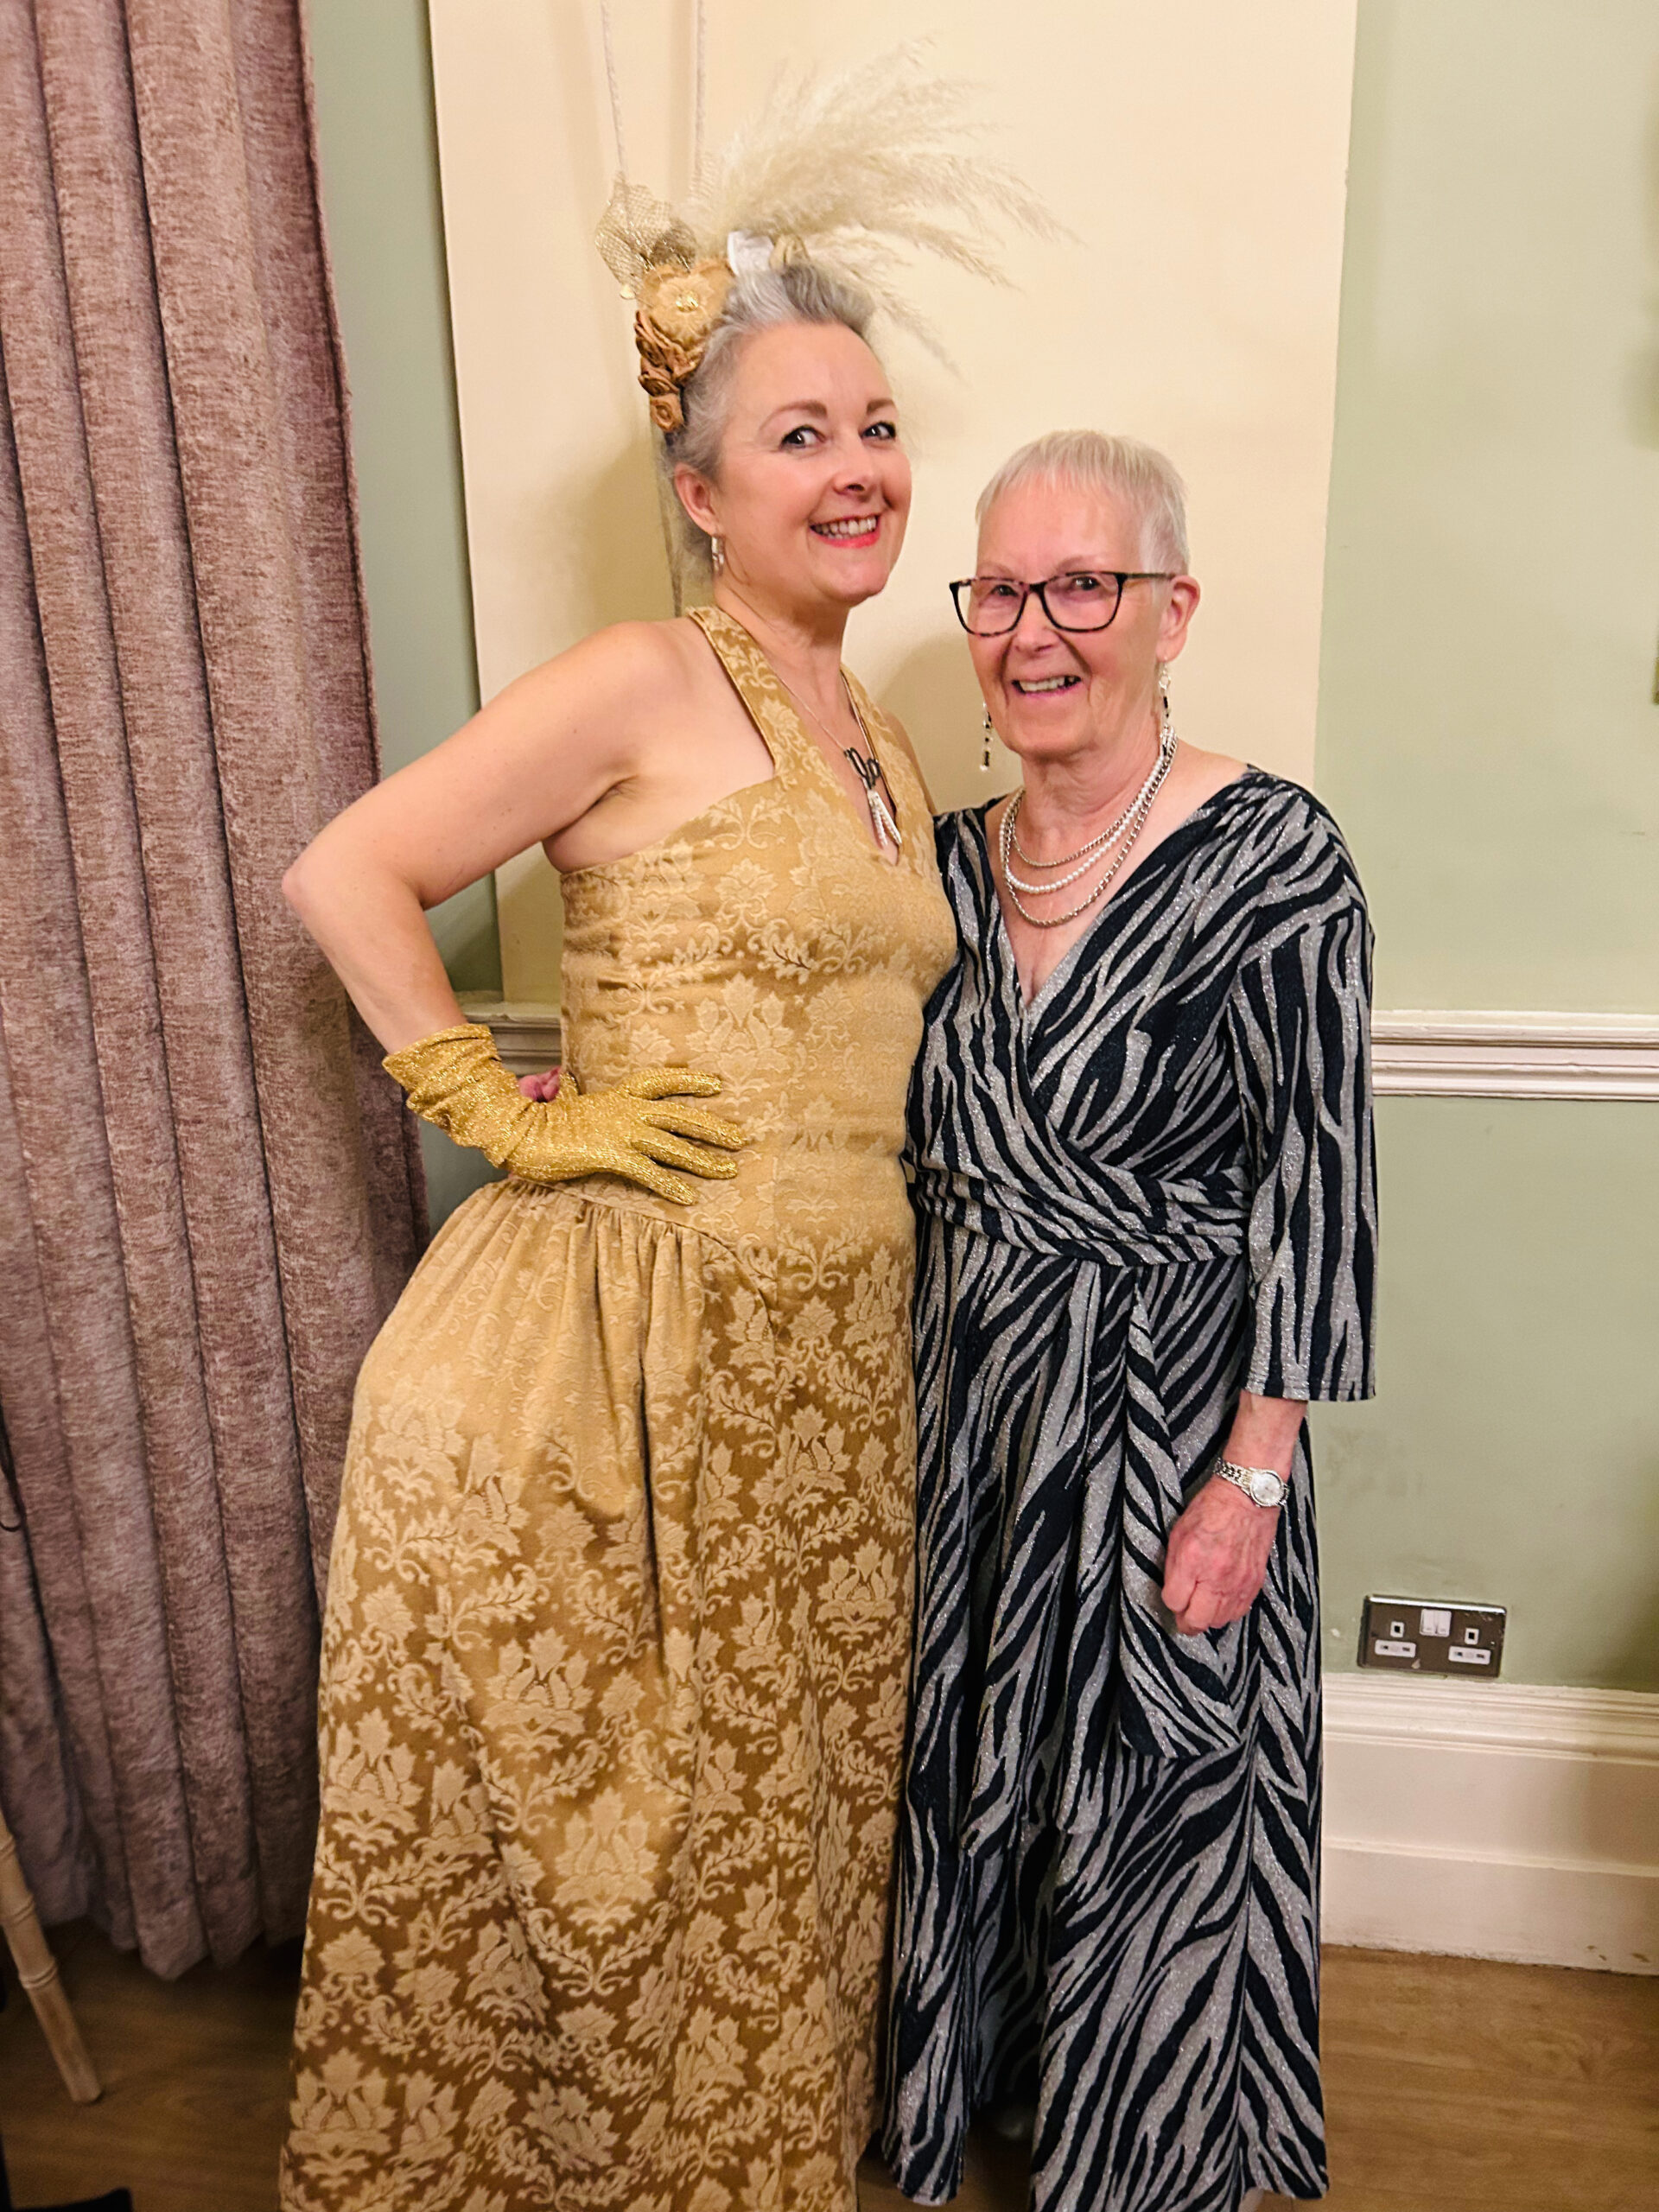
I must also include this photo of me and my mum, taken at the ball. She is the reason I sew. I’m so privileged to have inherited so many skills from her and I’m so proud that at 80 years young she is still sewing and finally took some time out of making for everyone else to make herself a gorgeous gown too.
And all that remains to be said is thank you. If indeed you reached the end of this marathon post. Or even if you didn’t, I totally appreciate your time and support. If you have any thoughts or questions please leave them in the comment box below and I will very happily get back to you. I can talk about this outfit till the cows come home. Just in case you didn’t gather that already!
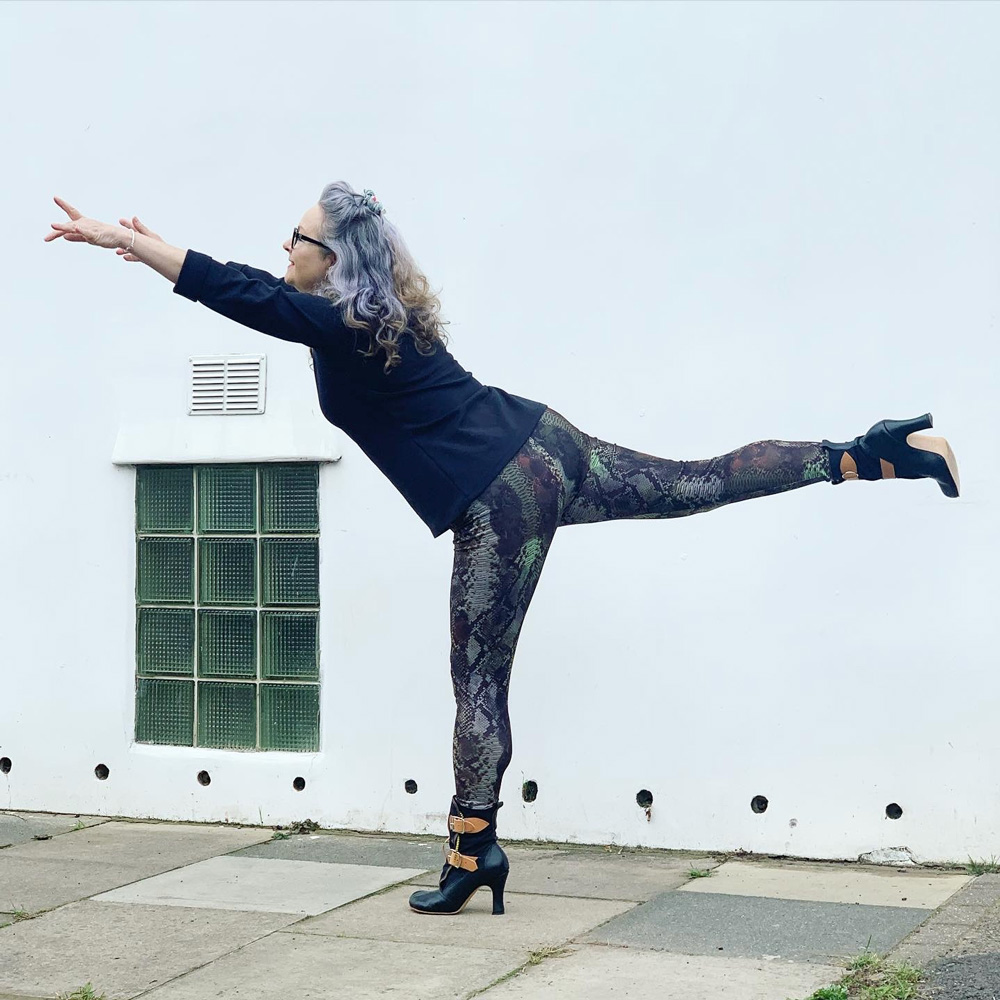
I remember quite plainly saying I did not see the point in making my own activewear. Where’s the fun? It’s just boring and functional. And let’s face it, there are plenty more interesting and fun things to be sewing up!
But never say never! I did a rain-check on the RTW pieces I already own – after one pair pretty much disolved, despite various fixing attempts – and realised not one single pair of bottoms actually fit me properly. Mostly the rise is the problem but also the waist elasticity.
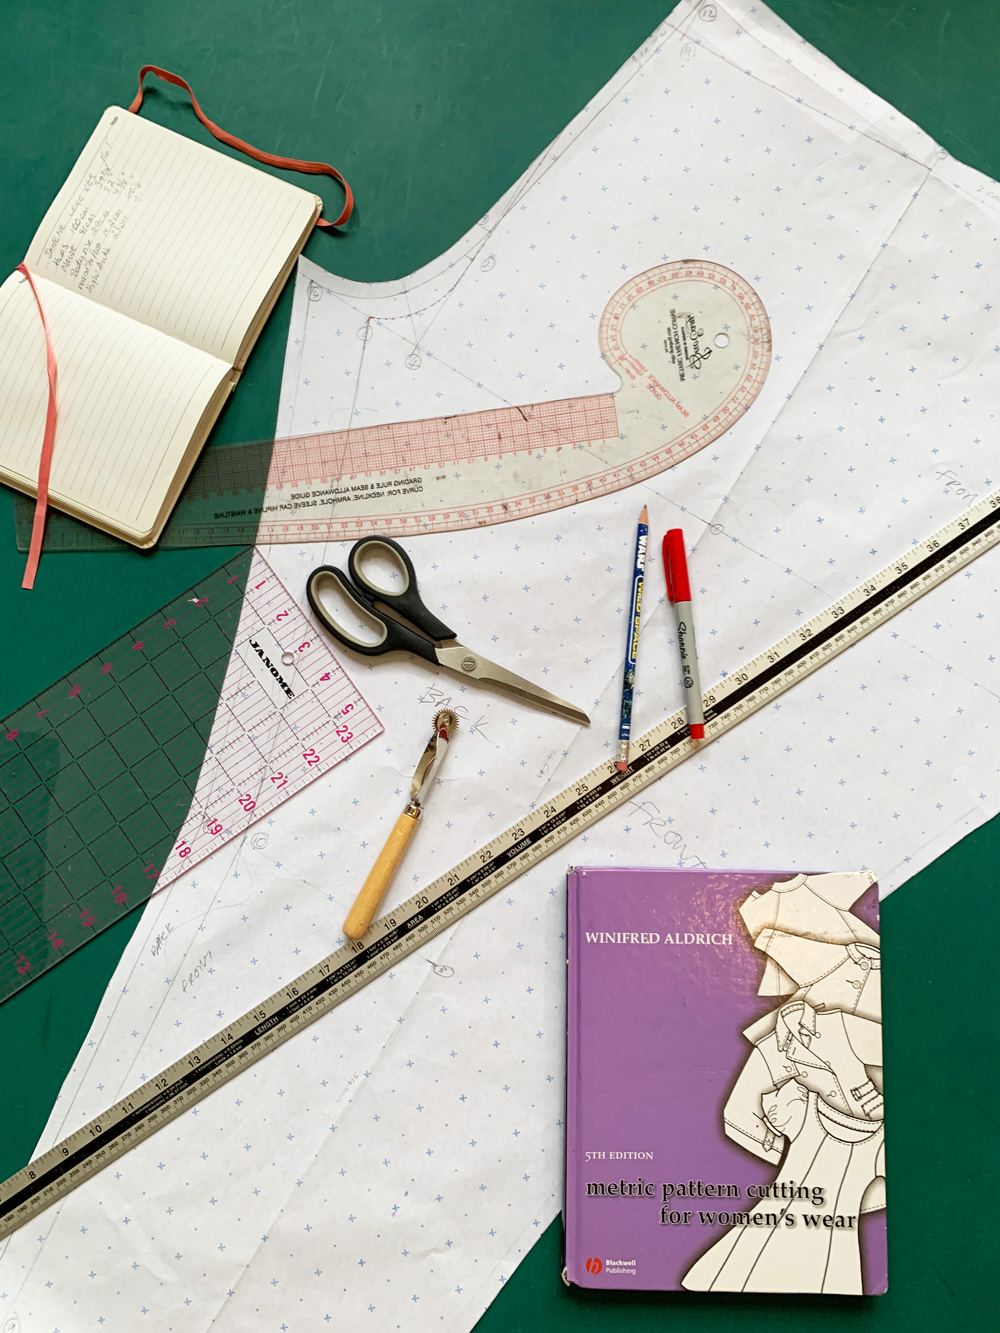
I spent the best part of an afternoon perusing patterns online. There are heaps! And I’m sure most of them would work a treat. But I would undoubtedly have had to make adjustments to said patterns and so I figured I may as well draft my own if it wasn’t going to work straight out the packet.
I followed instructions from Winifred Aldrich’s Metric Pattern Cutting for Women’s Wear – a firm fave in the sewing community. And it didn’t take long at all to draft the one single basic pattern piece.
In fact it took longer for me to decide how to finish the waistband!
I sewed up the leggings in a lightish weight very stretchy lycra. Took minutes on the overlocker with 4 threads. I didn’t even need to substitute stretch needles.
A quick try-on confirmed the fit was OK apart from quite a lot of ease at the waist – the back waist in particular. I didn’t really clock the excess at the thigh at this point. I was poised to take the waist in, before making a casing and threading elastic through – that totally would have been the quickest waistband solution – but then I visualised some gathering at the waist where the elastic waistband would have cinched it all in. I didn’t like how it looked (in my head!). So I set about another solution.
I measured the depth of the waistband from one of my existing pairs (10cm) and then measured the circumference of the leggings, 10cm down from the natural waistband. I halved that measurement to make a rectangular pattern piece that would ultimately be cut on the fold of the fabric.
I marked top edge, fold and side seam on the pattern piece.
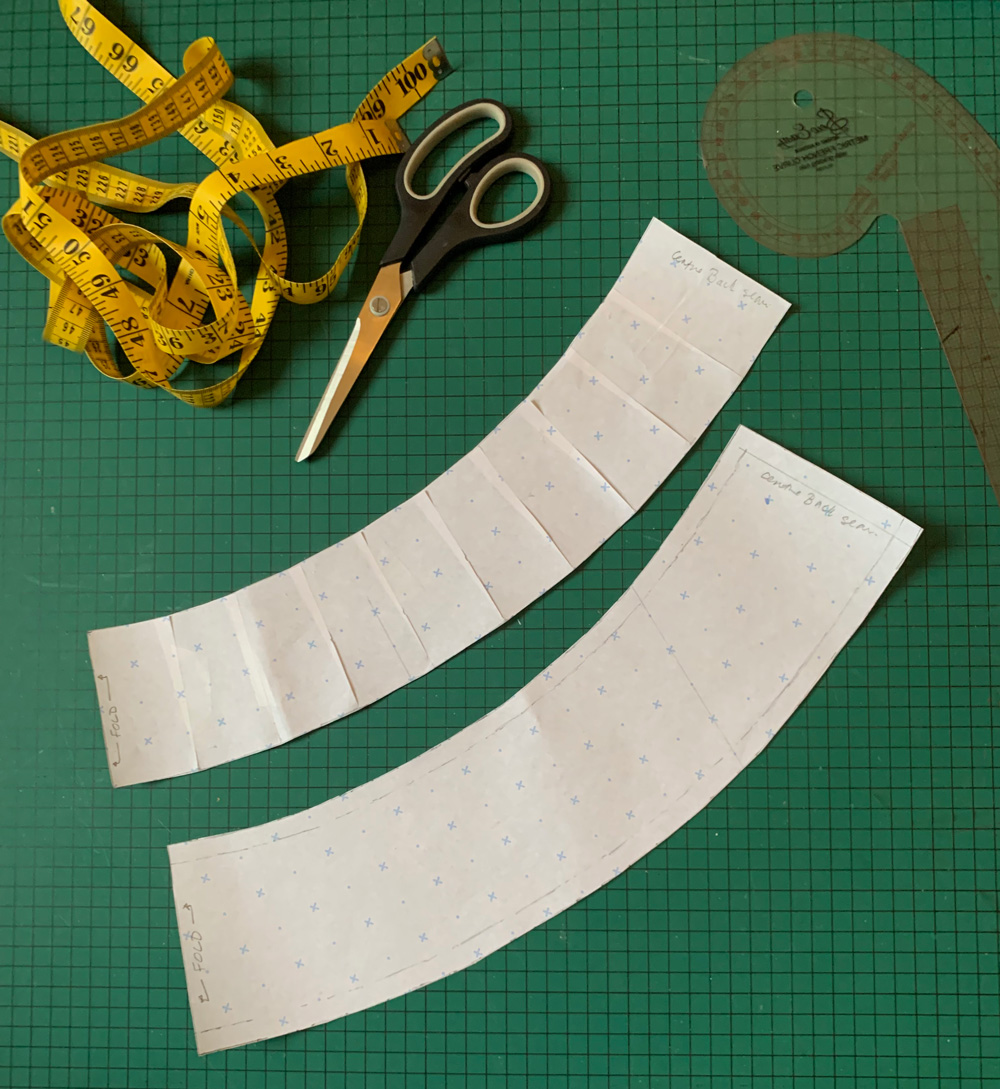
To avoid all the gathering at the waistline I marked 10 equidistant slash lines from top to bottom and closed up the top edge until the top now-curved edge measured approximately 80% of the bottom curve.
I then traced the now-curved rectancle onto another piece of paper to add 1cm seam allowance all round apart from the fold edge.
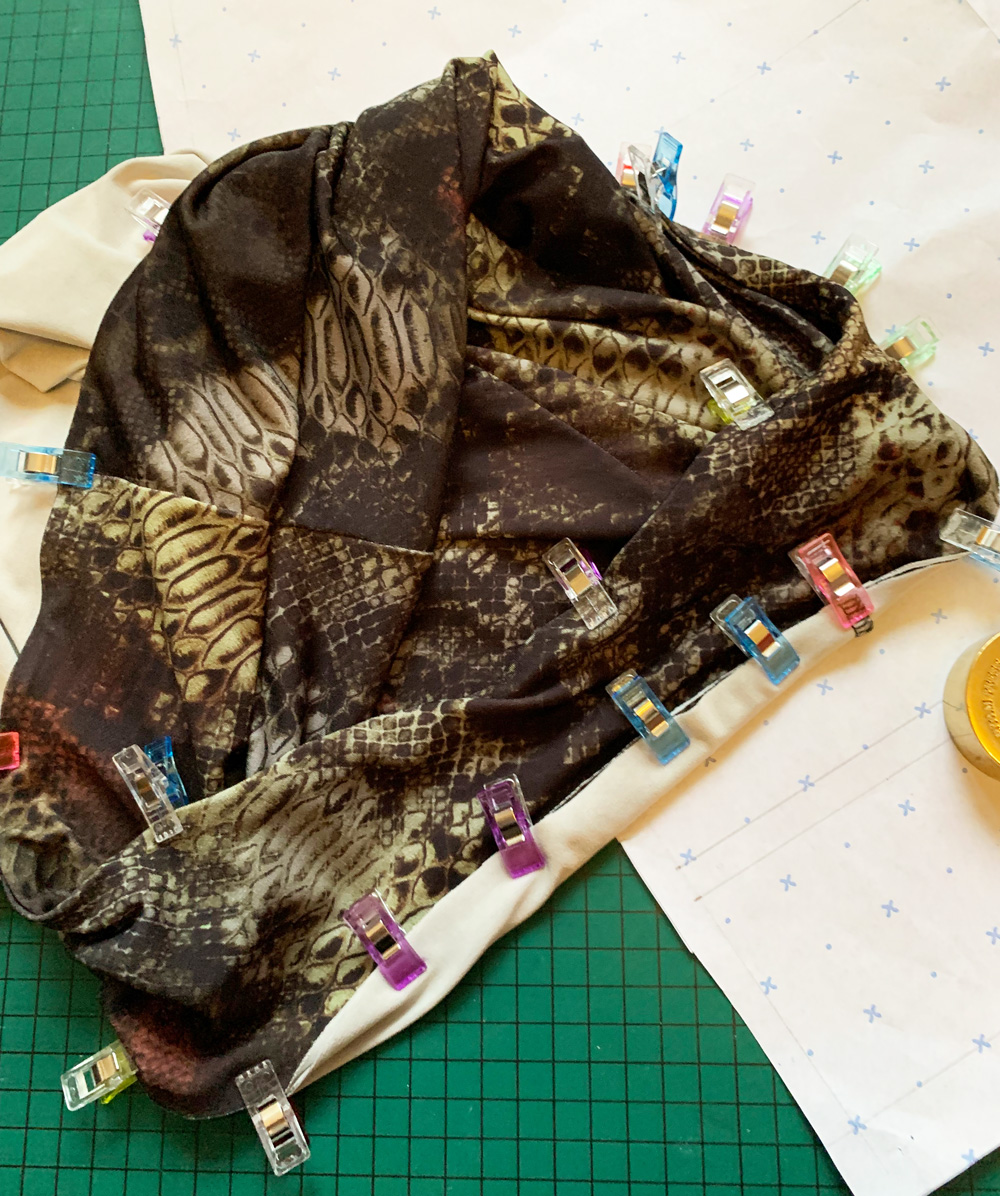
I pinned the pattern to the folded fabric and cut 2 fabric pieces. With each piece right sides together, stitched the short edges to make 2 circular bands.
I placed one band inside the other, right sides facing, and stitched along the top (inwardly curved) edge.
I remeasured the top seamed edge of the waistband and cut some narrow (7mm) elastic to that same measurement with no overlap allowed so it would be a wee bit tighter still.
I then overlapped the elastic by 1cm and sewed the ends together to form a circle. I made quarter point markings along the finished top edge of the waistband. And with corresponding marks made on the elastic, I pinned and lightly stretched to fit as I zigzagged the elastic to the seam, making sure the edge of the elastic didn’t go past the actual seam line.
I trimmed 9cm down from the top of the natural waistline of the leggings (to leave 1cm seam allowance) ready to attach the waistband.
Before attaching I gave a quick press to the waistband, right sides out, to shrink the elastic a bit and make sure both pieces were aligned accurately. Then I attached the bottom two edges of the waistband to the top of the right side of the leggings (right sides together). I aligned the seam of the waistband with the centre back seam and clipped the band all round the top of the leggings. There was no need to stretch to fit this time because both measurements were the same. The clips worked a treat by the way, because the pins kept catching on the fabric.
A quick zoom round on the overlocker, and it was clear that all that care taken for accurate positioning paid off.
Now I wouldn’t normally volunteer a photo of my rear end, but I’m so chuffed how those two centre back seams lined up and how nicely that deep waistband hugs my hips and dips into the small of my back!
The last thing to do was hemming. Believe it or not I found this bit the most tricky! With everything else going to plan and so quickly, I decided to get the twin needle out and do it properly rather than employ my usual lazy zigzag treatment.
I dug out my barely used Millward stretch twin needle and rehearsed a twin stretch stitch on a scrap piece of the fabric. Took a while to perfect before I sewed for real. But then it messed up before I finished the first round. Sooo annoying! I dug out the manual to see if I’d set it up wrongly and the only thing I did was not to use the needle supplied with the machine, doh!
So I changed up the stretch twin for a regular Brother twin needle and tried again on some scraps. Again, seemed ok until I went to sew the real hem and the same thing happened again. It just got jammed and sucked into the feed dog with the bobbin threads all tangled under. I unpicked and managed to re-sew over the last bit but still, sooo annoying!! I’m totally sticking to zig-zagging next time!
First test of the finished leggings was at my Zumba class. And I was so chuffed that they didn’t end up round my ankles. However I could feel how loose they were from the knee up the inner thigh and I really didn’t like the wobble factor as I was dancing! I’m so much more used to sturdier fabrics holding me in place!
I’m going to take them in but decided to shoot them as general day wear with heels as inspired by @paulalovestosew! They are entirely fine as… well, tights really!
And now I am on the hunt for some heavier stretch fabric. Thank you to everyone who have given some brilliant suggestions. I now appear to have too much choice!!
From not wanting to ‘waste time’ making my own, I can see how making these will quickly become addictive. So… absolutely… never say never!
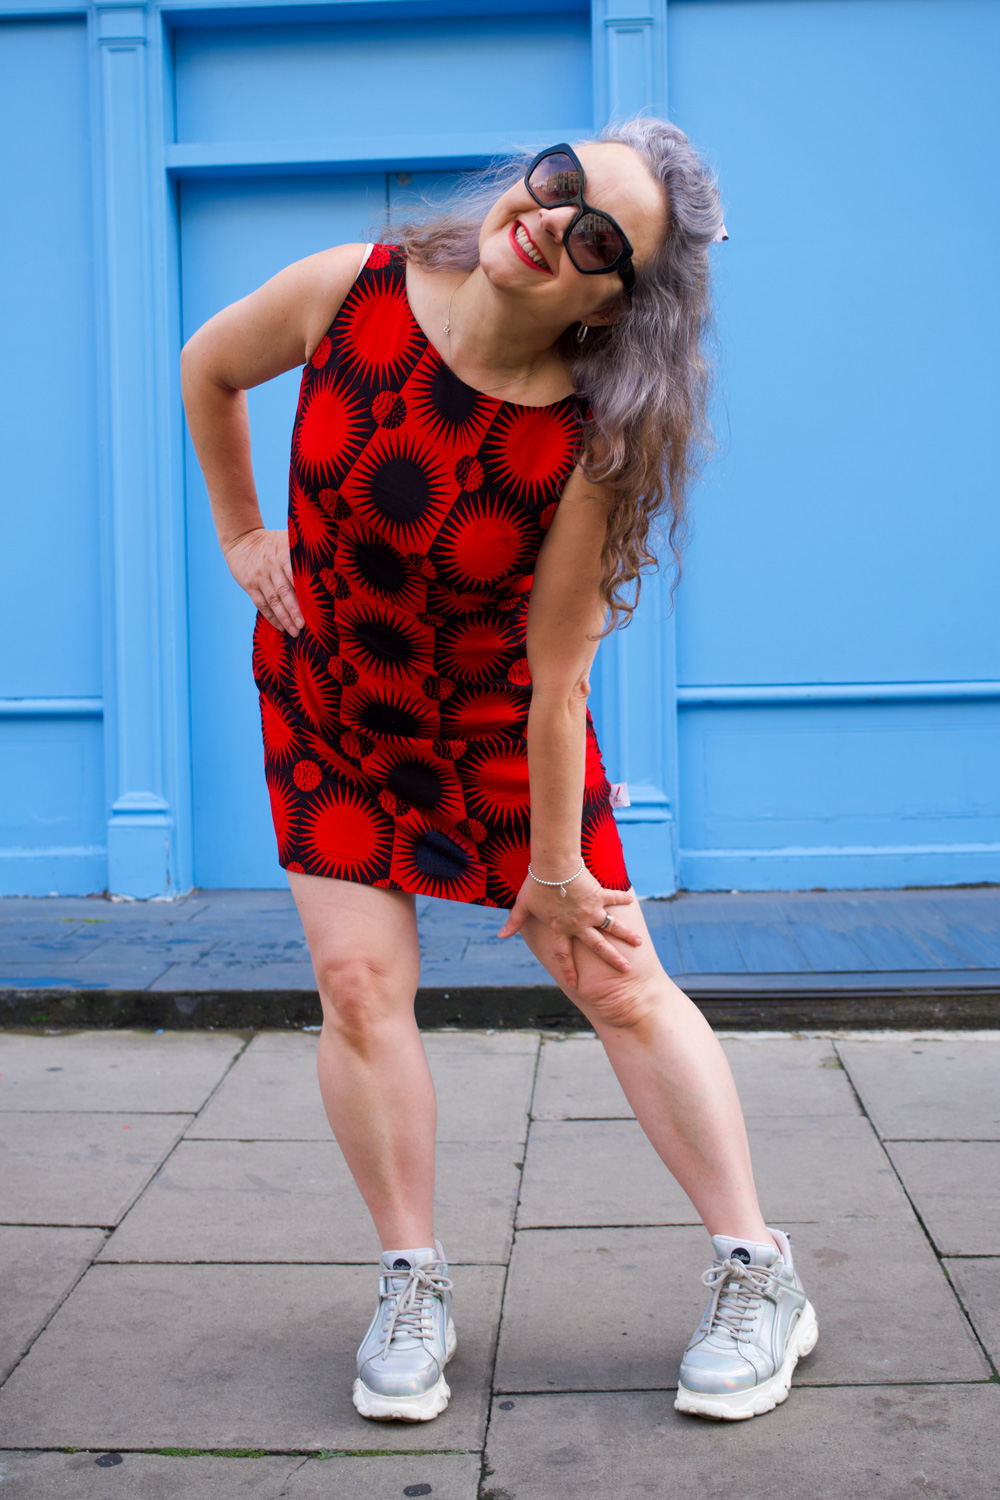
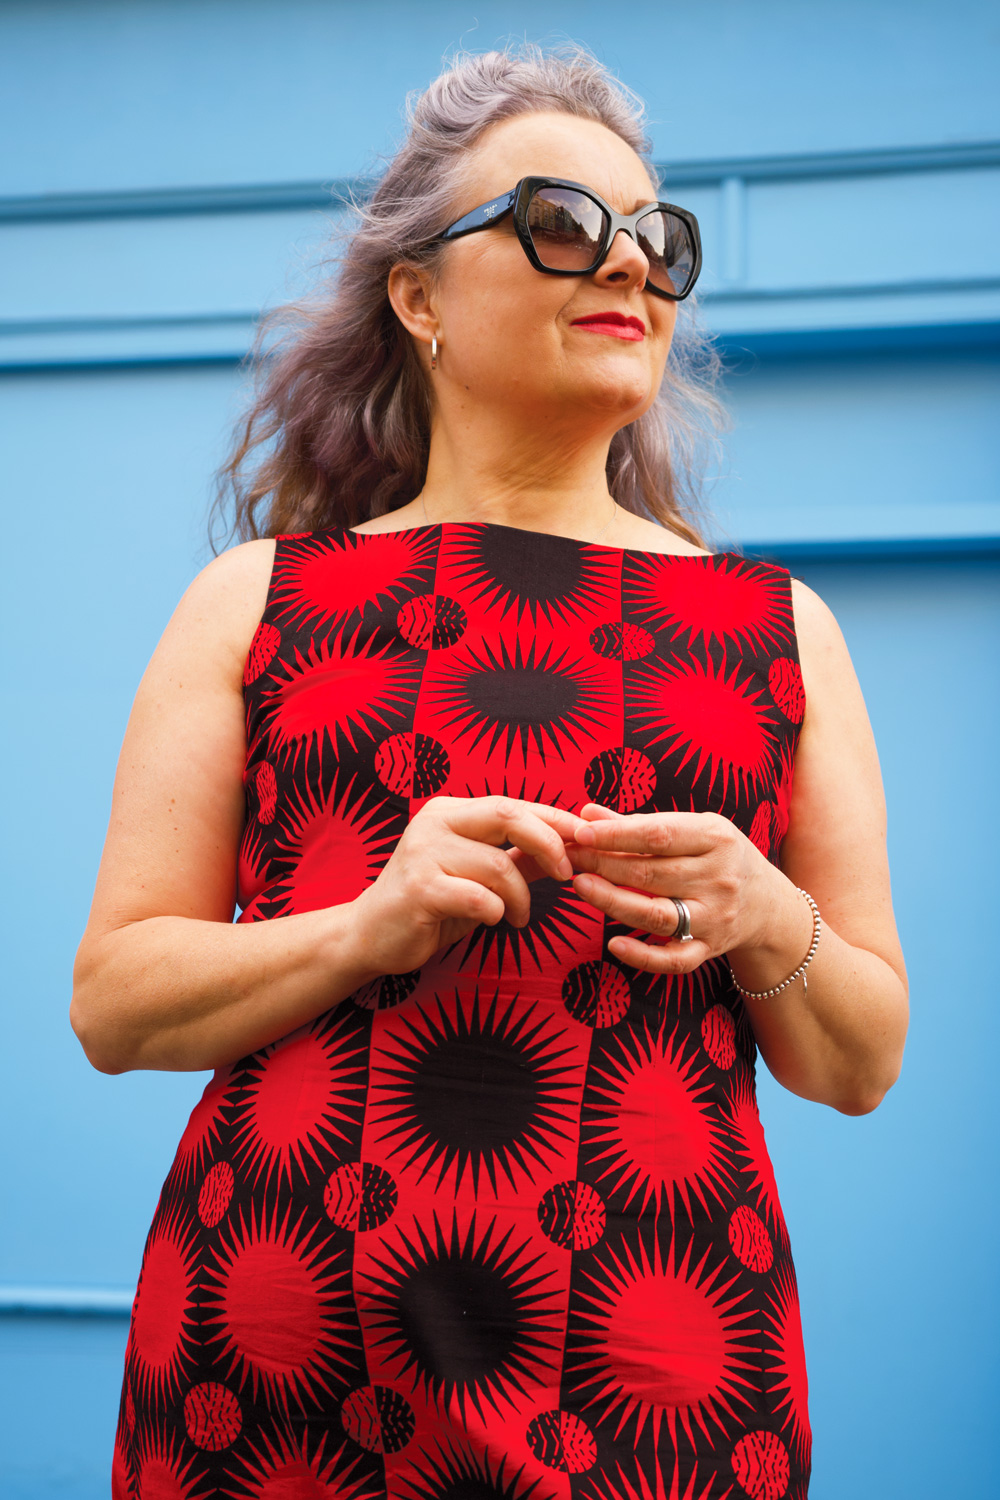
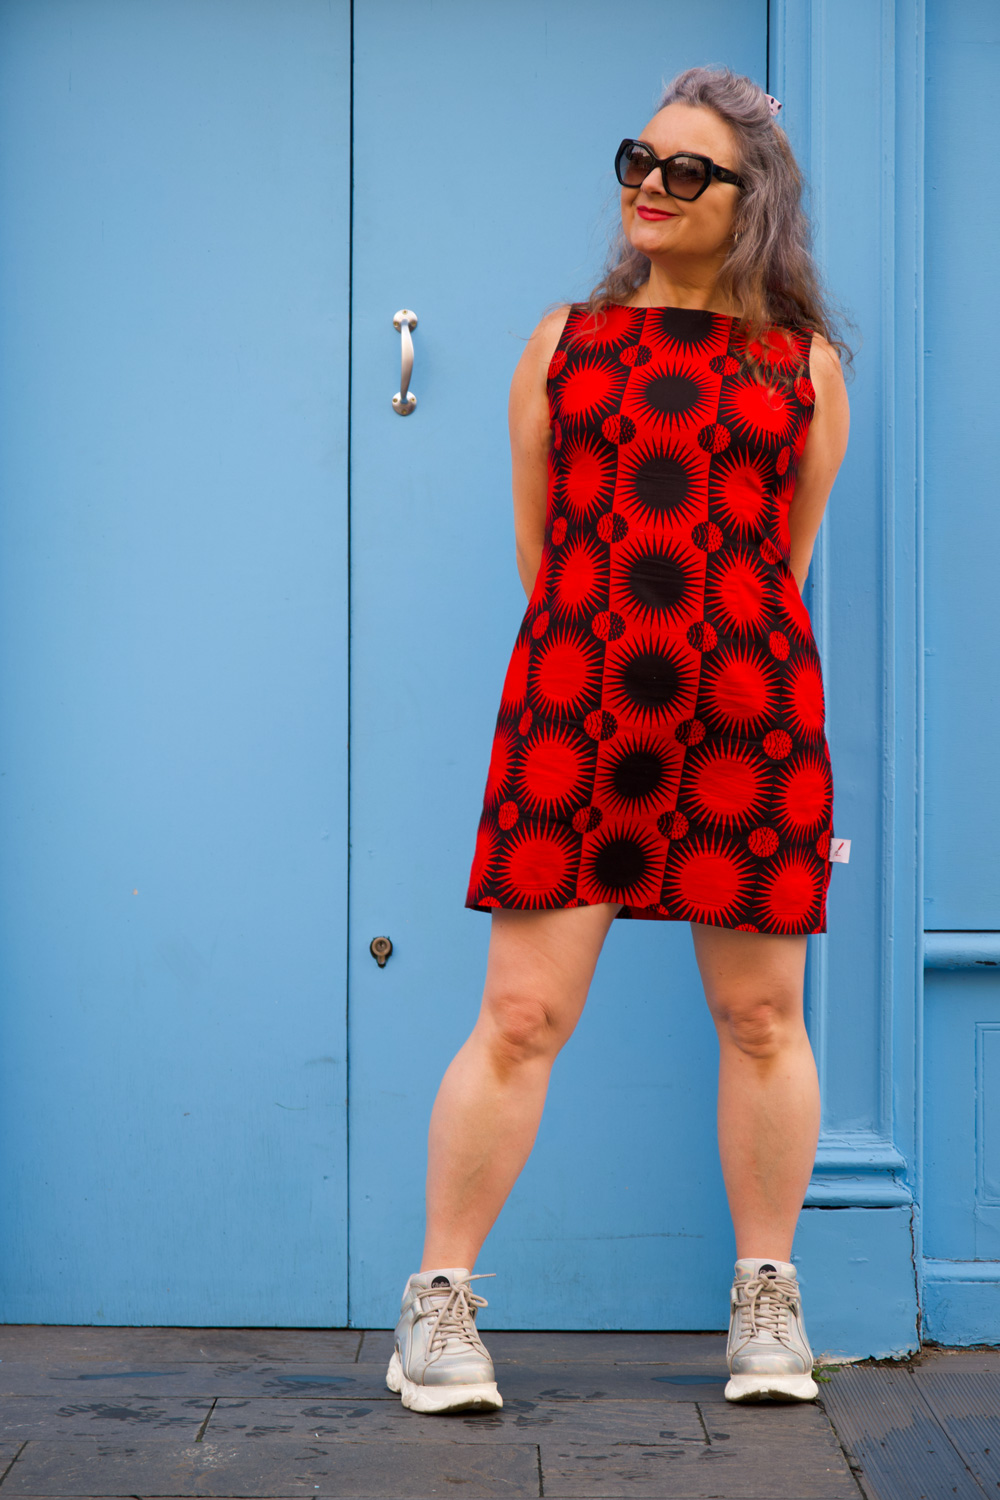
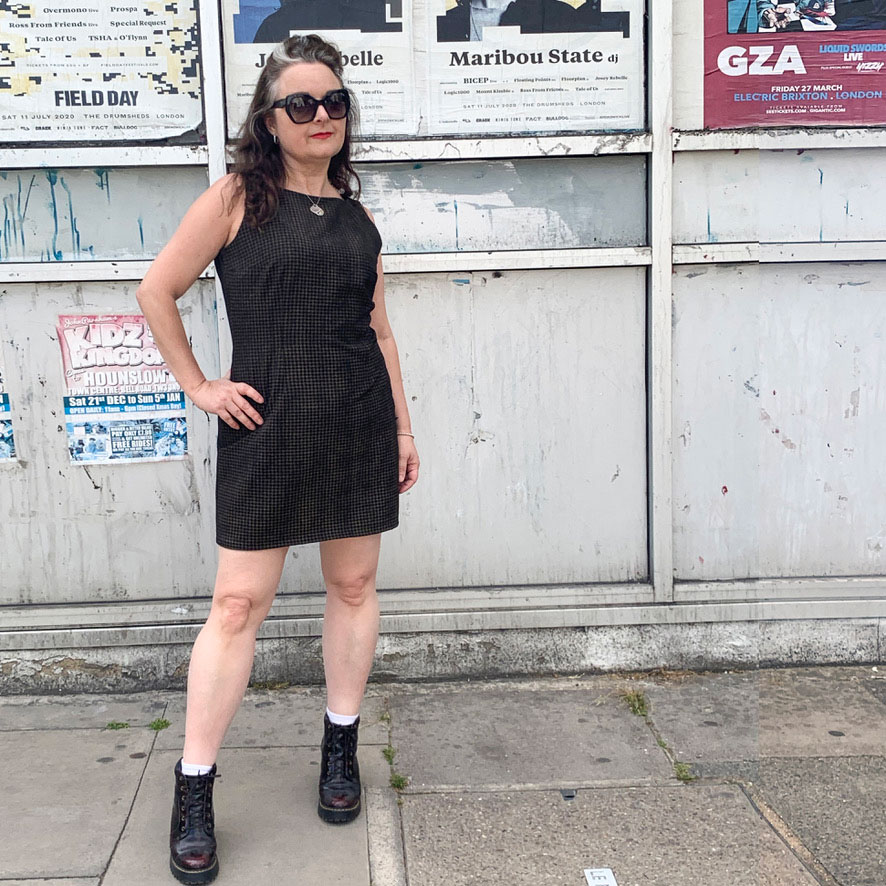
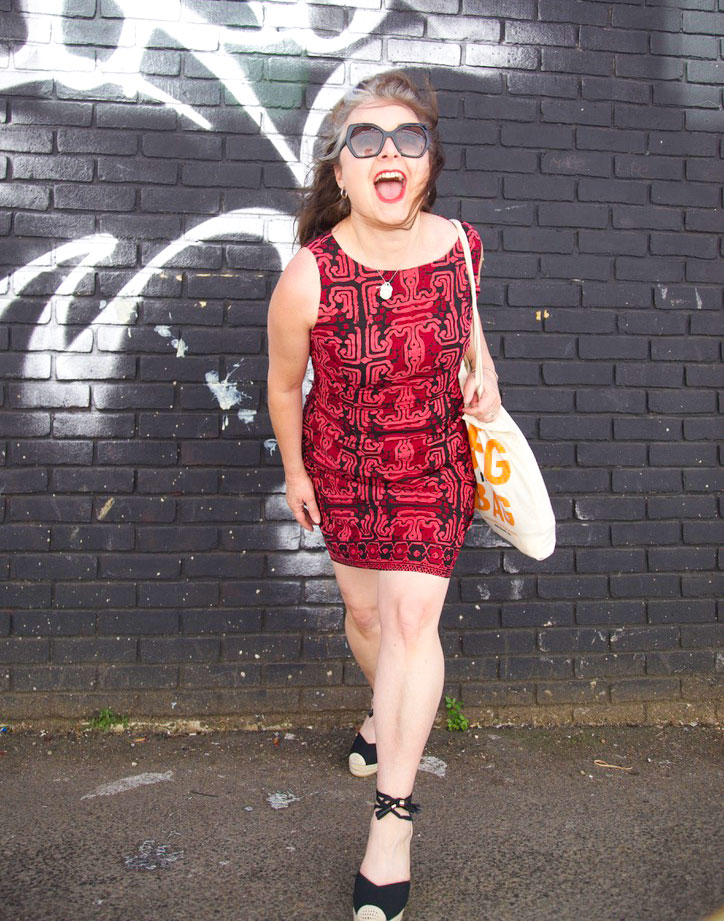
This is the dress I completed at the Crafty Sew and So camp, weekend before last which feels like a dreamy distant memory already, since I’ve been buried deep in work projects ever since. Thank goodness I realised the importance of taking a simple no-brainer project with me as I had anticipated a lot of chat and I didn’t want to be getting stressed out by fiddly details… or miss out on all the goss!
Sewing a sheath dress is a good test of fine tuning a fit as woven fabric has no forgiveness whatsoever! And I’m pretty sure I’ve nailed it now. It feels like it fits in all the right places and its amazing how that feeling transmits a confidence when I wear it. Well I can hardly blend into the background with this graphic print in any case!
I was hoping the Ankara fabric, with its strength and weight, would give good structure and I wasn’t disappointed. If you’ve sewn with it before, you’ll appreciate how your shears slice so accurately through the threads and the joy of ironing those sharp seams – especially helpful when pressing those understitched facings. They are so never going to pop out!
The dress pattern is simply a front and a back piece and an all in one facing to finish the armholes and the neckline. The zip is at the left side – something I learned from sewing a lot of vintage dresses and a method that means the back piece stays as one so there is no need to pattern match across a zip.
I would normally have tried harder to match across the side seams but I was working with a remnant here, left over from this crazy cowl skirt project, so I was limited with my placement options. Very happy that I used stash fabric though!
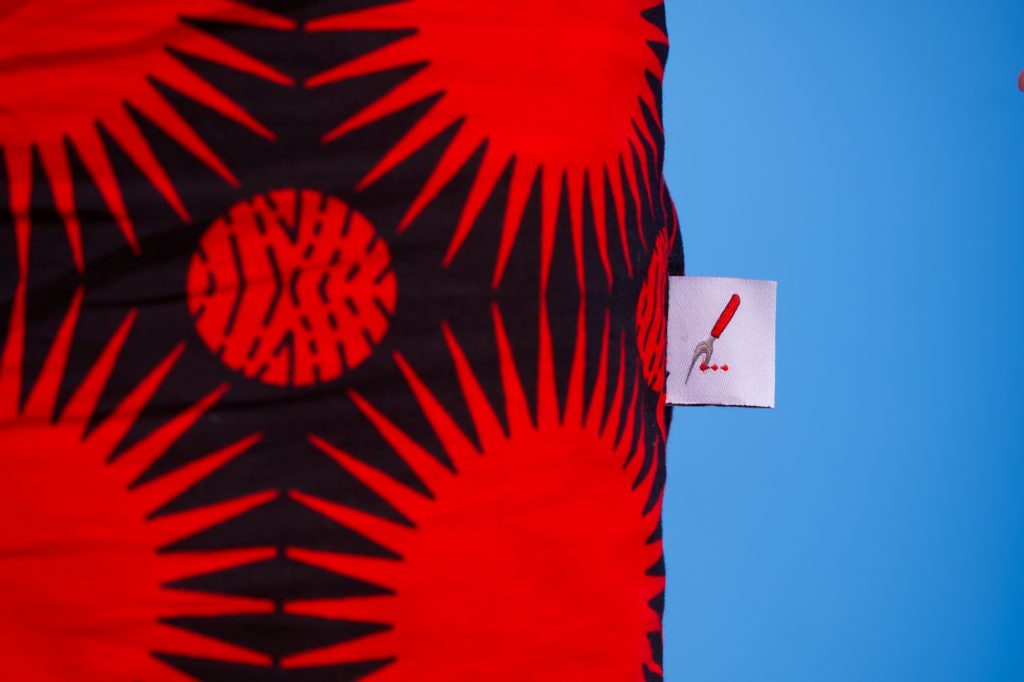
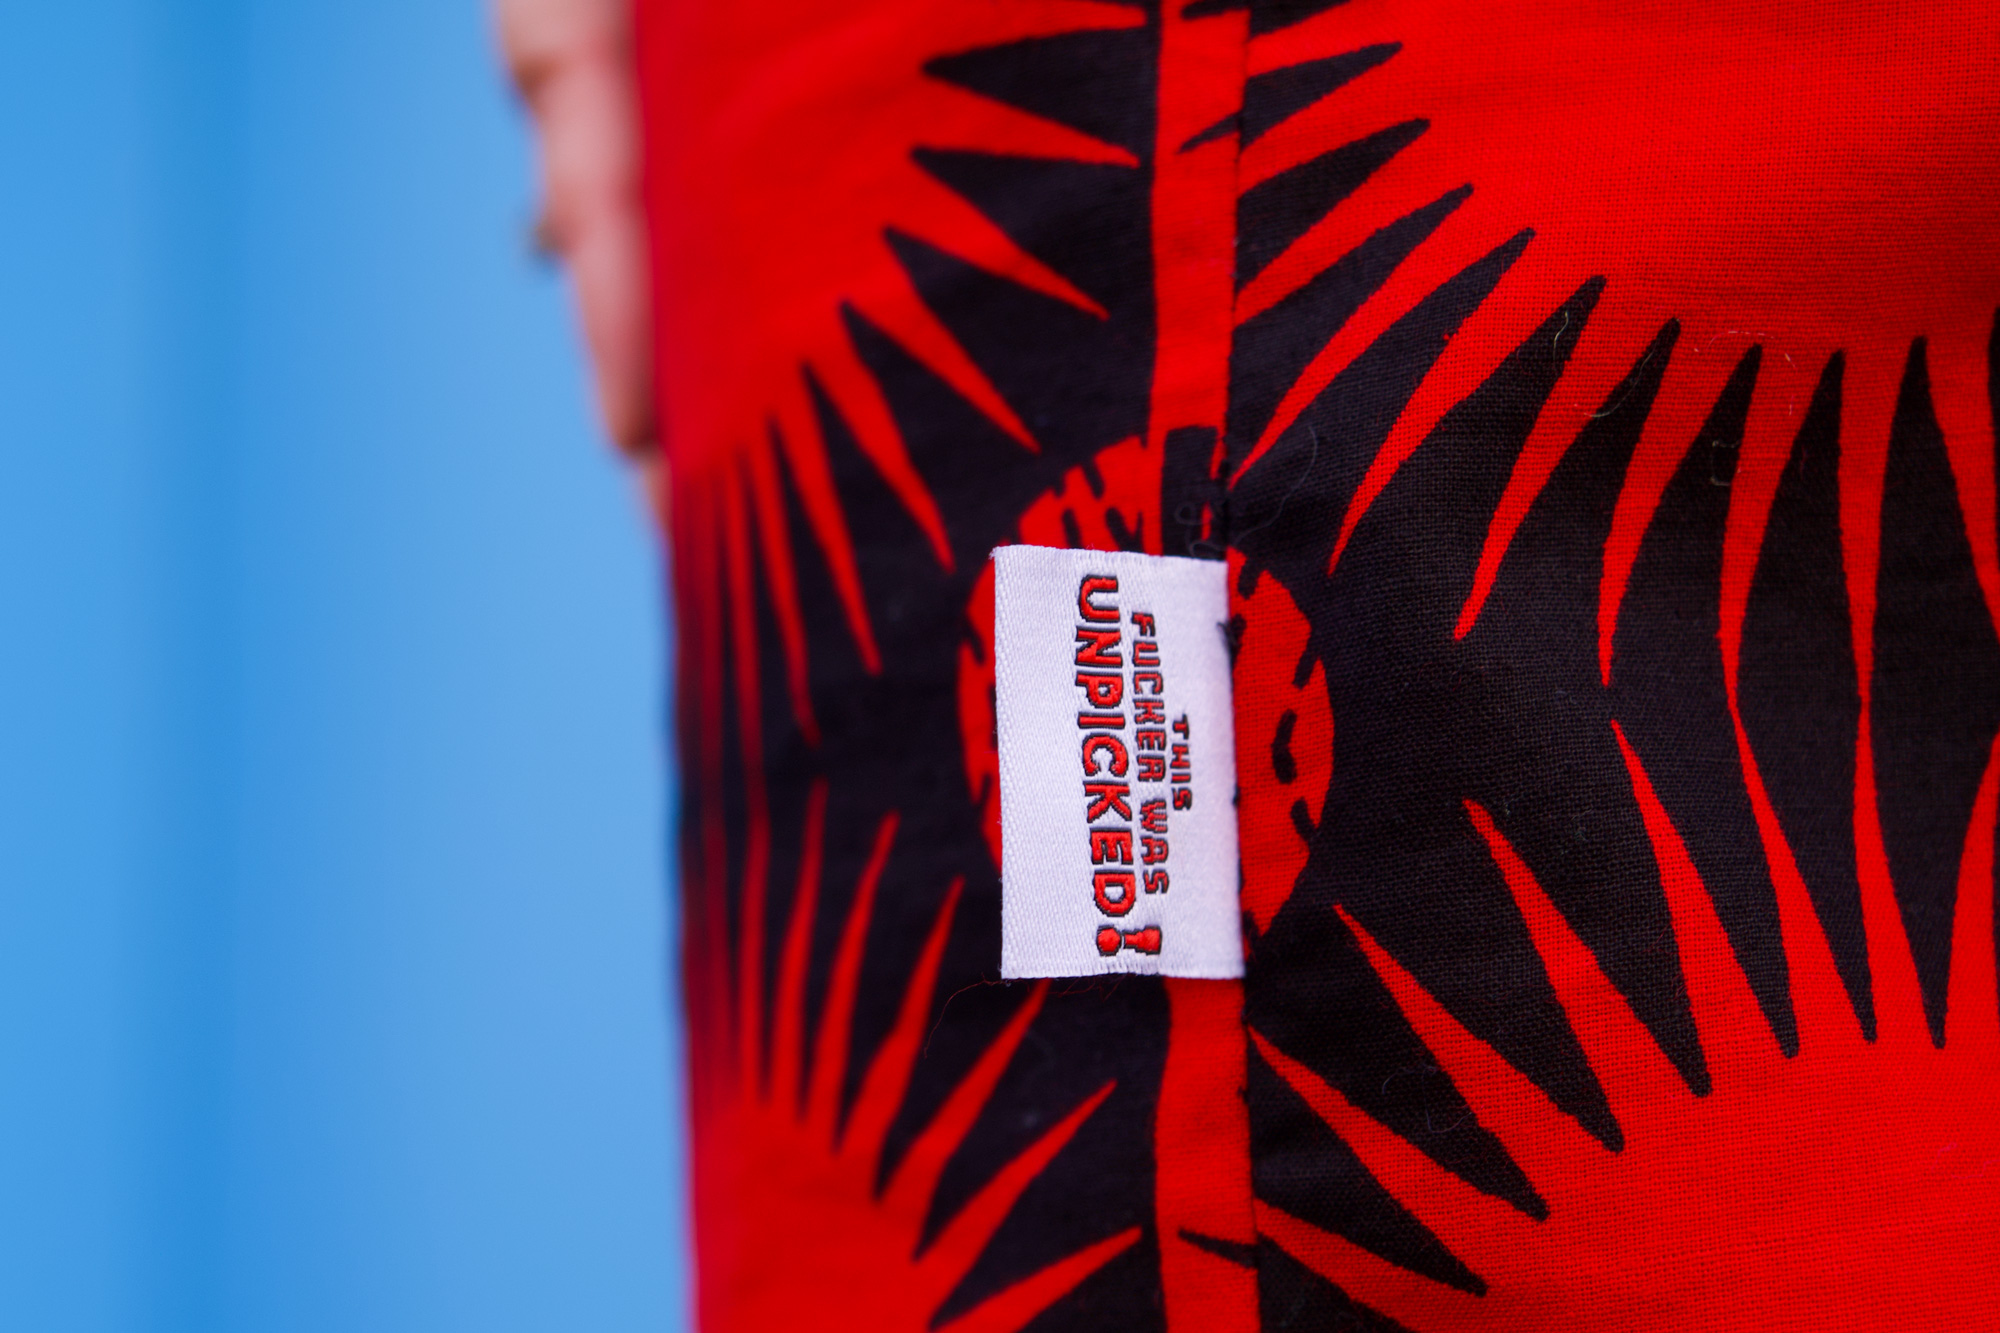
And whilst we are on the subject of side seams, I’d like to draw attention to the sweary label that Manisha from Manisha’s Fancy Fabrics kindly and appropriately gifted me from Sew Me In (explicit) Labels. Because, despite the simplicity of this dress, I had to unpick 3 seams at least due to distraction of talking and mostly laughing my head off. In case you need any confirmation, sewing alongside likeminded makers who share as much passion about dressmaking, is incredibly good for the soul but a little bit detrimental to productivity!
This won’t be my last sheath dress for a number of reasons:
Its a lovely no-brainer of a sew, once the fit is mastered
It uses precious little fabric
Its can be office-appropriate in a suiting fabric, casual in a cotton, dressy in a satin
It can be customised so easily
Thanks to Dan for these lovely photos. We were in Charlotte Street, and very much drawn in by the blue of the shopfront. We haven’t been up town for a long while and it was good to see the buzz is still there, with lots more pedestrianised areas for al-fresco drinking and dining.
Keep tuned for some more of my pattern drafting adventures. I’ve got a few plans up my sleeve!
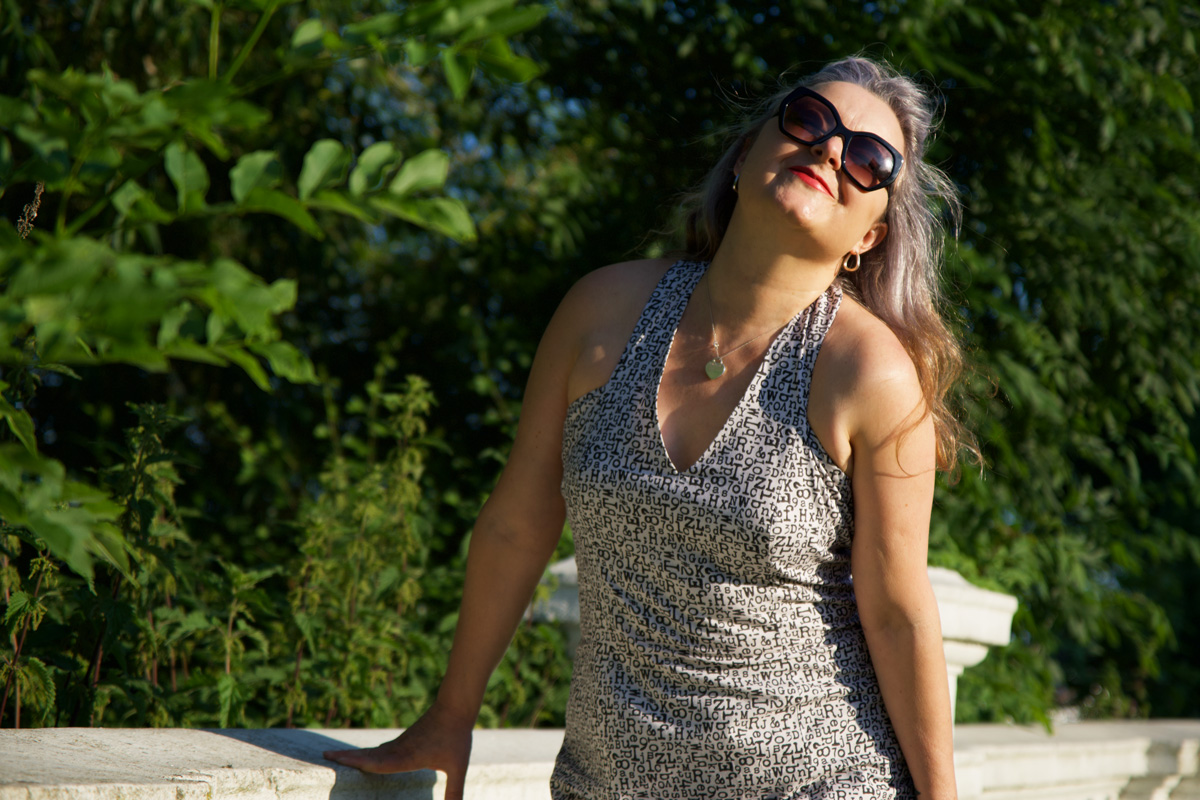
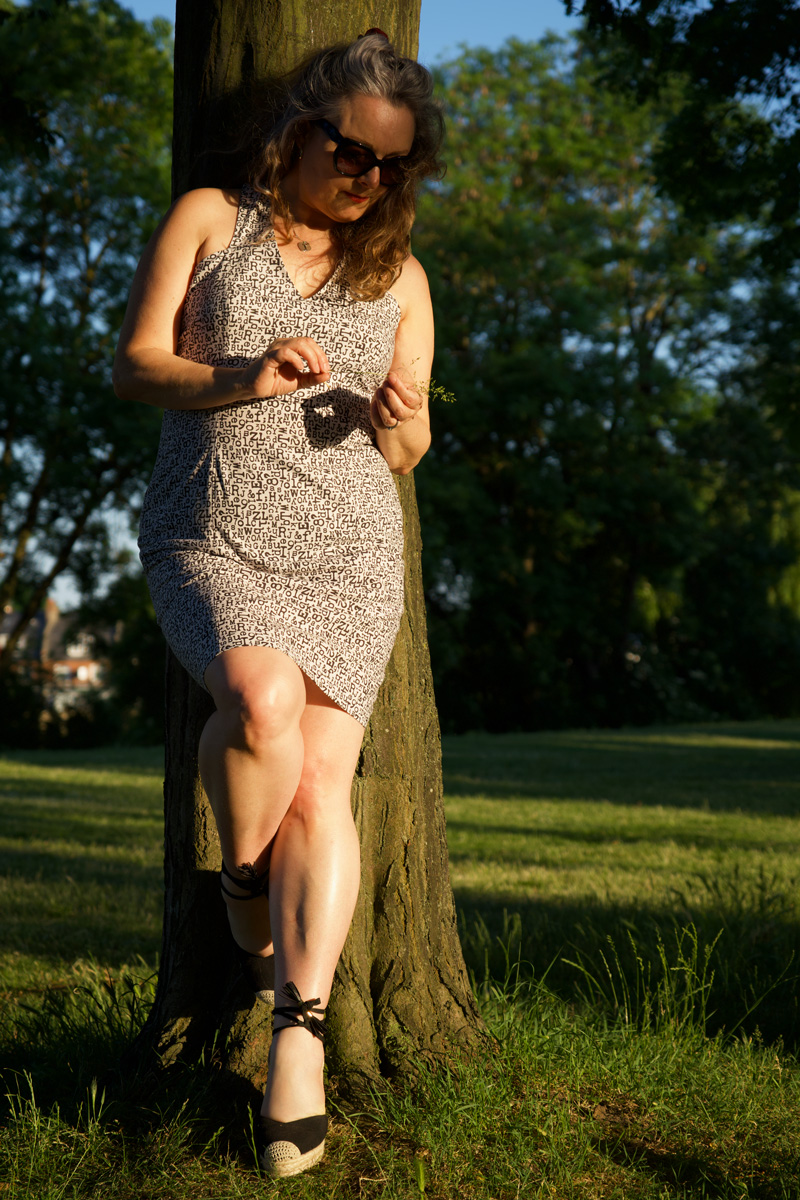
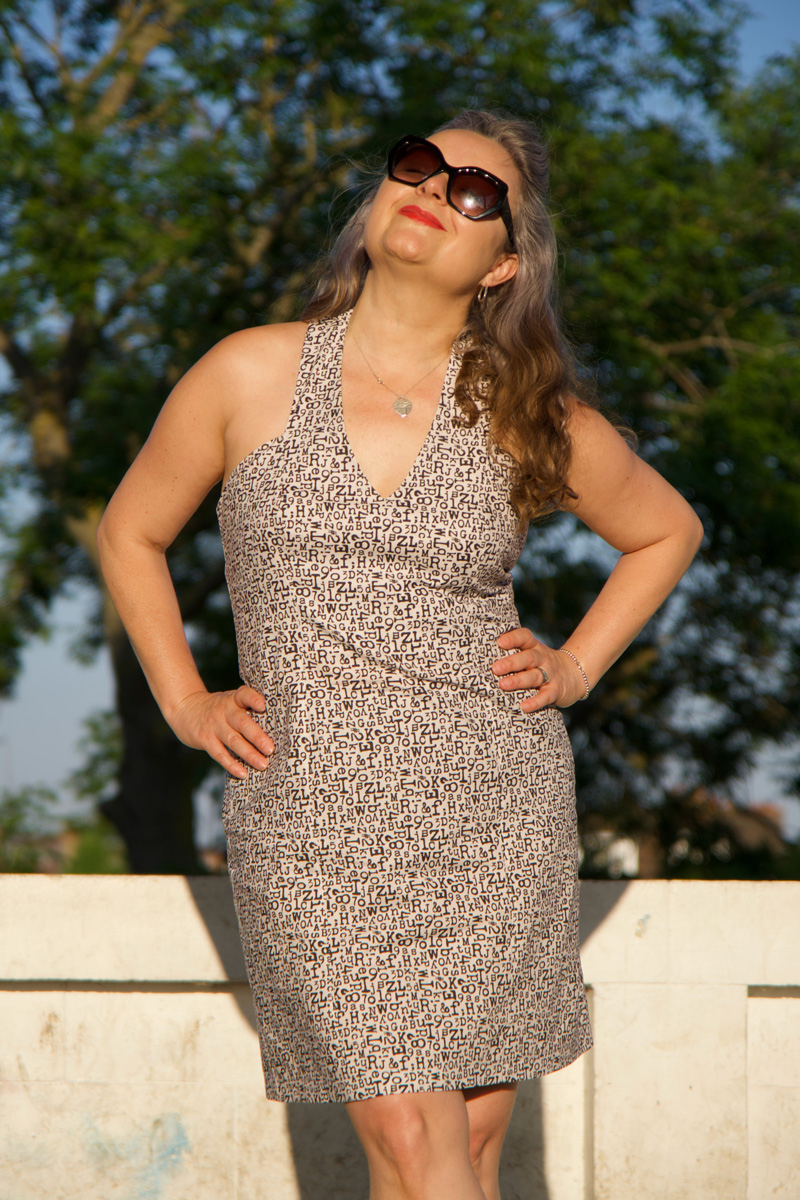
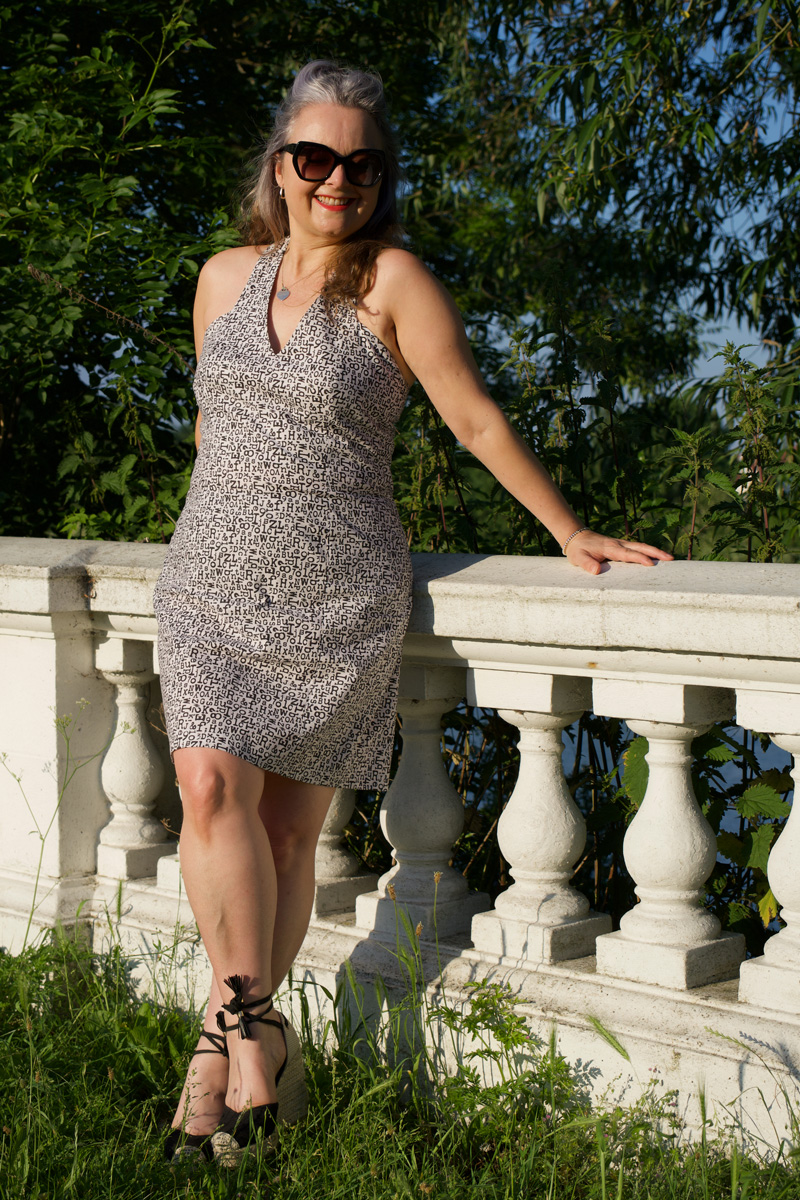
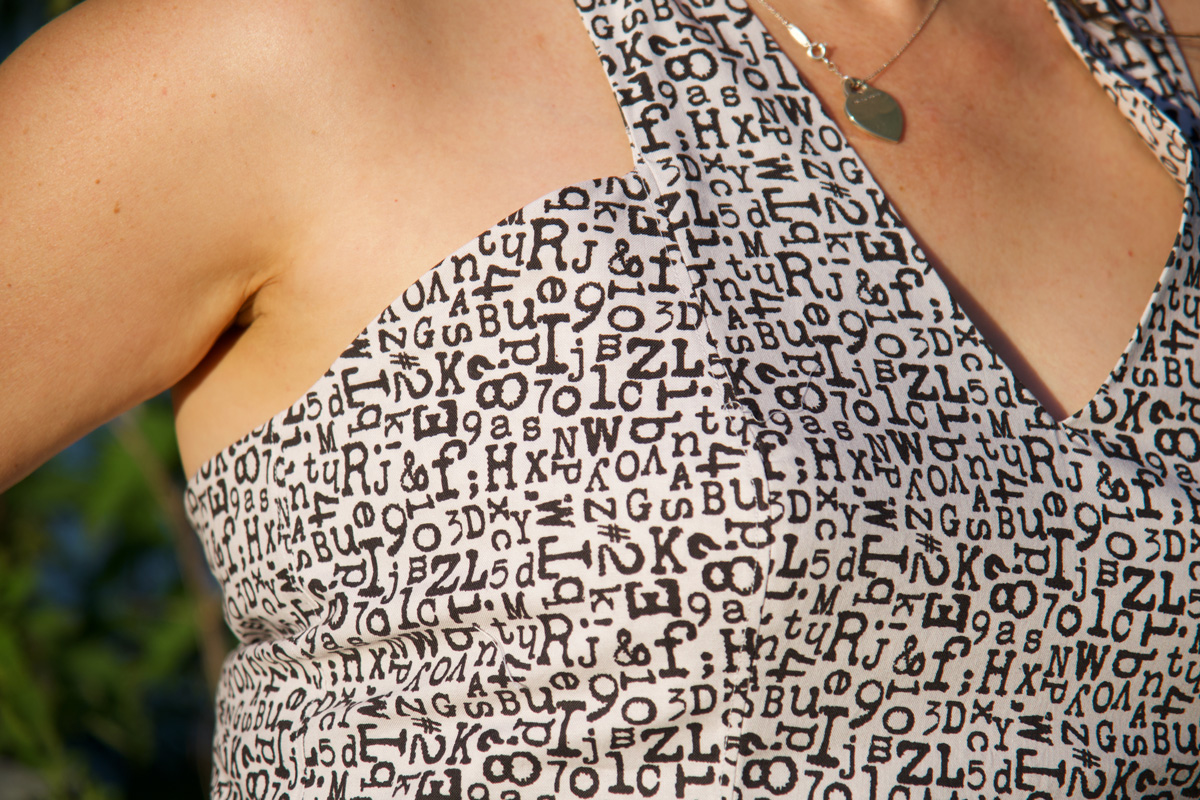
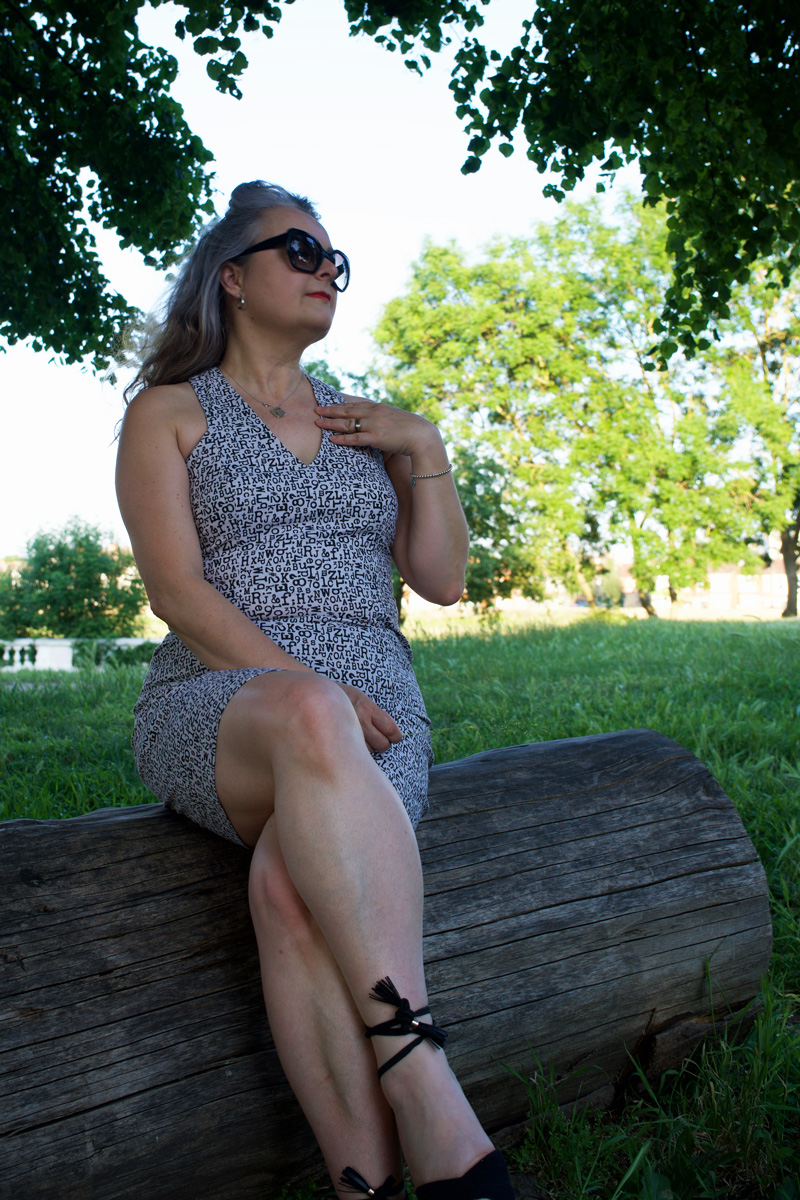
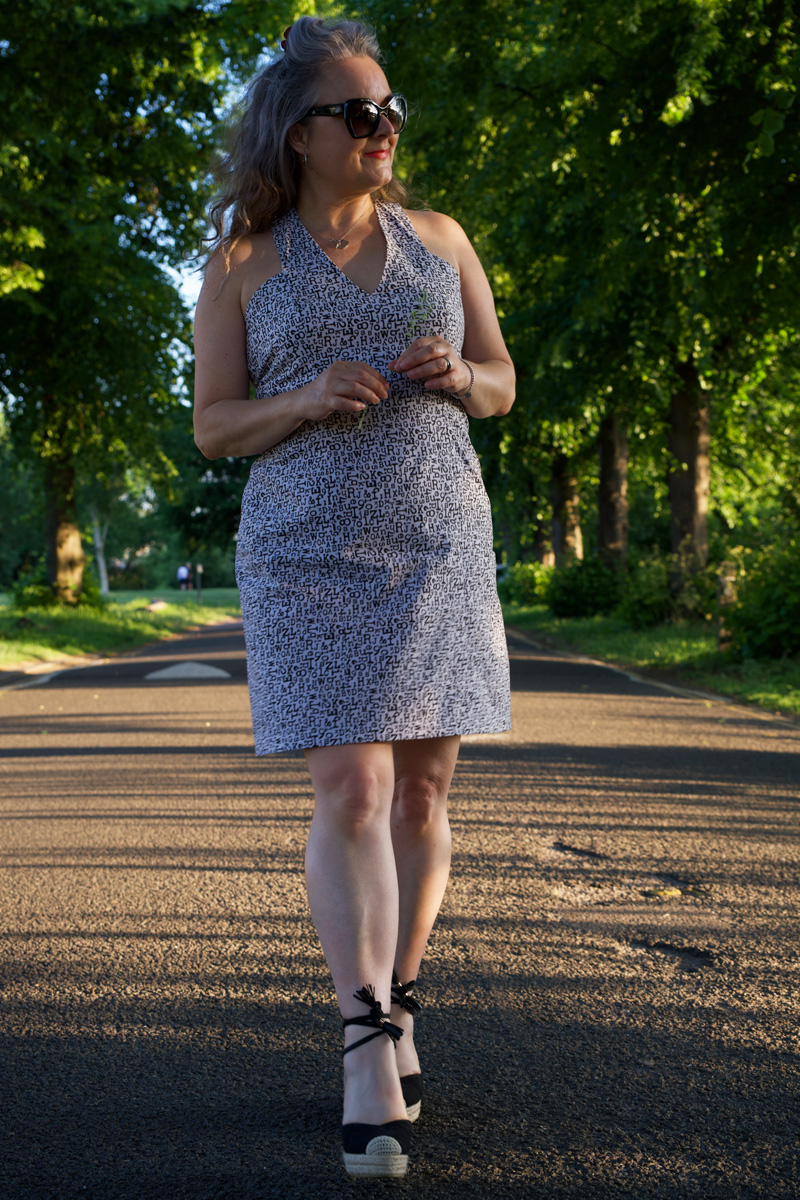
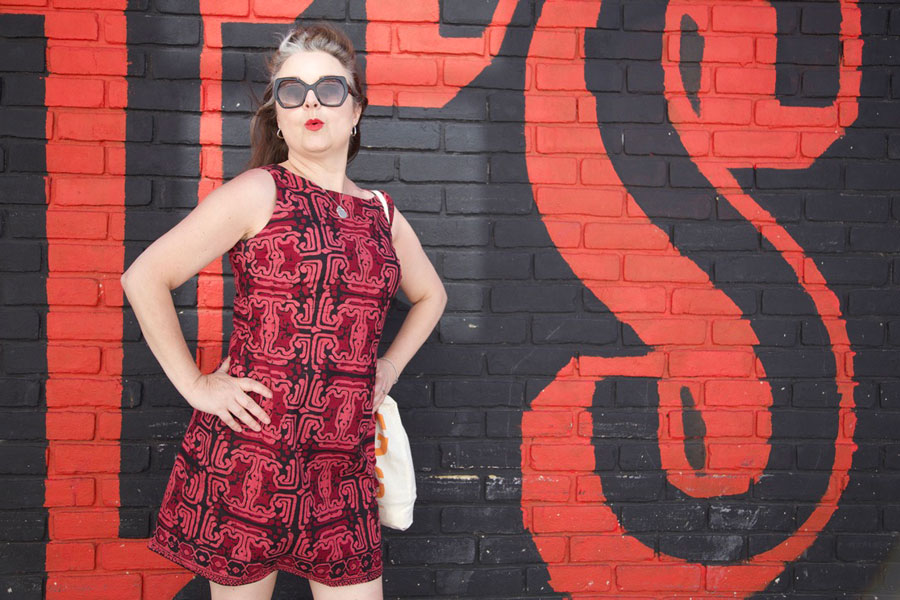
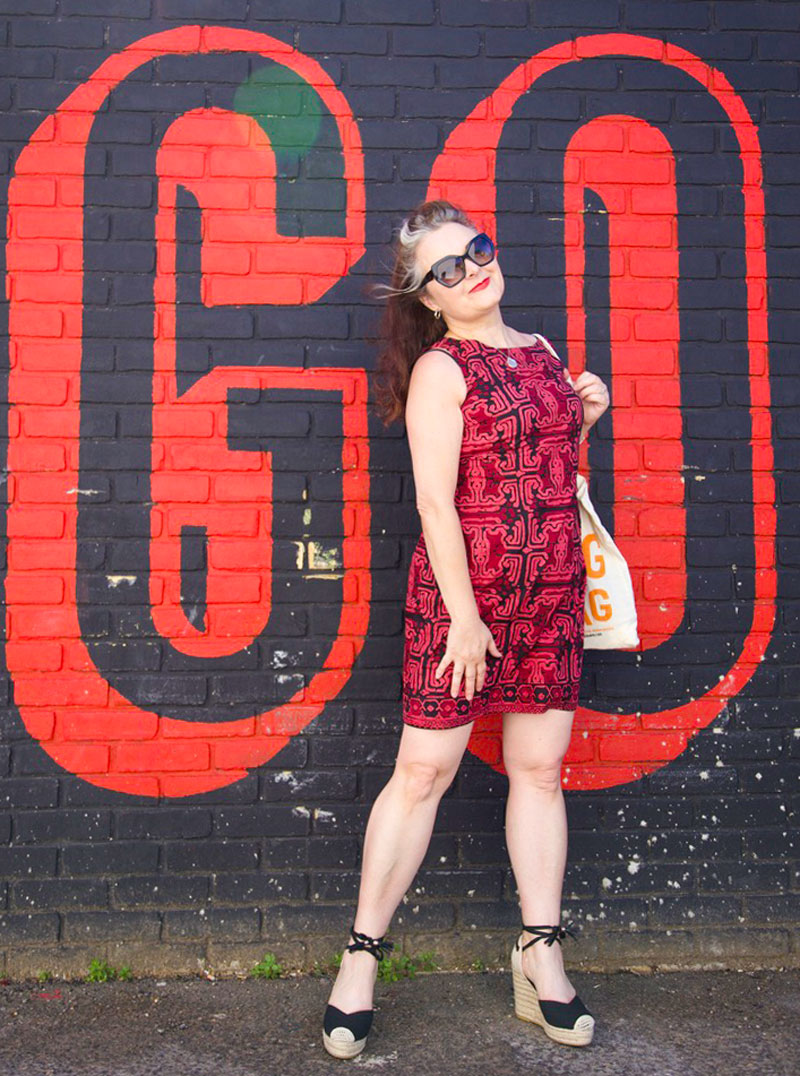
I had absolutely no plans whatsoever when I placed my order for this delightful Robert Kaufman cotton poplin fabric, which is usually a very bad mistake. Rash decisions with no end goal ultimately end up with more material languishing in stash mountain for a considerable amount of time. But I had to have it! I don’t generally like novelty prints but I think this can be classified more as graphic print or typographic print – very appropriate for a graphic designer anyways! And I absolutely love it!
When it arrived I was in awe of its texture. I don’t think I’ve ever worked with cotton poplin before – the cottons I’ve worked with have been much smoother and crease a whole heap more. You can see the weave of the threads on closer inspection of this one and it’s got a marvellous matt quality to it.
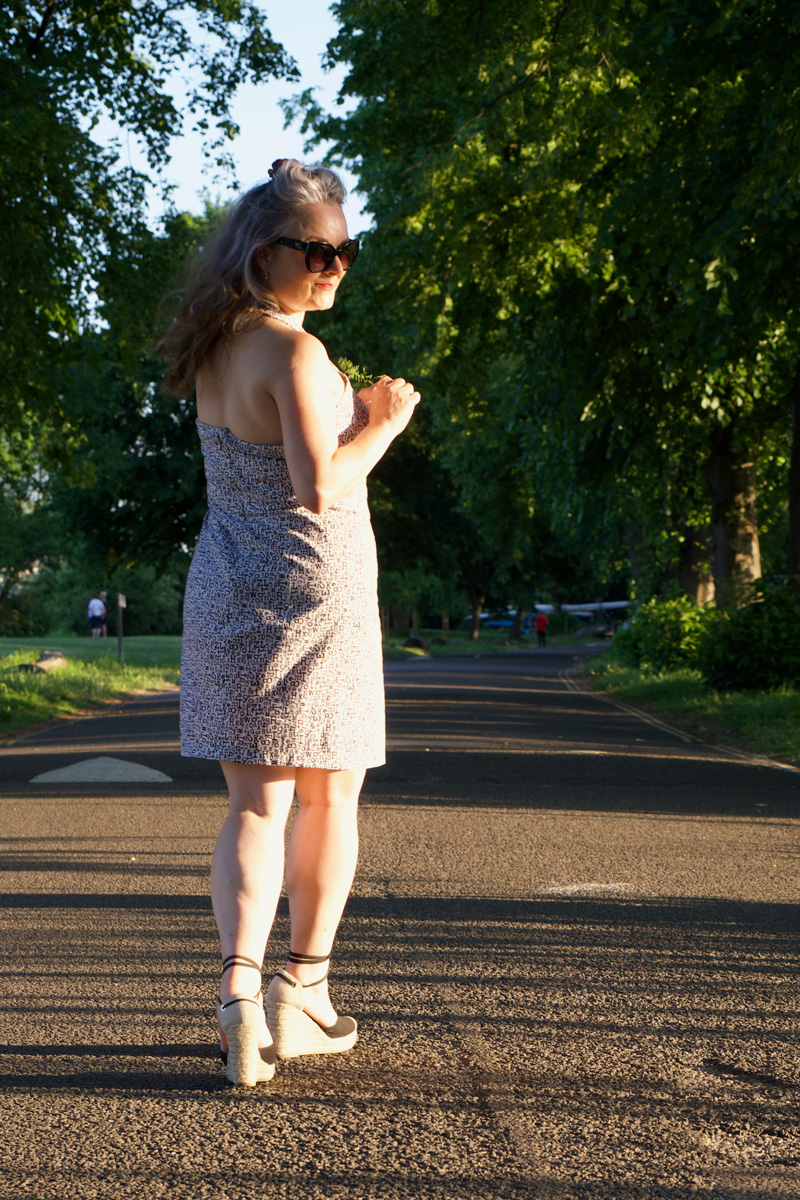
It feels very similar to some vintage batik fabric I used last year for a sheath/shift dress and I love how that one feels against my skin. So after much deliberation, I decided upon something much the same – fitted for sure but with all this roasty toasty weather we’ve been blessed with, I also liked the idea of baring my back and cutting away the shoulders to air a bit more skin!
But I had to get my skates on. Not only did I have a Minerva review deadline, there was an Insta hashtag challenge I was determined to join in with, too.
So typically, I decided to make things just a tad more difficult for myself by designing, self-drafting and sewing my own fitted sundress!
I traced my existing sloper template to include princess seams and a V-neckline, increasing the underarm curve slightly above the bust across the side front where it meets the centre front piece seam and the ‘strap’ that is graduated to the shoulder and meets a back extension to form a buttoned halter-neck.
I created a facing for the whole of the top half to the waist. I did consider making it shorter but I may add a lining to the skirt section at some point.
To finish the seams, I trimmed and pressed the seam allowance to the side and topstitched alongside the joins to create a kind of faux flat felled seam finish.
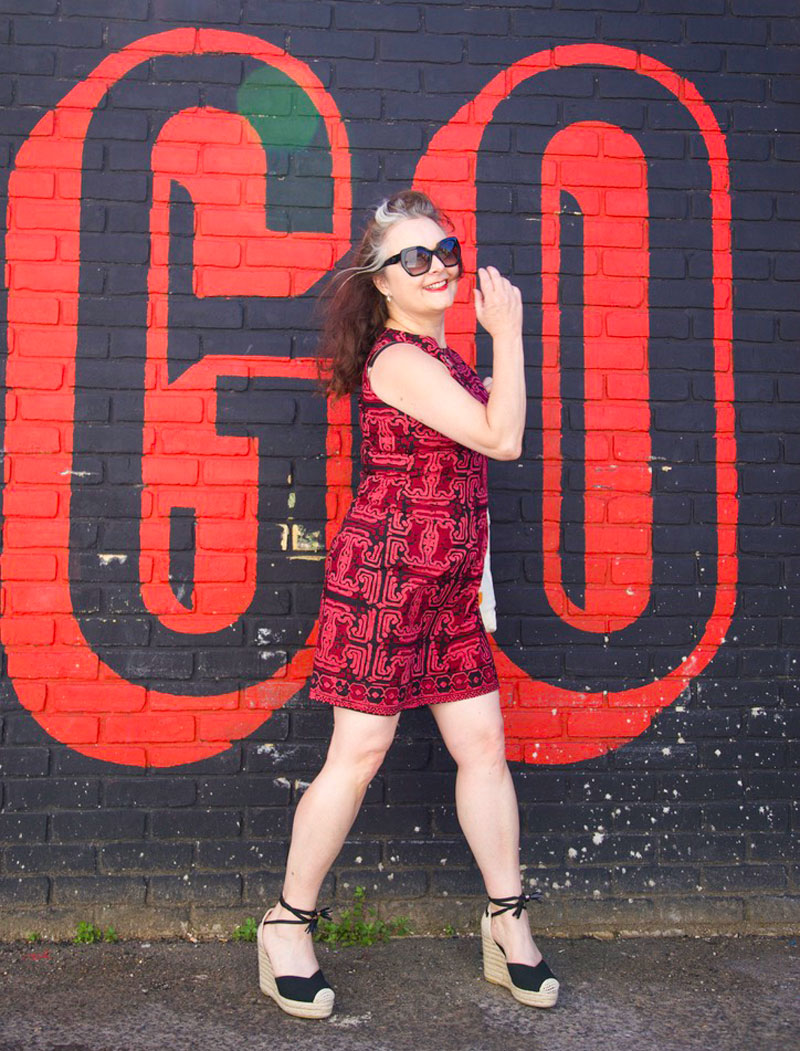
It’s not a bad fit for a first trial. I did do a mock up of a shortened version and its seemed to fit just right but its amazing what issues a little real life walk-around brings to the fore.
It transpires the back section collapses a little and could probably do with a bit more support. Maybe some interfacing would have given more structure or perhaps I need to add bones in the side and centre back seams? Or maybe I just live with it. What do you think? That said, I love how effortless it is to wear right now and I don’t particularly want to have to sit so upright in it all the time!
Needless to say, I’m not deterred. It’s so perfect to pair with espadrilles and I’m sure I’ll be donning trainers with it at some point, even flapping around in flip flops – DM’s too, probably. They’ll all go well with it, which proves its very much my kinda dress!
By the way, the fabric is called ‘Out of Print’ and if you like it as much as I do, here’s a link, but you’ll have to be quick. I don’t think theres many metres in stock.
Thank you so much to Minerva of course for gifting this lovely material as part of the Brand Ambassador programme. And also to the lovely ladies of Instagram (@sewing_in_spain, @Rocco.Sienna and @SewSarahSmith) who are hosting the #sewtogetherforsummer challenge which involves sewing a summer dress before 21st June. There are so many great entries already which have totally inspired and spurred my project along – do have a looksee! Sometimes deadlines are a good thing… Yay! I did it!!
One more thank you to my Daniel for finding this ideal little suntrap along the river and for taking these fabulous photos.
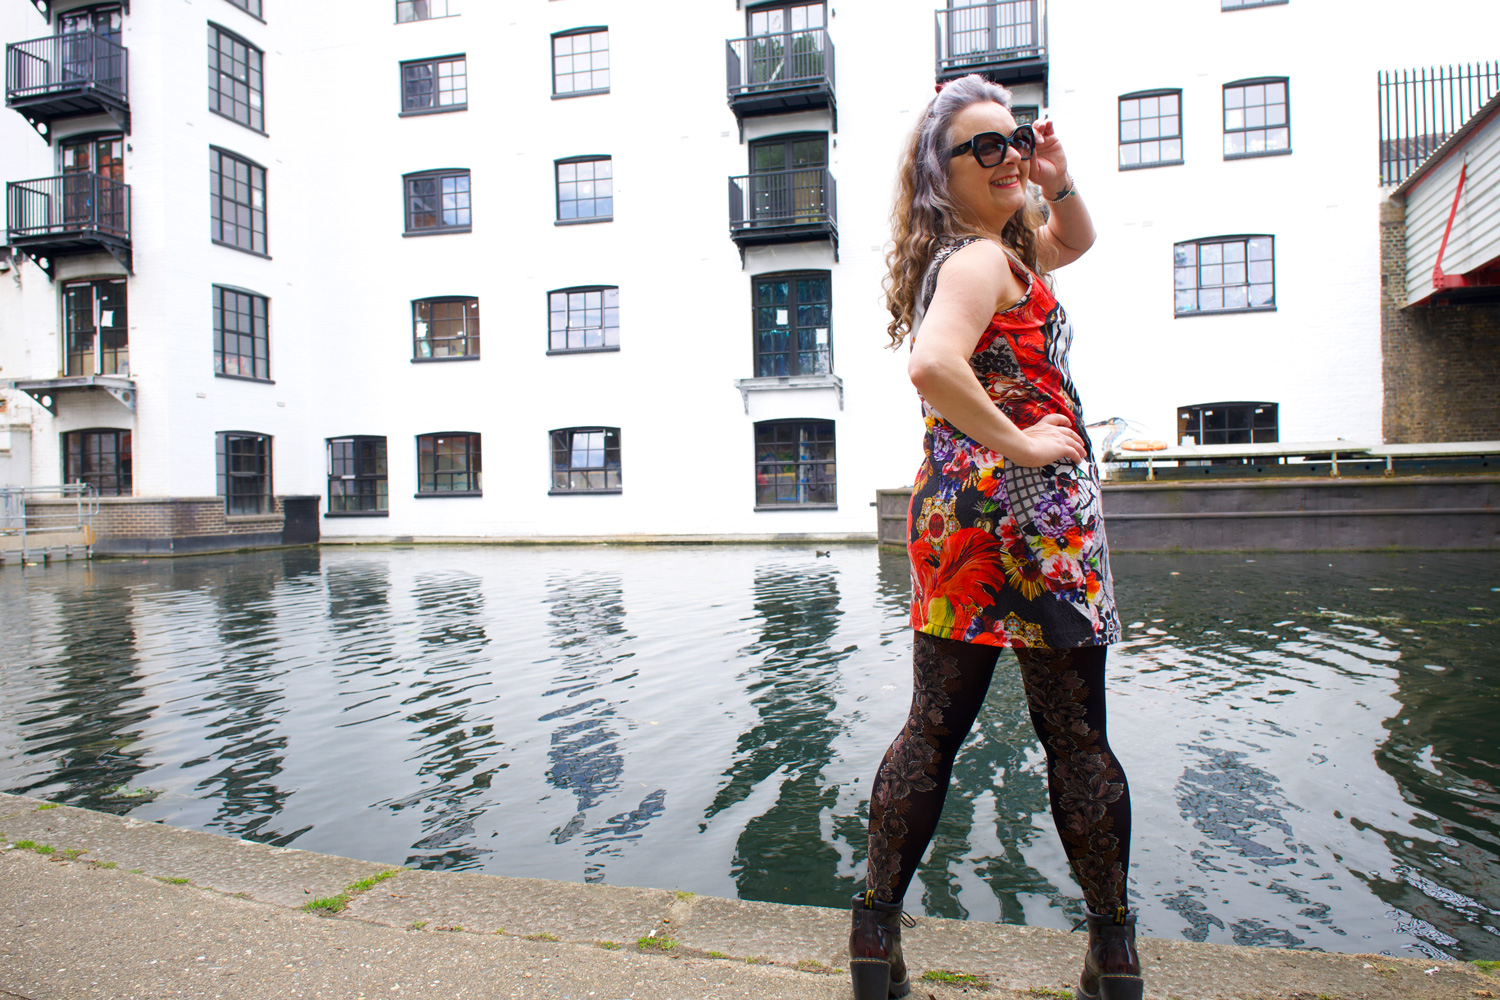
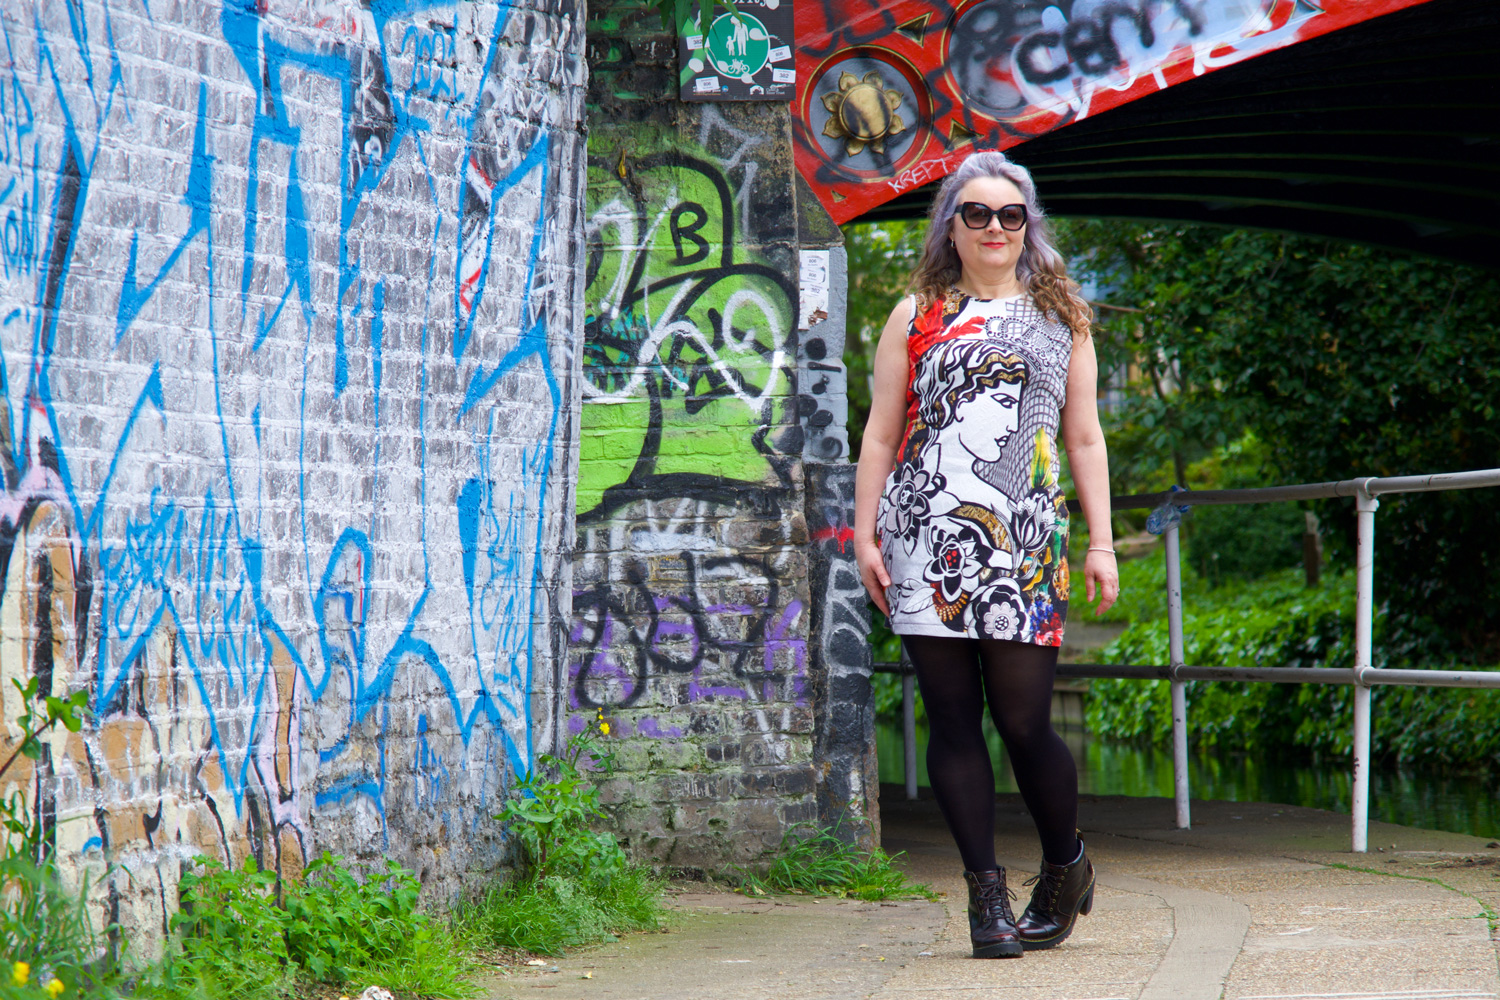
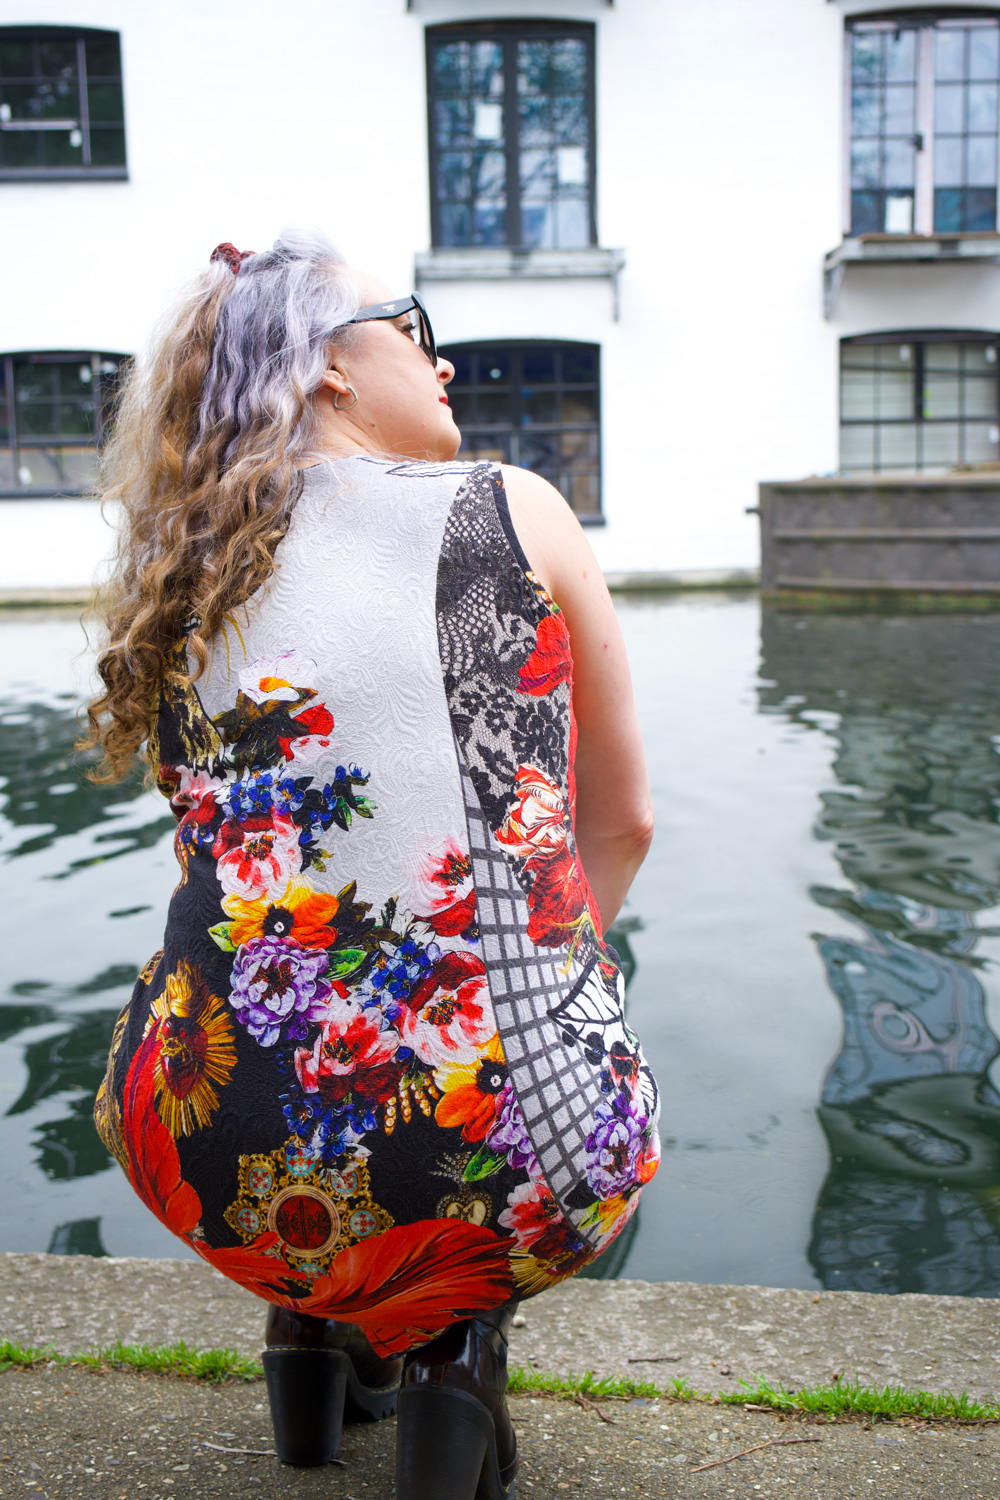
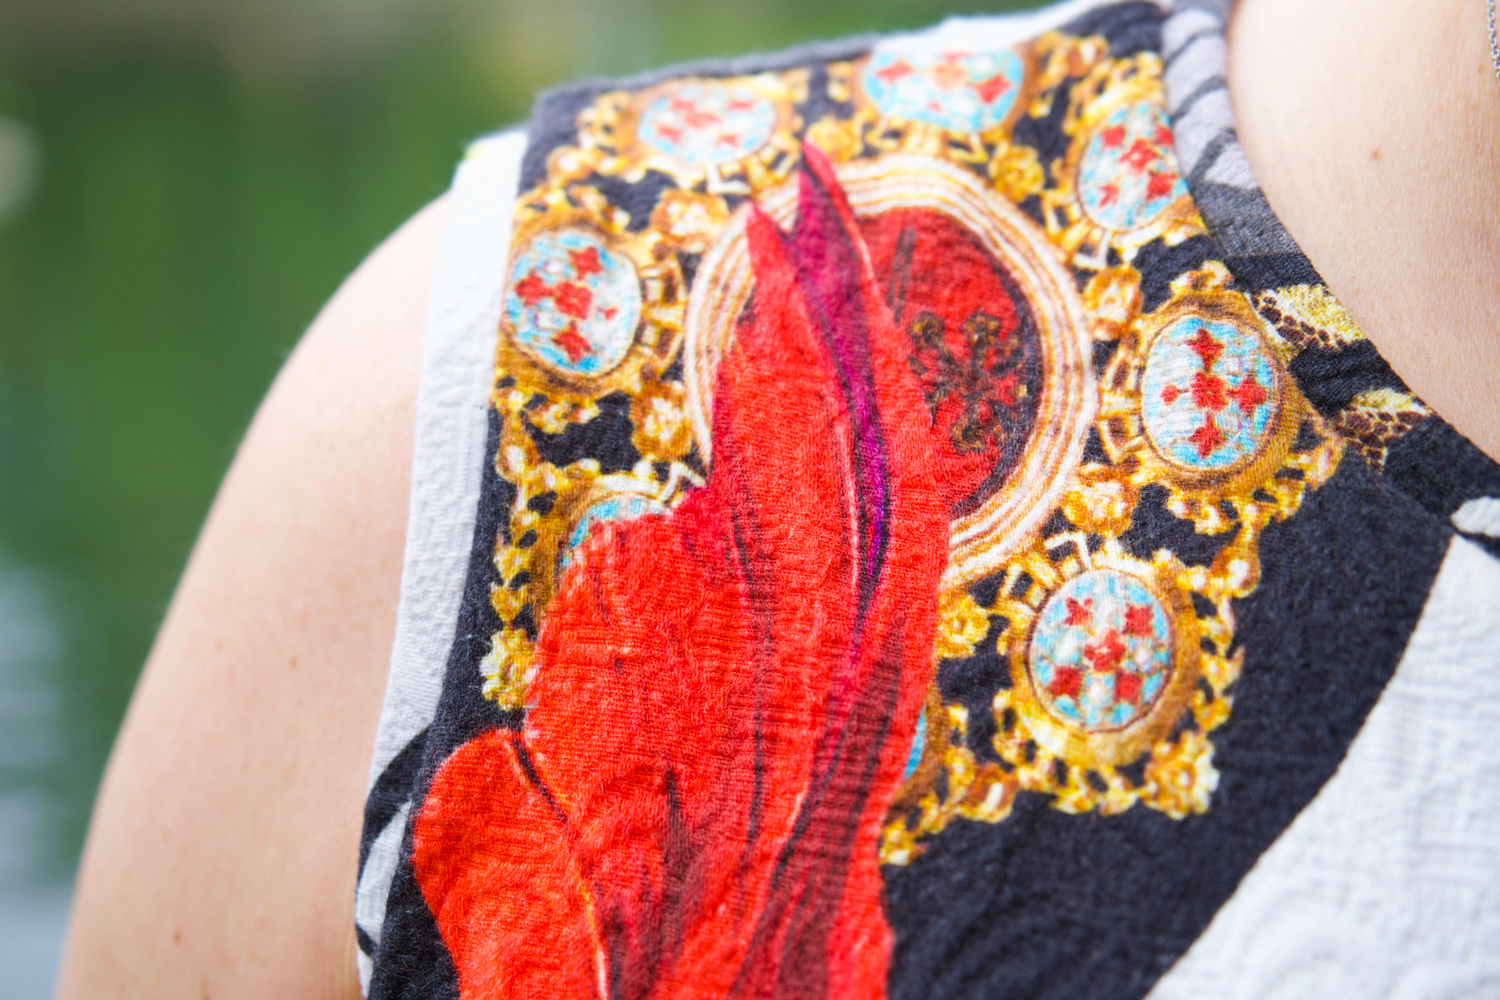
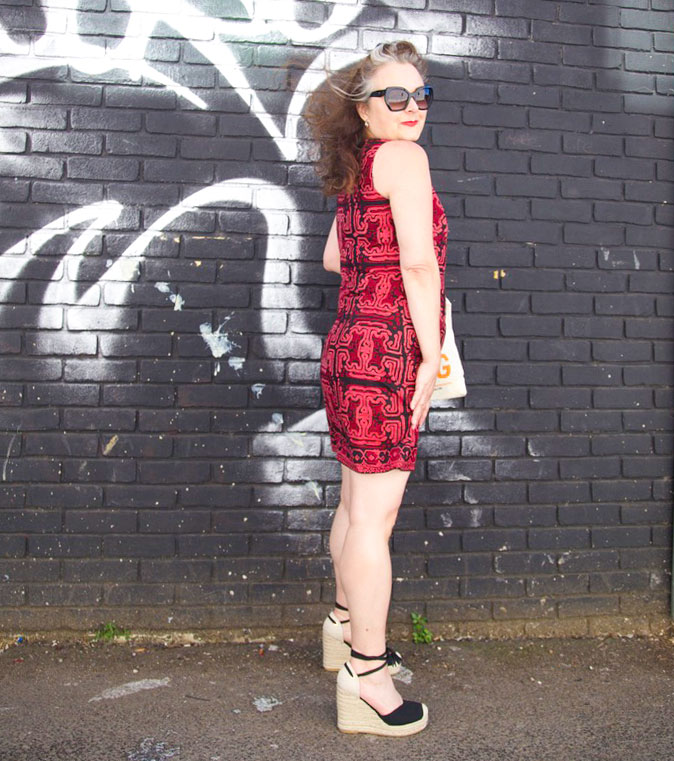
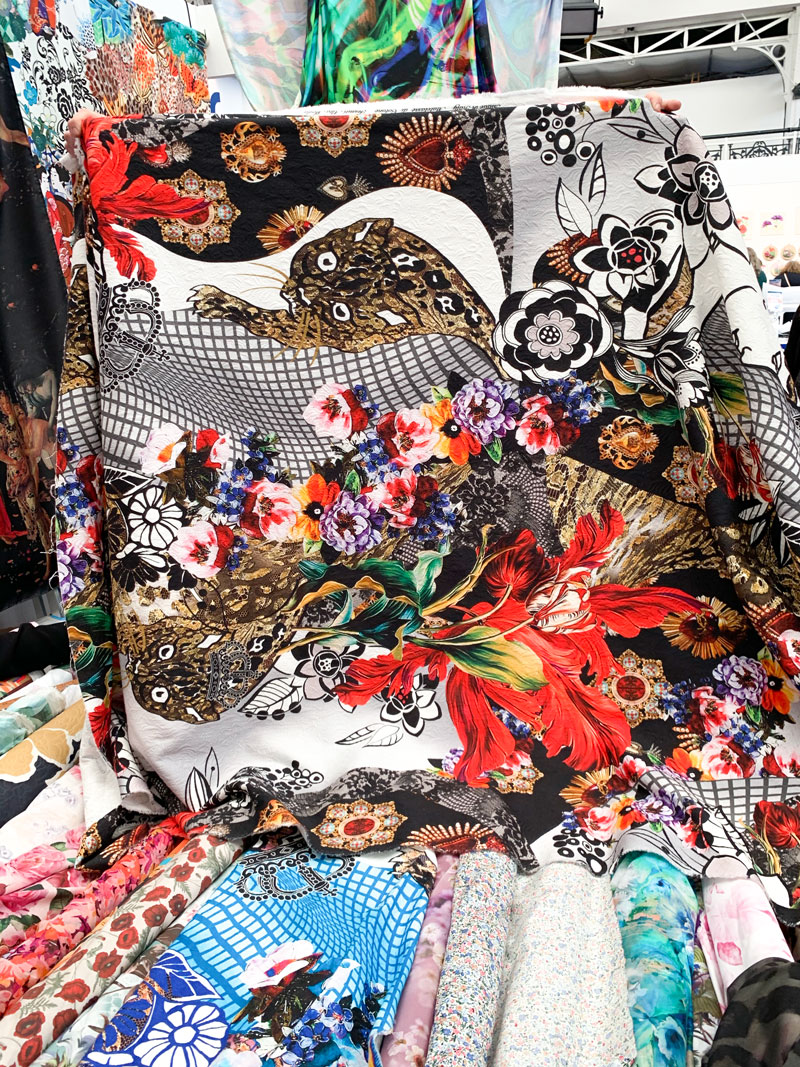
Remember that divine Dolce fabric I was compelled to buy, back at The Stitch Festival 2020? Well it just got stitched up. And boy oh boy it didn’t disappoint.
I had absolutely no idea what I was going to do with it at the time. But I knew it was going to be fabulous, even if I simply draped and cinched with a belt! It’s an Italian cotton metalassé according to the selvedge – a cotton and lycra Jacquard according to M. Rosenberg’s web listing. But all the same a quality weighty, textured stretch fabric of dreams. BTW, I pre-washed at 40 degrees and those colours still popped! And heads up, there are 3 singular metres left remaining on their site if you’re a sucker for a crazy-ass in-yer-face designer print as much as me!
Despite the try-hard distraction of the print, the texture of the metalassé holds it’s own
Ultimately, I decided to let the design speak for itself. Any clever design lines were going to get lost and I wasn’t going to jeopardise one bit of that amazing artwork if I could help it. That meant no darts, no pleats, no tucks, no waist seam. Mmmmm. A full length maxi dress for ultimate impact. That is the end goal. But first to trial a short sheath to test the fit. I bought enough to have a long and a short version, psychically of course!
I’ve drafted a few woven dresses in the past, for me and others, but I’ve only recently worked a knit sloper. So earlier this year I practised on some turtle neck rib-knit tops to test the fit – see black one here, and red one there. All I had to do was extend the bodice pieces to a dress length and omit the sleeves. I didn’t want a turtleneck but I did want a jewel neckline so I didn’t alter that much either.
Though I was happy with the results I knew that the template might not translate in this weightier stretch. Comparatively, the rib-knit was light weight and had way more stretch. I should really have trialled a sleeveless version too but impatient me couldn’t wait any more and I just went for it.
The pattern pieces simply consist of a back a front and some self binding for the neckline and the armholes. And cutting it out was a joy. Not only because is was dead quick with a rotary cutter and all, but it was so satisfying – no slippage, no stretching… just a lovely little satisfying crunch as that blade sliced through!
I first sewed the shoulder seams, after applying my favourite iron-on stabilising tape [aff-link] to limit any stretching, then I sewed the side seams using my overlocker. The first try-on highlighted a bit too much ease in the armholes so I nipped 1cm (so 2cm in total) off the end of the shoulder and graduated to zero at the neckline.
Happy with the rest of the fit I pondered the effect of facings over bindings. I have a love-hate relationship with separate facings – they always flap around and need ironing flat. The only ironing I don’t begrudge is pre-cutting out, and not post assembly! I much prefer an all in one neck and armhole facing that curves over or under bust. But this fabric is quite heavy and I feared the result would be too chunky.
So I decided on bindings which would mean trimming the seam allowances back a bit to allow for the additional 1cm wide strips to sit comfortably.
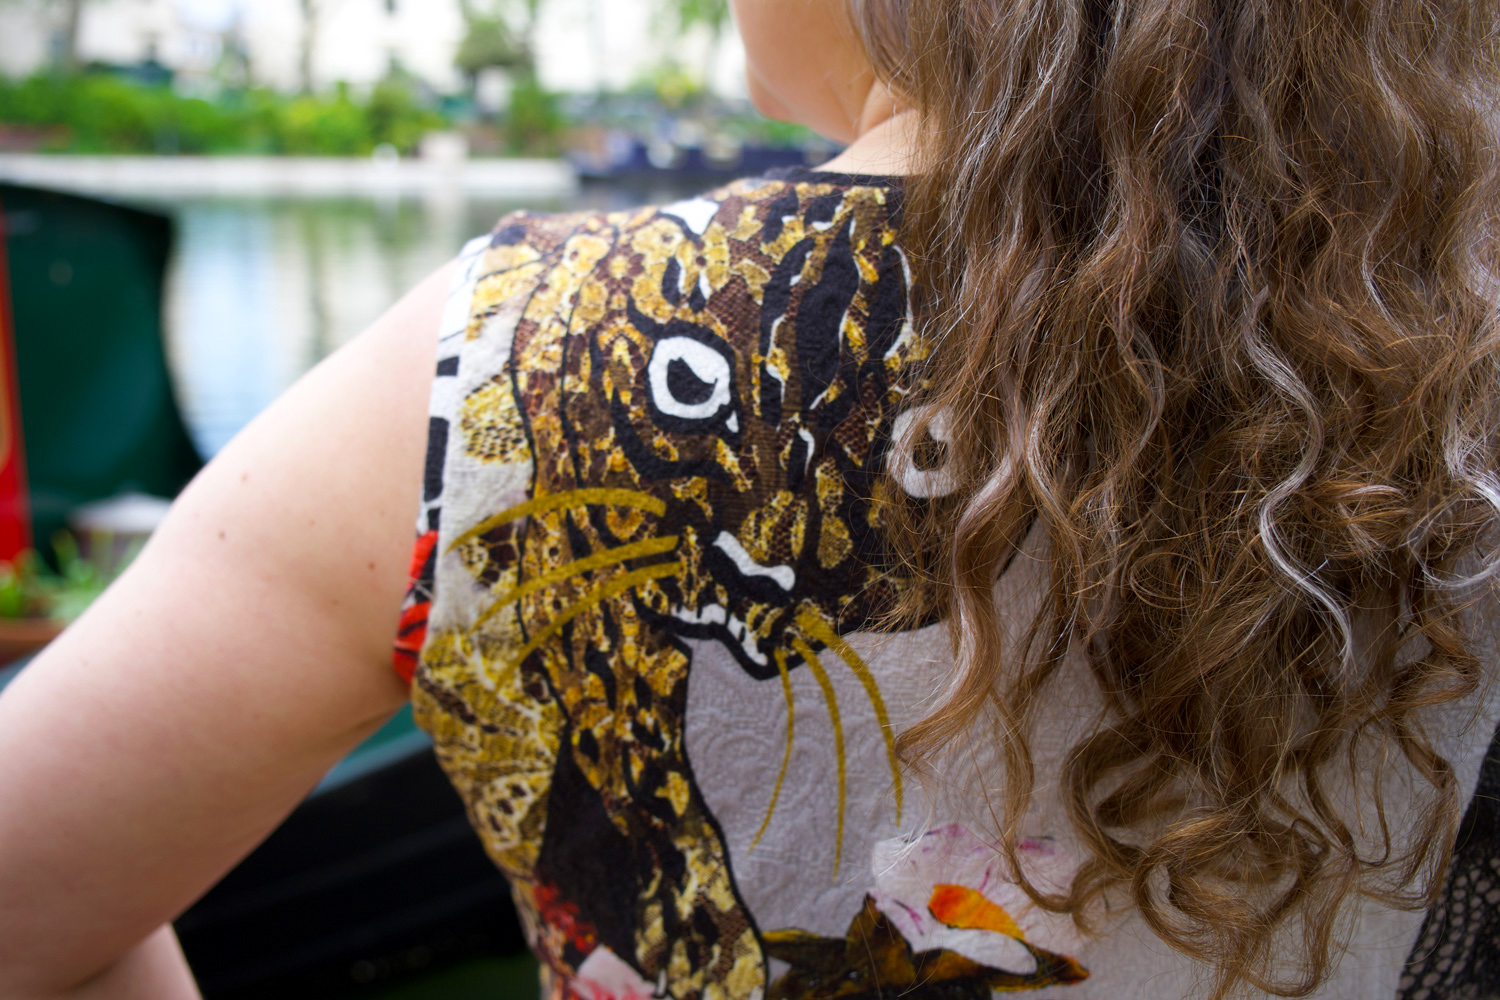
Looking at the back I can see that I would need to lower the armscyce next time. It’s comfortable and all but the knock on effect of taking out the ease on the shoulder has raised the underarm. Not a biggie though. That leopard over my shoulder is a dammed fine distraction!
As you might imagine, the thing that took the longest with this dress was consideration of placement. Both back and front are good. Like stupendously good! There was no pattern matching necessary. It was just plain choice. Well, and the want to not decapitate the chap on the front! I decided I didn’t like the idea of someone on my back but I did like the possibility of the back side being prettier than the front. So that’s the way the cookie crumbled.
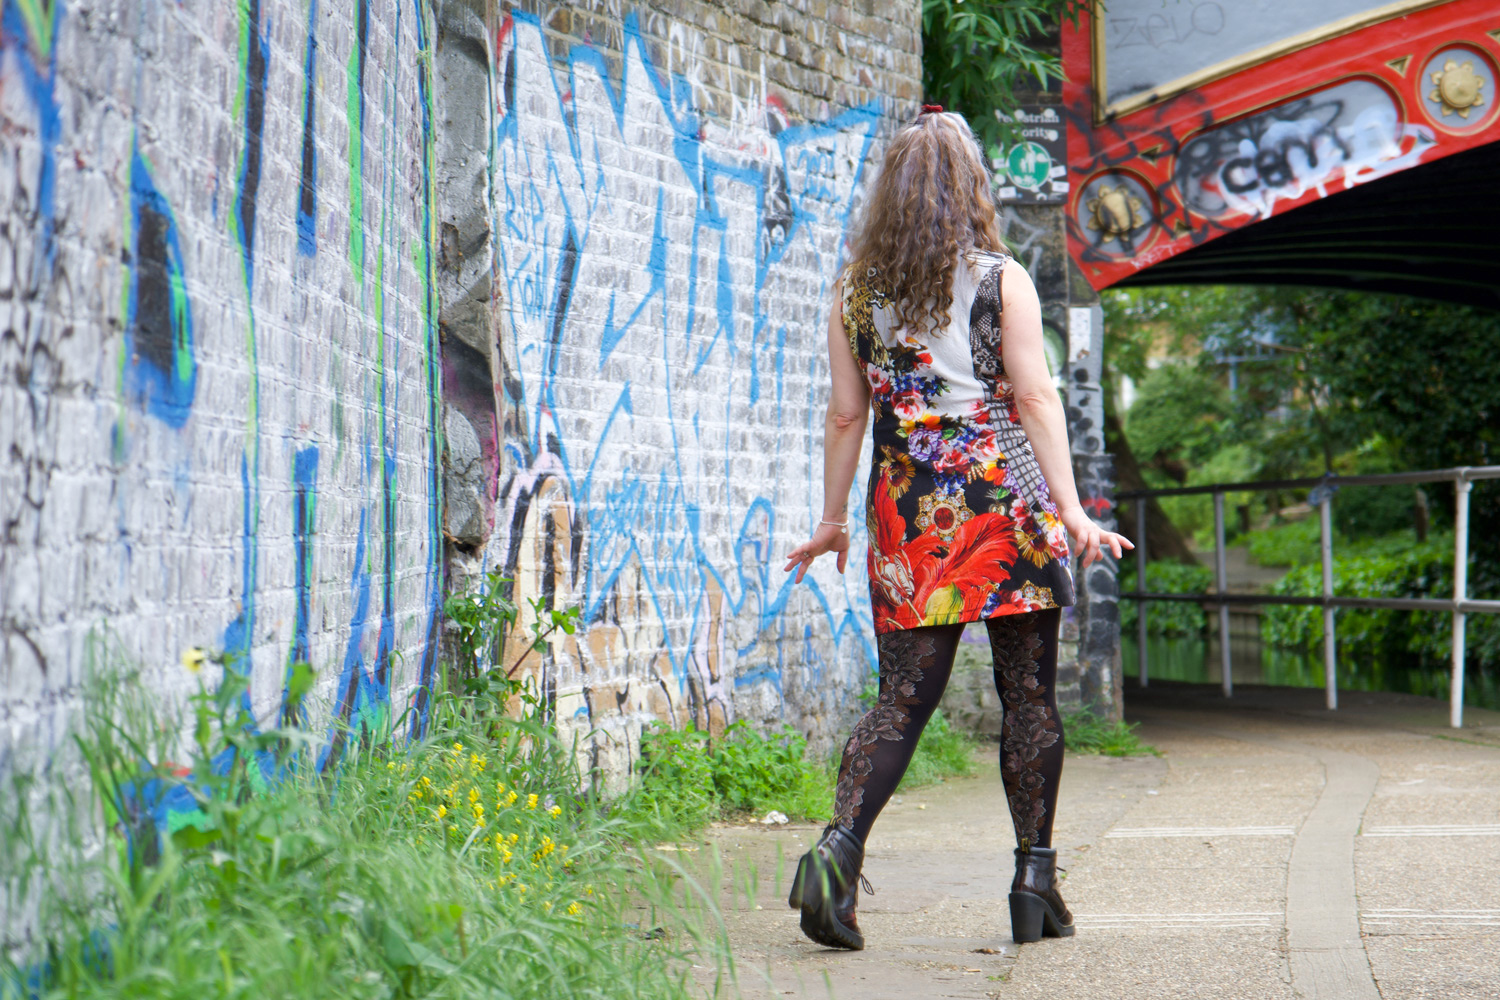
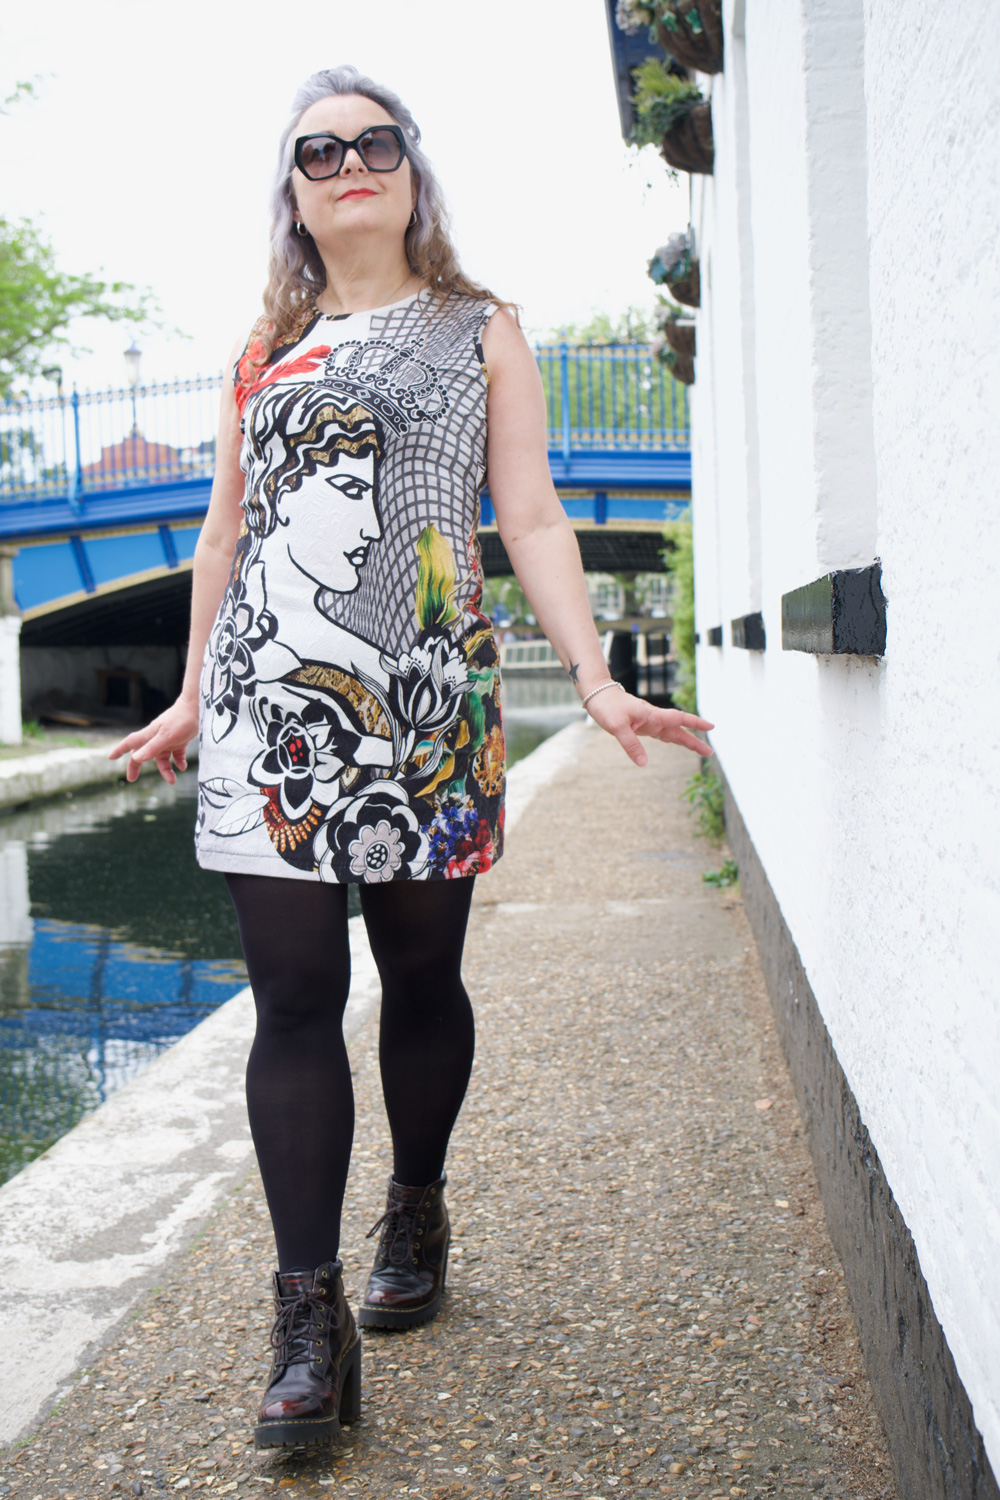
We had such fun taking these shots yesterday. Dan had recently been on a walk shooting birds along the Grand Union canal and suggested it might throw up some lovely backgrounds for the shoot. He wasn’t wrong and I was very humbled by all the wonderful comments from passing strangers, about my dress. It’s so effortless to wear. Though not quite the weather to wear without tights yet. No-one needs to be blinded by the intensity of my pale pins so soon into the year! In any case. It’s very short. I’m sure the world isn’t ready for my pants either!
More is more, when it comes to tights!
We walked to Westbourne Park, with a cheeky peek at some market stalls in Portobello along the way. Couldn’t resist this odd fabric from a vintage stall. Anyone want to hazard a guess as to what this is?!
If you can bear to watch this space for another year or so, who knows what kind of crazy dress this will turn into!
And there we started our walk, all the way to Paddington basin where we sat for a lovely lunch and a cheeky beer or two in a beautiful Victorian pub.
A bus ride back through the remnants of a demonstration in Hyde Park was quite exciting. A few more beers and a takeaway to round off a fabulous day of doing what we both love. Bring on the sunshine – we want more London days like this!
May is one of my favourite months for many a reason. The weather is warming – I so can’t bear the cold – and I’m more likely to get out more for walks and to visit my favourite places and people after a long hibernation period. It’s also the month that the lovely So, Zo What Do you Know? hosts the #MemadeMay challenge. Now it’s fair to say that each year this flurry of instagram selfie shoots gets easier for me as my wardrobe becomes fuller. But Lockdown has narrowed my choices somewhat by what fits and I’m going to have to make some more clothes. Shame, eh?!
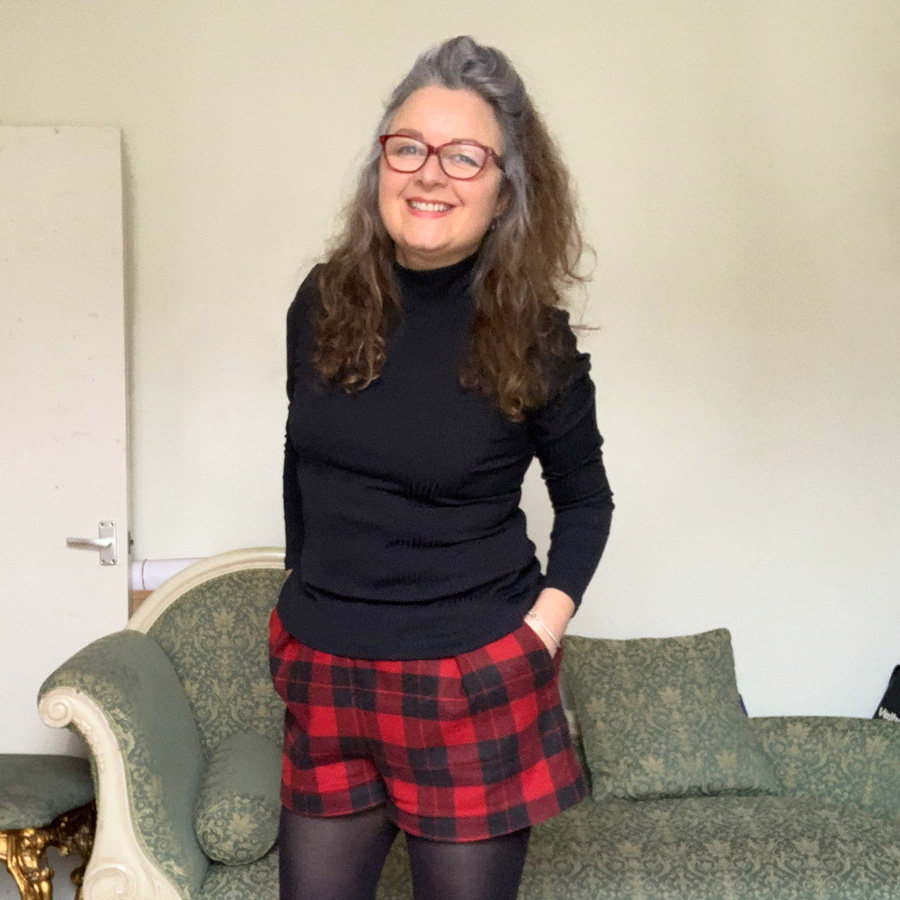
I’m kicking off with a new turtle-neck top, using the same self-drafted pattern as the black one I made not so long ago, which I might add might possible be my most worn thing ever, already!
Nothing needed to change but I really wanted to see if I could elimate some little folds from the underarm, across the bust. I figured that underarm armhold point might be sitting a bit high, so I lowered it a quarter of an inch and adjusted the sleeve to match.
It does fit a bit more comfortably but didn’t reduce the wrinkles! Haha. Still a lesson learned though. I luckily only adjusted the paper pattern. The digital version remains. But I am going to flatten off the sleeve head. It does seem to force my shoulder end to sit a little too high and it does measure a couple of mm’s longer than the armhole and because its a stretch knit there is no need for ease, so it will probably help. I do like the power of being able to tweak patterns here and there. It gives me a little buzz of control!
Once again the lazy in me couldn’t be arsed to set up another spool let alone the twin needle for the hems. So I zigzagged as usual. I kind of like the contrast of the zigs in between the black lines.
And I got the neck right this time! No silly amount of stretching. Just enough to fit. And its even more comfortable than the last.
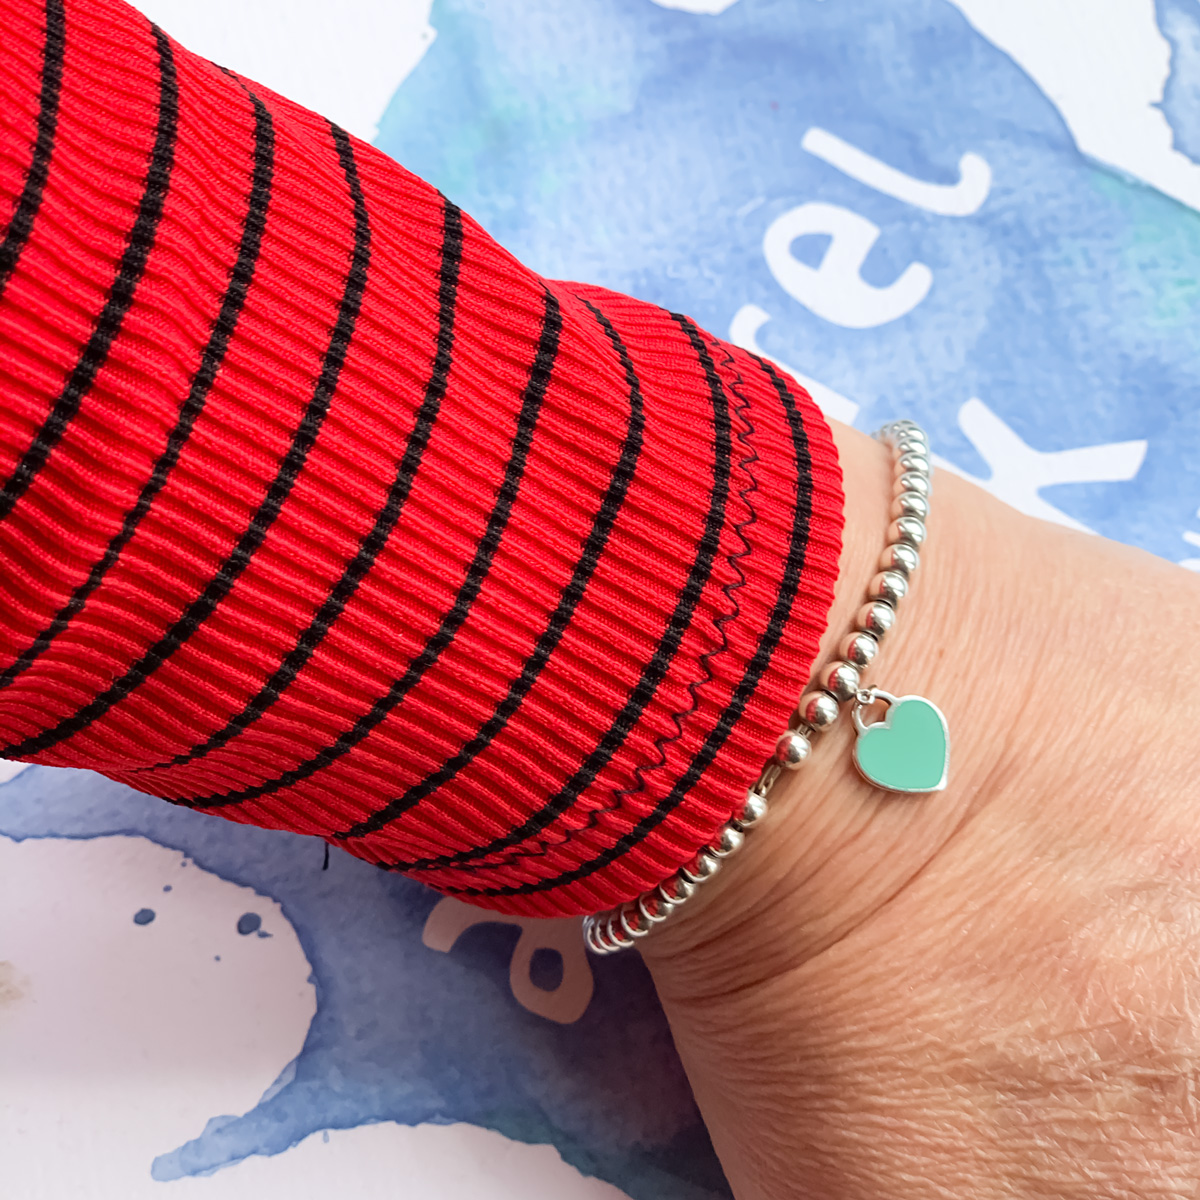
The fabric is once again from Minerva.com. It’s a polyester rib knit in a lovely bright red colour with a narrow black stripe running round. I even made sure to match the stripes at the side. To be fair I wasn’t going to worry about it but the fabric behaved so well, it was harder not to!
This isn’t the end of stretchy tops. I definitely need them right now. And there is still room for improvement, and welcome opportunity for experimenting with different fabrics. Watch this space!
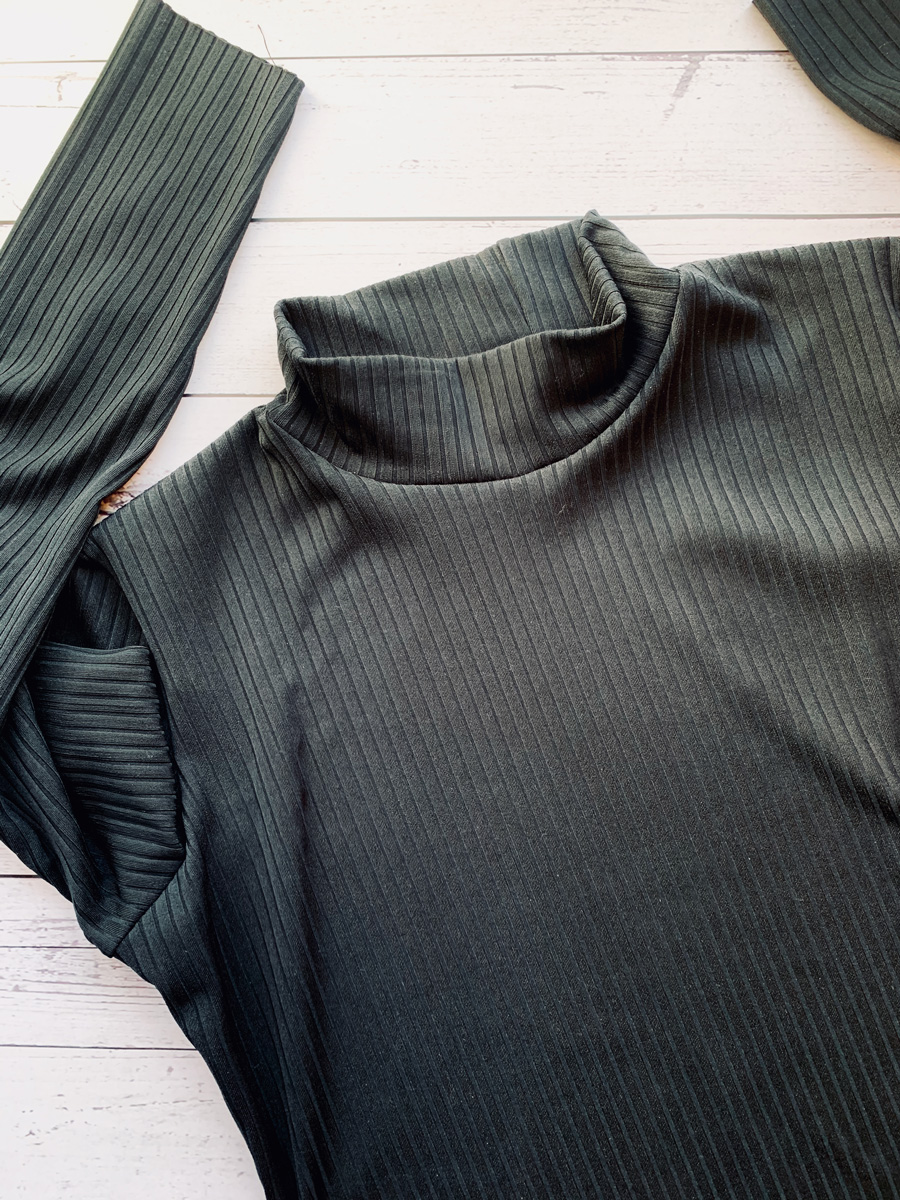
The last thing I made was this turtleneck rib knit top. Most probably up there with some of the most boring things I’ve made, but actually a top that ticks a lot of boxes.
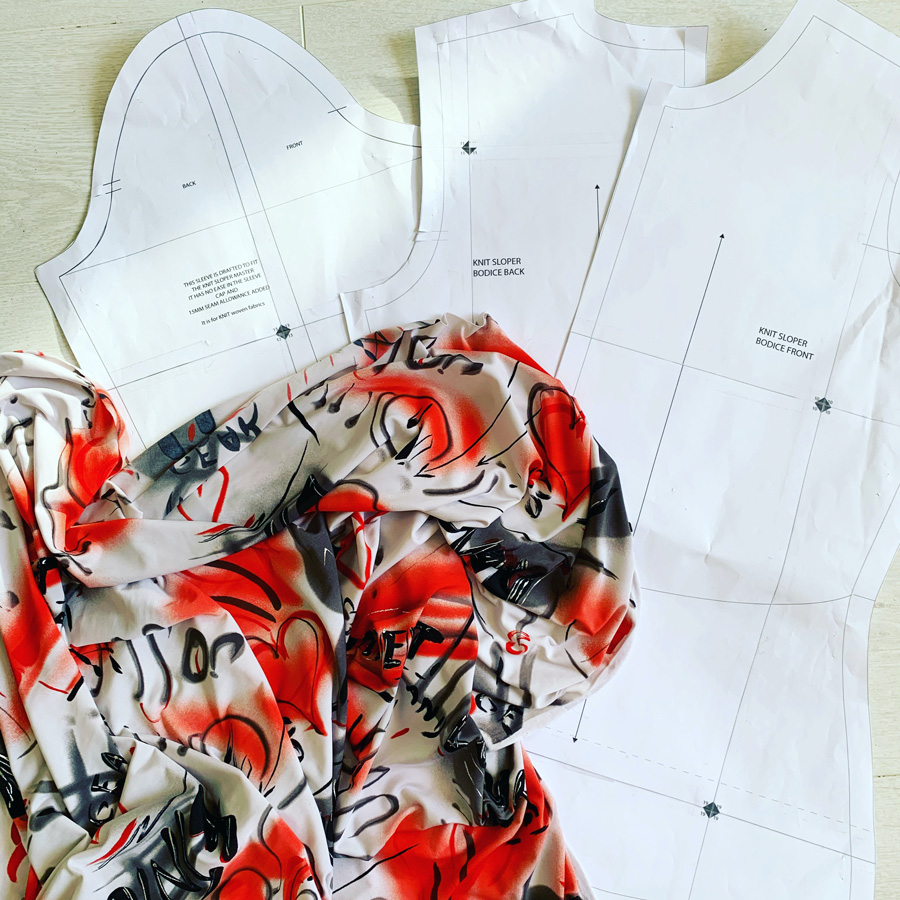
I self drafted it for one and learned something new in the process. I’ve self drafted a fair few patterns for woven fabric to date, like this Liberty Lawn summer dress, a few shift dresses like this batik one, and more recently my handkerchief hem dress to name a few. But I’ve never thought to self draft a knit pattern. Why would I? Its akin to reinventing the wheel as there’s so many great basic knit patterns out there. But I do love a challenge. And also have another agenda in the shape of some very special stretch fabric that is still waiting to be made into a well fitting dress so if I master a moulage in knit then I’ll be one step closer to designing a knit dress, right?
The process was actually very simple. In a nutshell removing the darts and any ease to create a close fitting shell that stretches around the curves of the body. I used my self-drafted woven moulage as a starting point and made the adjustments from there. I found a great lesson on Craftsy, by Suzy Furer and also referred to my favourite sewing book: Patternmaking for Fashion Design by Joseph Armstrong.
I tested it first on some nasty nylon fabric. To be fair I don’t know what the fibre content is but I’m certain there’s not an ounce of natural anything in it! Looks kinda cool with its graffiti design though. But I messed up royally on the turtle neck itself. Such a stoopid mistake. I made it 10% smaller than the neck opening which was fine. Sewed it in a circle to check it would go over my head which was fine too. Then stretched it as I sewed in place, much as I would sew a binding on a scooped neckline. Realising I had excess (as a result of over stretching) I cut off about an inch and a half, maybe even 2 inches more to make it fit. And that was where I went so wrong. I can just about get it over my head but its akin to being slowly strangled if I’m wearing it for more than half an hour!
Everything else was just fine, though. Just made a massive note to self to not mess with the collar piece!
I especially loved that it was all sewn on the overlocker save for the hemming, so was super quick to whip up. One very important thing gleaned from sewing knit tops before is to stabilise the shoulder seam to stop it stretching out. I used some Prym iron on stay tape (aff. link) for the first time and it was so easy to apply in a straight line. Its been subject to a few 40 degree washes since and it’s still totally intact. Definitely no going back to sew-in tape now.
So then I made the black one with ribbed knit I bought in the Minerva sale for a snip! And I love it. Its so versatile – goes with all my skirts and shorts and also is a great under-layer for some of my self-drafted dresses, on a chillier days. Topped with a cardi for an extra layer its a definite win win win!
It’s just so classic, with a nod to retro too and has already had soooo much wear that it will probably wind up being the most sustainable item of clothing in my wardrobe for that reason alone.
I’d love a couple more of these. A leopard print one for sure and perhaps a red one … predictable much! But first I have to make something a bit more exciting. And I’ll tell you all about that real soon.
In the meantime, here’s to boring practical clothes that go with absolutely everything and for a quick sew fix too!
Are you sewing much over lock down? I’m struggling to get as much sew time due to work pressures – everything is taking so much longer so I feel like I’ve lost so many hours in my day. But all things considered, it could certainly be much worse!
Lockdown forced me to buy fabric online. Not my favourite thing to do but needs must when Covid pulls the rug!
I headed straight to Minerva – amazing selection; easy to navigate website and very competitive prices. I’m also a fan of theaccompanying videos that showcase the fabric in action so you can get a fair impression of the weight and drape.
I was on a roll with the Shelby rompers, having made a starry one, a tropical one and an upcycled one in relatively quick succession, and my plan was to make a plain one that was a bit more casual and downplayed for those days when you want to be slightly less visible. Read: any excuse to go back to black!
I’m a sucker for black. But even moreso for a black fabric with a texture. And linen is a firm favourite. So I figured this crinkle cotton striped linen gauze would tick all the boxes. Black was sold out unsurprisingly, so I went for charcoal which actually champions those slubs with way more contrast.
But when it arrived I was a bit miffed. It wasn’t at all as I’d imagined. It was a bit scratchy, a bit wonky with it’s loose weave and worst of all, following a prewash it contracted to half the width! That lovely slubby texture totally worked against me, didn’t behave at all like regular linen and was almost elastic! – I was dead scared to make it into a romper. What if one leg ended up longer than the other, lol!
Channeling Blondie and Parallel Lines!
Despite the disappointment I rejoiced in the realisation that I’ve come far enough into my dressmaking journey to know when a fabric isn’t going to cut it. And the tantrums are few and far between now, because I’m quicker at finding solutions. Also the fabric completely softened after a prewash and I was more determined than ever to let this fabric do the talking.
So I went off piste. Not accidentally I’m sure because I’ve always got a catalogue of crazy designs in my head and sometimes they make it to a page in my Fashionary book so they’ve got a better chance of being realised. A summer linen dress incorporating a fitted sleeveless bodice, with a v-necklline and a handkerchief skirt would be it’s destiny.
I reached for my bodice sloper, added a v-neckline and narrowed the shoulders. I also swung the darts to fashion a double French dart for no good reason other than I’ve never done it before. And I really like the result!
The vertical stripes of this linen lend themselves perfectly to the bodice but I decided to switch the stripes horizontally for the skirt section because I much prefer how horizontal lines fall at the sides. There was precious little worry how it would all hang for cutting it on the cross because I was playing to it’s wonky nature in any case. And it turned out good. In fact more than good. I love it!!
I have to cite a few influences here: Liz from this year’s GBSB for sticking to her alternative fashion style. I realised I was drifting away from mine and she’s unknowingly reeled me right back in! My bestie Laura Bird who loves an All Saints asymmetric number, always sporting an ‘interesting’ dress and Burda Style for first introducing me to a hanky hem!I made my first maxi dress here and a second silver one here and they are still my favourites though this is my first short dress with a handkerchief hem.
So how did I cut the skirt?
I decided on the length of the skirt (the depth) and factored in seam allowance and hem.
I made the width of the skirt to the following calculation:
Front piece (cut 1) = half waist measurement + (2x length of skirt) + 8inches for 2 box pleats + (2x hem allowance)
Back piece (cut 2) = quarter waist measurement + (1x length of skirt) + 4inches for 1 box pleat + seam allowance + hem allowance
I marked the centre of the front piece and 4 inches either side to tack the box pleats. I overlocked the bottom of the bodice piece and the top of the skirt pieces before pinning and sewing in place. I sewed up to the side seam on each piece and then sewed the seam allowance of the extra fabric along the top edge. After the centre back edges were overlocked, I inserted an invisible zip and enclosed the top part of the zip with the facing.
Finally I hemmed all four edges of the skirt and mitred the corners. And oh what a neat little finish that is!
I know it’s not the most groundbreaking dress. But I made it to my own order and an image in my head and it really feels good. The fabric feels good against my skin in this heat and I love how carefree it is.
I finished up sewing it yesterday morning in good time for Dan to have a practice with his new camera. (Clever, hey?!) And I’m delighted with the results. Thank you oh clever talented husband of mine!
Also…new shoes!!Buffalo hologram numbers that literally turn rainbow in the sunshine. And yes I know I’m probably channelling 90s Spice Girl. And no… I’m not about to grow up anytime fast!
I’m so happy right now. Doesn’t take much – just a shed load of sunshine, some quality time with the fam and success at last with the fit of my shift dress.
In case you’ve missed any part of me whittling on about this process, my mission has been to achieve the best fit I can using my own dress pattern with minimal seam lines – ie a darted dress with both front and back pieces cut on the fold – so as not to disturb the print of a very boldly designed fabric that I have in mind to sew next!
The fabric I used here was the best test so far because it too required careful pattern placement. You can see the first version I made here and I just realised I didn’t even get round to blogging the second so here is an actual shot, instead!
I was gifted the gorgeous batik fabric a few years back, by a lovely friend who had inherited it from her parents. When she saw it featured in my instagram post she was so happy to see it again and so pleased that it was being put to good use. I kinda felt duty bound as I remember her telling me that her parents used to travel for to Thailand and Indonesia quite a lot in the 60s and 70s for work and that they always returned with gorgeous authentic fabrics. Proper sentimental value and vintage, too!
This piece in particular is undoubtedly a hand-blocked batik. Though this is based purely on my own research and I could be wrong so please correct me if you think different.
It wasn’t very wide but I knew it would be perfect for the third trial of my shift dress, knowing I was very nearly there with the fit. I wouldn’t have risked it otherwise!
It’s such a fine quality cotton. Actually feels so natural against my skin, which is an odd thing to say but I have worn cotton before that doesn’t feel nearly as good. And it completely stood up to a stroll in 24° of Shepherds Bush sunshine today.
I was intrigued by the selvedge of this fabric. Why would it have just one edge of border decoration? I put out to the wonderful, ever obliging sewing community on Instagram and the very clever Meg from @cookinandcraftin suggested it was very likely to be used for a hemline and a centre front detail for a sarong when wrapped. I loved knowing this and was determined not to waste this detail so I set about cutting my pieces on the cross grain in order to make the best use of the design.
But I hit a snag and realised just in time that the cross grain had absolutely no give at all, and considering the style and fit, it could have been a disastrous move. So I cut on the long grain, as I have trialled twice before (if it ain’t broke and all that) and cut the border separately to seam along the hemline with a generous seam allowance which is overlocked and pressed down on the wrong side. It actually helps to add a bit of weight to the bottom of the dress too.
I made a few other tweaks to the pattern since version 2:
I widened the shoulder straps by 1cm having struggled to pull the dress through the facing during construction, as per the ‘burrito-method’! The fabric I am going to use for the next one is much thicker and I don’t want to risk damaging it or pulling out any stitches in the process.
There was still an element of pooling at the back (swayback issues as usual). And even though I added a quarter of an inch more at the hips since last time – with some improvement – it didn’t seem to solve the issue as much as I’d like.
Then, just this morning, I saw that Cortney from @s.is.for.sew on Insta detailed how she lengthened her back darts to resolve a similar issue. So I moved the bottom point of the diamond dart down 2.25″ and continued the widest part down longer before tapering off. It worked a bloody treat!
And so I do believe I’m ready to cut into that prize D&G fabric that I got from The Stitch Festival 2020 – only dilemma now being, how the hell do I choose my favourite placement of the design? I anticipate this being the longest part of the process!
Dolce and Gabbana fabric at M Rosenberg’s stall
Thank you as always to Daniel for these amazing shots down the alley of the Laundry Yard in Shepherds Bush, London. For anyone who knows, you’ll know what a brave move this was!