Camp collar shirt

selfdrafted camp collar shirt

Did I imagine that Christmas and New Year break? Feels like it happened a lifetime ago… can I scroll back a few weeks pleeeease – it’s all a bit too much already! Any one else feeling the same?

I know I mustn’t complain. Too much work is the least of concerns for a freelancer. I’m just craving a sewing project soooo much! There’s so many in my head I’m literally going to burst if I don’t get to make at least one of them soon.

front view of shirt

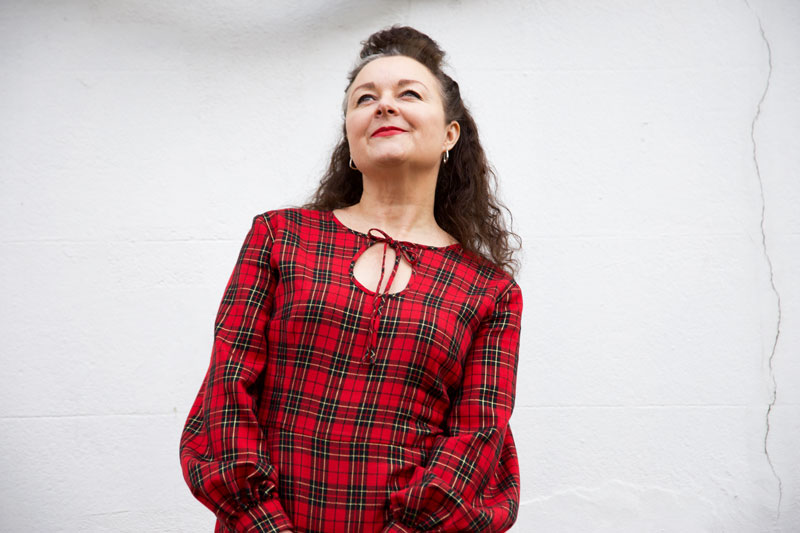
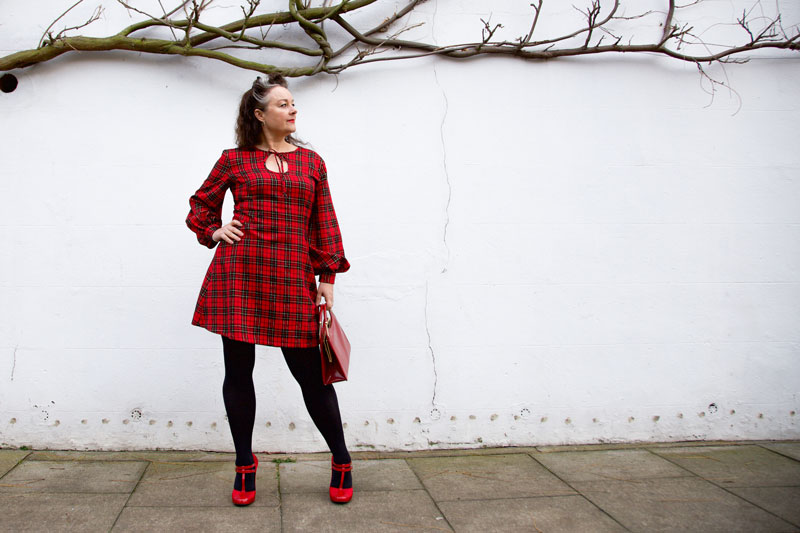
But it’s dark now… and I’m exhausted – story of my life. So I’ll just settle for a little fix from blogging a recently-made shirt for now.

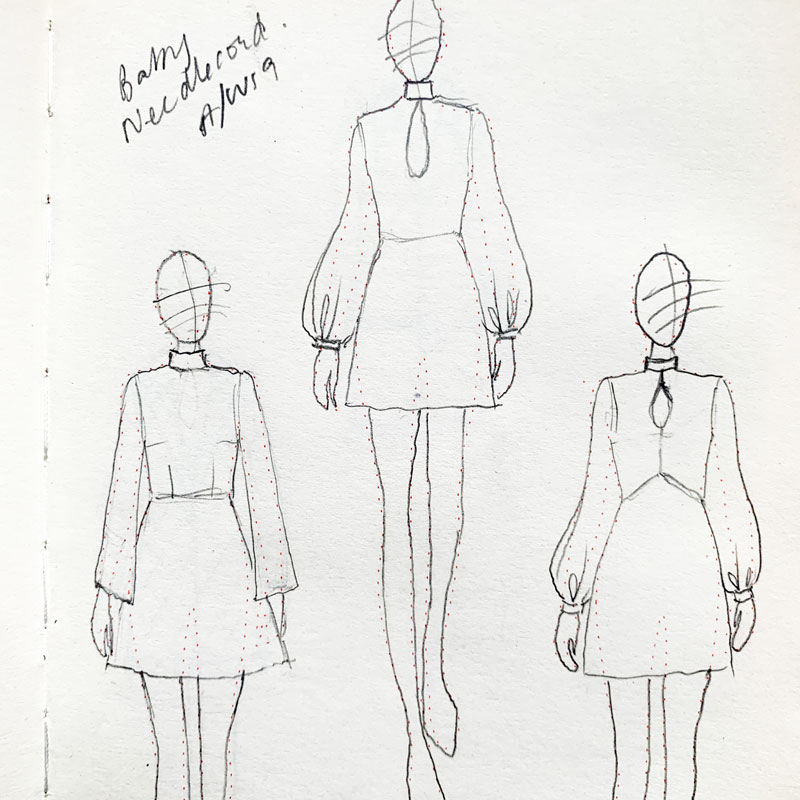
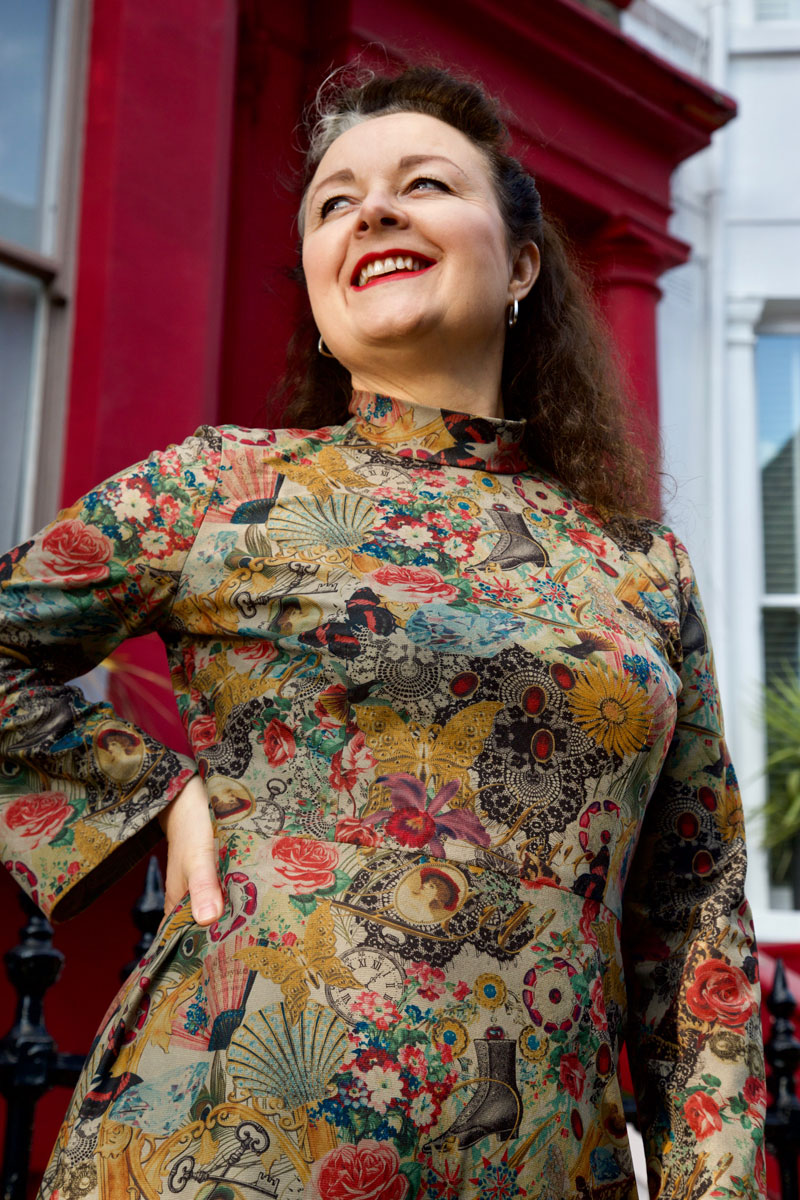
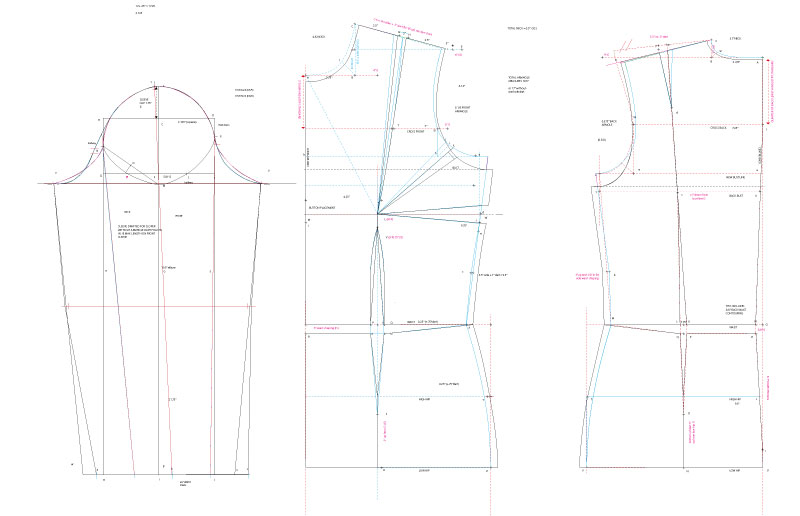
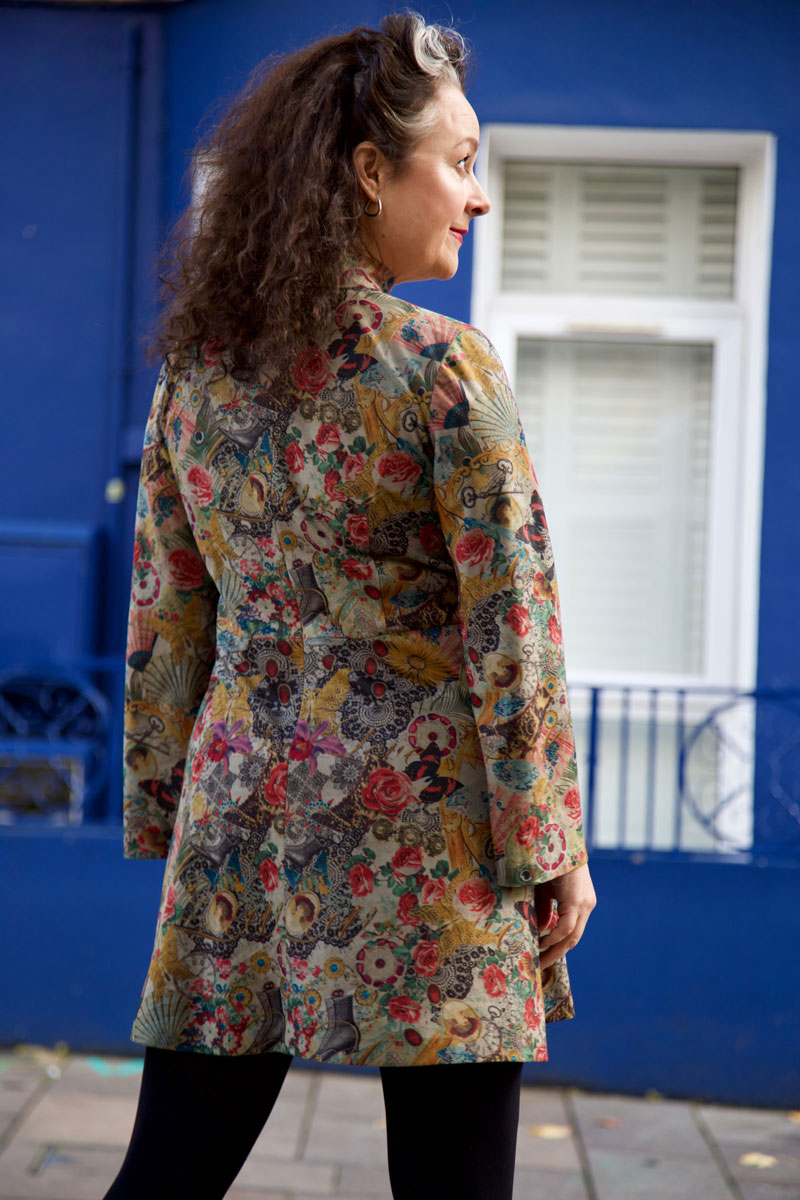
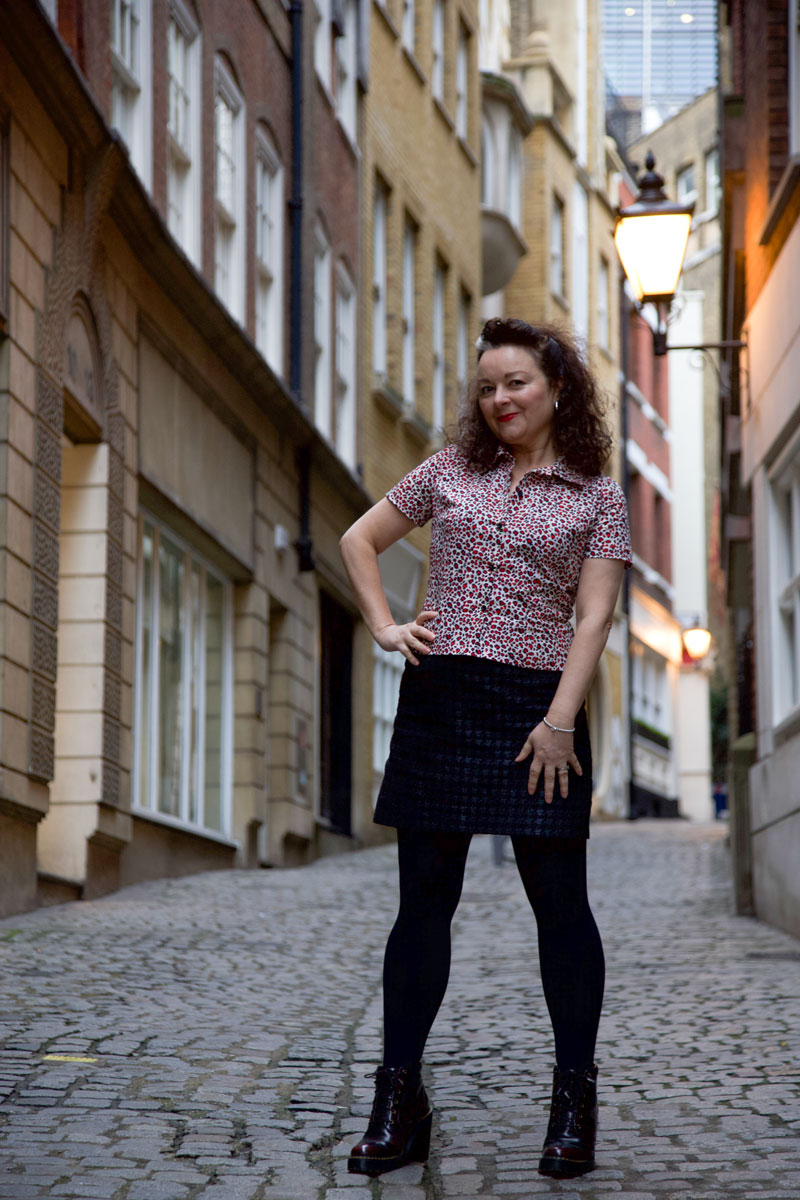
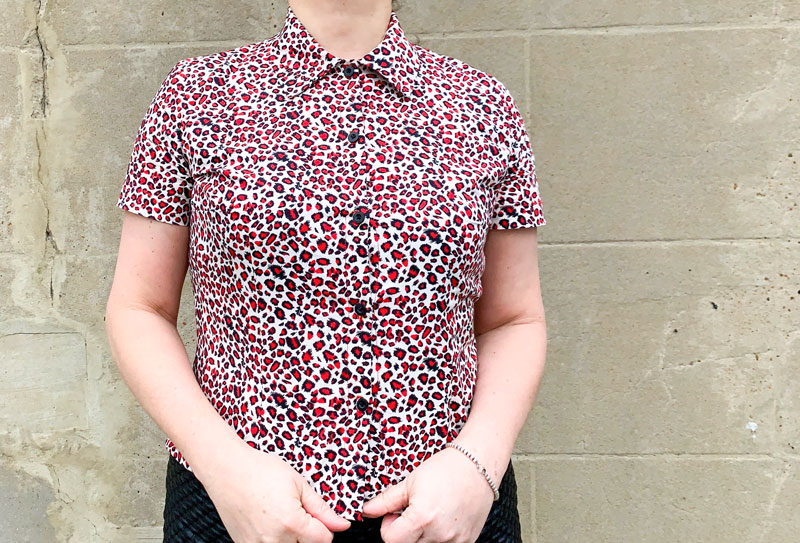
I already had this animal print cotton fabric in stash and it was just enough to rehearse a new self-drafted design. One of the upsides of designing my patterns digitally is that I can test a pattern layout on computer screen to see how much fabric I’ll be needing. And also plan the positioning of pieces for minimum waste without having to crawl around the living room floor ‘playing giant Tetris’ while the fam barks at me to get out of the way of the telly – I don’t have a proper cutting table, see.

Side view of camp collar shirt

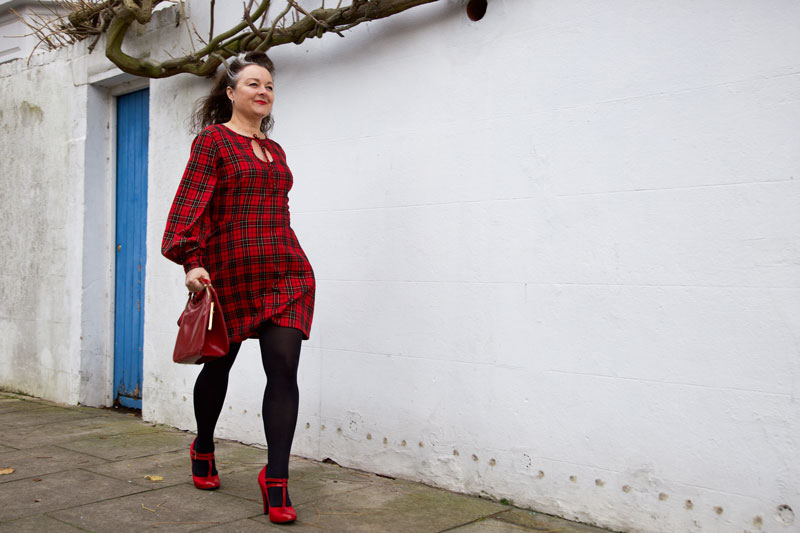
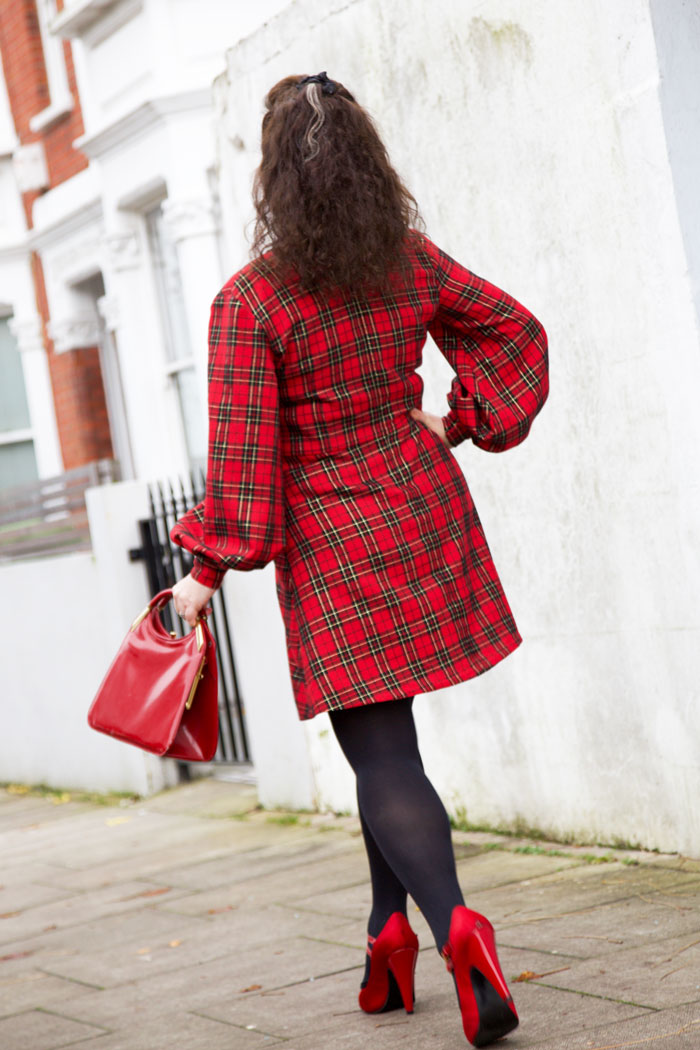
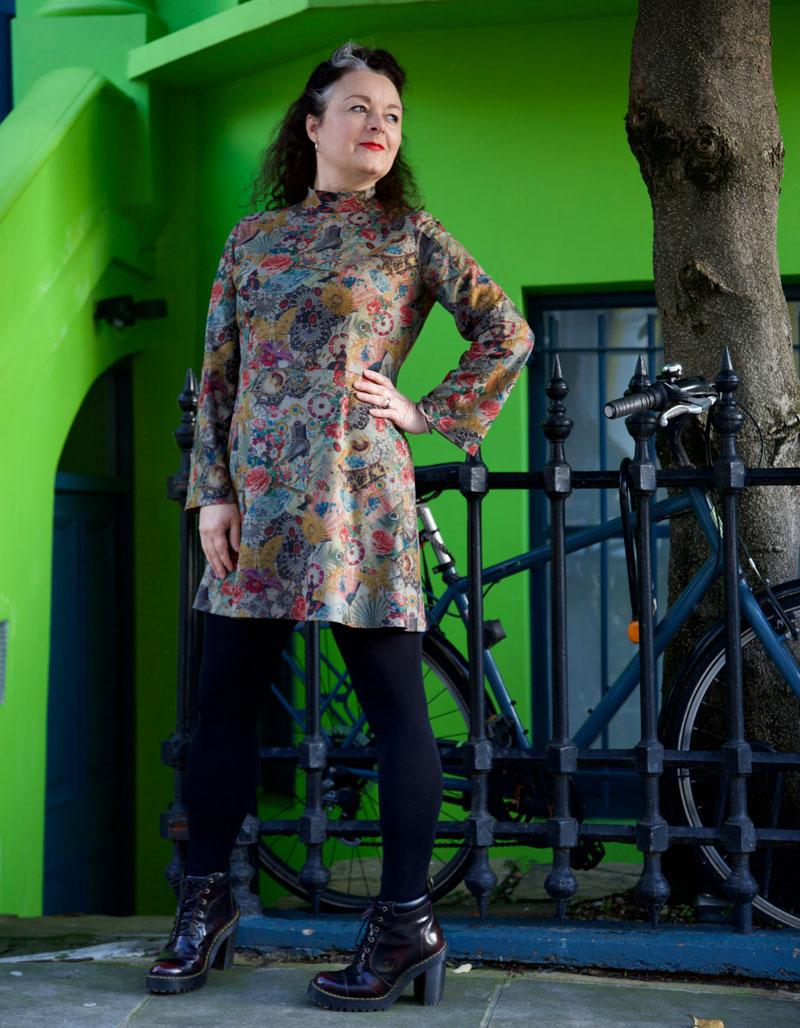
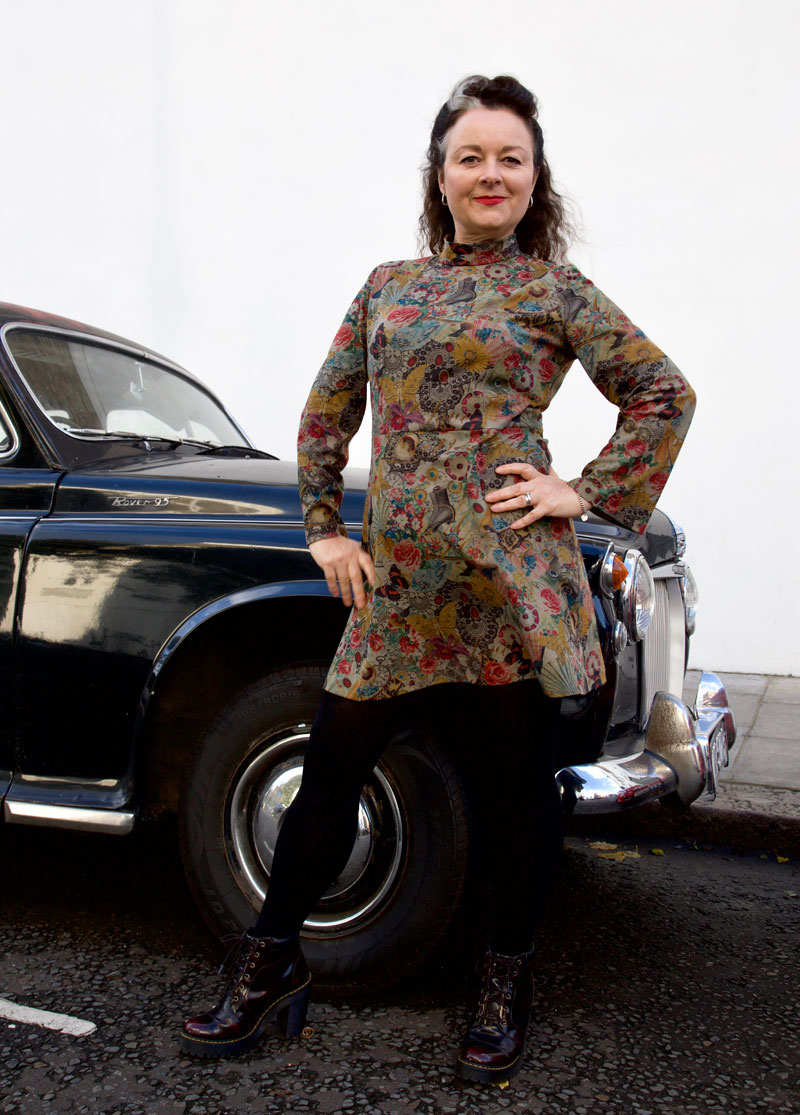
My recent self-drafted adventures have included a 70s style dress with flared sleeves and a Christmas Dress with bishop sleeves. Both of which use the same bodice block and knowing it worked both times meant I just had to add a bit of extra ease, add a button extension and lengthen to the hipline for a great fitting shirt. The sleeves would be simpler than both trialled before, and I found a great video tutorial on Bluprint to draft a one-piece collar. So what could go wrong?

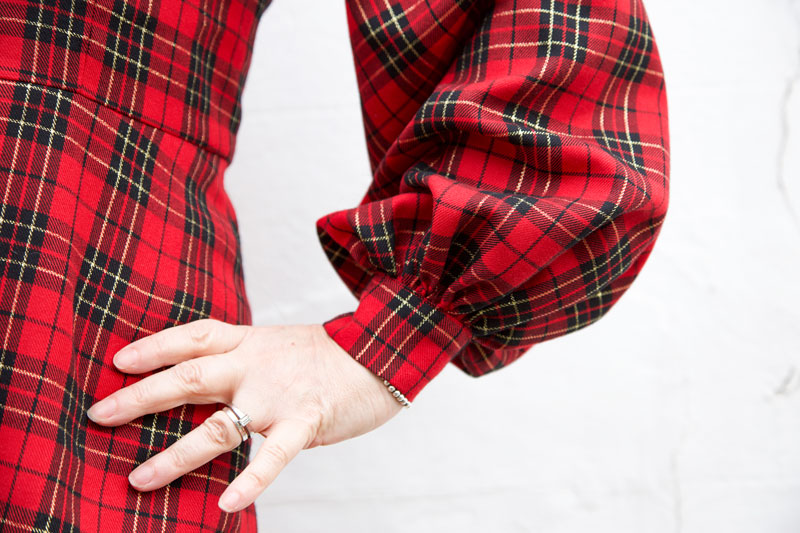
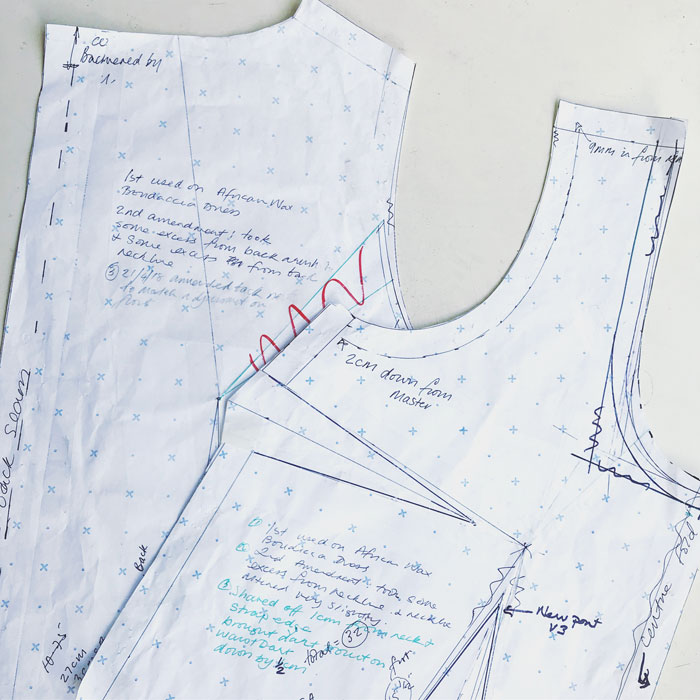
Well this is where I classically mess up because I try and run before I can walk. I’ve never actually made up a straightforward self-drafted sleeve for myself yet. Just flared ones in both cases. So there was never any trouble with fit. But as my block stands, it’s too tight. Luckily I had my suspicions and made one sleeve up in calico to check first. Lord knows where I went wrong. But I seriously must have got lucky previously! To rectify (badly) I have slashed and spread to the sleeve cap. And it works, kind of. But it is still a bit snug. In fact it’s a bit too tight under the pits too so I need a revisit to this pattern before I make another.

Back view of shirt

I’m going to lower the underarm point and redraft that sleeve with less haste (read less excitement) and less speed! Because I’ve got more plans going forward and I’m going to need those pattern pieces spot on!

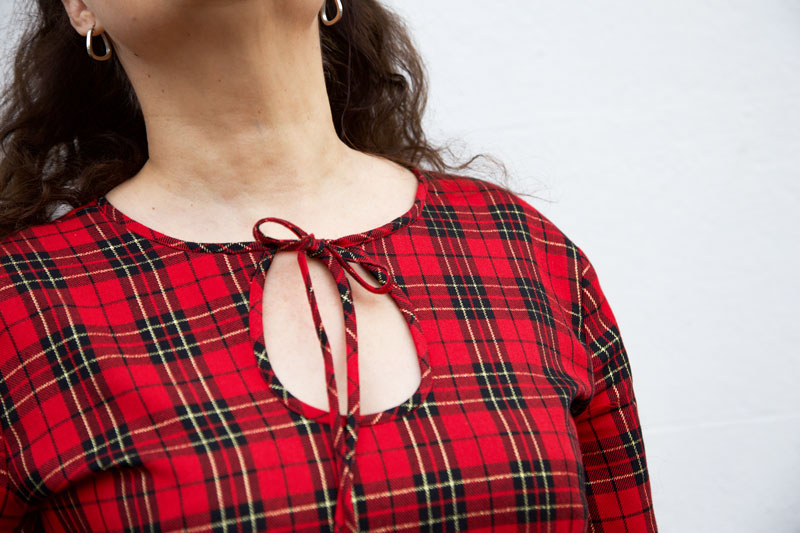
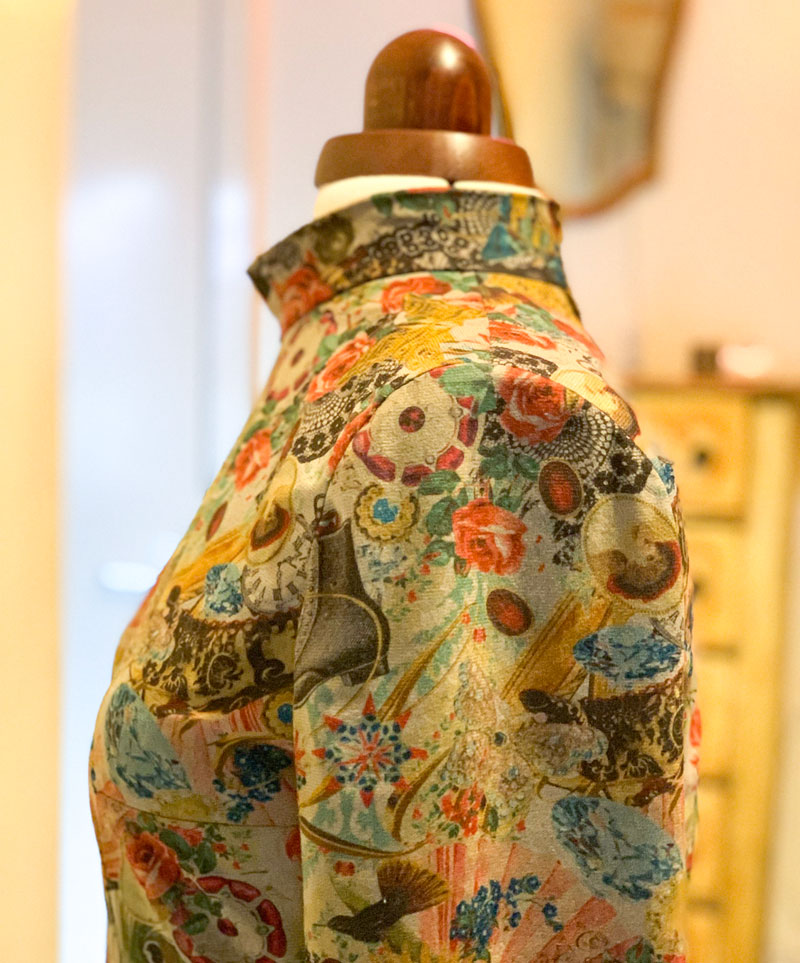
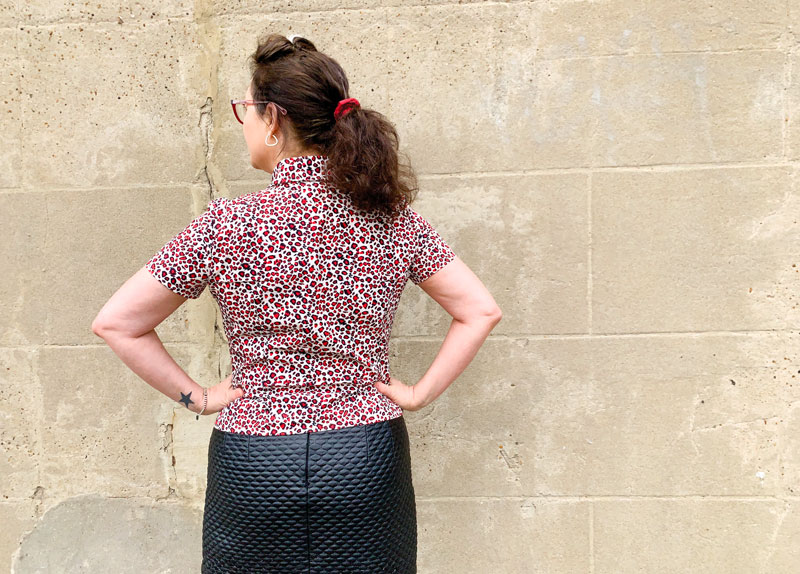
The collar worked out perfectly. It’s a camp or Hawaiian collar, so Suzy Furer told me on the Bluprint video tutorial. Basically a collar and stand, all in one. I did check out another tutorial on YouTube for the construction. It was kind of obvious but I just needed some reassurance.

hawaiian collar

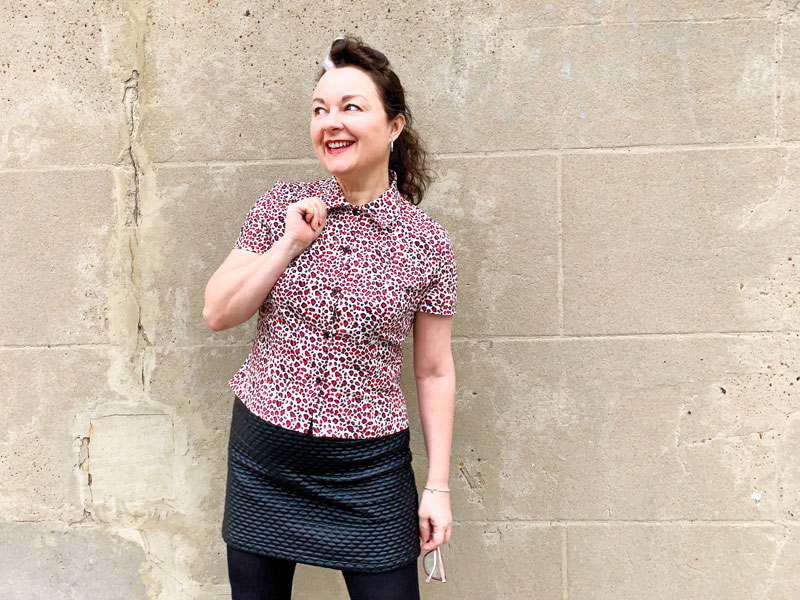
Suzy advised to ditch the waist darts front and back but I really quite like the fitted aspect of it and I’m convinced that if I lower the armscye by half an inch or so more and sort the sleeves out it will be a much more comfortable fit.

So the consensus is that it’s not the greatest self-drafted shirt in the world but it’s a great starting point and I’m looking forward to a new and improved one. Might have to buy some new fabric though… I’m feeling stripes!

Have you kicked off the New Year with a new project yet? Pray tell. I’ll do my best not to get too jealous!

Operation Christmas Dress complete!

handmade tartan dress with teardrop opening

Hopes were fading to get this dress finished on time for Christmas Day. But the sewing gods were looking down on me, somewhat favourably and I sewed them cuff poppers on quite literally at the stroke of midnight on Christmas Eve.

Oh how I love ‘the night before Christmas’ – When all the shops are shut and there’s nothing more to be got. The street outside is quiet; the Christmas tree lights twinkle at their brightest and that sweet little shot of sherry slips slowly down the hatch! Perfect time of year to have some hand sewing going on in front of a festive telly-box movie, too!

Tartan Christmas dress front

This dress is most definitely worthy of an ooobop original issue number 2. The turtle neck dress I recently made almost had a tear drop neckline but in an effort to walk before I could run, I saved it for this time.

The process was exactly the same:

  • I dreamt the design
  • I drew it in my Fashionary sketch book
  • I self-drafted the pieces from my previously created blocks, using Adobe Illustrator
  • Printed and tiled the pattern pieces
  • And sewed up the finished article.

This is proving to be my favourite method of dressmaking to date! That said, I’ve got so much still to learn and I’m anticipating some frustrating times ahead so I’ll still be checking out Indi and vintage sewing patterns when I need some respite!

To edge the teardrop – thus avoid lining or facing – I dug out and dusted off the bias tape maker. To be fair I don’t think its much quicker than the manual ironing method but it’s a bit more fun… when it works!

Close up detail of teardrop opening

I’ve messed up many a time binding edges so this time I knew to start with sewing the right side of the binding to the wrong side of edge of the teardrop opening. I used my quarter inch foot for a consistent seam and took it real slow. Any unevenness is corrected when the binding is pressed in position to the front. (It doesn’t matter if it’s a bit wonky on the back because it won’t be seen. The entire reason for starting on the back!) I then clipped the seam in the curved areas before slowly and carefully top-stitching close to the edge on the right side to finish the binding, where it does matter! That final press is so satisfying.

I then used two more folded bias strips to bind the neckline from back to front, concealing the top edges of the teardrop, and continuing the topstitch to the ends to form the ties. I sewed across the ends of the ties to prevent too much fraying. I’m happy for it to fray a little.

Now lets talk bishop sleeves – Lovely big billowy bishop sleeves! They’re a bit trendy at the moment but to be fair they’ve never been out of favour in my fashion world!

close up of sleeve and cuff

I took my sleeve block piece and similarly to how I flared it last time, created 4 slash points and spread the pieces till the width was a little more than thrice my cuff measurement. I didn’t deduct the length of the cuff from the sleeve as I wanted the fullness to overlap the cuff which it kind of does but the structure in the fabric doesn’t really make it perform as it did in my head!

The cuff is sewn akin to the binding to hide the seam and there’s a small overlap for the poppers.

Walking in my new dress

I really want to rehearse another, even more fuller bishop sleeve on a blouse made with a lighter viscose. Just to see how differently it behaves. I really want to add some lovely button loops and buttons to the cuffs too which I didn’t do here mostly because of time restraints, hence the poppers!

The rest of the dress is constructed the same as the turtle neck one: inserting an invisible zip in the back. And I must add how chuffed I was at just how invisible it turned out with all those checks matching up either side.

Back view of dress

After all that work I didn’t wear it on Christmas Day. I decided to spare it from the cooking splashes and wine spillages and wore it out on Boxing Day instead. Despite it’s festive feel, I will be wearing this dress at every other time of the year and occasion for when tights and sleeves are necessary. The fabric is 100% cotton except for the metallic gold thread and is so comfy to wear. Not surprising that I debated using the fabric for PJs initially!

striding out in my new tartan dress

It carries a lovely little memory too as I purchased the fabric on a sewing blogger meet up organised by @ClaireSews for when @liblib came to visit all the way from Austraila. We chatted over coffee and shopped our little hearts out in the Goldhawk Road. I wasn’t supposed to be buying more but @ella_yvonne convinced me it had my name on it! Always such a treat to meet like-minded sewists IRL.

I’m not holding much hope for completing anything new before New Year so I’ll take this opportunity to wish you all a fabulous, creative and healthy 2020.

All the very best of wishes and lots of love from Janene xxx

Ooobop original 70s style dress

ooobop original 70s style dress

The thing I love most about sewing is the eternal learning curve. I will always be on a joyful journey of discovery because there is no chance I will ever learn it all in my lifetime but with every little milestone I reach I get a little buzz of excitement which propels me to the next level and this little dress is prime example of my progress.

It might not be the most ground-breaking, couture class garment you’ve ever seen but its mine, all mine – an ooobop original

I dreamt it, I drew it, I drafted it, I sewed it.

sketches of the dress
Love drawing the possibilites in my Fashionary sketchbook

For sure, I’ve sewed and drafted for other people but never as successfully for myself. I’ve been bouncing between lessons on Craftsy’s Blueprint and instructions from various pattern-making books but it transpires the reason it took me longer to fit myself was my own dishonesty. Denial of my actual measurements. Reluctance to accept the differing pattern shapes to the examples given. Even cheating my measurements knowing it would look better if I nipped in certain stats. Desperate. IKR!

wearing ooobop original 70s style dress
Striking a pose in Notting Hill

And it just goes to show that you can’t cheat at maths. On the fourth attempt at a moulage (a close fitting blue print from which one adds ease to create a master sloper ) it bloody worked! I was so happy . Literally danced around the room in nowt but a pair of pants and the moulage for a good half hour. And then it dawned on me all the possibilities.

Classic pose with a classic car

But first I had to add ease to create the sloper. Another milestone reached as I’m getting much quicker and more efficient at drafting in Adobe Illustrator. Luckily I use this programme for my job as a graphic designer and can justify the substantial Adobe Creative Suite subscription. But it makes it all the more satisfying that I am getting untold extra benefits from its use. My space is so limited at home and the prospect of getting out and putting away all the giant drafting materials is exhausting in itself, before I’ve even put pencil to paper. Drawing patterns using my laptop and being able to store them digitally thereafter is literally life changing, for me!

Sloper created using Adobe Illustrator

Once I’d drafted the sloper, the only other piece left to draft was the turtle-neck collar. That was a case of simply measuring the neckline and cutting a bias rectangle piece to that length and 6″ wide. It was sewn like a bias binding around the neckline. I left the back edges open to insert a zipper to the top of the neckline then folded the facing part of the collar to the inside and finished by hand.

Striking a different pose with the classic car. Loving the silhouette
I do love the simple silhouette of this dress

I had originally planned an extravagant bishop-style sleeve but I didn’t think I’d have enough fabric for such indulgence, so I settled on a slightly flared sleeve instead – slashing and spreading my sleeve sloper from wrist to sleeve cap.

And while on the subject of fabric, let me tell you how I came by such a perfectly suited piece. Every now and then I venture out on a little sewing people meet-up. One of my favourites is  organised the London Stitchers Meet Up.  The last one I attended was held at The Blue Boat in Fulham and involved a fabric swap. Such a great idea to downsize that stash and to swap a piece or two that might not have plan attached, for something that triggers an instant course of action. Interestingly enough I had no plans on bringing any fabric back home. I’m trying to use what I have and not buy/acquire anything new but the stars instantaneously aligned when glanced over Giorgia’s shoulder to see it sat wantingly in the corner.  It was a beautifully soft baby needlecord (I think) with a vintage style montage print. I always maintain I’m more about texture than print but there are always exceptions to the rule. Thanks so much to Lauriane Loves Sewing for bringing it to the table. I do hope I’ve done it justice.

ooobop original 70s style dress

So why am I creating so much more work for myself when there are plenty nuff awesome patterns in the world? Each stage of sewing this dress confirmed what I good idea it was. The notches aligned perfectly. The bust darts hit where they were supposed to, the shoulders finished on my shoulder line. And I confess I stood and I stroked and I marvelled at how well they did, for quite some time.  No puckers, nuffink.

Marvelling at the inset of my sleeve caps

Add to that the waist sitting where it is meant to, no pooling in the small of my back and Bob is definitely my lobster! Gotta love it when an invisible zip becomes super evasive too!

Back view of dress with no pooling

Well I think that’s just enough of me blowing my own trumpet and time for me to big up the talents of my super lovely, supportive husband, Daniel. I’m always the first to run out of steam, just knowing there’ll be a hundred good shots even if I am pulling a stupid face in 50 percent of the contact sheet. But he always want’s just one more. And its always for good reason and I thank him from the bottom of my heart.

Lying on some steps in my 70s style dress
In response to ‘Just one More’!

And he’s available for booking. He loves an event. So good at capturing those  off the cuff, journalistic poses. So if you have an upcoming event and in need of a trusty photographer please do check out his portfolio here or contact him at danieljamesphotographic@gmail.com.

Thanks for swinging by. Your readership and comments mean the world to me and add so much to my journey. Wishing you all a gloriously productive weekend. xxx

Previous attempts at self-drafting:

Self-drafted Liberty lawn dress

Liberty Lawn dress by ooobop

What a glorious weekend. Unlike almost everyone I know, I didn’t make any plans and for a while I was fighting the fomo as I scrolled through hundreds of family getaway posts. But today I am glad. Not only have I ticked off a few niggly household jobs but I’ve had lots of me time to stop and think and evaluate. Those kind of days are as rare as hen’s teeth despite a generalistic view of ones freelance ‘flexibility’.

self drafted dress by ooobop

I did however manage to squeeze in a lovely river walk with Mr O who kindly took some photos for this blog post. He’s so busy with plans for a new show (a very exciting show that I will tell you about soon) that it’s quite difficult to sync a weekend together. But we managed a trot from Hammersmith to Barnes and back and talked and laughed… a lot!


Liberty lawn dress by ooobop

I’m wearing another self-drafted dress. I don’t self-draft nearly often enough, mostly because it’s a time-hungry process but every time I do I’m reminded of how much more satisfying it is to make a dress that is totally bespoke.

Now it’s not the most original or ground-breaking in design… that comes later (lol)… but it fits. Because I made it fit following various stages of tweaks. My pattern pieces look such a mess with all the scribbles and notes but they are truly important scribbles and notes which tell the story of the journey of fit each time they have been used.

self drafted bodice pattern ooobop

My first fitting was practised on a retro-style top in 2014. The next time I used the pattern was for this wax-print dress – same bodice but a half-circle skirt. I had minor issues with the neckline and corrected it for the third fitting: my skulls and roses dress.


The beautiful fabric is of course a luscious Liberty Lawn. It was a birthday present from a very thoughtful friend. I had 2 metres and didn’t want to waste any of it. The bodice is self lined which feels so good against my skin and was perfectly breathable for a hot sunny stroll. I drafted the armholes to cover that squidgy boob-fat bit (is that the technical term?) and so that the straps don’t fall off my shoulders. That combination involves a fine balance as my shoulders are quite slopy. There is a zip in the left hand side –vintage-style –  so that I didn’t have to split the fabric on the back piece.

Dress design by ooobop

For the skirt section, I took the whole 60″ width to make a dirndl. For anyone who’s tried – I’m sure you’ll share my appreciation of how damned satisfying it is to gather lawn. And out of respect for such a beautiful fine fabric, I hand- sewed the hem. Not only does this fabric gather beautifully but there’s a pleasure in pressing it too. It just stays and makes the whole hand stitching thing a breeze.

Dress designed by ooobop

I give small leftover scraps to my local primary school for them to use in their craft projects and I’m sure they’ll be delighted with the quality this month. I’m certainly glad that I didn’t have to bin them. I absolutely could not have brought myself to have even put my foot on the bin pedal!

Our walk was lovely. The air was filled with warm wisteria  perfume. Not too dissimilar to doughnuts I think. Or is that just me?

Liberty lawn dress with wisteria

And can I just mention my shoes. Quite a step away from my usual heels and platforms. They are Lotta from Stockholm Clogs. Handmade and verified well made! And they come in all sorts of styles and colours. Go check them out! I’m not sponsored by them. I’m just very happy to pass on a good find.

Handmade dress by ooobop and Lotta from Stockholm clogs


Skulls and roses dress

Ooobop Skulls and Roses dress

This dress is round three of my strive to perfect a self-drafted bodice pattern. It follows on from a self-drafted retro top, blogged in 2014 and my recent wax cotton print dress.

There’s something wholly satisfying about returning so soon to a pattern that you know will work. And I’m sure it will be even better to come back to following a few more tweaks.

The neckline on the wax cotton dress gaped just a little so I fixed that and refined the curve of the neckline too. There was also some gaping at the back bodice armholes, so I took out some excess and transferred it to the back waist darts.

Ooobop Skulls and Roses dress

The fit is much better but V3 dress – already underway – will have a little more fine tuning and then all I need to do is stay the same shape… forever! 😀

The skirt on this one is a simple gathered dirndl. Easy to make, easy to wear, easy to dance in. And also a little less of a Marilyn fashion risk than a circle skirt on a blustery day.

The invisible zip is set on the left side of the bodice as before, but this time I remembered to keep the back piece as one, so the pattern isn’t split. And plus, I’m rather digging the burrito method of self-lining. Have you tried this yet?

I’m chuffed that this was another piece of fabric that emerged from from the bottom of stash mountain. I’m sure Dan had his eye on this for a shirt at some point but I think he forgot. And I shamelessly neglected to remind him! The colour scheme is my favourite kind and I love a little nod to rockabilly.

This dress has been worn and snapped to death already with no time to blog until now. It’s been my go-to for all number of events – clubs, festivals, gigs and even the office. I’ve got to put it to the back of the wardrobe for a bit now, though, because I’m sure I’ve clocked the look that says: “Someone didn’t make it home last night!” 😮 I did. Obvs!

Daniel took these photos for me, on our date night last night. Multitasking. Always! I’m standing in front of St Paul’s church in Hammersmith. Such a beautiful grade II listed building among all the modern architecture and the hustle and bustle over and under the flyover at the broadway. It’s been a place of worship since the 1600s! So much history on a little patch of green.

Ooobop Skulls and Roses Dress

Light was fading and our tummies were rumbling as we snapped these in a hurry en route to The Gate – one of my favourite veggie restaurants. Dan agreed that there was no lack of meat on the plate. My only regret was that I didn’t have enough room for desert. They looked so awesome! Perhaps my next dress version ought to be of expandable material!

Ooobop Skulls and Roses dress


Significant birthday dress


ooobop party dress front

Mostly I sew from patterns. Vintage ones, Burda ones, any of the big-four, independent ones, any that take my fancy, really. But when it came to finding a pattern befit of a significant birthday party dress, I was stumped. I searched through the hundreds I owned, I trawled through plenty more online and still I didn’t come up trumps until a visit to the hairdressers presented this beauty in one of their glossy mags.

dior inspiration

Who was I kidding?! But a girl can dream right?!

With a couple of months to go and so many people asking what I was going to wear, the pressure was on and almost too much to bear. I even considered RTW as a get out clause! But following more procrastination and now only 6 weeks to go, cool words of advice from Sally of Charity Shop Chic, put me back on track and sold it to me as a simple circle puffball attached to a bodice of choice.

ooobop creeping through the woods

I just needed a prompt, a bit of pressure and some added faith, obviously!

With all that poompf in the skirt section going on, the quest was for a simple bodice. One I could toile and fit with not much time on my hands. It also had to fit in with a busy work load leading up to Christmas, and be sewn in the the evenings so black was totally out of the question too!

ooobop party dress front view

I remember ear-marking this vintage Weldons pattern as a potential party dress some time back and when I rifled through my patterns for the umpteenth time, it shouted out all the reasons it should be chosen. Simple to fit, no sleeves to insert, flattering neckline, small amount of fabric required and a perfect yoke for a string of cockerel feathers!

weldons pattern 3833

The small amount of fabric issue was quite an issue at this point as I’d already decided that silk was the only way forward. The only way I was going to get a classy, crumpled look and not just wind up looking like a discarded crisp packet!

ooobop in the woods

The skirt section is a greedy full circle with an added 16 inches around the waist to accommodate 4 box pleats: Two at the front and two at the back. The full hem is then gathered onto an a-line, mini underskirt which I self-drafted by closing the waist darts on a self-drafted skirt block, and adding a little flare. Both are attached to the waist seam.

party dress back sunrise

The wonderful Sew Busy Lizzy gifted me the polka-dot taffeta some time back. I love that it found a special use. Not so shiny that it caused static, strong enough to support all that silk whilst adding a cheeky secret air of Moulin Rouge!

polka dot taffeta lining

Having toiled the whole thing in calico beforehand, it transpired I needed 5 metres of dupion silk. Pricey at £25 a metre if one shops in Broadwick Street, London. But £12 if you’re lucky, in Goldhawk Road. I say lucky because I pretty much went in all the shops to get the right colour – a two-tone black & red. And the last one I tried had not only the best colour but offered the best price too.

back view of party dress

For all my fretting, Sally was absolutely right of course. It really didn’t take long to sew. The indecision and worrying took way longer! And fears about working with silk were laughed off when I made the first cut. Literally like cutting into butter. And it behaved and sewed up brilliantly.

And so the finished article partied hard to the band and the DJ with a hall full of amazing family and friends. It went way too quickly though, and I so wish I could press replay so I could get round to spending more time with everyone who came. But I guess thats the downside of hosting ones own!

Mr O aka Daniel Selway took these amazing shots for me this morning. Nothing wrong with a party shot but lets just say there’s a definite improvement of photographic quality in the sober light of day!

party shoes

Happy new year to you all. Wishing you a peaceful, healthy, and joyous 2017 xxx

A gold quilted mini-skirt


gold quilted skirt front

Nothing ground-breaking to see here, save a self-drafted mini skirt in gold quilted fabric!

I’ve been wearing my black quilted skirt to death, lately so I thought I’d better make another in case my work colleagues think I’m a dirty stop-out!

In fact I’ve been wearing this one on a regular basis now so it may be time for a third!

I made it a while back and completely forgot to blog it. Or rather missed every small good-weather-window to photograph it. So an indoor remote shoot it was. And I’m so going to get into trouble for ‘trespassing’ in LMO’s bedroom! Those pink walls are a complete giveaway!

gold quilted skirt back

I used the same process as last time, namely a shortened version of a self-drafted pencil skirt pattern; added a facing of black cotton twill, this time and an invisible zip.

The hem is hand stitched this time. Mainly because the backing is a woven black affair and easy to pick up on a couple of threads for the sake of invisibility.

It seems I’m in good company with my choice of gold quilting. Have you seen Karen’s (Didyoumakethat) metallic tunic dress? I just love how something simple can literally shine with a crazy fabric!

I also find it amazing that as the months get colder, my hemlines get shorter! Anyone else find the same?

A blue half circle skirt

blue half circle skirt

This is my new half circle skirt. Self-drafted and made in a cobalt blue poly crepe.

Sounds pretty simple hey? Well to be honest, in principle it was. And it would have been a swifty project if I’d have remembered a couple of simple things.

ALWAYS MARK YOUR SELF-DRAFTED PATTERN PIECES AS SOON AS YOU’VE DRAWN THEM

Why? Well in my case, I have a fair few circle and half-circle skirt pieces that I’ve not only drafted for myself, but for others too. And in my haste I’d just labelled them ‘skirt front’ or ‘full circle’ and one just said ‘circle skirt piece no SA’. The latter was helpful, at least to know that I needed to add a seam allowance but none were any help at all to know if it was the right waist measurement, the right length, a full or half circle etc. What a twit!

blue half circle skirt

So first job was to redraft another, to my size. And second job was to ensure all that info was written bold and clear on the pattern piece for future use.

I’d already prewashed my fabric, so that was a win. The number of times I’ve been fired up to sew and didn’t have prepared fabric to hand is way too many to count. But swifty projects aren’t very swifty at all if you haven’t factored in to…

ALLOW A CIRCLE SKIRT TO HANG AT LEAST OVERNIGHT BEFORE HEMMING

Sewing a circle or half circle really doesn’t take that long but don’t bank on whipping one up, hours before a party because it has to hang at least overnight to allow the weight of the bias fabric to drop. This will almost definitely result in an uneven hem and will need levelling before hemming. I put mine on a dressmakers dummy but I’m sure if it was hung evenly on a pegged coathanger, you would achieve the same result.

So next there’s the levelling. I put the dressmakers dummy, wearing the skirt, on a table so that the hem is at eye-level. I use a metal rule from table top to my desired length and then mark all round with chalk or pins, rotating the whole dummy rather than spinning it (that’s another long story). I then go round a 2nd time to double check the measurements.

Once trimmed I sewed a quarter inch line of stitches from the edge and pressed up a hem. I stitched and in this case didn’t need to turn over again. But that might be necessary if fabric is more fraying.

blue half circle skirt

The lining of course needs the same treatment.

I rarely hate on any aspect of sewing, but I discovered this morning that I truly hate levelling, trimming and narrow-hemming lining fabric for a circle skirt, like massively!

It appears I’ve only made one other half circle skirt before, but it was so long ago, it’s well and truly worn out! So as much as I love this colour blue – quite unusual for me actually, don’t you think?! – I feel I must make a replacement black one too. And maybe a red as well!

I must at this point just big up my 12 year-old daughter who took these lovely photos for me. It was a very impromtu shoot as I was doing some shots of my eldest daughter who was face-painting in the park. Little Miss O brought her own camera along for some practice and certainly did me proud. Look out dad, someone’s hot on your heels!

A quilted mini skirt

quilted skirt front

This skirt wasn’t on a list. Moreover it jumped to the top of the queue once I’d seen the fabric and decided I had to have a quilted skirt. I knew too that it would be a perfect pairing for my Sarah Shirt that I tested for By Hand London.

When I stumbled across the quilty roll of fabulousness in A-One, Goldhawk Road,  I had a flashback to some seriously stored inspiration: I fell in love with Marie’s quilted pleather skirt 2 years ago and clearly it didn’t leave my head. But I also saw Paloma Faith sporting a pink pvc quilted skirt on The Voice a couple of weeks ago (can’t find visual ref, sorry) which clearly gave a nudge to dislodge to said stored inspiration.

quilted mini skirt back

It’s not A-line, like Marie’s or Paloma’s though it would have been good to eliminate the darts. I figured that Sarah needed to do all the hollering and she needed a small straight skirt to wear underneath. It probably could have been more understated but I wasn’t up for sewing something so boring!

I used an existing self-drafted skirt pattern and shortened it. The poomfy fabric is totally unsuitable for a waistband so I faced it with some leftover heavyweight polyester satin. No interfacing needed. In fact no more bulk whatsoever needed! I did understitch and pressed with a cloth on a low heat but with all my might to get the waist seam vaguely flat!

quilted mini skirt facing

I haven’t lined it yet. Still pondering whether to or not. There are no messy edges inside, the quilty fabric doesn’t fray, but it does rustle when I walk! Might be a bit irritating for my work colleagues when I trot back and forth to the kitchen to make a cuppa. Will road-test it next week and test for ‘tuts’!

No fancy shoot this week (save the glimpses of it on the Sarah Shirt post). Mr O is away gigging with The Redfords, at a wedding fair, and I’m desperately trying to save some time so that I can get on with his #Blazerof2016 blazer toile!

So please forgive me as I bugger off to defluff the table and get cutting into that calico.

Wishing you a wonderful weekend, all x


On being bothered!

vintage simplicity pattern 6772

It’s been an eventful few days. Asides from the usual back to back workload, there was Holly Johnson on Thursday, Fleetwood Mac on Friday and a whole sunny day with the children at Pools on the Park in Richmond on Saturday.

I was therefore a little jaded last night. Like a hologram, in fact. a pink frazzled sleepy hologram! I wanted to sew. But the pattern I wanted to sew, typically wasn’t in my size, let alone relative to my proportions. I knew it needed some grading and it pained me to think I had to put some effort in before I could just sit and sew. I made another cup of tea. Did the washing up. Put a laundry load on. Flicked through Facebook. Made another cup of tea. I certainly could have graded and cut out the damned thing instead of doing all that, and by that time it was 9.30pm.

So I got cross with myself and my refusal to do what I’d arranged with myself to do. And set about it. The punishment being that if I fannied around anymore and didn’t put my mind to what was needed to be done I’d just lose more sleep-time. And I was tired, I can tell you!

So with the infamous Nike strapline loud and clear in my head, two back-to-back episodes of Eastenders lined up on iplayer, I got tracing and marking and cutting like a good’un. The bodice needed one set of grading, the skirt section another. And the darts needed redrawing and repositioning. I don’t know that I’ve ever employed the cut-and-spread method of grading so properly before. I’ve thought about doing it but it always seems like so much work. It really isn’t! No more winging it with adding a bit here and a bit there on the side seams!

graded pattern pieces

It’s a shirt dress by the way. Simplicity 6772 from the 1960s. I’m making version 3, the blue one on the right. Not my usual style of shirt-waist dress like the ones I made previously: the 1940s shirt dress and the shirt dress revisited, but a more casual, straight like shirt dress that buttons all the way down. I will skip those bound buttonholes though. The fabric is a suiting fabric, a lightweight wool-blend, confirmed by a burn test that revealed a crumbly kind of ash, signifying more poly than wool! So it doesn’t deserve such couture details. That’s my excuse and I’m sticking to it!

It’s Sunday afternoon and I’ve done the hockey run, put another wash-load on, seen my daughter off to the Park Club and had lunch with my son. Mr O is on his way to a wedding gig and I kid you not, I just actually heard a pin drop!

So now the pieces are cut out, darts marked and pinned and I’m now about to embark on the part I love the most. And fingers crossed, will be so pleased that I bothered to grade those pattern pieces. If it does work out good I will no longer have to miss out on those fabulous vintage pattern bids for being the wrong size.

vintage simplicity 6772 cut out

I won’t tempt fate. In fact I won’t waffle on any more as I now have a couple of hours of very valuable sewing time on my hands. Just have to avoid the distraction of the sun. Repeat. Just have to avoid the distraction of the sun!!