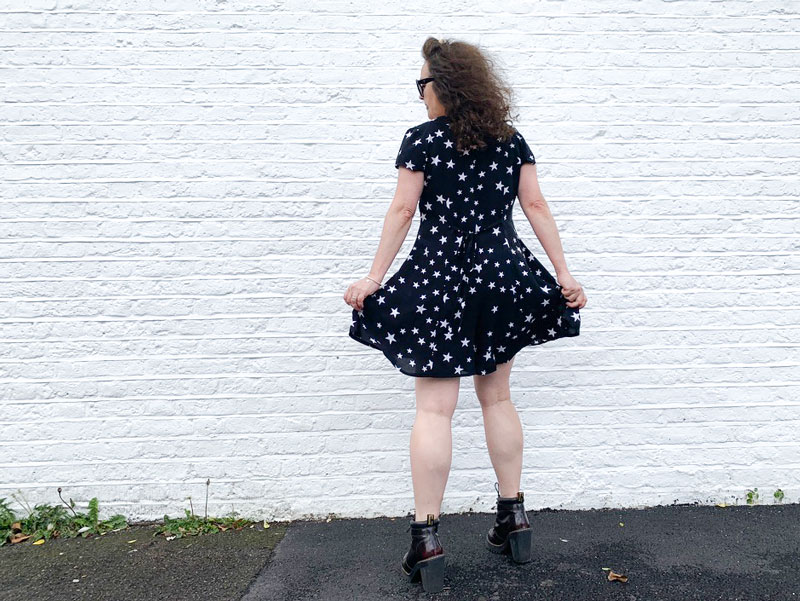
The first time I met the ladies of Crafty Sew and So was at their fabulous Dressmakers’ Ball in 2019. I’ve since been to their Crafty Sewing Camp and can verify that they throw a damn fine party! And so it seemed quite fitting that I chose to sew the Ready to Party Dress for my first experience with a My Handmade Wardrobe sewing pattern.
However, true to form and with no imminent fancy parties on the horizon I decided to make it up as an every day-dress instead.
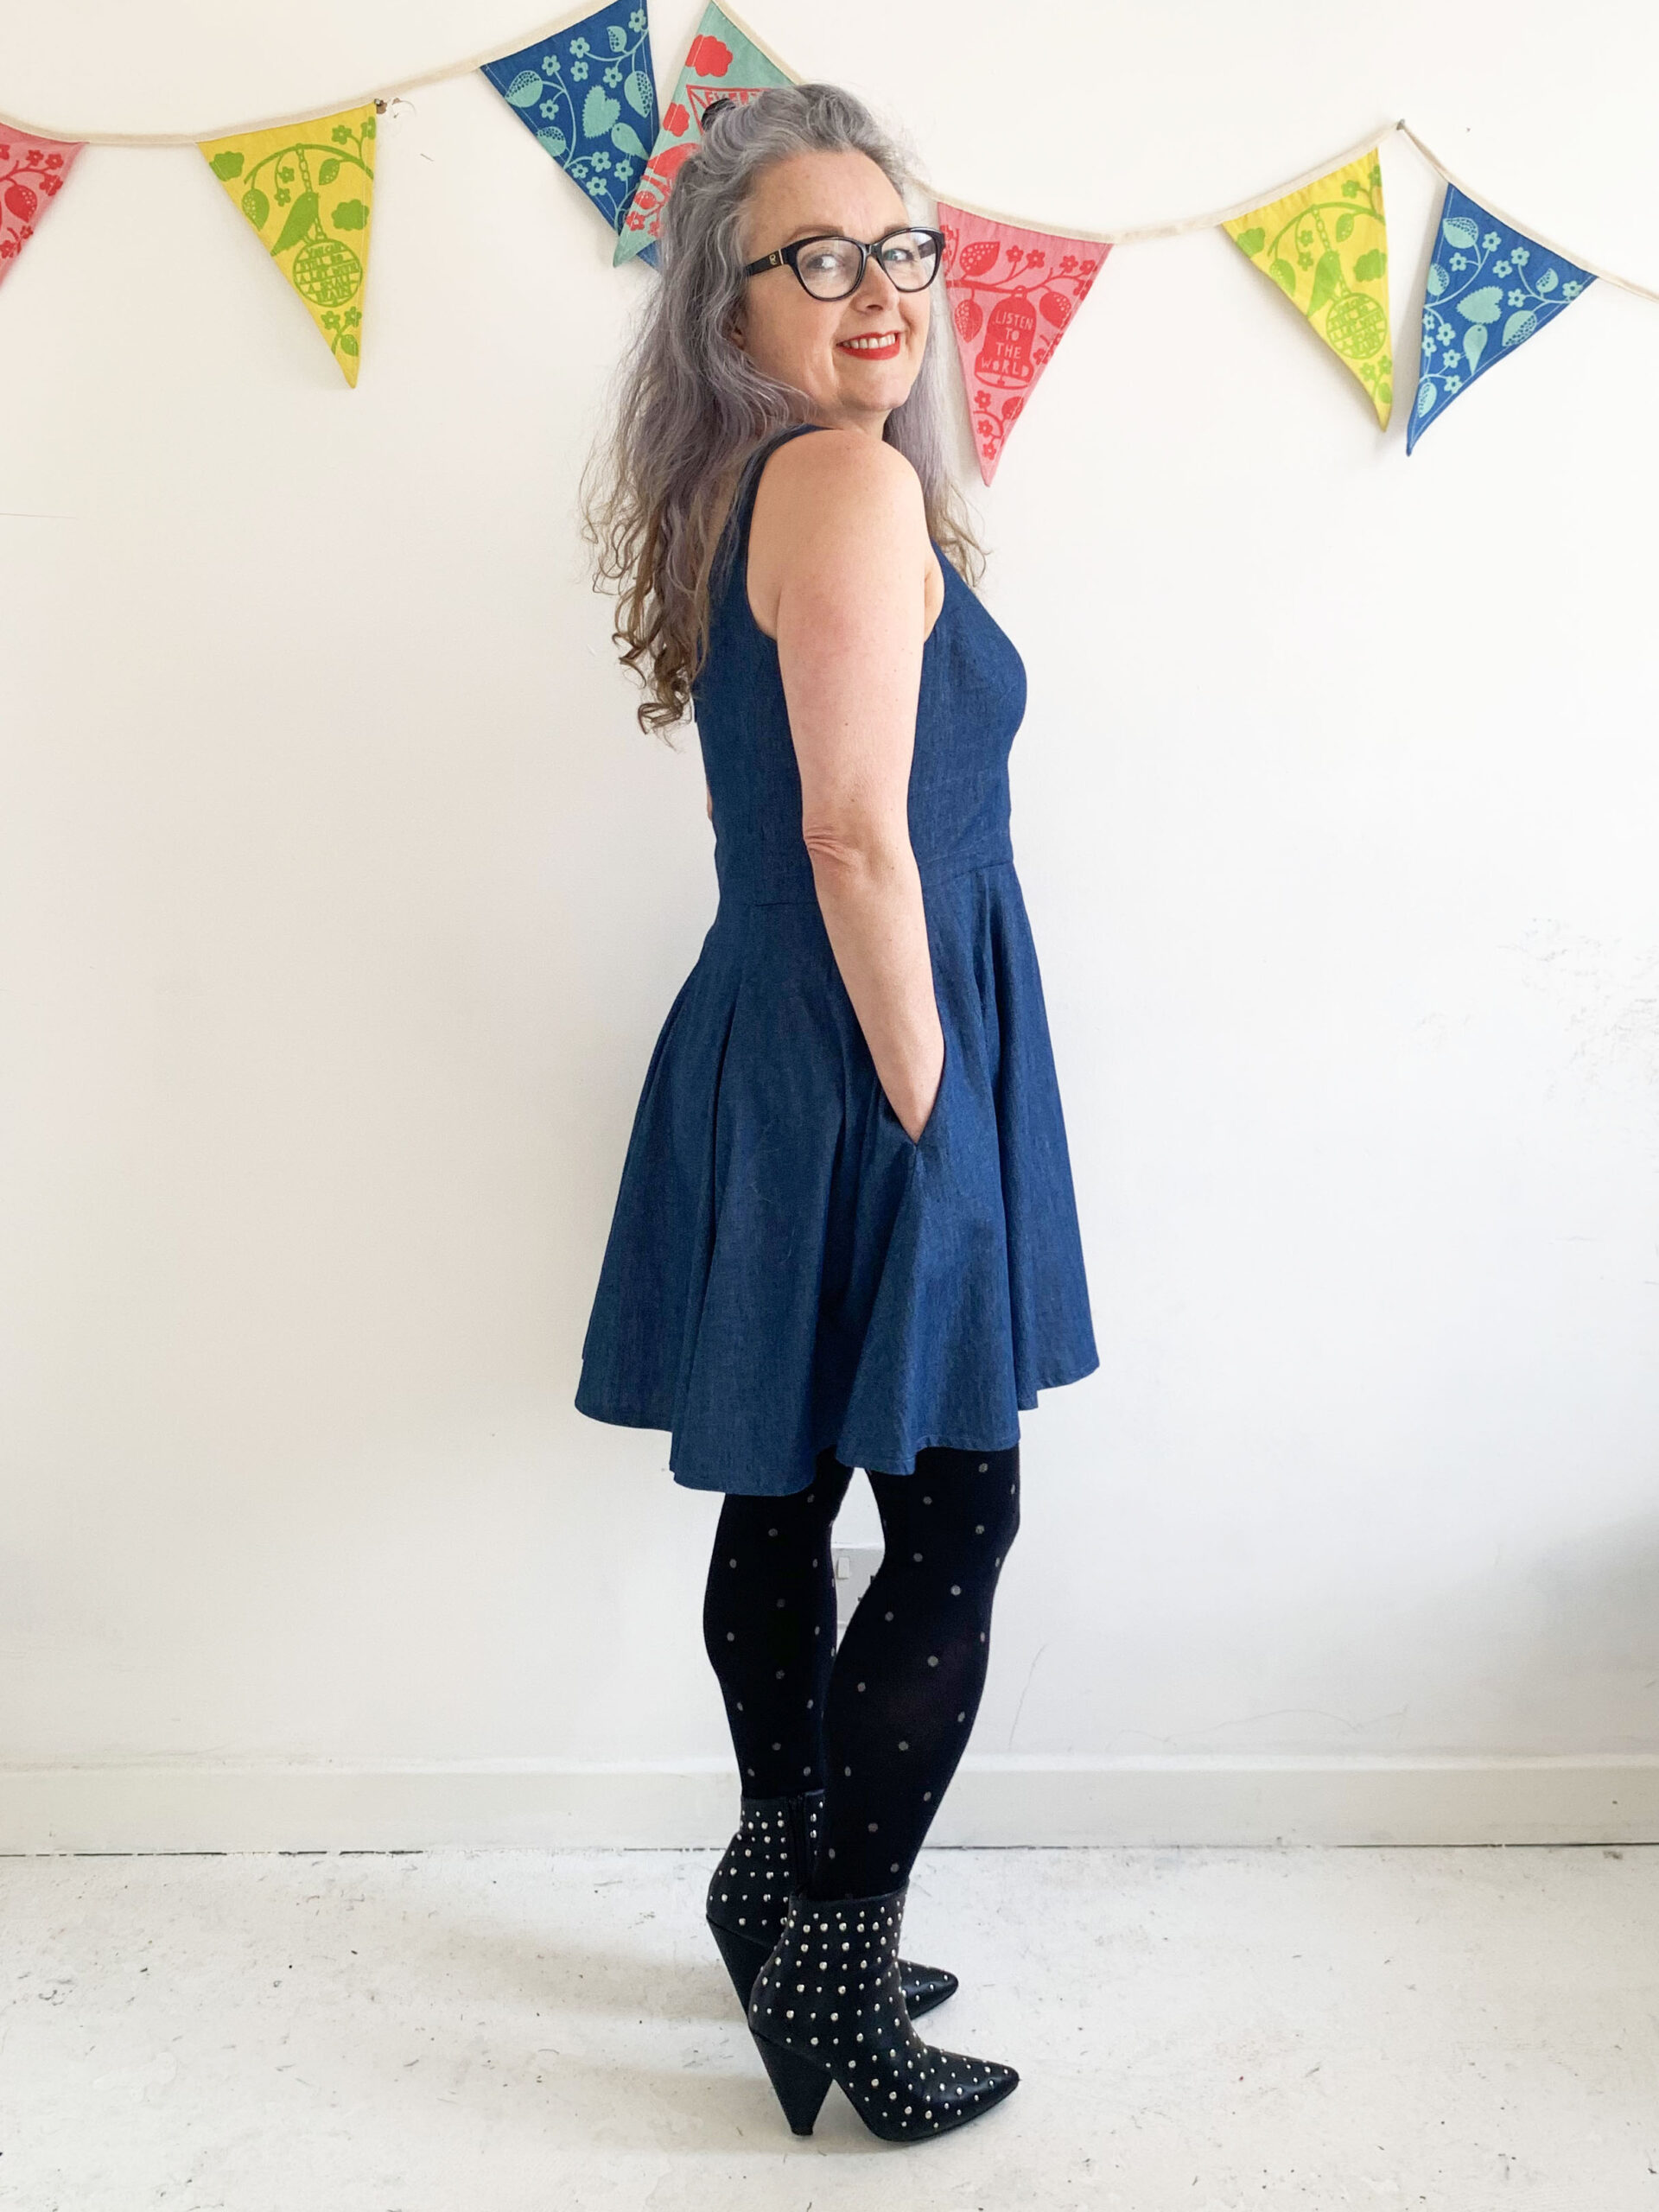
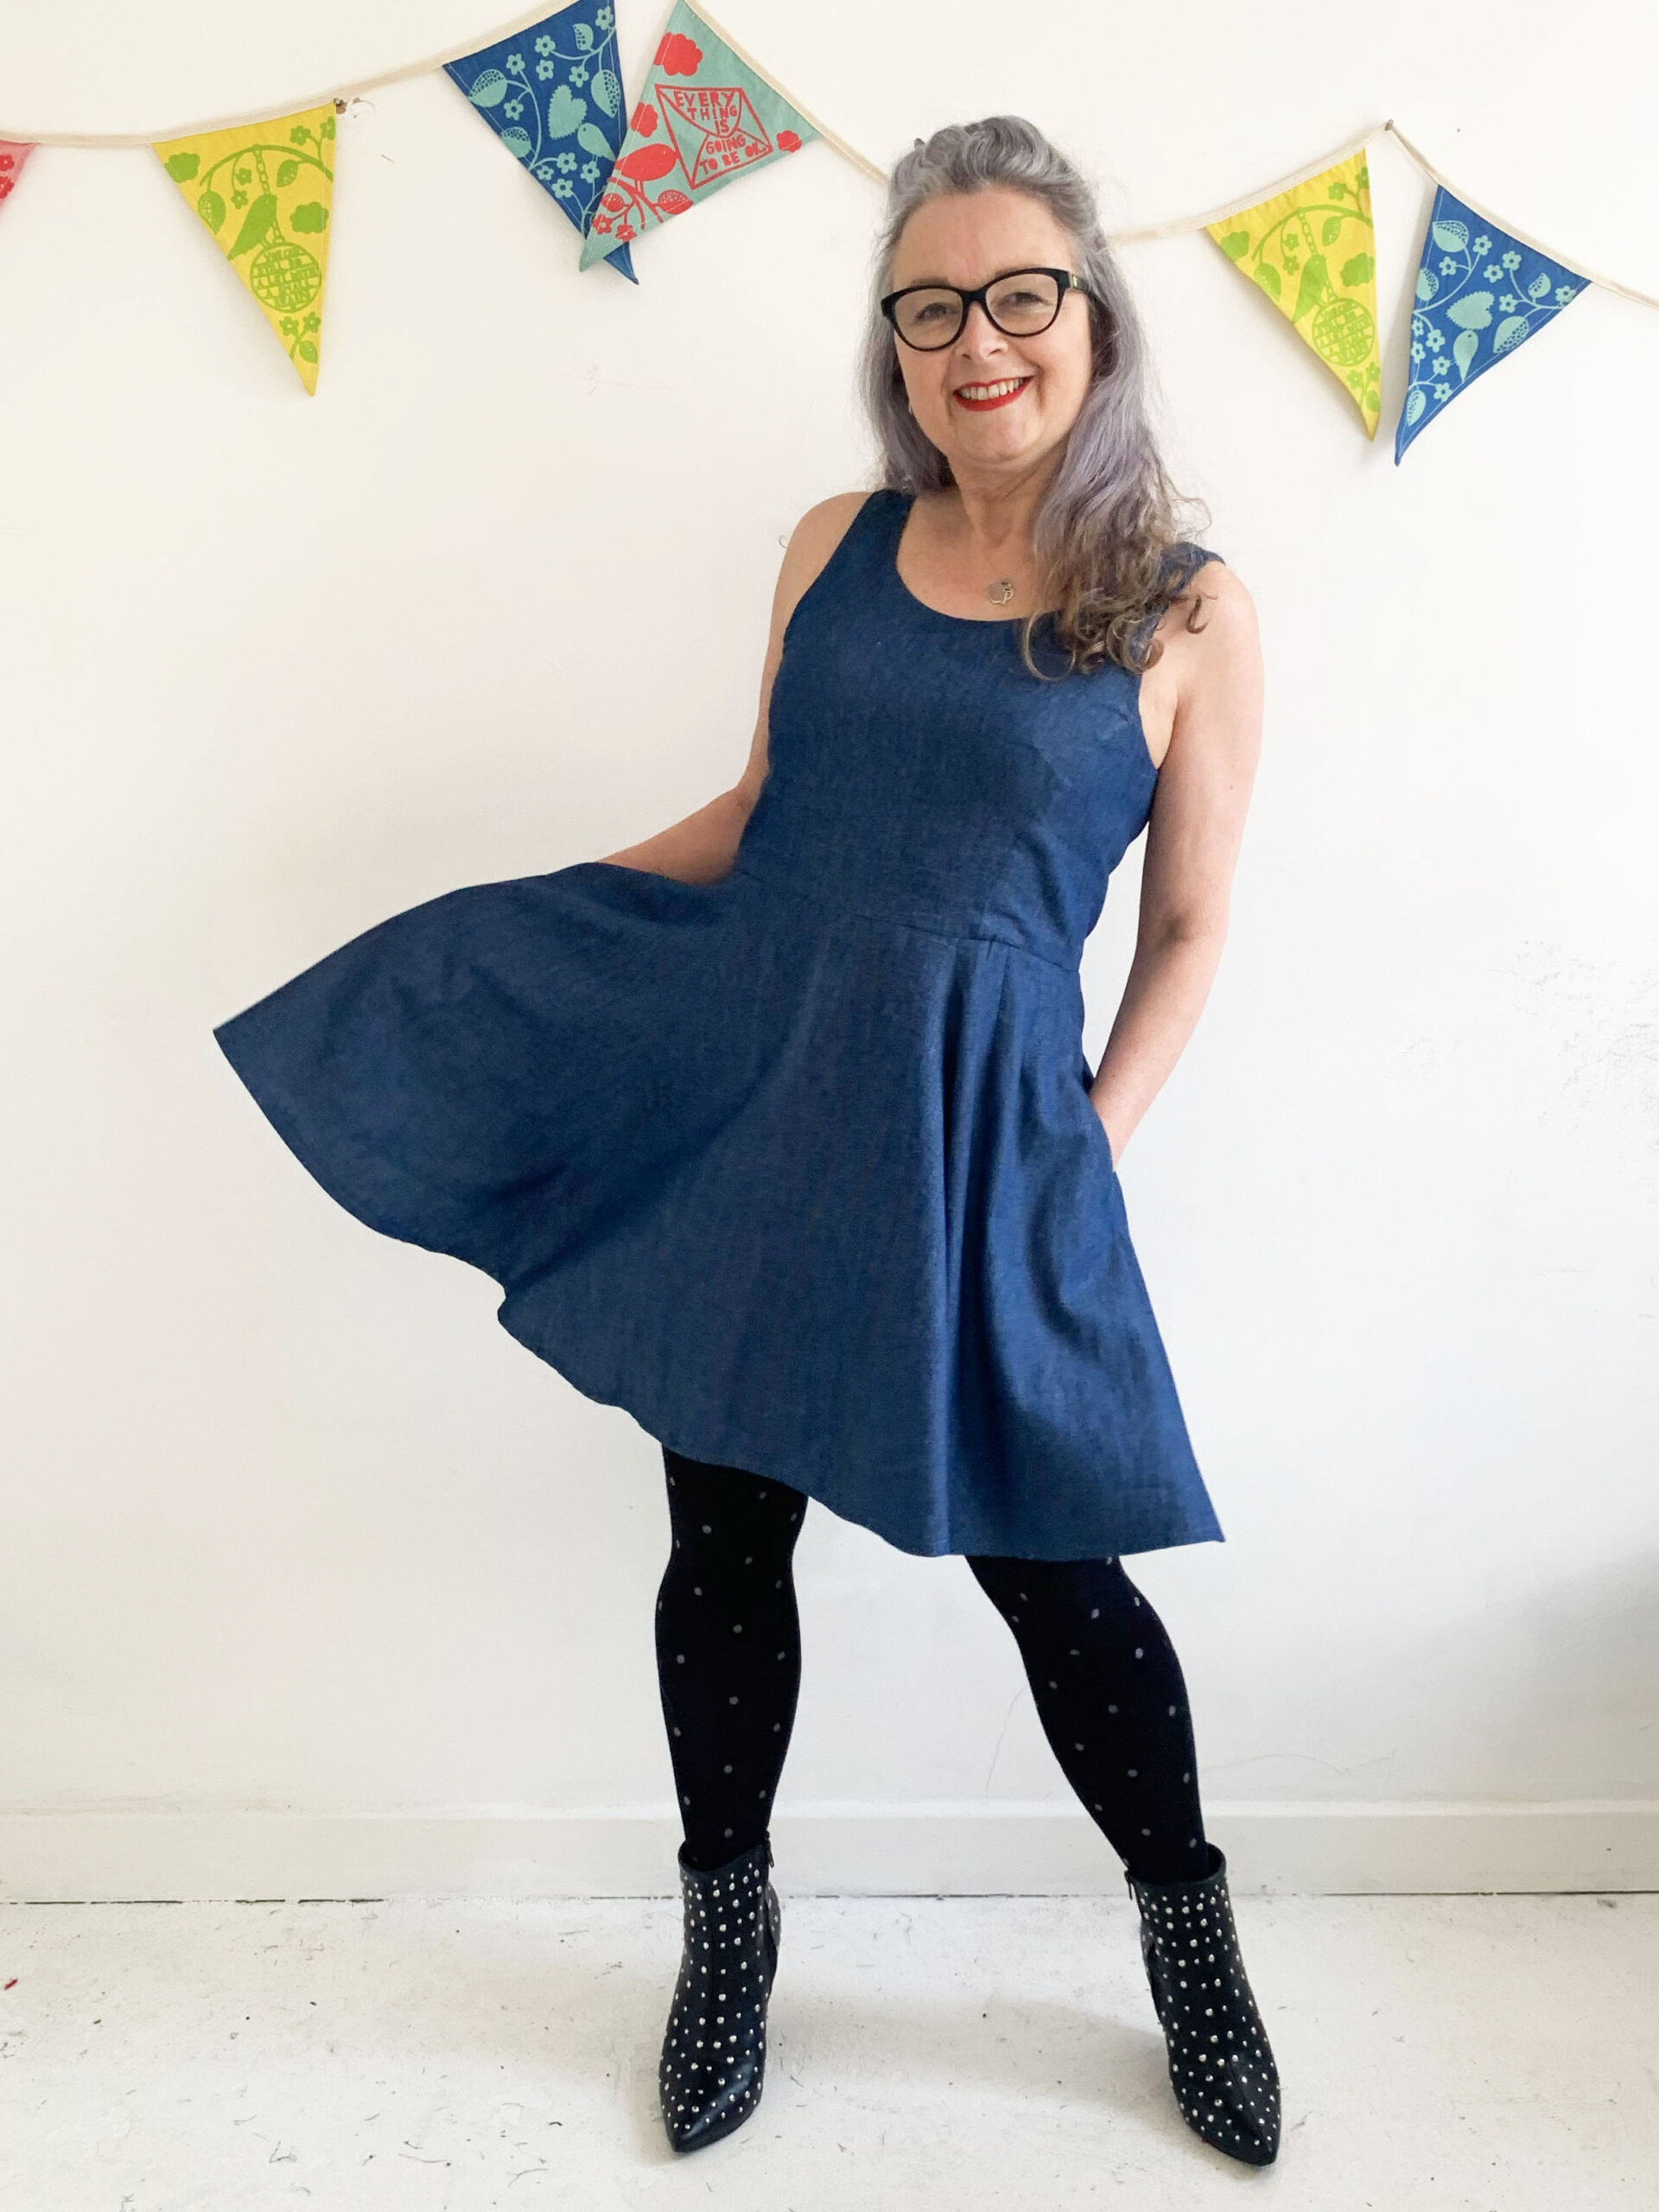
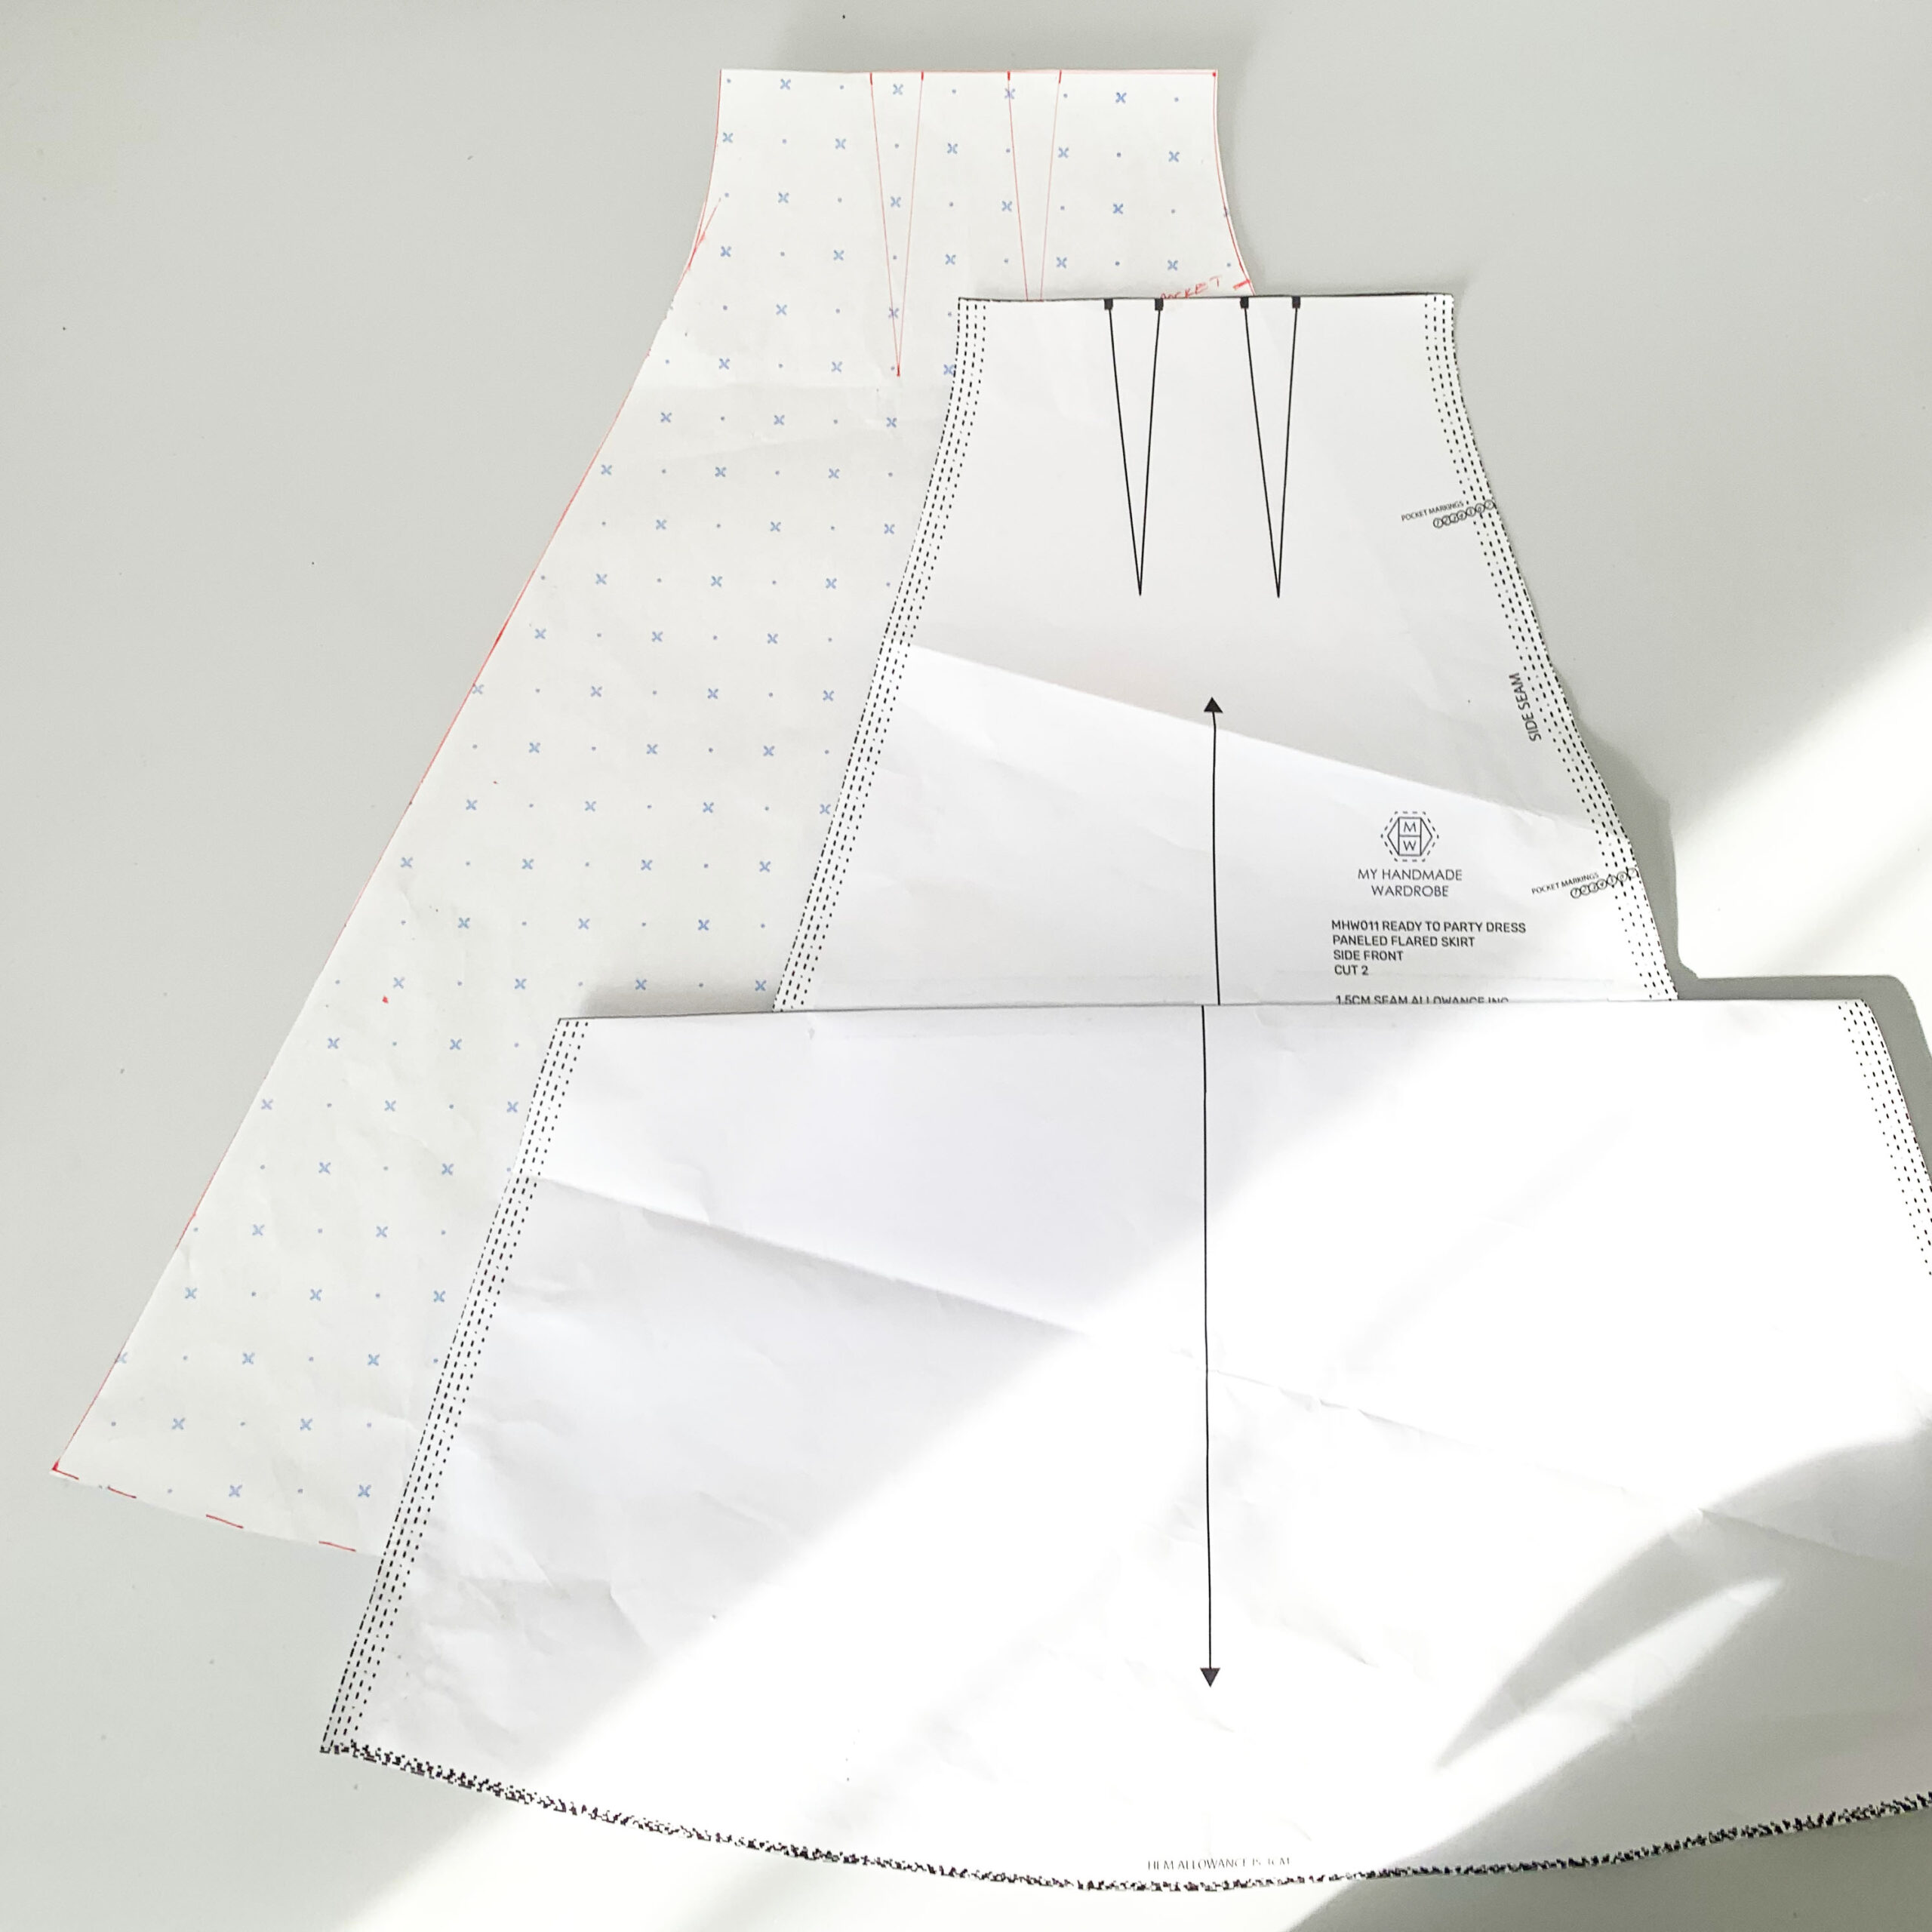
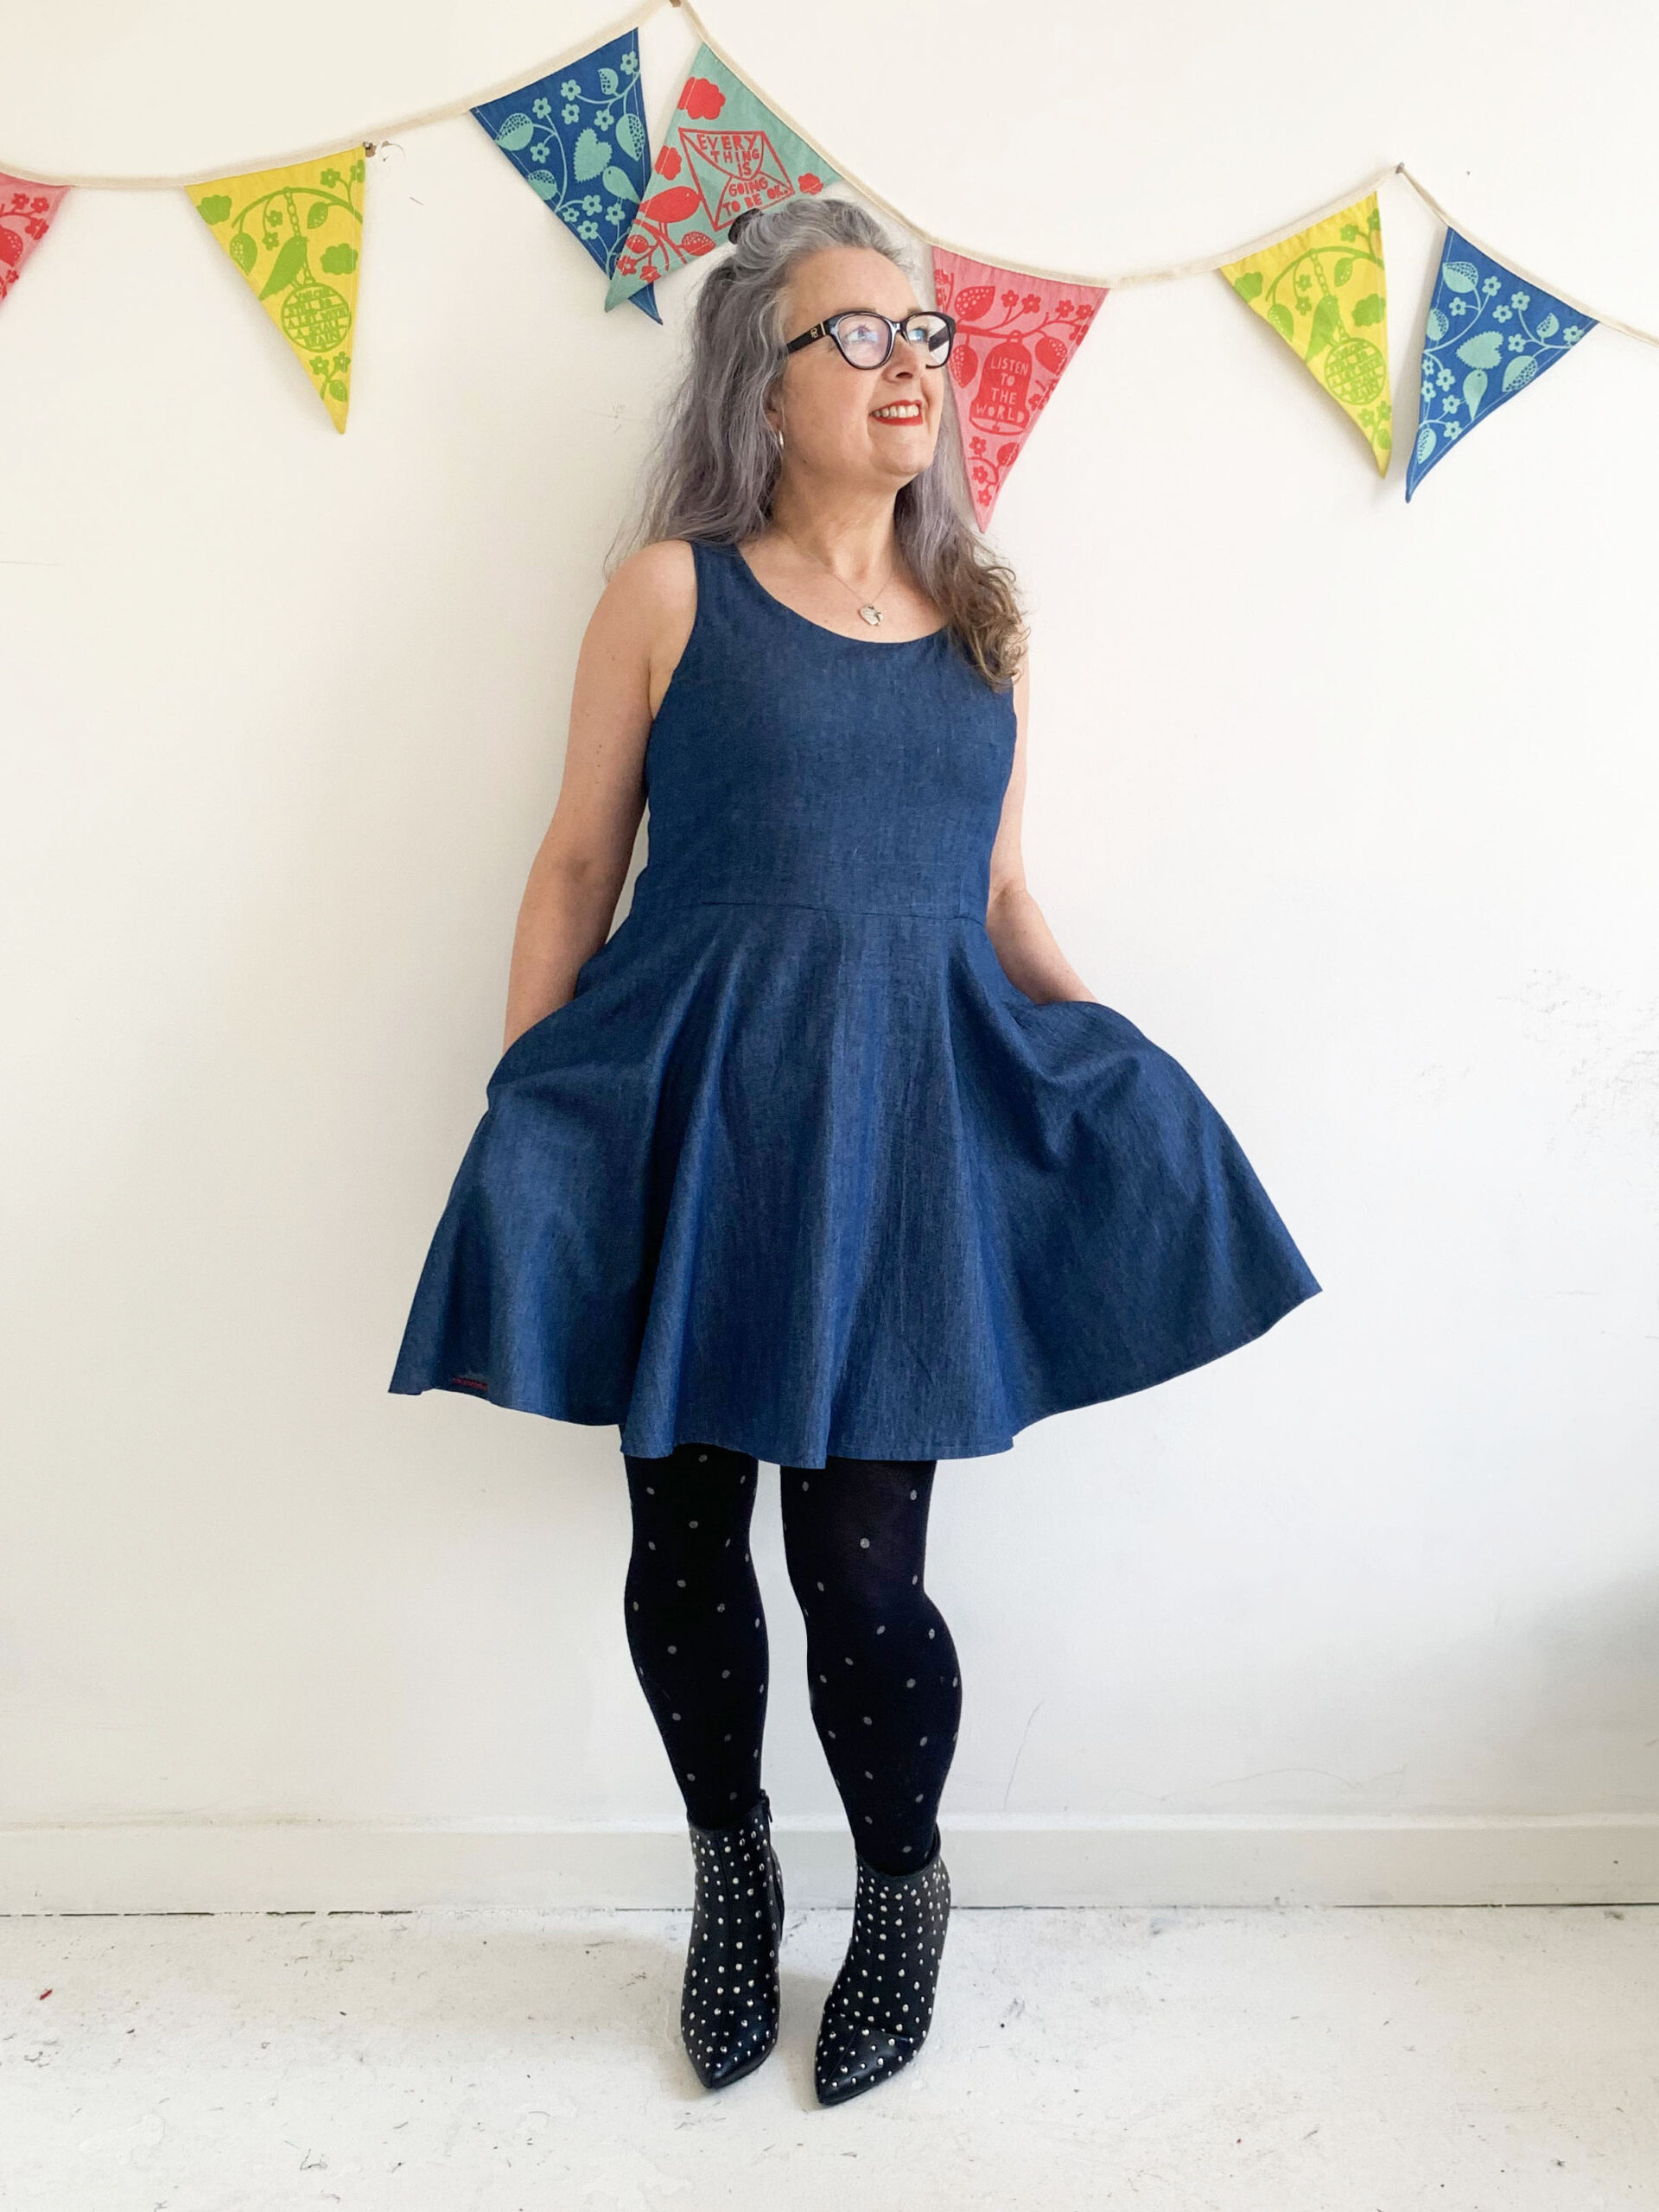
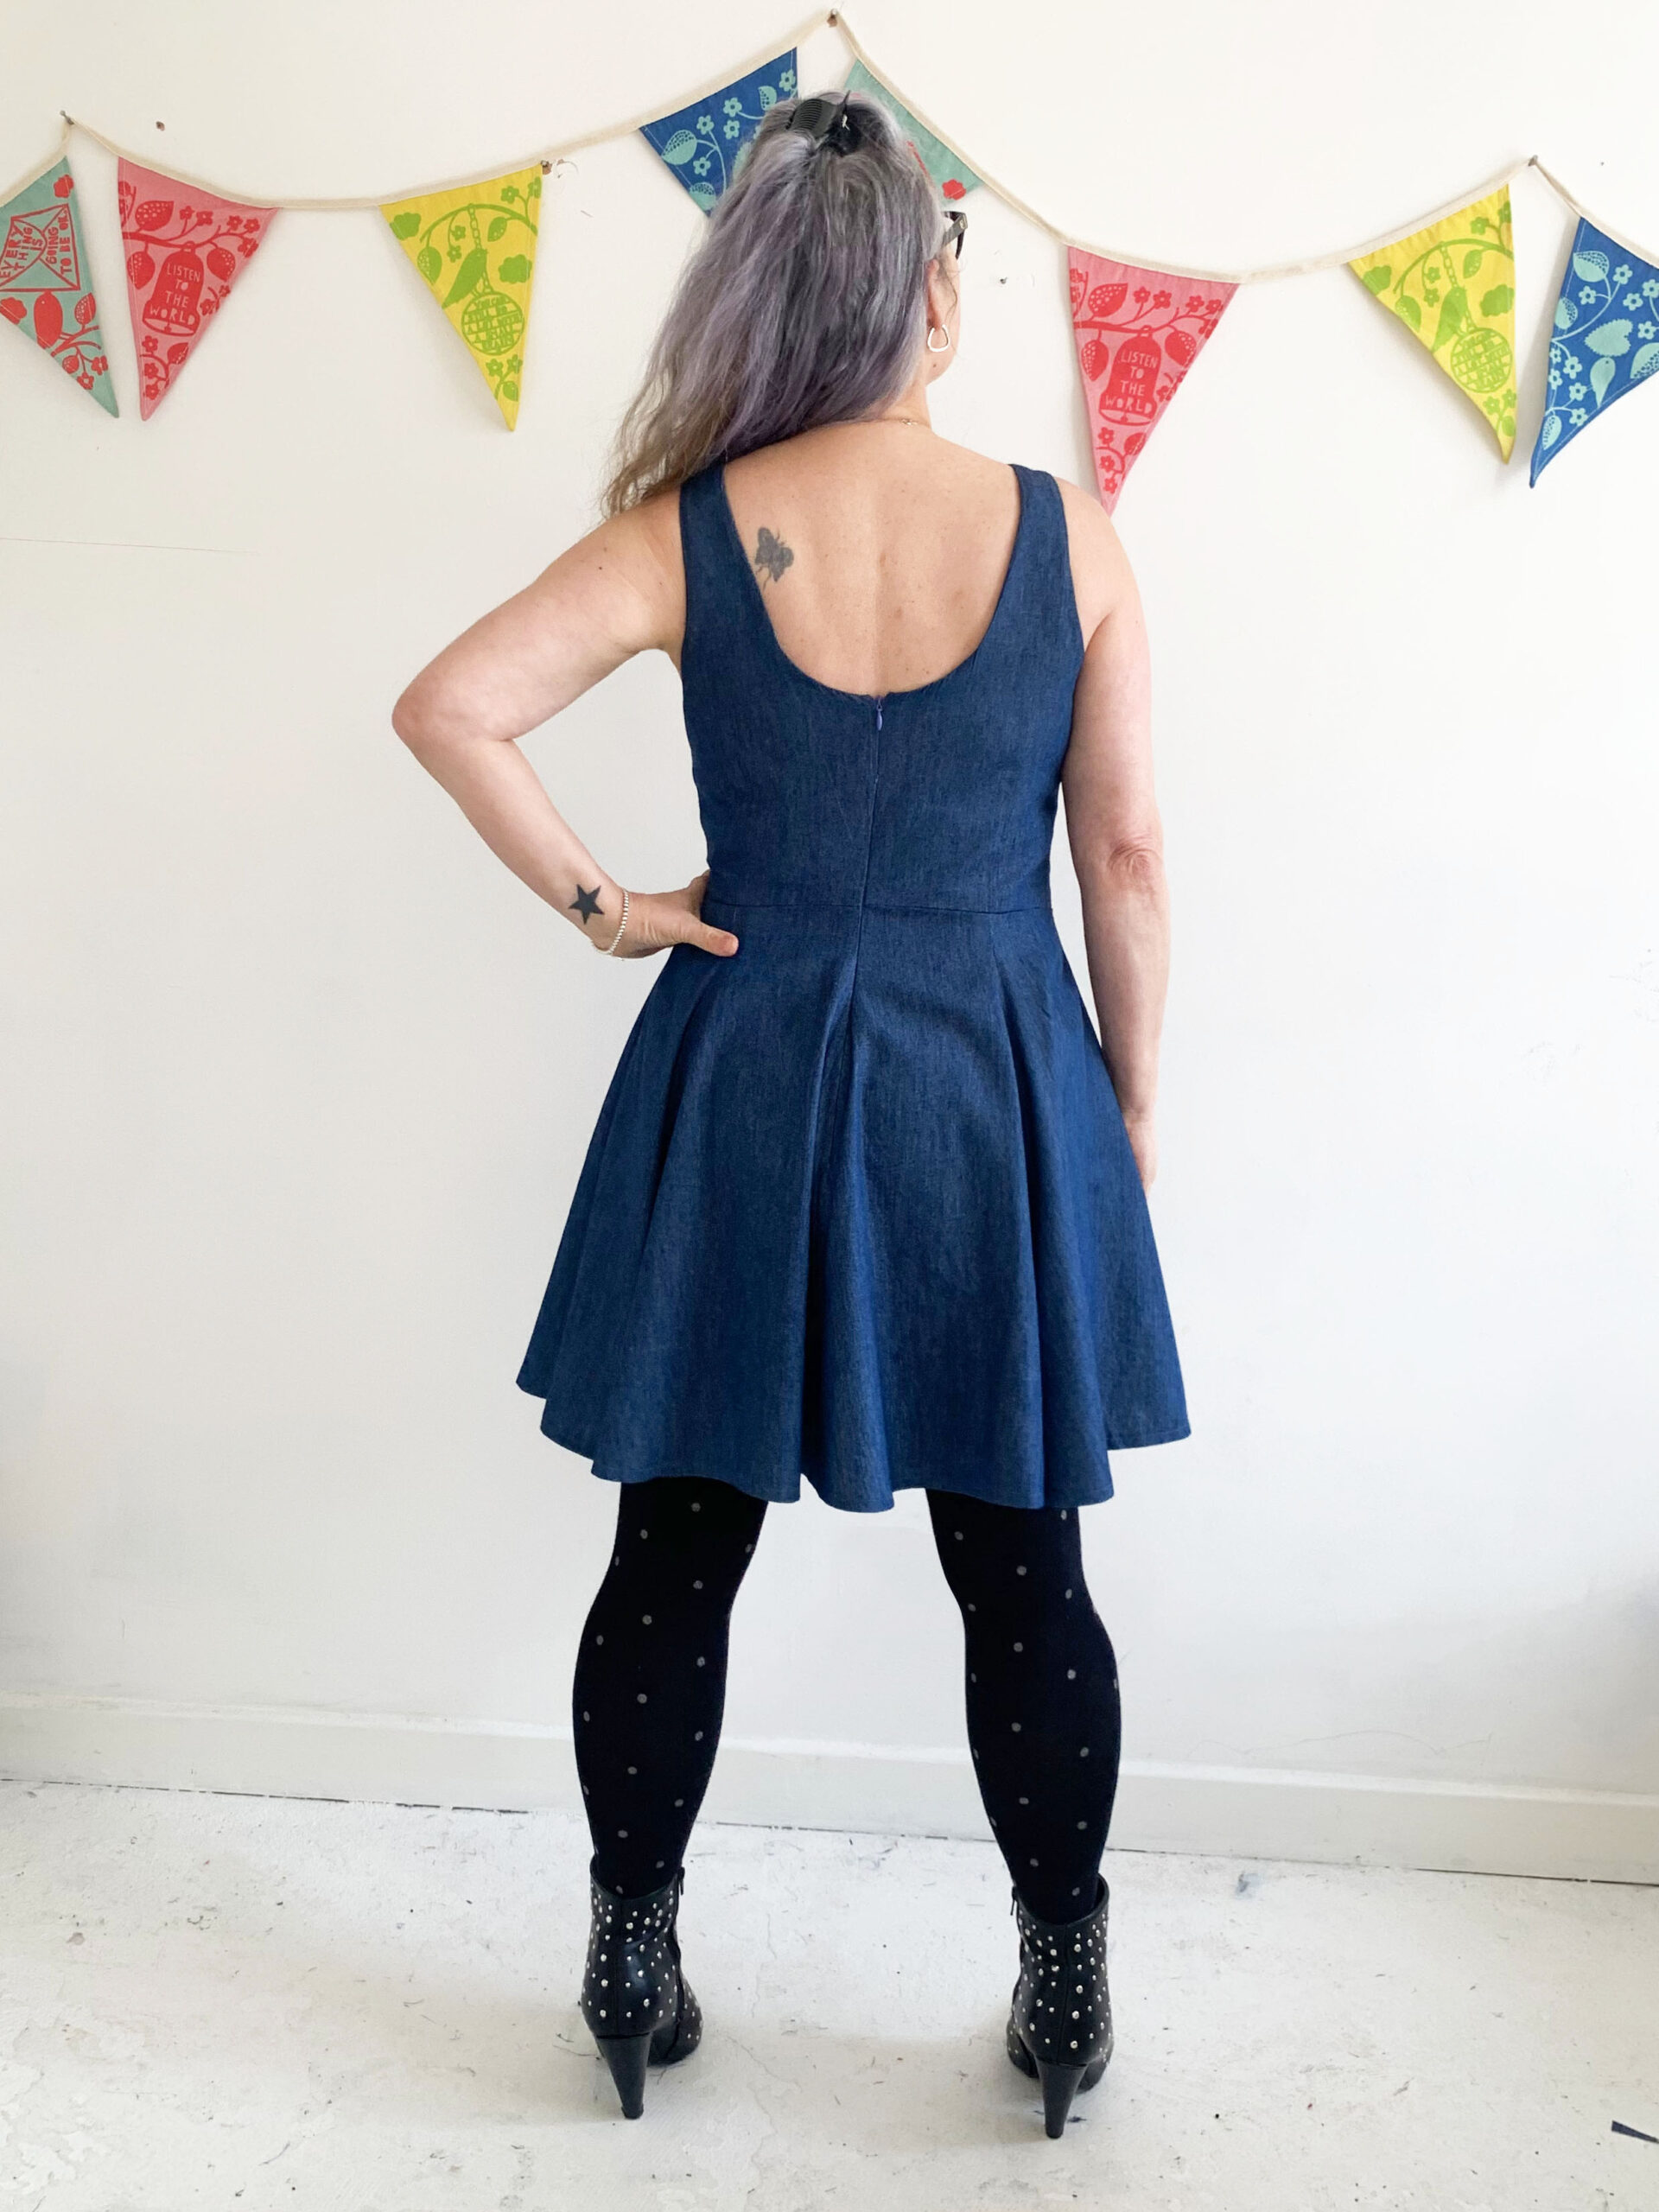
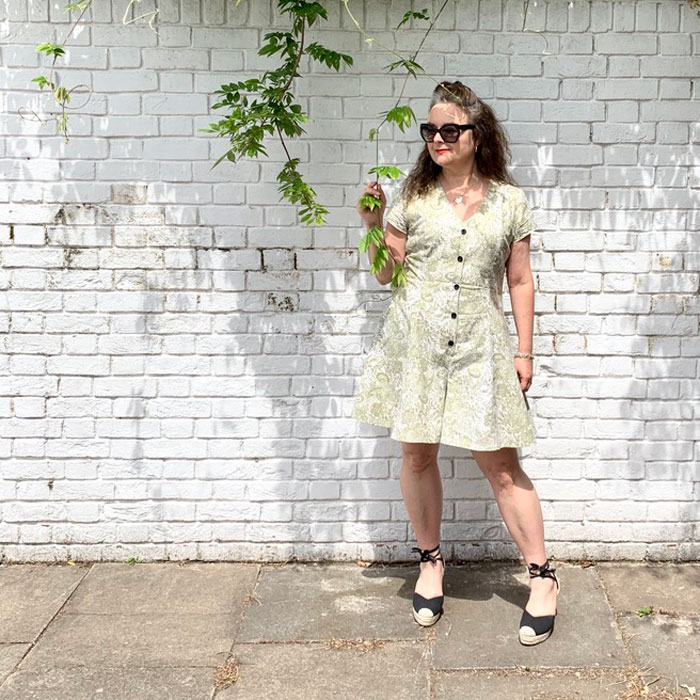
To make it more every-day, this dress was going to have to be substantially shortened for me. Before I go into more detail as to how I did this, I just want to add how interesting this skirt pattern is. It is made up of eight flared panels with a double set of darts on the side front and side back panels and the volume starts after the fitted section at the waist to create such a superb silhouette.
Each panel piece of the sewing pattern has a lengthen/shorten line which is super helpful as I really didn’t want to forego the amazing flare in the design. To be honest I wasn’t totally convinced I could remove a whole 9 inches without some sort of issue but hey, nothing ventured, nothing gained! As you can see there is quite a bit of a step when I folded up the excess. I sat and pondered a while and then convinced myself I just had to average out the difference to create the new pieces. So that’s exactly what I did. I traced the new piece and added the new side lines by drawing from the hem points to just below the waist shaping. And it worked!
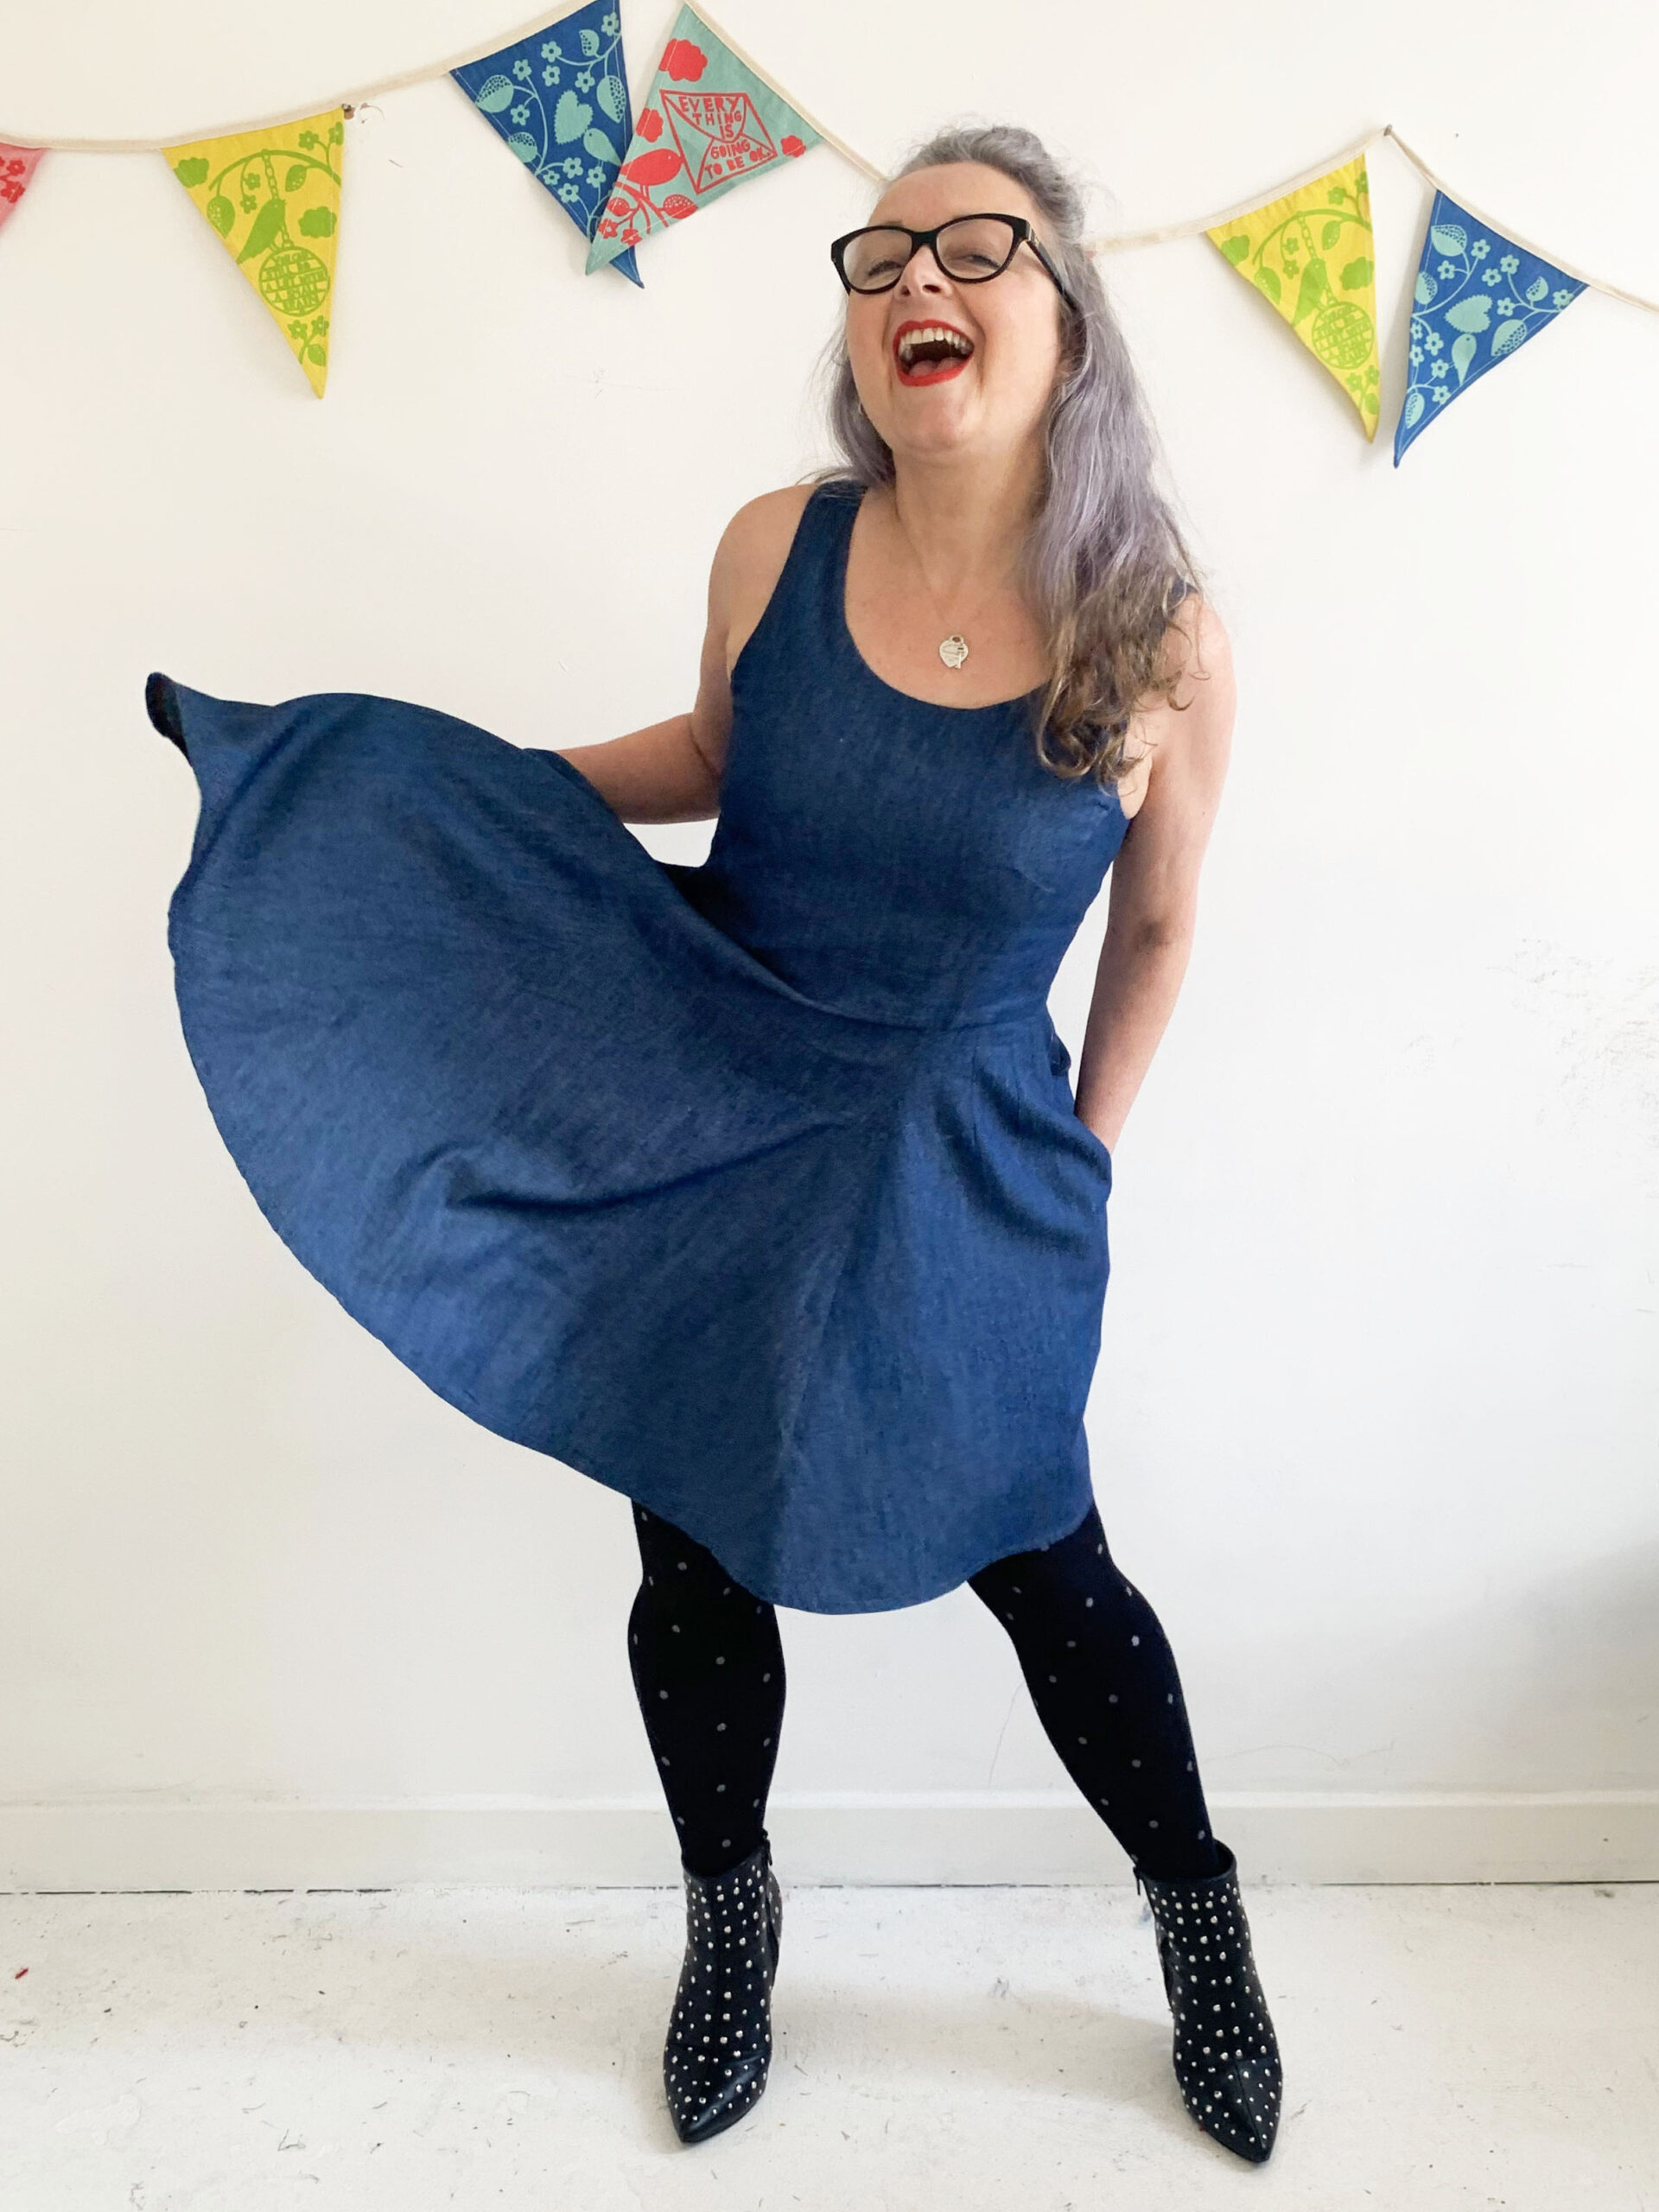
I took my time sewing the panels, being sure not to stretch out the bias seams of which there are many, and I’m sure the results were helped greatly by using this wonderfully soft and forgiving chambray fabric, also from Crafty Sew and So. It drapes so beautifully and seals the deal with my ‘every-day’ mission.
Because of potential bias behaviour, I did tack the sewn up skirt panels to my toile of the bodice while I sewed up the actual bodice. I felt it needed to hang a bit before hemming in case the hemline dropped unevenly and that proved to be a good idea.
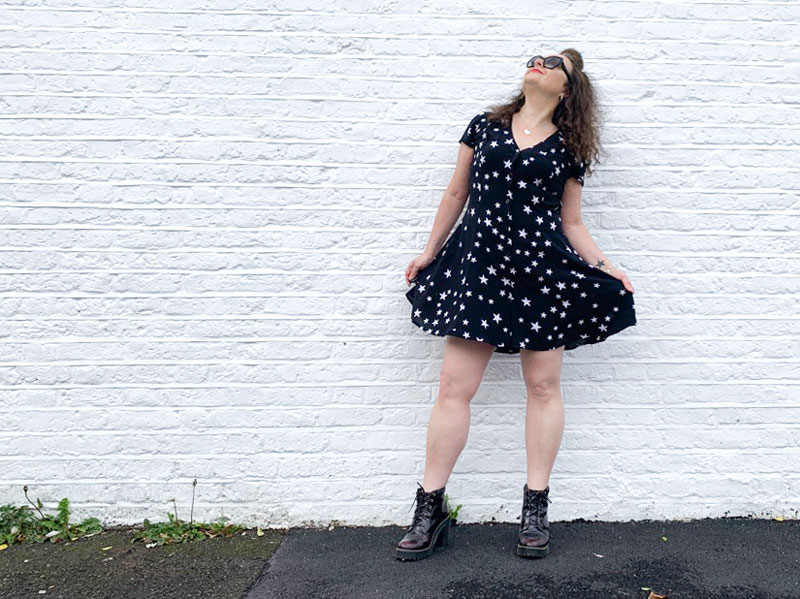
I cut a size 4 for the skirt and graduated down to a 3.5 for the bodice but next time I might just slither a bit more off to go from 3.5 to 3 as it is a bit roomier in the waist than I anticipated. That’s the beauty of having all the size lines to trace off!
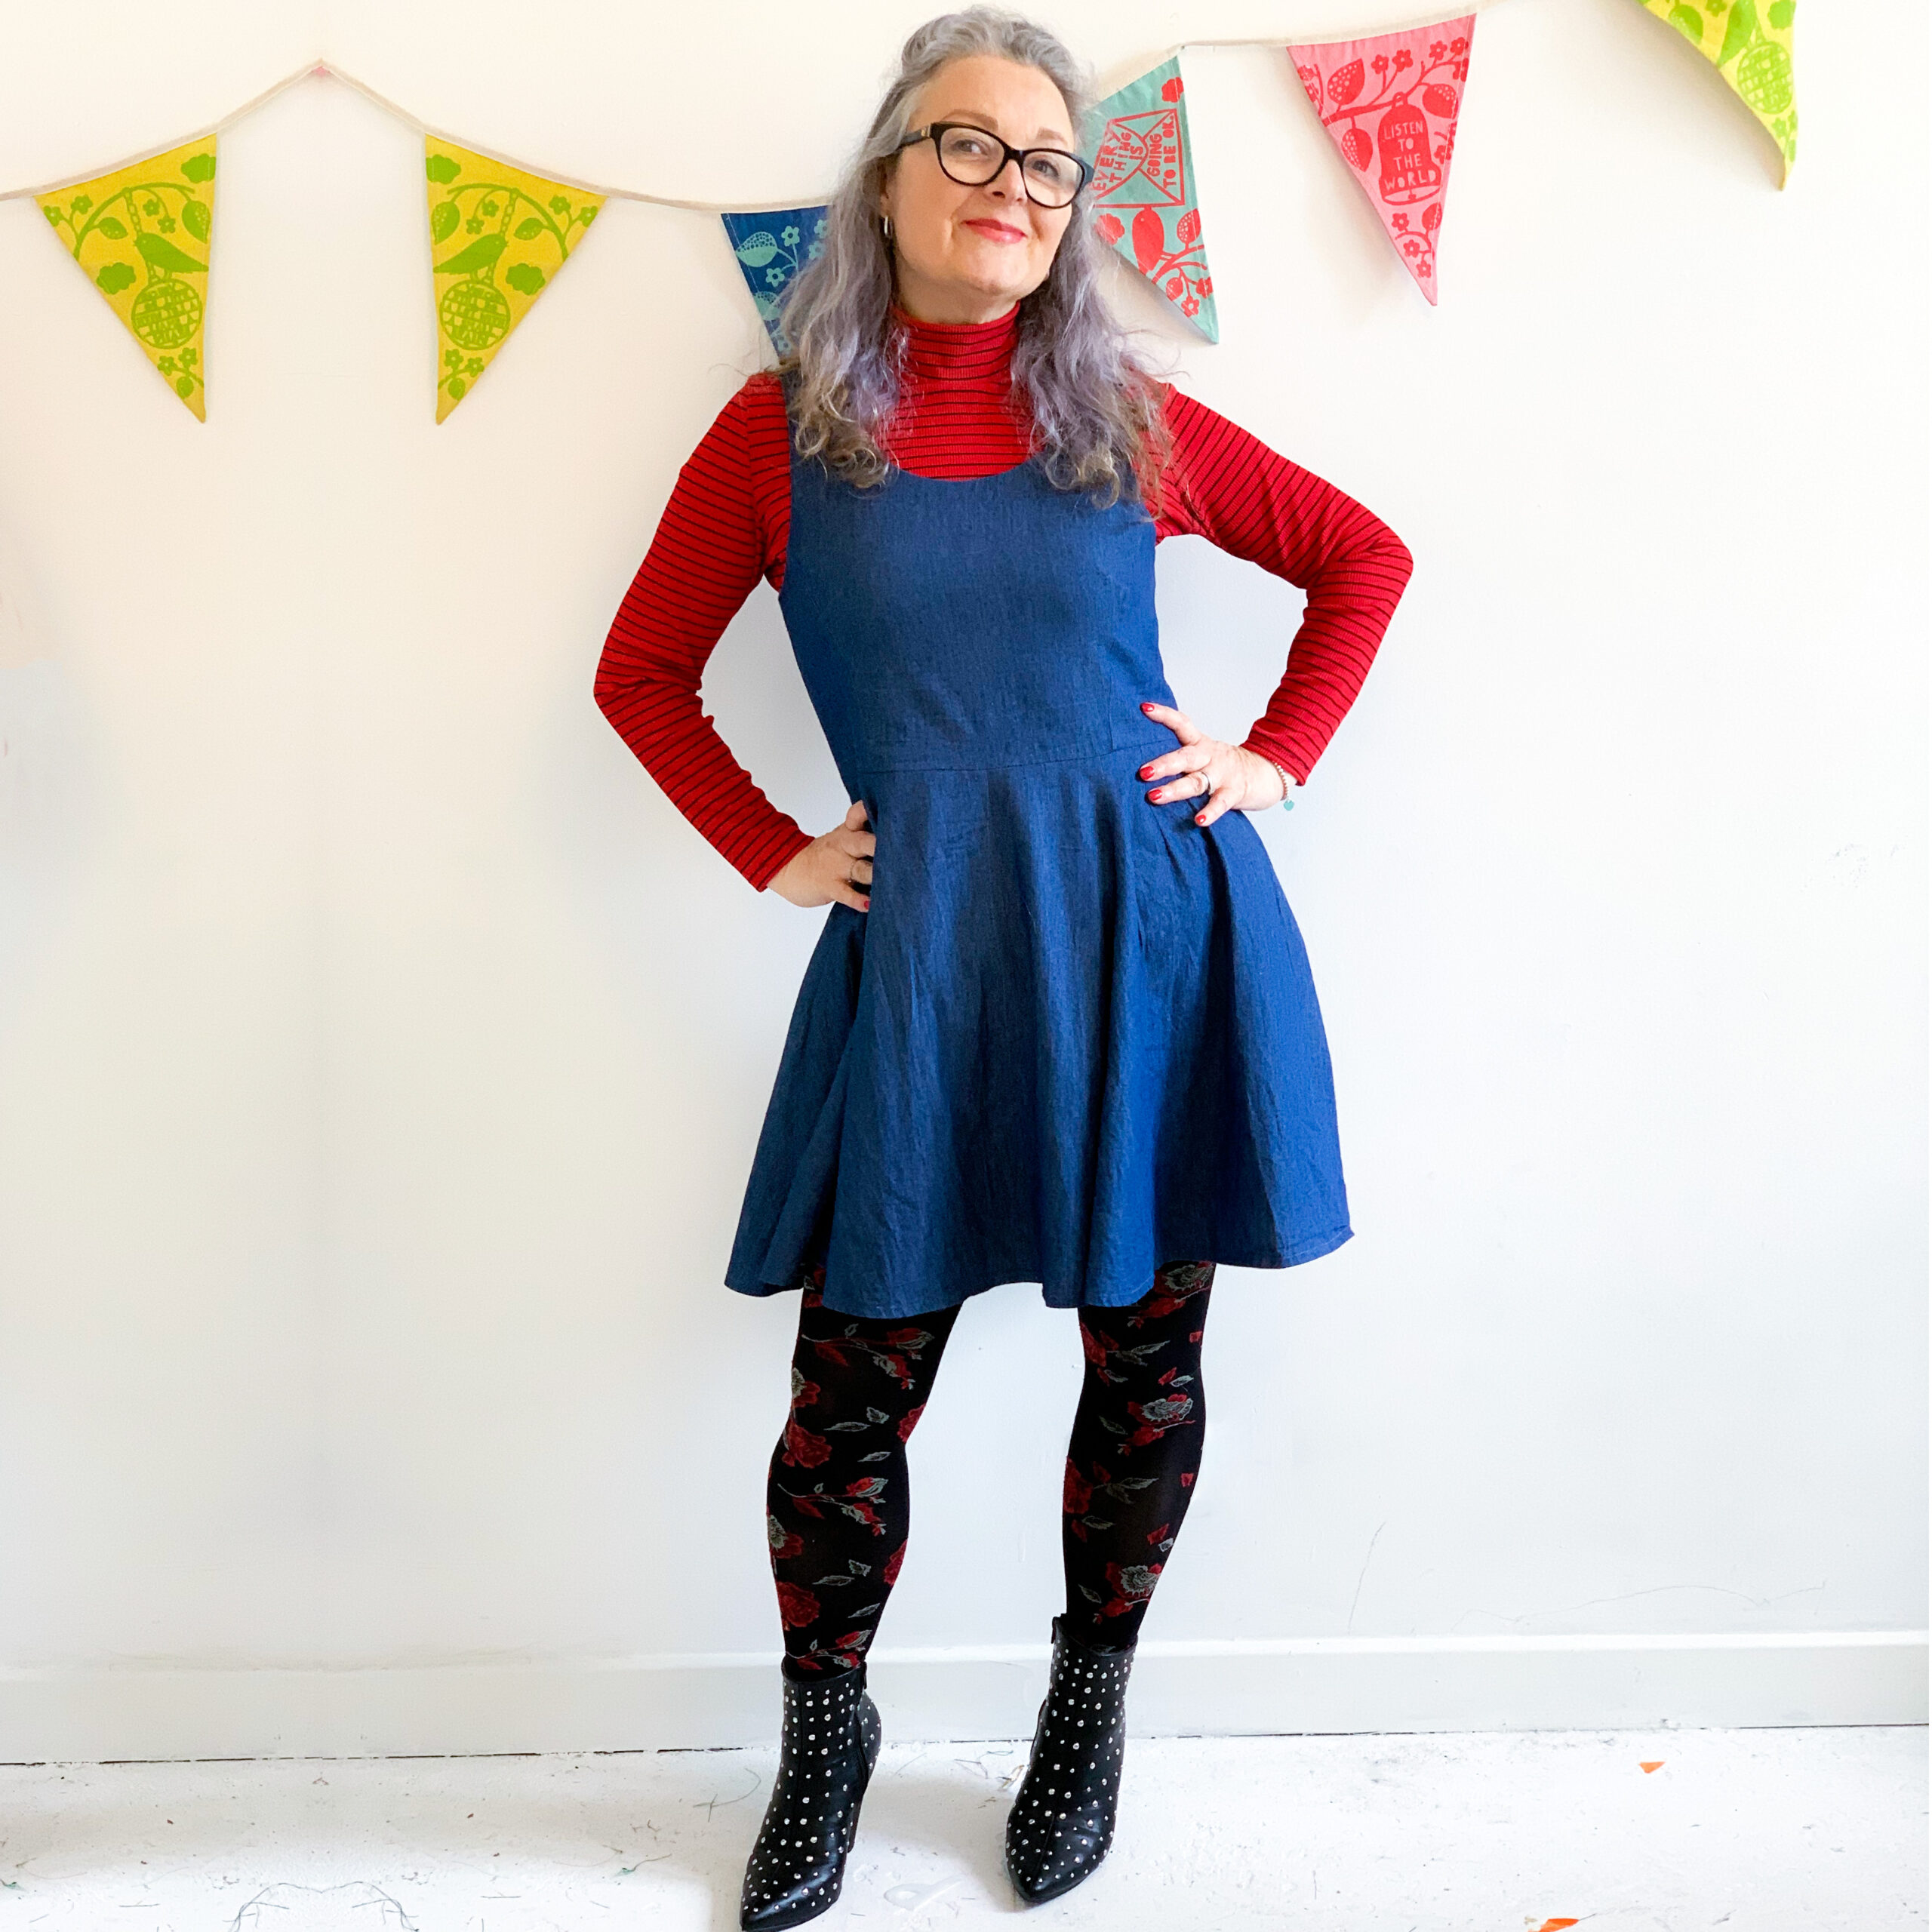
I was torn between choosing the sweetheart neckline and the round neckline of the bodice. And I was almost sold on sweetheart when I realized I could layer the round neckline version more readily with a t-shirt or turtleneck jumper underneath for a change of style and if it got chilly!
I love that its lined. In fact I love lining and the understitching process because it really does give a nice, neat finish.
Oh and I almost forgot to mention that it has pockets – lovely sized in-seam ones that get disguised in the drapes so you can stick anything you like in them with little chance of distorting the shape of the skirt!
I loved making this dress, it was a real pleasure to sew. And I love wearing it – its comfortable, versatile, flirty and feels good. And I can totally recommend this pattern and fabric combo. Because every day should be a party, right?!
Last weekend was a Godsend. Seriously. As a sewist, who wouldn’t relish permission to sew your undivided heart out for two full days whilst tuned in to all manor of inspirational videos and chat from the best kind of community ever. I’m talking the #SewingWeekender hosted by The Foldline and English Girl at Home, obviously. The event that sparked so much joy and raised so much money for such great causes.
And hey, I made a new outfit in the process, too!
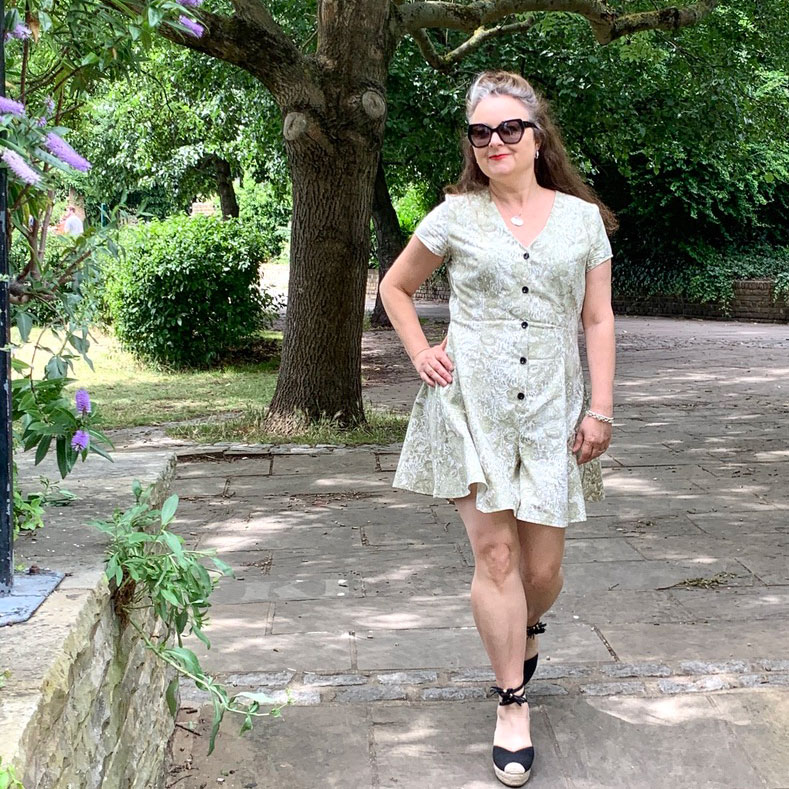
I’m not sure if I can ever stop making True Bias Shelby Rompers now. This is my third and still I’m not done!
This wasn’t the intended fabric though. I had factored in some crinkle cotton linen gauze, but following a prewash, it crinkled to half the size and became all elastic and everything. I set about ironing but got bored after the first 20cms and swapped it up for a really old pair of curtains instead. As you would!
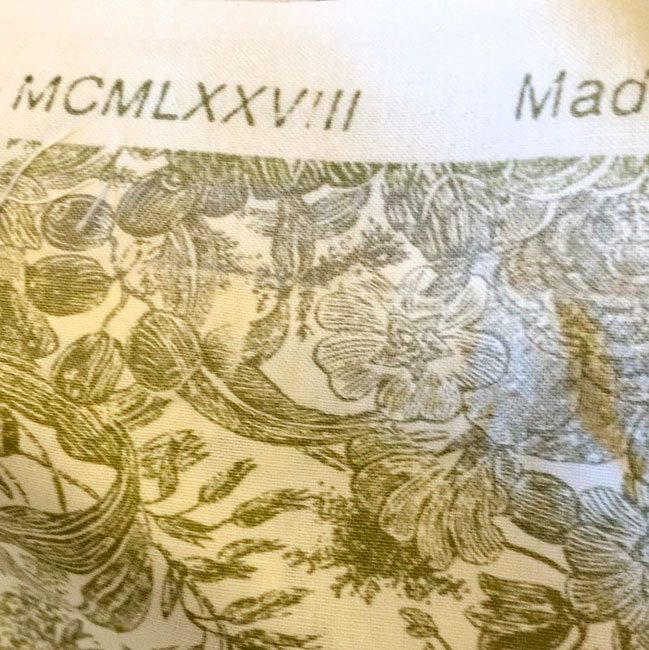
Ordinarily I have a reputation for exaggeration, but in this case I’m not joshing. I bought these Laura Ashley curtains in a charity shop many moons ago. Quite excited by the vintage factor. Had to look up those roman numerals though . . .
MCMLXXVIII = 1978 for the less Roman among us!
I bought them when I was dead broke. And still argued the West London inflated charity shop price! They served my previous two addresses as actual curtains and have sat wantingly in stash mountain for the last 10 years. So I think you might relate to my happiness at using them to make my third True Bias Shelby Romper suit.
I get it now. Using the same pattern over and over. If it ain’t broke and all that. Such an easy gig when it works straight out of the packet. I made my first ‘trial’ one in a very lightweight (quite see through) star-print viscose. And I love it still. The second, more improved version realised in a tropical print viscose and it’s so interesting to see the difference when it sews up in a fabric with a bit more structure. The silhouette is accentuated even more and feels good against the skin being 100% cotton and all. Feels even better knowing how many lives it’s lived and yet 42 years on its still many more years away from a landfill!
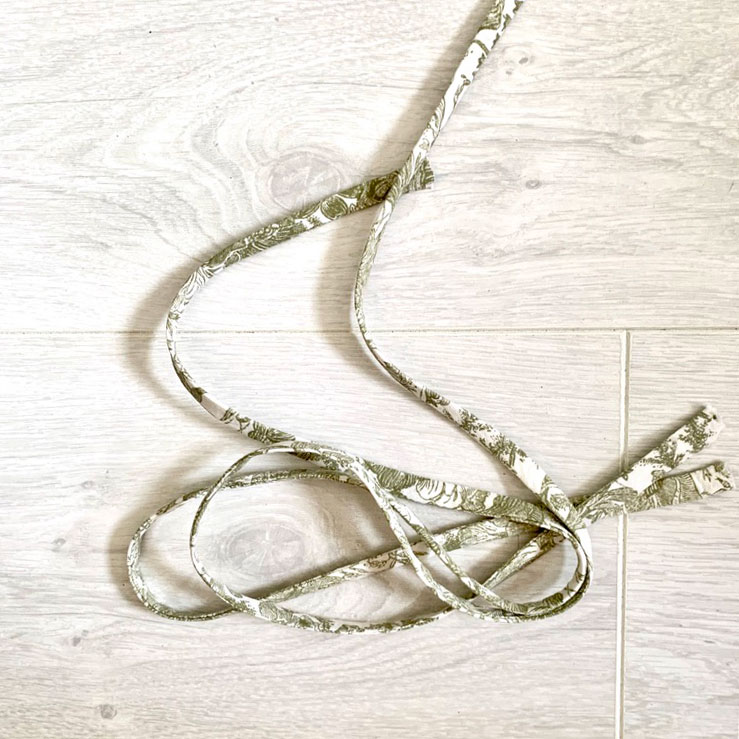
That said, there was a little issue with the tiny back straps. They didn’t turn as easily in curtain fabric. It’s a bit of a toughie compared to viscose. So following a wee tantrum, I re-cut the pieces on the bias – remembering a video tutorial I’d watched about cutting rouleau loops on the bias – and it bloody worked a treat. Thank goodness I had enough fabric left!
This isn’t the end of this particular project. I’ve got plans. Mostly to mess things up! You know what I’m like with my colour palette – there’s not a scrap of black going on, save for the buttons. So I’m going to add some paint. Just a bit. And not quite sure where and what. But watch this space!
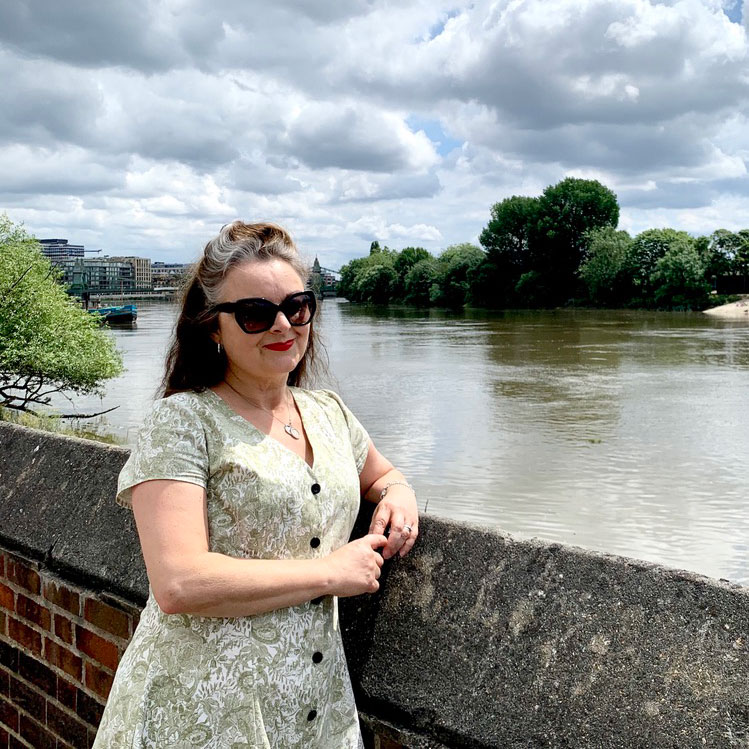
Thank you Daniel once again, for my lovely photos. Especially when the clouds dictated we should never have strayed further than the garden gate, let alone to the riverside. But I’m jolly glad we did.
All the kisses for the sewing community today. But mostly for The Foldline and their generous Instagram campaign: Random Acts of Kindness and to Amy aka AlmondRock, for tagging me! That in itself presented a fuzzy, warm virtual hug but the prospect of getting to choose a pdf pattern of choice was such an awesome treat!
I was literally that kid in the sweetshop. I don’t know if you’ve visited The Foldline’s pattern store recently but it is mind-blowing. So many super stylish patterns – Indie and Big 4. Put some serious quality browsing time aside before you head on in!
After a delightfully long peruse fuelled with umms and ahhhhhs a-plenty, I decided on the True BiasShelby pattern. Especially after I spied Patsypoomakes‘ version – which was definitely the deciding factor.
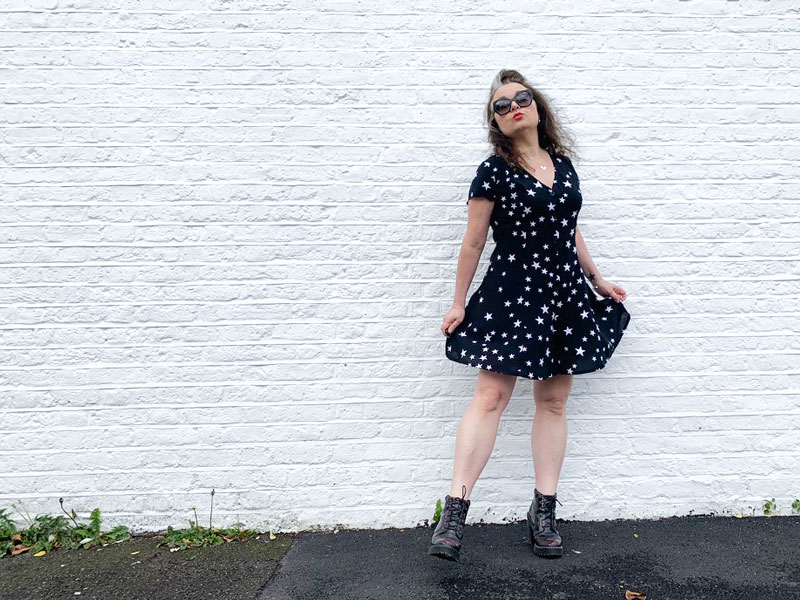
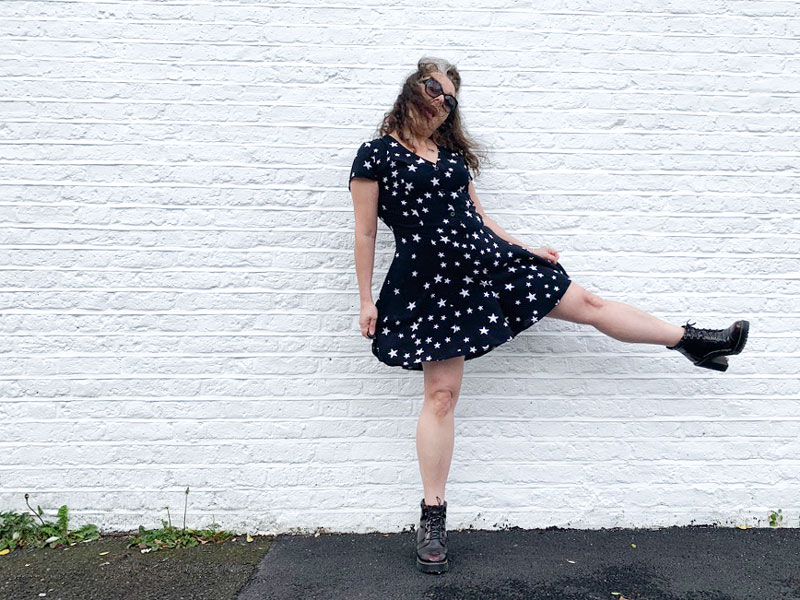
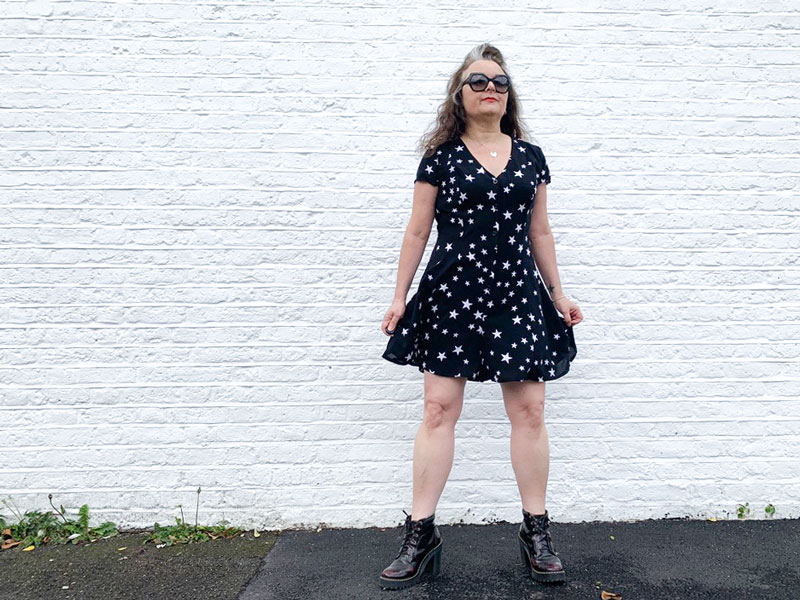
The Shelby is a very versatile design that delivers a v-neck, princess-seamed dress and romper suit in both maxi and mini lengths, with 2 sleeve options.
So reminiscent of my 90s youth – styled with DM’s, lockdown hair and a pair of shades to hide the baggy eyes. Much the same as I would have done thirty-odd years ago except hair probably would have been loaded with half a can of Elnett, crimped and backcombed for added bigness!
I have never used a True Bias pattern before and I really didn’t know what to expect with regards sizing, clarity of instructions, general fit and ease of sewing etc, so I opted for some super drapey stash fabric to toile it. After all what were the chances of a romper fitting in all the right places, first time round and without a ‘hungrybum’ feature?
I didn’t think for one minute that this was going to fit without some inevitable adjusting but I was going to enjoy the process all the same. I clipped and overlocked and pressed all the seams and it brought so much joy to see it taking shape. I diligently followed every step of what is probably the clearest most concise set of instructions I have ever encountered all the while believing this was destined to be a test garment only.
The more I progressed with the sewing the more it became apparent that I wasn’t going to look like a giant baby (I did have some initial doubts) and it was going to be a perfect fit and I was beginning to feel a bit sad that I might not have used the best fabric for it to be actually wearable. It looks pretty decent in the pics because it was a relatively cloudy day today. But it’s really sheer. Like hold-it-up-to-the-light and-see-absolutely-everything sheer!
I am determined not to let these go to waste and so my lightbulb moment came with the discovery of my ever-so-nineties Pineapple Dance Studio cycling shorts! No one would really know in any case, and everyone is saved from seeing my actual butt!
Princess seams always produce the smoothest and flattering lines IMHO but the waist ties at the back cinch in a waist I never knew was there! Creating them was a breeze with my Clover Easy Loop Turner and they are the perfect length and width to effortlessly tie into a cute bow.
You can totally tell how much thought and consideration has been put into drafting this pattern. I had no choice but to work on it in small, often hour-long stints and yet it was so easy to pick back up on where I left off each time. Even at my most tired after a very long working day, the instructions were so clear, the illustrations were brilliantly presented and it sewed up so effortlessly. I couldn’t recommend this pattern more if I tried!
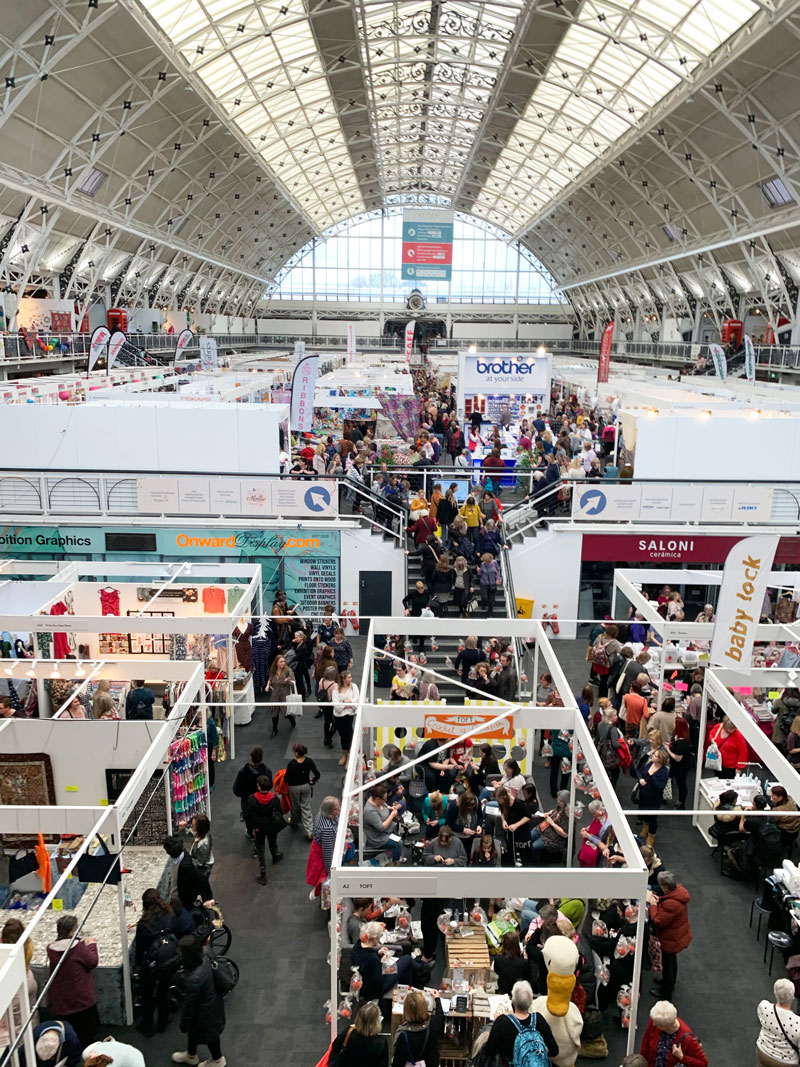
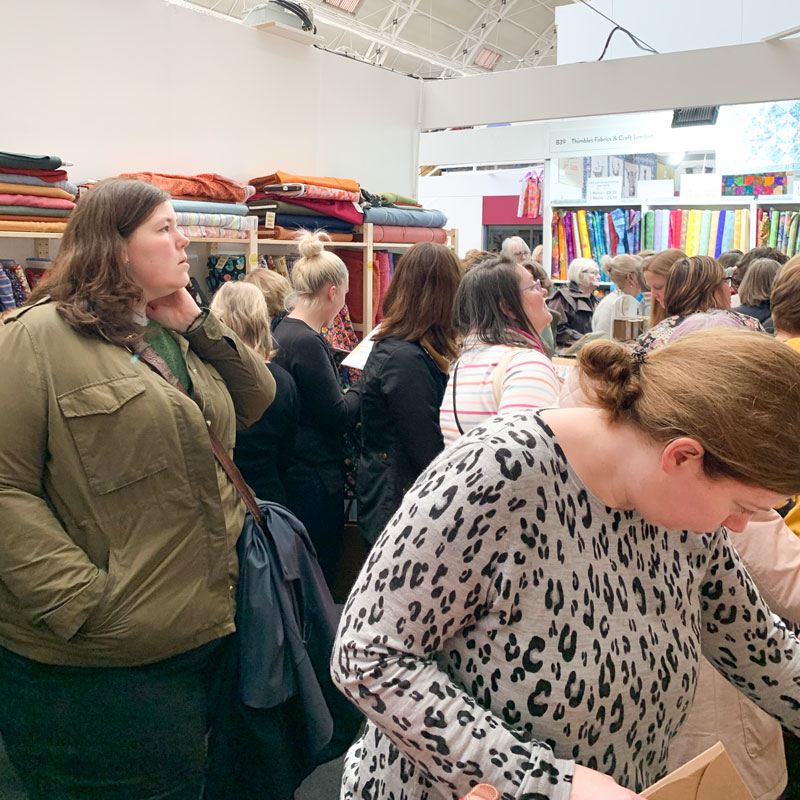
I don’t know about you but this year has been a slow starter for me. Full on with actual work but slow to get sewing, not a lot of space or energy to glean inspiration or motivation. But a trip to The Stitch Festival last week was just the ticket!
Like many others I was a bit confused by the rebrand – Previously named the Spring Knitting and Stitching Show, which was a bit of a mouthful to be honest – apparently it’s been changed to distinguish it from The Knitting and Stitching Shows later on in the year.
This year’s Stitch Festival ran from Thursday 25th until Sunday 28th February and was held at the Business Design Centre in Islington. Just a short tube ride for me but apparently easy enough for everyone I met travelling from further afield.
I went without a plan and especially planned not to buy fabric.
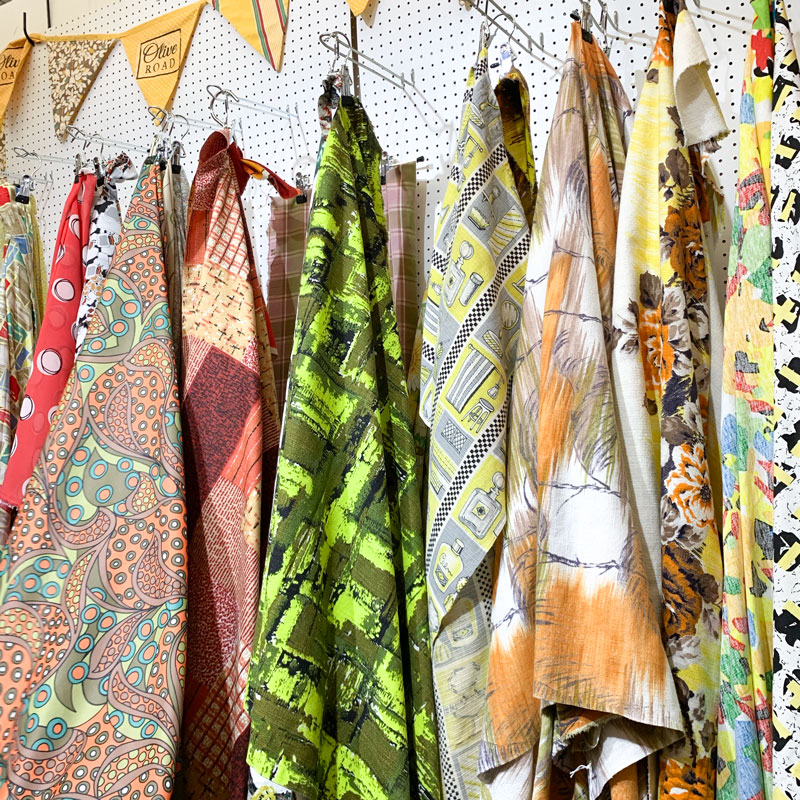
But with minutes of arrival, I found myself fondling some awesome vintage bark cloth fabric at stand H49: Olive Road London.
Fabrics on sale at the Olive Road stall
I didn’t realise it was genuine vintage at first and was about to kick off when I saw exactly the same curtain fabric I’d purchased in Brighton 5 years ago which I made into a Capital Chic Martini dress. For a split second I really thought I had mistakenly bought a modern take on a vintage fabric – that I’d been sold fake vintage! And then the lovely stall holder reassured me it was genuine and we had a good chat about how it must have been as super popular then as it is now! I wanted all her bark cloth, especially a small piece of rose print that caught my eye just as I was moving on.
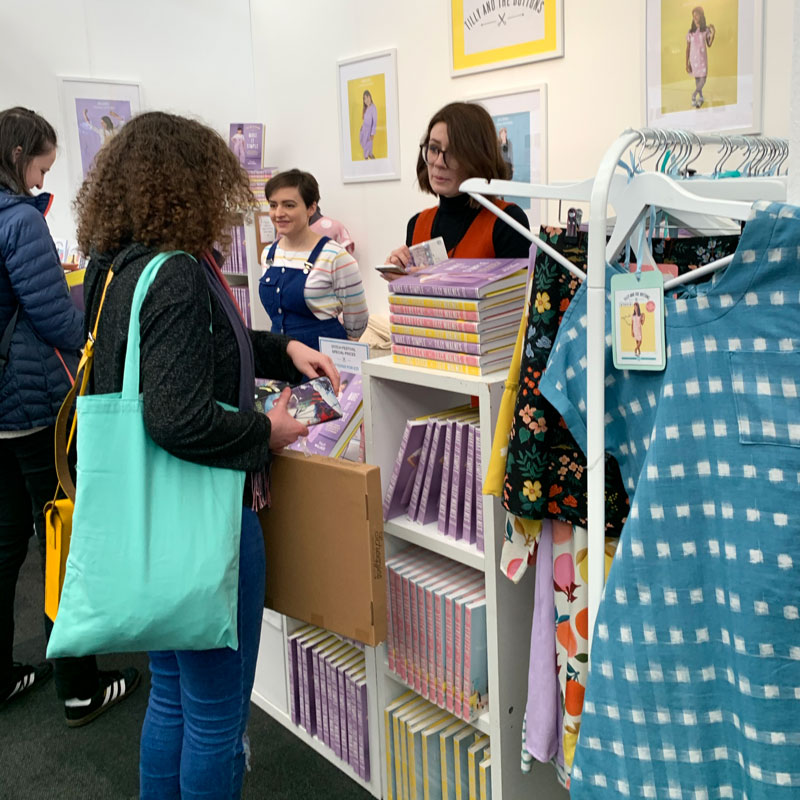
Soon after I waved to Tilly on her cute little stall. Always so cute. And always so busy. It was delightful to catch up with her at her recent book launch party for Make It Simple , so I didn’t feel quite so cheated of chat!
Tilly and the Buttons stall
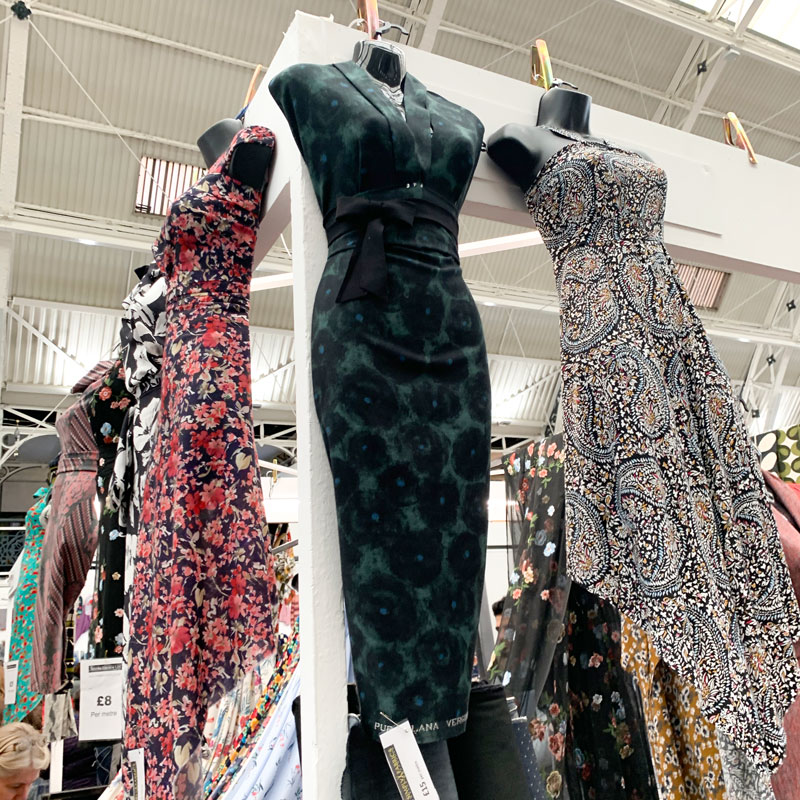
It was impossible to avert eyes at the fabric stalls. They were many and they were all fabulous. I particularly loved how The Textile Centre displayed their fabrics, deliciously draped on hanging mannequins. And some at just £5 per metre. Such a tease. One of the few things that holds me back from buying is that I must have a plan before I go adding aimlessly to my stash. I loved that black and green wiggle-dress fabric on the corner but I was ridiculously restrained.
The Textile Centre stall
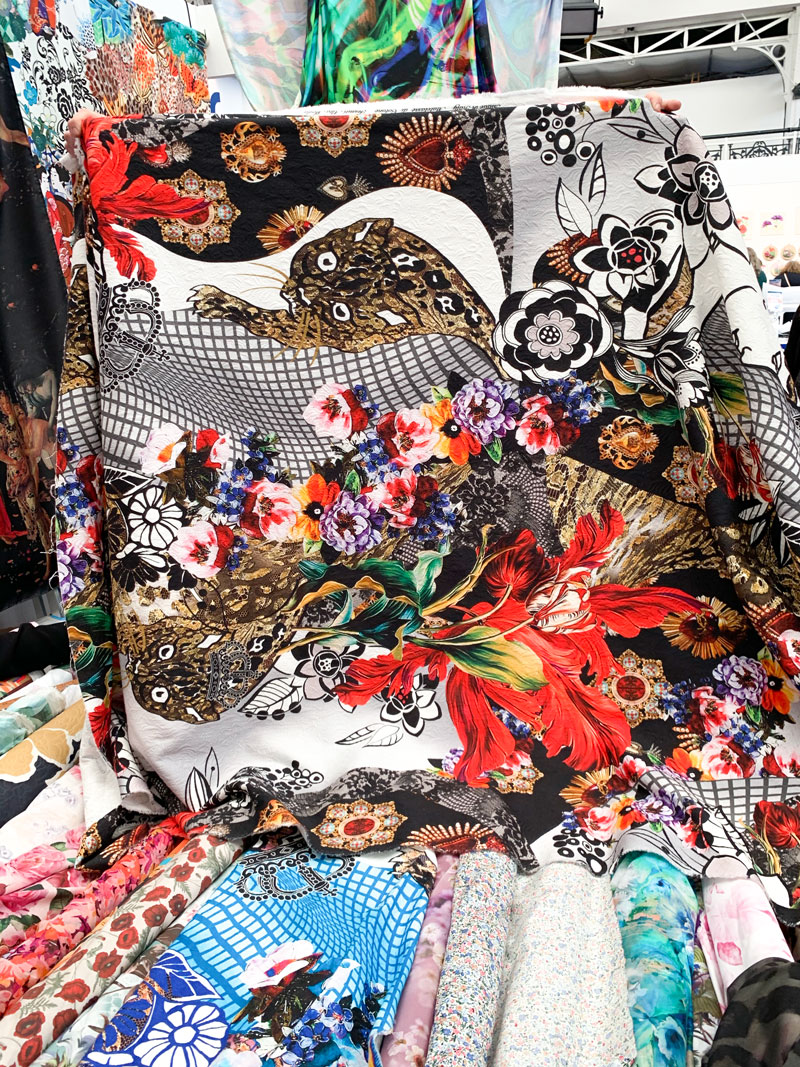
In fact I was so proud of my power to refrain until I chanced upon M. Rosenberg & Son‘s stall. Gets me every time. One of my favourite purchases from them was the sparkly dog-tooth I used for my vintage Butterick coat. And their powers of lure was just as strong this year. How on earth was I supposed to walk past this?!:
Dolce and Gabbana fabric at M Rosenberg’s stall
I didn’t of course. Just as I stopped to take a closer look, I heard my name called across the other side of the stall. I looked up and was so excited to see Dibs Maxwell who I first met very many years ago, online at Dibs and the Machine. She now sells specially selected and stunning fabric at Selvedge and Bolts. Defo worth a browse! She fought her way round to my side and we hugged a big hug! No photo sadly to display we just carried on from where we left off, chatting and laughing (always laughing) And then she made me buy the fabric!!
We wandered over to see Sew Me Sunshine and The Foldline who shared a stall together. They too were chocca with customers so we said our hellos and terra’s and went on our merry way.
Sew Me Sunshine and The Foldline
I wandered a little more in search of an expanding sewing gauge. But I couldn’t find one for looking. What I did want more at this point was a little sit down and a bite to eat. The cafe area looked fab with lots of healthy and delicious options but I tend to bring my own to events like this. Basically so I can skip the queue and guarantee I will get a truly plant-based option, not one that’s had the cheese flipped out of it! I sat on the mezzanine level along with like-minded visitors, looking down on the visitors buzzing around on the various levels and planned my next move.
I noticed that John Scott (John Scott Sewing World) was about to do a talk in the next half hour so I took a seat near the front of the hall and stroked my D&G fabric while I waited. I really didn’t expect the hilarity and the fun that followed. I recognised John but I can’t say I really knew that much about him at that point. Within seconds I was in stitches hearing about his stories in the film and TV industry. He really is an amazing story teller.
I loved hearing how his signature bridal wear included beading as much on the back if not more than on the front of a wedding gown, given that most of the photo opportunities involve the back view of a bride when she is talking to her guests!
I gasped when he told of the ballgown that he made for his mother to wear to a party and that was spotted by Princess Margaret across the room. She asked who the designer was and that’s how John began making couture dresses for the Royals. Hilariously, his parents were still largely unimpressed that he was a dress designer at that point and only started coming round when they saw his name among the credits of a Bond movie. But the acceptance came when after all the big blockbuster films – like Tomb Raider, Love Actually, and Notting Hill and all the TV shows, including the Catherine Cookson epics and Poirot (whereby all the costumes were made authentically to 1920s and 1930s fashions) – he joined Richard and Judy for a slot as the resident fashion expert on This Morning and stayed for 10 years! Now his mum was truly proud and told all her friends!
Seriously I could have listened to John all day. He was so uplifting. I felt like I’d been having a chat with an old friend. Plus I got a cheeky photo with him afterwards!
Cheeky hug with John Scott
I left the talk inspired and hanging on to Johns best bit of advice to ‘let the universe guide you’. I generally do that but I loved that he reinforced the mission!
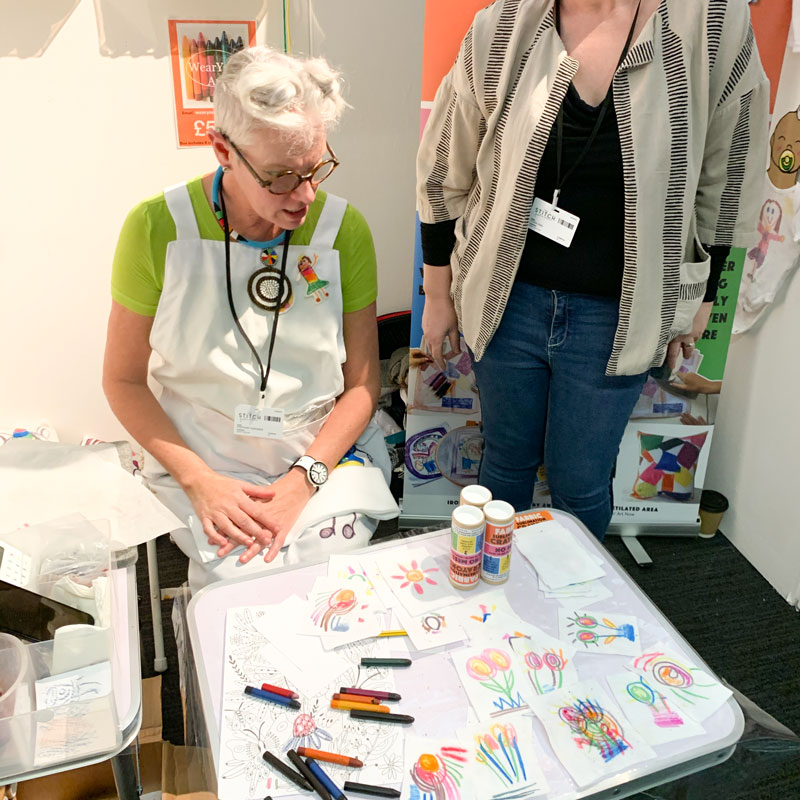
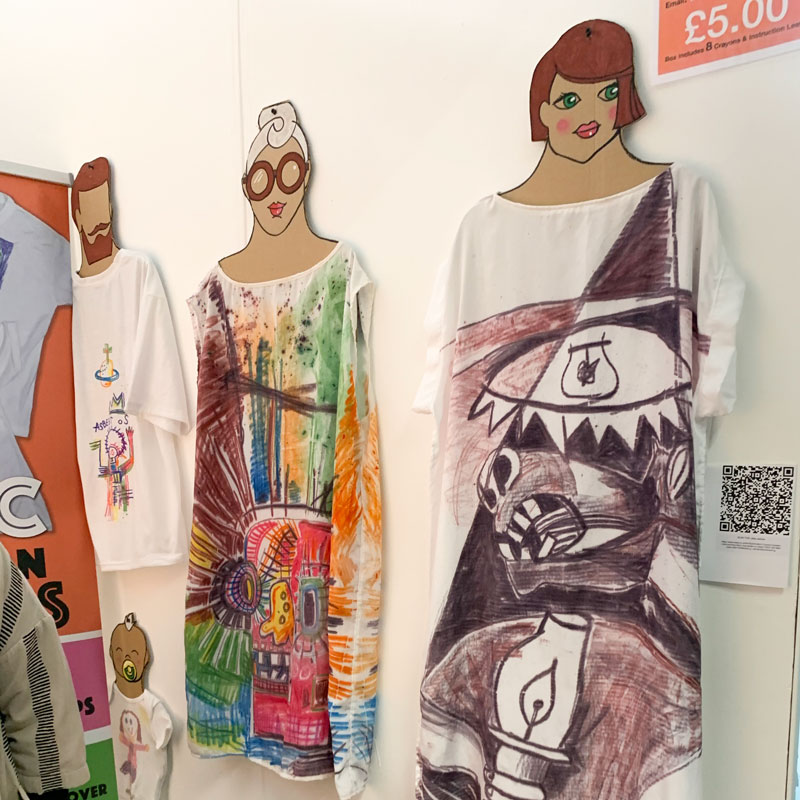
Next stop was a little stall run by Stef at Wear Your Art. She was demonstrating her brilliant dye sublimation crayons. I’ve never seen these before and I was blown away with how vividly they transferred to fabric.
Stef from Wear Your Art
There are two processes: the first is to draw a design on paper, place it face down on the fabric and the iron on the reverse to transfer. The second is to draw directly onto the fabric, place a protective piece of paper on top and then iron to fix design in place. The latter results in a richer colour especially if the fabric is man made. It works on natural fibres too but not quite as vividly.
Wear Your Art dresses
I can’t wait to use my crayons to create a truly original piece of art to wear! If you fancy some too and didn’t grab a pack at the Stitch Fest you can order a set from Ebay here.
Nearby I spied the entries for the Stitch Festival Dressmaking Competition and I was so impressed with the entries. I picked three faves . . .
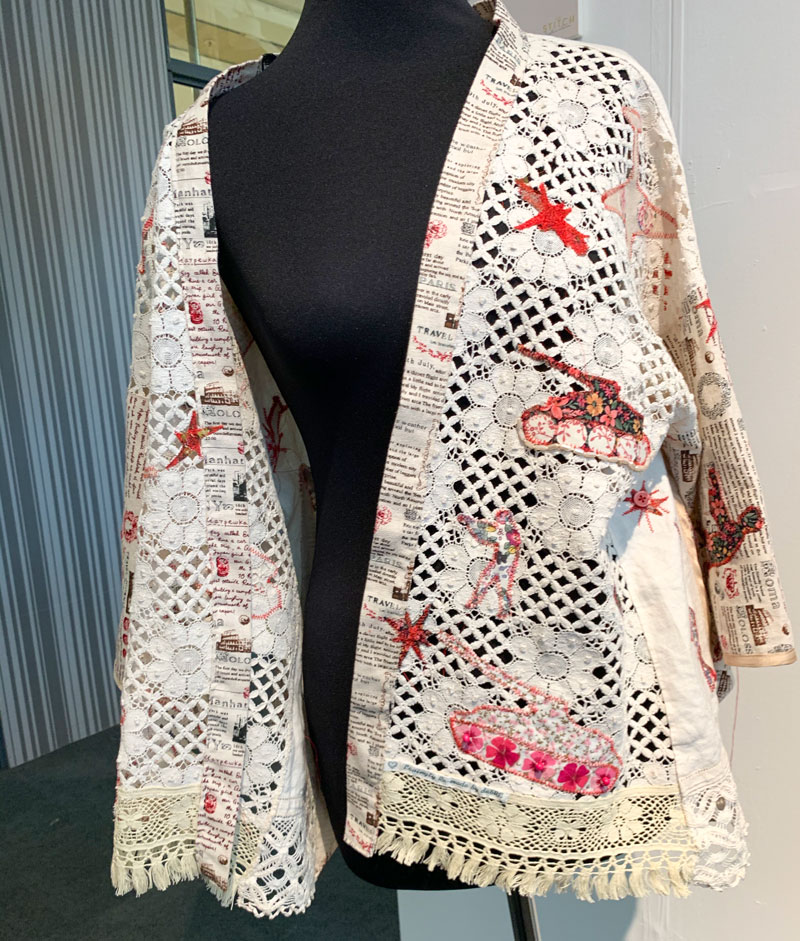
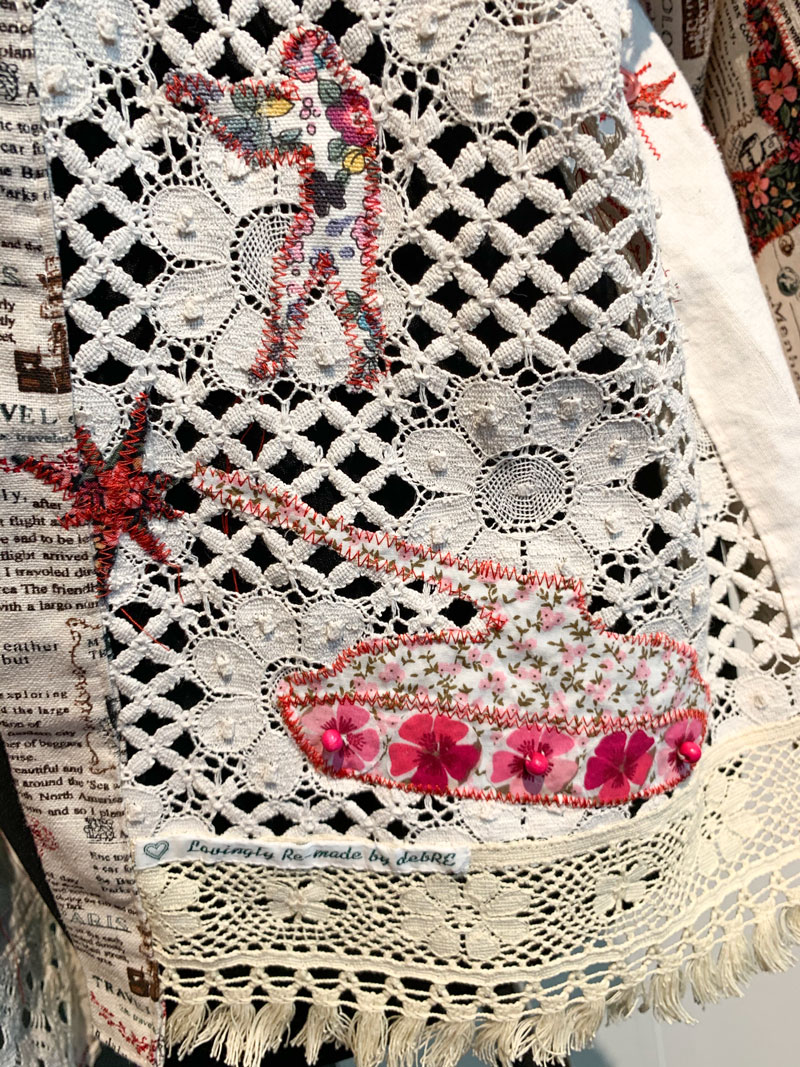
This is Weapons of Mass Reconstruction by Debra Wade:
Weapons of Mass Destruction by Debra Wade
She based the shape on the simple classic Kimono. The theme was inspired by Afghan war rugs, Russian tanks (named after flowers) and the patchwork reflected rebuilding over scars of terrorism.
It incorporated the contrast of delicate fabric and brutal imagery in a way that was both camouflaged and pretty.
Appliqué detail
No pattern was used and the materials were mostly reclaimed linen and cotton, tablecloths, clothing and curtains. I just loved the concept and the end result.
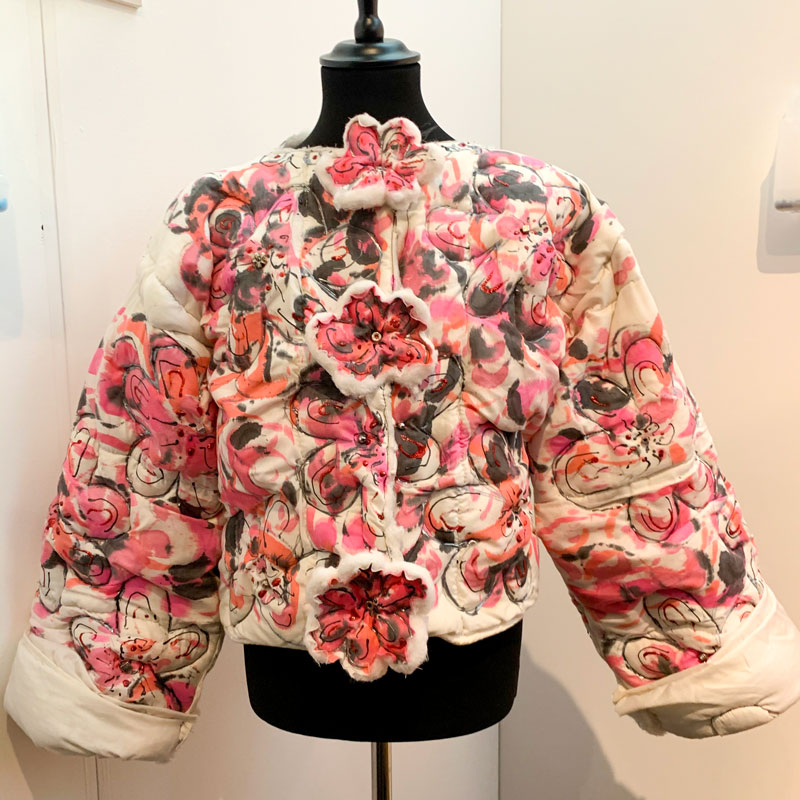
10.4tog jacket by Gillian Foster:
Duvet jacket by Gillian Foster
No pattern was used for Gillian Fosters 10.4 jacket either. She set about combining her love of watercolour painting, freeform stitching and a reclaimed duvet to create her masterpiece. I’m so fired up to be more free with my sewing already – oh the possibilities!
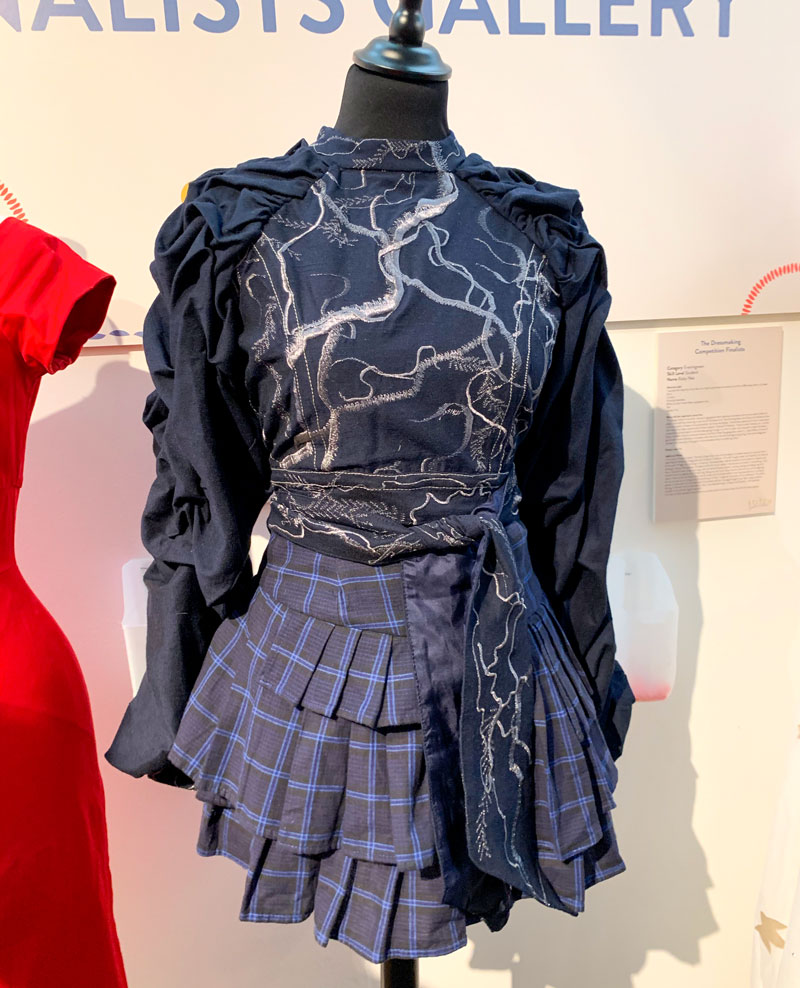
I also loved this outfit by Hannah Gait.
Eveningwear by Hannah Gait
It was part of her graduate collection inspired by the blues of a midnight garden: using wool and silk fabrics with an embroidered vine design of her own. I’m not sure it befitted the evening-wear category but I would certainly wear this outfit at any time of the day.
A little wander on from here led me to a small collection of garments by Swanky Modes I had a quick look and a read before I went in to hear Esme Young talk.
Swanky Modes collection
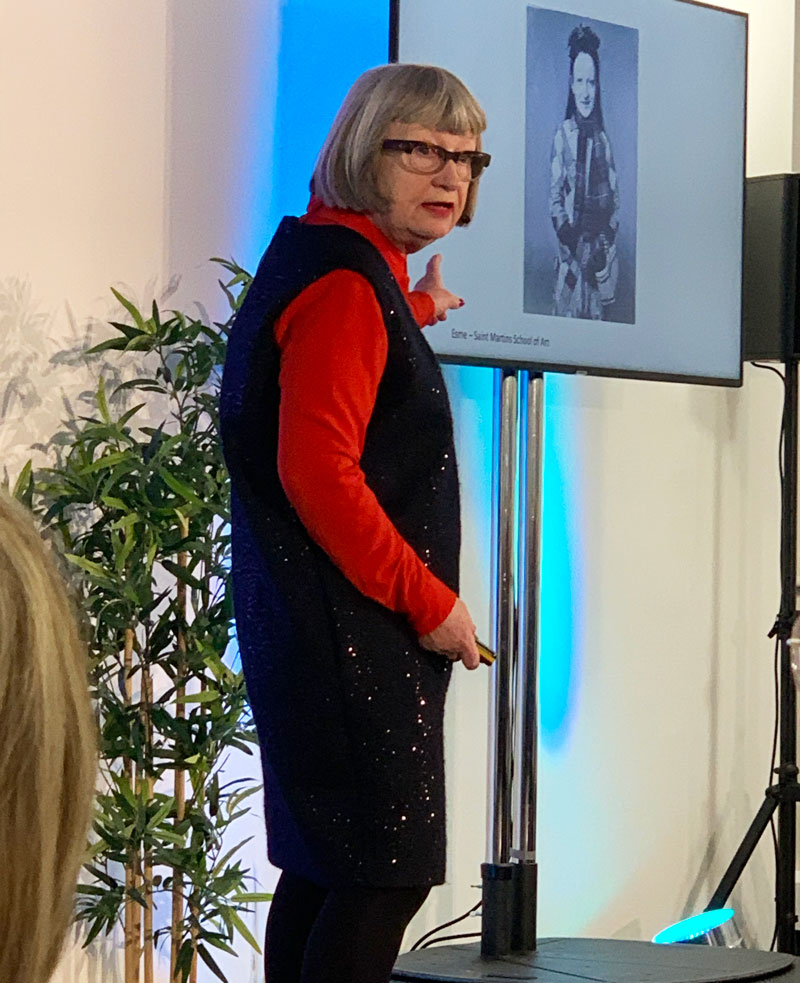
It was lovely to hear Esme talk about her life and work. I knew nothing about Swanky Modes, the 70s Camden boutique she set up with her St. Martins Graduate friends, Judy Dewsbury, Melanie Herberfield and Willie Walters. So fascinating and inspiring to hear how they set about, creating crazy one-off outfits from bedding and shower curtains and practically anything they could get their hands on.
Esme Young talked about her life and works
The small selection of costumes on display included
The Pyjamas from Bridget Jones
Dale Winton’s luxe suit from Trainspotting 2
The nurses outfit from Trainspotting 2
Dale Winton and Rachael Flemming in Trainspotting2
The Padlock dress worn by Grace Jones
The amorphous dress created by Esme’s fashion brand Swanky Modes
Daywear from the Swanky Modes label
Just as I was leaving the lecture theatre I spied Susan Young from SusanYoungSewing and ambassador for SewOver50 across the room. Always a treat to bump into your sewing friends but not least of all when they introduce you to two very lovely Sewing Bee contestants: Janet Pool and Juliet Uzor. I bloody love the sewing community!
I’m buzzing at this point. I can’t believe that a single ticket not only gave access to such a massive selection of quality stalls to buy from but also quality talks and demos a-plenty with a familiar face or ten to bump into along the way!
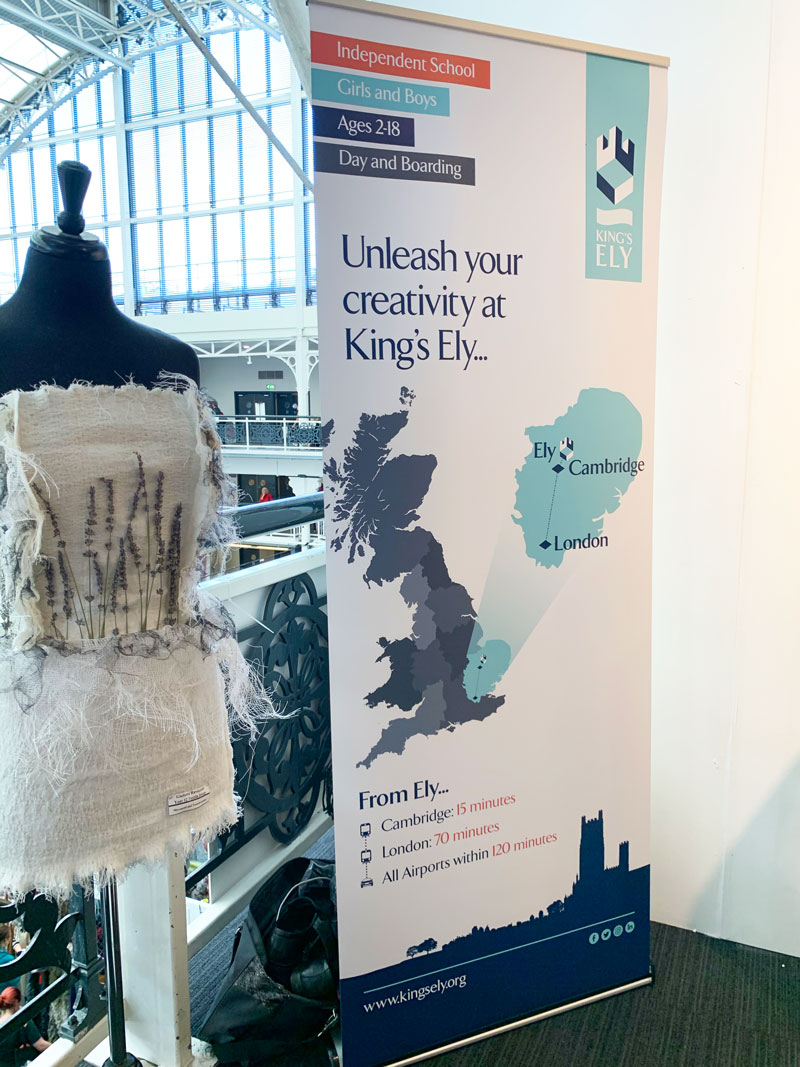
I wasn’t quite finished yet. I hovered around some more cool looking demos – embroidery and crochet – before I was drawn into the marvellous space hosted by King’s Ely Independent School, Cambridge.
Kings Ely Independent School, Cambridge
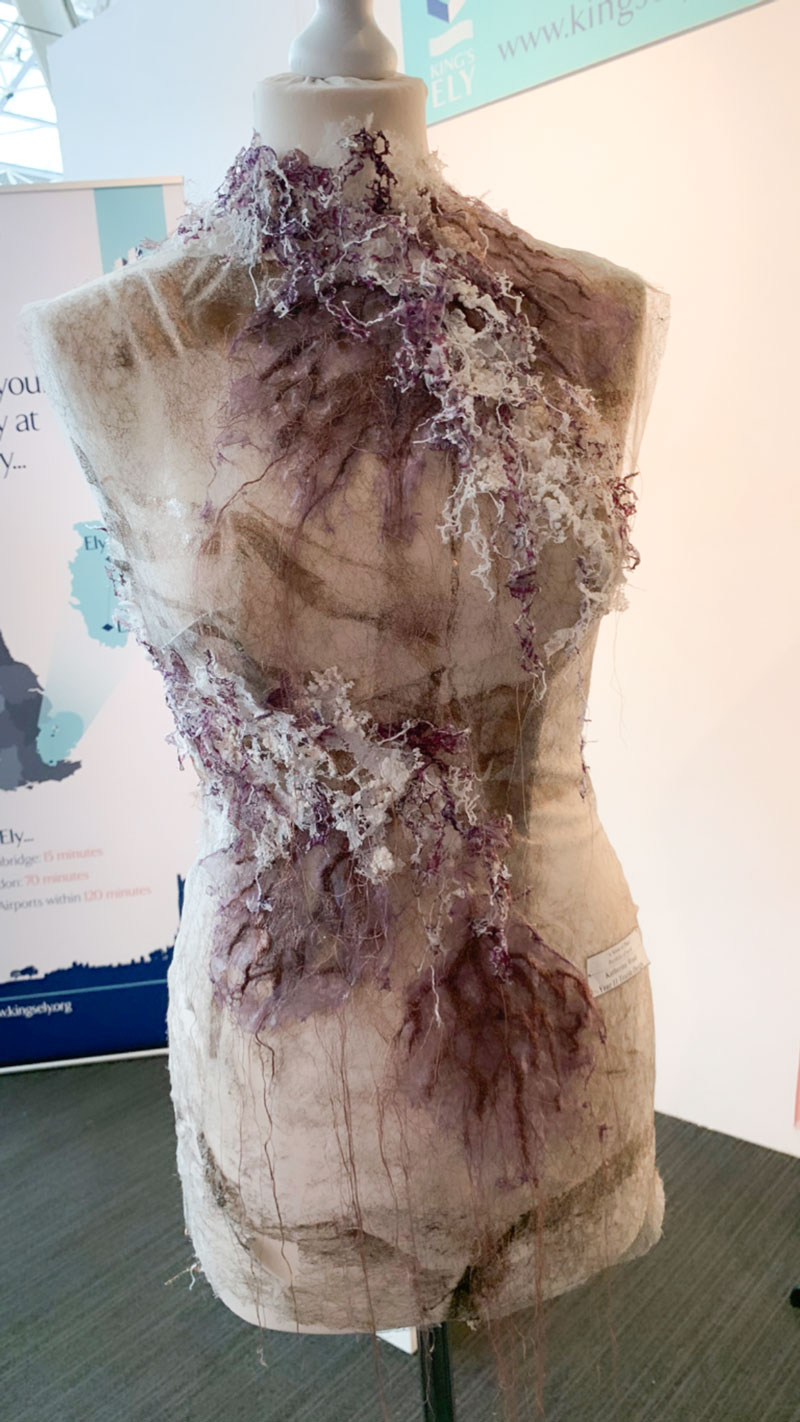
The display was an amazing array of A-level textile students’ work. I was literally blown away with the high level of concepts and craftsmanship. The first one that caught my eye was entitled A Sense of Place by Katherine Wood:
A Sense of Place by Katherine Wood
I loved the mossy textures and fantasy woodland vibe along with the dripping threads and natural earthy colour tones.
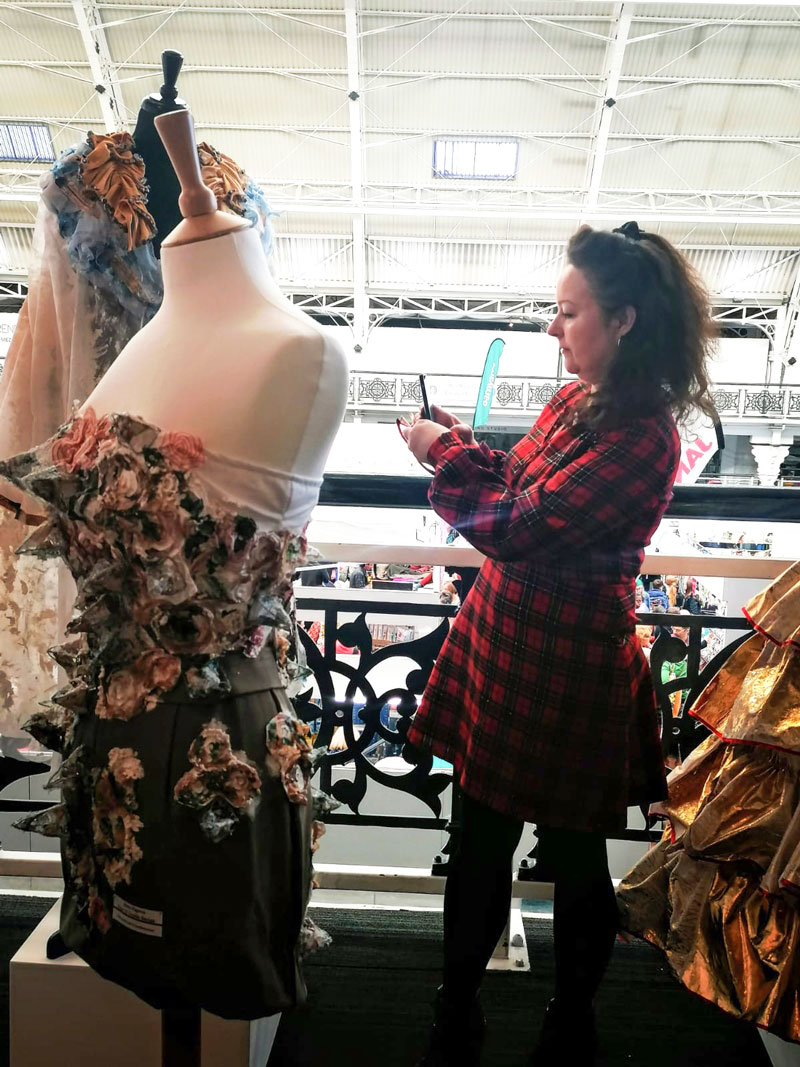
I spoke to one of the school’s retired tutors who was delighted to show me around the exhibits. She was so proud of the student’s work and rightly so.
Me, photographing the gorgeous garments by Kings Ely students
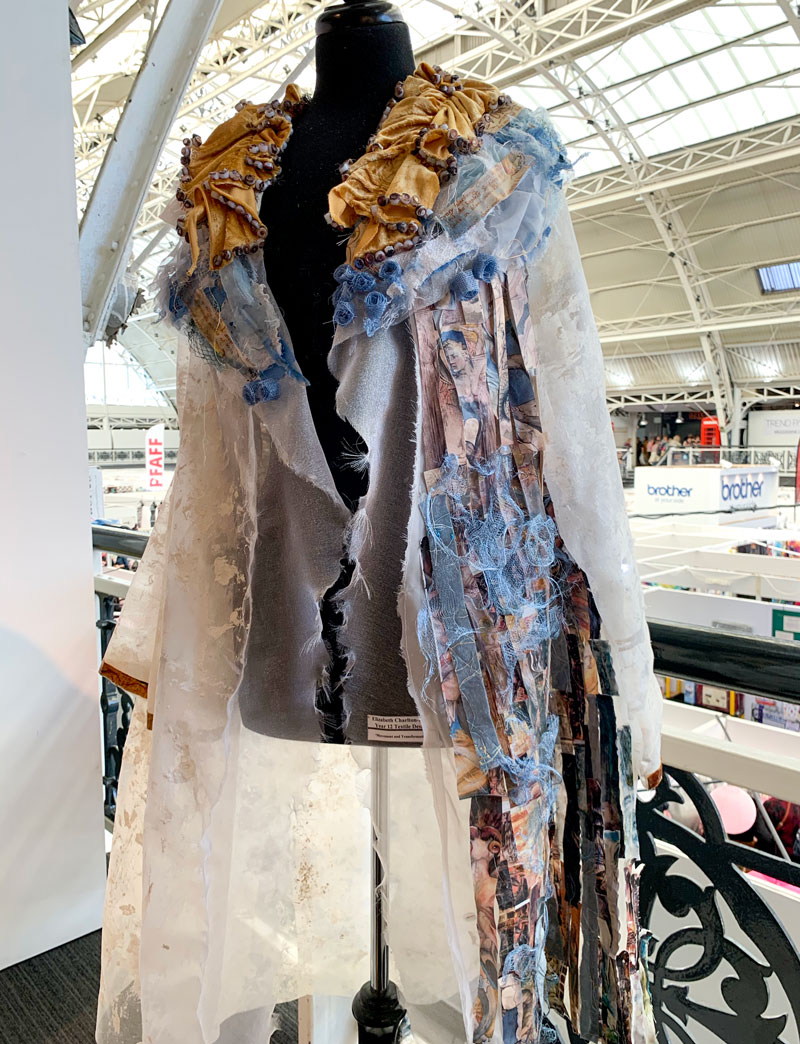
Elizabeth Charlton Movement and Transformation
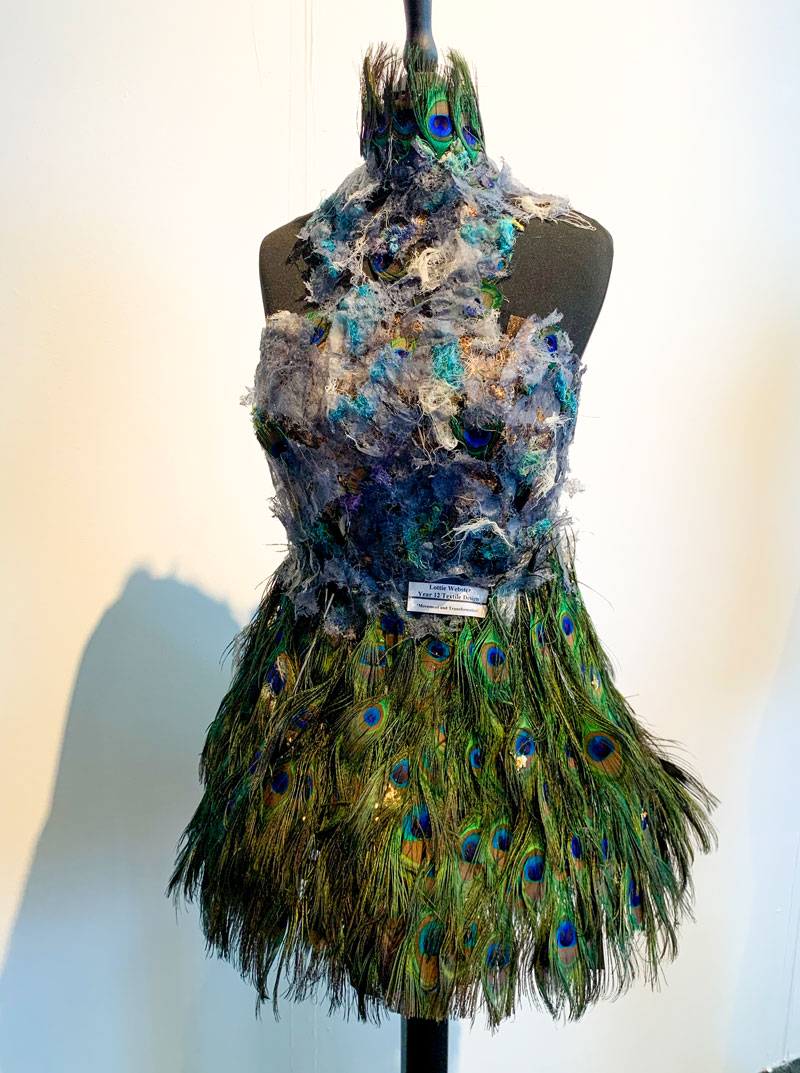
Lottie Webster Movement and Transformation
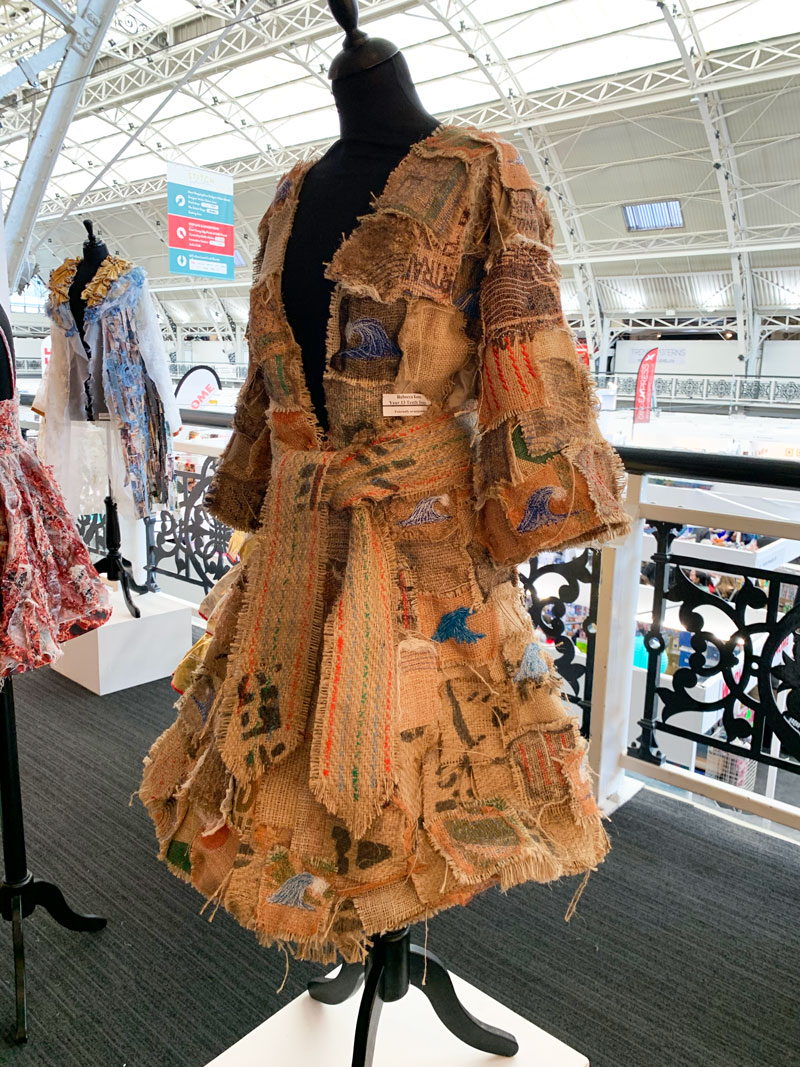
The passion for their subject was evident in the carefully chosen materials and colours and not least of all, workmanship. I couldn’t take my eyes off this coat of printed and embroidered hessian patchwork pieces. So original and so impressive.
Rebecca Keene coat
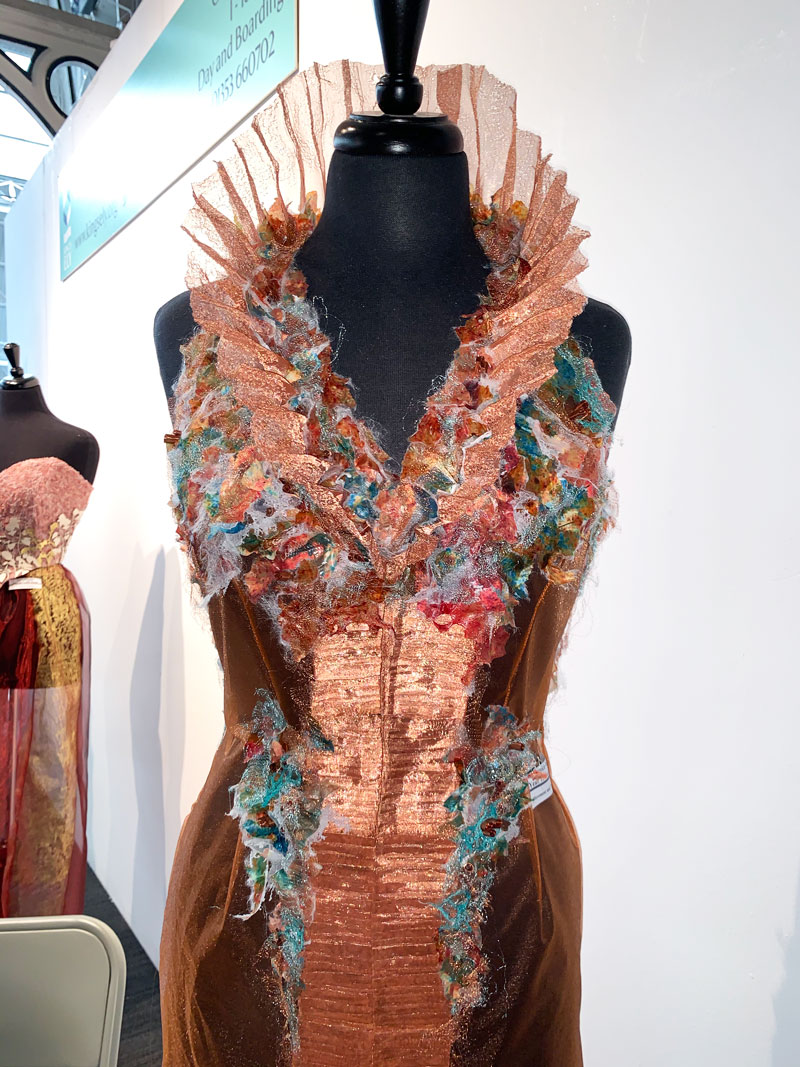
And then this stunning dress … with a ruff no less. I do love a ruff. Such fabulous colour and textures formed with well considered placement of organza and chiffon and the copper metalic threads reflected the light so brilliantly. I really want to make a dress with a ruff now.
Dress with Ruff by Beatrice Whymark
Thank you Kings Ely School, for such an awesome and motivating feast for the eyes. You are all very talented artists and designers and I will be waiting patiently for the day I see your names in lights and telling all that I saw your work first at The Stitch Festival 2020!
Believe it or not there was much more to see and do but sadly I have to end here. I’m as exhausted writing this as I was at the end of my day at the festival! I left with a couple of hours to spare, buzzing with new ideas, more motivated than ever and clutching my bag of stunning D&G fabric.
I managed a good few years of dressmaking without a dressform… tailors dummy… dressmakers mannequin… whatchamacallit! I didn’t consider myself at all worthy of such a professional tool. I don’t have room enough to swing a mouse in my house let alone space to accommodate an extra lodger, with a price tag.
But one day I took surprise delivery of a delightful pair of such assistants – one male and one female. Mr O had sought to surprise me with this very generous gift. Strings attached of course.
I’d always contested that it would be too tricky to make him shirts what with him being the illusive musician and the need for checking fit and all. So hats off to his persistence and problem solving skills!
I did make him a few shirts. Years ago, mind. And the tailors dummy was great for checking all the aspects of shirtmaking. It’s become a little redundant of late though.
But the female dressmaker stand was dressed and draped repeatedly and undoubtedly earned her keep. The main issues I had with the female one were the colour and all the plastic bits. When I stood back from the mannequin and looked at my displayed work I couldn’t help wishing she was more classy – more graceful and more like those neutral coloured dressmaker stands with the tiny wooden ‘heads’ that didn’t distract from the garment and had better pinnability to boot! I also had illusions of practicing draping techniques to create some crazy unique styles and I just wasn’t inspired to work on this blue, now-rickety dressform.
She didn’t age well. The adjustment cogs became stiff. I think they were quite tight to start with. The covering got a bit patchy and loose in places. it wasn’t particularly padded, was difficult to pin to and the hem gauge accessory at the bottom just broke off one day. I never managed to use that part of it to be honest. Ended up with a more wiggly line than I would have created without it!. Instead I would stand her on a table and measure the hemline up from the table with a metal ruler, turning as I went.
But that in itself was a bit of a disaster one day when I realised the body had become loose on the stand and was spiralling down as I turned it.
She almost got her marching orders that day but guilt set in when the more caring me realised how ungrateful and wasteful I was being. She did the job… but she wasn’t nice to work with. That’s all. But that’s such a thing!
Well they do say ‘be careful what you wish for’. (I wished so much to have a nicer dressform, I can’t tell you.) One fateful day earlier this year my ‘delightful’ son had a proper tantrum and vented spleen on blue lady dressform. Rather her than me to be honest, though to be fair, the ensuing bisection was way more of a shock to him than it was me. He had no idea I was upstairs and had witnessed the attack and that I spied on him as he tried to reassemble the twisted wreck, quite-rightly panic-stricken.
Oh the joy on two counts of asking ‘does anyone know how my dressform came to be broken?’. He fessed up, with shameful apology and offered to contribute to a new one. I couldn’t take his dosh. I was too happy that I now had an excuse for a replacement.
May I introduce Adjustoform FG202 | Lady Valet Small 8-Part Adjustable Dressmaker’s Dummy. Naked as the day she arrived. And almost perfect in every way…
I first caught sight of her at John Lewis Department store. And I know you shouldn’t judge on looks but that is definitely what drew me in for a closer inspection. The adjustment wheels turned easily – way easier than my previous model. The wooden stand is way more attractive and sturdier than the flailing metal legs of before and the ecru body covering is much easier on the eye and conducive to shooting garments of all colours. Best of all it has boobs!
Well, kind of… I do exaggerate! But there is definitely more boob than I had before which helps immensely when checking, shooting or simply displaying a garment. As expected there is no means to change a cup size so a good workaround is a bra stuffed with a pair of two of secret socks! Or I have seen more accurate ways of padding the body with batting to create a more closely replicated size.
Although I was sold already, I’ve learned to reccy online and resist an impulse buy. In any case it wasn’t available to buy in store at the Westfield branch so I found one – a whole £40 cheaper – on Amazon. I took full advantage of the free delivery with my Amazon Prime subscription and she arrived box fresh the following day.
Assembly was a doddle. I didn’t question that there was no instruction booklet, deeming it superfluous to requirement in any case: The body slots into the pole and is tightened with a screw and the feet slot into the base.
I later found said booklet under the flap of the box as I crushed it for recycling. But I’m glad I did as I would have never guessed to rotate the metal device at the base of the stand to hold the feet on. If you don’t do this the feet fall out of their slots when you pick up the dummy!
So was it worth the investment I hear you ask?
Yes is the short answer. I definitely needed one since more often I am dressmaking professionally. I can leave a circle skirt to hang for the bias to drop, I can achieve a level hem in the absence of a client. I can stand back and see how the garment looks and hangs and I can rotate the body to see how it works at all angles.
The only shred of doubt in my mind is that I know that my Adjustoform Lady Valet is only a slight upgrade, mostly for aethetic reasons and will never be a substitute for a real person’s proportions
This isn’t a one size fits all. And so even with padding will only ever be as near as dammit. Only when I progress to super successful fashion designer extraordinaire status (in my dreams) can I afford the space and the expense of an army of models in varying sizes.
There is better padding on this dressform compared to the blue one but only of marginal difference. You still hit underlying plastic unless you go in at an angle with those pins.
The gaps in the adjustment areas not conducive for draping. For the records I haven’t ventured down that road properly yet. I tend to work with existing or self-drafted flat patterns, but if I wanted to drape and pin a design I would be better off with one of those other kinds of dressform/tailors dummy/mannequin/dressmaker’s stand things with collapsable shoulders like they had on the Great British Sewing Bee.
Do you use one of the aforementioned? What are your views? And pray tell… what on earth do you call it?
The weekend before last I had the absolute pleasure of joining Kate and Rachel from the Foldline along with some other lovely sewing bloggers –Marie, Jane, Katie, Elena and Charlotte – to visit Contrado – a very exciting, UK-based printing company with so much to offer.
The Day began cozied up in a room with tea, sticky buns and more lovely fabric samples than one could possibly shake a stick at. Already sold! We’d each come armed with a design in mind and we were going to print our very own fabric. It was almost too exciting to bear.
Chris and the gang gave us an introduction from whence they came to where they are today and I was effortlessly sucked into his mesmerising world of print-on-demand on pretty much anything with a turnaround of just a couple of days, in most instances.
We uploaded our ’tiles’ and chose our fabric. I’m making that bit sound easy but when you’ve got a choice of over 75, so generously care of Contrado, it was such a tough decision. We watched the scheduling process as it happened on the big screen. Upload to print. Just like magic.
Next stop was to see them emerge from the printer. What? Already? I seriously wasn’t expecting to take mine home the same day.
A little trot past the photo studio and around the trampoline (I didn’t ask that question) and into the print room where all the magic was happening. I was amazed at the silence of the operation. Smooth-running synchronised inkjets dancing back and forth in a clean and cool room. And not smelly at all!
The transferred fabrics were coming out and as I turned the corner, there was mine, printing onto actual cotton satin fabric in front of my very own eyes. The natural fabrics get printed onto directly whereas the designs for synthetics are transferred.
While this was happening, we were shown some of the great garments available for customisation. A dressing gown, espadrilles, a baseball cap, some lucky pants, swimwear, kimonos, all printed and handmade right there on the premises, to order.
It really is incredible. But seeing how speedy the seamsters were upstairs it was completely plausible. We oooed and arrred at the machines a lot. I can still hear the Randomly Happy squeals of delight. And just check out this bad boy!
And it’s not just about garments. Though clearly that’s what we were all most interested in. It’s about product too: Hairbrushes, X-Box controllers, clocks, deckchairs, foam cubes, roller-blinds, shower curtains, phone cases, trays, biscuit tins… it would have been easier to ask what they don’t print on!
The next room was where the fabrics were heat-sealed (for durability) and packed. Though most of us chose not to have ours packed and instead, just folded for immediate cradling. You can just imagine the squeals in that room!
And so here are the fruits of my humble tile! Plans for a 50s wiggle dress of sorts have promptly entered the queue!
We all had such a brilliant and inspiring day. I left not only with an armful of amazing fabric but a head full of design plans for more. I love that this is a UK-based and family-run company. And I’m completely smitten with the strength of passion that passes through the team. It matters that communication is good when you are working at creating something so unique and precious. And so to meet such an approachable team in person was not only reassuring but it was truly an absolutely honour.
With much thanks to Rachel and Kate and the Contrado team.
Today I would like to share a review of a great book that is already my best friend and bible for #Blazerof2016. The lovely people of Bloomsbury Publishing have not only sponsored me this fabulous book but have also sent an extra copy for one other lucky reader!
The title of the book is Classic Tailoring Techniques for Menswear: A Construction Guide. And this is the 2nd edition written by Roberto Cabrera and Denis Antoine since it first published in 1983.
My bookshelves are home to all sorts of sewing literature but when it came to ventures in proper tailoring techniques, none of them books scratched that itch, if you know what I mean.
I am a woman on a mission with a man’s jacket to make before June is out. Jamie has already completed his stunning plaid blazer and panic was beginning to set in fast. But now I have my trusty guide I feel the journey will be easier.
If ever I was doubting the ‘why’ of tailoring, the short and concise intro reassures the reader of the unsurpassable techniques over faster more modern ways to achieve that impeccable finish. It gives a brief but insightful history that inspires a preparation for a very slow but satisfying journey ahead!
The contents include the following chapters: Tailoring; The Pattern; The Fit; The Fabric; Layout and Cutting; The Jacket; The Pants; The Vest; and Alterations.
There then follows an extended table of contents which allows the reader to go straight to the finer points within each chapter. The Jacket is clearly my primary concern and so when I come to pockets, I now have all the necessary information to create a welt, cash, patch, double-piped or double-piped pocket with flap should I choose to add one… or all of them!
As a book designer myself I’m very particular about presentation and I am a stickler for levels of information. So I’m very happy to report that I found the inside layout to be very clean and concise. The font is classic and unfussy, a good size with comfortable space and set in good readable chunks.
I must admit, at first I was disappointed by the black and white photography. It does appear take away some visual interest but on further inspection, all becomes very apparent. The hand-stitches which are crucial to the tailoring process along with other key marked areas are highlighted in red against the greyscale photography and therefore are easily recognised without distraction. It’s a more sophisticated approach than the sole use of line-drawn illustrations and diagrams which can sometimes be too graphic and disassociated with the real thing. Colour photography would have looked lovely – especially to see some of those coloured tweedy fibres – but style over substance would have been useless in this instance. I’m after good, clear and immediate instruction and this is what this book delivers.
The reality of the photography delivers on other levels too: you can identify the lay of the fabric, how it ripples, how it rolls, how it behaves. You’d never get that across with any amount of linework!
That said. This book also displays some fine line drawings which hone in on the tiniest details.
All the tailoring and understructure supplies you will need are clearly listed and defined along with necessary techniques and hand-stitches. And there is a very well explained section on how to take measurements. The repeated photo of the man in white pants is a little distracting but as I mentioned before, far more preferable to a line drawing. It’s easier to see exactly where on the body those measurements should be taken. Nothing left to the imagination here!
And fitting is obviously a major part of the process. This section does good to address posture and body imbalance and how to identify the issues. I’m focussing on the jacket here and where wide shoulders and a stooped posture adjustment might come in dead handy, but should I venture into tailoring trousers in the future I’ll be ready for any amount of bow-legs, knock-knees and flat bottoms!
There is brief but great insight into the world of wool fabrics that are used in tailoring. The weights, the textures and the usages; naps, shrinkage and how to straighten a grain. This section may have benefitted from some colour just to see those checks and stripes pop, but again. It’s just the information I need. I can go see and stroke any amount of fabrics up the Goldhawk Road for that kind of fix!
Laying and Cutting Out covers exactly how the professionals do it. Great to see the hands at work and of course a vital section on matching plaids/checks and stripes.
When I got to the Jacket section I was a bit overwhelmed. So much stuff to learn. But that is the whole point. I want to learn. And I want to have reference to it all. I want to get good at this and there is no fast track way. Just slowly and properly and remembering to enjoy each little step-by-step instruction. I’m really looking forward to making some shoulder pads. There’s a great how-to with a pattern at the back of the book. Incidentally there are also traceable patterns included for a French fly and a French tab and some other elements that I’m not going to pretend I know what they are yet!
The Trousers and Waistcoat sections are just as detailed. Covering the classic tailored processes for each stage. No stone unturned, it would seem.
The final section covers Alterations, which will prove invaluable if I ever I fancied some more unselfish sewing further down the line. And already I am inspired to pick up on the advice for relining a jacket. Something I have been putting off for so long (see this Boer War jacket). It is so simply and brilliantly explained that it makes me feel daft for every doubting my capabilities! And if you ever need to alter a pair of trousers for the man who has muscular inner thighs, look no further.
In fact, it’s all there: what you need, and what exactly you need to do to achieve each stage of a perfectly classic tailored jacket, waistcoat or pair of trousers. Brilliantly presented and clearly explained… in black and white (and red)!
Or if you fancy winning yourself a FREE copy, simply leave a comment below and let me know how you are getting on with #Blazerof2016 or indeed any other tailored garment you have plans for. Entries will be drawn on 30th April and the winner announced on 1st May 2016. It really is a fabulous prize – good luck!
Both the review and the giveaway copyies of Classic Taloring Techniques for Menswear were kindly given to me free of charge by Bloomsbury Publishing. All opinions expressed are my own.
Grab yourself a cuppa, some delicious snacks and pull up a chair. This may take some time. The little gasp of joy I inhaled when I picked up the latest issue of Burdastyle is about to manifest itself as an exhalation of excitable word spray!
That said, the cover is probably the least inspiring of images. I don’t know, something to do with a grubby looking pink jumper teamed with a skirt that doesn’t make much sense but don’t diss that skirt till you see it later on…
The first section is titled ‘Call of the Wild’. It’s mostly about animal print but get behind that if it scares you, to see some of the sophisticated lines that are very camouflaged by it.
For instance this sheath dress (A). The print totally hides it’s streamlined seamlines but what a shape. Further on you’ll see some colour blocking to illustrate them. I love the neckline. Not too dissimilar to the BHL Flora dress which we all know and love. Skirt (B) is a classic pencil with gold buttons along the front two dart lines as far as I can make out. They are kind of hidden in that print too but it’s a nice detail all the same.
The choice of contrasting blue pleated panel with the print on dress (C) is a little mind boggling to say the least. I don’t hate it, I don’t think. Just not really sure about it. It’s an add-on rather than an inset. I much prefer the version that comes later.
Animal print parka (D) I can deal with though. This one’s made from polyester poplin so it’s very lightweight and it’s got lots of pockets too!
I’m loving the contrast of ribbing against animal print chiffon in this shirt (E). I’m loving that it’s described as easy to put together too!
So here is that skirt from the cover (F), teamed with a top that also has ‘an enhanced added panel’. It makes much more sense altogether, if you like that sort of thing. Definitely better balanced. But perhaps still a little odd!
Not so keen on this flared jacket (G) though. I think I’d prefer a more cropped look like the Vogue jacket I made (and have since lost… I’m so gutted!!). It kind of looks a bit maternity at this length.
Next section is Western. Fringe, kilim, wool and leather. Not generally my style but there are still some lovely things going on here.
I can just picture the envy of all my camping buddies if I were to turn up in that blanket coat (H) Its made of Jacquard and leather. A most special kind of parka!
The dress (I) is all a bit too much for me. The kilim design and the long bodice. I’m sure if the accented rib knit sat on the actual waistline it might appeal more. In a different fabric though.
This funny little garment (J) is classed as a waistcoat. It’s not for me, I’m afraid. But the urban western leather suit (K) totally is! I’ve only ever done an alteration on a leather skirt, never sewn one from scratch so all the topstitching on those panels scares me but excites me in the same breath! There’s a sewing class included for the jacket too.
And could this tailored blazer (L) be any more stylish if it tried? I properly love this jacket!! And I don’t even mind the ruffles that poke out on the little top (M) Though I foresee a nightmare and an expensive tantrum if 100% silk chiffon were indeed to be used! The ruffles on top (N) only decorate the front. but looking at the back view, I quite like the way that only the sleeves are ruffled.
Loving the dropped hem on this midi skirt (O) and especially how the centre front seam is embraced with diagonal stripes. A cotton/wool mix – I bet this skirt feels amazing.
The Timeless Beauty section brings forth polished cuts, sophisticated fabrics and delicate colours…
Here’s that funny little waistcoat again (P). A little more classically acceptable in leather, wouldn’t you agree? But I don’t like ruffles enough to deal with a full length dress worth of them! This dress (Q) just says ‘pain in the backside from beginning to end’ or ‘patience of a saint’ however you look at it!
Here’s another version of that top and skirt (R). A touch more casual but still very elegant. The sweater/slacks combo (S) is not really my thing though.
And just look how much more elegant that kilim dress gets to be in grey poly crepe (T)!
Shirt with accent and skirt with buttons (U) are a good office combo and I even like the variation on that blazer in velvet with details (V). Or do I?! Maybe it is a bit odd. But the classic sheath dress (W) is not only good as a classic staple, it’s designed for tall sizes too. This issue is definitely teaching me that there is sophistication to be found in plain colour dresses. Step away from the print!
There’s some cute little Cowgirl tunics and dresses in this issue. Some lovely details going on and I adore the fox purse. Surely that’s not for children alone?!
The next section is called The Art of Colour. Lots of colour blocking with high tech fabrics.
For instance you can now see some of those seamlines in that first sheath dress that were previously hidden by animal print, in this colour blocked version (1). It’s made from a high-tech reversable jersey, though you’d have to have darned neat seamwork to reverse this I would have thought! I find the blocking of this top (3) is quite jarring and unnecessary. It’s like one of those optical illusion vase pictures where you’re not sure whether to look at the black or the white bits. But, strange as it still is, because of the different colours employed, I’m quite diggin’ the weird pleated panel on this dress (4) now.
Whilst dress with no pleats is refreshingly, classically simple (5).
The giant pleat of fabric in the teal top (7) quite appeals now. Just with that contrasting neckline. Turns a very ordinary T shirt into something far more interesting.
There’s a lovely choice in the Plus Fashion section this month.
Who doesn’t love a shirt-waist dress (9) ? I’m currently working on a second version of the 60s shirt dress I made but I’ve already got sleeve and pocket envy, looking at this one.
The pretty cape collar dress (10) is so pretty but this fabulous bohemian knitted coat (11) is a total winner. Just imagine how cosy that would be in Astrakhan (71% new wool, 19% mohair).
I love the lace cuffs on that blouse too (13). Guipure lace in case you can’t see. Totally poshes up a peasant blouse! That neckline is repeated on the tunic dress (15) and the short sleeved version (16) too which incidentally works beautifully with leather strides. I think I want some.
And that just about wraps it up as far as this months gorgeous garments are concerned.
Did you get your issue yet? Any thoughts? Any faves?
The skies may be grey and the sun may not be out but the June 2015 issue of Burda Style magazine most certainly is. And that’s enough to brighten my day!
There’s all sorts of summer fun going on this month. Opening with a cool, light and breezy dress (A). I’m not so sure I can pull off as much elegance as the model wearing it, but with a careful fabric choice, perhaps. I’m intrigued by the wide collar top (E). Moreso that it’s linen. I love linen.
Dress (G) looks like a comfy number. I don’t do comfy as a rule but if I can get over that fabric choice I think a plain colour jersey would make more of that gathered front detail.
The floral dress (B) is for teens and definitely not for my pear-shaped bod but I’d quite like a lace dress like (B). Burda suggests adhesive bra pads to avoid a bra strap. No big pants allowed here either!
Once again I’m having to get past the crazy print on top (C) to envisage a slightly translucent white or black lightweight cotton fabric. The skirt looks fun and easy though.
Great to see some teen designs in this issue. Almost always the kid stuff is for the little ‘uns. Just how cool is that Sergeant Pepper jacket (H)? I so wish my daughter would let me make that for her. She’s more likely to go for the parka though.
I’m so tempted by the jumpsuit (D), even though I haven’t worn a pair of trousers in years. Sold by the midriff. I do like a midriff! I might have to do something about the halter pieces though. Looks like a lot of fabric going on there.
I do like the seamlines on dress (F). Bit difficult to see here but they are panelled seams in corset-style. But I like dress (J), more. The front rouching and the neckline has a certain Asian chic about it. It’s made of jersey, would you belive it? So no zipper going on here!
The Happy Hour section takes us on a night out with lots of black and gold going on.
I love the contradiction of a lace bomber jacket (K)! The interesting front seams are highlighted with satin binding and it has pockets, of course.
Top (Q) looks very elegant tucked in here but the contrast definition with the skirt doesn’t work for me. Especially with all that front drapey pocket business. Too much volly where I really don’t need it!
Ah see… I much prefer this dress (L) in one colour. Though I don’t think the shot does it as much justice. Looks a bit lop-sided here with one shoulder shorter than the other. It is an ‘easy’ make so it might be worth a try.
Cute little tube dress (P) here for all you daring ladies. And this certainly would be an easy one to put together for an emergency going out dress… just two side seams needed in that metallic jersey print.
I love how Burda fills the void in my lack of fabric knowledge. This dress (O) is made of metallic twill! Never have I come across such stuff.
And I love the corsetted detail on dress (N). One would totally have to pay attention to perfect fit and stitching on this one though. That satin highlights every glitch.
Lace is a great choice for this elegant top (R) A shortened version of dress (L). The armholes and neckline are beautifully bound with organza. Not sure why the hem would stay raw though.
And I maintain my love for the jumpsuit (M). Especially if I could get my hands on some gold metallic, viscose linen weave! Super stylish!
Next up is the Sunshine section, kicked off with this pretty shirt dress (S). A Peter Pan collar is enough of a change to give it a cute edge but I think I’d ditch the lower flounce. Not sure why that section appears to be cut on the bias too. Bit jarring with those stripes.
Love the paper bag shorts (T)! Not sure if I could carry them off with a detailed top section though. It would have to be a plain T or similar.
Really like the yellow ensemble (Y). Especially now I can see more detail on that skirt. The buttons could contrast and be a lovely feature. The collar feature adds a little vintage-style twist. Gorgeously cool for picnic days in the park.
Love the shirt dress (W) cropped to a shirt too.
However I’m not too impressed with the colour section. Mostly because I don’t like the chosen colour palette. All too much for little old me, I’m afraid. And I’m finding it hard to see past the colours to focus on the designs. Short of my latest make, I tend to have black or red as a base colour and work up from that. My pick would be the Kaleidoscope tube dress (6). In black, probably. Call me unadventurous!
Plus Fashion goes all out adventurous on us though . . . on safari…with some mad sleeves!
You can’t really see the detail in dress (9). The volume of fabric is concealed by the detail of the print but you can hopefully pick out the rouched seams all the way down to the wrist in dress (12). My favourite piece in this section of the mag is the ankle length lace coat. Or ‘chasuble’ as Burda calls it. Learn something new every day!
So whaddyafink? Have you got yours yet? Have you already whipped something up? Do tell x
Can you feel that spring sunshine, desperately trying to squeeze though your bedroom window in the morning? Well if that isn’t happening, the March 2015 issue of Burda Style magazine will do it’s best to brighten your days.
There’s some lively goings-on this month, with all sorts of asymmetric, geometrical, hankerchief-hemmed and draped goodness!
Beach Pearls sets some scenes for a summer wardrobe: I just love that maxi dress (A). It’s not dissimilar to the viscose jersey one I made here, but the bust detail is right on the money! A lot more support I would think and what a flattering silhouette!.
It also translates into a lovely strappy top (B).
Now I like where the asymmetrical skirt (C) is coming from but not quite where it landed up! Way too much like a sack tied round the middle for me. Further on it is redeemed with some better styling, I can assure you.
Nice Jumpsuit (C), btw. If jumpsuits are your thing. You might want to add some ‘fashion tape’ to the list of required notions, though. Click here: Hollywood Fashion Tape if you’re interested in buying any from Amazon!
Flared trouser suits (E)? mmm…and bat wing empire-lines (F)? double mmm… Lets move on to the shirtwaist dress with ‘maxitail in the right seam’ (G). I do like that. And I love the biker-meets-Mao jacket too (H)!
Uh oh. There’s that batwing-empire-line again (I). Swiftly moving on to the Flowers and Stripes section!
I’ve never made or owned a pair of culottes (A). But I bet they’re a far safer than a full skirt on a windy day. And looks lovely in a largish print. If you like that sort of thing.
And there’s that shirt-waist dress (B) again with ‘cut-on-dipped hem’ like last time! It would be better to use a fabric that has a reverse as good as the good side, I would have thought.
Look how that lovely maxi translates to a cute beach dress too (C).
This month features a chic wrap dress (D). There is some assurance of a button at the side and concealed snap fasteners to keep the wrap in place. Potential for a Bucks Fizz moment there!
The peasant top addict in me (see two of them here and here) is quite drawn to this ‘relaxed tunic’ (E)! Would need a fine drapey jersey to pull off with any sophistication I would have thought.
And there’s some more geometric delight in the shape of a simple v-neck dress with symmetrical ‘cut-on tails’ (F)!
Any weddings occurring this year? Loving both these bridal party dresses (A) in The Big Day section.
The bride’s dress (B) is the same as (A) with a flowy underskirt of crêpe chiffon. That’s if you haven’t been put off by the chiffon adventures in The Great British Sewing Bee recent episode.
Can’t help thinking this dress (C) is a bit cake-like with all the tiers an’ all.
And although I usually embrace a bit of invention, I still wouldn’t want to look like I’d been dragged behind the wedding car, en-route in this dress (D)!
This fairytale dress (E) is far simpler and much more sophisticated though. Just get rid of the batwing-empire-maid who’s ruining the photo!
Oh this is much better (F). Lovely wide-dipped hem again. Bust darts for shape. Cotton lace overlay, crepe satin underlay. I’d wear it with cowboy boots. Or even DM’s. Or is that just the hippy in me?!
Now there’s that asymmetric skirt again (centre, G), styled much more favourably with a gorgeous jacket: standing collar and 50s style winged lapels. See, it does have potential to work. Nice suit on the right too!
I’ve picked out the following three from the Reader Favourites section:
Jumpsuit (A) made short for all you lovely long-legged people!
Lovely floor-length dress (B) in striped jersey with side slits and a ‘hankerchief hem’. I can definitely feel some more maxi’s coming on this year.
And a cute little dress (C) based on the short lace wedding party dress design. Not my cuppa tea fabric-wise, but I’m always sold on a midriff piece!
Not overly inspired by the plus section this month I’m afraid, though the trench coat is rather amazing, I must say.
But, there is cuteness for small people at the back.
The best design and the garment most fitting to the Colour Splash section by far, is the paint-spattered dress (A) with tying bands that resemble the sleeves of another garment. Hands up who wants an adult version? Genius!