Vogue Cocktail Hour dress V9241

V9241 cocktail dress

cocktail hour eve appeal

The first time I’d heard of the Eve Appeal was when I took part in last year’s Vintage Sewalong campaign. They are the ONLY UK  national charity that raises awareness and funding research into the five gynaecological cancers so it wasn’t too much of an ask for me to join in the Cocktail Hour once again, and help McCalls promote a range of Vogue patterns that raise good money for such a great cause.

Last year I made Retro Butterick 5813 for the Big Vintage Sewalong 2016. This year I chose Vogue 9241, a fabulous design by Kathryn Brenne.

V9241_PATTERN_COVER

A little bit Helena Bonham Carter, A little bit Anne Robinson, perhaps… but totally full of character and no doubt a talking point at a cocktail party. Sadly the only cocktail party I’ve ever been invited to was the one at The Knitting and Stitching Show at Ally Pally and I was typically too busy with work to attend. Though I prefer to think that I have been to loads and they were so good, I’ve clean forgotten all about them!

But if I do ever get another invite (nudge, nudge) I would be proud to wear this dress. It would rock a room of standard LBDs and not leave without comment.

I chose this design because of that awesome collar, of course, and because it reminded me of my birthday dress – the skirt section at least – and I considered using silk dupion, the same. But not only do I not like doing things twice, I find the suction of creativity too much to bear if I copy what’s on the packet. ie a red silk dress. I felt like black would have hidden too  much of the detail so I went a bit off piste and used a pinstripe suiting fabric instead, lol!

V9241_cocktail_dress_4

I wanted those pinstripes to emphasise the godets and that collar. Actual stripes would have been a bit too cray-cray (mmmm…. maybe next time though?!) I really wasn’t 100% sure it would turn out as special in what is effectively a boring cheap suiting fabric!

But it did. And I am so happy. Which is lucky really because I hadn’t left any time to change it up!
This dress really isn’t as complicated as it looks. I wouldn’t go as far as to say it’s a doddle but really just more time-consuming than anything. It needs a fair bit of yardage too so watch out if you’ve got any big ideas on fancy pants fabric. It could end up costing an arm and both legs!
V9241_cocktail_dress_5
One thing which I must point out is that there is an error on the layout and pattern pieces. The instructions say to cut 2 of front which threw me a bit because there was no reference to use it anywhere. The layout plan indicated the same. I wondered if it could be a facing/lining of sorts but a quick Tweet message to McCalls confirmed it was an error and that they had contacted the US office to amend.
This pattern has a massive amount of ease. It’s so helpful to have body measurements and corresponding size table on the packet but better still to clock the ease on the pattern pieces themselves. Not all pattern companies do this so kudos to Vogue. With that info at hand, I realised I could afford to drop a whole dress size. I’d suspected I might have to do this because the pattern image itself looks a little bit roomy. I like things more snug, like a hug!
V9241_cocktail_dress_6
The collar is sewn front to facing, then the wire is sewn to the seam allowance of the outer curved edge before turning out. The wire is sewn in using a wide-ish zigzag stitch making sure to keep the needle either side of the wire. Requires a fair bit of concentration. Frightened the bloody life out of me when I took my eye off the ball and the needle clonked on the wire!
V9241_wired_collar
This is the second time in a month that I’ve had the need for animation wire, the first being for the wings of Amelia Fangs outfit. I ordered some more off Amazon. Affiliate link here:

I ordered all three weights as I really wasn’t sure what constituted ‘medium weight’. Initially I tried the lightest one but it was a bit flimsy so I opted for the 2mm diameter.
I’ve been having a lot of fun positioning the collar in all sorts of ways. But there would be more fun I’m sure if my fabric was sturdier or interfaced to give it a bit more structure. I could go totally could go totally Maleficent! This pinstripe stuff is very soft with quite a bit of drape which still works well, mind.
V9241_cocktail_dress collar
The skirt is all about the godets. How do you even say that? Godettes or godays? A little care is needed to insert the points accurately into the open seams of the bodice but if you’ve ever made quilt blocks with inset seams you will be walking it!
I noted the length was kinda granny for me. So I lobbed 4 inches off before I cut it out. And it reaches just shy of knee length now. But by nature of how the godets are tied up inside, I can just as easily lower the hem a couple of inches or so if I must be more demure!
I pretty much followed the instructions to the T but I could have done with taking some of the excess out of the back bodice length – that’s always an issue for me. But skirt seciton moves around and drapes so unusually, I don’t think it’s a biggie! And I hand stitched the bias facings of the armholes, rather than topstitch as instructed. Call me old fashioned!
V9241_cocktail_dress_3
So I am the last entry on the Vogue Patterns Bloggers Calendar 2017. I initially thought that was the best position to be in but the mash-up of anxiety and inspiration was building with each gorgeous post that popped up, every month.  In case you didn’t catch them all, click here to the amazing contributions from all the fabulous sewing bloggers. I just love how everyone has put an individual spin on their own cocktail dresses.
I do hope that some or one of these at least will inspire you to buy a pattern from the Cocktail Hour selection and rustle one up for yourself. Or maybe even buy one for a gift for a sewing friend. All helps towards the amazing work done by the Eve Appeal.
Thanks to The Foldline for including me in the line up, to Dan for the fabulous photos and also to Aska and Tom at the Thatched House in Hammersmith for allowing us to shoot them in their lovely pub.
 

A 60s worky shirt-dress

simplicity 6772 shirtdress frontGood afternoon lovely readers. I trust you are having a lovely weekend. I love the peace and quiet of a Sunday afternoon. It’s especially quiet today since Mr O and both children are all out. Best blogging time I thought, but eeek, no photographer! So please excuse the awkward poses to the remote snaps! It’s hard to summon up the enthusiasm when there’s no one bossing you around.

This is the first draft of Simplicity 6772. A lovely fitted sheath dress with front button closing and notched collar. Or a shirt-dress to the layperson!

simplicity 6772 packet

I made version 3, with short sleeves, which buttons all the way down. And I used a £2.50/metre suiting fabric from Dave/Danielle the Drapers in Shepherds Bush Market. I did stop to ponder who might make such a crazy suit in gingham but images of capri trousers and cropped jackets a la Doris Day quickly sprung to mind, very nearly usurping the plans for this dress.

I love Dave the Draper fabric for test garments. I don’t think you can actually buy cheaper and even though the content and quality is an unknown, its always good enough. And generally speaking I end up with something wearable, in this case…. for a fiver!

simplicity 6772 sideThat said, I will be making some adjustments to the next one, which incidentally is already cut out! Namely: taking some of the ease out of the sleeves. They are practically puffed sleeves and it certainly didn’t warn me of that on the packet front. They are also a weird length. I made twice the suggested hem allowance, and turned them up! I’ll also be shaving a centimetre off each shoulder before I sew them in.

I did some proper grading on this pattern using the cut and spread method. A little added to the bodice, moreso added to the waist and hip with the side seams blended together. I remembered to add the extra to the collar and the sleeves, though I probably should have left the sleeves alone to avoid the puff!

Given that it’s suiting fabric it didn’t need a lining. I just overlocked the seams. Suiting is a joy to hem, especially on this kind of check. It’s so easy to pick a couple of threads and the stitches just disappear. It’s presses so easily too. It’s a wool blend of sorts. And I have totally gotten over my snobbery of synthetic/blended fabric, since it doesn’t need much ironing and doesn’t tend to crease when you’ve been sat down at an office desk all day.

I love a shirt-dress but have only made two before. The 1940s Shoe Dress and The Shirt Dress Revisited. Both from the same pattern, both with full skirts. I like how this one is more understated though. Would be completely utilitarian in a khaki! It certainly feels more worky than the other two. To be honest, I’m lucky enough to work in a creative environment where almost anything goes (as is often apparent!).

I was a little disappointed that I didn’t have a suitable set of red buttons but it was quite refreshing to be persuaded with blue ones. I toyed with green and checked ones but the winners were some gorgeous vintage buttons kindly inherited from my friend Nigel’s, aunt.

vintage blue buttons

There are a whopping twelve darts going on in this dress! Four long diamond ones in the front, four of the same in the back; two shoulder darts and two bust darts. And its all these ‘lovely’ darts that create the great shape to this dress. The back especially. And I love that little kick pleat. So glad I didn’t exchange it for a slit.

simplicity 6772 shirtdress back view

It would be crazy at this point not to mention the shoes. A more than happy find on my way back from work in the sale at Office. They are of course my favourite Lola Ramona shoes. These ones having pale green polka dots, a cream bow and purple heels. The thing I love most about these shoes is that they don’t go with anything but yet they look good with everything!!

lola ramona spotty bow shoes

I’ll be off now. The plan is to return shortly with a revised version of this shirt-dress. But you know what happens when you make plans. Well, when I make them, anyway!

TTFN x

On being bothered!

vintage simplicity pattern 6772

It’s been an eventful few days. Asides from the usual back to back workload, there was Holly Johnson on Thursday, Fleetwood Mac on Friday and a whole sunny day with the children at Pools on the Park in Richmond on Saturday.

I was therefore a little jaded last night. Like a hologram, in fact. a pink frazzled sleepy hologram! I wanted to sew. But the pattern I wanted to sew, typically wasn’t in my size, let alone relative to my proportions. I knew it needed some grading and it pained me to think I had to put some effort in before I could just sit and sew. I made another cup of tea. Did the washing up. Put a laundry load on. Flicked through Facebook. Made another cup of tea. I certainly could have graded and cut out the damned thing instead of doing all that, and by that time it was 9.30pm.

So I got cross with myself and my refusal to do what I’d arranged with myself to do. And set about it. The punishment being that if I fannied around anymore and didn’t put my mind to what was needed to be done I’d just lose more sleep-time. And I was tired, I can tell you!

So with the infamous Nike strapline loud and clear in my head, two back-to-back episodes of Eastenders lined up on iplayer, I got tracing and marking and cutting like a good’un. The bodice needed one set of grading, the skirt section another. And the darts needed redrawing and repositioning. I don’t know that I’ve ever employed the cut-and-spread method of grading so properly before. I’ve thought about doing it but it always seems like so much work. It really isn’t! No more winging it with adding a bit here and a bit there on the side seams!

graded pattern pieces

It’s a shirt dress by the way. Simplicity 6772 from the 1960s. I’m making version 3, the blue one on the right. Not my usual style of shirt-waist dress like the ones I made previously: the 1940s shirt dress and the shirt dress revisited, but a more casual, straight like shirt dress that buttons all the way down. I will skip those bound buttonholes though. The fabric is a suiting fabric, a lightweight wool-blend, confirmed by a burn test that revealed a crumbly kind of ash, signifying more poly than wool! So it doesn’t deserve such couture details. That’s my excuse and I’m sticking to it!

It’s Sunday afternoon and I’ve done the hockey run, put another wash-load on, seen my daughter off to the Park Club and had lunch with my son. Mr O is on his way to a wedding gig and I kid you not, I just actually heard a pin drop!

So now the pieces are cut out, darts marked and pinned and I’m now about to embark on the part I love the most. And fingers crossed, will be so pleased that I bothered to grade those pattern pieces. If it does work out good I will no longer have to miss out on those fabulous vintage pattern bids for being the wrong size.

vintage simplicity 6772 cut out

I won’t tempt fate. In fact I won’t waffle on any more as I now have a couple of hours of very valuable sewing time on my hands. Just have to avoid the distraction of the sun. Repeat. Just have to avoid the distraction of the sun!!


Drafting a skirt block made clearer

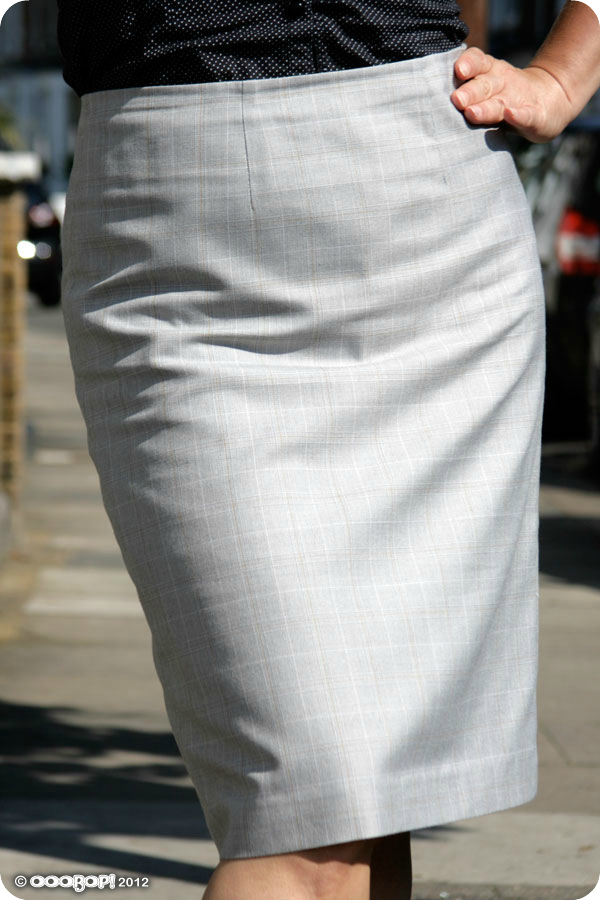
self drafted skirt front view

Why on earth would I want to go to the bother of drafting a skirt block when I already posess a pattern collection of monster proportions? Good question.

Well apart from the fact that I am the world’s greatest procrastinator, it’s mostly because I plainly just don’t like not knowing about stuff! Well, that plus the fact that I wanted to create a perfectly fitted skirt! I have managed it once or twice before, by adjusting patterns, but only by the power of ‘flook’ and not by any knowledgable means.

Making a fitted skirt pattern is something I have been wanting to do for such a long time. I looked into taking a course but was really shocked by the prices. I guess I set my hopes high starting with the London College of Fashion!  Getting a course to fit in nicely with work and children is a bit tricky too. So I set out on a mission to self-teach! It has taken me a long time to get my head round it (the old grey matter aint what it used to be!)… and get round to actually doing it.

The truth is, I am quite impatient and the idea of some mountainous mathematical process leading up to the joyful part of sewing wasn’t very enticing to say the least. But if I am ever to realise some of these far fetched designs I carry round in my head then I have to start learning to draft a properly fitted skirt block at the very least!

To be honest. Now that I have sussed it, it seems remarkably easy!

The hardest part of this process was being totally honest about my own body measurements! I’m forever thinking I’m smaller than I am or believing that if I make anything at least a half a size smaller I will loose some pounds to fit into it properly! But I had to be true to myself this time if I was going to go to the effort of making something to properly fit.

The following instructions have been compiled from various sources and put together here in a fashion that is clearer to me. I can’t claim this as the best way forward for everyone. So if you are going to use these instructions and make a skirt from the pattern, please make a toile first! I needed, in any case to document the instructions as a note to self because even after my first attempt, I forgot some of the process! This method really did work for me and it would make me such a happy bunny if they work for you too, so be sure to let me know!

All measurements are in inches (sorry). I use millimetres in all that I do at work but I can’t break away from imperial measurements for sewing and cooking!

Drafting the basic skirt block

First make a note of your measurements.
It is easier if someone does it for you. Less chance of cheating!
Make sure the tape measure is comfortable and not tight.

You will need 3 measurements:

  • Waist
  • Hip
  • Length

and the following materials:

  • A large piece of paper, that is just over half of your hip measurement by just over how long you want your skirt to be. (Tape pieces together if necessary)
  • A long ruler
  • A pencil
  • A right angled triangle/set square.

NB: this pattern allows for 1 inch of ease which can be altered to suit.

(Click on the images to enlarge)

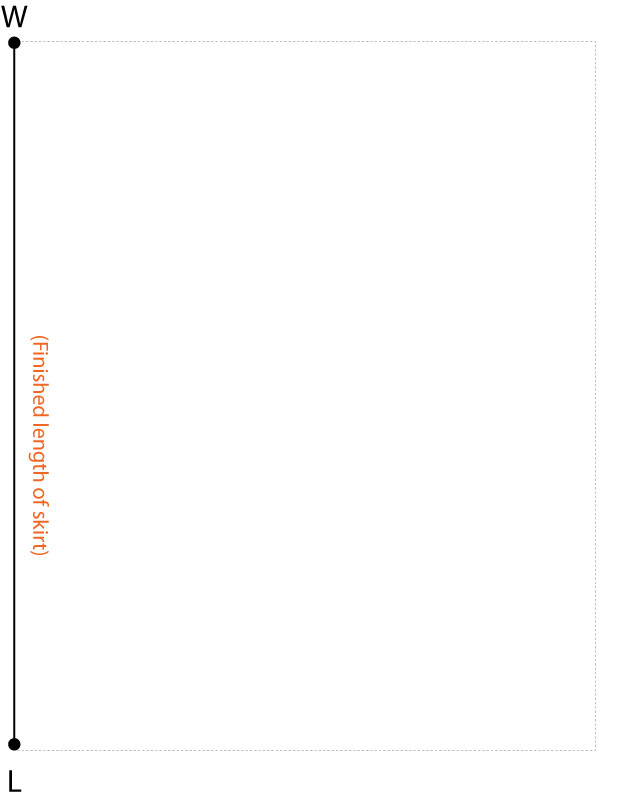
STEP 1:

On the left hand side, draw a vertical line the length you would like your skirt to be.
Mark the top point as W. (W to L = length of skirt)
drafting a skirt block step 1

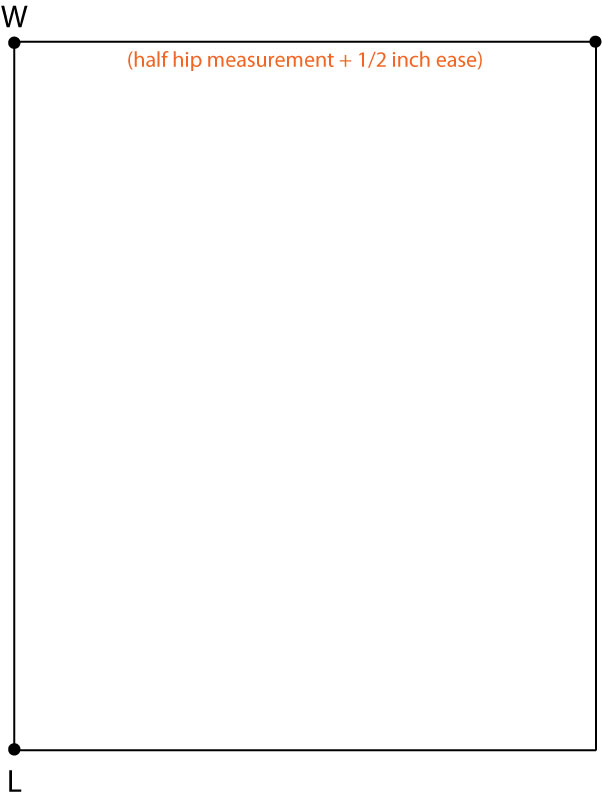
STEP 2:

Draw a line at right angles to point W, to the length of half your hip measurement + 1/2 inch ease.
Complete the rectangle.
drafting a skirt block step 2

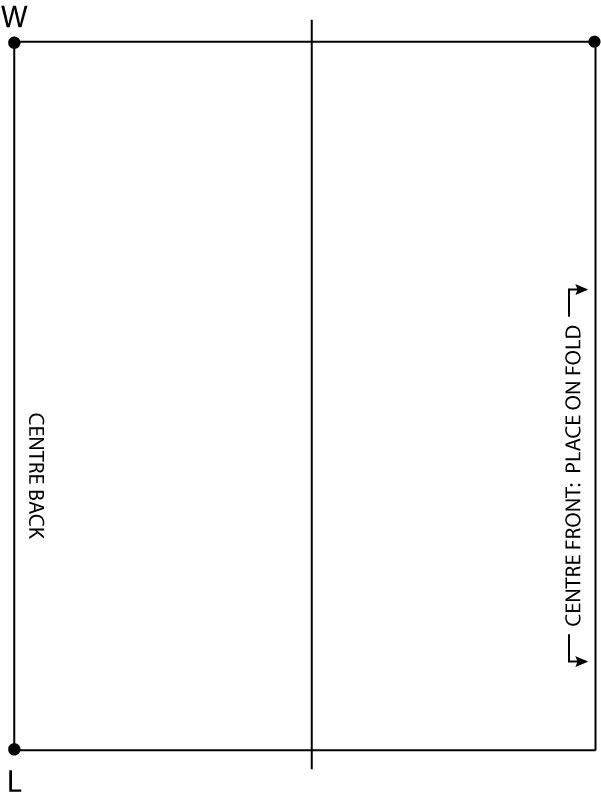
STEP 3:

Draw a vertical line between the two outside edges, at a distance that measures 1/4 hip measurement plus 1/2 inch ease, from the centre back seam. This will separate the front from the back pieces.
Mark the left vertical line as centre back and the right vertical line as centre front. Draw arrows on centre front to remind you to position centre front on fold.
skirt block step 3

STEP 4:

Measure 8 inches down from the W point. Mark this new point with H. Draw in the horizontal Hip Line.
Measure half way between the Waist Line and the Hip Line and draw a line across. This is the Middle Hip Line. Mark it MH.
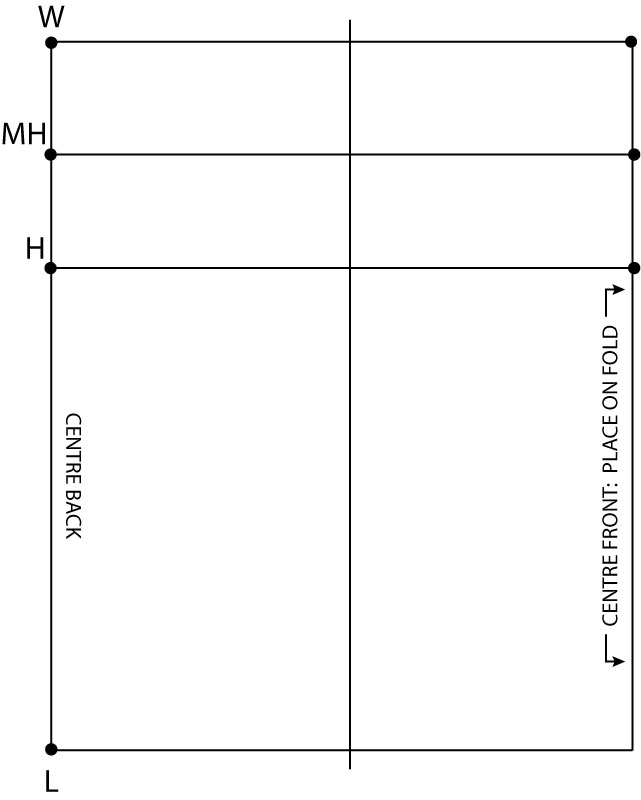
drafting a skirt pattern step 4

STEP 5:

Draw a line from point W that rises to half an inch above the Waist Line.

Measure across from point W, diagonally up to the new guide line, the distance of 1/4 waist measurement + 1/4 inch ease + 1.5 inches for 2 back darts. From that end point, draw a line down to the point where the Hip Line meets the centreline. This creates the hip curve and a shape to the waist.

Repeat the process for the front pattern piece to create the hip curve for the front side. The diagonal waist line for the front piece will be 1/4 waist measurement + 1/4 inch ease + 3/4 inch for 1 front dart.

You can use a french curve or freehand to give a smoother curve at the end.
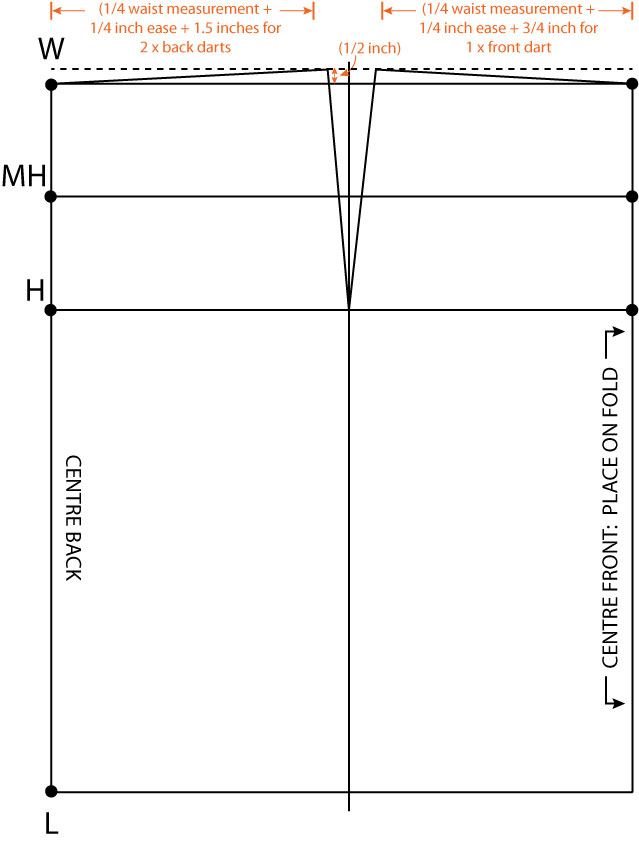
make a skirt pattern step 5

STEP 6:

To create the front dart: find the centre point of the wast line on the front piece and draw a vertical line, from the Waist Line to just before the Middle Hip Line. This is the central fold of your 3/4 inch wide dart. Draw in the dart as shown below.

To create the back darts: draw 2 vertical lines equidistant across the Waist Line. The dart nearest the centre back line extends to an inch and a quarter down past the Middle Hip Line. The other back dart, nearest the side seam, extends just to the Middle Hip Line. Draw in the two darts, each 3/4 inch wide at the top, as shown in the diagram below.

NB: please note that although these darts appear to be standard measurements, you may very well have to alter them to suit your own body shape. Making a toile will highlight if this is necessary for you or not.
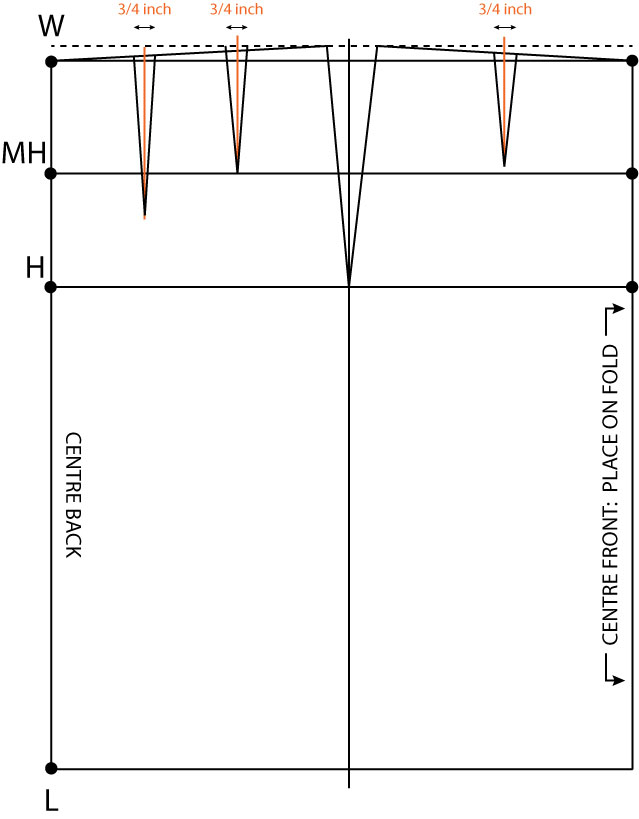
adding darts to skirt pattern step 6

Et voila! The tricksy bit is done!

All that remains is to smooth those curves, cut the front and back pieces apart and add seam allowance. You should be familiar with this process if you regularly use Burda Style patterns from the magazine! 5/8 inch is usual. A good hem allowance is between 1.5 and 2 inches.

Remember not to add seam allowance to the centre front, but do add it to the centre back.

To create the facing, I traced from the Middle Hip Line up to the Waist Line on both pieces, cut out and folded the paper on the dart lines to create the curve at the waist. But you could alternatively make a waist band, whereby a facing piece is not necessary.

I do hope this is of help and that I didn’t make it too confusing. Do shout if I’ve missed anything or if there is anything you don’t understand.

First skirt from the self-drafted pattern
self drafted skirt side view

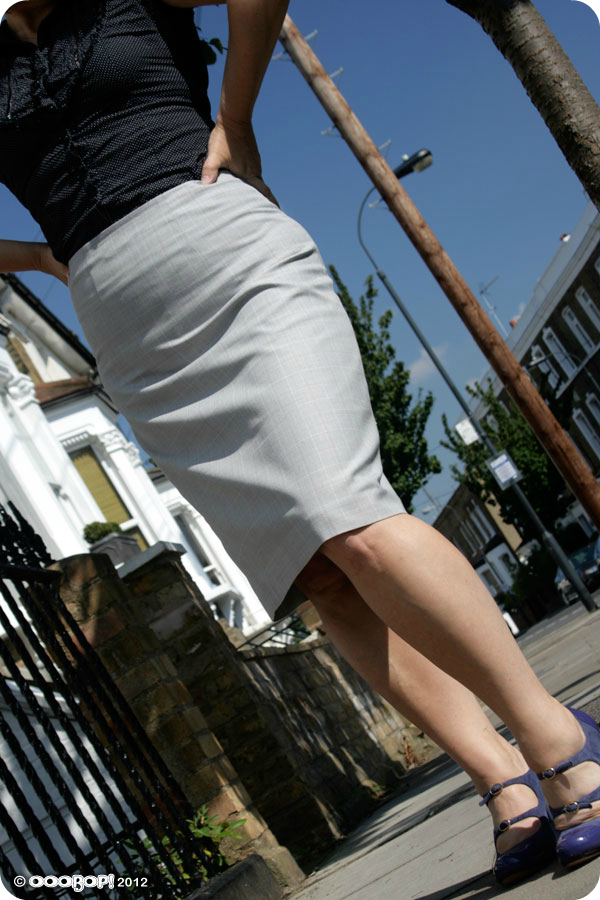
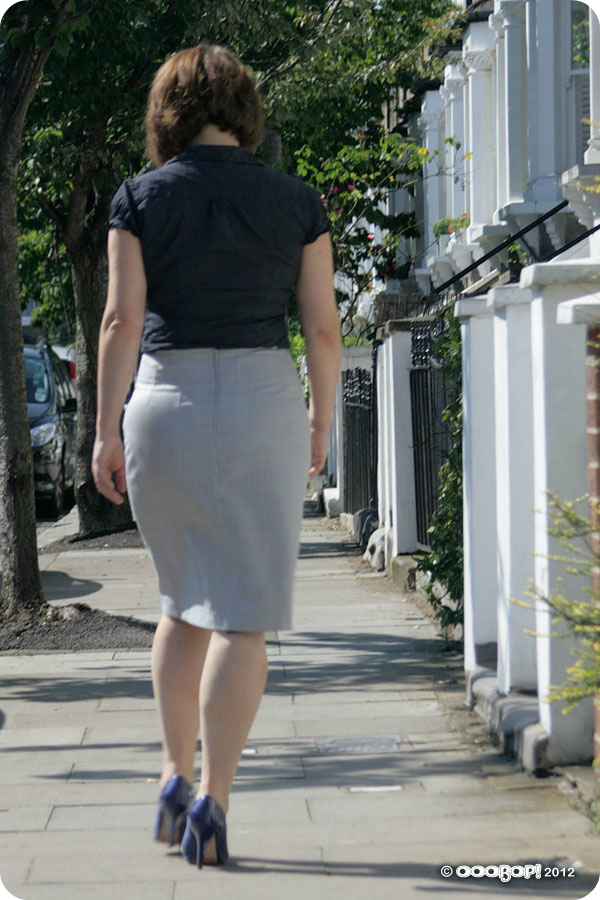
Probably the most boring skirt I have ever made, re. choice of fabric, lack of features… not even a walking slit, standard length etc. BUT, by the same token, probably the biggest learning curve so far!

This is a very wearable toile. I’m so glad I did this. Pencil skirts are a great go-to for work. Especially in neutral colours. This is a very lightweight, cheap suiting fabric and I never thought it would be wearable but with the addition of a lining it gained a bit more structure. To create the lining pieces, I cut the same skirt pieces from below the line of the facing and added a couple of inches across the width of front and back for ease, which was incorporated as a pleat along the top seam line. Incidentally the two-tone polka dot lining is far more interesting than the self fabric! I found 3 metres of it in a Charity shop recently for £1!
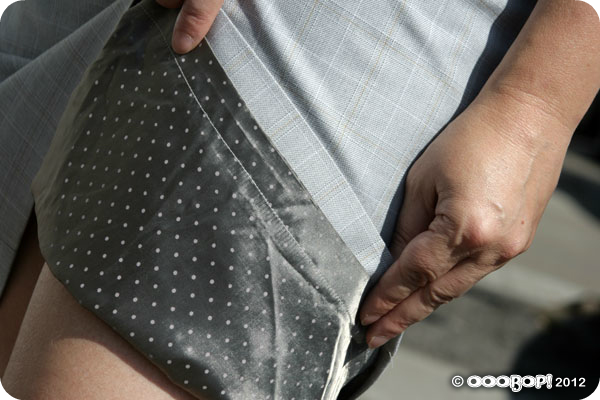
polka dot lining

I inserted a lapped zipper but I still need a little practice in that department! One great tip I picked up along the way, however was to take the loose thread from the baseline stitching of the zip, thread a needle and take the thread to the inside of the garment. You can then either knot the ends together with the bobbin thread or, in the case where the bobbin thread is too short ( I have an automatic cutter and this often happens) you can just do a couple of reinforcement stitches and snip. It  all helps to create a flawless finish on the outside.
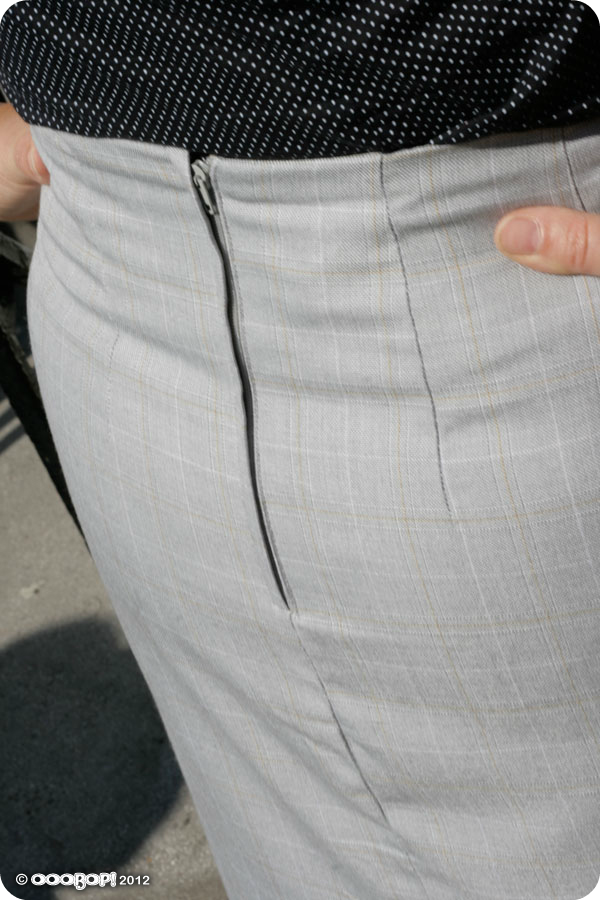
lapped zipper

I love the idea that I am on my way to making custom fitted garments. Im sure it will be a very rewarding journey.

I am going to experiment a bit more with variations on this block before I steam into the creation of a bodice block. I like the idea of changing the darts to princess seams, perhaps with piped seams, making it more of a wiggle skirt with a vent, and making a high-waisted version too. Oh hours in the day… where art thou?!
back of skirt