Another hand made gift for Christmas

tilda rabbit in christmas tree

I’ve been toying with the idea of making everyone a hand made Christmas present, like forever! And I never get it together in time. But this year I made two!: The secret santa gold pleather bag for Emmie, and now this Linen Tilda rabbit for a special baby boy who’s name I can’t declare lest I give the surprise away!

I forgot how much fun these are to make. I made the last two so far back, the post has sadly gone missing. But here’s a picture of them at least:

Tilda rabbits

And here’s a link to the chicken I made from the same book which is called Crafting Springtime Gifts.

Crafting Springtime Gifts

I’d dutifully traced the patterns on to some cereal box card so I simply had to draw round the pieces on the linen, sew along the lines and then cut out with a small seam allowance.

I got a nice plump bag of polyester toy stuffing from the market. It’s amazing how much you need for just one wee bunnie!

The eyes are drawn on with a laundry marker which is always a scary thing to do as it’s the last thing you do once its all sewn up. I was pre-planning a bunnie with shades just in case my hand shook to much and screwed up the eyes!

The nose is embroidered. I didn’t have any pink embroidery thread so I sewed with 4 regular pink threads and achieved the same. Little bit on the wonk but all part of the handmade charm!

tilda rabbit head shot

This time round I used pink satin for the inner ears. What child doesn’t like to feel a bit of ‘silky’ when they are nodding off to sleep?!

I also left the buttons off and replaced with some embroidered crosses on the straps instead. Don’t want to be the cause of a terrible choking incident!

tilda rabbit profile

I have visions of this little fella being dragged around by one arm or leg in true old fashioned childlike stylee. And ending up pale and threadbare in his later years. That’s if baby approves and doesn’t banish him to the toy box forever!

I love sewing with linen and I love having the chance to employ a decorative stitch! Goodness knows why I only reserve it for toys though!

tilda rabbit decorative stitch

In other news. I’m thinking of making a new hat. Not sure I’ll get that done before Christmas though. That would be one massive miracle!

And that just leaves me to say, thank you so much for your continuing support and wonderful comments. Have a fabulous Christmas one and all, wishing you lots of love and good health for the coming year. xxx


My Vintage Dreamcoat!

My vintage Dreamcoat

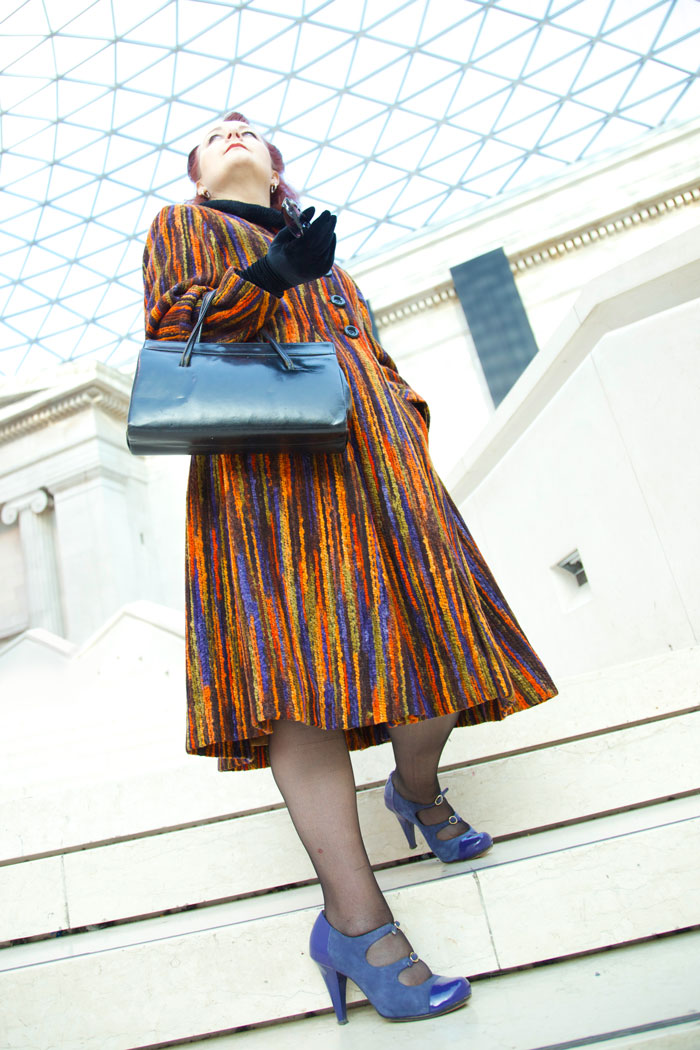
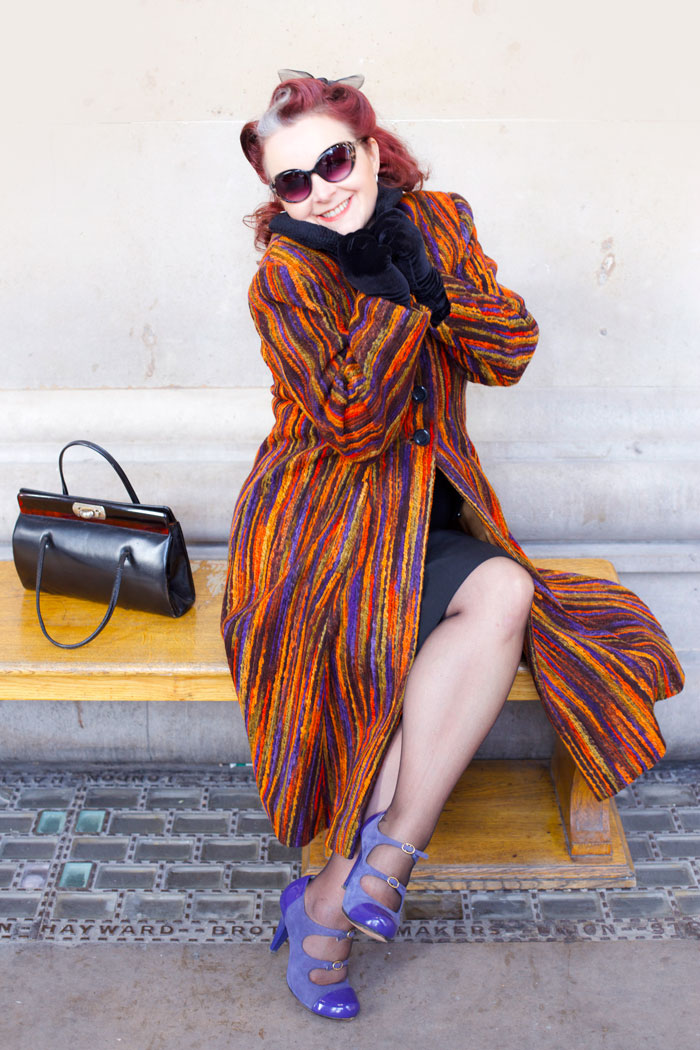
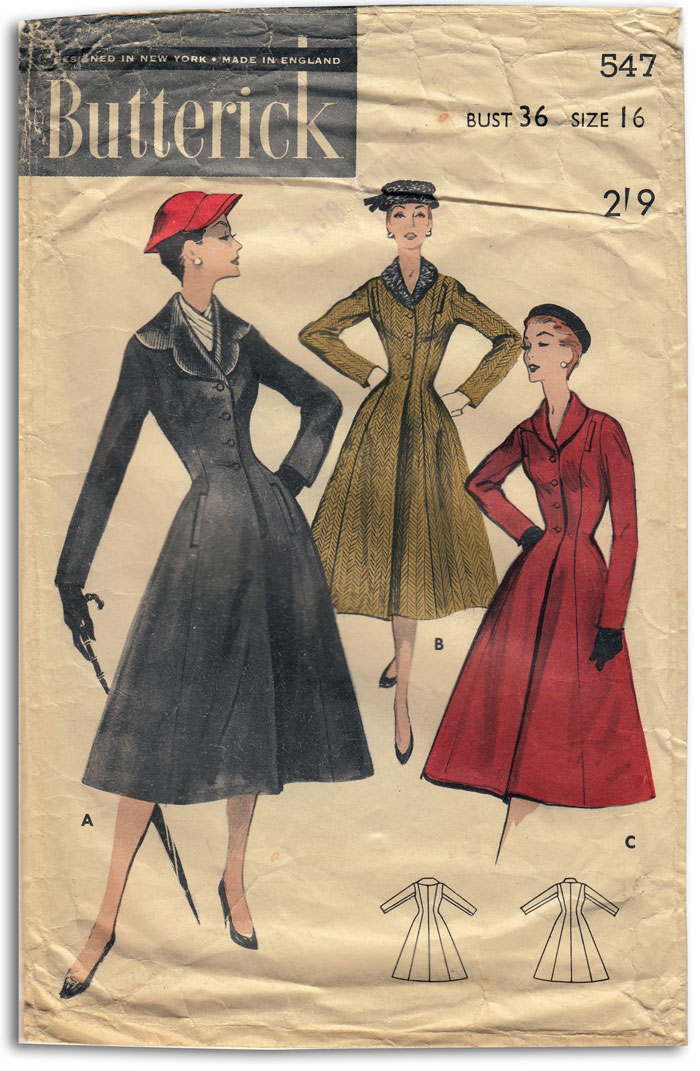
And so I present the focus of all my dreams since first bidding all my hard-earned pennies pounds on vintage Butterick 547. It’s taken nearly seven months to realise the nagging vision that was persistent even throughout my busiest months.

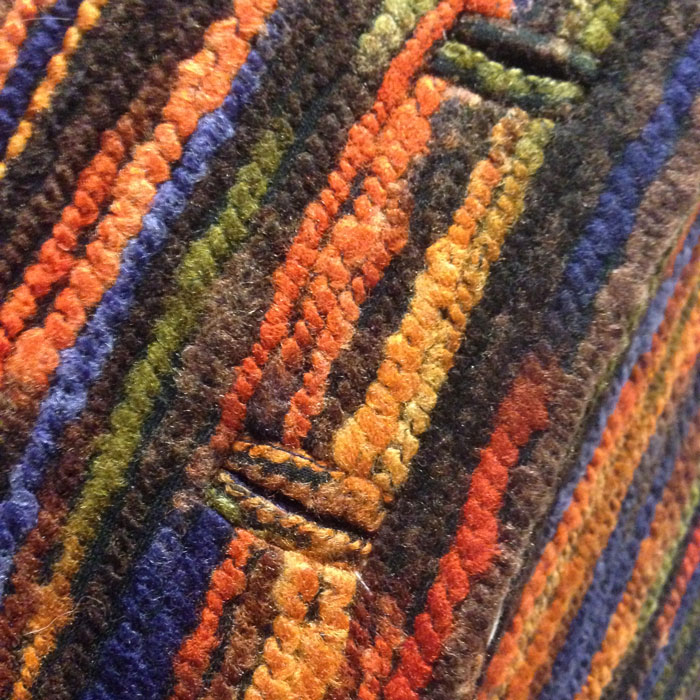
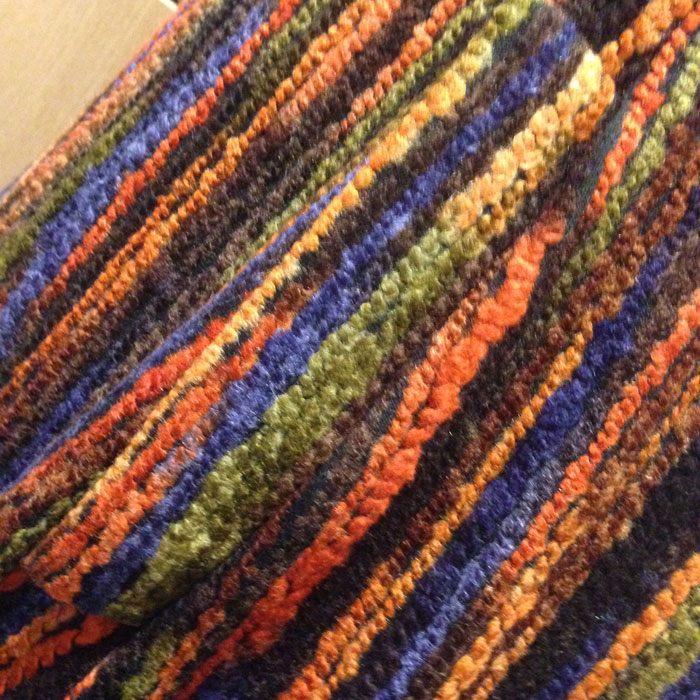
At least 2 of the 7 months, were taken up with searching for the ideal fabric. Quite incredible seeing as I’m a stone’s throw from the Goldhawk Road. I watched London folk on a daily basis, as they paraded their neutral tones around town, and that was inspiration enough to fuel a rebellious approach and lead me to an online supplier of ‘quality coating fabric’ – Fabric Dreams. Of all the samples I requested (which were incidentally free of charge and free of postage!) this non-wool, fabric was my favourite. I confused myself with this choice at first believing a quality coat must be in wool. But I went with gut and gut came good!

vintage Butterick 547

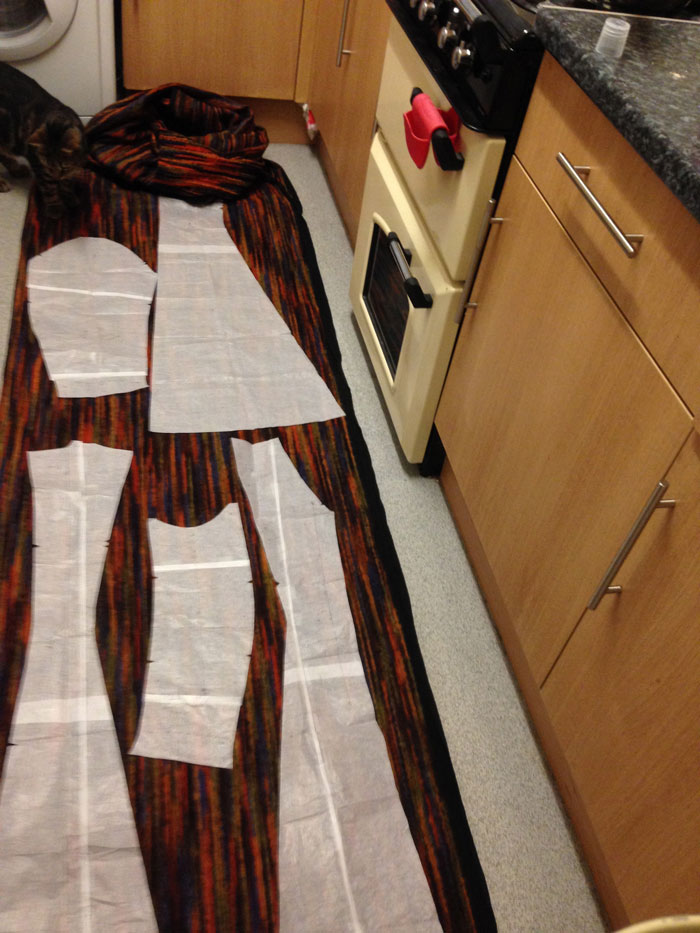
The hardest bit about the construction was having enough space to lay out the pieces. They were huge. I knew I was going to have to lob off the usual 4 inches from the bottom but I wanted to construct the original length in case I had a later moment of maxi-madness!

vintage coat butterick 547

This coat was seriously made in hourly bursts. If I had no hours left at the end of the day, sleep was stolen. I could not have done it any other way. Full time freelanceness which often runs into the evenings, with school runs and domestic chores to boot, means little or no time to sew. But UK weather waits for no seamstress and I was seriously going to freeze my butt off unless I got a wriggle on. Good enough motivation wouldn’t you say?!

vintage coat B547

The only issue with working in hundreds of little shifts is that I probably spend as much time getting stuff out and putting it away as I do on actual sewing time. But hey ho. Got there in the end. I really must stop dreaming about one of the children’s bedrooms being a sewing room. Terrible mother!

vintage dreamcoat

I interrupt this post to big up my amazing and wonderful bestest friend and boyf in the whole world, Daniel. I swear this coat wouldn’t look half as good if it wasn’t for his amazing photography skillz! I owe him so many waistcoats, it’s untrue!!

The other great thing about him being chief Ooobop photographer, is that we get to mooch around London together finding lovely locations. Today was mostly the British Museum. Feel like a bit of a fraud for not actually looking at one single exhibit. But we did have a cultural day at the V&A yesterday, honest guv!

vintage dreamcoat back

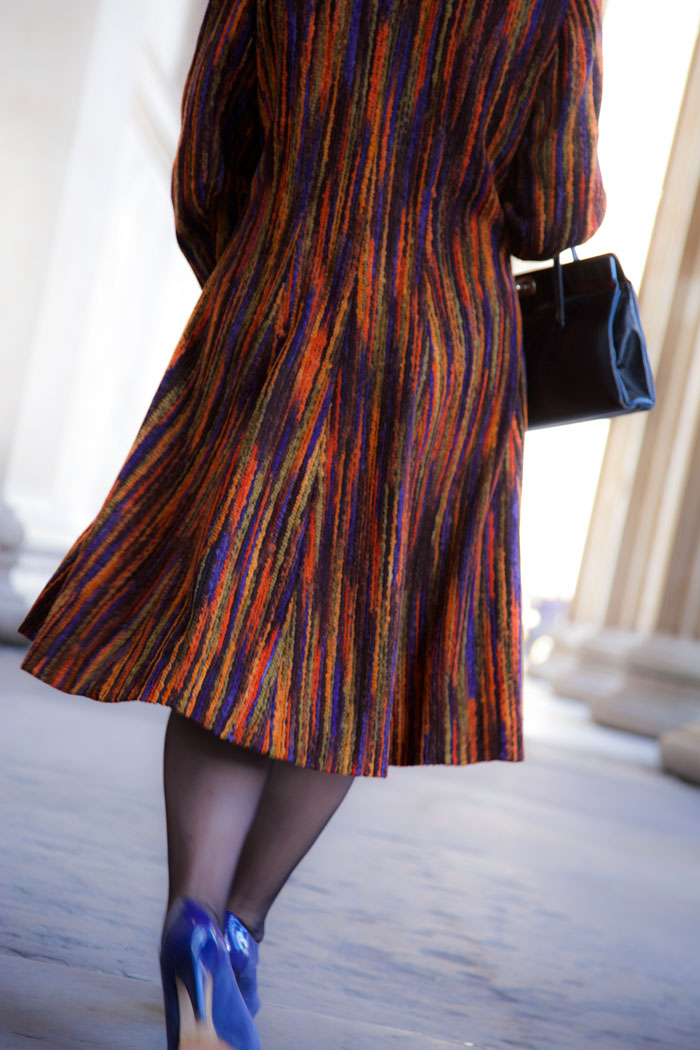
The coat is made of eight panels which create such a lovely shape. There was stacks of ease and I think I could have pinched out a bit more but I like how it feels and I wouldn’t want to feel restricted in it at all. Interestingly enough, even though the ‘skirt’ is not a circle, letting it hang overnight, the hemline dropped in the same way. A lengthy process to level up the hem, and check it at least 5 times before cutting, was quite painful but worth it.

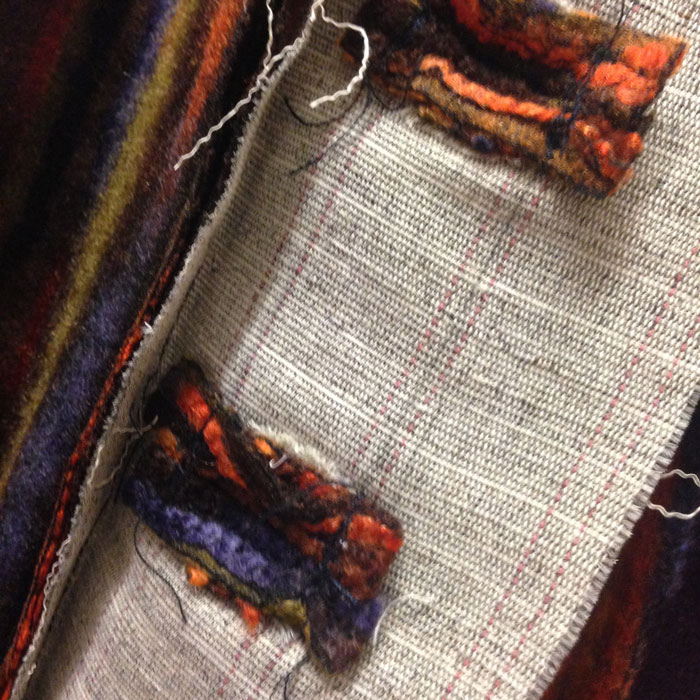
vintage coat at the British MuseumLining this coat was quite a chore. Even though I chose a real quality, strong, gold lining, it frayed like Billy-O. So I serged every open seam. Because I can. Because I now have an overlocker BTW!! But because I am a newbie overlockerist I got all smug and complacent with the speed and completely hacked through the side-back panel. I swore a bit. But didn’t have time for a proper sulk. I’d come far too far enough down the line to be crying over torn lining. Luckily for my sanity, I had over-bought said gold lining by a metre and a half and so I cut another piece, dutifully unpicked the ruined one and half an hour or so later it was as if nothing had happened!

An entire evening and a morning was spent entirely hand-sewing in the lining with tiny stitches. Around the armholes, down the side seams, all around the facings and neckline and of course the hems. What joy!

But what warmth!

warm vintage coat

I’ve stubbonly been walking around in my draughty Vogue jacket, lovely as it is, refusing to buy a coat, lest it meant I would never finish this one. But now I have. And boy, it feels good to be warm. Bring on the snow!

Of course the warmth may not have been totally down to the coat. Mr O insisted this was a great photo of me having a cheeky snifter! He’s such a bad influence.

cheeky_snifter

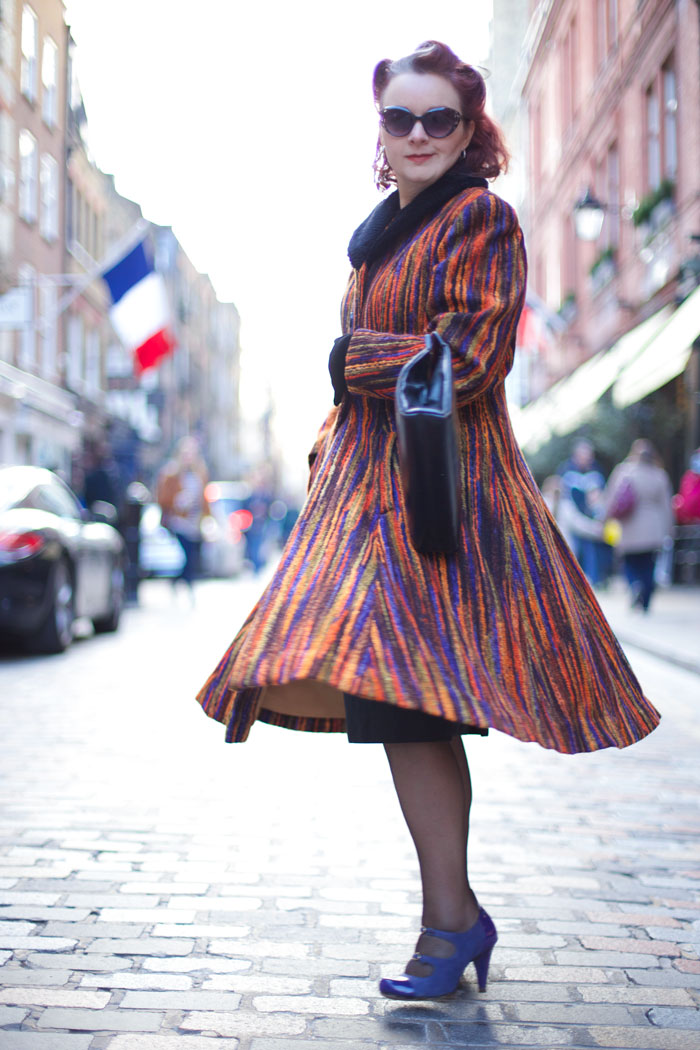
A little wander into Covent Garden was lovely on such a bright winter’s day. This coat is great for twirling in too!

twirling vintage coatAnd a little venture into Neal’s Yard to soak up some more colour, if that was at all possible!

vintage Coat Neals YardThank you all for your support and patience throughout my first coat-making venture. It feels amazing to be wearing something so functional, yet so strikingly original and properly fitted. I won’t divulge cost of this project as it has scared the living pants off me but I can honestly say it was worth every single penny pound!

Vintage coat in progress

And so, six months after my gruelling battle to win this beauty of a pattern, work has begun, in earnest. When I was bidding the for pattern, I had the finished coat, clearly in mind and so to be faced with 19 pattern pieces and the usual vague set of instructions, the fear set in.

Butterick_547

I’ve made a jacket or two, I’ve even tackled the wicked welts. So what was I afraid of? Doing it justice, I think. If I was going to go to the bother of making a coat – not just any old coat, but the coat of my nightly dreams since battle was won – I needed the right fit, the right fabric, the finest construction, let alone the neatest bound buttonholes. (Something I hadn’t yet conquered !)

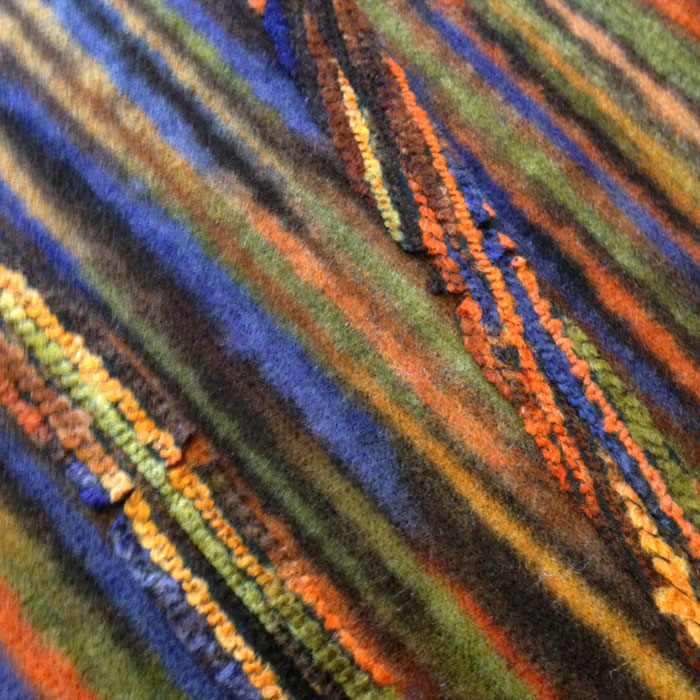
I live near fabric heaven, The Goldhawk Road. And so finding the right fabric should have been easy, right? Easy enough when your expectations aren’t stationed on the moon! I searched high and low and eventually found this amazingly eccentric fabric, online at ‘Fabric Dreams‘. Quite apt, really! I initially had tangerine wool in mind so I ordered a few different free samples and then sat under the letterbox for all of 4 days!

When they did arrive, it was a no-brainer. Even though the fabulous, firey fabric was 100% not wool (and not just tangerine, but an entire fruitbowl of colours) and the others were, it screamed at me to be given a chance and so I agreed to put it centre stage. After all, if I was ever going to go to the bother of making a coat, there’s no way I wanted it to go unnoticed, oh no!

I even made a toile. Just the body section. And this confirmed my need to loose some circumference. I had my suspicions that the coat would be a little big, and it was, but was worried I’d loose the nipped in shape if I took it in at the top and let it out at the waist (the usual Ooobop sausage-shape adjustment!). So with some careful measuring, re-measuring, a little panicking and some more measuring, I took out half an inch, vertically, all the way down, from each of the front and back pieces. So as not to affect the silhouette of the design. Incidentally, like a good girl, I had pre-traced all the pieces!

And then to cut the real fabric. Ooooo the suspense, the fear, the excitement! The pieces are massive. I know I will eventually chop off about 6 inches but I wanted to start long so I could make that decision later. But that did mean I had to cut out on the floor. My kitchen table just ain’t big enough! And that, in turn, meant I had to wash the floor… doh! Always something to hamper a plan! Still took three roll outs of the fabric and continual shooing of cats.

cutout_on_floor

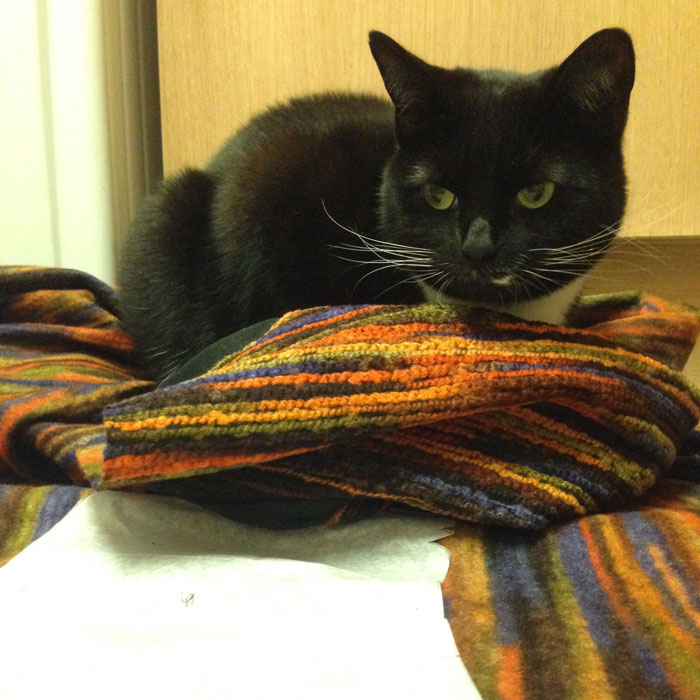
Honestly, why do they insist on laying where I’m cutting? It’s not like there’s no other piles of fabric in the house!

Cat on fabric

An hour and a pair of stiff legs later, I had a wonderful pile of cut pieces. It’s quite tricky to cut though the ‘corded’ texture but it doesn’t fray.

Yesterday I sewed the main body sections and oooed and arrred as I steamed those seams open. For all it’s 100% not woolness, it presses beautifully. And I haven’t had to clip any curves either.

pressed seams

It was getting late last night and I did hesitate to start on the bound buttonholes but knew my dreams would be sweeter if I at least had a go. So I tried a few tester ones on some scrap fabric using the instructions on the pattern sheet. They were rubbish! So I went to YouTube to find someone who’d show me how. They were rubbish too! And then I remembered Karen’s fabulous Ebook download which proved to be the perfect method and I’d even go as far as saying I loved doing them!

bound buttonholesbound buttonholes reverse

Practising those stood me in good stead for making the welt pockets too!

welt pocketsPretty camouflaged huh?! Thats without the invisible stitching which is yet to be done. I’ll be fishing around for ages trying to find a way in, when it’s finished properly!

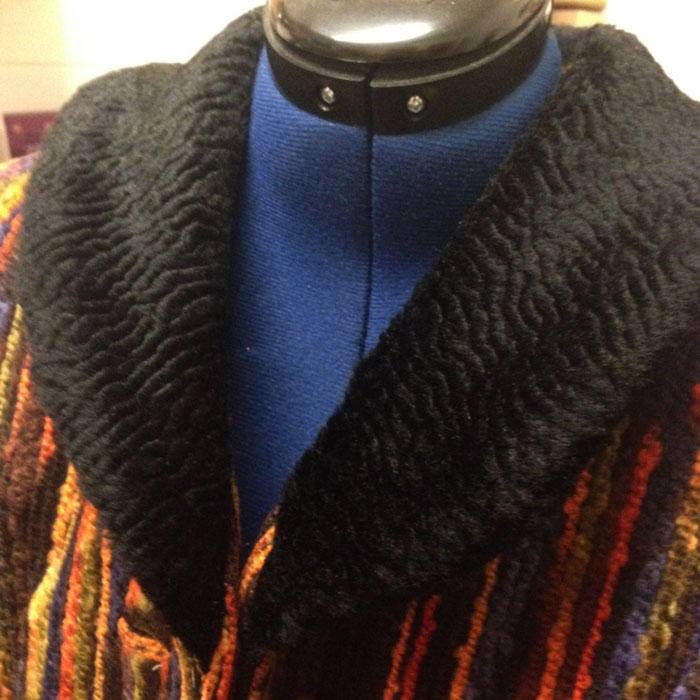
I pondered for ages, wondering what kind of collar I should have. Should it be the big dramatic scalloped one? One of the self same fabric to keep it simple or a little furry shawl collar? I opted for the latter, after going round in circles. Mostly in the shower!

Faux fur is fast running out in the Goldhawk Road. The good stuff anyway. I’m told by reliable sources that no more will be ordered as summer stock will soon be on it’s way! So I was well chuffed to find this short pile, soft-as-you-like, faux fur. Works a treat.

faux fur collarThough I’ve made fantastic headway this weekend, there is still a lot of work to be done. The sleeves, the length, the hem, the lining and the facing behind the buttonholes. But it will be worth it I’m sure. I can feel those sub zeros honing in over the next few weeks but hey, bring ’em on. I’m going to be snug as some bugs!

Burda drawstring top

‘Well about bloomin’ time!’ I hear you say… again! After all those reviews, all those bigging-up posts harping on about what I fully intended to make, you’d think I’d have rustled up at least one of those Burda goodies by now.

Well here it is. Care of Burdastyle Magazine, May 2013 issue, the drawstring top.

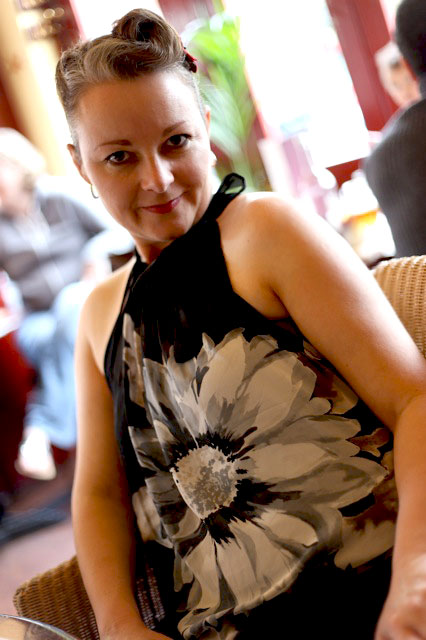
drawstring top
Fashioned from a lovely piece of chiffon that was hanging around after the fabric swap at Rachel’s meet up back in April. Incidentally, if anyone can put their hands up as to whom was the kind donor I would be so happy to know.

I had no idea it was destined for this top but I was secretly hoping that whatever I made, it was going to incorporate a flower placement, both front and back. And guess what? It does!

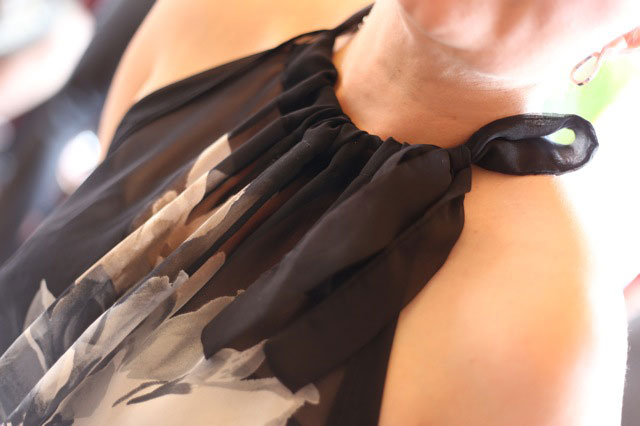
drawstring neck
It is the most simplest top in the world. One you have to draft yourself, mind! And I don’t mind that at all as it goes.

I’ve been tinkering with all sorts of pattern adjustments recently, including an FBA. Not for me, you understand. Which is why it’s far more exciting. I am making a prom dress for my friend’s gorgeous daughter. But more news about that in a couple of weeks. The dress is a big secret until her big day!

Anyway, I digress. Back to the top. Well, actually there is nothing much more to add, other than I figured out how to cut chiffon in a straight line after I had cut it on the wonk! I thought I was being clever by pulling a thread at the hem to make sure I hemmed it even. But actually I’d cut it completely on the wonk and the whole thing ended up being about 2 inches shorter than planned as a result :-/

I used a rolled hem… not by using my rubbish rolled hem foot… but by hand. It was a slow but sure process but it worked just fine.

The pieces consist of a front and a back, seamed only at the sides, with a drawstring around the neck. The raglan armholes are rather large – much larger than the photographs show – and you will therefore require a modesty garment underneath unless you reduce them beforehand.

This is how it appears in the mag:

chiffon drawstring top from Burda May 2013I made it in a panic when I thought I was running out of Me-Made-May garments but never actually got round to wearing it because of this stupid pretend summer we are having. But it was perfect for today’s Father’s day date at Café Rouge and even got the seal of approval from my eldest daughter…Win!

drawstring chiffon top

Now, back to that prom dress…

Me Made May 13: My final days

So here we are. The final days of Me Made May ’13! I feel quite sad in a way. But relieved. And accomplished. And enlightened. So thank you SoZo for setting this brilliant challenge. I didn’t realize quite what a knock on effect it would have. Or how it would make me feel. I wholly recommend this challenge to anyone who has yet to take the plunge. 

I really didn’t think I would make it to the end of the month. For sure there were repeats and some days no photo evidence at all. In reality, taking a photo of yourself every day is really difficult. Easy at first with all the initial enthusiasm for the challenge but then harder each day as the sun disappears, the hubby sets of earlier for work and the outfits get more tight-fitting the older they are!

But the journey was worth it. It was fantastic to focus each day on each hand made garment and realise where I’ve come from and what I’ve arrived at. Confirmation on what I’ve learned and achieved was invaluable. I don’t have time to stop and think properly about most things these days, especially what I’m going to wear on any particular day. So this was a fantastic excuse for self-indulged focussing, on past experience as well as some future plans. Oh yes, of course the flip side of the coin has meant my project list has increased ten-fold. But hey that list always makes for sweet dreams, if nothing else!

So to wrap up… the final days of  Me Made May ’13.

Jersey cowl neck top

DAY 22: Silk touch jersey cowl top and wool pencil skirt
Neither of these are blogged, I made them so long ago. But the cowl top is made from a free pattern on Burdastyle by Ichigogirl. Its the same as the stripy one I made. The skirt is a Simplicity pattern that my mum gave me to kick start my sewing antics. It has a little vent on the front knee. I didn’t line it, unfortunately and this is something I would never do with wool now. I should really go back and line it. It would hang much better and not stick to my tights!

Day 23 black self-drafted pencil skirt

DAY 23: Black self-drafted pencil skirt
This is possibly the most worn and practical of garments in my wardrobe. It fits like a glove, because I drafted it to my exact measurements. It’s properly lined and the lining is even properly attached to the vent. The waistband incorporates a woven interfacing so it doesn’t roll and is fastened by a hook and bar instead of a rubbish ‘eye’! It was a fantastic learning curve making this skirt. So absolutely worth all the effort that it feels fantastic to wear. I always imagined a whole weeks worth of these to choose from and I still think that is highly necessary. They are perfect work skirts and glam up nicely for a spontaneous evening out too!

DAY 24: Stripy wool mini A-line skirt
A miserable day. No sunshine at all, so the woolly skirt came back out. No photographer today I’m afraid. I’ve come to realise how much I wear this skirt. Mostly when I can’t think of anything else to wear. It fits; it’s comfortable; it goes with DMs… and it keeps my butt warm!

Day 25 mmm13 Elisalex shortened

DAY 25: The shortened Elisalex
Today was the 20th anniversary of the day my dad died. Always a sad day. But always a good excuse to don a pretty dress and catch up with my wonderful brothers and sisters, nieces and nephews. The cemetery is a bit of a trek from the bus stop so I needed to sport something easy to walk in. Small heels means small skirt in my world so there was only one thing to do. And that was to chop the bottom off my test Elisalex dress! So glad I did. The duvet cover did good! Although I love my longer rosy version, it’s kind of ‘for best’ but this cheeky little version is now a great little throw-on when-the-sun-shines-and-go dress!

DAY 26: Grey pencil skirt
No photographic evidence today. I wore the first pencil skirt I ever drafted which still fits pretty well. Its lined but has no vent. I was taking things one step at a time back then and to learn to create a vent was information overload! I have to take pigeon steps but it still works. It’s a good staple, though a little boring. It’s days are numbered as soon as the others are on the cutting table!

Day 27 goat eating dress

DAY 27: First summer dress of the year
Today we went to the Surrey County Show. An ideal place to sport a full on flowery frock. Not such a great idea to wear in the goat tent though! Note that Mr O sought his photo opportunity before letting me know what was occurring! I still love this dress but I need to take some volume out of the back. I didn’t notice before but it gapes at the zip. I’m pretty sure its a simple fix. And hopefully it will fit better.

Day 28 Danielle dress

DAY 28: Danielle dress
Now here’s a blast from the past. Almost 2 years ago to the day. It was a bit of a squeeze, I can tell you. So much wrong with this dress but I still like the vibe of it. The fabric was a charity shop find, unsure of the content but it’s soooo itchy and scratchy. I thought I was being out there by using red lining but that turned out to be a no-no with the pale open weave fabric on the skirt! I can’t really breathe in this dress and you can tell by the pull across my chest but this dress is a lovely reminder that I should make another that fits in a much lovelier fabric.

Day 29 button back top

DAY 29: Button back retro top
I was fast running out on day 29 so it was a great propmt to rectify some issues with some garments I don’t tend to wear any more. This one in particular was really annoying to wear because I made the neckhole too small. I really liked the jewel neckline but in reality it kind of chokes you to death. Only problem was that the first buttonhole started right at the top, so to lob a centimetre off the neckline would halve my first buttonhole. My need to wear a me-made top spurred on a quick fix and I replaced the buttonhole with a press-stud and sewed the button on top so nobody will ever know!

Day 30 vintage pencil skirt with pockets

DAY 30: Vintage pencil skirt with pockets
Not yet blogged but again, a hurried make out of desperation but boy I’m glad. I’ve been meaning to make this for yonks! It still needs some fine tuning and this is really just a test garment but I will fill in the details when I blog it. But what’s more to say? Its a pencil skirt with pleats and front pockets… hooray!

Day 31 1940s shoe dress

DAY 31: 1940s shoe dress again!
A shameless repeat but one I’m prepared to wear again and again. This is by far one of my favourite dresses. It gets comments from total strangers as I stroll down to Sainsbo’s. It’s cool and comfy and is covered in shoes! This is the item of clothing that I need at least 5 more of. Along with 7 pencils skirts, my wardrobe should have at least 7 of these too!

And so we leave the month of May and venture on to pastures new. A prom dress for my friend’s daughter is on the go, FBA’s and all, a bespoke pencil skirt for my daughter’s birthday present and another that was bid on by my friend at the school auction. (Far too nervous to ask what she bid!)

Thank you as always for your wonderful comments and support x

Me-made May’13: My first week
Me-made May’13: My second week/
Me-made May’13: My third week/

How to make a Roman blind / shade

And here is the long awaited tutorial. Sorry I took so long. I completely underestimated how long it would take to put together! Despite the lengthy post, this really is a simple sewing project, involving jus a few lines of straight line sewing. Please do a mock up first to check I haven’t given you a bum-steer! And please do point out anything that is unclear or needs adding.

It does, however require some very careful measuring and a few calculations.

No corners must be cut. The accuracy in the measurements will ensure perfectly fitting and super smooth operating blinds.
Remember: Measure twice (at least!) and cut once!

roman shades during day

You will need:
Furnishing weight fabric for the outer
Curtain lining for the backing.
Nylon cord. As a guide I used 9m but yours may be more or less.
Small plastic rings
4 screw eyes
Cleat
Acorn / cord pull.
Strong self adhesive velcro. The width of your window frame or baton.
Wooden doweling or synthetic rods cut to size.


1. Calculate the size and cut your main fabric roman shade step 1
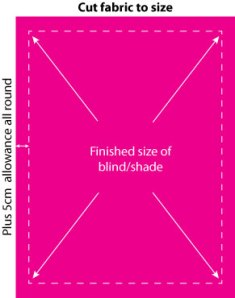
Measure the size that you want your finished blind to be.

Add 5cm side turnings and hem allowances on all sides, to this measurement, and cut your fabric.
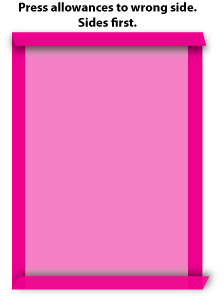

roman shade tutorial step 22. Press Allowances
Press the allowances all round. You could even mitre the corners if you wanted to be really clever… er…I didn’t!
No need to stitch in place at this point. All will become clear!


roman shade tutorial step 33. Now to prepare your lining… and some serious sums!
Start with the measurement of the finished size of your blind. This will include allowances of 2.5cm all round.

First work out how many sections/folds you want to incorporate into your blind.
I chose to have 7.
The bottom panel must be half the depth of the others which are equidistant.
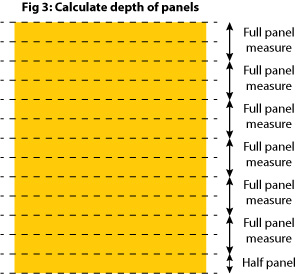
To calculate this I doubled 7 (panels) to make 14 and deducted 1 to make 13 and divided this into the finished depth of the blind (150cm in my case)
so:
7 x 2 – 1 = 13
150cm / 13 = 11.5

11.5 is the half size panel at the bottom
The remaining 6 full size panels will be double that at 23cm (see fig 3)

You will also need to accommodate the dowels so extra fabric will be needed to allow for the casings.
Measure the circumference of your dowels and allow a couple of milimeters extra, otherwise you will struggle to get the dowels in the casings.

My casings were 12mm.

12mm x 7 panels = 84mm (8.4cm to be added to the final depth of the lining fabric)

So the finished measurement of the lining fabric to be cut is 80cm (width) x 158.4 (150+8.4)

Always measure twice and cut once!
You can now cut your lining to size.


4. Mark the positions of the panels then hem all round

Mark the positions of the panels, starting with the bottom one, in my case, 11.5cm from the bottom. I chose to mark on the right side with chalk to make the lines easier to follow.

Mark up from this point, the depth of the casing, in my case 12mm. From that point, mark the next full size panel up, in my case, 23cm
Mark the depth of the casing and from that point the next full size panel. Repeat the markings for the rest of the panel.

The side turnings and hem allowance is 2.5cm all round. Fold and press in position.
Sew all round close to the edges of the lining fabric so the rods wont get caught in the seams.

roman shade tutorial step 55. Create casings for rods

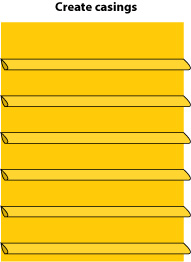
With wrong sides together and guide lines matching, fold in between the casing lines and press.

Sew accurately on the marked lines from edge to edge.
Repeat this for the remaining casings.
Your lining is now complete and ready to attach to the main fabric.

roman shade tutorial step 66. Attach prepared lining to main fabric

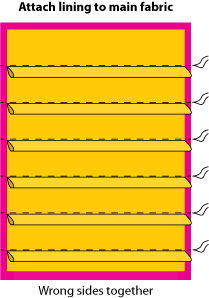
Lay the main fabric, as prepared in step 2, wrong side up on a flat surface.

Lay the prepared lining, wrong sides down, on top of the main fabric, making sure it sits 2.5cm in from each edge.

Making sure both layers are perfectly flat, pin together along the casings, so the casings are facing down towards the bottom hem.
Use as many pins as it takes to secure your two pieces together with no bubbles or creases!

Sew neatly and carefully from one side to the other, directly above the casings, sewing both lining and main fabric together.

Hand sew the top edge of the lining to the main fabric. Or machine stitch if you prefer.


7. Attaching the velcro

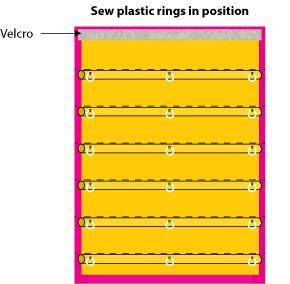
Stick the loop side (the fluffy side) of the velcro to the top edge of your blind.

Stick the hook side (the spiky side) of the velcro to the top edge of your baton or window.

NB. I used the strongest adhesive velcro I could find, which worked beautifully but to ensure it didn’t separate from the fabric I also hand stitched it.
This is very difficult but worth the effort to strengthen the bond. Do not under any circumstances try to sew it on the machine. The adhesive will totally ruin the needle and get stuck!

roman shade tutorial step 88. Insert the rods and sew on the rings

Inset a rod into the hem of the main fabric and hand sew the hem of the main fabric to encase it.
This helps to give the base of the blind a bit of weight and keeps it hanging nice and straight.

Hand sew the lining hem over the main fabric hem.

Insert the other rods into the casings and hand stitch the ends closed to stop the dowels falling out.

Hand sew 3 plastic rings to the centre of each dowel casing, one at each end and one in the middle.
It is important that the rings are perfectly aligned with each other.
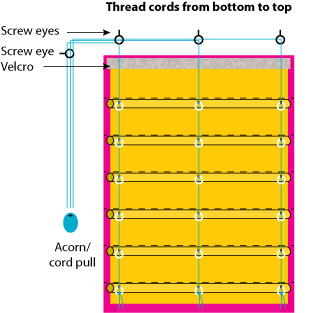

roman shade tutorial step 99. Attaching the cords

Screw 3 screw-eyes into the the underside of your baton or window frame.
They must be aligned with the rings you have attached to your dowel casings.

Attach the 4th screw eye to the side of the window frame, in line with the others.

Attach 3 lengths of nylon cord to the bottom 3 rings. Ensure the knots are tied securely.

Assuming your pull cord is going to be on the right hand side of the window,
run the first length of nylon cord up through the right hand set of rings. It will need to be long enough to do this and then run along the top 3 screw eyes and the side screw eye, down to the cleat, plus a little bit more!
Then run the middle cord up through the rings and allow enough to run through the centre and right hand screw eye, and the side screw eye, down to the cleat, plus a little bit more!
The final cord runs up the rings in the same way, through the top right hand screw eye, through the side screw eye and down to the cleat plus a little bit more!

NB: The screw eyes will sit below the velcro in real life!


10. Attach the blind to the window

You can now attach your blind to the window by pressing the velcro edges together firmly.
Thread the cords as detailed above.
With the blind at the lowered position, carefully make sure that the cords are neatly and precisely lined up. Gently pull on them individually and secure all three cords together at the ends with an ‘acorn’ or cord-pull.
Attach your cleat, proudly raise your blind, marvel at the magical way it folds up and wrap the cord around your cleat. Or lower it and raise it a few more times just for the joyfulness of it all!

Vintage western shirt #2… the flowery kind

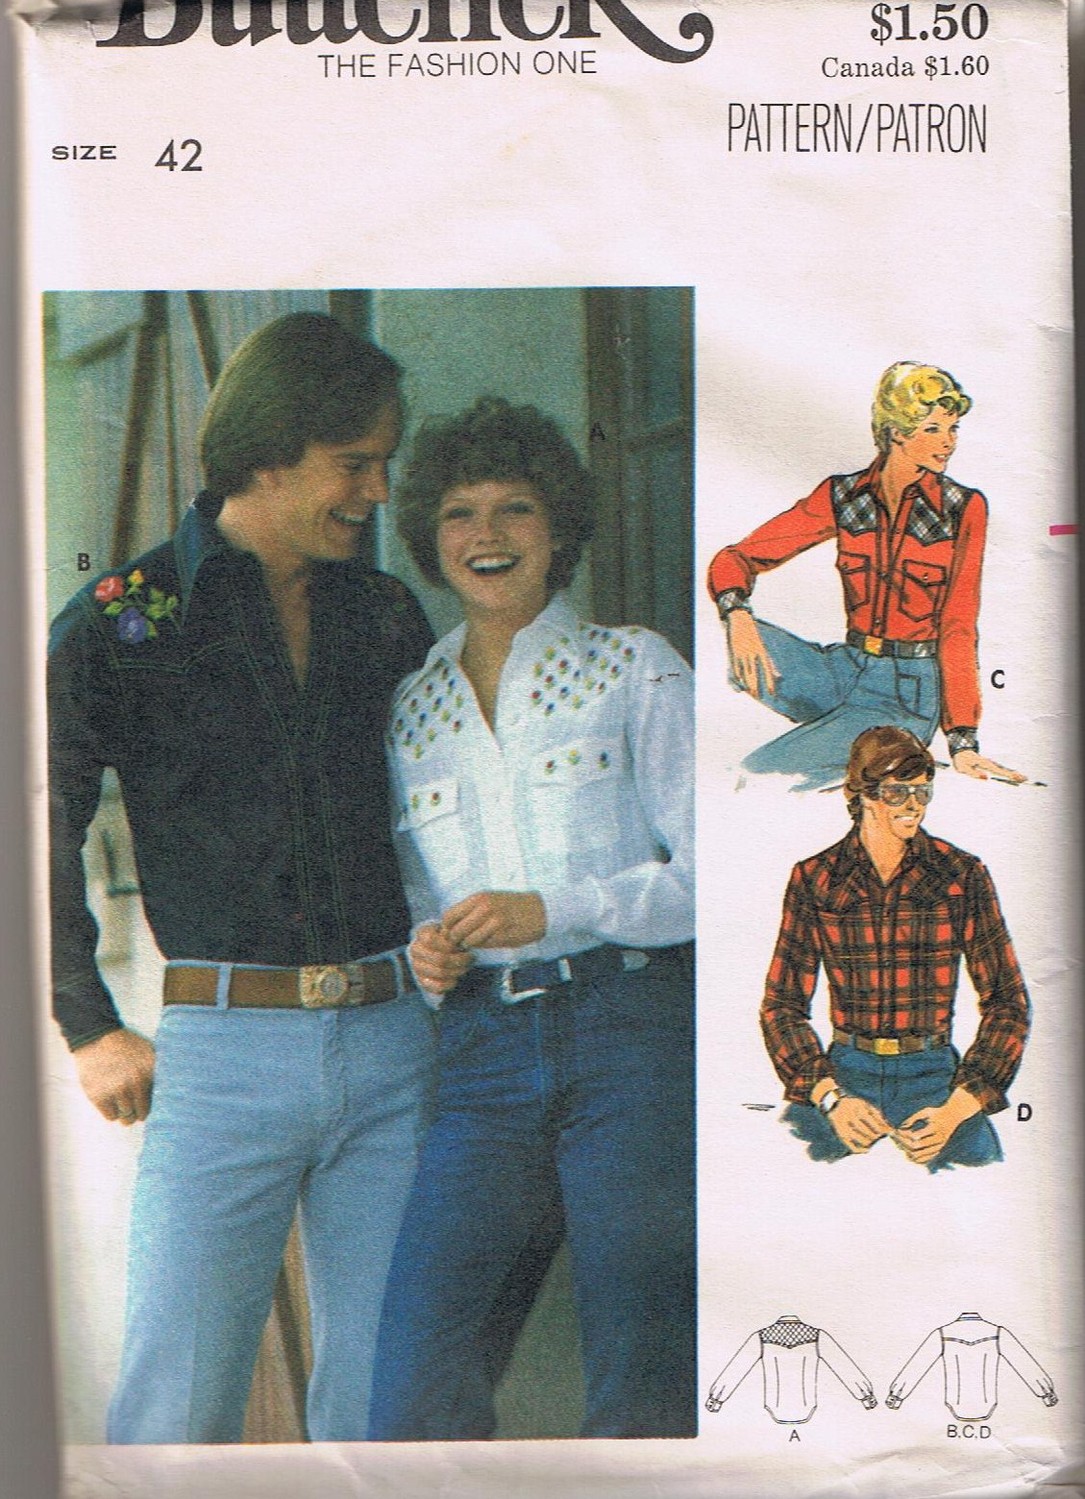
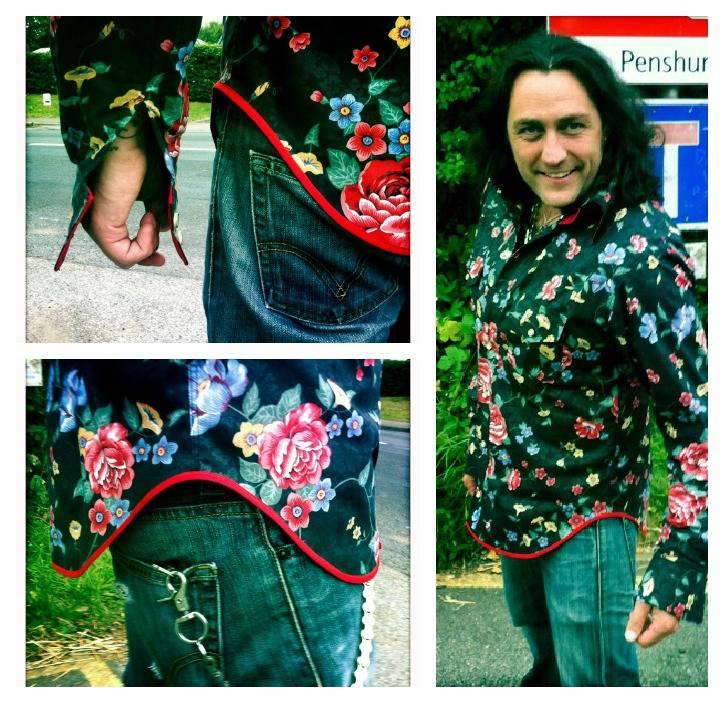
Flowery vintage western shirtAs promised, here is the finished shirt. It is a revisit to the same shirt I made for Mr Ooobop! almost a year ago. On first inspection I thought it must be 70s, given the flappy collars and slim fit. But one reader clocked the hairstyles on the pattern envelope and said it was probably more 1980s. Either way, its another vintage make that has been a valuable learning curve and keeps the old chap happy at the same time… double whammy!

Butterick 5007

I made some brave adjustments to the pattern this time. (Well, brave for me, that is!) Namely to the chest, shoulders and sleeve length. Of course there is a knock on effect for each change, given the many different pieces to this pattern, so I had to keep on my toes!

I have said it before, and I am very conscious of blowing Mr. Ooobop’s trumpet, but he is very good at knowing what fabric suits and especially good at choosing buttons. Check these out…

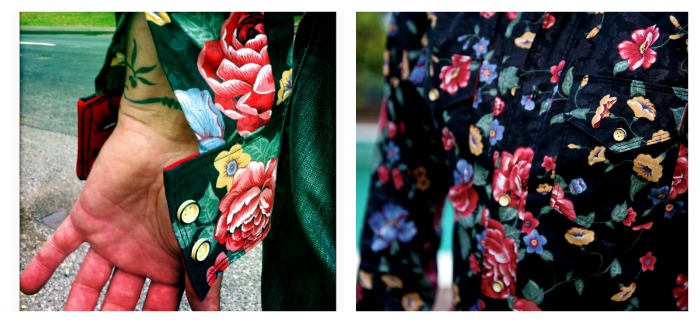
yellow buttons with black outline

They are little chunky white buttons with a yellow fill and a black outline. They are indeed a trifle camouflaged here but I can’t imagine any other button being better on this shirt. I have mastered buttonholes, which is a good thing seeing as there were 13 of the damned things to make, but I did get a bit over confident and had to unpick two of them because they weren’t perfectly centred in the placket. I really don’t want to be doing that on a regular basis. Took as much time to unpick 2 buttonholes as it did to sew 13 of them AND hand sew on all of the buttons!

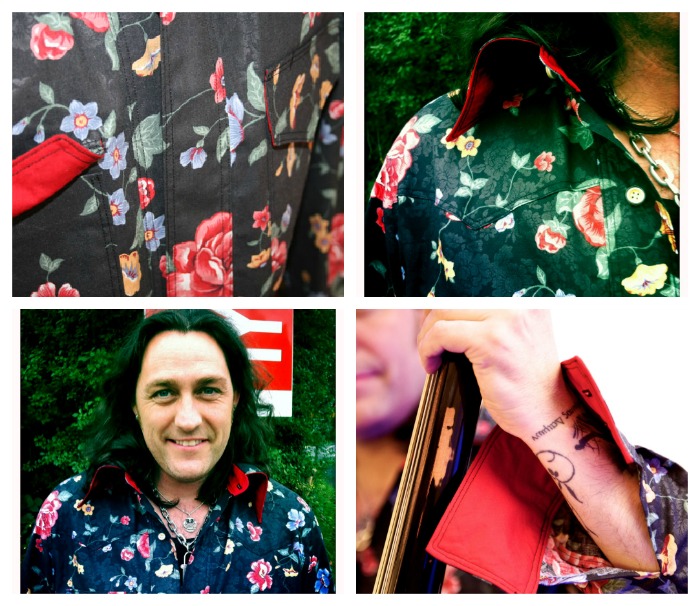
I couldn’t resist adding a couple of new features to this one. I underlined the collar, the collar stand and the under flaps of the pockets in a plain red cotton…

collar cuffs and pockets with red contrast lining… and I added some bias trim to the curved shirt hem. Mostly because Mr. Ooobop! wanted to preserve the length. It was an obvious solution but I think it makes for a lovely finish too, highlighting the shirt-tails!

bound hem

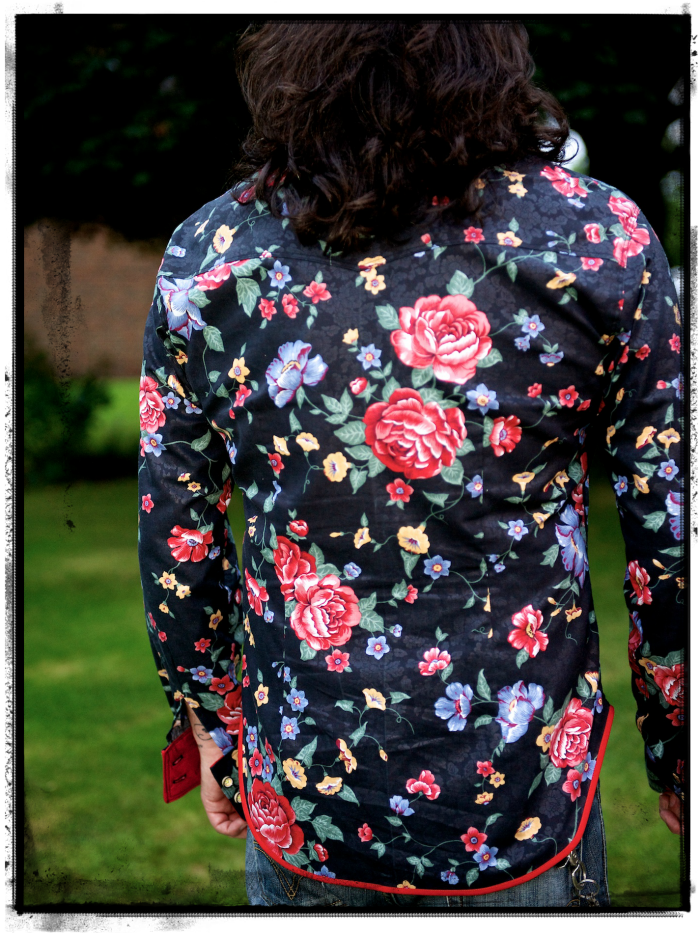
I am really happy with the fit on this one.

vintage western shirt back

Mr Oobop! got a fair few comments when he turned up at his last gig.

Mr Ooobop playing double bass

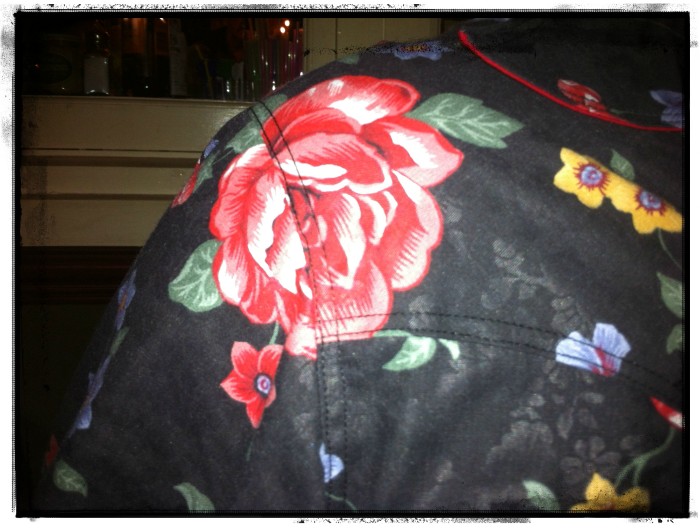
The finishing on this shirt – all the topstitching and flat felled seams –  was the time consuming bit. but imagine how long it took me to match that rose on the shoulder?! (wink, wink, nudge, nudge 😉 )

matching up the pattern on the shoulderSpecial thanks to George, Tom and Cat of The Redfords for the fabulous photography.

Drafting a skirt block made clearer

self drafted skirt front view

Why on earth would I want to go to the bother of drafting a skirt block when I already posess a pattern collection of monster proportions? Good question.

Well apart from the fact that I am the world’s greatest procrastinator, it’s mostly because I plainly just don’t like not knowing about stuff! Well, that plus the fact that I wanted to create a perfectly fitted skirt! I have managed it once or twice before, by adjusting patterns, but only by the power of ‘flook’ and not by any knowledgable means.

Making a fitted skirt pattern is something I have been wanting to do for such a long time. I looked into taking a course but was really shocked by the prices. I guess I set my hopes high starting with the London College of Fashion!  Getting a course to fit in nicely with work and children is a bit tricky too. So I set out on a mission to self-teach! It has taken me a long time to get my head round it (the old grey matter aint what it used to be!)… and get round to actually doing it.

The truth is, I am quite impatient and the idea of some mountainous mathematical process leading up to the joyful part of sewing wasn’t very enticing to say the least. But if I am ever to realise some of these far fetched designs I carry round in my head then I have to start learning to draft a properly fitted skirt block at the very least!

To be honest. Now that I have sussed it, it seems remarkably easy!

The hardest part of this process was being totally honest about my own body measurements! I’m forever thinking I’m smaller than I am or believing that if I make anything at least a half a size smaller I will loose some pounds to fit into it properly! But I had to be true to myself this time if I was going to go to the effort of making something to properly fit.

The following instructions have been compiled from various sources and put together here in a fashion that is clearer to me. I can’t claim this as the best way forward for everyone. So if you are going to use these instructions and make a skirt from the pattern, please make a toile first! I needed, in any case to document the instructions as a note to self because even after my first attempt, I forgot some of the process! This method really did work for me and it would make me such a happy bunny if they work for you too, so be sure to let me know!

All measurements are in inches (sorry). I use millimetres in all that I do at work but I can’t break away from imperial measurements for sewing and cooking!

Drafting the basic skirt block

First make a note of your measurements.
It is easier if someone does it for you. Less chance of cheating!
Make sure the tape measure is comfortable and not tight.

You will need 3 measurements:

  • Waist
  • Hip
  • Length

and the following materials:

  • A large piece of paper, that is just over half of your hip measurement by just over how long you want your skirt to be. (Tape pieces together if necessary)
  • A long ruler
  • A pencil
  • A right angled triangle/set square.

NB: this pattern allows for 1 inch of ease which can be altered to suit.

(Click on the images to enlarge)

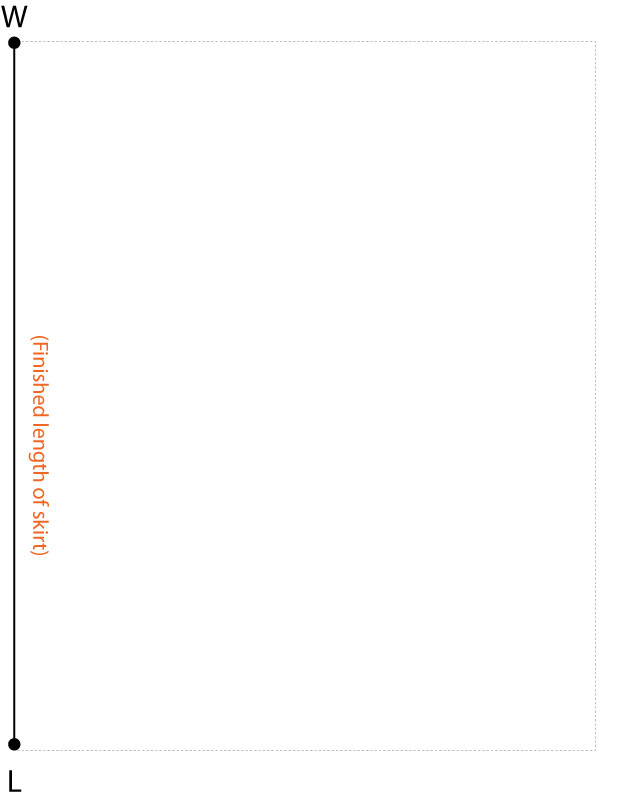
STEP 1:

On the left hand side, draw a vertical line the length you would like your skirt to be.
Mark the top point as W. (W to L = length of skirt)

drafting a skirt block step 1

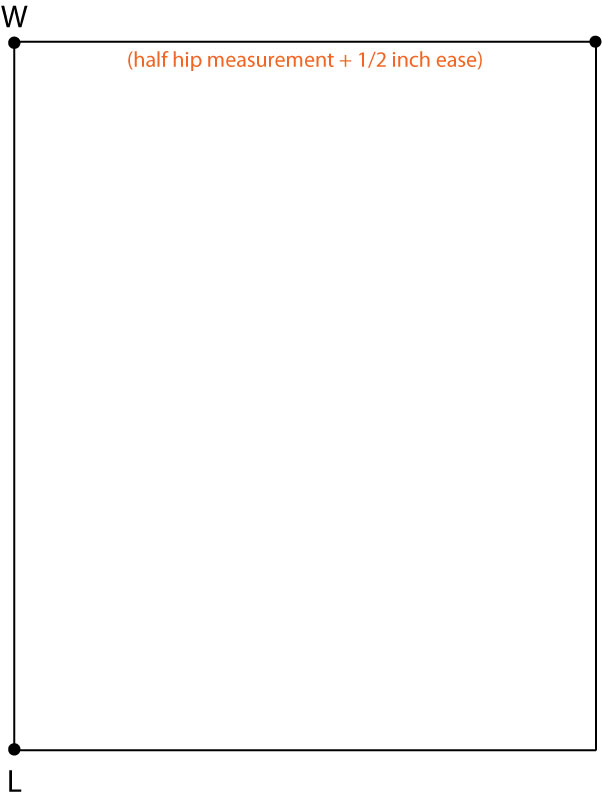
STEP 2:

Draw a line at right angles to point W, to the length of half your hip measurement + 1/2 inch ease.
Complete the rectangle.

drafting a skirt block step 2

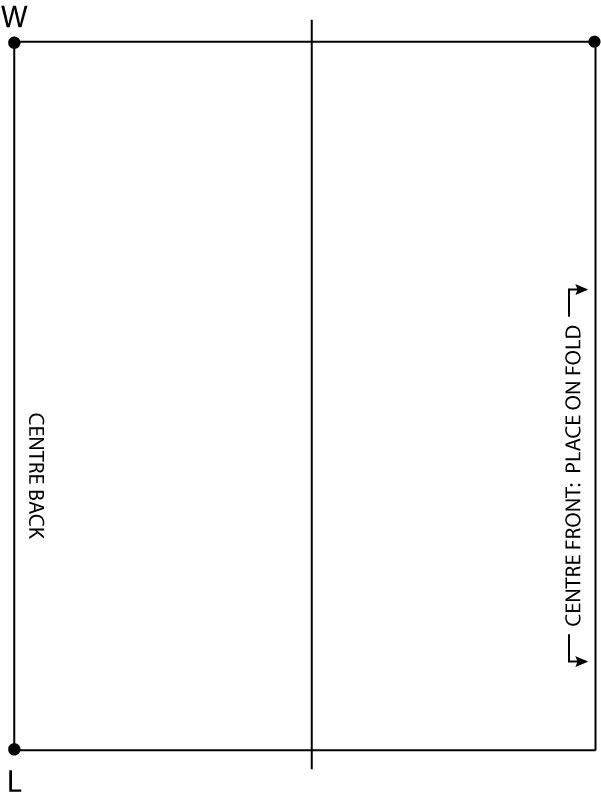
STEP 3:

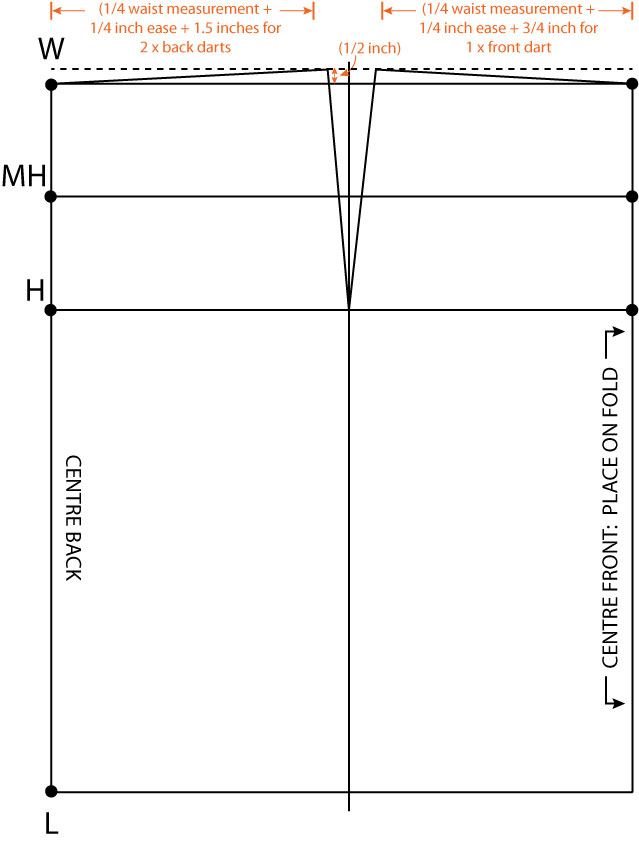
Draw a vertical line between the two outside edges, at a distance that measures 1/4 hip measurement plus 1/2 inch ease, from the centre back seam. This will separate the front from the back pieces.
Mark the left vertical line as centre back and the right vertical line as centre front. Draw arrows on centre front to remind you to position centre front on fold.

skirt block step 3

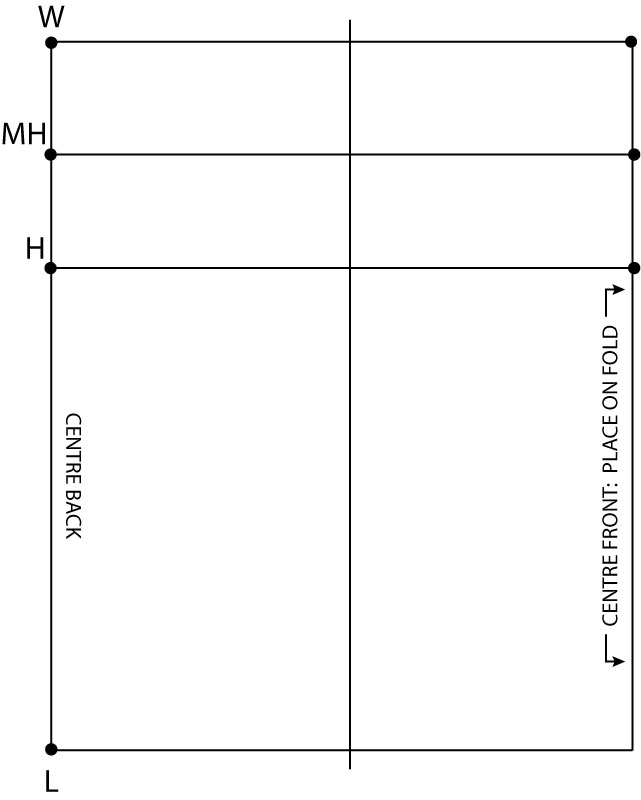
STEP 4:

Measure 8 inches down from the W point. Mark this new point with H. Draw in the horizontal Hip Line.
Measure half way between the Waist Line and the Hip Line and draw a line across. This is the Middle Hip Line. Mark it MH.

drafting a skirt pattern step 4

STEP 5:

Draw a line from point W that rises to half an inch above the Waist Line.

Measure across from point W, diagonally up to the new guide line, the distance of 1/4 waist measurement + 1/4 inch ease + 1.5 inches for 2 back darts. From that end point, draw a line down to the point where the Hip Line meets the centreline. This creates the hip curve and a shape to the waist.

Repeat the process for the front pattern piece to create the hip curve for the front side. The diagonal waist line for the front piece will be 1/4 waist measurement + 1/4 inch ease + 3/4 inch for 1 front dart.

You can use a french curve or freehand to give a smoother curve at the end.

make a skirt pattern step 5

STEP 6:

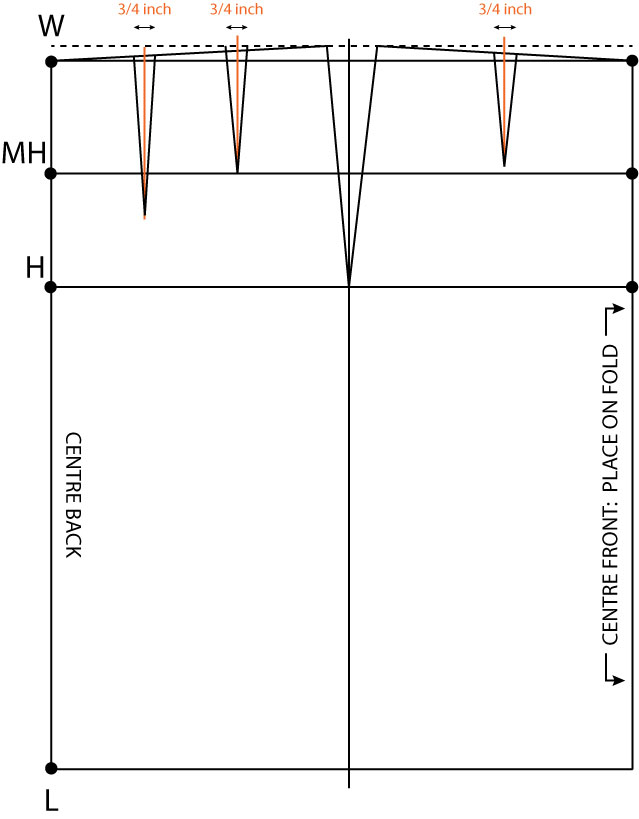
To create the front dart: find the centre point of the wast line on the front piece and draw a vertical line, from the Waist Line to just before the Middle Hip Line. This is the central fold of your 3/4 inch wide dart. Draw in the dart as shown below.

To create the back darts: draw 2 vertical lines equidistant across the Waist Line. The dart nearest the centre back line extends to an inch and a quarter down past the Middle Hip Line. The other back dart, nearest the side seam, extends just to the Middle Hip Line. Draw in the two darts, each 3/4 inch wide at the top, as shown in the diagram below.

NB: please note that although these darts appear to be standard measurements, you may very well have to alter them to suit your own body shape. Making a toile will highlight if this is necessary for you or not.

adding darts to skirt pattern step 6

Et voila! The tricksy bit is done!

All that remains is to smooth those curves, cut the front and back pieces apart and add seam allowance. You should be familiar with this process if you regularly use Burda Style patterns from the magazine! 5/8 inch is usual. A good hem allowance is between 1.5 and 2 inches.

Remember not to add seam allowance to the centre front, but do add it to the centre back.

To create the facing, I traced from the Middle Hip Line up to the Waist Line on both pieces, cut out and folded the paper on the dart lines to create the curve at the waist. But you could alternatively make a waist band, whereby a facing piece is not necessary.

I do hope this is of help and that I didn’t make it too confusing. Do shout if I’ve missed anything or if there is anything you don’t understand.

First skirt from the self-drafted pattern

self drafted skirt side view

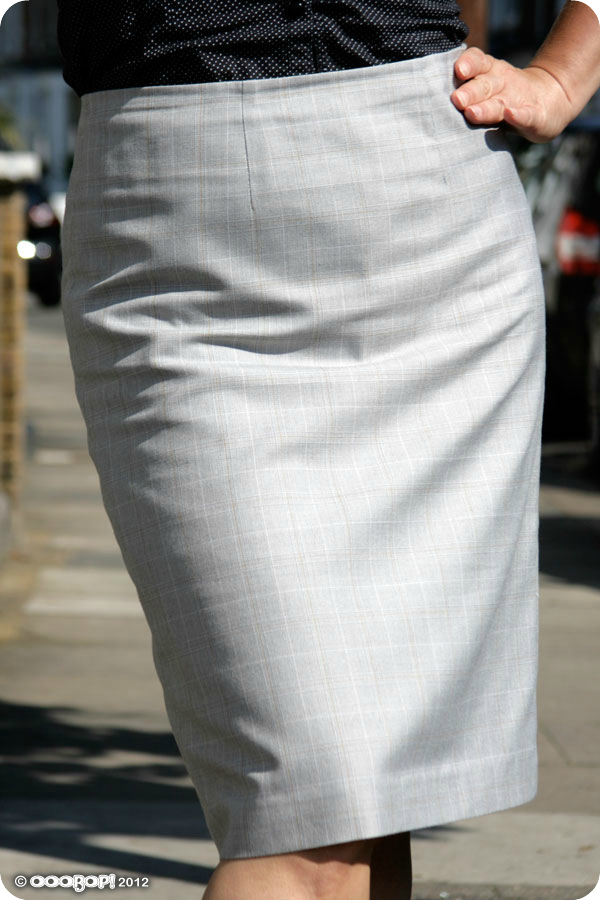
Probably the most boring skirt I have ever made, re. choice of fabric, lack of features… not even a walking slit, standard length etc. BUT, by the same token, probably the biggest learning curve so far!

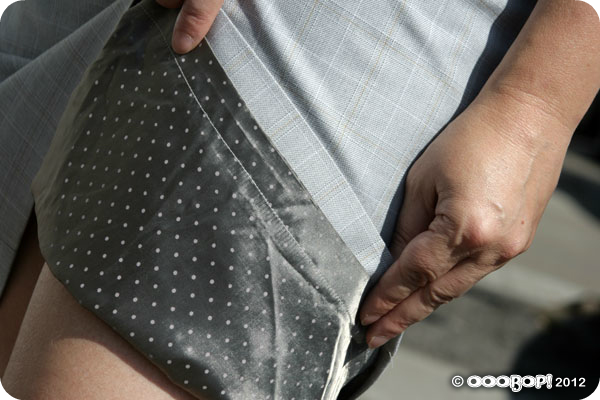
This is a very wearable toile. I’m so glad I did this. Pencil skirts are a great go-to for work. Especially in neutral colours. This is a very lightweight, cheap suiting fabric and I never thought it would be wearable but with the addition of a lining it gained a bit more structure. To create the lining pieces, I cut the same skirt pieces from below the line of the facing and added a couple of inches across the width of front and back for ease, which was incorporated as a pleat along the top seam line. Incidentally the two-tone polka dot lining is far more interesting than the self fabric! I found 3 metres of it in a Charity shop recently for £1!

polka dot lining

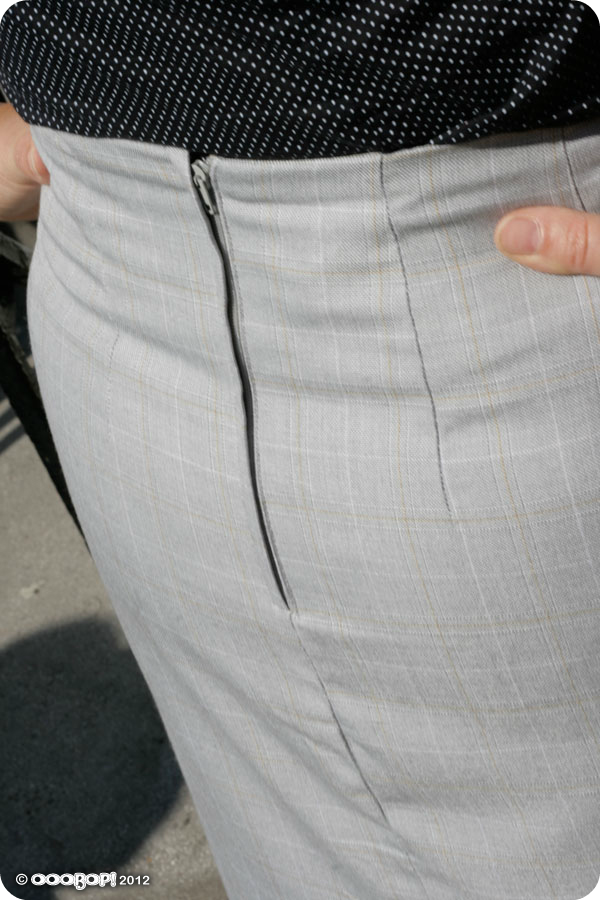
I inserted a lapped zipper but I still need a little practice in that department! One great tip I picked up along the way, however was to take the loose thread from the baseline stitching of the zip, thread a needle and take the thread to the inside of the garment. You can then either knot the ends together with the bobbin thread or, in the case where the bobbin thread is too short ( I have an automatic cutter and this often happens) you can just do a couple of reinforcement stitches and snip. It  all helps to create a flawless finish on the outside.

lapped zipper

I love the idea that I am on my way to making custom fitted garments. Im sure it will be a very rewarding journey.

I am going to experiment a bit more with variations on this block before I steam into the creation of a bodice block. I like the idea of changing the darts to princess seams, perhaps with piped seams, making it more of a wiggle skirt with a vent, and making a high-waisted version too. Oh hours in the day… where art thou?!

back of skirt

Horizontal or vertical buttonholes?

horizontal buttonholes

I’m in the process of making a second version of the 1940s shirt dress I made in May, and I’ve been prompted into wondering (ie arguing with Mr Ooobop!) whether it is usual to make horizontal or vertical buttonholes on a garment. I couldn’t bear the quandary any longer!

So I did a little research and came up with the following…

  • Horizontal ones allow for a little more expansion. The button can slide along the opening without distorting the buttonhole as much as a vertical one.
  • It’s easier to sew buttons in position, following a column of vertical buttonholes as there is a little  more room for manoeuvre, but you have to sew them on more accurately to meet the positions of the end points of horizontal buttonholes.
  • Horizontal buttonholes generally can’t be placed on a shirt placket band as there is not enough room for them to sit comfortably and so vertical ones are used.
  • Exceptions include the collar and cuffs where there is more stress, then you will find a horizontal one. And in the case of more expensive shirts, the bottommost button too!
  • Horizontal buttonholes take a bit longer to create as the foot needs to be repositioned and position measured each time, whereas its easier to shift the position down each time for vertical ones. I’m thinking this is a reason for mass produced garments having vertical ones.
  • Horizontal buttonholes stay buttoned more securely. Any stress across the garment opening, pulls the button into the the end of the buttonhole, where the button stops.
  • It is a little less-fiddly to button up with vertical buttonholes.
  • Most vintage patterns are marked for the buttonholes to be created horizontally.

So there you have it… fascinating, hey?! It doesn’t prove much except that you can seemingly create them however you like… so long as it works for you and your choice of garment!

I’m going with horizontal ones and now feel much happier about doing so. Apart from the fact that it makes me feel a bit rebellious, (and that I won the argument) I like that it’s a little bit of authenticity for this little 40s number.

Which way round do you sew your buttonholes? Any reason different from the above?

I’m hoping to have said dress all finished and blogged by the weekend so bring on the sunshine so Mr Ooobop! can take some sunny shots!

ooobop! gypsy top #2

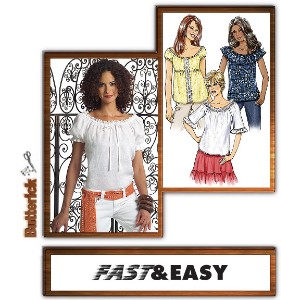
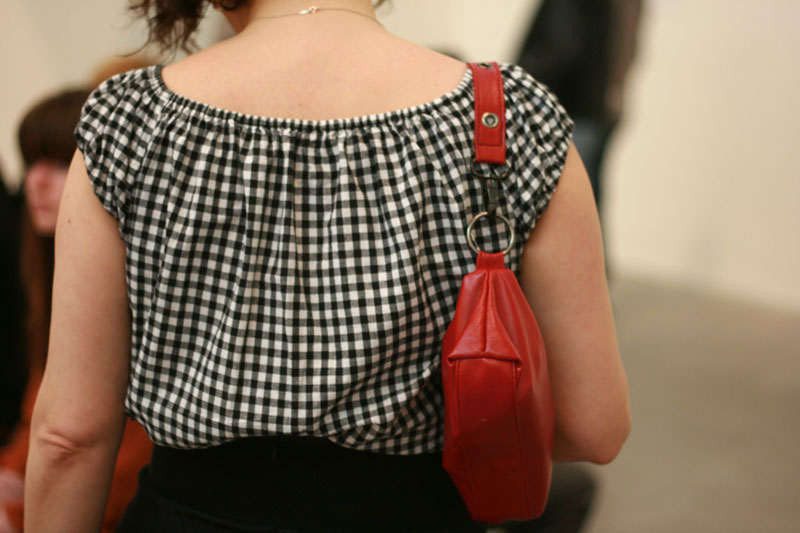
gypsy top frontThere is something quite comforting about visiting an old pattern. I made my first gypsy top almost a year ago and not only have I had great use out of it, it made a great addition to Dorothy’s ensemble too! Once again I used Butterick B4685, Fast and Easy… and indeed it was.

butterick b4685 sewing pattern

I used view D this time but omitted the front lace panel. I did originally include the underbust elastic but when I tried it on, tucked in a skirt, which is mostly how I intend to wear it, I looked a little (more) like the Michelin Man! So out came the elastic, quicker than when it went in!

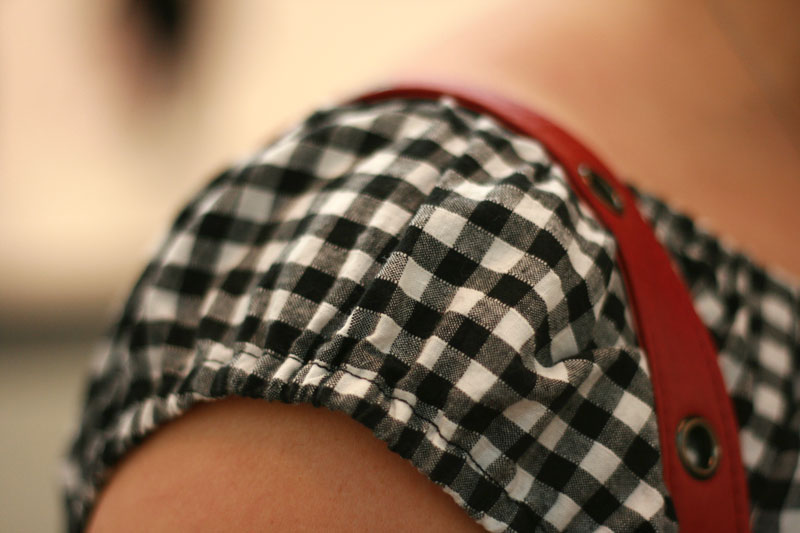
I used a remnant of cotton gingham that I picked up from Oxfam, and used every last bit of it! So very satisfying especially as I’ve since found that 100% cotton gingham isn’t that easy to get hold of. Well not in a choice of colours. Despite my local plethora of fabric shops, they all stock poly cotton gingham, for the demand of school dresses, apparently. It looks just as pretty for sure but pure cotton feels so much nicer against my skin.

I prefer the sleeves and the simplicity of this style. Its less fussy and so quick to make up. I am going to make a few more, lined up for summer, and my eldest daughter has put an order in for one too.

gypsy top sleeve detail

It also made sense to enter this into Made by Rae’s Spring Top Sewalong 2012, just as I did last time round. Its not nearly up to the standards of most of the beautiful tops over there but I’m liking the annual inspiration of creating a new tops for Spring all the same! You can see this and all the other entries over at Flickr. My entry has been successful so I will keep you posted when it is time to vote! 😉

gypsy top back view

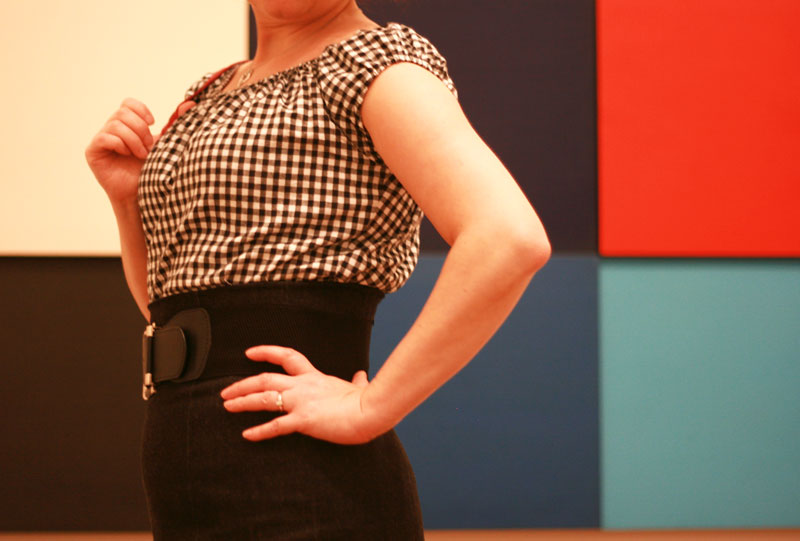
I wore it out to a trip to the Tate Modern yesterday with Mr and Little Miss Ooobop! and I have to say it is perfect gallery wear. It’s always soooo hot and stuffy in the galleries. The artwork made for a choice back drop too!

gypsy top side view

Hope you are all having a wonderful Easter break 🙂