Princess Jessica’s Prom Dress

I think I have kept you all in suspense for quite long enough. This evening is Jessica and Tom’s leavers prom and so I am allowed to reveal the dress I have been working on for the last few weeks.

I was feeling a bit poorly today so Mr Ooobop, like the knight in shining armour he is, set off with his new birthday camera without sparing the horses. The following photos are some of the loveliest he has taken. And I think you will agree that the beautiful subjects contribute somewhat to the awesomeness too.

Meet Jessica. The most wonderful 16 year old daughter of my friend Tina. Can you now picture the pressure that was to create her a prom dress fitting for such a beautiful princess?!

Jessica having hair styled

Tayla Harris was in-house hairdresser for the evening and styled Jessie’s hair beautifully. Complete with little jewels to match her necklace.

Hair jewels
Hair jewels

And ooo… look. A cheeky first glance of the bodice! Such a tease, I know!

Hair styled with jewels to match necklace

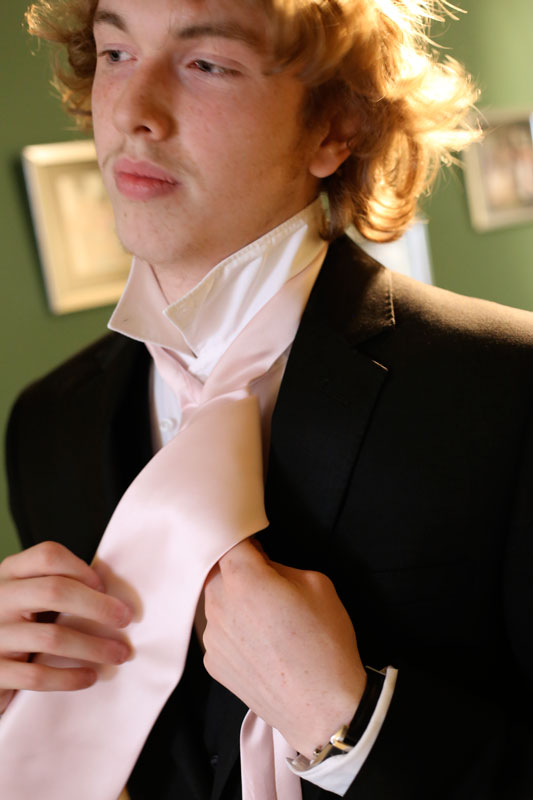
With make-up, hair and outfit complete, enter Jessie’s Prince Charming – the lovely Tom. I’m so pleased he liked his tie. He didn’t really have much choice in the matter, bless him. It was delivered seconds before this photo was taken. I only finished it this morning! And here we also have a side view of the prom dress. I’m getting there, honest!

Tom's arrival and receiving the tie
Tom’s arrival and receiving the tie

The tie was made to match Jessie’s sash as you can see. And Tom did a much better job of tying it than I did!

Tom putting on his tie
Tom looking more like Prince Charming every minute!

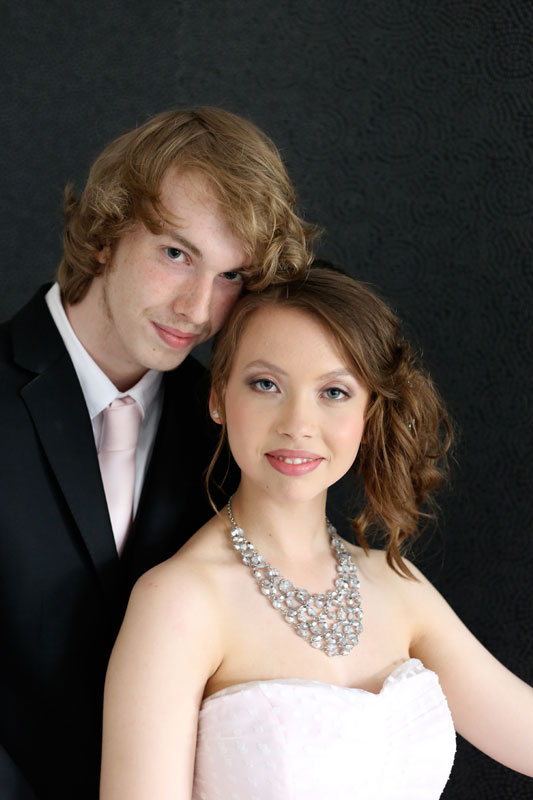
So now they were both dressed to impress, Mr O worked his magic and took some awesome shots of them together. Don’t they look adorable?

Jessica and Tom
Jessica and Tom
A beautiful portrait of the prom Princess and her Prince

I would love to be a fly on the wall tonight and take a picture of them dancing together. The dress is a circle skirt underneath 10 layers of gathered polkadot tulle so you can imagine just how twirly and frothy it would be.

A little dance to limber up!

Jessie came to me with a firm idea of what she wanted and luckily for me there was a very similar pattern in one of my old Burda magazines. I’ve got quite a hefty collection now. It’s always a joy to go through back issues and see patterns you didn’t notice first time round. But this one was on the money! The only thing I had to do, knowing how standard the sizing works, was to do an FBA. And I had to learn how to do it pretty quick!

prom dress idea

Thankfully for me, and for Jess, I had recently come across a great set of instructions on the By Hand London site. These totally took the fear factor out of the whole process. And I learned so much. Not least of all to come down 2 sizes for Jessies petite body and then doing an FBA. It took just 4 fittings to get it right but oh it was so worth it.

Side view of the dress

The strapless bodice section of the dress is boned. For good reason! This was a first for me too. Though I did discover some fantastic boning in my local haberdashery department that sold pre-cased boning. I just had to sew it directly onto the open seams.

The front and back have rouched tulle stretched across 2 panels

The front and back have rouched tulle stretched taught across 2 panels. I love the way they ‘butterfly’ out from the centre seam. And I love how classic and timeless they both look here. Reminiscent of the 1950s.

Full skirt. 3 layers.

The tulle overlay is ivory in colour and works so well to soften the pink. Kind of like a frothy strawberry milkshake, don’t ya think?! Of all the techniques involved in making this dress, funnily (or not so funnily) the most tricksy part was gathering all those 10 metres into a 27 inch waist. I even made several gathering threads to avoid breakage but it was still a nightmare. I ended up gathering small sections at a time and pinning it on the underskirt, on the mannequin and then hand tacked it all together before I even thought of taking it to the machine!

The bodice and skirt are lined in full with a slightly darker pink lining. That was one of the easier bits! Unlike the Burda instructions, I sewed the circle skirt lining to the waist seam and then once the bodice lining was seamed at the top, I turned under and hand-stiched the waist seam of the lining over the raw edge of the skirt lining.

Oh yes! How could I forget? The shoes!! Check out these amazing Kurt Geiger shoes that Jessie snapped up in the sale for a mere £29! Pink patent leather with bows and bling!

Kurt Geiger shoes
Kurt Geiger shoes: Pink patent leather with bows and bling!

Have you got loveliness overload yet? I think I have. But hang on I forgot to show you the back. Pretty bow sash and all

back view of the dress

And so the ‘royals’, unfazed by their impromptu photoshoot, bade their farewells and headed off to the prom.

En route to the prom

I would so love to have seen everyone’s faces as they walked in together.

Outside the venue
Outside the venue

A massively big thank you to Mr Ooobop for these amazingly professional photos. I would never have got these together myself. I also have to thank Tina for asking me to make this dress for her beautiful princess. It has been such a huge learning curve for me. I don’t deny there was a fear factor involved. I had no choice but to get it right. But that’s how we learn fast, right?!

And last but not least for the ever obliging Jessica and Tom. You make just the perfect models and have brought such beauty to my blog! I am being totally honest when I say that these pictures brought a tear to my eye. I hope you guys had the time of your life! x

A cape for Poison Ivy

poison ivy front

Meet my biggest little girl! Hardly a villain but seriously rocking the whole Poison Ivy thing!

It’s not often I get asked to contribute to her wardrobe. It is in fact never! So I was very honoured by the request to make a capelet for her Halloween costume. Yes I know this is a bit late in the day, soz, but I wasn’t allowed a sneak preview on the day (something to do with me being an embarrassing mum at her last party I would think!) and had to wait patiently for photographic evidence so I could share it with you.

poison ivy back

It was a very fun and quick project and even ‘biggest little’ was impressed! If you knew her like I do you would know how amazing that is!

poison ivy

Here’s a better picture of the stand-up collar. You cant see it for all the red luscious locks!

cape on manequin

The exterior is a bright green poly satin fabric with red satin lining and I used some glitzy buttons at the neck to cover the ends of the ribbon. Should have sewn them in the collar stand really!

It was a very simple project for quite an effective fancy dress accessory…

First I measured the neck (plus ease) and the measurement from the neck, over the shoulder to just below the elbow. Using Pi (22/7) I worked out the radius to draw the neck hole and from that circumference I could mark the length of the capelet and draw the circumference at the hem (plus SA)

circumference formula

Have you ever wondered what that little hole is for at the end of your tape measure? Well I sure have found a use. If you position and hold down the tape measure at the distance required, on the centre point, or corner of your paper, you can put the point of a pencil in the hole at the other end and draw the arc of the circle. Its not as accurate as a compass but I don’t have a set of compasses that large and this method was good enough!

draft circle

I folded the fabric into quarters and pinned the pattern, making sure it was butted to both adjacent sides.

folded fabric

pinned patternI did the same with the lining and cut out. This is not my favourite fabric to work with, I hasten to add!

cape liningNext up, I pinned the self to the lining, right sides together, using lots and lots of pins. I am telling you, this is soooo not my favourite fabric to work with. It slipped and slid all over the place!

pinned lining and selfThen I cut the front opening. You can see just how far out I was with the cutting/positioning of this slippery stuff!

cut opening

But I saved the situation with a genius idea to round off the corners! And note my next exclusive dressmaking tool…. a dinner plate!

round cornersI stuck in some more pins before I attempted to sew around the base hem and up the front openings. But it still took 3 or 4 attempts. It was like a couple of magnets repelling against each other!

more pinsI left the neckline open while I constructed the collar. First I made the collar stand. The measurement for which was the neck measurement (plus ease) by 5 inches (I think!)

I folded it in half, lengthwise and applied fusible interfacing to one side.

interface collar standTo make the ruffle, I cut a strip the same width only twice as long, folded, pressed and seamed the short ends, right sides facing. I gathered the raw edges to the same length as the collar stand.

ruffleI don’t have pics for the next stage but hopefully it will make sense. I sewed the short ends of the collar stand together and turned right side out. Matching raw edges, I pinned the ruffle to one side of the collar stand, right sides together, careful not to catch the underside.

collar ruffleI turned the ruffle up, hiding the raw edges inside and gave it a press to keep it in place. I then folded in the seam allowance from the remaining side and topstitched in place.

finished collarAgain I am missing a few pics, but to finish off I sewed the base of the collar stand (the folded edge), right sides facing, to the neckline of the self side of the cape. I then folded and pressed in the seam allowance on the lining and top stitched to the other side of the collar, very close to the edge.

poison ivy cape

Buttons and ribbons were then sewn in place.

Hope this gives you some insight. So sorry for the missing pics. I will be more diligent with my tutes next time!

This is indeed a very fun and quick make… but I would advise a woven fabric just for sanity’s sake!