Another turtle neck top complete – in time for MemadeMay

May is one of my favourite months for many a reason. The weather is warming – I so can’t bear the cold – and I’m more likely to get out more for walks and to visit my favourite places and people after a long hibernation period. It’s also the month that the lovely So, Zo What Do you Know? hosts the #MemadeMay challenge. Now it’s fair to say that each year this flurry of instagram selfie shoots gets easier for me as my wardrobe becomes fuller. But Lockdown has narrowed my choices somewhat by what fits and I’m going to have to make some more clothes. Shame, eh?!

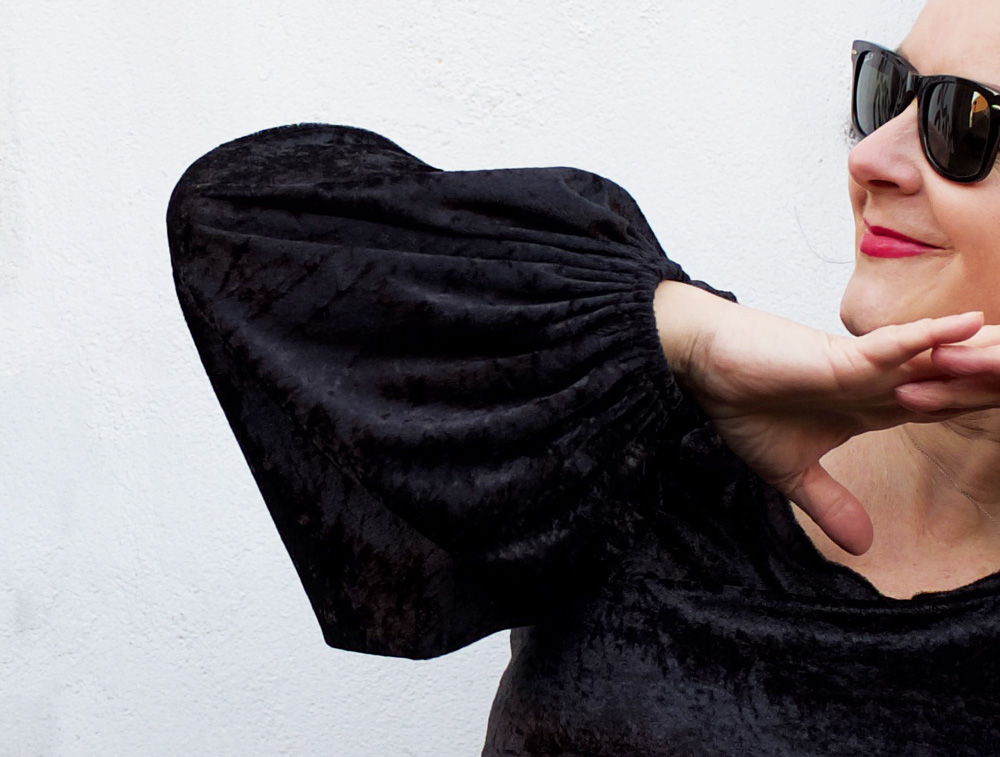
I’m kicking off with a new turtle-neck top, using the same self-drafted pattern as the black one I made not so long ago, which I might add might possible be my most worn thing ever, already!

Nothing needed to change but I really wanted to see if I could elimate some little folds from the underarm, across the bust. I figured that underarm armhold point might be sitting a bit high, so I lowered it a quarter of an inch and adjusted the sleeve to match.

It does fit a bit more comfortably but didn’t reduce the wrinkles! Haha. Still a lesson learned though. I luckily only adjusted the paper pattern. The digital version remains. But I am going to flatten off the sleeve head. It does seem to force my shoulder end to sit a little too high and it does measure a couple of mm’s longer than the armhole and because its a stretch knit there is no need for ease, so it will probably help. I do like the power of being able to tweak patterns here and there. It gives me a little buzz of control!

Once again the lazy in me couldn’t be arsed to set up another spool let alone the twin needle for the hems. So I zigzagged as usual. I kind of like the contrast of the zigs in between the black lines.

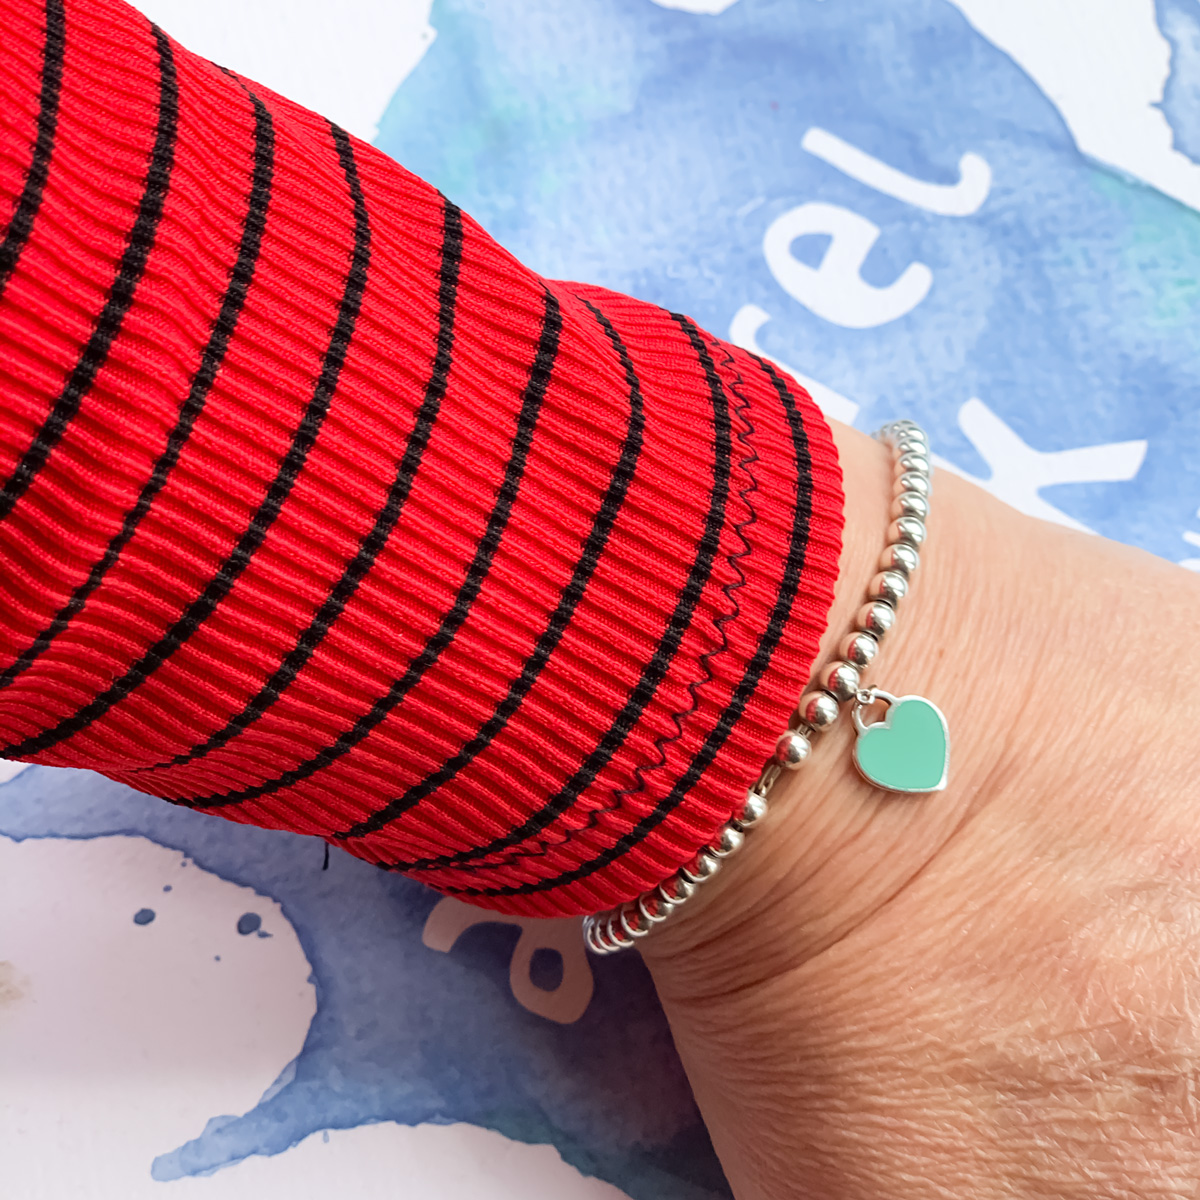
And I got the neck right this time! No silly amount of stretching. Just enough to fit. And its even more comfortable than the last.

The fabric is once again from Minerva.com. It’s a polyester rib knit in a lovely bright red colour with a narrow black stripe running round. I even made sure to match the stripes at the side. To be fair I wasn’t going to worry about it but the fabric behaved so well, it was harder not to!

This isn’t the end of stretchy tops. I definitely need them right now. And there is still room for improvement, and welcome opportunity for experimenting with different fabrics. Watch this space!

Vogue robe in a luxurious Liberty silk – my wfh wardrobe is looking better already!

I generally don’t have a go-to order for dressmaking. My thought processes vary according to mood, need and weather. Sometimes choosing pattern first and then pairing an appropriate fabric, sometimes the other way round, especially if I’m fabric shopping in real shops and then an idea will spring to mind while I’m stroking and bouncing and draping and holding all the materials aloft. The latter is a dangerous game though, and hasn’t helped stash mountain at all!

But when Minerva approached me with some Liberty silk offerings I was quick to choose which fabric but wasn’t so quick to pair a pattern. What a gift! But wow… what a blooming responsibility! What pattern would best showcase this heavenly fabric?

I needed a project with damage limitations. It had already arrived at a super work-busy point in time and there was only room for assignment within small allocated time-slots throughout the weeks.

Mood and need and weather came to the fore. I was so tired of shuffling round the house in my tatty old dressing gown. Sometimes I don’t even bother getting out of it to work – there’s actually no need when I’m working from home and nobody is going to see me. But a silk robe would have me sitting more upright, feeling so much better about myself, plus it’s getting warmer so I really don’t need to be enveloped in velour anymore. I had a need to swan around in silk! And a robe would be simple, right?!

In an ideal world I’d have drafted the pattern myself. I’m getting quite fond of the maths. But with time not on my side that wasn’t going to be a great option because it would need toiling, too. So a quick scout on the web presented me with V8888. A delightful selection of nightwear to accompany a very stylish robe. I ordered it from Minerva.

I also ordered a very large cutting mat and a new blade for my Fiskars rotary cutter. I’ve worked with silk satin only once before and it was a slippery beast. My scissors slid around the dining room table and I was cursing at every snip. But weighted down and cut slowly and carefully with said cutter, this time I had no problems at all. I was amazed at how little it frayed, especially with all the extra handling involved. Most of the seams except for the armholes are sewn with a French seam. And because I only had one shot of this, I checked and double-checked and triple-checked each side and pairing of seams before sewing. It was totally worth it of course because the inside is so neat and the robe so much stronger as a result.

I chose the longer sleeves for the shorter version of the robe. Because I like that look and it’s way more classy. The shorter sleeves involved a band of lace at the hem and that would have been far too fussy for the design of this fabric. I wanted to keep it as simple as possible.

But I had not anticipated all the rouleau loops. Haha. There was me, thinking simple robe tied at the waist with a belt. The belt was actually such a joy to make and press. So satisfying. But the loops I left for another day. And another day. Until I didn’t really have many days left to submit the finished article!

So I cracked on. And fell at the first hurdle. My smallest loop turner was too fat. The smallest drinking straw I had in the kitchen drawer (for the drinking straw/kebab stick trick) was too fat as well. So I remembered a trick my mum taught me, by tying the long threads left at the end of the seam to the end of a bodkin, or large-eye needle, and pulling through, eye of needle first. So satisfying that I was weirdly excited to do the rest and even made a little graphic tutorial for my sister in law!

There are two inside ties – one front left and the other inside right side seam. There are two belt loops inset on each side seam and there is a thread loop at the right front opening. I’m thinking of doing a tutorial for that too as it was quite fun to do.

I am so grateful to Minerva for the opportunity to sew with this fabric because it has definitely delivered some more valuable experience as well as a super luxurious wfh outfit! I must admit I was terrified of cutting into it at first but once I got going, any fear was allayed, largely due to the quality of those threads. It’s so stable, on grain and not at all like the silk I previously sewed that was fragile enough to catch on the rough skin of my hands! Liberty silk is most definitely worth its price point.

And just to note, it does make me sit straighter, it feels amazing to wear and it has got me out of doing the washing up!

Daniel is of course the man behind the lens and this was such a fun shoot. The look on my daughter’s face was priceless when she poked her head around the bedroom door to see what we were up to. Even more so when Dan said ‘Its not what it looks like’!! Haha. We are so doing our best at being embarrassing parents!

Please note: I am an Ambassador for Minerva and the fabric was given to me free of charge in exchange for a review. I purchased the pattern and all notions required. To see the original article and more of my Minerva Makes. Please visit my Minerva profile.

Tilly Agnes top with hacked sleeves

Tilly and the Buttons Agnes sleeve hack

I feel like I haven’t posted anything in yonks though I did publish a write up about my By Hand London Rumana Coat over at Minerva. That’s the deal, see. They send me choice fabric, I whip something up and give them an exclusive write-up in exchange. If you haven’t seen it on my instagram grid @ooobop, do hop over to here at my Minerva profile to have a looksee!

The coat was such a lovely project to work on but if you’ve worked on one before, and if you don’t get much time to sew, you’ll know just how long it takes in short bursts. As soon as I finished it I promised myself that my next project would be a quicker one. A Tilly and the Buttons Agnes top – Just the ticket for a swift sew on a spare Saturday morning.

Tilly Agnes top in crushed black velvet

For clarity I cut it out the night before, but seriously, this top was ready to wear by lunchtime.

It helped that I’ve made three others before: One in a navy/ivory striped cotton jersey, a plain black cotton jersey one and a navy/red/ivory striped one in a gorgeous French Terry. Each time I opted for the ruched neckline and those gorgeous puffy sleeves but this time I thought I’d change things up a bit with a bishop sleeve.

To do this, I took the regular full length template and slashed from the hem of the sleeve to the arc of the sleeve cap. I spread the pieces, traced the result and repeated the process again with the new piece to create the flare.

I was tempted to go larger still but was worried the fabric would be too bulky gathered in at the wrist.

Tilly Agnes sleeve hack detail

The fabric is a gorgeous stretch crushed velvet from Fabrics Galore. I bought it eons ago when we were allowed to go actual fabric shopping. It was definitely earmarked for an Agnes and I’m so pleased to have stuck to plan for a change! My only concern was the extent of stretch compared to the jerseys I’d used before.

I measured the bodice pattern pieces and physically stretched the fabric to guesstimate the result and I’m glad to report that it fits. Albeit very snuggly! There would be no hope if there were any remaining mince pies to be had!

Though it has to be said,  I do like the contrast of the close fitting body against the draping sleeves. Luckily!

To sew this top you begin by stabilising the shoulder seams with some tape or ribbon or suchlike. I skipped this stage with one that I made with disastrous results – the shoulder stretched out like Billy-O! So I made sure to obey that instruction this time.

And then on to that neckband. Oh boy was I in for a ‘treat’ this time.  The object is to stretch the doubled over loop of fabric as you stitch it around the neckline. Well, the crushed velvet, as soft and lovely as it is, definitely wasn’t designed for such treatment. And it curled up like a goodun on the raw edge I wanted to sew. It became a nail-biting 8-stage process of pressing, pinning, unpinning, pressing, basting, pressing, sewing and eventually overlocking which thankfully sliced off the curl and the bulk thus making the topstitching way easier. I decided against the ruching at the neckline to avoid tempting fate!

Tilly Agnes top detail of neckline

From this point on it was seriously plain sailing. The sleeves are set in flat. No ease necessary on the cap. The side seams and underarm seams are sewn in one go. I used the overlocker for this – so satisfying! I hemmed the bottom up with a Zigzag stitch, mostly because I’m too lazy to set up another spool and swap out the needle for a twin one! In. Any case the stitches were going to sink in to the velvet so it didn’t really matter.

And finally I cut some Prym 7mm standard elastic (Aff link) just a bit wider than my wrist and wide enough to go over my knuckles plus bit extra for the overlap. (Its all very calculated round here!) I threaded the elastic through a gap in the sleeve hem that I sewed up and zig zagged the overlapped ends before sewing up the gap.

And then my hacked-sleeve Tilly Agnes was ready to go!

Tilly Agnes sleeve hack

I love that she’ll be a staple in place of any boring long sleeve Tee and can be dressed up or down owing to the slightly more luxurious fabric. Just got to remember to pull those sleeves up if I’ve got soup for tea!

And I’m so glad this was as successful as was envisaged because I have just taken delivery of a new length of equally gorgeous stretch velvet from Minerva in leopard print which I can’t wait to make!

Thanks to Daniel for my impromptu photoshoot. We went for a walk trying to avoid people and ended up down the back of the bus garage… such glamour!

Tilly Agnes top with sleeve hack

And thanks to you my lovely reader,  for taking the time to read my ramblings and for your continuing and valued support. Hope you are also managing to find joy in the small things to keep you happy in these weird times.

More soon
Janene x

Alix in Black Watch

BHL Alix dress in Black Watch tartan

This is my second version of the By Hand London Alix Dress. The first was a test version that I didn’t get round to blogging but in any case this one is way better!

Alix is such a great design. Echoes of the 70s and of the 40s even, with its flattering midriff and gathered bustline. Incidentally, the first version I pattern tested had box pleats at the bust line which didn’t work for me so the gathered option is way better.

I love the full sleeves, made possible by the shoulder pleat and the elasticated wrists. Pays to be a bit generous with the elastic though. The first one I made pretty much turned my hands blue!

Another plus for this dress is that there are no fussy closures. No zips, no hook and eyes, no buttons… nada! Just a lovely long sash to tie as tight or as loose as you like. The neckline is perfectly wide enough to get over even my moon head and theres a pleat at the back to balance out the fullness of the front.

Alix in black watch back

And no lining! Just good old serged seams. Which works fabulously for this poly viscose tartan. I have been meaning to use Black Watch variety for some time, since I made my BHL Sabrina dress back in 2014. I loved how it made a contrast against the Royal Stewart tartan but still remain nervous that someone will shoot me down for mixing of the clans!

I’ve been wearing this to work – a lot – and it is perfectly comfortable to wear sitting down, standing up, running for the bus and climbing stairs. And its a no brainer for getting ready in the morning. Cue plenty dernier tights and a trusty pair of Doc Martens!