Susannah quilt block

quilt block susannah

Say hello to Susannah, my latest quilt block from issue 15 ‘Art of Quilting’. She looked to be a little complicated from the instructions but as with most things it made sense when the pieces were cut and under the foot!

This was another opportunity to practice those set-in seams. To begin with, the green gingham rectangles and the red floral tapered rectangles were joined in pairs to make the four double patches that occupy the corners. The first double patch was sewn to one side of the orange central square. Then the next double patch is sewn to the first, and again to the central square.

Before sewing I marked the 6mm seam line on the wrong side of the central square to ensure that the set in seams started and finished from the point of seamlines crossing and not the edge of the fabric like the other seams.

All went swimmingly until the last and final seam, which simply didn’t match up. Took me a while to figure but it was easily resolved by unpicking a couple of stitches and restitching to fit. I’d over stepped the corner seam and it had thrown out the position of the last piece!

This seemed like such an easy one from the start, and it is, really, but a lot of care is needed to make it work accurately.

Block Facts:

Name: Susannah
History: This is a variation of a block known as ‘Oh Susannah’, the popular song which was first published in America in 1848.
Level: Set in seams require experience.
No. of pieces: 9

Progress report:

Block 1: The Double Four Patch
Block 2: The Whirlwind
Block 3: The Sailboat
Block 4: The Shoo-fly
Block 5: The Trafalgar
Block 6: The Windmill
Block 7: The Chequer Square
Block 8: The Diamond Square
Block 9: The Cactus Pot
Block 10: The Sawtooth Star
Block 11: To come!
Block 12: The Windmill Sails block
Block 13: The Basket of Flowers block
Block 14: Susannah

Basket of Flowers quilt block

basket of flowers quilt block

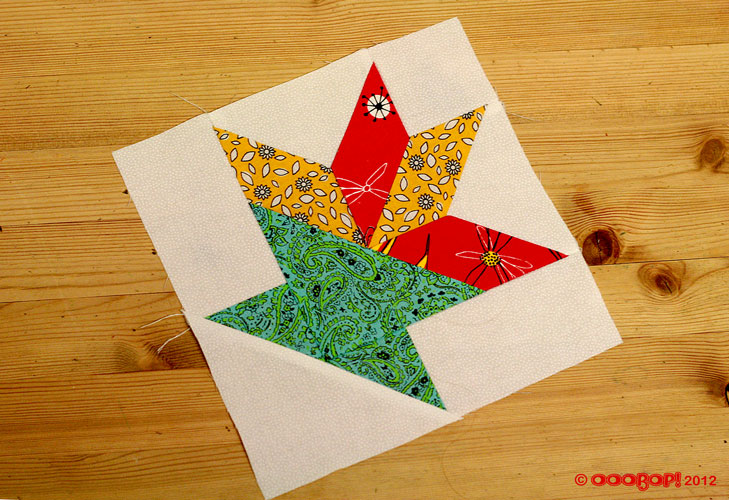
Introducing the Basket of Flowers block, from issue 14 ‘Art of Quilting’. And what a little trickster this was! Just when you get the hang of ‘chaining’ and running seams from top to bottom, this little bunch of pieces involved set-in seams, meaning the seams meet at the same point rather than the lines of stitching crossing over.

Though my quarter inch foot is still my best friend when it comes to quilting, in this instance it is also advisable to draw on the seam lines so you can accurately pin point where the seams will meet.

The red flower diamond shape and the orange daisy diamond shape are seamed together, starting and ending at the seam points. This is repeated for the second set.

The small white triangles are then positioned between the diamond pairs, and each side sewn from edge to seam point.

These two sets are then joined along the long edges of the diamonds from seam point to edge.

The white square then is inserted between the two sets, being careful to meet at the seam points.

Then it starts to get a little easier as the big green paisley triangle is sewn along the long edge. No seam points to meet just edge to edge seam.

The little green paisley triangles are then seamed to the white rectangles and seamed to each side.

One last big white triangle to sew across the bottom… a good old press … et voilà!

This one did take a little more time than the others but it was still a pleasure to make and its a lovely one to add to the set.

Block Facts:

Name: ‘Basket of Flowers’ or ‘Lily Basket’ or ‘Flower Basket’
History: This design was ideally suited to the dress and feedsack prints of 1930s America, where it was a particular favourite
Level: Set in seams require experience.
No. of pieces:13

Progress report:

Block 1: The Double Four Patch
Block 2: The Whirlwind
Block 3: The Sailboat
Block 4: The Shoo-fly
Block 5: The Trafalgar
Block 6: The Windmill
Block 7: The Chequer Square
Block 8: The Diamond Square
Block 9: The Cactus Pot
Block 10: The Sawtooth Star
Block 11: To come!
Block 12: The Windmill Sails block
Block 13: The Basket of Flowers block