ooobop! review: Burda Style November 2013

Burda cover November 2013

Good morning Burda lovers! The sky is blue, the sun is streaming through my window and it’s hard to imagine that we will all be battening down the hatches in preparation for a freak storm tonight. Quite frankly the idea of being house bound for a few days suits me just fine. Mustn’t forget to pop out for emergency supply of spools! 😉

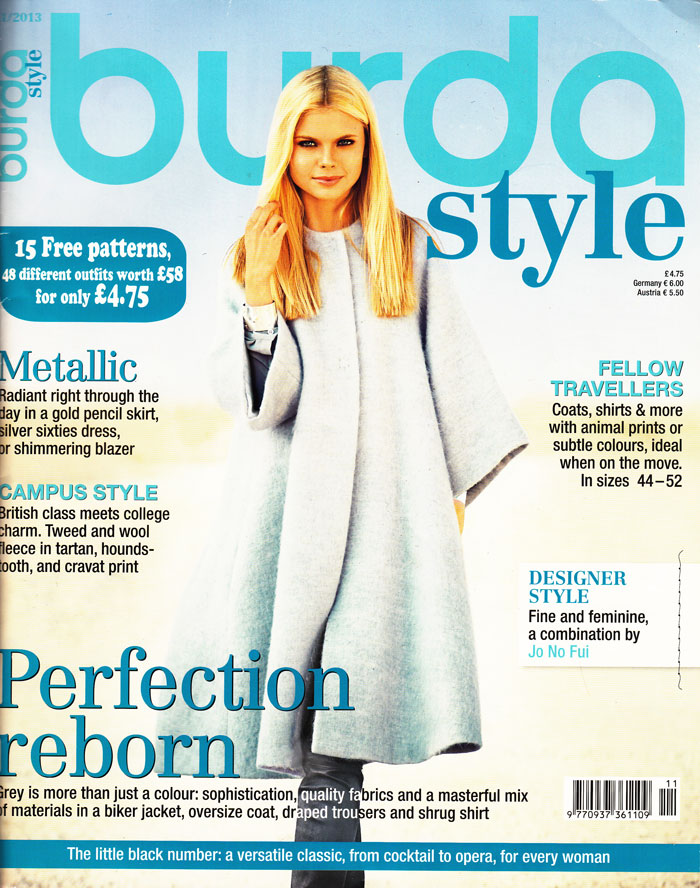
I’m going to start with the cover image because that’s where I gave my first ‘ooo’! Ice-blue wool fleece. It’s just one of the fabric options I’ve been mulling over for my coat, when I eventually get to it. I didn’t really clock the style – it looks fine on the cover – but I think the unfortunate stance of the model in the top left image below, kind of ruins the class and brings on the tent!

This first section is all about Grey. (Even though that coat has an ice blue hue about it on the cover!) I wish I could wear grey with conviction. It does look dramatic, moreso than black, because you can actually see the detail in the cut and style. But it just accentuates my deathly palor. I don’t mind being ‘pale and interesting’ but when people ask if you are feeling ok more than once in a day, you know there’s an issue!

I’m intrigued by the strides (middle row, first col). I love that wrapped-look from the front view. I almost want there to be tails behind. But that amazing mirror prop only serves to highlight how ‘unusual’ they are from the side. Steals every ounce of flattery I’m afraid.

The blazer (centre pic) is a great wardrobe standard. It’s made in a twill weave wool here. Nice and heavy and great paired with skinnies.

And I really like the biker-style jacket in ponte jersey with leather sleeves and trim. (row 2, col 3).

There’s a strong likelihood of an overlocker joining the family soon and so the world of knits is becoming more of interest to me. I have a side-cutter attachment on my machine which doesn’t render the process impossible but it’s just really slow compared to the formula one skills of an overlocker! And I’m just imagining how delightfully speedy that two-piece jersey set would be to run up. It’s an ‘Easy’ one too! In case you think, as I did that its a long sleeve top with under arm air holes, I can confirm that its a sleeveless cowl-neck tank with a separate long-sleeved bias-cut shrug. (col 3, row 1)

Burda 11-13 Grey garments
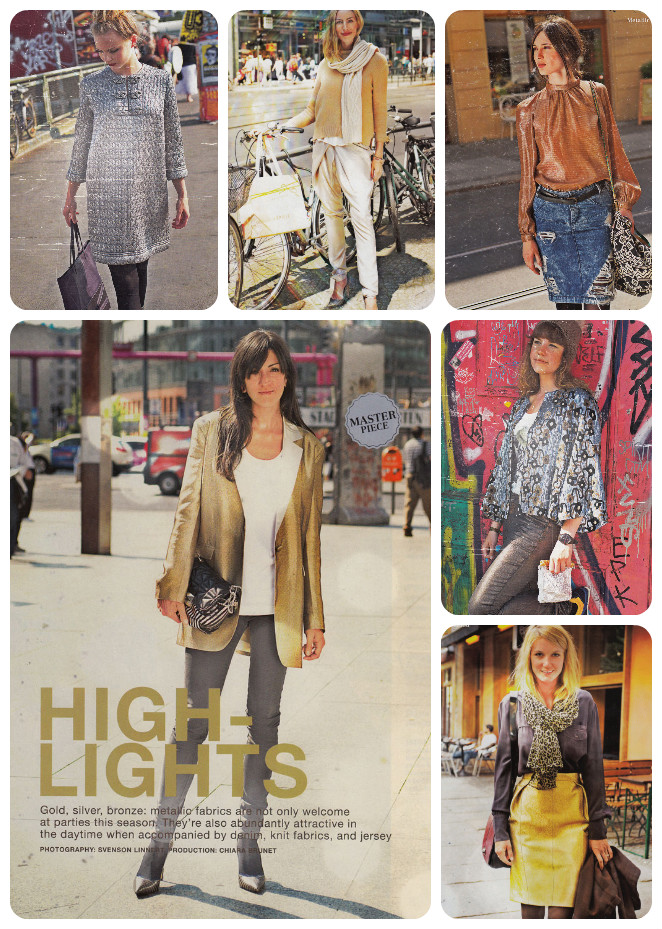
It is heading for that time of year when we need to add a little sparkle to the dark winter nights and days. And party season will be upon us before you know it. So although I’m not favouring much in this next ‘Metallic Mood’ section, it’s inspiring enough to make me go on a treasure hunt for some shiny fabric.

The little cropped jacket (2nd row, 3rd col) is not dissimilar to the Vogue jacket I made recently. Excepting the flared sleeves. And I think if I could get past that fabric it would be a cute cape-like addition in wool or silk.

The skirt, (3rd row, 3rd col) has the same laid in pleats as the strides in the first section, but I can’t see a side view here to see what happens. The gold lamé is a good distraction and defo a new fabric consideration though!

burda 11-13 metallic garments

I need no encouragement to make black clothes. It was my ‘colour’ of choice before sewing and I only sew coloured things because I think I ought to veer away from black. Because black is boring, no? Actually I don’t think it is boring and there’s a part of me that wants to revert to black every winter. The other inner me just fights it off all the time!

And so here temptation is laid before me once again in the shape of the inevitable LBD’s.

I love the idea of a massive silk flower added to an otherwise simple and classy dress. (row 1, col 1) and I really want to incorporate some cotton lace into garments. If I can find some, that is! Looks great on the bodice section of that dress (row 1, col 1). No sweaty pits either!

The line drawing of the fitted dress (row 3, col 1) didn’t sell well to me at all. I didn’t see the point in sewing quite so many sections together unless one is doing some serious colour blocking. But if the effect is a sophisticated dress which moulds to the figure, such as this one. I’m sold!

I quite like the coat dress with it’s low cut V-neck and front snap fastener band too (3rd row, 3rd col). Well, that is of course if somebody would sew on those little darling snap fasteners for me. Serious pet-hate!

I’m not quite sure what’s going on with the crêpe de chine dress (3rd row, 2nd col). It is fundamentally the same as the coat dress but with gathering at the vertical seams and leg of mutton sleeves. A bit too much pouffiness going on for me. Apparently this dress is reminiscent of the ‘wirtschaftswunder’ era. Learn something new every day!

burda 11-13 black garments

Alessia Giacobino is the highlighted designer in this issue. I find these mini Burda features inspiring as I never studied fashion so never had any prompting to delve into the lives of designers. Guilt always overcomes me when I confess (or not) to not having heard of a certain designer. And I love it when I come across one that I truly love. I googled some more on Alessia and I really like her classy, flattering and surprising designs. I’ll leave you to do your own recce. I’m sure you won’t be disappointed.

Burda has supplied patterns for this designer-style outfit below. Imagine how luxurious that washed silk blouse would feel. I think the flounce would annoy me in the front. Would much prefer it at the side. But I do appreciate the detail, nonetheless.

Alessia Giacobino blouse and skirt

It always surprises me, how drawn to campus style I am. I am neither the age or of the leaning towards these fashions so I can only assume that Burda sells them well or that students have properly upped their game recently!

Let’s start with the dress (row 1, col 1). Not dissimilar to some of the summer dresses I have made this year, but with the addition of a midriff (how I love a midriff), a low V-neck, long sleeves and made with a delicious mousseline (a very fine, semi-opaque fabric similar to muslin, apparently). So actually quite different, really! But I do love it!

I also love the cowl neck knit dress (row 2, col 3). Mostly because anything in tartan/plaid makes me go ‘ooo’ right now. And because I am dreaming of being behind the spools of an overlocker soon!

I don’t wear strides. Mostly because I have never found any to fit properly. But if I get the inclination one day, I will definitely be fashioning some like the ones in row 2, col 2.

The wind is starting to pick up now. We’ve got ghostly ‘wooooos’ whispering round the windows. So that’s why I guess I’m being drawn away from ‘classy’ and towards the ‘practical’ of the odd hooded-scarf (row 1 col 2). It’s not knitted but sewn from a knitted fabric and it has pockets too! Might need an overlocker for that one too!

burda 11-13 campus style

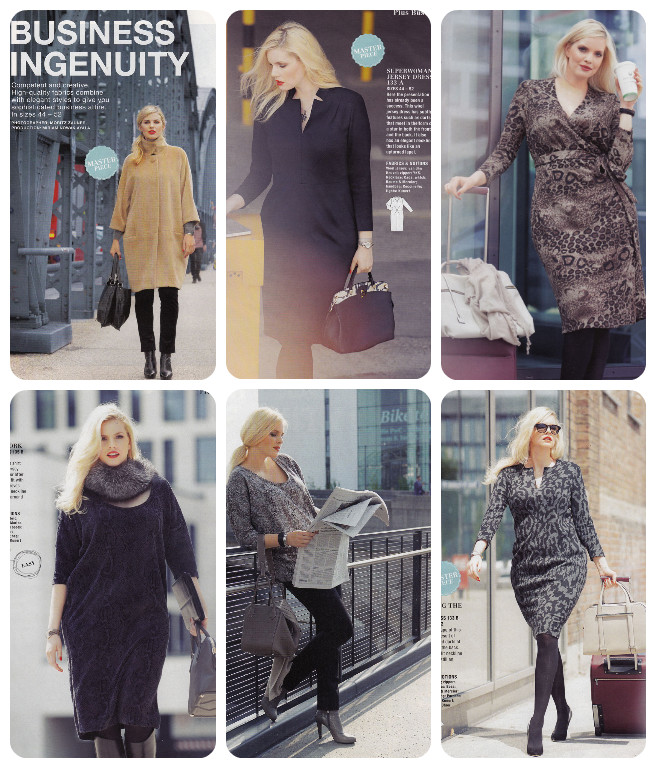
Sophistication is definitely the theme for the plus fashions this month. Loving the star-shaped darts in the wool jersey dress (row 1, col 2). The neckline is lovely too and the shoulder line is really sharp. The dress in row 2, col 3 is pretty much the same but with a different neckline, creating a less formal but nonetheless still stylish look.

The tie-waist dress (row1, col 3) is very flattering too. Or is it that I’m just sold on the idea of animal print angora jersey?!

burda 11-13 plus fashions

The kids section is great as always. A great selection of fun, versatile staples for little girls. But what about the boys? Not that I have a little boy but it does seem a little unjust to leave them out.

I’m also a little bit miffed as Little Miss O sits outside these sizes. I tried to make a pair of shorts from a very small ladies size recently but of course the proportions were all wrong and though they fit round the waist, they were massively massive elsewhere. So perhaps I need to attempt to scale up the shorts pattern (row 3, col 1) to see what happens. The dress is super cute too but I am sad to say that most 9 year olds seem to have ditched the dresses for now.

burda 11-13 kids clothes

Well the sun has gone in. The ‘ooos’ are getting a little more howly so I better get finding some patterns… I mean battens!

Keep safe and warm everyone xxx

On winning my most favourite pattern yet

Butterick_547I do worry myself sometimes. It’s not as if I don’t have enough patterns. It’s not even as if I don’t own any lovely vintage coat patterns. They just weren’t the right ones. And I just didn’t know it until I saw this one. And I wanted it.

The trouble is, someone else clearly had the same line of thinking, and that person wanted it badly too. We went head to head on Ebay. I even warned my prospective opponent up front, via Twitter, that I really really wanted it. But when the bidding reached £40, still with 3 days to go, I decided to back out.

But I dreamt about the finished coat in the meantime. I had a vivid dream of twirling in a garden. Heaven knows where I was. That was beside the point. It was enough of a sign that I had to get back on that bidding horse. After all, how much in real money would a ready made coat like that cost me in real life? I bags I couldn’t even find one to fit so perfectly for any money.

But I wasn’t that hasty, oh no. I did a frantic 2-hour search online just to check that there wasn’t the self same pattern in hyperspace ready to pop in my shopping cart for a fiver. Of course there wasn’t. In fact there wasn’t a single solitary fitted coat pattern remotely similar, anywhere on the web. I guess that’s why I had such a fiesty opponent to deal with.

Anyhows. To cut a long story of a 7-day bid a little bit shorter. I won this gorgeous pattern for a princessly sum of £50. It made a giant hole in my monthly budget and It’s true to say I would have happily survived without it. But I don’t regret it one tiny little bit.

I’m casually stroking wool in all my local fabric shops. Doing the sums and still constantly dreaming of twirling around in the finished article. But I have to say, it’s doing nothing to help me keep cool at night, I can tell ya!

Me Made May 13: My final days

So here we are. The final days of Me Made May ’13! I feel quite sad in a way. But relieved. And accomplished. And enlightened. So thank you SoZo for setting this brilliant challenge. I didn’t realize quite what a knock on effect it would have. Or how it would make me feel. I wholly recommend this challenge to anyone who has yet to take the plunge. 

I really didn’t think I would make it to the end of the month. For sure there were repeats and some days no photo evidence at all. In reality, taking a photo of yourself every day is really difficult. Easy at first with all the initial enthusiasm for the challenge but then harder each day as the sun disappears, the hubby sets of earlier for work and the outfits get more tight-fitting the older they are!

But the journey was worth it. It was fantastic to focus each day on each hand made garment and realise where I’ve come from and what I’ve arrived at. Confirmation on what I’ve learned and achieved was invaluable. I don’t have time to stop and think properly about most things these days, especially what I’m going to wear on any particular day. So this was a fantastic excuse for self-indulged focussing, on past experience as well as some future plans. Oh yes, of course the flip side of the coin has meant my project list has increased ten-fold. But hey that list always makes for sweet dreams, if nothing else!

So to wrap up… the final days of  Me Made May ’13.

Jersey cowl neck top

DAY 22: Silk touch jersey cowl top and wool pencil skirt
Neither of these are blogged, I made them so long ago. But the cowl top is made from a free pattern on Burdastyle by Ichigogirl. Its the same as the stripy one I made. The skirt is a Simplicity pattern that my mum gave me to kick start my sewing antics. It has a little vent on the front knee. I didn’t line it, unfortunately and this is something I would never do with wool now. I should really go back and line it. It would hang much better and not stick to my tights!

Day 23 black self-drafted pencil skirt

DAY 23: Black self-drafted pencil skirt
This is possibly the most worn and practical of garments in my wardrobe. It fits like a glove, because I drafted it to my exact measurements. It’s properly lined and the lining is even properly attached to the vent. The waistband incorporates a woven interfacing so it doesn’t roll and is fastened by a hook and bar instead of a rubbish ‘eye’! It was a fantastic learning curve making this skirt. So absolutely worth all the effort that it feels fantastic to wear. I always imagined a whole weeks worth of these to choose from and I still think that is highly necessary. They are perfect work skirts and glam up nicely for a spontaneous evening out too!

DAY 24: Stripy wool mini A-line skirt
A miserable day. No sunshine at all, so the woolly skirt came back out. No photographer today I’m afraid. I’ve come to realise how much I wear this skirt. Mostly when I can’t think of anything else to wear. It fits; it’s comfortable; it goes with DMs… and it keeps my butt warm!

Day 25 mmm13 Elisalex shortened

DAY 25: The shortened Elisalex
Today was the 20th anniversary of the day my dad died. Always a sad day. But always a good excuse to don a pretty dress and catch up with my wonderful brothers and sisters, nieces and nephews. The cemetery is a bit of a trek from the bus stop so I needed to sport something easy to walk in. Small heels means small skirt in my world so there was only one thing to do. And that was to chop the bottom off my test Elisalex dress! So glad I did. The duvet cover did good! Although I love my longer rosy version, it’s kind of ‘for best’ but this cheeky little version is now a great little throw-on when-the-sun-shines-and-go dress!

DAY 26: Grey pencil skirt
No photographic evidence today. I wore the first pencil skirt I ever drafted which still fits pretty well. Its lined but has no vent. I was taking things one step at a time back then and to learn to create a vent was information overload! I have to take pigeon steps but it still works. It’s a good staple, though a little boring. It’s days are numbered as soon as the others are on the cutting table!

Day 27 goat eating dress

DAY 27: First summer dress of the year
Today we went to the Surrey County Show. An ideal place to sport a full on flowery frock. Not such a great idea to wear in the goat tent though! Note that Mr O sought his photo opportunity before letting me know what was occurring! I still love this dress but I need to take some volume out of the back. I didn’t notice before but it gapes at the zip. I’m pretty sure its a simple fix. And hopefully it will fit better.

Day 28 Danielle dress

DAY 28: Danielle dress
Now here’s a blast from the past. Almost 2 years ago to the day. It was a bit of a squeeze, I can tell you. So much wrong with this dress but I still like the vibe of it. The fabric was a charity shop find, unsure of the content but it’s soooo itchy and scratchy. I thought I was being out there by using red lining but that turned out to be a no-no with the pale open weave fabric on the skirt! I can’t really breathe in this dress and you can tell by the pull across my chest but this dress is a lovely reminder that I should make another that fits in a much lovelier fabric.

Day 29 button back top

DAY 29: Button back retro top
I was fast running out on day 29 so it was a great propmt to rectify some issues with some garments I don’t tend to wear any more. This one in particular was really annoying to wear because I made the neckhole too small. I really liked the jewel neckline but in reality it kind of chokes you to death. Only problem was that the first buttonhole started right at the top, so to lob a centimetre off the neckline would halve my first buttonhole. My need to wear a me-made top spurred on a quick fix and I replaced the buttonhole with a press-stud and sewed the button on top so nobody will ever know!

Day 30 vintage pencil skirt with pockets

DAY 30: Vintage pencil skirt with pockets
Not yet blogged but again, a hurried make out of desperation but boy I’m glad. I’ve been meaning to make this for yonks! It still needs some fine tuning and this is really just a test garment but I will fill in the details when I blog it. But what’s more to say? Its a pencil skirt with pleats and front pockets… hooray!

Day 31 1940s shoe dress

DAY 31: 1940s shoe dress again!
A shameless repeat but one I’m prepared to wear again and again. This is by far one of my favourite dresses. It gets comments from total strangers as I stroll down to Sainsbo’s. It’s cool and comfy and is covered in shoes! This is the item of clothing that I need at least 5 more of. Along with 7 pencils skirts, my wardrobe should have at least 7 of these too!

And so we leave the month of May and venture on to pastures new. A prom dress for my friend’s daughter is on the go, FBA’s and all, a bespoke pencil skirt for my daughter’s birthday present and another that was bid on by my friend at the school auction. (Far too nervous to ask what she bid!)

Thank you as always for your wonderful comments and support x

Me-made May’13: My first week
Me-made May’13: My second week/
Me-made May’13: My third week/

Me Made May 13: My third week

I did it. I actually made 3 weeks of Me Made May ’13! It wasn’t as desperate as I thought it would be and I’ve really enjoyed it! The only thing that has been a bit tricky is getting a photo when the mister has left earlier for work.

Most of the garments I have worn this week have issues. Mostly fitting issues. Things drafted either too big or too small and things that no longer fit because of some unwelcome poundage that crept up over the last year or so! I must learn to create things that fit in the now and not for when the pounds are shed. Because it doesn’t work like that!

Another revelation, which comes as no surprise to me, is that I need more skirts and tops for work. I’ve no shortage of ideas. Just got to pull my finger out!

So here we go. Week 3 of  Me Made May ’13.

pin dot jersey top

DAY 15: Pin dot jersey top
New Look 6753. This is one of the few jersey tops I’ve made. I like how it’s an easy-to-wear casual top but it’s not my favourite top to wear. Perhaps because I made it too big and its defied all my attempts of shrinkage too! I have since been advised to make a size smaller when using stretch fabric. I’m sure I’d love it more if it fit more snuggly. Still better than a Primani top though!

stripy cowl top

DAY 16: Stripy cowl top
This was a great free pattern from the Burdastyle website. Really simple to put together and really easy to wear. I’m not convinced I graded it up properly, or enough for that matter so the cowl isn’t as dramatic as it could have been. But I still like it.

pinstripe wool jacket

DAY 17: Wool pinstripe jacket
This is a pattern from Burdastyle magazine, issue 11/2010. It was my first venture into tailoring and is anything but perfect but it prompted me to delve more into the art of old school tailoring techniques which are now ready to employ when I embark on another. Once again I overestimated the size but that means it’s great to wear with a few layers underneath and boy I needed them today! The pinky mauve pinstripe means it doesn’t really go with much apart from a flooky pinstripe skirt that I owned already!

floral mini skirt

DAY 18: Floral mini skirt
I made this in march last year and it still feels good teamed with Docs and a cardi. Keep meaning to make more of these. They are so simple and so cute and so easy to wear. So long as its none too windy!

tartan shorts

DAY 19: Plaid shorts
I do enjoy wearing these. Despite the fabric going all bobbly on me. Only on the weekend, mind. Won’t catch me in the office with that much leg out! I wore them down to the river pub to meet some friends. The pattern I used was Simplicity 2659. A simple and satisfying overnight make. There will be more of these. It’s just a matter of time. However I will not be using the twill tape facing method. I will draft a properfacing this time. They do need a bit more structure at the waist and front. And I must make them a wee bit bigger next time!

black rose party dress

DAY 20: Black rose party dress
This is me and my lovely fella, the last of the party people, at the end of his spectacular 40th birthday party. It was taken in the wee hours of the morning and so I’m very glad the photo is such poor quality! The dress, which I just about fit into, was whipped up overnight for a party March last year. I have since found some very similar fabric which will be another one of these one day!

DAY 21: Wool check skirt
I didn’t manage to get a photo of today but rest assured it was a me-made kinda day. I wore the same wool check skirt I sported on the second week, day 10. Crazy that May has turned out cold enough to sport a woolly skirt more than once in the space of a couple of weeks.

Can’t believe there’s only one more week left. I think I’m going to have to dig real deep now!

Laters! x

Me-made May’13: My first week
Me-made May’13: My second week/

Me Made May 13: My second week

If I’m honest, I thought that So Zo’s Me Made May ’13 would be an easy 4-poster for the month of May. I really thought it would help to bridge the massive gap between my sporadic makes and make me look more efficient than I actually am. Well, it has been a good gap-bridger for sure, but it hasn’t been a doddle!

I’m sure many of you can relate to the pre-work madness of getting kids off to school, while catching up on the jobs you were meant to do the night before, shouting threats of x-box confiscation if the son doesn’t arise anytime soon, feeding the cats with one hand and signing homework books with the other before getting one’s own butt out the door to work. So throw a rummage through the drawers for a me-made outfit and fluttering of the eyelashes at the general direction of ones hubster for a quick photoshoot into the equation and, well you can imagine what the neighbours must think!

But all that aside. It has been a total eye opener. I have worn things I had completely forgotten about and there has been a realisation of how much I’ve advanced. I may even go back to some of these projects and fix some niggling issues. But I equally might not!

So here we go. Week 2 of  Me Made May ’13.

Vintage wing collar blouse

DAY 8: 1950s wing-collar blouse
Butterick 556. Im still very happy with this blouse even though the shoulder pads have gone all lumpy and weird in the wash! The sleeve heads leave a lot to be desired. I remember thinking at the time that the sleeve looked more gathered than eased into the armscye. I really need to make another but better. So good to wear to work.

Day 9 1940s shoe dress

DAY 9: 1940s Shoe Dress
Butterick 2638. This is the same pattern I used for the red version and with the same issues, ie button placement. I think I prefer the shorter length sleeve. The shoe-print fabric was such a great find from a charity shop. It’s 100% cotton with such a smooth finish. I need more of these dresses.

Day 10 wool check skirt mmm13

DAY 10: Wool check skirt
I wasn’t expecting to include this skirt in May. It’s a blanket-weight wool, an ex-throw in fact, turned pencil skirt! But we all know how the weather in Blighty is a constant surprise! I self-drafted the pattern. I didn’t stay stitch the waistline before adding the waistband, hence why it probably came up a bit bigger and just noticed that the lining peeps at the hem otherwise, quite happy with this one.

Day 11 mmm13

DAY 11: Dotty shawl collar swing jacket
I made this a good couple of years back from a free pattern in Sew magazine. It is a great spring jacket with three-quarter sleeves and I love the fabric. I had to create the buttonholes by hand but apart from that it was very easy to put together as far as I remember. I do enjoy wearing it. Something about the collar makes it feel vintage and glamourous.

DAY 12: Grey pencil skirt
Hubby off to work early + non obliging offspring = no photo! But see photo above. I wore it yesterday too. Don’t judge!

day 13 stripe wool skirt

DAY 13: Stripy wool skirt
You really can tell how chilly it was this week. All the wool came out to play! This is a very simple A-line mini skirt from Burdastyle magazine. The fabric is a twill-backed Italian wool from Ditto Fabrics in Brighton. Very lovely to wear.

Day 14 lace peasant top

DAY 14: Lace-trimmed peasant top
I didn’t think I had much love for this top. Mostly because it’s white and partly because of the lace. But seeing it here with a black skirt and after wallowing in all the lovely comments I got at work, I think I do now. One of the quickest tops to rustle up and tuck into a skirt. I need a red one! 

Feels so good to round up week two. Only a couple of days for week three… eek! See you soon! x

Pinstripe Spencer Jacket: the inside story

finished jacket by the fountains

First I must thank you all for your lovely comments on my initial post about the finished jacket. I’m so touched and I love that warm and fuzzy feeling I get when they find their way into my mailbox!

So as promised, here is some nitty gritty detail from the project for those that might be considering this jacket for the first time.

Burda jacket #131 11/2012

Though I am pleased overall, with the results. I can’t help being niggled that more tailoring techniques weren’t employed. I’ve only myself to blame. I could have researched them myself but there’s always a next time!

The jacket is cut from pieces #131, Burda Style magazine 11/2010 but the construction details are from #130. The only difference being that I chose the full length sleeves with vents… and proper working buttonholes… glutton for punishment, me!

I made the toile back in February and was intending to make adjustments to the waist only. But I got worried about it’s ‘snugness’ and just went up a size in the end. A little bit chicken perhaps, but also concerned that I was more likely to be wearing a few layers underneath in the colder months!

It is essential that you make a toile. There is so much work involved in this, you don’t want to get to the end to find it doesn’t fit!!!

My first slip up, that I DIDN’T clock until I got round to dealing with it, was the back vent. I am so used to adding the statutory 15mm seam allowance to each edge that I clean forgot to add 4cm as specified, to the vent openings. Doh. I could kick myself. It doesn’t look so bad in the photos but I know that it isn’t created properly. It is intended as a ‘split’ but would have been so much neater with an interfaced proper allowance. So please remember to do this if and when you cut yours! I would even go as far as to make it a vent rather than a split. But that opens another can of worms with the lining!

back split that really wants to be a vent!

The miniature pattern layouts indicate what pieces are to be interfaced with fusible interfacing. I did toy with the idea of sewing traditional interfacing. I liked the idea of employing some traditional skills but I agreed with myself that I was embarking on a big enough journey and that the fusible stuff would be just as good for what I was trying to achieve.

And so the interfaced pieces included: centre front; side front; outer collar stand; under collar; back facing; outer pocket flap; neck and armhole edge of centre back.

The main construction of the body came together very easily. Darts seams and pressing.

But then came my reality check. Welt pockets with flaps. Needless to say I practiced these before the real thing. You can see how I got on with this here. Well worth checking out YouTube or the Burda site for instructions. I challenge anyone to get the gist of welt pockets from the following instructions!! Or it could be just me!!

pocket instructions

I am over the moon at how they turned out in the finished fabric. I don’t intend to put anything in the pockets, for goodness sakes, don’t want to misshapen them! But I am so proud when I slip my hand inside. Feels so special! And no one gets to see that lovely welt under the flap, except moi! Though I have pointed it out to a few of my friends who smile loyally with raised eyebrows!

welt pocket
welt pocket
pocket lining
peek at the pocket lining

Next up was the notched collar. This was actually not as scary as I was anticipating. I did pin and I did baste before stitching and it all worked out just fine. The stitches sank invisibly into the wool when I machined the seam so I didn’t want to risk having to unpick at any point! Neat trimming and clipping is essential and it is also important to take care when you ‘push out your points’ Very easy to push a pointed implement through the point of the lapel, (especially if you are using soft wool) and ruin everything. It’s worth being slow and patient with this part because it is such a lovely sharp feature. You’ll be really chuffed when it comes together at this point.

pointy lapel
pointy lapel and notched collar

There was a suggestion to sew the pointed lapels to the underside of the collar to keep them in place but I didn’t really feel this was necessary for the weight of the fabric I used. I like being able to turn up the collar when its chilly!

Now shall we talk mitred corners? I’m so glad these were included. It makes so much sense and makes such neat corners. Nothing else will ever do from now on! Of course it goes without saying that you won’t survive with these instructions, especially if this is your first time…!

mitred corner instructions

… so I went with these instead!

[youtube http://www.youtube.com/watch?v=rdOSLpZ37kU]

I mitred the sleeve vents and the back vent in the same way. Though I had created a bit of a monster on the back vent by forgetting the extra allowance. Please don’t forget this!!!

back vent mitred corners
not enough SA on the vent but check out those mitred corners baby!

When I came to set in the sleeves I realised I had clean forgot a couple of notches. You will never work out how to inset those sleeves if you forget the notches, I can tell you. Mostly because I tried… and failed… 3 times!!! Till I relented and placed the pattern pieces over the made up sleeves and marked them.

Once I’d put the shoulder pads in, I tried it on and grinned from ear to ear. I was definitely on the home straight! But one niggling factor was that I didn’t like how the sleeve just ‘hung limp’ off the shoulder. I had heard mention of sleeve headings before but obviously never had to take full notice. So I found this little tute in my book Readers Digest: New Complete Guide to Sewing. This book has been so useful and really didn’t let me down this time.

Make a sleeve heading:

Cut 2 pieces of 3 x 5 in (7.3 x 12.5 cm) pieces of lamb’s wool, flannel, or polyester fleece. I had some leftover cotton flannel from my son’s pyjamas. Probably not as weighty or as poofy as lamb’s wool but it was better than nothing!

sleeve cap pieces
sleeve cap pieces

Make a 1 in (2.5 cm) fold on long side of each piece. How lucky is this. My fabric had 1 in square pattern!

sleeve cap fold
sleeve cap fold

Centre and pin heading to wrong side of sleeve cap with fold against seamline, wider half of heading against sleeve.

sleeve cap pinned in position

Whipstitch fold of sleeve heading to sleeve seamline. Heading now supports and rounds out sleeve cap.

without sleeve cap
without sleeve cap

The difference is subtle but is hugely important for my self satisfaction!

with sleeve cap
with sleeve cap

Before I lined the jacket I neatened and pressed all the seams. I did wonder if you have to neaten the raw edges, after all they wont show but I was worried about it fraying inside with wear and if it might eventually have a knock on effect to the seams coming apart. Probably over worrying but better to be safe than sorry was my own conclusion. But here presented my next concern. As much as I pressed this gorgeous wool, the seams would not lie perfectly flat throughout and I knew that would affect the overall shape and create a lumpy lining. And who would want lumpy lining?!

So I decided to stitch the seams down, like a good tailor lady. But hey! Guess what little tailoring trick was missing. NO UNDERLINING!!! Not that I have ever had to underline anything to date. But I have heard about it. I have wondered why you would want to but now it was blindingly obvious. My fabric was sturdy enough to live without it but how much easier would it have been to sew the seams down flat onto an underlining. I will definitely underline next time I make a jacket and I wholly advise you to do this even if you think your fabric is sturdy enough. It makes sense you know!! Fortunately my fabric was quite thick with a forgiving texture!

stitching seams down sans underlining

I found it was much easier to do, over my knee, whilst watching The Paradise! And also safer to stitch onto the interfaced pieces.

stitching seams down on interfaced sections

Hemming was easy with this fabric but be aware that a curvy hemline is naturally created with all those shaped pieces. To take in that excess fabric I just made a couple of tucks either side of the vent, symetrically positioned so that the finished shape was uniform. You’ll notice here that there is no evidence of interfacing. After I hemmed I remembered I was supposed to interface the hems. So I dutifully unpicked all that hand stitching, cut some strips of fusible interfacing, fused it on and re-hemmed. BUT do remember to interface the hem sections of your pieces from the start and NOT at this stage. You know it makes sense 😉

wavy hemline
wavy hemline

So then came the lining. I had pondered a silk lining but the lilac poly satin I found was so lush I looked no further. So long as you remember your ‘ease pleat’ in the centre back, you can’t go far wrong. I can’t give to much advice about this stage because I kind of winged it!!! But what I did remember to do was to push the lining up to the hemline of the outer fabric and roll it down over itself to create more ease and allow for shrinkage. Not that poly lining shrinks but I think its general practice! I did the same on the sleeves. I’m not sure I lined the vents on the sleeves properly but it works… of a fashion!

The buttons were a lucky find, though I was gutted I couldn’t find smaller coconut shell buttons. The two pictured here were way to big even for the front! So sparkly resin shank buttons it was. Lucky to find them in 2 different sizes at Shepherds Bush market. 20p each… a snip!

raspberry buttons
I WILL find a perfect use for those coconut shell buttons!

I created the buttonholes on the machine. Holding my breath as I did so. You know how it is. There’s always a chance of a wayward buttonhole! But next time I would love to try bound buttonholes. Karen did such a beautiful job with hers and I bet it feels far more special to button up with bound ones!

Well here ends my waffly post of niggles. I hope to have been of some help and not too much of a waffling bore!

Have a wonderful weekend all…. wrap up warm!! x

Burda 11/2010 Jacket #130

burda jacket 130 Nov2010

Oh where to start?

Well, from the very beginning would probably be a good idea! I started this jacket way back in February but was wearing it in my head from the first time I saw it in Burdastyle mag 11/2012! I completely ignored the number of coloured circles which indicate level of difficulty. Half a circle short of the most difficult… how difficult would that be?!

It transpires that it wasn’t particularly difficult, once I’d deciphered the 2 magazine columns of instructions, though my strops might have suggested differently. I really don’t respond well to written instructions as much as pictorial ones!

I will do a follow up post with all the niggly construction bits but for now I am so happy to present the finished jacket that was kindly and so brilliantly shot by Mr Ooobop! today. Kensington Gardens provided an amazing autumnal backdrop, despite the lack of sunshine and we had a lovely stroll while Little Miss Ooobop! went to a bowling party at All Star Lanes.

These were taken at the Italian Fountains near Lancaster Gate. It was lovely and misty but still the colours of the trees were beautiful.

burda Jacket Italian Fountains

burda jacket shot by italian fountainsDespite the lack of blue sky, my trusty photographer was determined to make use of the gorgeous colours and he got some great detail shots too.

burda jacket autumn leavesI’m so loving the sparkly raspberry buttons!

sparkly raspberry buttonsBesides being so happy to have finished and be wearing my jacket, today also proved how we take for granted all the beautiful open spaces that London has to offer. So many on our doorstep. Must get out more often!

Wishing you all a wonderful weekend. I’m off to find a tiny project!

burda jacket in the leaves

The audition dress!

V8280 audition dress

I made this dress last weekend to wear to an audition on Friday. I’m afraid I can not speak of the adventures it had or the reaction it got as I am sworn to a confidentiality agreement so I can only tell of the making of the dress itself!

V8280 Roland Mouret dress

I’m sure, for most of you lovely sewing people out there, you have already guessed it to be the Roland Mouret knock off by Vogue – pattern no V8280 – the Galaxy Dress. But perhaps it wasn’t instantly recognisable without its signature sleeves.

V8280 galaxy dress

On reading lots of reviews about how the sleeves would be best placed on a pitch against the New York Giants, I did run up a quick toile to test out their outrageousness. I wasn’t too scared by them but I wanted this dress to be right and not feel too self-conscious in it! So I went for Vew A. It looks a bit boring on the envelope but I do believe this is probably the classiest dress I’ve made to date.

v8280 sewing pattern

Might have something to do with fabric choice though. I’ve come to realise that the longer I keep up this sewing lark, the more choosy I’m getting about quality of materials. For sure I still love a charity shop find but in truth, nothing beats shopping specifically for the most appropriate fabric. I needed to impress with this dress so it had to be good stuff. I chose wool crepe and silk lining. Oh what luxury! I have really started something now! Just look at the texture in that wool…

wool crepe texture

I love the way that it pressed so beautifully yet didn’t crease too much when it was worn.The wool crepe was £15.99 and the silk lining £6.99 a metre from one of my favourite fabric shops in the Goldhawk Road. Probably my most expensive make, around £42 in total but the blow was softened after I checked the prices of similar wool and silk in Berwick Street, London…. more like £30 – £80 a metre!!!!

If I’d have had the time, I would have made a full toile to check the sizing properly. I overestimated the sizing of the bodice and ended up taking it in by 3 inches under the arms. I will definitely take it down a size next time. And oh yes, there will be a next time!

This is also my first experience working with a modern Vogue pattern. I have heeded the warning of others about their ‘vague’ instructions, but I found this one to be very simple to put together. Bearing in mind I didn’t go for the sleeves!

Once you get the hang of the ‘flanges’… lol – or once you get used to calling them ‘flanges’ – it will all make perfect sense. And they do help to create a very flattering neckline. I chose the sweetheart neckline just because I think its more feminine and reminiscent of  glamourous ’40s ladies.

sweetheart neckline

Working with this fabric was a dream and made inserting a zip and lining up darts and seams, a breeze.

v8280 back view

invisible zipper

There were no instructions to fully line the dress, only to line the bodice. But from past experience I know I will never get away with an unlined skirt. My biggest fashion blunder was to take my coat off in the entrance to a party only to find out my unlined dress had ridden all the way up to my armpits. The worst (or most life-saving moment) of that was that another guest had to tell me. Otherwise I’d have strutted my stuff onto the dance floor like a complete fool, outdoing any Bridget Jones moment! And so I cut the lining, the same as the skirt but with an additional half inch added to the side of each piece. I sewed the back seam from the zipper opening to the top of the vent and the side seams but didn’t make the darts. I pinned the waist of the lining to seam allowance of the skirt section, first pinning at the side seams, then to the back openings, with one pin at the centre front. I then folded pleats at the dart positions and pinned those in place before sewing to the seam allowance all round.

I’m not entirely sure this was the best way forward. There may be more professional ways of doing this but it worked, for me, anyhows!

I bound the hem with bias tape and machine hemmed the lining. Tricky old stuff, silk lining. Seems to carry far more static than poly lining, when ironed. But boy does it feel good! Raising one’s own standards is very amusing!!

bound hem

And all that is left to say is thank you once again to Mr Ooobop! for being amazing in every way. Not only does he dutifully take lovely photos for me, he is the most amazing support for my often waining morale and makes me so happy… gush gush!

He will insist on a leg shot though!

side detail on tights