How I hacked a Frida to make my daisy dress

Waaay back in April, I went to my very first New Crafthouse party. I’d heard of these legendary do’s but I was always too slow to the checkout page. This time round, howevs, I got a heads up and I snapped up a ticket the minute they went on sale.

The theme was Spring Fling… I do love a brief! Kind of narrows down the options of what to make, which is helpful because as you probably know its virtually impossible for a dressmaker not to make something new for a party!

Another good thing is, that because there’s usually a bank of ‘wanna makes’ swimming around in my head, I just have to pause the slideshow and pick a winner!

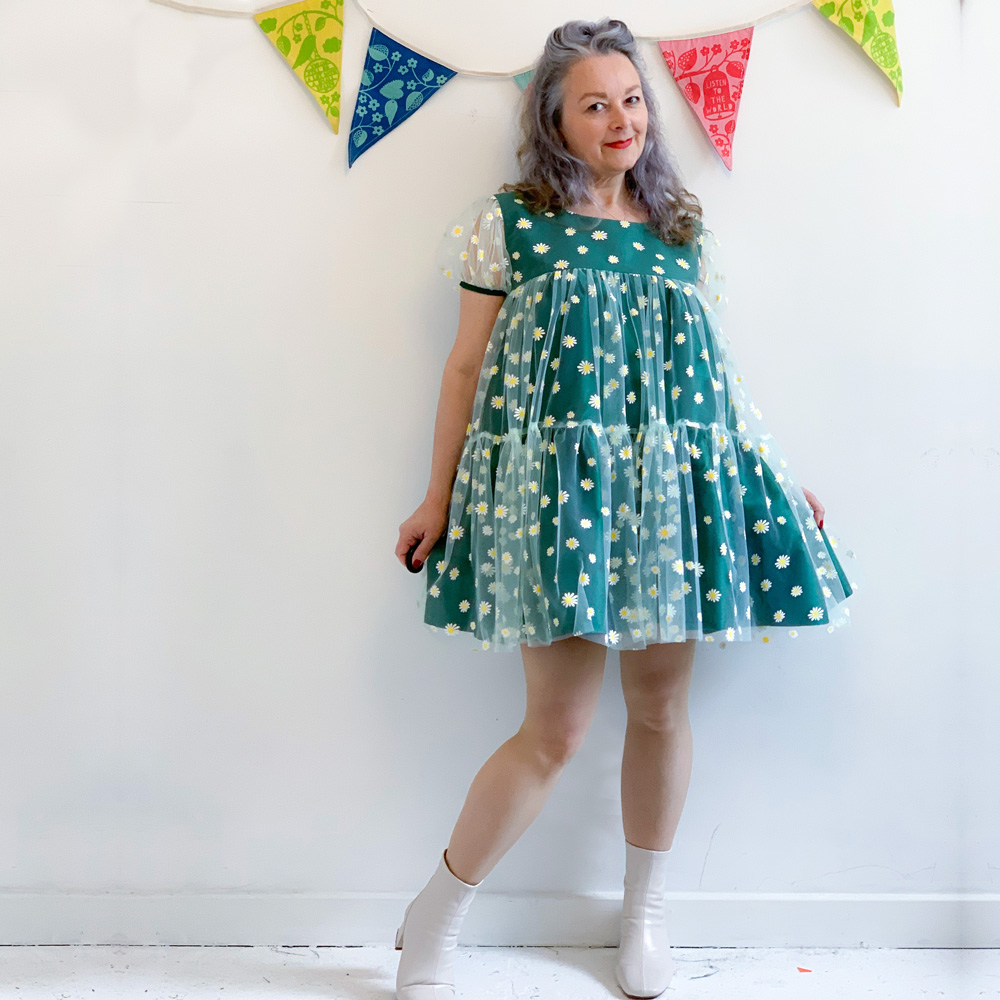
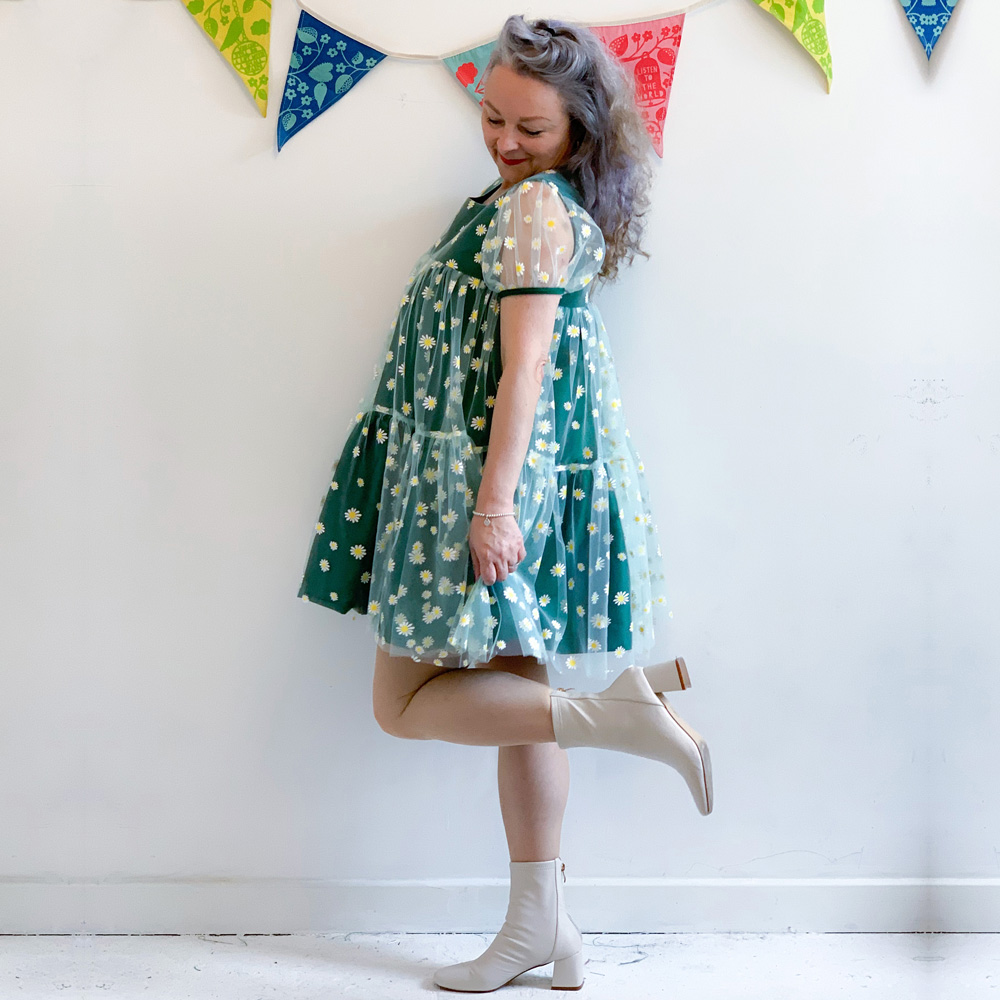
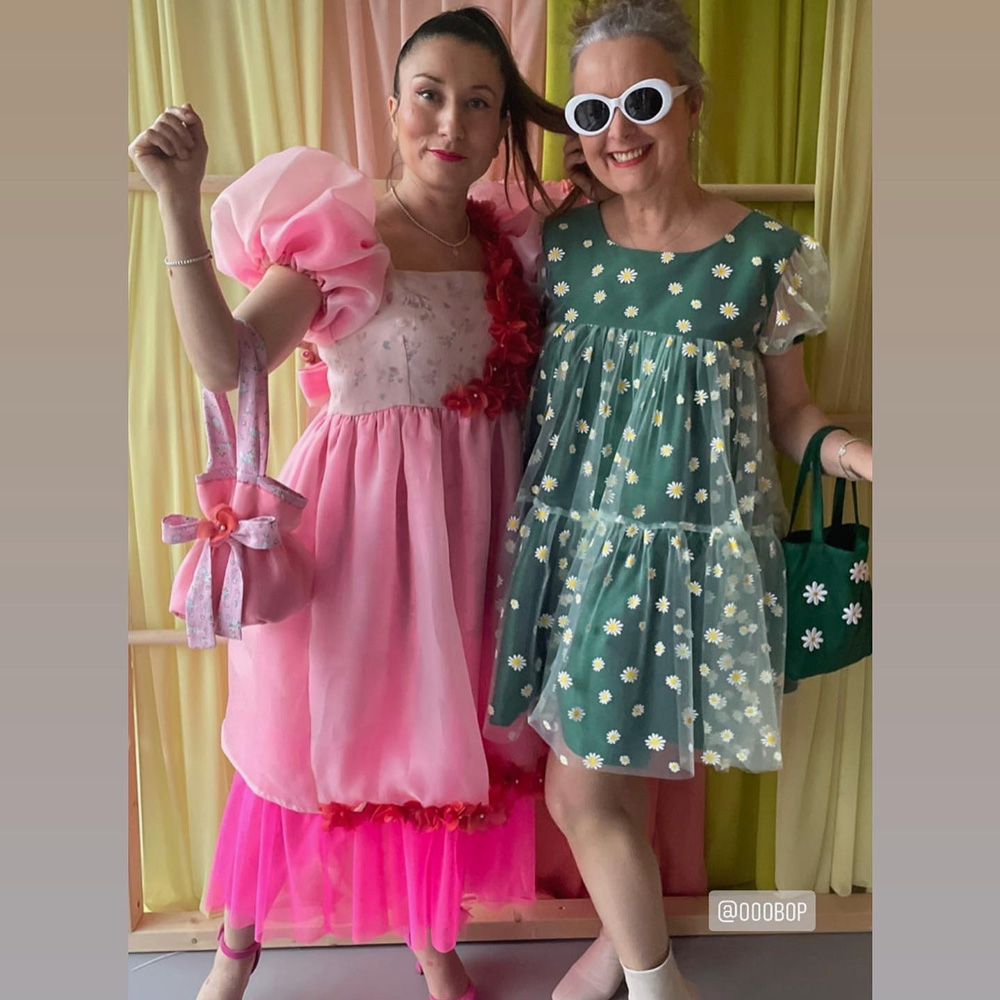
I’d been toying with a Molly Goddard style dress for a while. Not so over the top as that pink Killing Eve number – though, never say never! I guessed pink might be the popular choice for a spring theme and I wanted something a bit different, so I pictured what spring looked like in my local parks and daisies sprung to mind. 

But boy did I set a task for myself. I wanted daisy tulle. It had to be daisies, on tulle and nothing else. And I searched high and low until I finally found it some on Etsy. Its actually a pale green tulle which was a bonus too though it doesn’t really come across as such.

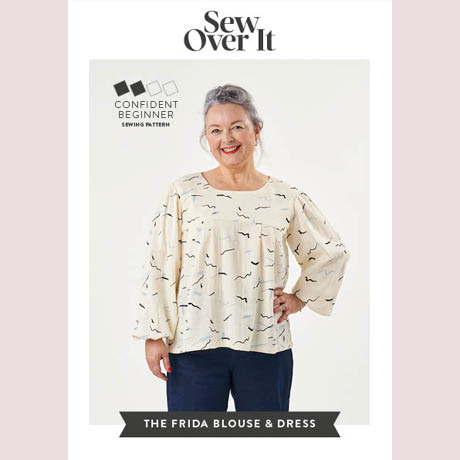
As for the pattern, I knew exactly what I was going to use. The SewOverIt Frida blouse and dress is such a great little pattern with no closures. Zippers and tulle aren’t generally friends so it was a perfect choice and a very simple hack would make my vision happen. And hey… see anyone familiar on the pattern cover?!

I kept the bodice section pretty much exactly as was, apart from shaving a little off the shoulder, because I  wanted the sleeve puffs to sit on the end of my shoulder point for maximum pooof! I used a green poly taffeta for the underdress because it had great structure and also was a great grassy base for the daisies to sit on. I overlaid the tulle on to the bodice piece to sew as one and I love how the sheen of the taffeta shone through.

I used the longer skirt section of the Frida Dress pattern as the foundation of the under-dress. The top part where it meets the bodice is pleated and I kept that but I split it about half way down and spread that bottom half to end up with a gathered bottom tier. This created much more of a dramatic A-Line silhouette and already the cheeky fun of this little party dress was beginning to make an appearance.

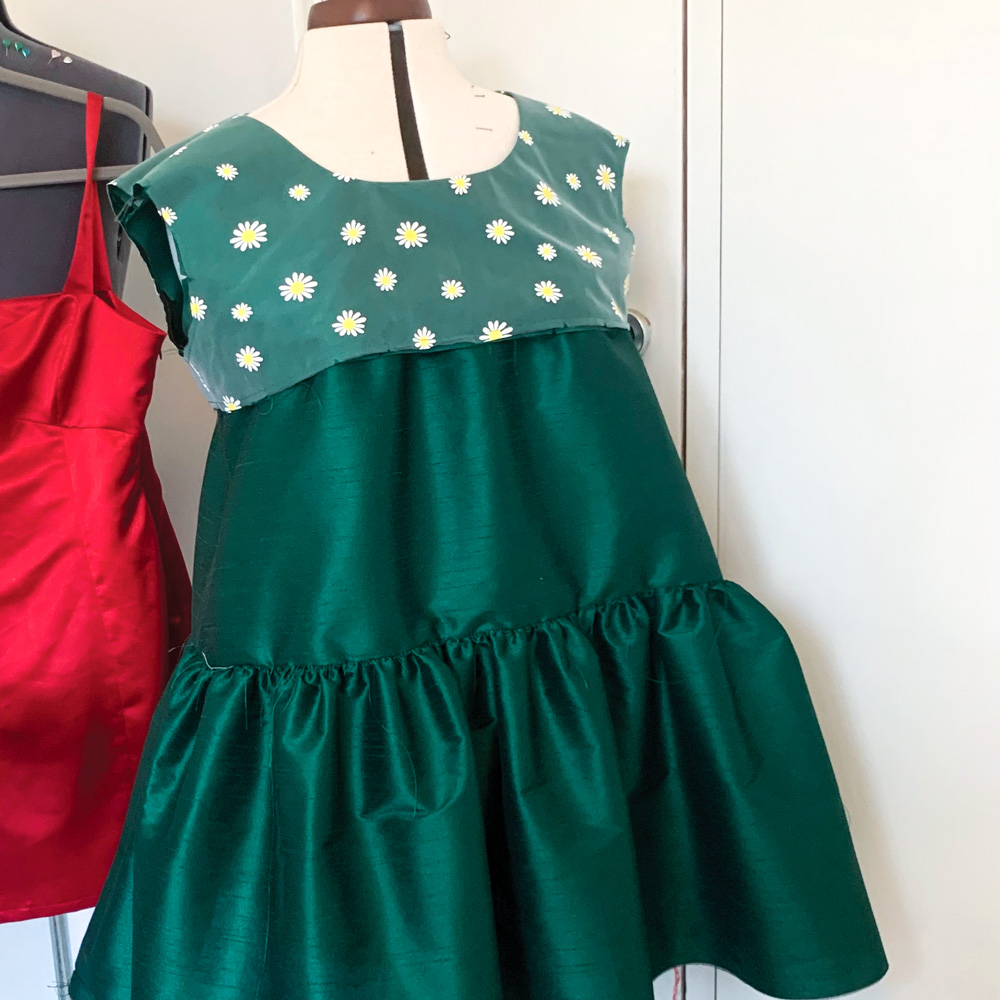
The tulle overlay is simply two gathered rectangles, each to the same depth as their corresponding under layers. The bottom layer was cut twice as long as the upper one and gathered onto the top tier.

For the sleeves,  I took the fuller sleeve pattern piece of the Frida, shortened it and then cut and slashed to spread it really wide. It was a bit trial and error but it worked just right with the first draft. I created some binding from the taffeta to edge the sleeves. I was so happy at this point as there were strong indications that it was evolving exactly as it had taken shape in my head!

Apart from gathering the tulle (one of my least favourite things to do) The process was pretty simple. And I finished it just in time to meet up with Alma and Ilaria and set off for the do!

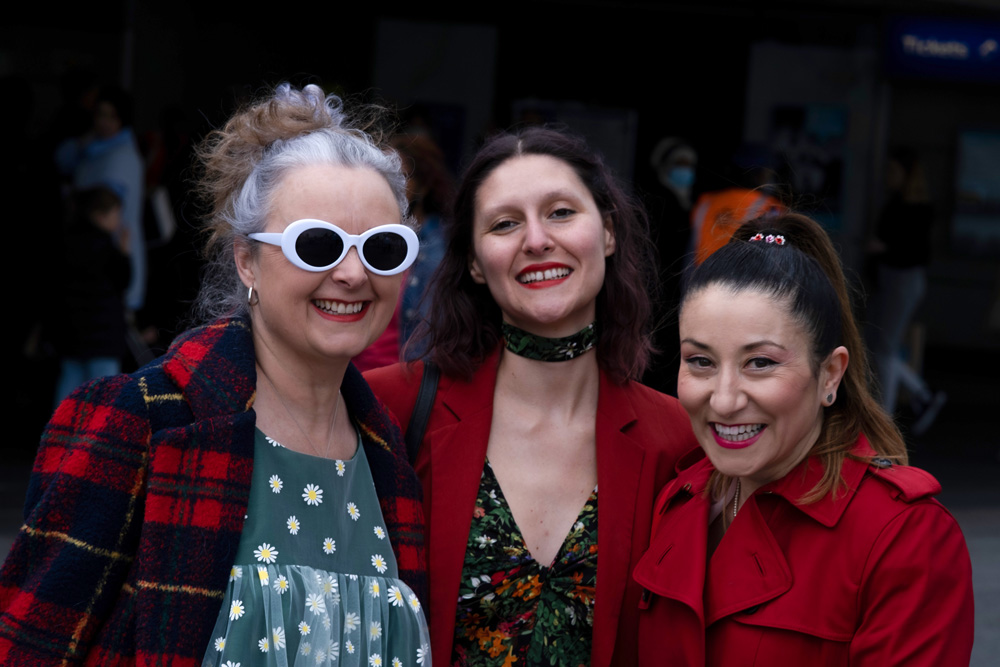
We had such an amazing time – New Crafthouse is such a lovely space in East London and Hannah and Rosie were awesome hosts. We were greeted at the door with a gin fizz and had immense fun catching up with sewing friends old and new, everyone of them looking incredible in their handmade creations. It blows my mind how much talent there is in our wonderful sewing community.

And guess what! Not only did Ilaria win first prize for her amazing Botticelli meets Molly Goddard dress (we clearly have great minds)… but I won a runners up prize too!

We seriously had no expectations of coming away with prizes. It was so exciting. And we were buzzing all the way home.

Useful Links
Sew Over It Frida Blouse and Dress pattern
The New Crafthouse
Mod Retro Vintage Sunglasses (aff link)

ooobop review: Burda Style March 2015

Burda Style March 2015 cover

Can you feel that spring sunshine, desperately trying to squeeze though your bedroom window in the morning? Well if that isn’t happening, the March 2015 issue of Burda Style magazine will do it’s best to brighten your days.

There’s some lively goings-on this month, with all sorts of asymmetric, geometrical, hankerchief-hemmed and draped goodness!

Beach Pearls sets some scenes for a summer wardrobe: I just love that maxi dress (A). It’s not dissimilar to the viscose jersey one I made here, but the bust detail is right on the money! A lot more support I would think and what a flattering silhouette!.

beach pearls burda march 2015

It also translates into a lovely strappy top (B).

Now I like where the asymmetrical skirt (C) is coming from but not quite where it landed up! Way too much like a sack tied round the middle for me. Further on it is redeemed with some better styling, I can assure you.

Nice Jumpsuit (C), btw. If jumpsuits are your thing. You might want to add some ‘fashion tape’ to the list of required notions, though. Click here: Hollywood Fashion Tape if you’re interested in buying any from Amazon!

Flared trouser suits (E)? mmm…and bat wing empire-lines (F)? double mmm… Lets move on to the shirtwaist dress with ‘maxitail in the right seam’ (G). I do like that. And I love the biker-meets-Mao jacket too (H)!

Uh oh. There’s that batwing-empire-line again (I). Swiftly moving on to the Flowers and Stripes section!

Flowers and stripes burda style march 2015

I’ve never made or owned a pair of culottes (A). But I bet they’re a far safer than a full skirt on a windy day. And looks lovely in a largish print. If you like that sort of thing.

And there’s that shirt-waist dress (B) again with ‘cut-on-dipped hem’ like last time! It would be better to use a fabric that has a reverse as good as the good side, I would have thought.

Look how that lovely maxi translates to a cute beach dress too (C).

This month features a chic wrap dress (D). There is some assurance of a button at the side and concealed snap fasteners to keep the wrap in place. Potential for a Bucks Fizz moment there!

The peasant top addict in me (see two of them here and here) is quite drawn to this ‘relaxed tunic’ (E)! Would need a fine drapey jersey to pull off with any sophistication I would have thought.

And there’s some more geometric delight in the shape of a simple v-neck dress with symmetrical ‘cut-on tails’ (F)!

Any weddings occurring this year? Loving both these bridal party dresses (A) in The Big Day section.

The Big Day Burda March 2015

The bride’s dress (B) is the same as (A) with a flowy underskirt of crêpe chiffon. That’s if you haven’t been put off by the chiffon adventures in The Great British Sewing Bee recent episode.

Can’t help thinking this dress (C) is a bit cake-like with all the tiers an’ all.

And although I usually embrace a bit of invention, I still wouldn’t want to look like I’d been dragged behind the wedding car, en-route in this dress (D)!

This fairytale dress (E) is far simpler and much more sophisticated though. Just get rid of the batwing-empire-maid who’s ruining the photo!

Oh this is much better (F). Lovely wide-dipped hem again. Bust darts for shape. Cotton lace overlay, crepe satin underlay. I’d wear it with cowboy boots. Or even DM’s. Or is that just the hippy in me?!

Now there’s that asymmetric skirt again (centre, G), styled much more favourably with a gorgeous jacket: standing collar and 50s style winged lapels. See, it does have potential to work. Nice suit on the right too!

I’ve picked out the following three from the Reader Favourites section:

reader favourites burda march 2015

Jumpsuit (A) made short for all you lovely long-legged people!

Lovely floor-length dress (B) in striped jersey with side slits and a ‘hankerchief hem’. I can definitely feel some more maxi’s coming on this year.

And a cute little dress (C) based on the short lace wedding party dress design. Not my cuppa tea fabric-wise, but I’m always sold on a midriff piece!

Not overly inspired by the plus section this month I’m afraid, though the trench coat is rather amazing, I must say.

plus size trench coat burda march 2015

But, there is cuteness for small people at the back.

Childrens section burda style march 2015

The best design and the garment most fitting to the Colour Splash section by far, is the paint-spattered dress (A) with tying bands that resemble the sleeves of another garment. Hands up who wants an adult version? Genius!

Nikita’s Prom Dress

Nikita prom dress title pic

I’m grinning like a Cheshire cat and welling up with pride as I sit poised to write this post. Meet Nikita, the sister of Jessica who was the lovely recipient of my first ever hand-made prom dress.

I knew there was another one on order, a year ago. After all you can’t make for one without the other can you?!

But what joy. What an absolutely pleasure to have another opportunity to make such a special dress. I’ve learned one hellofalot in this last year. Fitting mostly. This little beauty only took two fittings. I quite forget how many Jessica’s one took! I’ve learned not to be scared of cutting into the fabric. Learned how to be honest with measurements, how to be brave with fabric choices and mostly that I CAN make a dress befitting of a princess!

Nik modelling dress by the wooden door

Up until a few weeks ago, all Nikita’s dreams of her school leavers prom were wiped out when her school declared no funds for such frivolities, after all, this year. Everyone was gutted for her. Especially knowing how hard Nik has worked throughout her last school years… despite being asleep for most of them! Normal teenage behaviour you might assume but no, unfortunately for Nikita she suffers with narcolepsy. An awful condition which means she has to take very strong medication to keep awake. Lots of things trigger a collapse. Not least of all a fit of the giggles.

I reprimanded her dad recently, for his insistence on telling jokes one after the other but Nikita assured me it was fine because his jokes were so rubbish! She has the best S.O.H. ever!

It was such a relief when her school confirmed the prom would actually go ahead. But then a little panic set in when I realised I had a couple of weeks to pull off the dress.

Nikita wearing prom dress at Fulham PalaceI think by now you have the right to safely assume that Mr Ooobop, AKA the lovely Daniel Selway has been behind the creation of these blinding photos!

Helped by a scorching summer’s day and the beautiful setting of Fulham Palace, he has blown me away once again with his amazing self-taught skills.

Nikita wears ooobop prom dress at Fulham PalaceThe dress itself is fashioned from the same materials as Jessica’s, only in stronger colours. Red Duchesse Satin and Black polka dot tulle.

The halterneck bodice section is Simplicity 3825. Inspired by Nikita’s leaning towards a Marilyn-esque dress.

simplicity 3823 sewing pattern

I’ve had this pattern in my collection for some time and I’m so glad it came into good use.

I basted a layer of the dotted tulle over the bodice pieces and treated them as one for the outer pieces. Inside the bodice is self lined with the red satin. Its a good medium weight and gave the dress some necessary structure whilst not losing out to optimum swishy drape for the skirt.

Oh just look how divine her smile is!

By the fountain at Fulham Palace

The skirt is a full circle, of course. One can’t pose over street vents if the skirt doesn’t rise above one’s head! But actually a more demure pose was to be found next to a water fountain in the grounds of Fulham Palace!

Nikita sitting by the fountain in her prom dress

And lest I forget! There are the now signatory and obligatory 10 metres of soft-as-you-like dotted tulle that adorn said circle skirt. And no tears this time. I knew what to expect. I knew to pin section by section and I knew to baste… and to breathe!

walking barefoot in Fulham Palace gardens

walking away, barefoot

The back of the dress is genius in design. It has a wonderful elasticated panel which keeps the bodice fitted nice and snug with no gapes. I just love the effect that is created with the gathered netting over the liquid shiny satin.

back of prom dress bodice


ooobop prom dress in the parkI can honestly say that this dress is testament to everything I love about sewing. Not only about what I get out of the whole deal but what everyone else gets too. Nikita loved her dress and I feel so honoured to have made an original number for her. Mummy Tina was delighted to see her daughter have the best time in her new dress, Daddy Tim was very happy that I’d fulfilled the brief of a ‘modest’ dress and we are all so happy with Daniel’s outstanding photos.

Nikita will do well with whatever she choses to do. Of that I am sure. Nothing is going to hold this little lady back!

prom dress front

In the apple orchardAnd the talents didn’t stop there, oh no. Nikita’s lovely sister Jessica did such an amazing job of her make up for the prom and also today before the shoot. I’m so miffed I missed out on todays events. Slogging away in an icy office when I could have been out on location with the dream team in Fulham Palace!

Jessica doing Niks make up

So thank you girlies, for making a crazy sewing lady so happy and thank you Daniel for making my blog so pretty and thank you lovely readers for making it all worth it.

Portrait of Nikita

Princess Jessica’s Prom Dress

I think I have kept you all in suspense for quite long enough. This evening is Jessica and Tom’s leavers prom and so I am allowed to reveal the dress I have been working on for the last few weeks.

I was feeling a bit poorly today so Mr Ooobop, like the knight in shining armour he is, set off with his new birthday camera without sparing the horses. The following photos are some of the loveliest he has taken. And I think you will agree that the beautiful subjects contribute somewhat to the awesomeness too.

Meet Jessica. The most wonderful 16 year old daughter of my friend Tina. Can you now picture the pressure that was to create her a prom dress fitting for such a beautiful princess?!

Jessica having hair styled

Tayla Harris was in-house hairdresser for the evening and styled Jessie’s hair beautifully. Complete with little jewels to match her necklace.

Hair jewels
Hair jewels

And ooo… look. A cheeky first glance of the bodice! Such a tease, I know!

Hair styled with jewels to match necklace

With make-up, hair and outfit complete, enter Jessie’s Prince Charming – the lovely Tom. I’m so pleased he liked his tie. He didn’t really have much choice in the matter, bless him. It was delivered seconds before this photo was taken. I only finished it this morning! And here we also have a side view of the prom dress. I’m getting there, honest!

Tom's arrival and receiving the tie
Tom’s arrival and receiving the tie

The tie was made to match Jessie’s sash as you can see. And Tom did a much better job of tying it than I did!

Tom putting on his tie

Tom looking more like Prince Charming every minute!

So now they were both dressed to impress, Mr O worked his magic and took some awesome shots of them together. Don’t they look adorable?

Jessica and Tom
Jessica and Tom

A beautiful portrait of the prom Princess and her Prince

I would love to be a fly on the wall tonight and take a picture of them dancing together. The dress is a circle skirt underneath 10 layers of gathered polkadot tulle so you can imagine just how twirly and frothy it would be.

A little dance to limber up!

Jessie came to me with a firm idea of what she wanted and luckily for me there was a very similar pattern in one of my old Burda magazines. I’ve got quite a hefty collection now. It’s always a joy to go through back issues and see patterns you didn’t notice first time round. But this one was on the money! The only thing I had to do, knowing how standard the sizing works, was to do an FBA. And I had to learn how to do it pretty quick!

prom dress idea

Thankfully for me, and for Jess, I had recently come across a great set of instructions on the By Hand London site. These totally took the fear factor out of the whole process. And I learned so much. Not least of all to come down 2 sizes for Jessies petite body and then doing an FBA. It took just 4 fittings to get it right but oh it was so worth it.

Side view of the dress

The strapless bodice section of the dress is boned. For good reason! This was a first for me too. Though I did discover some fantastic boning in my local haberdashery department that sold pre-cased boning. I just had to sew it directly onto the open seams.

The front and back have rouched tulle stretched across 2 panels

The front and back have rouched tulle stretched taught across 2 panels. I love the way they ‘butterfly’ out from the centre seam. And I love how classic and timeless they both look here. Reminiscent of the 1950s.

Full skirt. 3 layers.

The tulle overlay is ivory in colour and works so well to soften the pink. Kind of like a frothy strawberry milkshake, don’t ya think?! Of all the techniques involved in making this dress, funnily (or not so funnily) the most tricksy part was gathering all those 10 metres into a 27 inch waist. I even made several gathering threads to avoid breakage but it was still a nightmare. I ended up gathering small sections at a time and pinning it on the underskirt, on the mannequin and then hand tacked it all together before I even thought of taking it to the machine!

The bodice and skirt are lined in full with a slightly darker pink lining. That was one of the easier bits! Unlike the Burda instructions, I sewed the circle skirt lining to the waist seam and then once the bodice lining was seamed at the top, I turned under and hand-stiched the waist seam of the lining over the raw edge of the skirt lining.

Oh yes! How could I forget? The shoes!! Check out these amazing Kurt Geiger shoes that Jessie snapped up in the sale for a mere £29! Pink patent leather with bows and bling!

Kurt Geiger shoes
Kurt Geiger shoes: Pink patent leather with bows and bling!

Have you got loveliness overload yet? I think I have. But hang on I forgot to show you the back. Pretty bow sash and all

back view of the dress

And so the ‘royals’, unfazed by their impromptu photoshoot, bade their farewells and headed off to the prom.

En route to the prom

I would so love to have seen everyone’s faces as they walked in together.

Outside the venue
Outside the venue

A massively big thank you to Mr Ooobop for these amazingly professional photos. I would never have got these together myself. I also have to thank Tina for asking me to make this dress for her beautiful princess. It has been such a huge learning curve for me. I don’t deny there was a fear factor involved. I had no choice but to get it right. But that’s how we learn fast, right?!

And last but not least for the ever obliging Jessica and Tom. You make just the perfect models and have brought such beauty to my blog! I am being totally honest when I say that these pictures brought a tear to my eye. I hope you guys had the time of your life! x

Party skirt for Princess Gabrielle

princess skirt collage

You may have seen me whinging (and crying) on Twitter about this skirt. And now I’m looking at it I really am bemused by how a tiny skirt for a 3 year old could have given me so much jip!

The skirt is made from 3 layers of the most atrrocious fabric: Purple polyester satin for the underskirt, purple soft netting to add poofiness in the middle, and a top layer of glittery pinky-purple stretch tulle… with an off grain ribbed effect which was already stretched out of shape.

So the first issues began with the cutting. Purple polyester all cool apart from the fuzzy fraying threads that combined when handled to form a faux cobweb mass much like you’d buy for decoration at halloween. I was covered in the stuff and even the cats managed to get it wrapped round their chops and were in a right old pickle till I unwound it from their teeth!

I telephoned my mum to ask for some advice on cutting the netting and tulle and she advised to measure and run a line of pins as markers. Great advice but I can’t tell you just how many pins I picked up from the floor afterwards! You have to weave them in and out or else they just drop out!

And lastly and most annoyingly that glittery stretchy nightmare stuff. Because it had a horizontal ribbing, I thought it would be a doddle to cut but nooooo. It was all wonky and stretched from the outset. I’m not entirely happy with the edge to this layer but hey its going to be on a twirling whirling 3 year old party girl who’ll be boinging on a massive pink inflatable castle for most of the day so I think it might go unnoticed!

Now I wasn’t going to admit to the most stupid mistake I made. Because I still can’t believe I was that stupid but hey. We all learn from them….

When I’d finished… or when I thought I’d finished… I thought the waistband was looking a bit too bulky and however much I trimmed the inside elastic, it still came up bigger than the intended 50cm. A lot of head scratching, a goodnights sleep and a eureka moment revealed that I’d cut the waistband not 2x the waist measurement but 4x the waist measurement. I’d measured the strip with it folded, like a complete dingbat!!! Here’s the evidence:

too much bulk on waistbandI did laugh at myself, through the tears. I have been so busy with work this week and I’m amazed I actually got any sewing done. But I’m so glad I did. Gabrielle’s birthday party is tomorrow and I can’t wait to see the photos of her wearing her princess skirt. I’m sure they will make for better viewing than the above! Watch this space 🙂