My Vintage Dreamcoat!

My vintage Dreamcoat

And so I present the focus of all my dreams since first bidding all my hard-earned pennies pounds on vintage Butterick 547. It’s taken nearly seven months to realise the nagging vision that was persistent even throughout my busiest months.

At least 2 of the 7 months, were taken up with searching for the ideal fabric. Quite incredible seeing as I’m a stone’s throw from the Goldhawk Road. I watched London folk on a daily basis, as they paraded their neutral tones around town, and that was inspiration enough to fuel a rebellious approach and lead me to an online supplier of ‘quality coating fabric’ – Fabric Dreams. Of all the samples I requested (which were incidentally free of charge and free of postage!) this non-wool, fabric was my favourite. I confused myself with this choice at first believing a quality coat must be in wool. But I went with gut and gut came good!

vintage Butterick 547

The hardest bit about the construction was having enough space to lay out the pieces. They were huge. I knew I was going to have to lob off the usual 4 inches from the bottom but I wanted to construct the original length in case I had a later moment of maxi-madness!

vintage coat butterick 547

This coat was seriously made in hourly bursts. If I had no hours left at the end of the day, sleep was stolen. I could not have done it any other way. Full time freelanceness which often runs into the evenings, with school runs and domestic chores to boot, means little or no time to sew. But UK weather waits for no seamstress and I was seriously going to freeze my butt off unless I got a wriggle on. Good enough motivation wouldn’t you say?!

vintage coat B547

The only issue with working in hundreds of little shifts is that I probably spend as much time getting stuff out and putting it away as I do on actual sewing time. But hey ho. Got there in the end. I really must stop dreaming about one of the children’s bedrooms being a sewing room. Terrible mother!

vintage dreamcoat

I interrupt this post to big up my amazing and wonderful bestest friend and boyf in the whole world, Daniel. I swear this coat wouldn’t look half as good if it wasn’t for his amazing photography skillz! I owe him so many waistcoats, it’s untrue!!

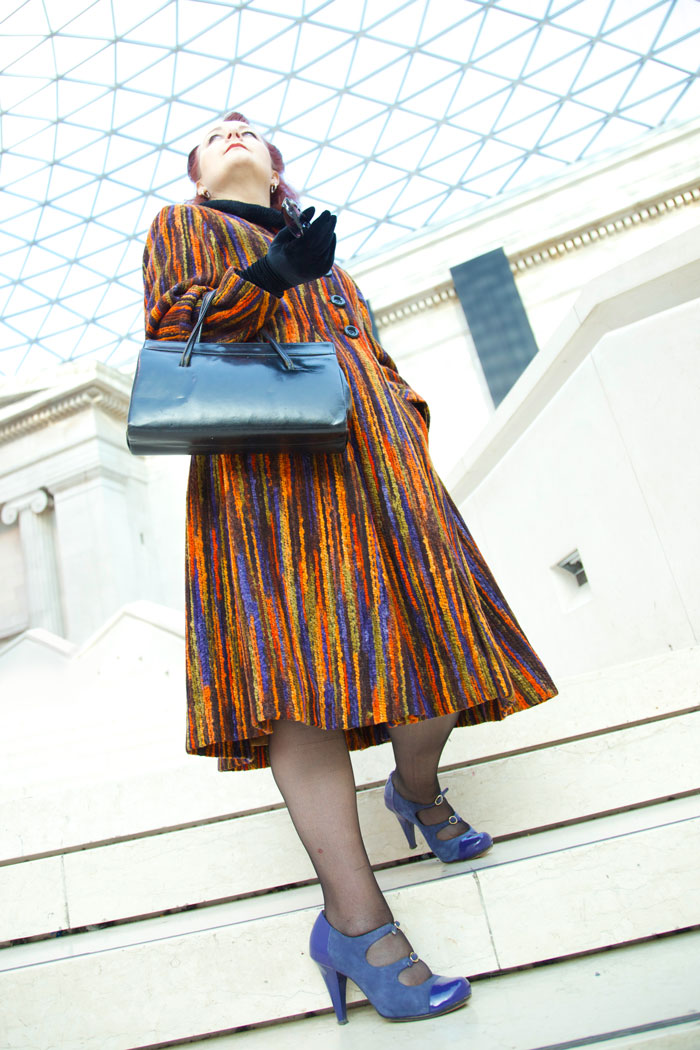
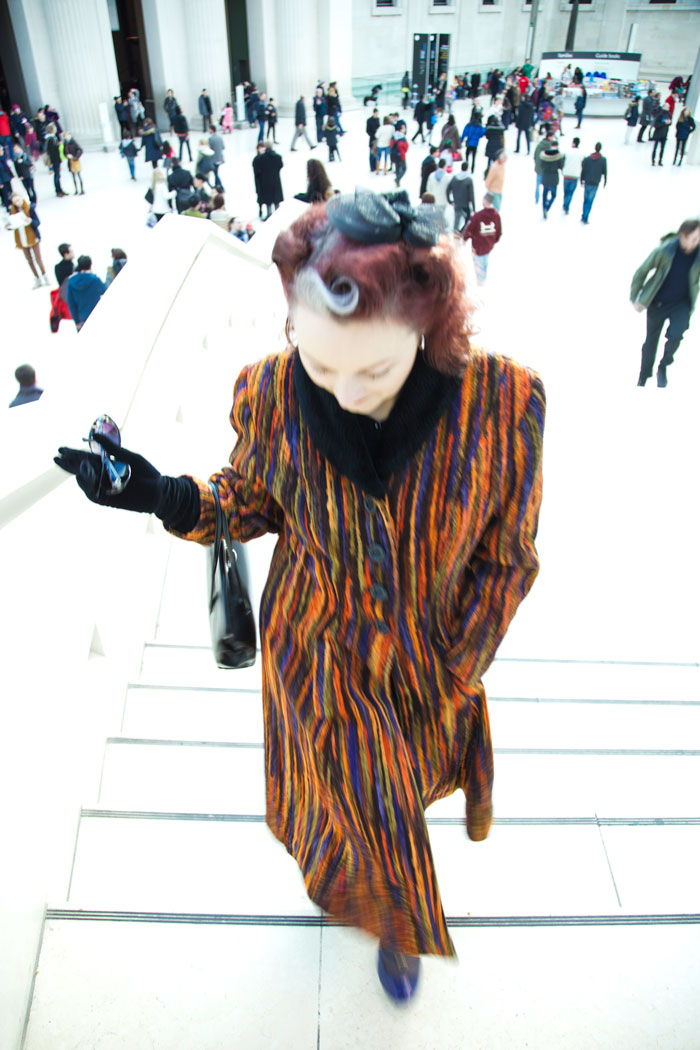
The other great thing about him being chief Ooobop photographer, is that we get to mooch around London together finding lovely locations. Today was mostly the British Museum. Feel like a bit of a fraud for not actually looking at one single exhibit. But we did have a cultural day at the V&A yesterday, honest guv!

vintage dreamcoat back

The coat is made of eight panels which create such a lovely shape. There was stacks of ease and I think I could have pinched out a bit more but I like how it feels and I wouldn’t want to feel restricted in it at all. Interestingly enough, even though the ‘skirt’ is not a circle, letting it hang overnight, the hemline dropped in the same way. A lengthy process to level up the hem, and check it at least 5 times before cutting, was quite painful but worth it.

vintage coat at the British MuseumLining this coat was quite a chore. Even though I chose a real quality, strong, gold lining, it frayed like Billy-O. So I serged every open seam. Because I can. Because I now have an overlocker BTW!! But because I am a newbie overlockerist I got all smug and complacent with the speed and completely hacked through the side-back panel. I swore a bit. But didn’t have time for a proper sulk. I’d come far too far enough down the line to be crying over torn lining. Luckily for my sanity, I had over-bought said gold lining by a metre and a half and so I cut another piece, dutifully unpicked the ruined one and half an hour or so later it was as if nothing had happened!

An entire evening and a morning was spent entirely hand-sewing in the lining with tiny stitches. Around the armholes, down the side seams, all around the facings and neckline and of course the hems. What joy!

But what warmth!

warm vintage coat

I’ve stubbonly been walking around in my draughty Vogue jacket, lovely as it is, refusing to buy a coat, lest it meant I would never finish this one. But now I have. And boy, it feels good to be warm. Bring on the snow!

Of course the warmth may not have been totally down to the coat. Mr O insisted this was a great photo of me having a cheeky snifter! He’s such a bad influence.

cheeky_snifter

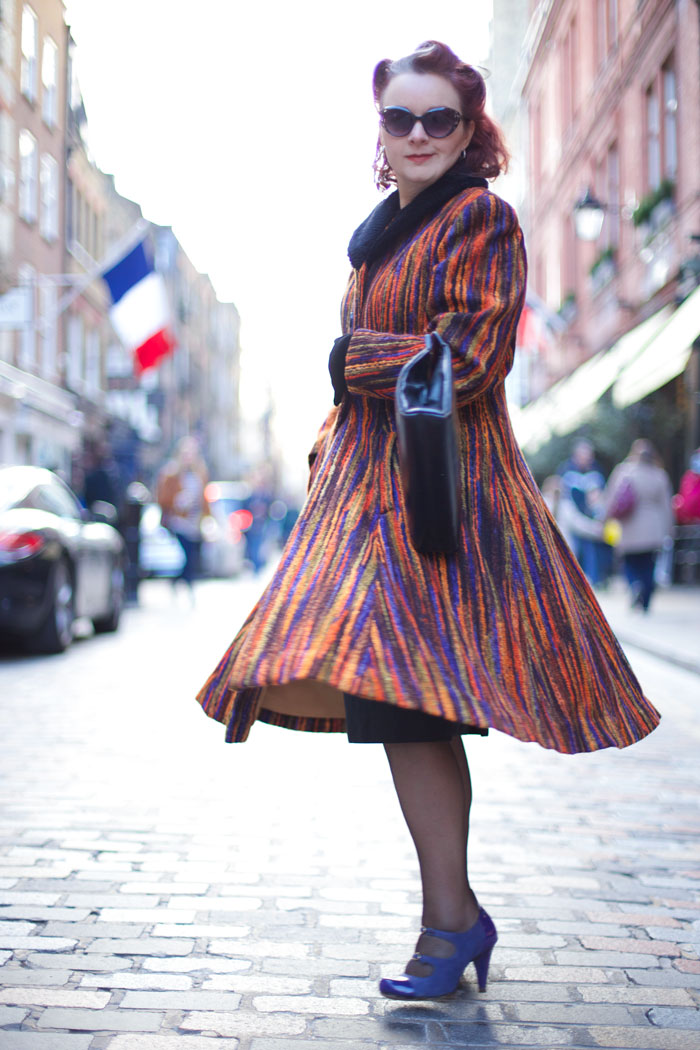
A little wander into Covent Garden was lovely on such a bright winter’s day. This coat is great for twirling in too!

twirling vintage coat
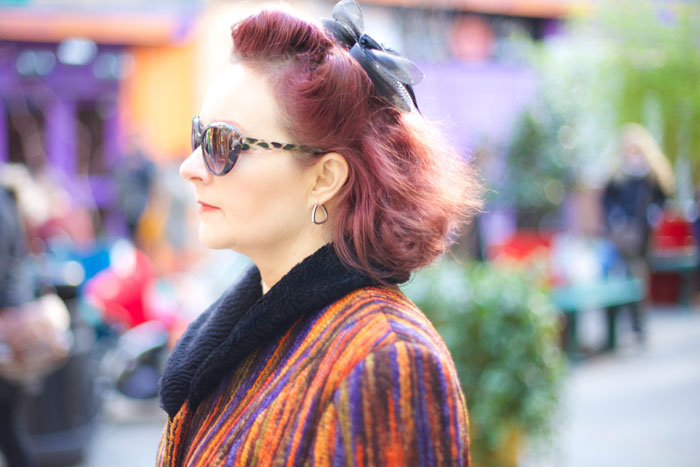
And a little venture into Neal’s Yard to soak up some more colour, if that was at all possible!

vintage Coat Neals YardThank you all for your support and patience throughout my first coat-making venture. It feels amazing to be wearing something so functional, yet so strikingly original and properly fitted. I won’t divulge cost of this project as it has scared the living pants off me but I can honestly say it was worth every single penny pound!

Drafting a skirt block made clearer

self drafted skirt front view

Why on earth would I want to go to the bother of drafting a skirt block when I already posess a pattern collection of monster proportions? Good question.

Well apart from the fact that I am the world’s greatest procrastinator, it’s mostly because I plainly just don’t like not knowing about stuff! Well, that plus the fact that I wanted to create a perfectly fitted skirt! I have managed it once or twice before, by adjusting patterns, but only by the power of ‘flook’ and not by any knowledgable means.

Making a fitted skirt pattern is something I have been wanting to do for such a long time. I looked into taking a course but was really shocked by the prices. I guess I set my hopes high starting with the London College of Fashion!  Getting a course to fit in nicely with work and children is a bit tricky too. So I set out on a mission to self-teach! It has taken me a long time to get my head round it (the old grey matter aint what it used to be!)… and get round to actually doing it.

The truth is, I am quite impatient and the idea of some mountainous mathematical process leading up to the joyful part of sewing wasn’t very enticing to say the least. But if I am ever to realise some of these far fetched designs I carry round in my head then I have to start learning to draft a properly fitted skirt block at the very least!

To be honest. Now that I have sussed it, it seems remarkably easy!

The hardest part of this process was being totally honest about my own body measurements! I’m forever thinking I’m smaller than I am or believing that if I make anything at least a half a size smaller I will loose some pounds to fit into it properly! But I had to be true to myself this time if I was going to go to the effort of making something to properly fit.

The following instructions have been compiled from various sources and put together here in a fashion that is clearer to me. I can’t claim this as the best way forward for everyone. So if you are going to use these instructions and make a skirt from the pattern, please make a toile first! I needed, in any case to document the instructions as a note to self because even after my first attempt, I forgot some of the process! This method really did work for me and it would make me such a happy bunny if they work for you too, so be sure to let me know!

All measurements are in inches (sorry). I use millimetres in all that I do at work but I can’t break away from imperial measurements for sewing and cooking!

Drafting the basic skirt block

First make a note of your measurements.
It is easier if someone does it for you. Less chance of cheating!
Make sure the tape measure is comfortable and not tight.

You will need 3 measurements:

  • Waist
  • Hip
  • Length

and the following materials:

  • A large piece of paper, that is just over half of your hip measurement by just over how long you want your skirt to be. (Tape pieces together if necessary)
  • A long ruler
  • A pencil
  • A right angled triangle/set square.

NB: this pattern allows for 1 inch of ease which can be altered to suit.

(Click on the images to enlarge)

STEP 1:

On the left hand side, draw a vertical line the length you would like your skirt to be.
Mark the top point as W. (W to L = length of skirt)

drafting a skirt block step 1

STEP 2:

Draw a line at right angles to point W, to the length of half your hip measurement + 1/2 inch ease.
Complete the rectangle.

drafting a skirt block step 2

STEP 3:

Draw a vertical line between the two outside edges, at a distance that measures 1/4 hip measurement plus 1/2 inch ease, from the centre back seam. This will separate the front from the back pieces.
Mark the left vertical line as centre back and the right vertical line as centre front. Draw arrows on centre front to remind you to position centre front on fold.

skirt block step 3

STEP 4:

Measure 8 inches down from the W point. Mark this new point with H. Draw in the horizontal Hip Line.
Measure half way between the Waist Line and the Hip Line and draw a line across. This is the Middle Hip Line. Mark it MH.

drafting a skirt pattern step 4

STEP 5:

Draw a line from point W that rises to half an inch above the Waist Line.

Measure across from point W, diagonally up to the new guide line, the distance of 1/4 waist measurement + 1/4 inch ease + 1.5 inches for 2 back darts. From that end point, draw a line down to the point where the Hip Line meets the centreline. This creates the hip curve and a shape to the waist.

Repeat the process for the front pattern piece to create the hip curve for the front side. The diagonal waist line for the front piece will be 1/4 waist measurement + 1/4 inch ease + 3/4 inch for 1 front dart.

You can use a french curve or freehand to give a smoother curve at the end.

make a skirt pattern step 5

STEP 6:

To create the front dart: find the centre point of the wast line on the front piece and draw a vertical line, from the Waist Line to just before the Middle Hip Line. This is the central fold of your 3/4 inch wide dart. Draw in the dart as shown below.

To create the back darts: draw 2 vertical lines equidistant across the Waist Line. The dart nearest the centre back line extends to an inch and a quarter down past the Middle Hip Line. The other back dart, nearest the side seam, extends just to the Middle Hip Line. Draw in the two darts, each 3/4 inch wide at the top, as shown in the diagram below.

NB: please note that although these darts appear to be standard measurements, you may very well have to alter them to suit your own body shape. Making a toile will highlight if this is necessary for you or not.

adding darts to skirt pattern step 6

Et voila! The tricksy bit is done!

All that remains is to smooth those curves, cut the front and back pieces apart and add seam allowance. You should be familiar with this process if you regularly use Burda Style patterns from the magazine! 5/8 inch is usual. A good hem allowance is between 1.5 and 2 inches.

Remember not to add seam allowance to the centre front, but do add it to the centre back.

To create the facing, I traced from the Middle Hip Line up to the Waist Line on both pieces, cut out and folded the paper on the dart lines to create the curve at the waist. But you could alternatively make a waist band, whereby a facing piece is not necessary.

I do hope this is of help and that I didn’t make it too confusing. Do shout if I’ve missed anything or if there is anything you don’t understand.

First skirt from the self-drafted pattern

self drafted skirt side view

Probably the most boring skirt I have ever made, re. choice of fabric, lack of features… not even a walking slit, standard length etc. BUT, by the same token, probably the biggest learning curve so far!

This is a very wearable toile. I’m so glad I did this. Pencil skirts are a great go-to for work. Especially in neutral colours. This is a very lightweight, cheap suiting fabric and I never thought it would be wearable but with the addition of a lining it gained a bit more structure. To create the lining pieces, I cut the same skirt pieces from below the line of the facing and added a couple of inches across the width of front and back for ease, which was incorporated as a pleat along the top seam line. Incidentally the two-tone polka dot lining is far more interesting than the self fabric! I found 3 metres of it in a Charity shop recently for £1!

polka dot lining

I inserted a lapped zipper but I still need a little practice in that department! One great tip I picked up along the way, however was to take the loose thread from the baseline stitching of the zip, thread a needle and take the thread to the inside of the garment. You can then either knot the ends together with the bobbin thread or, in the case where the bobbin thread is too short ( I have an automatic cutter and this often happens) you can just do a couple of reinforcement stitches and snip. It  all helps to create a flawless finish on the outside.

lapped zipper

I love the idea that I am on my way to making custom fitted garments. Im sure it will be a very rewarding journey.

I am going to experiment a bit more with variations on this block before I steam into the creation of a bodice block. I like the idea of changing the darts to princess seams, perhaps with piped seams, making it more of a wiggle skirt with a vent, and making a high-waisted version too. Oh hours in the day… where art thou?!

back of skirt

The audition dress!

V8280 audition dress

I made this dress last weekend to wear to an audition on Friday. I’m afraid I can not speak of the adventures it had or the reaction it got as I am sworn to a confidentiality agreement so I can only tell of the making of the dress itself!

V8280 Roland Mouret dress

I’m sure, for most of you lovely sewing people out there, you have already guessed it to be the Roland Mouret knock off by Vogue – pattern no V8280 – the Galaxy Dress. But perhaps it wasn’t instantly recognisable without its signature sleeves.

V8280 galaxy dress

On reading lots of reviews about how the sleeves would be best placed on a pitch against the New York Giants, I did run up a quick toile to test out their outrageousness. I wasn’t too scared by them but I wanted this dress to be right and not feel too self-conscious in it! So I went for Vew A. It looks a bit boring on the envelope but I do believe this is probably the classiest dress I’ve made to date.

v8280 sewing pattern

Might have something to do with fabric choice though. I’ve come to realise that the longer I keep up this sewing lark, the more choosy I’m getting about quality of materials. For sure I still love a charity shop find but in truth, nothing beats shopping specifically for the most appropriate fabric. I needed to impress with this dress so it had to be good stuff. I chose wool crepe and silk lining. Oh what luxury! I have really started something now! Just look at the texture in that wool…

wool crepe texture

I love the way that it pressed so beautifully yet didn’t crease too much when it was worn.The wool crepe was £15.99 and the silk lining £6.99 a metre from one of my favourite fabric shops in the Goldhawk Road. Probably my most expensive make, around £42 in total but the blow was softened after I checked the prices of similar wool and silk in Berwick Street, London…. more like £30 – £80 a metre!!!!

If I’d have had the time, I would have made a full toile to check the sizing properly. I overestimated the sizing of the bodice and ended up taking it in by 3 inches under the arms. I will definitely take it down a size next time. And oh yes, there will be a next time!

This is also my first experience working with a modern Vogue pattern. I have heeded the warning of others about their ‘vague’ instructions, but I found this one to be very simple to put together. Bearing in mind I didn’t go for the sleeves!

Once you get the hang of the ‘flanges’… lol – or once you get used to calling them ‘flanges’ – it will all make perfect sense. And they do help to create a very flattering neckline. I chose the sweetheart neckline just because I think its more feminine and reminiscent of  glamourous ’40s ladies.

sweetheart neckline

Working with this fabric was a dream and made inserting a zip and lining up darts and seams, a breeze.

v8280 back view

invisible zipper

There were no instructions to fully line the dress, only to line the bodice. But from past experience I know I will never get away with an unlined skirt. My biggest fashion blunder was to take my coat off in the entrance to a party only to find out my unlined dress had ridden all the way up to my armpits. The worst (or most life-saving moment) of that was that another guest had to tell me. Otherwise I’d have strutted my stuff onto the dance floor like a complete fool, outdoing any Bridget Jones moment! And so I cut the lining, the same as the skirt but with an additional half inch added to the side of each piece. I sewed the back seam from the zipper opening to the top of the vent and the side seams but didn’t make the darts. I pinned the waist of the lining to seam allowance of the skirt section, first pinning at the side seams, then to the back openings, with one pin at the centre front. I then folded pleats at the dart positions and pinned those in place before sewing to the seam allowance all round.

I’m not entirely sure this was the best way forward. There may be more professional ways of doing this but it worked, for me, anyhows!

I bound the hem with bias tape and machine hemmed the lining. Tricky old stuff, silk lining. Seems to carry far more static than poly lining, when ironed. But boy does it feel good! Raising one’s own standards is very amusing!!

bound hem

And all that is left to say is thank you once again to Mr Ooobop! for being amazing in every way. Not only does he dutifully take lovely photos for me, he is the most amazing support for my often waining morale and makes me so happy… gush gush!

He will insist on a leg shot though!

side detail on tights

A proper pencil skirt

pencil skirt

I do believe I have sewn a garment in the same month as the current Burdastyle! Not sure that has happened before. But I was very excited about April’s edition and I knew I would make this skirt.

burda_april_2012_puppy

I love classic, timeless styles. And the pencil skirt is no exception. Worn anywear, anytime, dressed up or down, it makes getting dressed for work or an evening out, a mindless operation! I also love that it can be modern or vintage, whatever you team it with.

Satin was the suggestion for this particular version but there was another one with a gabardine recommendation. Satin is a bit too posh for work and everyday so I set off to get some gabardine. I bought some but wasn’t filled with the usual glee once I’d parted with my cash. Praps it will soften a bit in the wash, I thought! But just as I was on my way out of the shop my eyes continued searching – as they always do – and I spotted some black stretch denim. That’s the stuff, I thought. And I was right. Comfy, casual but smart and sturdy enough to hold me in, in all the right places!

pencil skirt

This is possibly the shapeliest pencil skirt pattern I have come across. Largely due to the panels and princess seams I would assume. It is really high waisted and a lack of waistband allows for a shapely top at the waist, or near under-bust!

The instructions didn’t relay details of a lining and I have learned hard lessons from not including one so I dug out some deep red poly lining, cut the same pieces as the skirt, minus the facing and allowed a pleat in the front.

lining pleat

I felt quite pleased with myself for remembering this trick but alas it wasn’t enough ease to have just the one in the front. I should have really allowed for another two, one at the top of each back panel. It really is a very snug fit!

The invisible zip went in without any probs. It lines up and everything!

invisible zip

I will definitely return to this pattern at some point and would love to make a posh version and include the couture techniques suggested on the Burda Style website, namely adding boning, underlining etc.

But I seriously must not veer off the project list any more than I already have! I have much more interesting projects to fry, not least of all my jacket! I can report that it is, at last, taking shape, all be it in the initial stages, but it has a body, nonetheless, and some welt pockets with flaps and a collar ready and waiting its turn….. honest! 😉