Gypsy dress and panel placement


ooobop soladida gypsy dress front

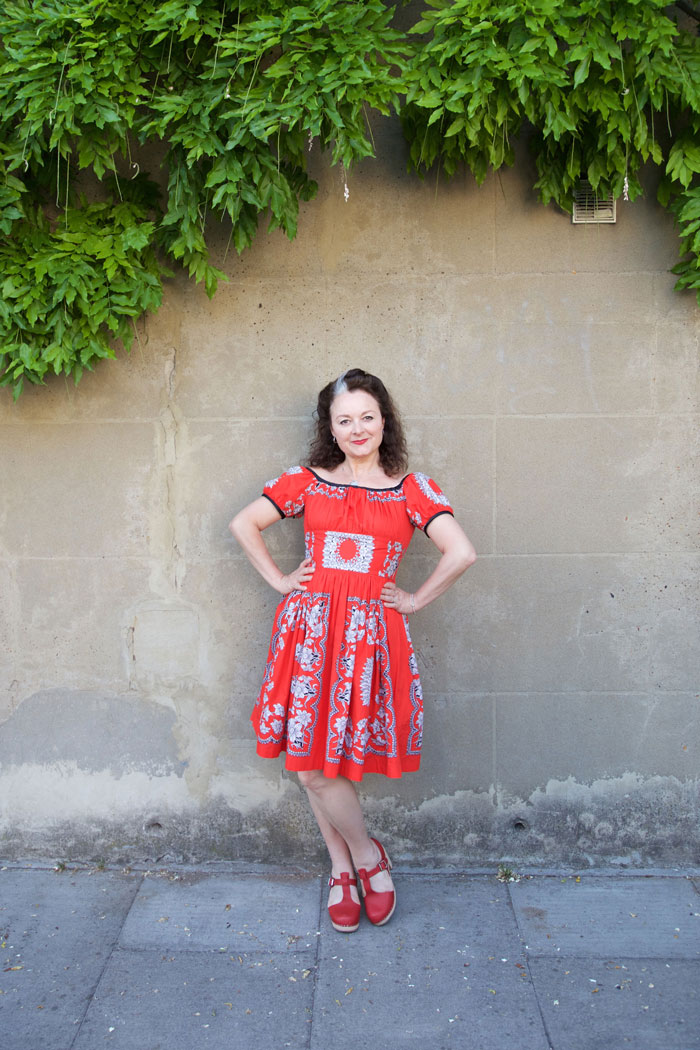
I am flexing those self-sabotage skills again. I have had notice of my daughters wedding for almost a year and with only a month away, have I begun making my mother of the bride dress? Don’t be daft. But I did make another Sew La Di Da French Gypsy dress. And I must say, I’m not even a little bit sorry!

ooobop soladida gypsy dress front

I totally blame that upstairs bit at Misan Fabrics, in the Goldhawk Road, where they have the most desirable remnants on sale, way cheaper than the fabrics they have downstairs. There was this 3.5m bolt of bright red panel fabric that was signalling from the top shelf. I didn’t have a clue what I’d do with it at that point. Cutting it up for headscarves was an option. But not a very exciting or fulfilling one. Maybe posh napkins or a gathered skirt? Seriously, I’m so uninspired sometimes. I spread it out on the table and looked to the assistant for a suggestion. A shrug of the shoulders translated that she wasn’t the least bit interested and was I going to buy it or not? The reason I was stalling was that the label said £10. I didn’t imagine for one minute that meant for the whole lot. So when the penny dropped, so did the idea that I could indeed make a gathered skirt but with a French Gypsy dress bodice attached to the top of it… for a tenner!


It’s great to revisit a recently-made sewing pattern: It’s already been traced; the fit is established – though I had to keep in mind that the fabric I used last time had a bit of stretch – plus having rehearsed it already, it’s a more confident sew and the process is therefore quicker.

ooobop soladida gypsy dress bodice

There was an issue of placement though. There were not going to be any happy accidents here, oh no! The skirt was dead easy to work out. I just used the width of the fabric for front and back and then halved the back for the seam allowance and zip. But I did think to make sure the panels aligned from the same point at the top/bottom… just before I cut, lol

The midriff – which I must have told you a hundred times before, is my favourite section of a dress – deserved a small floral border that came from the centre of the larger panel. I like how it kind of looks like a giant buckle from a distance. The little floral bits at the side were a bonus.

ooobop_soladida gypsy dress midriff

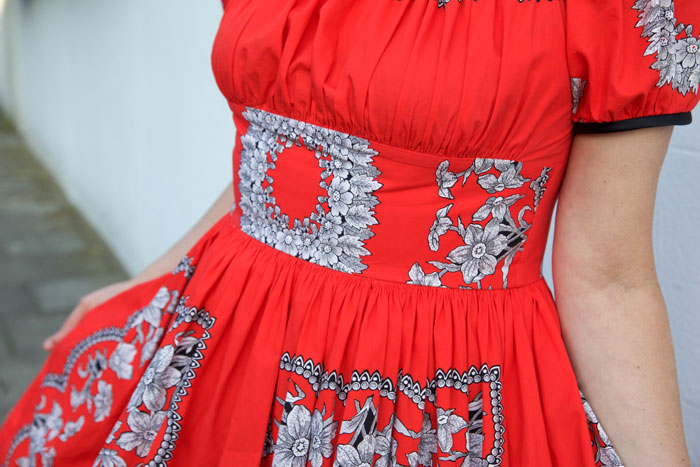
That same little patterned square worked for the sleeves just as well.

ooobop soladida gypsy dress sleeve

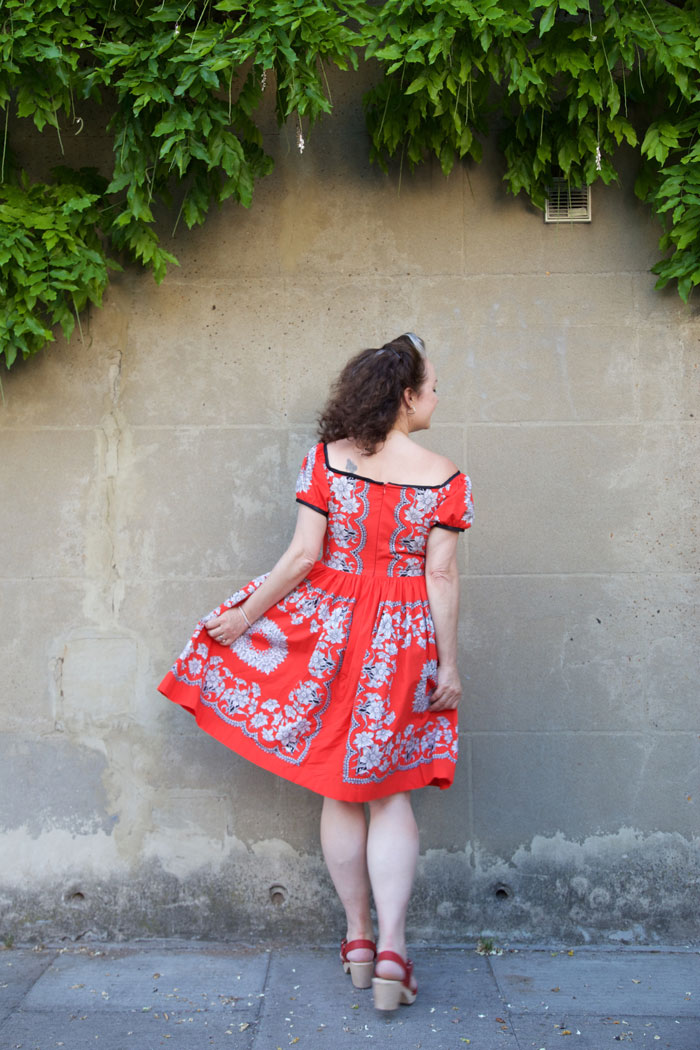
Back bodice pieces always give the most placement jip when there’s a zip to factor in. So annoying. Even more annoying when I’d already cut the back skirt pieces apart and could have made life easier for myself if I’d have thought it out properly and allowed for a side closure instead. But then I had a little brainwave and made sure that the placement didn’t need any matching up. I just needed to make sure the design was the same distance away from the zip on either side. Which it is. Kind of!

ooobop soladida gypsy dress back

The only section I’m not crazy about is the front gathered bust section. There wasn’t enough plain red and I didn’t want to repeat too much the ‘lacy’ edging of the panel section. I can live with it though!

I still had enough duchesse satin left over from the last time to make the black binding which is lucky because I love how it outlines the dress at the top.

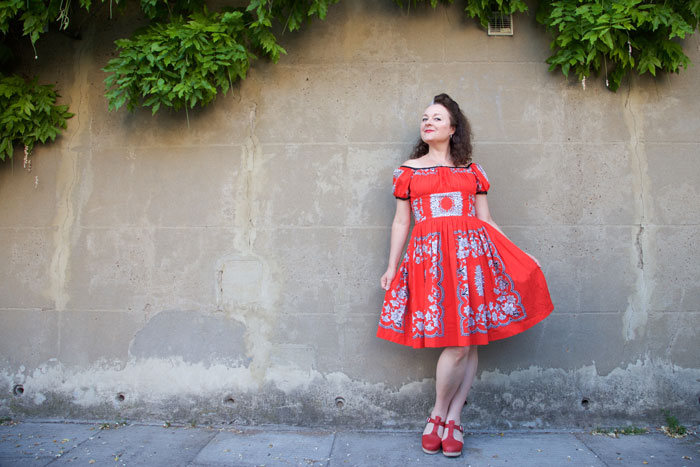
My new dress had it’s first outing today and proved to be very picnic-worthy and received lots of lovely comments. It also attracted some attention on our little shoot in the neighbourhood earlier this evening. One passing stranger couldn’t resist joining in and worked it so well it would be rude not to include him. Thinking of you, Karen (didyoumakethat). I didn’t even have to tell him what it was for!

ooobop soladida gypsy dress guest

Thanks as always to the lovely Mr O for these lovely photos. x


Personalised bunting

personalised bunting Maddie

When I’m busy at work, it’s so tricky to find sewing time or the energy sew when I get home! But it’s imperative that I fit some in at least, or I start to feel resentful about my day job and that’s a bit pointless because, hey… I need to pay the bills so I can at the very least keep a roof over my sewing table!

And so bunting was last week’s fix. One for baby Maddie and the other for her big brother, Charlie:

personalised_bunting_charlie

Bunting in itself isn’t very taxing to make: With right sides together, I sew the two diagonal sides of each triangle set, leaving the top edge open for turning; trim, turn right-sides out, and press. Once I have as many as I need, I pin and sew to a length of bias binding, allowing enough for ties at the ends.

But in order to personalise ones bunting it pays to have some double sided Bondaweb to hand. And do not sew the triangles together until you’ve appliquéd the letters.

I traced the individual letters from a printout onto the peel-off paper side of the Bondaweb – making sure the letters were first reversed. If you don’t do this the letters will read back to front!

I then ironed the tacky side to the reverse side of the fabric and cut out the letter shapes. You can then peel off the backing and iron the letter to the front side of the bunting to keep the letter shapes perfectly in position as you sew them on.

I happen to have a cool appliqué stitch on my sewing machine but a zigzag stitch is perfectly good enough. Just keep it nice and slow and pivot around any corners and curves.

personalised bunting applique

It’s also a good idea to tack the open top edges together before you pin and sew to the bias binding strip. Just keeps them nicely in position and stops any pesky puckers!

I find it strangely satisfying to have a pile of appliquéd bunting triangles on my table and admit to just sitting and admiring before I launch into attaching the bias binding!

personalised bunting for charlie

I just love browsing for fabrics that coordinate together. And if you happen to love them it makes sewing the bunting so much more satisfying. But it does make the giving-away part of it more difficult. Lucky it is personalised!

personalised bunting Maddie

So there you go. The joys of bunting. A mood-boosting, sewing fix of a lovely gift. What’s not to love?!

How do you cope when you are short on sewing time? Do you just accept the break or do you find smaller fixes too?

Burda Brigitte Blouse

First I must apologise for those who have had issues trying to comment on my blog over the last week or so. I won’t bore you with the tecchie issues but suffice to say all is now good at Ooobop HQ! (touch wood!) Thanks for bearing with.

It feels so good to be able to write a post. I knew how much this blog meant to me but didn’t realise quite how much. I found out quick enough when I thought I’d lost nearly 2.5 years of work! I’ve been such a bloomin’ grumpy pants all week, Mr O will tell you for nothing!

I feel like I should be making a bit more of a dramatic re-entrance, but I’m afraid we’ll just have to make do with a humble gingham peasant blouse.

burda gingham boatneck blouse

It’s a very nice gingham peasant blouse though. Care of Burda’s June 2011 edition Mag. It’s also available for download here where it’s featured in a sheer fabric.

I’ve made three sleeveless ones before but this one has long sleeves and no elastic. And it presented a fine oopportunity to create some bias gingham binding around the neckline and cuffs which is always lovely!

burda gingham peasant blouseThe fabric was sold to me as Egyptian cotton, which I had no reason to dispute. It is smooth and cool to the touch and feels like fine quality. But the pyromaniac in me is compelled to do a burn test, always. And the little black crumbly ash that resulted, confirmed the fibres as a poly blend, doh! Win some lose some. Should’ve sniffed a rat at £5.99 really!

But not a worry as it still feels nice against my skin and it’s not snug on the pits so remains a good choice for a warm summer’s day or an office with failed air-con.

The instructions suggested a gathered hem into another bias band but I was nervous about too much poof around my middle and given that I almost always tuck in my tops I just did a standard hem. But, note to self, I didn’t increase the length enough to compensate, and with one wave across the street, it comes untucked, whether I’ve tucked it in my pants or not!

burda gingham peasant blouse

It’s very quick to make if you can even up your gathers quickly. I faffed a bit too much with my gathers as usual, but it still got completed in an evening.

I love the raglan sleeves and the boatneck. So easy to wear. Great with a pencil and equally a circle skirt. And the plan is to make some capri pants one day, just like Burda’s styling, to come somewhere close to that retro Brigitte look.

burda gingham peasant blouse

Peasant blouse: Burda pattern, handmade by ooobop
Skirt: self-drafted & handmade by ooobop
Belt: H&M
Shoes: Rocket Originals
Photography: © Daniel James Photographic


1939 Vintage Simplicity Dress

vintage 1939 dress

It’s been a while since I sewed a proper vintage dress and when I spied 5 gorgeous yards of pretty blue and white print fabric in a charity shop for a fiver, it was a sure sign to unwrap one of my favourite patterns. I bought the fabric thinking that if I screwed up, a fiver was worth the risk. But actually I loved the fabric so much I used some other polycotton, from stash mountain, to rehearse a toile for the bodice first.

Very few alterations were needed. I did a slight FBA to add a bit of shape and added an extra inch to the waistline. I think it fair to say that I manage to pack away a few more calories than those svelte 30s women!

simplicity 3302 pattern pieces

The pattern is a vintage original from 1939: Simplicity 3302. And the condition of the pieces was impeccable. Factory folded and clean. Such an honour to be working with such precious pieces that are 75 years old!

The most surprising thing about this dress is that it takes 5 yards of fabric. At 35 inches wide that is. But it really doesn’t look that extravagant. I’m used to 50s style dresses taking up miles of fabric but the skirt section of this one isn’t even a full circle!

vintage dress simplicity 3302

I kept to the instructions, like the good GTS I am, and I created a neck facing instead of lining. I also decided against overlocking the seams. It somehow seemed wrong! The fabric behaved beautifully and frayed very little so I opted for a spot of pinking! Feels far more authentic and it pressed beautifully flat.

I’m not totally sure what the fabric content is. But on doing a burn test, I was left with a very silky white dust. So the consensus is that it is 100% natural fibre and top notch quality I reckon! It has quite a good drape going on and doesn’t crease too much either which makes me wonder if it is cotton or not. I made a decision not to line it. Mostly because of the gorgeously warm weather we’ve been experiencing but also because it always seems a bit mad to line a natural fabric with a synthetic lining. And I wasn’t about to splash out on silk!

sitting pretty in vintage dress

Having said that. I did use a silk organza for the sleeve stiffeners. You didn’t think those puffs stick out like that, unaided did you?! Quite a clever little trick that involves a circular piece of fabric like tafetta or flannel or organza, folded in half and sewn to the sleeve head before the gathering is done.

silk organza sleeve stiffener

vintage_1939_dress_sleeve_headIt looks a bit comical until you press the seam onto the sleeve and not onto the bodice which I did at first. Didn’t get a shot of that but the look on Dan’s face was priceless!

There is also an inverted pleat that is topstitched at the hem of the sleeve. So neat.

pleat on sleeve

I’d like to say it all went swimmingly but I made quite a big boo boo when I inadvertently cut the back as two pieces and not on the fold. Very easily done when patterns of that era are unprinted, but, regardless, I needed a quick solution as it would have come up too small once I’d seamed it and also, I didn’t have a large enough leftover piece to cut another back piece. Quite a big issue when you get your hands on a unique piece of fabric from a charity shop. It’s not like you can go back and bag another metre!

So… This is a bit bodgie… I made an inch wide length of bias tape from a 2 inch strip that I’d rescued from the selvedge, using my trusty Simplicity Bias Tape Maker Machine. And with half inch seam allowance I sewed it on each centre seam of the back. That effectively joined the back pieces together where they would have sat had there had been a fold!

Luckily the seams are disguised by the busy print so I think I got away with it!

back of vintage 1939 dress

I know my hair do isn’t strictly 1930s and the shoes are far from authentic but it needed a little bit of vintage styling to pull it off. Especially as youngest dort decided it was ‘lovely but very 80s!!’

vintage simplicity 3302 dress

I love the sweetheart neckline. So discreet and so pretty. It doesn’t have any added interfacing so I’m surprised it holds so well. I did clip into those curves good and proper though!

vintage sweetheart necklineI wrestled a bit with the zip. I knew I didn’t want an invisible zip. That seemed a bit wrong too so I opted for a lapped style zip insert. But could I get my head around it… No I bloomin’ couldn’t! I can do it with my eyes closed in the back of a pencil skirt but for some reason I just couldn’t pull it off. So I went for a straightforward zip insertion whereby I basted the seam shut, centred the zip and sewed to seam allowance. I did however prick stitch close to the teeth on the right side.

side zipper

I reluctantly wore my new dress a to a party on Sunday. I didn’t know any of the guests and was a bit worried I’d stick out like a sore thumb (in my 80s dress…. thanks dort!). But my assumptions were way off. Such wonderful food and great music and the most amazing people. My ‘wallflower status’ was upheld!

candy from Black Dwarf Designs
With Candy from Black Dwarf Designs

Oh and hats off to my wonderful fella, Daniel Selway who took the photos and who now finally has a site to host his pictures. Right here, in fact!


Vintage western shirt #2… the flowery kind

Flowery vintage western shirtAs promised, here is the finished shirt. It is a revisit to the same shirt I made for Mr Ooobop! almost a year ago. On first inspection I thought it must be 70s, given the flappy collars and slim fit. But one reader clocked the hairstyles on the pattern envelope and said it was probably more 1980s. Either way, its another vintage make that has been a valuable learning curve and keeps the old chap happy at the same time… double whammy!

Butterick 5007

I made some brave adjustments to the pattern this time. (Well, brave for me, that is!) Namely to the chest, shoulders and sleeve length. Of course there is a knock on effect for each change, given the many different pieces to this pattern, so I had to keep on my toes!

I have said it before, and I am very conscious of blowing Mr. Ooobop’s trumpet, but he is very good at knowing what fabric suits and especially good at choosing buttons. Check these out…

yellow buttons with black outline

They are little chunky white buttons with a yellow fill and a black outline. They are indeed a trifle camouflaged here but I can’t imagine any other button being better on this shirt. I have mastered buttonholes, which is a good thing seeing as there were 13 of the damned things to make, but I did get a bit over confident and had to unpick two of them because they weren’t perfectly centred in the placket. I really don’t want to be doing that on a regular basis. Took as much time to unpick 2 buttonholes as it did to sew 13 of them AND hand sew on all of the buttons!

I couldn’t resist adding a couple of new features to this one. I underlined the collar, the collar stand and the under flaps of the pockets in a plain red cotton…

collar cuffs and pockets with red contrast lining… and I added some bias trim to the curved shirt hem. Mostly because Mr. Ooobop! wanted to preserve the length. It was an obvious solution but I think it makes for a lovely finish too, highlighting the shirt-tails!

bound hem

I am really happy with the fit on this one.

vintage western shirt back

Mr Oobop! got a fair few comments when he turned up at his last gig.

Mr Ooobop playing double bass

The finishing on this shirt – all the topstitching and flat felled seams –  was the time consuming bit. but imagine how long it took me to match that rose on the shoulder?! (wink, wink, nudge, nudge 😉 )

matching up the pattern on the shoulderSpecial thanks to George, Tom and Cat of The Redfords for the fabulous photography.