Burda birdie drawstring top

blue bird drawstring top

I knew I’d make another one of these. I just needed another metre of fun chiffon and this little birdie print was perfect. All totally synthetic of course but I’m learning not to be such a fabric snob in my old age and hey… you can’t argue at £2.50 a metre!

I had a couple of issues with the last one I made, namely the size of the armholes. It transpires that this was partially due to the stretch in the other fabric because the alterations I made – namely ditching the side seam allowance and raising the underarm point by 1 inch – have made a larger difference than anticipated. But its all good and there will be no fashion faux pas when wearing this one!

blue bird drawstring top

Advisable to seam the sides with French seams. It gives a very satisfying finish but the instructions provided are otherwise very simple to follow.

Below is a pic of the back view as requested. Exactly the same as the front, in case you thought I might have the ability to rotate my head a whole 180 degrees! And you also get to see the print a bit better here too.

blue bird drawstring top back view

Actually. Maybe they’re not birdies. Maybe they are the little fluffy bits from a dandelion clock. Hey ho. Cute all the same!

Since my last post, the instructions for the pattern are free to download from Burdastyle here. It’s called the Summer Tank 05/2013. If you are not already a member I can assure you it’s worth the registration with this site. The gallery is constantly being updated with inspirational uploads from fellow sewists and there are plenty of other free pattern downlads available among the great ones you can purchase.

Thanks as always to Mr O for the great photography. He snapped these literally in seconds this evening. That birthday camera was worth its weight in gold! 😉

ooobop! review: Burda Style July 2013

Just when you thought I’d forgotten all about you! So sorry for the really really late review. I’ve had this issue in my clutches for quite some time and I’m sure most of you have snapped one up and made up your entire summer wardrobe in the meantime. But for those faraway friends who always get the bum end of the deal when it comes to Burdas on shelves, this post is dedicated to you.

Celebrating Summer is the opening theme for July. So get your sunnies on because there is nothing shy or wallflower-like about these there garments.

Cotton, jersey and linen. Bold prints, floral and batiks… all a little bit hippy for me, to be honest, but for any beginners looking for some dramatic starter projects, a few of these could well be worth a punt.

Burda July 2013 summer designsThe dress, bottom right corner, for instance is fashioned from a rectangle of fabric with single slit. You can just about see the diagram to the right of the dress. There are some nifty instructions to wear this dress in three genius ways with the help of a circular bangle. But, easy as it states, I haven’t quite got my head around it enough to explain, I’m afraid!

My hippy tendencies, however, do extend to love of tipi!

Burda July 2013 Tipi

The next section gets a bit more versatile. The opening shorts and silk vest top with twisted straps brings a little sophistication to some interesting casual wear. Not sure what to make of the pink wool and leather-trimmed shirt dress (centre) with oversized bellow pockets. I already don’t like the puckering around the waist! But the cowl neck  on the jersey satin top (centre right) is so classy as is the soft wool jacket (bottom left corner) with its silk trim and pocket flaps. Really interesting asymmetric closure too.

Burda July 2013 summer fashionsI wasn’t immediately bowled over by the retro pattern. But on closer inspection those shorts are really cute with their angled hip yoke pockets, waist pleats and turn-ups. I’d really like to give these a go before my holiday, if I get a chance. The T-shirt though a useful pattern to have, is a little boring really but far more intriguing is the use of fabric here. It’s made of striped raffia! Can’t imagine that’s a snuggly wear!

Burda July 2013 retro shorts and Tshirt

It lightens up somewhat with shimmering silks, floaty tulle and pearly sequins. My pick of the set is that silk batiste with ruffle appliqué jacket (bottom left corner). Short, boxy cut and properly unnecessary! Which is why I love it so much! I quite like the deep v-neck top (centre bottom) but I wouldn’t sew with that sequin fabric for all the silk in china!

Burda July 2013 Summer shimmering fashionsIncluded in this section are some more of those genius wrap dresses. The top one shows another two ways to wear the one shown previously. Beach dress becomes evening dress with clever usage of a bangle!

The one below has two side slits and makes such a great beach dress. No bangle involved here, the fabric piece is simply draped around the body.

Burda July 2013 wrap dresses

Some lovely lingerie patterns included in this issue. I’ve made a couple of pairs of pin-up pants but I really want to explore the world of undies in more detail. I’m tempted to rustle up a couple of slips too as a cheats way of avoiding a lining!

I love the French knickers and the camisole tops. And imagine how luxurious they would feel in silk crepe satin…

Burda July 2013 lingerie

But hey. Guess what section tops it all off, once again? You guessed it!

Bolder, shapelier, sexier and far more likely to appear in my holiday suitcase. Check out that all-red stretch satin halter neck dress (top left corner). Sparkly rhinestones cover a small gathered section under the bust. Soooo flattering. Loving the red lace dress (next to the halter dress) with three-quarter length sleeves too. (I do like a red dress!) I’m not entirely sold on the use of asymmetric darts though. Looks to me like a mistake.

And wow! That purple cowl-neck dress (3rd column first row) sports a cowl to behold. Its made of a double layer of silk jersey, here. I anticipate a nightmare sewing scenario but if anyone wants to make this for me, I’d be happy to receive!

Burda July 2013 plus fashions

From the lack of reviews on this issue along with the odd very negative ones, I gather this hasn’t been the most popular. I have to admit, it took a few going-back-to’s to get a fair impression but as always, if there’s only one pattern that hits the mark it’s still so worth the cover price. So stick with it lovely sewists!

Princess Jessica’s Prom Dress

I think I have kept you all in suspense for quite long enough. This evening is Jessica and Tom’s leavers prom and so I am allowed to reveal the dress I have been working on for the last few weeks.

I was feeling a bit poorly today so Mr Ooobop, like the knight in shining armour he is, set off with his new birthday camera without sparing the horses. The following photos are some of the loveliest he has taken. And I think you will agree that the beautiful subjects contribute somewhat to the awesomeness too.

Meet Jessica. The most wonderful 16 year old daughter of my friend Tina. Can you now picture the pressure that was to create her a prom dress fitting for such a beautiful princess?!

Jessica having hair styled

Tayla Harris was in-house hairdresser for the evening and styled Jessie’s hair beautifully. Complete with little jewels to match her necklace.

Hair jewels
Hair jewels

And ooo… look. A cheeky first glance of the bodice! Such a tease, I know!

Hair styled with jewels to match necklace

With make-up, hair and outfit complete, enter Jessie’s Prince Charming – the lovely Tom. I’m so pleased he liked his tie. He didn’t really have much choice in the matter, bless him. It was delivered seconds before this photo was taken. I only finished it this morning! And here we also have a side view of the prom dress. I’m getting there, honest!

Tom's arrival and receiving the tie
Tom’s arrival and receiving the tie

The tie was made to match Jessie’s sash as you can see. And Tom did a much better job of tying it than I did!

Tom putting on his tie
Tom looking more like Prince Charming every minute!

So now they were both dressed to impress, Mr O worked his magic and took some awesome shots of them together. Don’t they look adorable?

Jessica and Tom
Jessica and Tom
A beautiful portrait of the prom Princess and her Prince

I would love to be a fly on the wall tonight and take a picture of them dancing together. The dress is a circle skirt underneath 10 layers of gathered polkadot tulle so you can imagine just how twirly and frothy it would be.

A little dance to limber up!

Jessie came to me with a firm idea of what she wanted and luckily for me there was a very similar pattern in one of my old Burda magazines. I’ve got quite a hefty collection now. It’s always a joy to go through back issues and see patterns you didn’t notice first time round. But this one was on the money! The only thing I had to do, knowing how standard the sizing works, was to do an FBA. And I had to learn how to do it pretty quick!

prom dress idea

Thankfully for me, and for Jess, I had recently come across a great set of instructions on the By Hand London site. These totally took the fear factor out of the whole process. And I learned so much. Not least of all to come down 2 sizes for Jessies petite body and then doing an FBA. It took just 4 fittings to get it right but oh it was so worth it.

Side view of the dress

The strapless bodice section of the dress is boned. For good reason! This was a first for me too. Though I did discover some fantastic boning in my local haberdashery department that sold pre-cased boning. I just had to sew it directly onto the open seams.

The front and back have rouched tulle stretched across 2 panels

The front and back have rouched tulle stretched taught across 2 panels. I love the way they ‘butterfly’ out from the centre seam. And I love how classic and timeless they both look here. Reminiscent of the 1950s.

Full skirt. 3 layers.

The tulle overlay is ivory in colour and works so well to soften the pink. Kind of like a frothy strawberry milkshake, don’t ya think?! Of all the techniques involved in making this dress, funnily (or not so funnily) the most tricksy part was gathering all those 10 metres into a 27 inch waist. I even made several gathering threads to avoid breakage but it was still a nightmare. I ended up gathering small sections at a time and pinning it on the underskirt, on the mannequin and then hand tacked it all together before I even thought of taking it to the machine!

The bodice and skirt are lined in full with a slightly darker pink lining. That was one of the easier bits! Unlike the Burda instructions, I sewed the circle skirt lining to the waist seam and then once the bodice lining was seamed at the top, I turned under and hand-stiched the waist seam of the lining over the raw edge of the skirt lining.

Oh yes! How could I forget? The shoes!! Check out these amazing Kurt Geiger shoes that Jessie snapped up in the sale for a mere £29! Pink patent leather with bows and bling!

Kurt Geiger shoes
Kurt Geiger shoes: Pink patent leather with bows and bling!

Have you got loveliness overload yet? I think I have. But hang on I forgot to show you the back. Pretty bow sash and all

back view of the dress

And so the ‘royals’, unfazed by their impromptu photoshoot, bade their farewells and headed off to the prom.

En route to the prom

I would so love to have seen everyone’s faces as they walked in together.

Outside the venue
Outside the venue

A massively big thank you to Mr Ooobop for these amazingly professional photos. I would never have got these together myself. I also have to thank Tina for asking me to make this dress for her beautiful princess. It has been such a huge learning curve for me. I don’t deny there was a fear factor involved. I had no choice but to get it right. But that’s how we learn fast, right?!

And last but not least for the ever obliging Jessica and Tom. You make just the perfect models and have brought such beauty to my blog! I am being totally honest when I say that these pictures brought a tear to my eye. I hope you guys had the time of your life! x

A Tie for Prom Prince Tom

A few months ago I was asked if I’d make a prom dress for my friend’s daughter. Of course I was delighted to oblige, and honoured and scared but it happened. By some amazing miracle it happened. But I can’t show you just yet. Jessica’s prom is tonight and Fulham’s best kept secret can’t be revealed until she’s all dolled up and ready to rock. Mr Ooobop is at the ready with his camera, don’t you worry!

But what I can show you is the tie I made for princess Jessica’s prince charming. I hope he won’t mind. In fact I hope he likes it. Prince Tom hasn’t seen it yet but I hope it’s a relief and fair competition for all the designer ties he went in search for;-) Designer sort is Tom, by all accounts. He likes his labels. But all the Ralph Laurens and the Guccis of the world couldn’t match the gown. Shame I don’t have an ‘ooobop!’ label at the ready, I’m sure that would have sold him sweeter!

A tie for Prince Tom
Pink satin tie with pink gingham lining

I only had a couple of evenings to research, cut and sew the tie. Sailing close to the wind, I know! So my first point of panic call was to all my wonderful Twitter followers. And they came up trumps immediately.

Angela from Sew Mental Mama was straight in there with a link to a FREE tie pattern and tutorial from Collette Patterns. And here’s a link to the fabulous ties she made for her son and her husband using Simplicity 1745. (wow! that pattern cover is creepy!)

Rachel from My Messings tweeted with a link to Unique Schmuck who had made one here. No hard sell on the hand sewing. In fact no sell at all. But that’s ok because I’m a weirdo and I quite like it!

And then Tom came along with some fantastic words of encouragement which gave me all the confidence I needed to get started!

Tokyo Tom tweet

Laura After Midnight confirmed it as an easy one too, so I duly printed out and pieced together the Collette tie pattern, having unpicked one of Mr Ooobop’s ties to compare. I realised that though the paper pattern was probably the best place to start, it was very slim and actually tapered differently from the ready-made one I had unpicked. Wouldn’t normally have been an issue except for one major factor. The only interlining I had was from the unpicked tie. Shops were shut and I had nothing similar in the stash, save from some white felt which, even when cut on the bias has no elasticity.

Carefully unpicked tie!
Comparing pattern with existing tie

I was a bit nervous of using the existing one as a template as it was so difficult to position straight, being cut on the bias and all. It didn’t appear that it had been cut accurately to start with so I was off to a wobbly start. But after a bit of bullet biting, it was full steam ahead.

Interlining from ready-made tie

I did use the Collette Patterns instructions however. And without these I would not have achieved the point or the lining inset that was required on each end.

With no ooobop! labels at the ready I was determined to put an ooobop! slant on this otherwise very conservative tie. So I added some pink gingham lining. It made sense to make the loop in matching gingham too. There. Happy now!

Detail at back of tie

There was a fair bit of hand-stitching, it’s true. But on the whole a very satisfying project indeed. I now have a couple of hours before delivering it and seeing the gorgeous couple in all their gorgeousness.

Come back soon for the big reveal!

tie on mannequin
Is this how you tie it? Don’t judge!

Burda drawstring top

‘Well about bloomin’ time!’ I hear you say… again! After all those reviews, all those bigging-up posts harping on about what I fully intended to make, you’d think I’d have rustled up at least one of those Burda goodies by now.

Well here it is. Care of Burdastyle Magazine, May 2013 issue, the drawstring top.

drawstring top
Fashioned from a lovely piece of chiffon that was hanging around after the fabric swap at Rachel’s meet up back in April. Incidentally, if anyone can put their hands up as to whom was the kind donor I would be so happy to know.

I had no idea it was destined for this top but I was secretly hoping that whatever I made, it was going to incorporate a flower placement, both front and back. And guess what? It does!

drawstring neck
It is the most simplest top in the world. One you have to draft yourself, mind! And I don’t mind that at all as it goes.

I’ve been tinkering with all sorts of pattern adjustments recently, including an FBA. Not for me, you understand. Which is why it’s far more exciting. I am making a prom dress for my friend’s gorgeous daughter. But more news about that in a couple of weeks. The dress is a big secret until her big day!

Anyway, I digress. Back to the top. Well, actually there is nothing much more to add, other than I figured out how to cut chiffon in a straight line after I had cut it on the wonk! I thought I was being clever by pulling a thread at the hem to make sure I hemmed it even. But actually I’d cut it completely on the wonk and the whole thing ended up being about 2 inches shorter than planned as a result :-/

I used a rolled hem… not by using my rubbish rolled hem foot… but by hand. It was a slow but sure process but it worked just fine.

The pieces consist of a front and a back, seamed only at the sides, with a drawstring around the neck. The raglan armholes are rather large – much larger than the photographs show – and you will therefore require a modesty garment underneath unless you reduce them beforehand.

This is how it appears in the mag:

chiffon drawstring top from Burda May 2013I made it in a panic when I thought I was running out of Me-Made-May garments but never actually got round to wearing it because of this stupid pretend summer we are having. But it was perfect for today’s Father’s day date at Café Rouge and even got the seal of approval from my eldest daughter…Win!

drawstring chiffon top

Now, back to that prom dress…

Me Made May 13: My final days

So here we are. The final days of Me Made May ’13! I feel quite sad in a way. But relieved. And accomplished. And enlightened. So thank you SoZo for setting this brilliant challenge. I didn’t realize quite what a knock on effect it would have. Or how it would make me feel. I wholly recommend this challenge to anyone who has yet to take the plunge. 

I really didn’t think I would make it to the end of the month. For sure there were repeats and some days no photo evidence at all. In reality, taking a photo of yourself every day is really difficult. Easy at first with all the initial enthusiasm for the challenge but then harder each day as the sun disappears, the hubby sets of earlier for work and the outfits get more tight-fitting the older they are!

But the journey was worth it. It was fantastic to focus each day on each hand made garment and realise where I’ve come from and what I’ve arrived at. Confirmation on what I’ve learned and achieved was invaluable. I don’t have time to stop and think properly about most things these days, especially what I’m going to wear on any particular day. So this was a fantastic excuse for self-indulged focussing, on past experience as well as some future plans. Oh yes, of course the flip side of the coin has meant my project list has increased ten-fold. But hey that list always makes for sweet dreams, if nothing else!

So to wrap up… the final days of  Me Made May ’13.

Jersey cowl neck top

DAY 22: Silk touch jersey cowl top and wool pencil skirt
Neither of these are blogged, I made them so long ago. But the cowl top is made from a free pattern on Burdastyle by Ichigogirl. Its the same as the stripy one I made. The skirt is a Simplicity pattern that my mum gave me to kick start my sewing antics. It has a little vent on the front knee. I didn’t line it, unfortunately and this is something I would never do with wool now. I should really go back and line it. It would hang much better and not stick to my tights!

Day 23 black self-drafted pencil skirt

DAY 23: Black self-drafted pencil skirt
This is possibly the most worn and practical of garments in my wardrobe. It fits like a glove, because I drafted it to my exact measurements. It’s properly lined and the lining is even properly attached to the vent. The waistband incorporates a woven interfacing so it doesn’t roll and is fastened by a hook and bar instead of a rubbish ‘eye’! It was a fantastic learning curve making this skirt. So absolutely worth all the effort that it feels fantastic to wear. I always imagined a whole weeks worth of these to choose from and I still think that is highly necessary. They are perfect work skirts and glam up nicely for a spontaneous evening out too!

DAY 24: Stripy wool mini A-line skirt
A miserable day. No sunshine at all, so the woolly skirt came back out. No photographer today I’m afraid. I’ve come to realise how much I wear this skirt. Mostly when I can’t think of anything else to wear. It fits; it’s comfortable; it goes with DMs… and it keeps my butt warm!

Day 25 mmm13 Elisalex shortened

DAY 25: The shortened Elisalex
Today was the 20th anniversary of the day my dad died. Always a sad day. But always a good excuse to don a pretty dress and catch up with my wonderful brothers and sisters, nieces and nephews. The cemetery is a bit of a trek from the bus stop so I needed to sport something easy to walk in. Small heels means small skirt in my world so there was only one thing to do. And that was to chop the bottom off my test Elisalex dress! So glad I did. The duvet cover did good! Although I love my longer rosy version, it’s kind of ‘for best’ but this cheeky little version is now a great little throw-on when-the-sun-shines-and-go dress!

DAY 26: Grey pencil skirt
No photographic evidence today. I wore the first pencil skirt I ever drafted which still fits pretty well. Its lined but has no vent. I was taking things one step at a time back then and to learn to create a vent was information overload! I have to take pigeon steps but it still works. It’s a good staple, though a little boring. It’s days are numbered as soon as the others are on the cutting table!

Day 27 goat eating dress

DAY 27: First summer dress of the year
Today we went to the Surrey County Show. An ideal place to sport a full on flowery frock. Not such a great idea to wear in the goat tent though! Note that Mr O sought his photo opportunity before letting me know what was occurring! I still love this dress but I need to take some volume out of the back. I didn’t notice before but it gapes at the zip. I’m pretty sure its a simple fix. And hopefully it will fit better.

Day 28 Danielle dress

DAY 28: Danielle dress
Now here’s a blast from the past. Almost 2 years ago to the day. It was a bit of a squeeze, I can tell you. So much wrong with this dress but I still like the vibe of it. The fabric was a charity shop find, unsure of the content but it’s soooo itchy and scratchy. I thought I was being out there by using red lining but that turned out to be a no-no with the pale open weave fabric on the skirt! I can’t really breathe in this dress and you can tell by the pull across my chest but this dress is a lovely reminder that I should make another that fits in a much lovelier fabric.

Day 29 button back top

DAY 29: Button back retro top
I was fast running out on day 29 so it was a great propmt to rectify some issues with some garments I don’t tend to wear any more. This one in particular was really annoying to wear because I made the neckhole too small. I really liked the jewel neckline but in reality it kind of chokes you to death. Only problem was that the first buttonhole started right at the top, so to lob a centimetre off the neckline would halve my first buttonhole. My need to wear a me-made top spurred on a quick fix and I replaced the buttonhole with a press-stud and sewed the button on top so nobody will ever know!

Day 30 vintage pencil skirt with pockets

DAY 30: Vintage pencil skirt with pockets
Not yet blogged but again, a hurried make out of desperation but boy I’m glad. I’ve been meaning to make this for yonks! It still needs some fine tuning and this is really just a test garment but I will fill in the details when I blog it. But what’s more to say? Its a pencil skirt with pleats and front pockets… hooray!

Day 31 1940s shoe dress

DAY 31: 1940s shoe dress again!
A shameless repeat but one I’m prepared to wear again and again. This is by far one of my favourite dresses. It gets comments from total strangers as I stroll down to Sainsbo’s. It’s cool and comfy and is covered in shoes! This is the item of clothing that I need at least 5 more of. Along with 7 pencils skirts, my wardrobe should have at least 7 of these too!

And so we leave the month of May and venture on to pastures new. A prom dress for my friend’s daughter is on the go, FBA’s and all, a bespoke pencil skirt for my daughter’s birthday present and another that was bid on by my friend at the school auction. (Far too nervous to ask what she bid!)

Thank you as always for your wonderful comments and support x

Me-made May’13: My first week
Me-made May’13: My second week/
Me-made May’13: My third week/

ooobop! review: Burda Style June 2013

Burda magazine June 2013

Can you believe this is the summer edition of June 2013? I can’t. I’m wrapped in my fleecy blanky, fingerless gloves no less, shivering my butt off as I point blank refuse to turn the heating on. My toes are curled for no other reason other than I can’t uncurl them because they are frozen solid. Is this weather for real?

I really want to get excited about summer clothes, really I do. But I’m struggling. So if you hear a slightly less enthusiastic tone this month, please bear with!

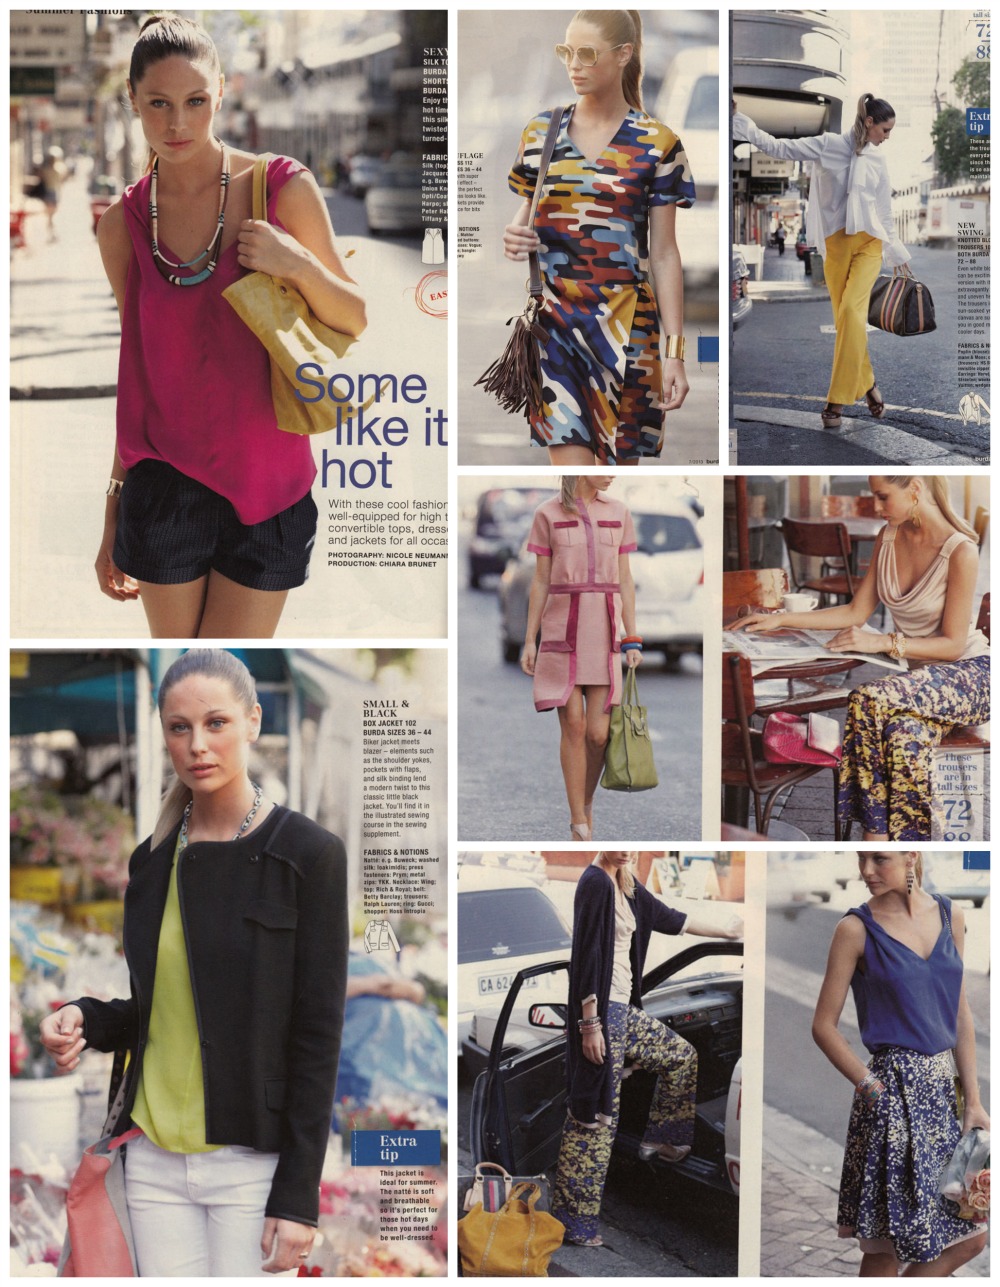
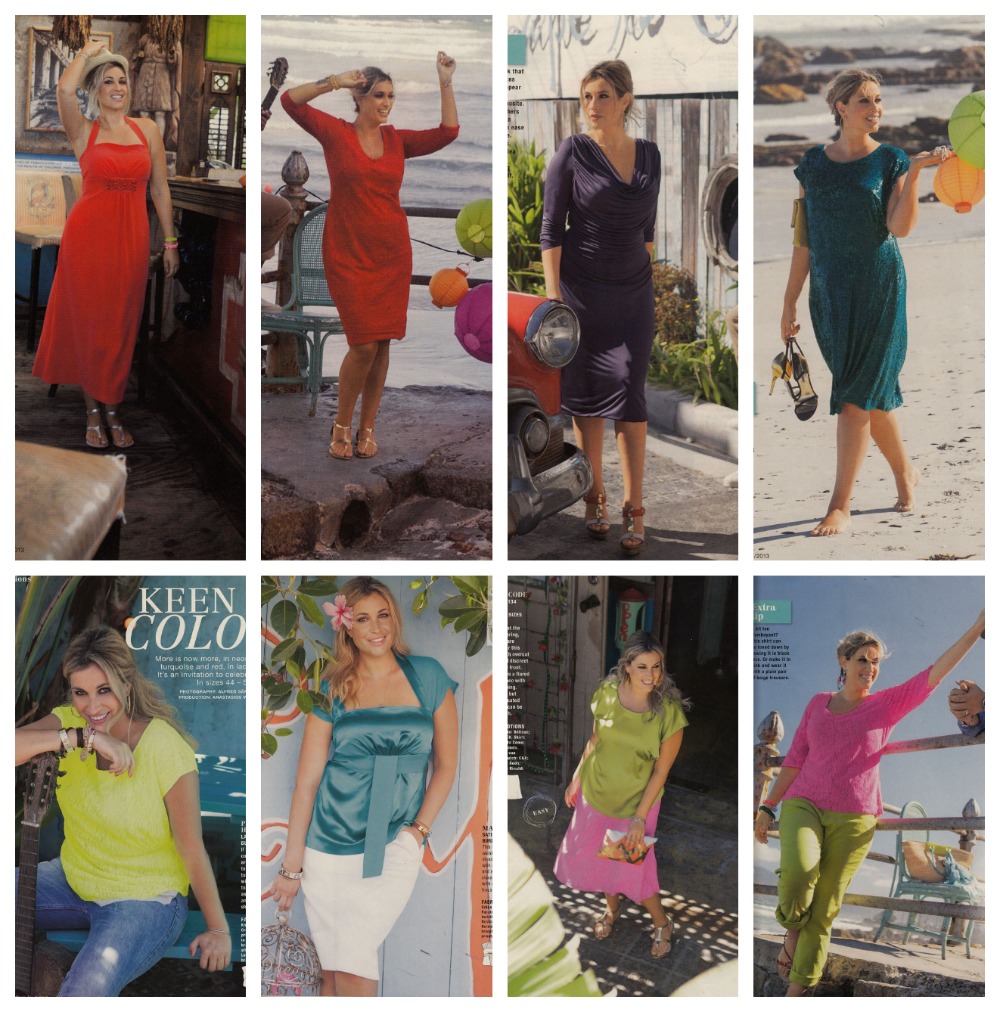
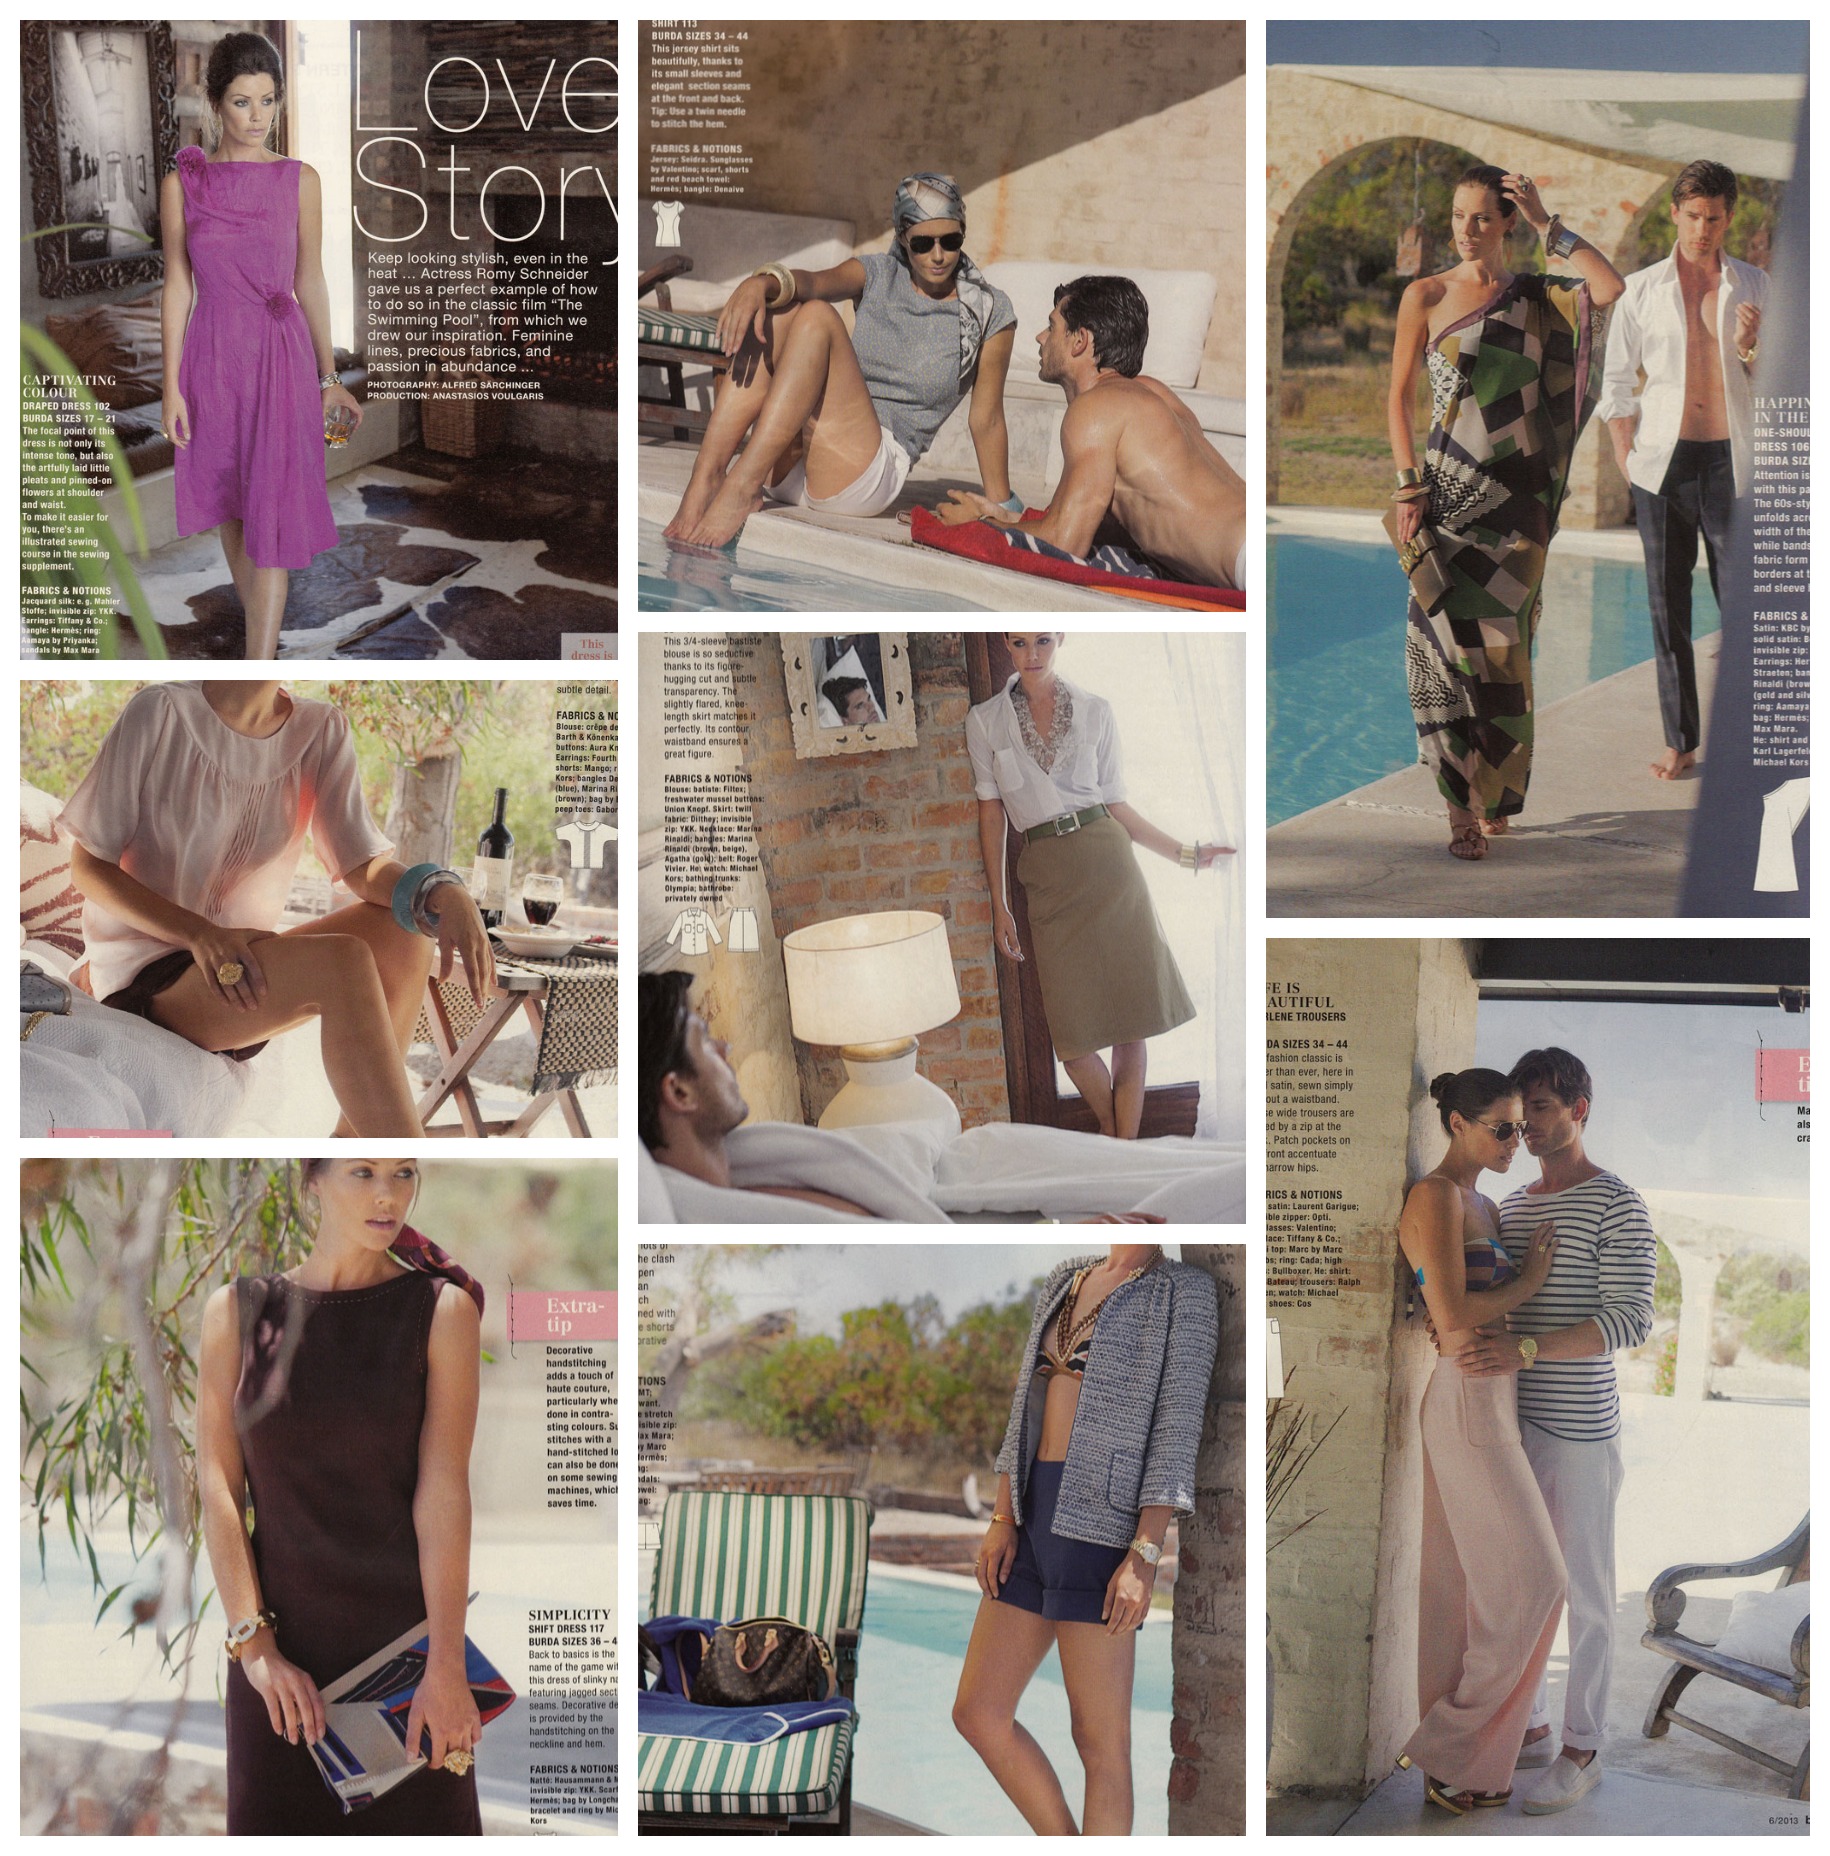
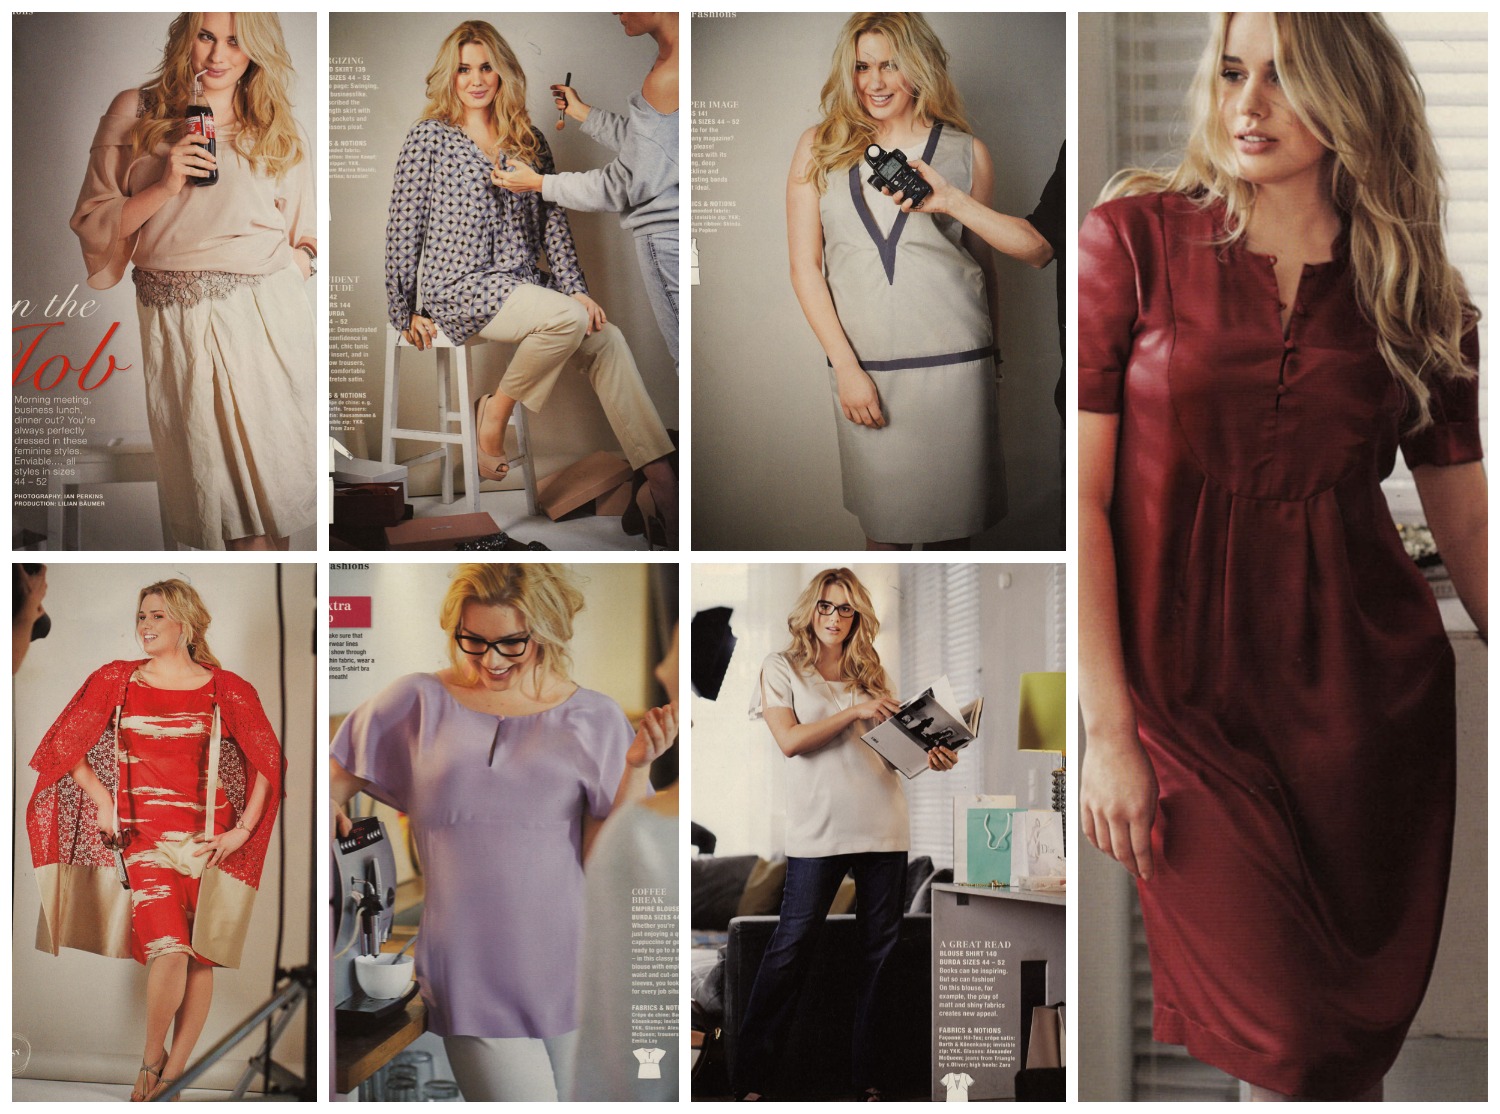
First section up is… Summer Fashion… ha! “Keep looking stylish, even in the heat…” is the opening line of the first intro copy.  Ha bloody ha! Rub it in why don’t ya!

Summer fashion Burda June 2013Ok. I’m going to try. I actually do really like the hand finishing on the brown shift dress, bottom left (above). Its a great couture technique that I’m thinking of employing on a future wool crepe dress I have planned.

The shorts, centre, bottom row, are not dissimilar to the plaid shorts I made. These ones are made with stretch pique which sounds more comfy. I will defo give these a go as one of my gripes was the lack of facing with with Simplicity ones. I know I could probably draft one but hey, I don’t need to now! A bit difficult to see in the photo (top row, centre pic) but that t-shirt looks to be a good fit with side panels and neat little sleeves. Don’t have an overlocker as yet and I’m wincing at the thought of messy insides so I’ll just hang on a bit for that one until I win the lottery. Boy I can’t believe how much those overlockers are!

My dislikes are the pink pants, bottom right. I love this look on the right kind of body. I don’t have that kind of body, unfortunately so they won’t be appearing on my list anytime soon. As won’t that dress top left corner, funnily enough. I say funnily enough because at first glance it looks like a classy dress. Save the pompoms! But it’s not even the pompoms that are putting me off. I quite like them. Its more the “artfully laid little pleats” that appear on the right shoulder aligned with the left hip. Even from the photo I can see some annoying crosswise folds that would annoy the heck outa me!

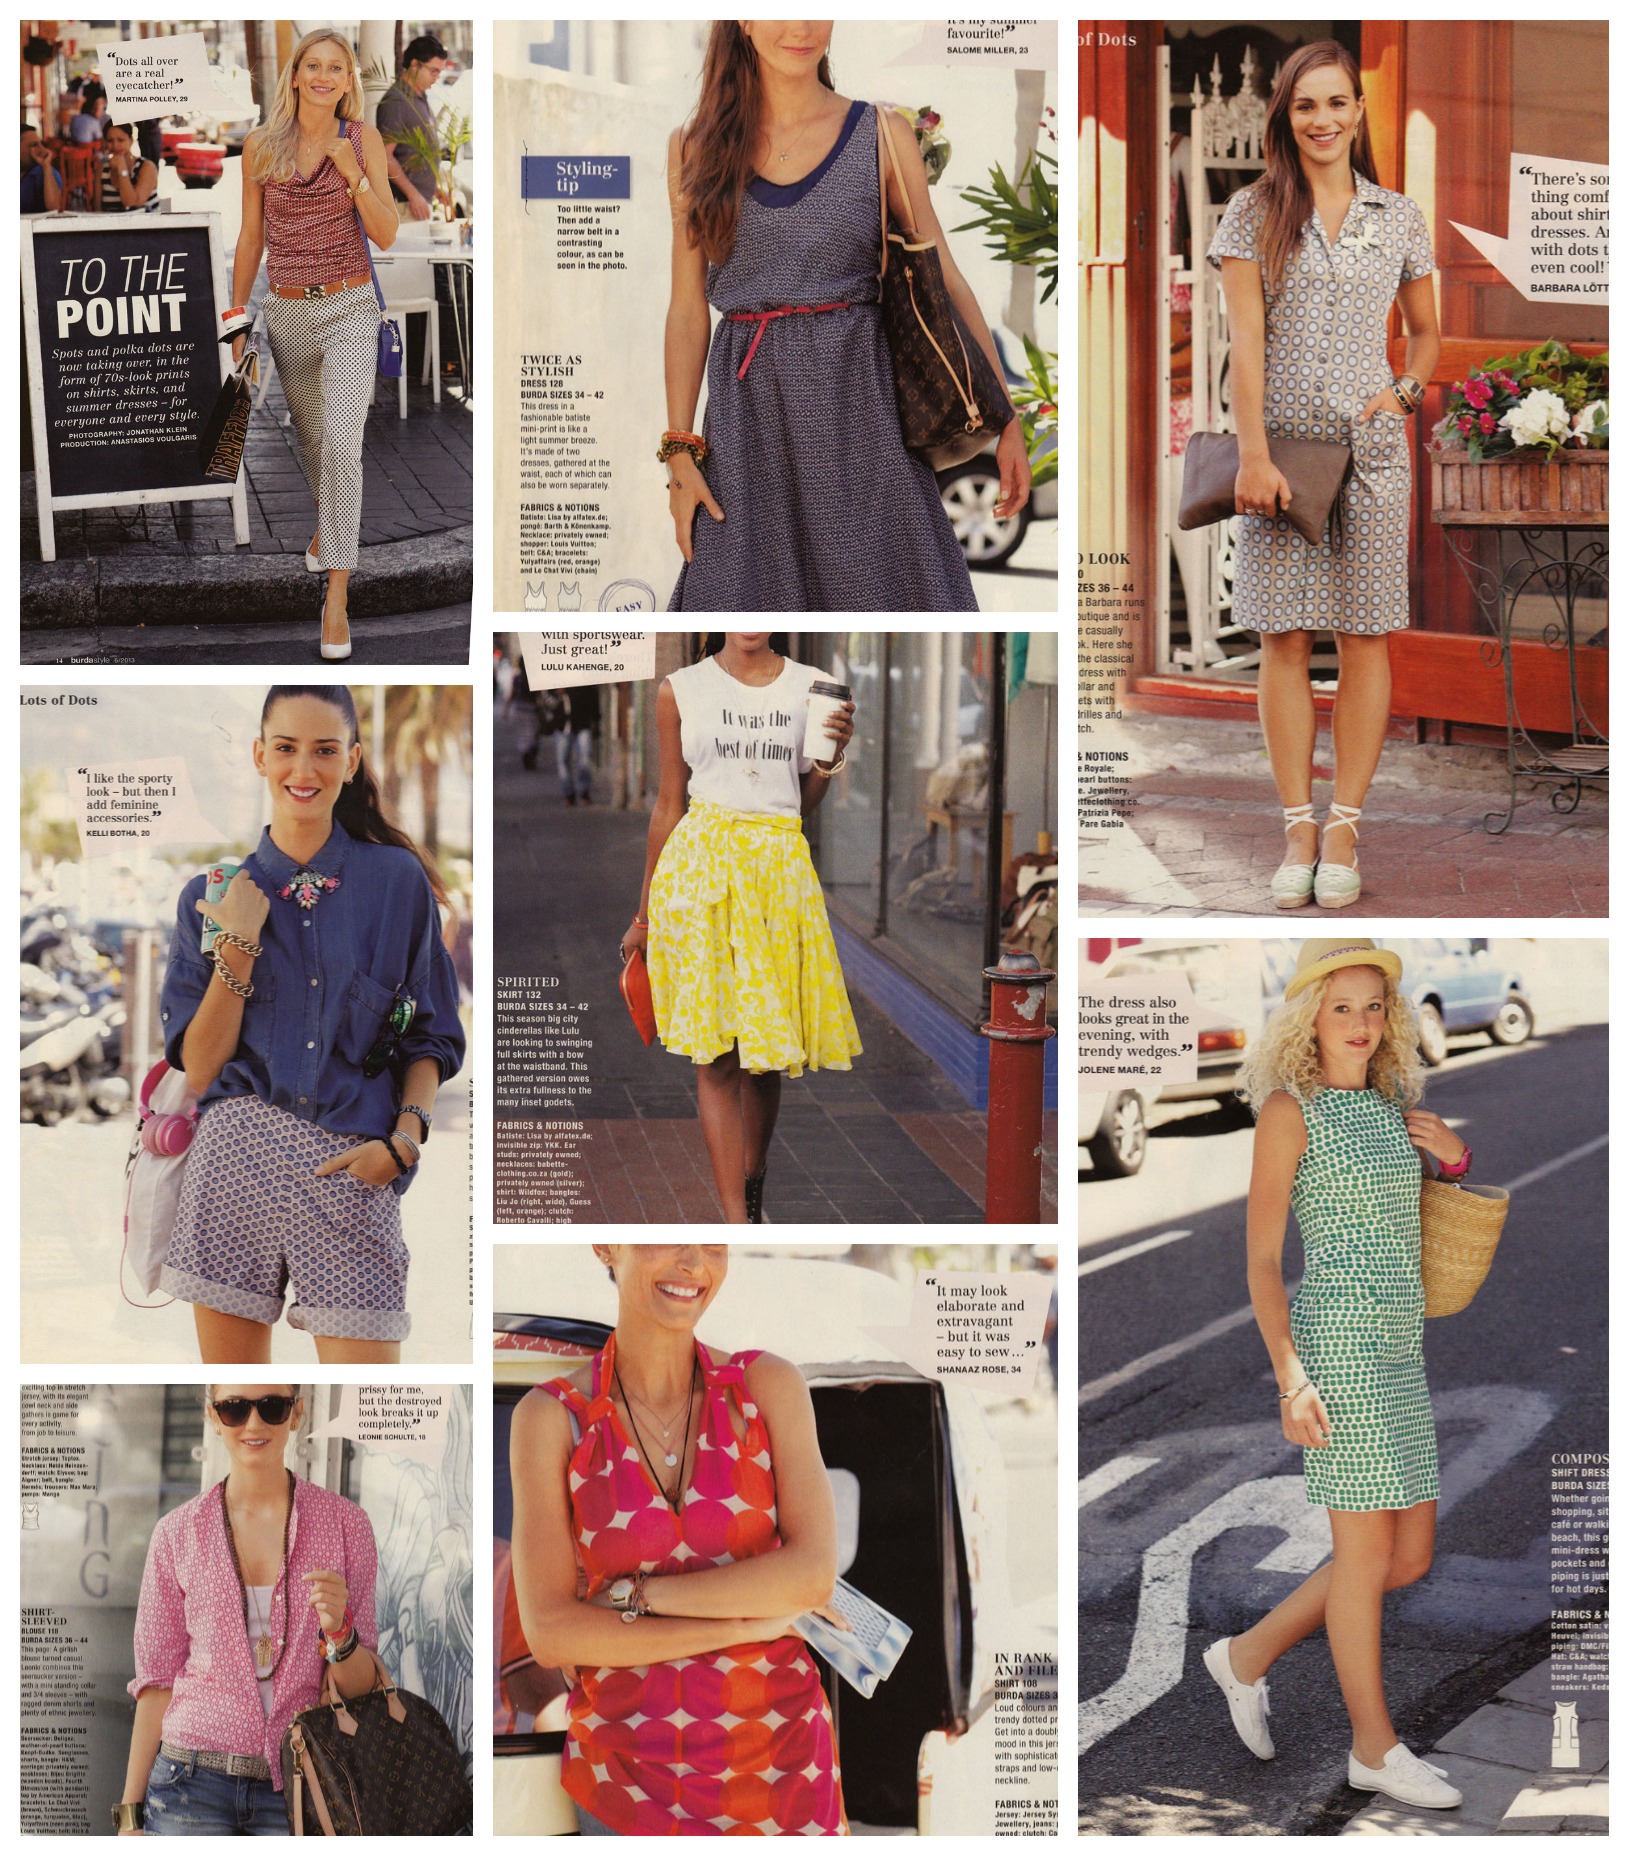
So who doesn’t like lots of dots? That’s the theme for the next section:

Lots of dots Burda June 2013I think I can safely say I like everything in this section save the long shorts, first column middle row. Just a bit unflattering and boyish for me. I love the shirt-dress top right, most of all. If Me-Made-May’13 has taught me anything it’s that I need more shirt dresses. I love how comfortable and stylish and edgy they can be. It’s not to do with cutting edge design. More clever choice of fabric that makes a great shirt dress. And I’d love to have one for every day of the week. This is quite a slim-fit one and it sure fits the bill as far as I’m concerned.

The shift dress, bottom right corner, has some great side panels that are piped. I still haven’t attempted piping but this would be a great opportunity to practice. It would also be a great chance to practise some colour blocking too. Employing some block colour in those panels would create a great slimming effect.

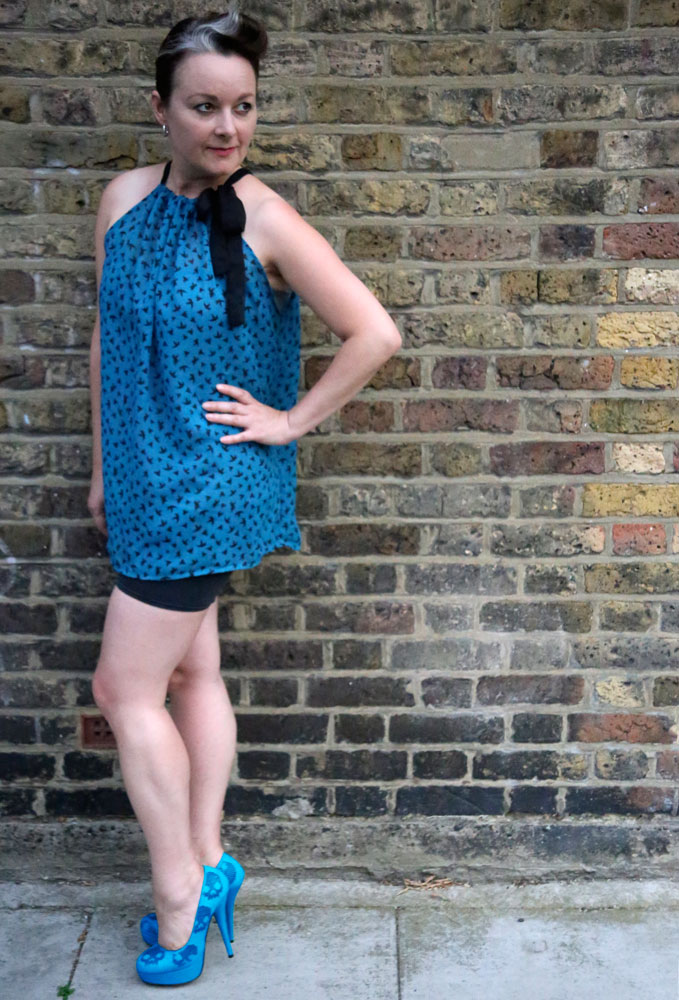
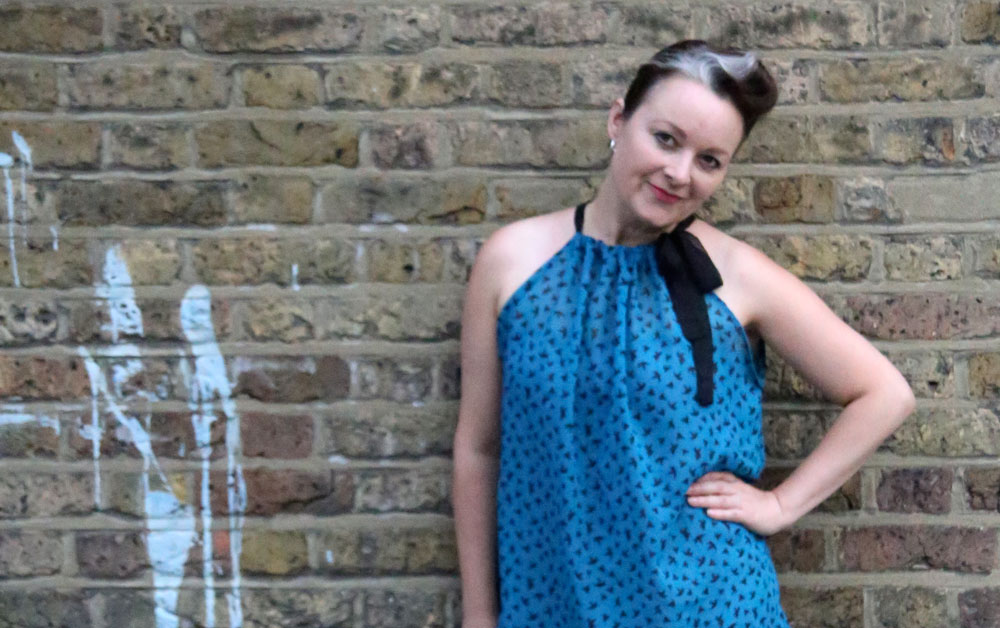
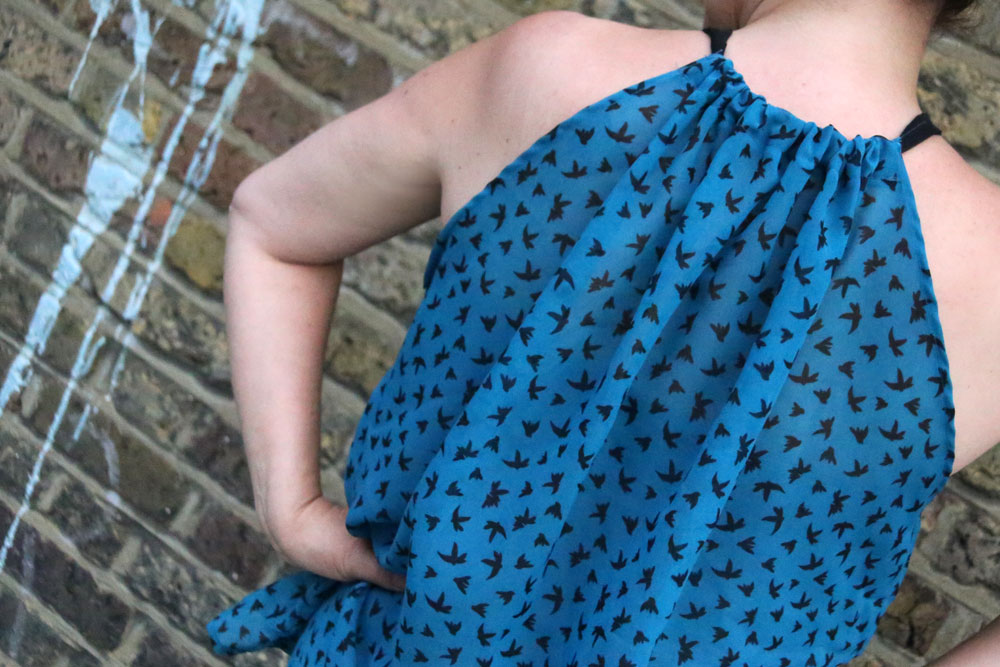
The cowl top with gathered sides (top left corner) is a firm fave too. Much more stylish to wear than a plain old T! And I love the yellow swinging full skirt. Perhaps not in yellow though. It’s got plenty inset godets on top of all the gathering. And a big bow at the waistband. Dead funky!

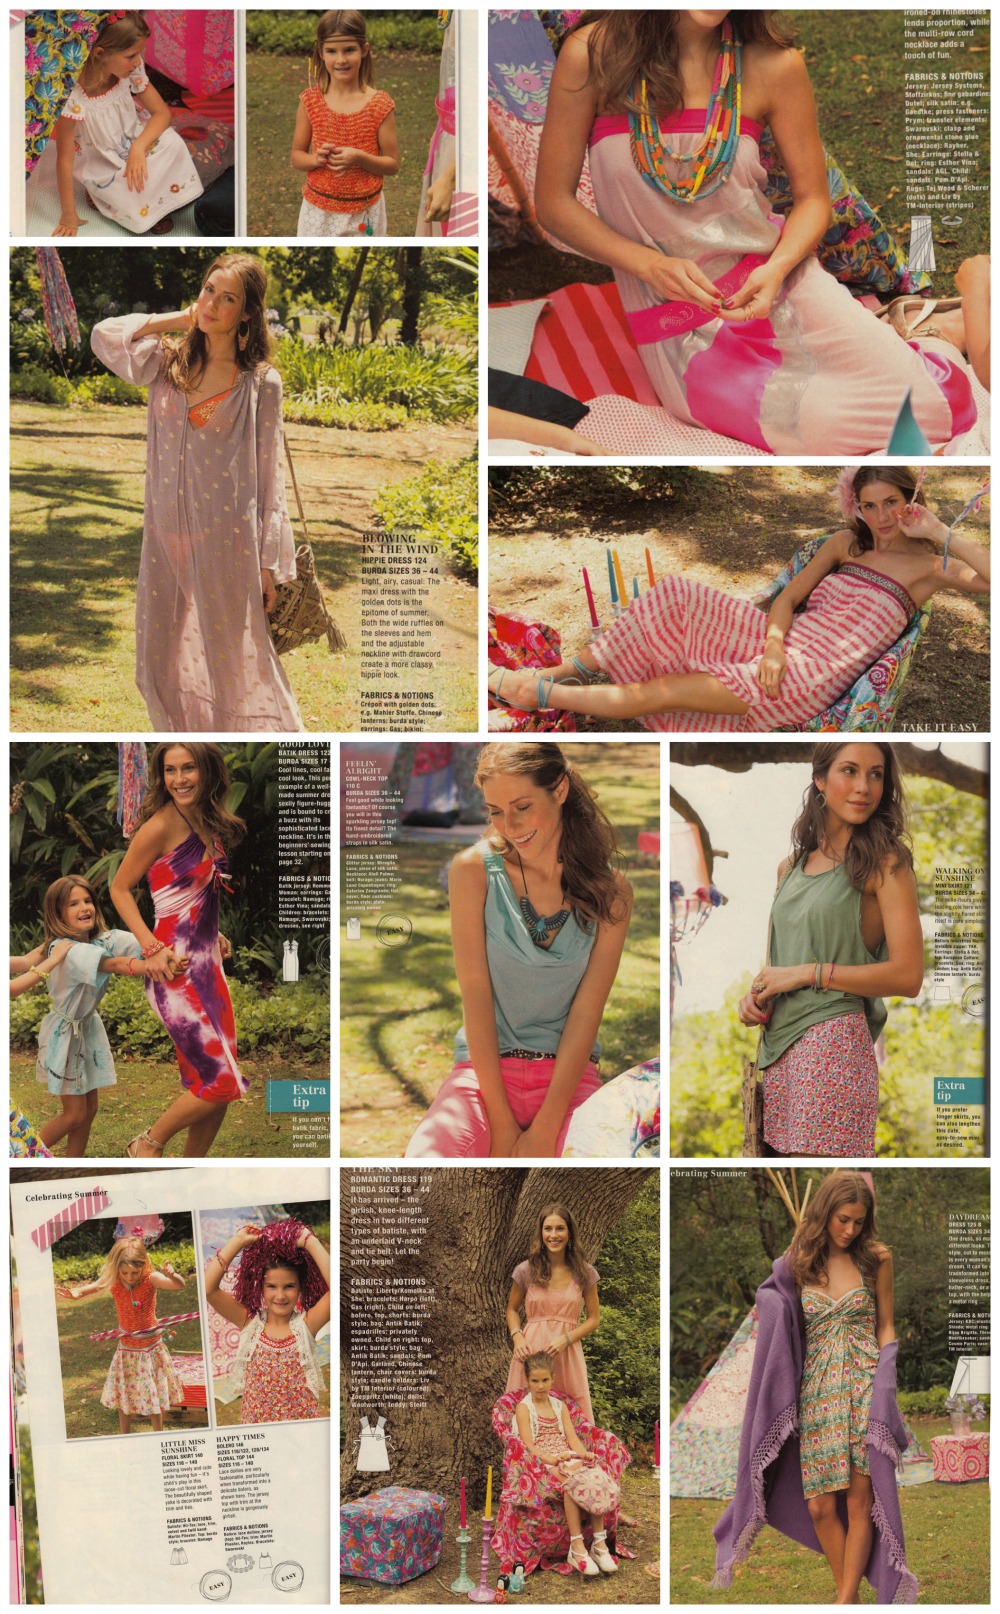
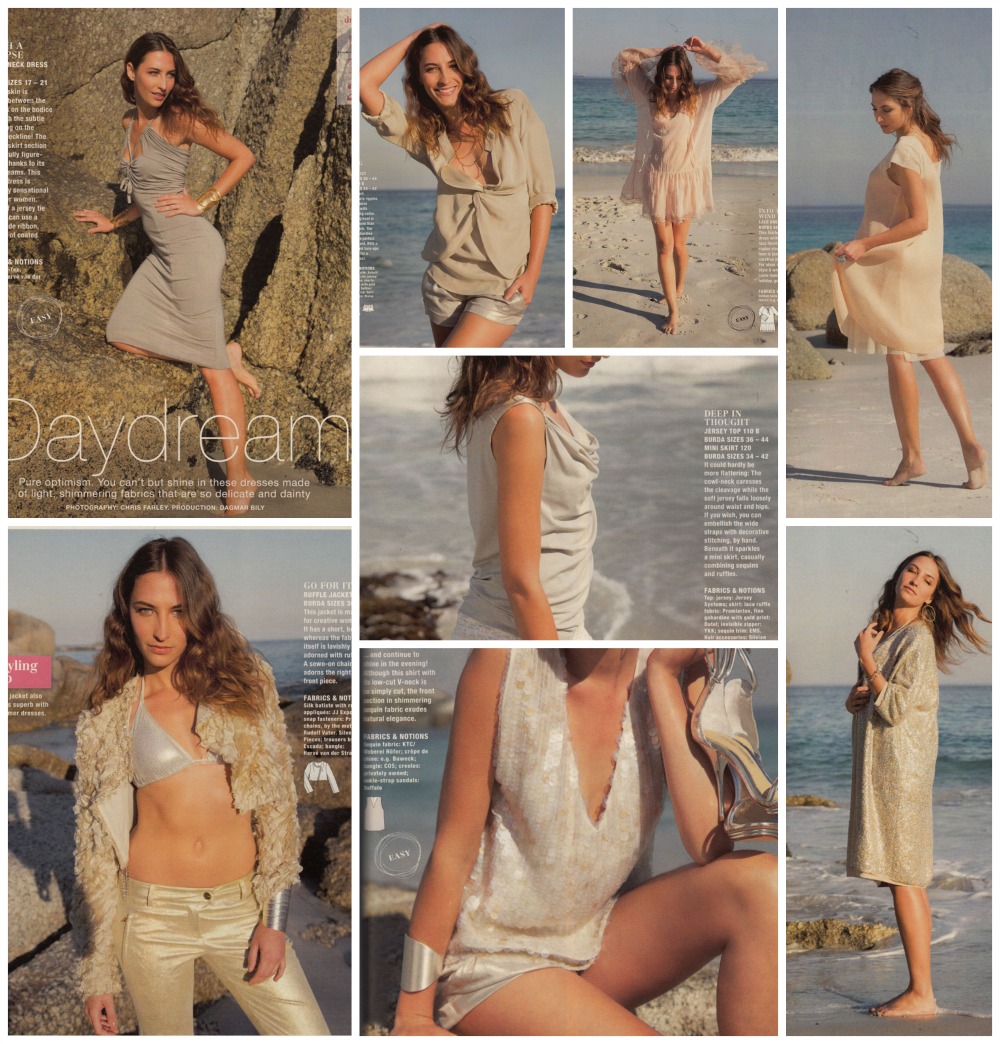
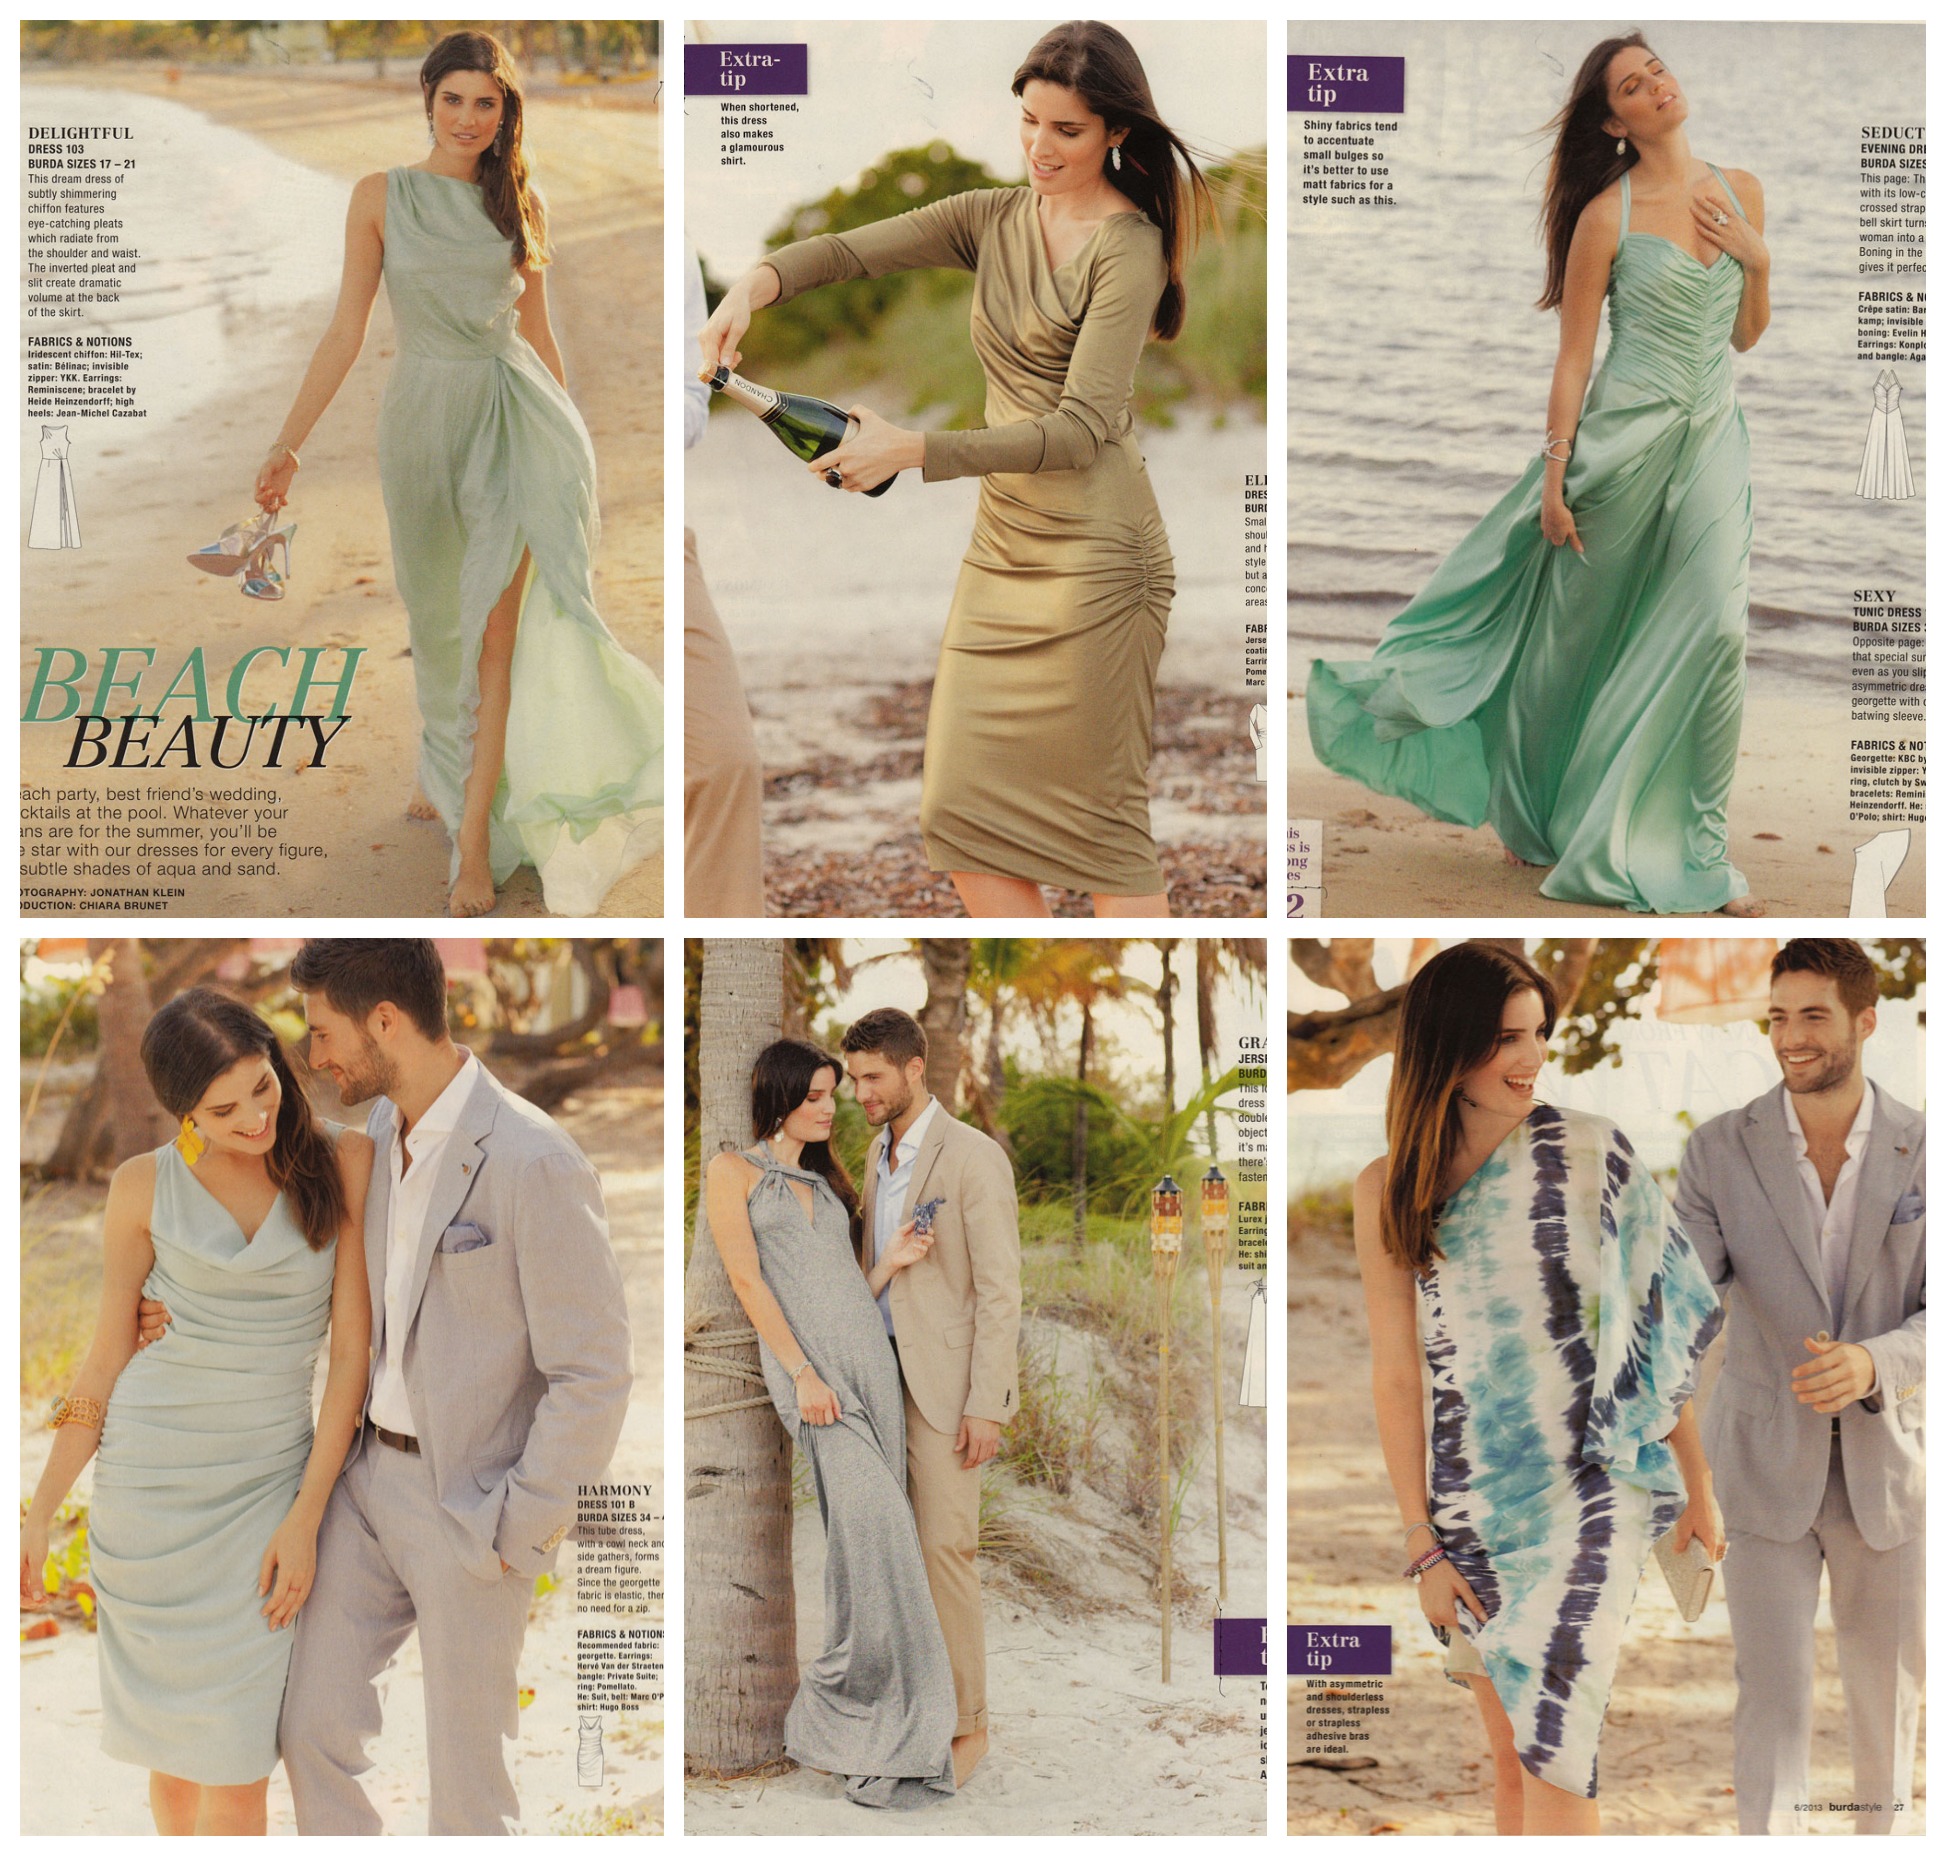
The next section is all about beach wedding/party dresses. I truly have goosebumps right now thinking about how the chiffons and georgettes might feel next to my skin, but there are some pretties…

beach beauty section burda June 2013
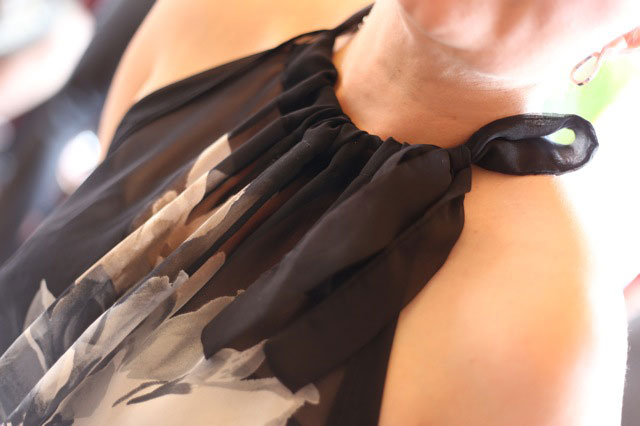
The cowl neck dress, bottom left corner, is my favourite here. With its side gathers and simple shape I think it could be really flattering and perfect for a few evening cocktails on the beach. The dress, top right, is quite stunning and doesn’t look that difficult to construct but there is some yardage of crèpe satin going on here, so it’s not really for the ‘thrifties’ among us!

I don’t dislike the others. They all have their place. Apart from the strange diagonal pleated bodice dress, top left corner – same issues as that purple dress in the first section. Oh, and that one sleeve wonder dress bottom right corner. Not sure I could handle that!

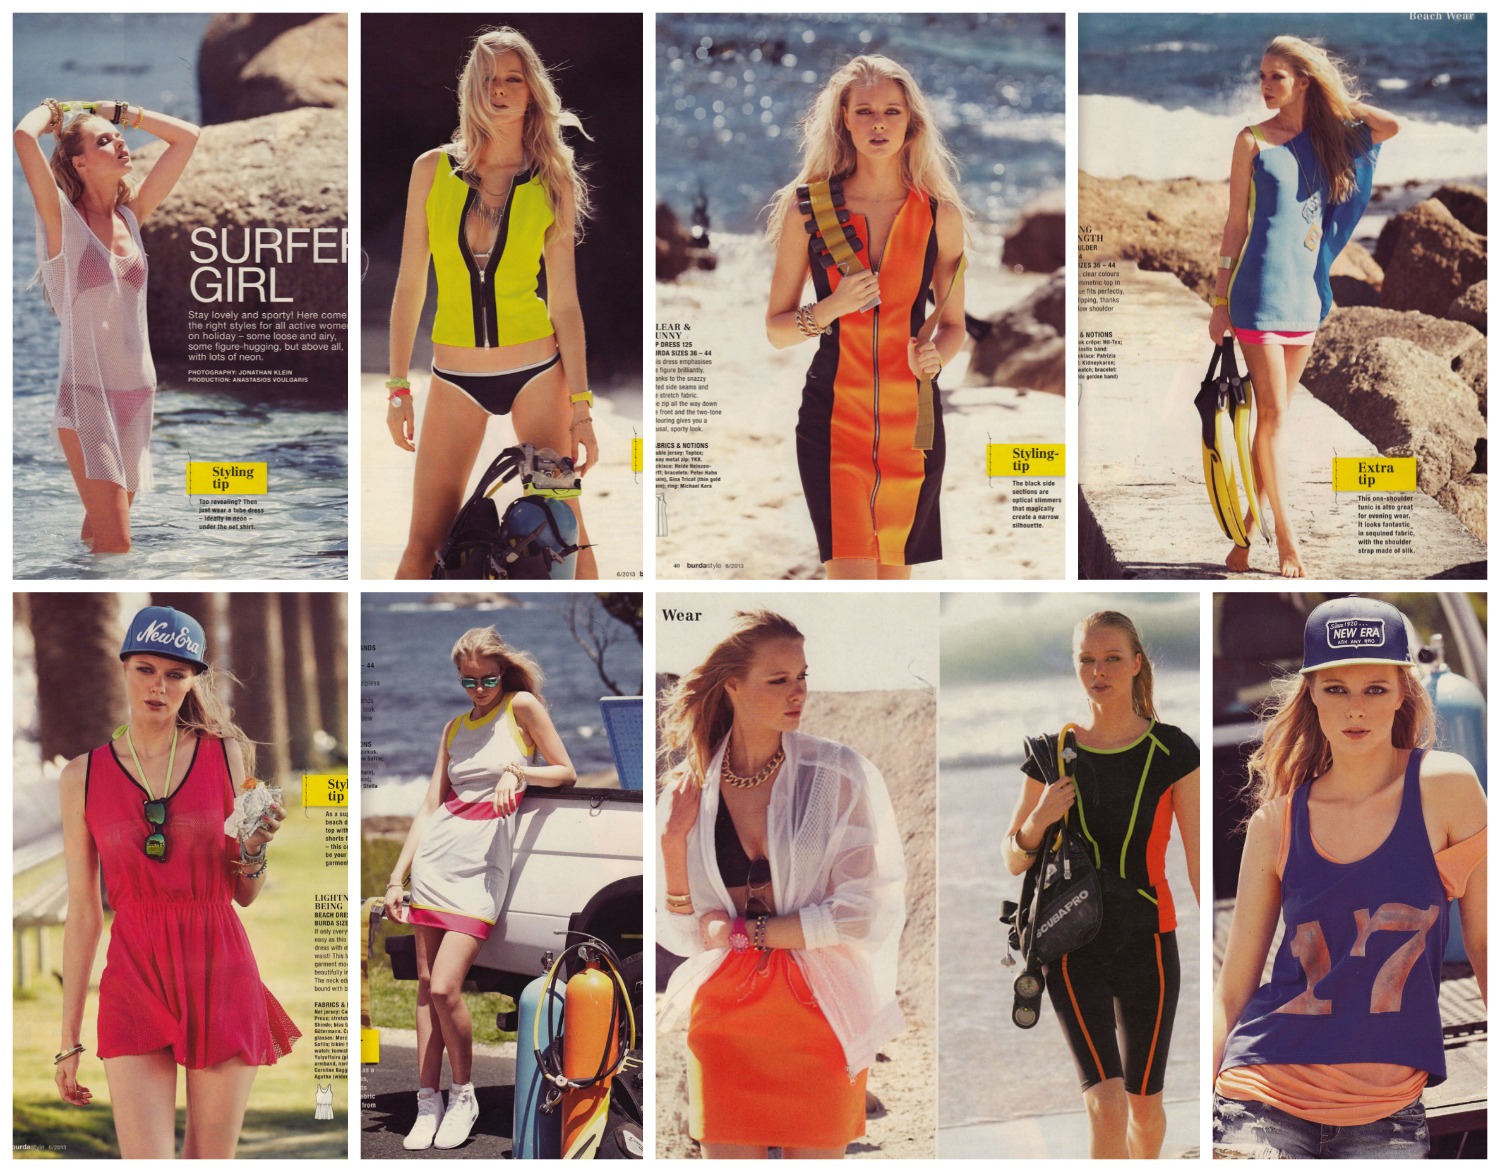
So, swiftly we move on to ‘Surfer Girl’. Not me. Not any part of it. I have noted there are a lot of runners that sew. Or sewists that run! I wish I could say I was one of those. But I’m not so I will leave judgement in the hands of the “Sporty Spices” of the sewing blogger nation…

surfer girl section June 2013That said, the little jersey skirt in the centre, bottom row, could be a quick and easy casual make for holidays and weekends. The jacket is a bit 80s for me, mind!

The Mother & Daughter section is at the very least tweeee!

Mother and Daughter section June 2013Would anyone ever consider dressing to match their daughter?

I quite like the dress, top centre. Though it looks a bit starchy in the batiste. I might be inclined to use something slightly drapier. I do really like the idea of printing on the fabric though. That would totally seal the uniqueness of the garments. You could really create some signature pieces with a clever use of design. I just made a skirt, similar to the star-print one, top right corner, but from an old vintage curtain. I love the deep waistband. I need to finish mine but I hope it looks as good as it does on this mummy!

The Plus Section gets as much attention, if not more this month:

Plus fashions June 2013I love how each of these designs incorporate clever structured detail to flatter the curviest of bods. Simple lines and crepe satin exude the elegance and the loose cut sleeves and empire waistline of that red dress, bottom left is simple yet stunning. But the one I like most is the red dress on the right. Cute standy up collar and dinky button loops on a fabulous yoke bodice add perfect detail to really versatile dress.

So what do you all think? Any faves? Any absolute disses?

I’m off up the wooden hill to Bedforshire right now. I’ve given up trying to keep warm. But I’m still thinking shirt dress. Perhaps in some rockabilly print that I have in a box somewhere. I’ll dream about it and see how it looks!

Night all. And thanks so much for keeping up with my ramblings x

Me Made May 13: My third week

I did it. I actually made 3 weeks of Me Made May ’13! It wasn’t as desperate as I thought it would be and I’ve really enjoyed it! The only thing that has been a bit tricky is getting a photo when the mister has left earlier for work.

Most of the garments I have worn this week have issues. Mostly fitting issues. Things drafted either too big or too small and things that no longer fit because of some unwelcome poundage that crept up over the last year or so! I must learn to create things that fit in the now and not for when the pounds are shed. Because it doesn’t work like that!

Another revelation, which comes as no surprise to me, is that I need more skirts and tops for work. I’ve no shortage of ideas. Just got to pull my finger out!

So here we go. Week 3 of  Me Made May ’13.

pin dot jersey top

DAY 15: Pin dot jersey top
New Look 6753. This is one of the few jersey tops I’ve made. I like how it’s an easy-to-wear casual top but it’s not my favourite top to wear. Perhaps because I made it too big and its defied all my attempts of shrinkage too! I have since been advised to make a size smaller when using stretch fabric. I’m sure I’d love it more if it fit more snuggly. Still better than a Primani top though!

stripy cowl top

DAY 16: Stripy cowl top
This was a great free pattern from the Burdastyle website. Really simple to put together and really easy to wear. I’m not convinced I graded it up properly, or enough for that matter so the cowl isn’t as dramatic as it could have been. But I still like it.

pinstripe wool jacket

DAY 17: Wool pinstripe jacket
This is a pattern from Burdastyle magazine, issue 11/2010. It was my first venture into tailoring and is anything but perfect but it prompted me to delve more into the art of old school tailoring techniques which are now ready to employ when I embark on another. Once again I overestimated the size but that means it’s great to wear with a few layers underneath and boy I needed them today! The pinky mauve pinstripe means it doesn’t really go with much apart from a flooky pinstripe skirt that I owned already!

floral mini skirt

DAY 18: Floral mini skirt
I made this in march last year and it still feels good teamed with Docs and a cardi. Keep meaning to make more of these. They are so simple and so cute and so easy to wear. So long as its none too windy!

tartan shorts

DAY 19: Plaid shorts
I do enjoy wearing these. Despite the fabric going all bobbly on me. Only on the weekend, mind. Won’t catch me in the office with that much leg out! I wore them down to the river pub to meet some friends. The pattern I used was Simplicity 2659. A simple and satisfying overnight make. There will be more of these. It’s just a matter of time. However I will not be using the twill tape facing method. I will draft a properfacing this time. They do need a bit more structure at the waist and front. And I must make them a wee bit bigger next time!

black rose party dress

DAY 20: Black rose party dress
This is me and my lovely fella, the last of the party people, at the end of his spectacular 40th birthday party. It was taken in the wee hours of the morning and so I’m very glad the photo is such poor quality! The dress, which I just about fit into, was whipped up overnight for a party March last year. I have since found some very similar fabric which will be another one of these one day!

DAY 21: Wool check skirt
I didn’t manage to get a photo of today but rest assured it was a me-made kinda day. I wore the same wool check skirt I sported on the second week, day 10. Crazy that May has turned out cold enough to sport a woolly skirt more than once in the space of a couple of weeks.

Can’t believe there’s only one more week left. I think I’m going to have to dig real deep now!

Laters! x

Me-made May’13: My first week
Me-made May’13: My second week/

Me Made May 13: My second week

If I’m honest, I thought that So Zo’s Me Made May ’13 would be an easy 4-poster for the month of May. I really thought it would help to bridge the massive gap between my sporadic makes and make me look more efficient than I actually am. Well, it has been a good gap-bridger for sure, but it hasn’t been a doddle!

I’m sure many of you can relate to the pre-work madness of getting kids off to school, while catching up on the jobs you were meant to do the night before, shouting threats of x-box confiscation if the son doesn’t arise anytime soon, feeding the cats with one hand and signing homework books with the other before getting one’s own butt out the door to work. So throw a rummage through the drawers for a me-made outfit and fluttering of the eyelashes at the general direction of ones hubster for a quick photoshoot into the equation and, well you can imagine what the neighbours must think!

But all that aside. It has been a total eye opener. I have worn things I had completely forgotten about and there has been a realisation of how much I’ve advanced. I may even go back to some of these projects and fix some niggling issues. But I equally might not!

So here we go. Week 2 of  Me Made May ’13.

Vintage wing collar blouse

DAY 8: 1950s wing-collar blouse
Butterick 556. Im still very happy with this blouse even though the shoulder pads have gone all lumpy and weird in the wash! The sleeve heads leave a lot to be desired. I remember thinking at the time that the sleeve looked more gathered than eased into the armscye. I really need to make another but better. So good to wear to work.

Day 9 1940s shoe dress

DAY 9: 1940s Shoe Dress
Butterick 2638. This is the same pattern I used for the red version and with the same issues, ie button placement. I think I prefer the shorter length sleeve. The shoe-print fabric was such a great find from a charity shop. It’s 100% cotton with such a smooth finish. I need more of these dresses.

Day 10 wool check skirt mmm13

DAY 10: Wool check skirt
I wasn’t expecting to include this skirt in May. It’s a blanket-weight wool, an ex-throw in fact, turned pencil skirt! But we all know how the weather in Blighty is a constant surprise! I self-drafted the pattern. I didn’t stay stitch the waistline before adding the waistband, hence why it probably came up a bit bigger and just noticed that the lining peeps at the hem otherwise, quite happy with this one.

Day 11 mmm13

DAY 11: Dotty shawl collar swing jacket
I made this a good couple of years back from a free pattern in Sew magazine. It is a great spring jacket with three-quarter sleeves and I love the fabric. I had to create the buttonholes by hand but apart from that it was very easy to put together as far as I remember. I do enjoy wearing it. Something about the collar makes it feel vintage and glamourous.

DAY 12: Grey pencil skirt
Hubby off to work early + non obliging offspring = no photo! But see photo above. I wore it yesterday too. Don’t judge!

day 13 stripe wool skirt

DAY 13: Stripy wool skirt
You really can tell how chilly it was this week. All the wool came out to play! This is a very simple A-line mini skirt from Burdastyle magazine. The fabric is a twill-backed Italian wool from Ditto Fabrics in Brighton. Very lovely to wear.

Day 14 lace peasant top

DAY 14: Lace-trimmed peasant top
I didn’t think I had much love for this top. Mostly because it’s white and partly because of the lace. But seeing it here with a black skirt and after wallowing in all the lovely comments I got at work, I think I do now. One of the quickest tops to rustle up and tuck into a skirt. I need a red one! 

Feels so good to round up week two. Only a couple of days for week three… eek! See you soon! x

Me Made May 13: My first week

Not so very long ago I signed up to So Zo’s Me Made May ’13. Whereby I pledged to wear something handmade, every day throughout the month of May 2013. I did leave it till the very last minute, knowing what a flake I can be. And to be honest I could do without creating extra work for myself. I really do have plenty ’nuff on my plate right now! But… what fun! And what revelations…

So here is what I pledged:

‘I, ooobop!, sign up as a participant of Me-Made-May ’13. I endeavour to wear at least one handmade garment each day for the duration of May 2013’.

There was still a big pause before I pressed the ‘publish’ button. I don’t have an issue with wearing something handmade every day. In fact that it an ultimate goal. I would love to own an entirely handmade wardrobe. It’s having enough to last a month that’s the issue right now! So I think you might be seeing a few repeats unless I can rustle up some emergency quick-makes!

Here are the first 7 days along with my discoveries:

Blouse pattern from Burda Magazine September 2011 issue

DAY 1: Gingham Burda Blouse
Have since learned that this shirt is too long and hence too tight on the hips.
An easy fix… if I get round to it! Would love to try one in a block colour
to make use of those fabulous shoulder darts. Should also wear it with a belt.
It’s not the shapeliest of blouses!

day2_norman_hartnell_top_mmay13

DAY 2: Norman Hartnell blouse
Very fond of this blouse. Very easy to wear. Perfect for work or going out.
And given that it was a relatively simple make, I need to make more!

day3_1940s_red_dress_mmm13

DAY 3: 1940s Shirt-waist dress
I still love this dress. Any dress with a midriff gets my seal of approval.
Have since learned to be more precise when sewing buttons in position.

Day4_70s_dress_mmm13

DAY 4: 1970s Dress
I have neglected this dress. I didn’t line it and so I can’t successfully wear it with tights
which is kind of a necessary requirement in the UK!
Would happily make this one again. The shape is very cute and I do love
the statement collar!

Day5_NewLook6750_mmm13

DAY 5: Daisy dress with red bias trim
New Look 6750. One of the first dresses I made, hence not blogged.
Note to self: As lovely as cotton voile is, it’s not very good at
hiding all those lumps and bumps, expecially if one has made the dress a tight fit!
Also must remember to allow a bit of ease when binding sleeve hems.
Near cut off the circulation in my arms!
Only dress so far I am not entirely comfortable wearing.

Day6_Elisalex_mmm13

DAY 6: Elisalex dress
Dress completed and worn to a picnic on this day. By far my most
favourite dress. incredibly comfortable. Very stylish and very satisfying to make.
It’s a keeper!

Day7_gingham_-peasant_mmm13

DAY 7: Gingham peasant top
One of the easiest tops I’ve ever made. Love wearing it with a pencil skirt.
Need to make some capri pants to pull off that Doris Day look.
Keep meaning to add a tiny black bow to the front neckline!

One of the great things about this challenge for me, is having some proper attention focussed on each garment. I usually throw things on without a thought, especially when I’m off to work, in a ‘that’ll do’ kinda way. I’ve been wearing far too many rubbish Primani T-shirts when I don’t really need to. If I just make a few more tops, I can ditch them altogether, especially if I include a quality t-shirt or two on my project list. Wearing me-mades on a daily basis really does have a feel good factor.

I’m sure the next few weeks will get more and more challenging and probably with some new revealations but so far so good and lessons learned already. Cheers Zo!