School reports (or shorts to the layperson!)

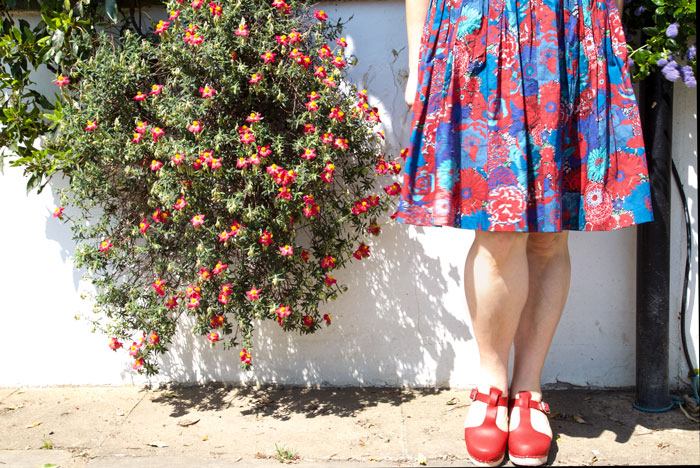
I have created some fabulous projects recently (blows own trumpet): A mother-of-the-bride dress for me, an original and self-drafted dress design for a new customer and a tiered dress that I helped a friend to realise from some fabulous sketches she’d made. But before you get too excited, those posts are very much waiting on the back burner of the publishing pile until I can get hands on the photographic evidence.

In the meantime I have a small and rather underwhelming pair of shorts to report. Or ‘school reports’ as the cheeky cockney mister would have them called!

wearing handmade in Quadrophenia Alley
Classy shot in Quadrophenia Alley, Brighton!

This is third time out the packet for Simplicity 2659. Such a great little pattern that came free with Sew Magazine a good few years ago. I made my first ever pair (see here) in May 2012 where I declared it a small baby step towards the making of actual long pants / trousers. And I followed up with a second more wintry pair here. Simplicity 2659 easy chic 
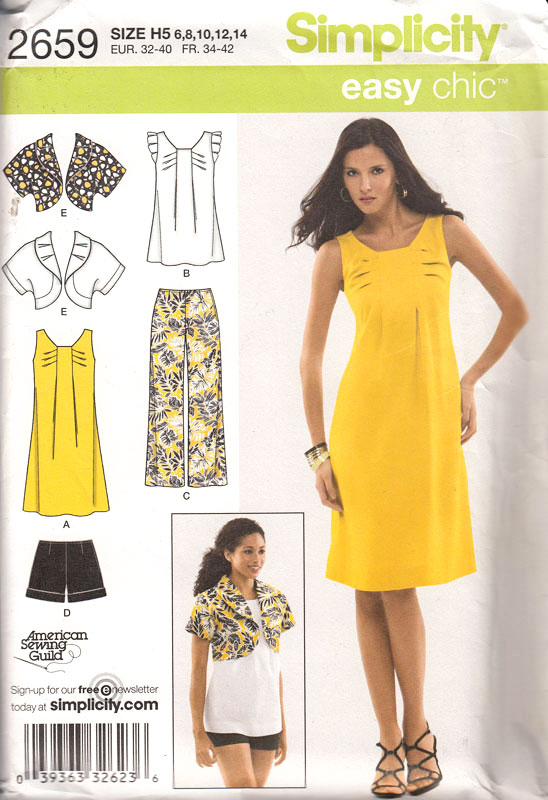
Six years on I still haven’t made any ‘longs’ for me but I did make a couple of pairs of satin brocade jogging pants for my youngest so I guess that counts… in a toddler step kinda way. I’m itching to try drafting a proper pair for myself as I’m convinced its the only way to get a proper fitting pair. Just got to find some time… and the courage!

handmade shorts simplicity
Even classier shot, in Brighton, day after Pride!

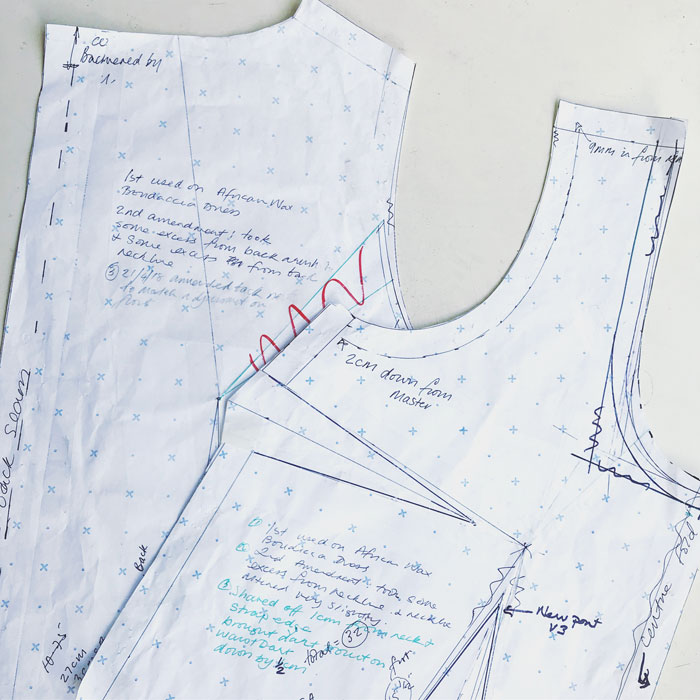
The only thing different I did in the making of the shorts this time was to invest in a facing rather than use this twill tape to finish the waistline. Twill tape worked great for the last two versions. It certainly is a quick and unfussy operation but I didn’t have any left and couldn’t even wait the single day for a Prime delivery! So I measured 7cm down from the waist of both the front and back sections and traced off the top portion of the pattern. I then closed up the darts to form facing pieces, cut the pieces and sewed the right hand side seam and pressed open. The zipper is on the left and so the left hand side of the facing was going to be slip-stitched to the zipper tape. With right sides together I sewed the facing to the waist seam of the shorts. I understitched that seam allowance to the facing, close to the line of stitching to prevent it rolling out and also tacked the facing to the front and side seams.

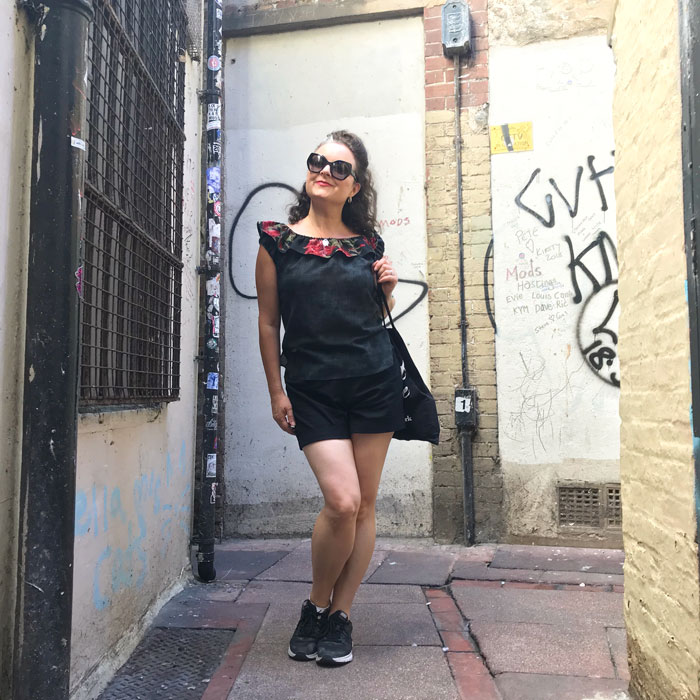
Talking zipper – I hand sewed it in this time. Just because I had a spare mo and also because I had the inclination. I like the little visible little prick stitches and it feels like I have more control over the insertion. I always seem to miss catching in the underlap of the overlap when I sew by machine. If you know what I mean?! I finished off with a hook and eye at the top. lapped zipper 
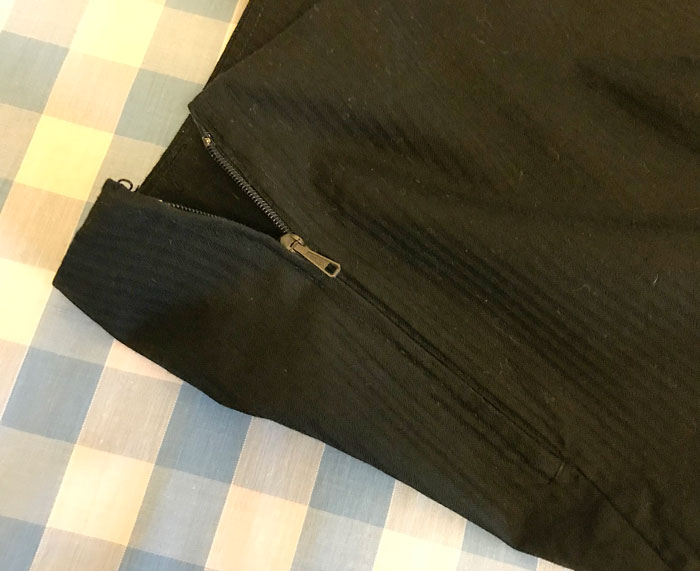
I just love the turn ups. In fact I get a little moment of joy from sewing the bias strips onto the hemline. It’s like they bring the party to an otherwise ridiculously small and simple garment. And of course because they are cut on the bias there is a contrast in the direction of the fabric pattern. In this case the diagonals meet the vertical lines in the fabric. I can’t explain why this makes me so happy. It just does! You might have to imagine what they actually look like as it appears that it’s harder to shoot a pair of black shorts than actually make them! simplicity 2659 shorts 
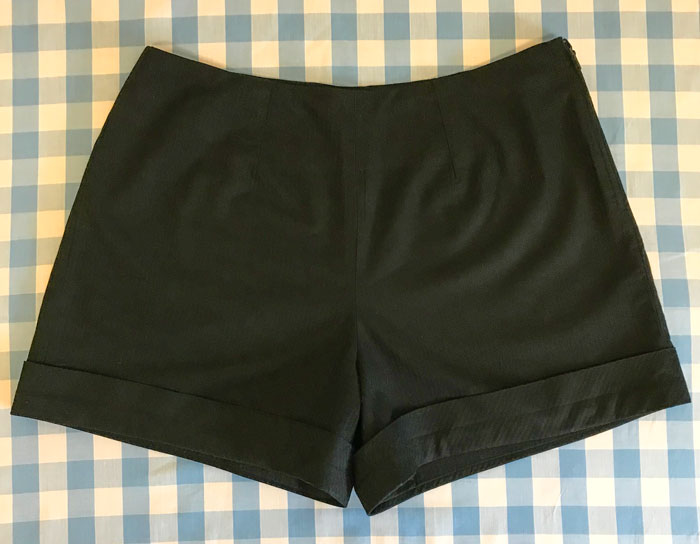
And I finished them up just in time for a little day trip to Brighton. This weather 
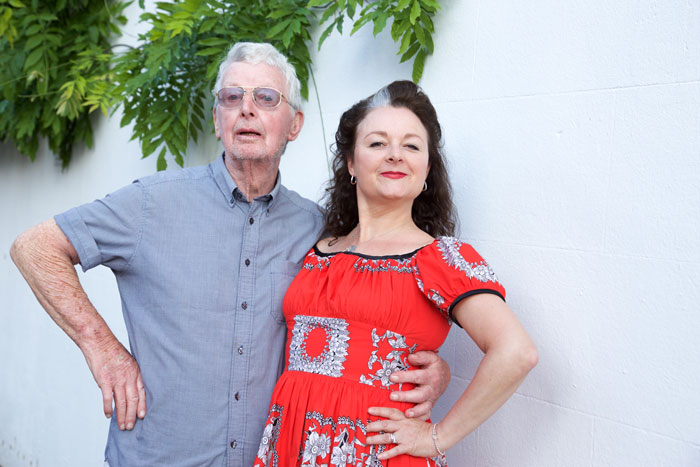
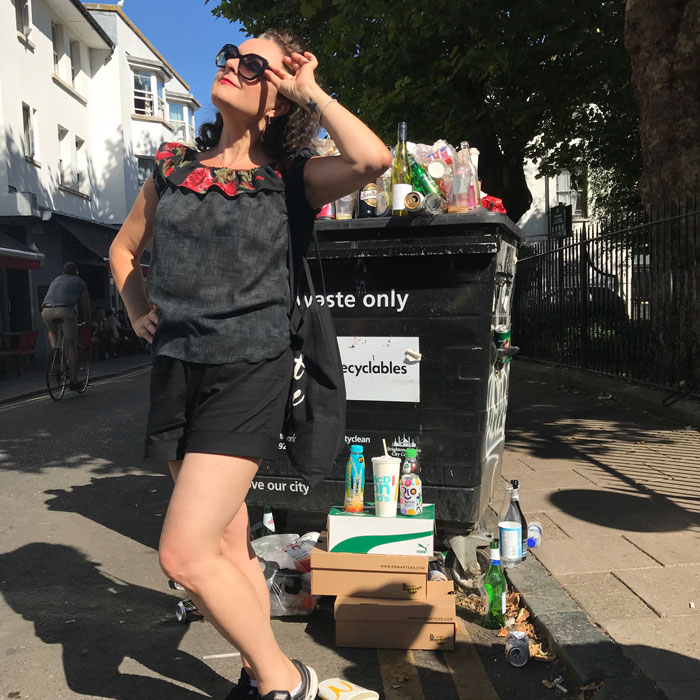
is still  up until Sunday was sweltering in the UK and I’ve decided that minimal coverage of body is the only way forward! Ordinarily I’m a little bit shy about too much naked leg on display but in Brighty, anything goes and nobody bats an eyelid so I was happy as Larry paddling in the sea…. simplicity 2659 shorts 
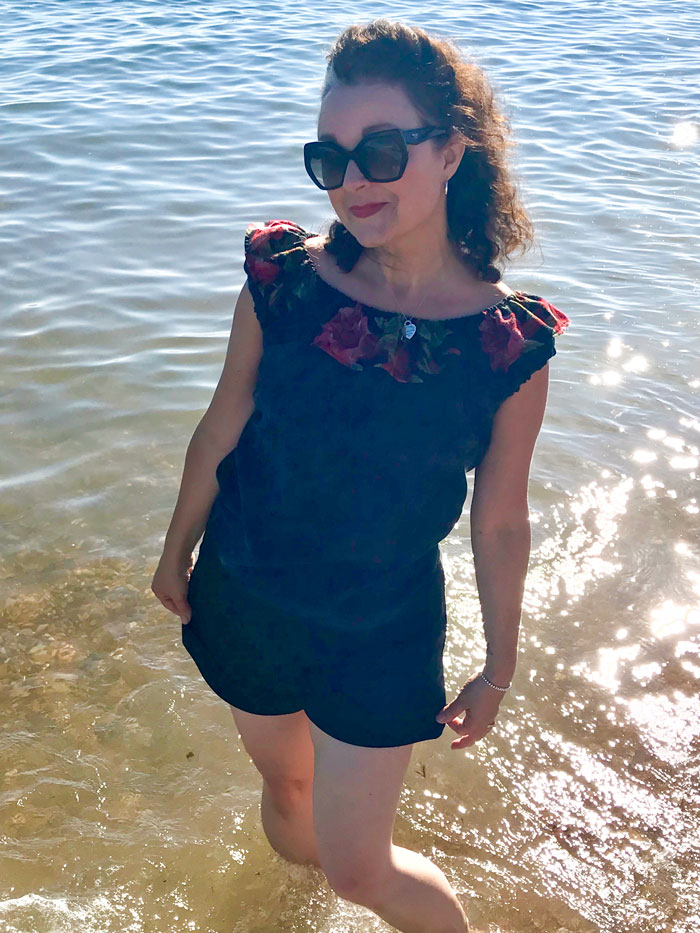
… and sitting astride a scooter, care of Mod Roy! But boy did I feel like a traitor. My dad was a rocker after all! (Spot the guy who seriously wanted to feature on ooobop!) With Mr O on Modroys scooter 
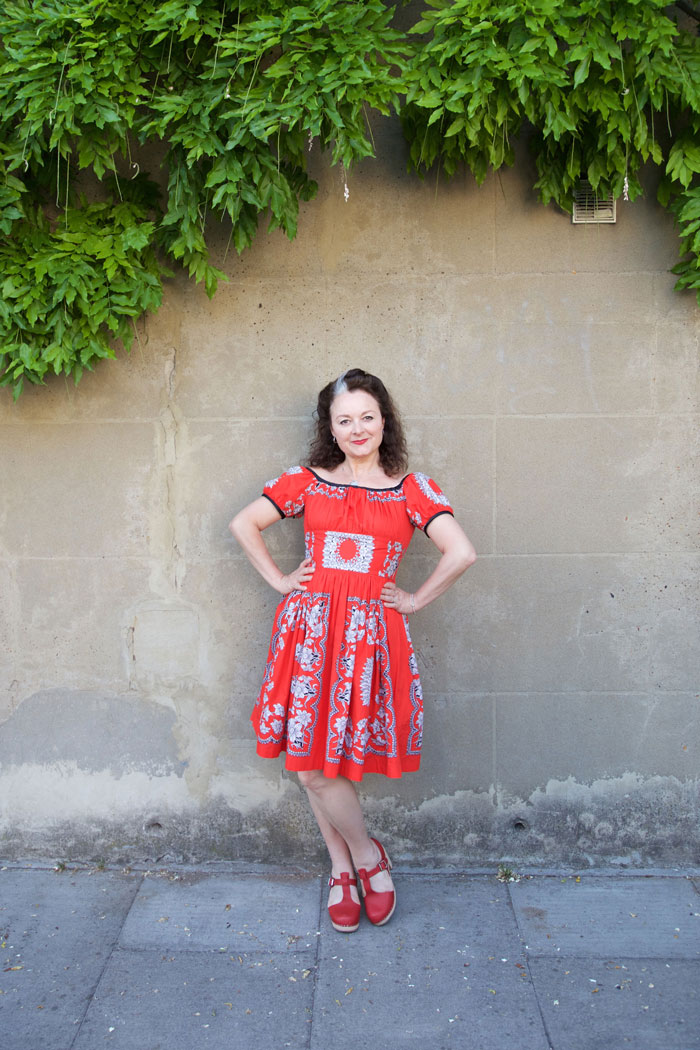
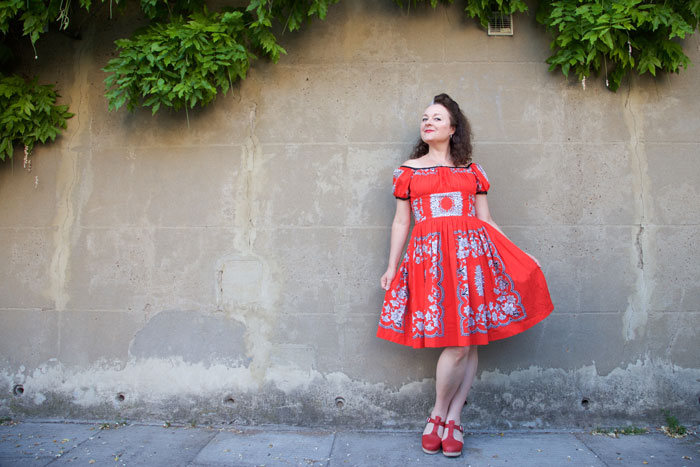
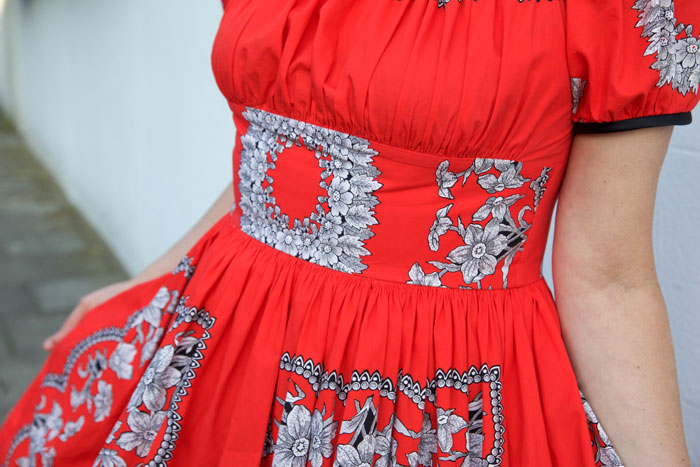
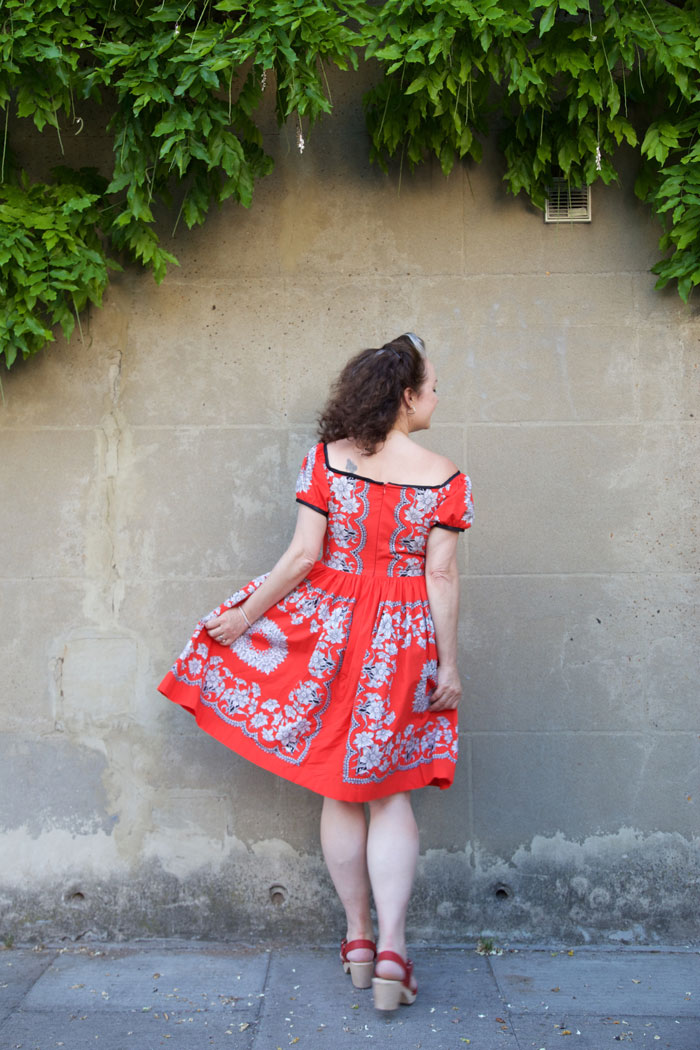
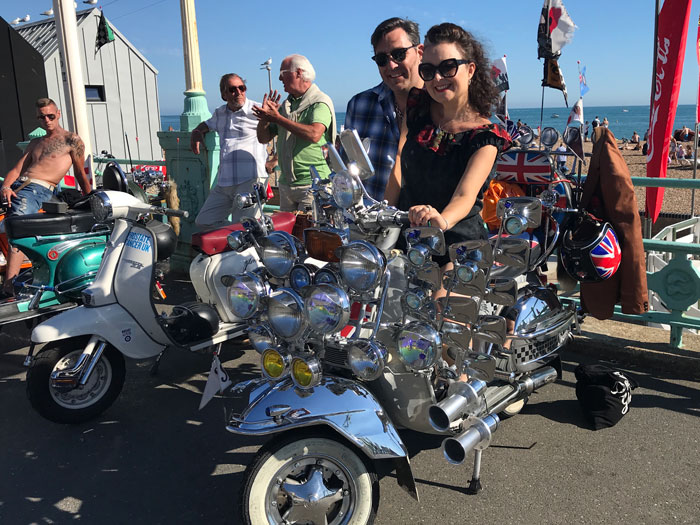
Incidentally. The top I am wearing is handmade too. The pattern I used is Butterick B4685 . I made it from some fake linen border print fabric along with a matching skirt and blogged it here.

Pattern-free cowl skirt in African wax fabric

Cowl skirt front

I’m pretty sure I once said I’d never make clothes for anyone else. But owing to my rubbish memory I now seem to be making a habit of it!

Lucy is one of my beautiful returning customers. and I love the challenges she throws my way. It seems I’m happy making things for other people so long as they are not boring things, lol!

Lucy has a way more interesting social life than me and loves pinning her favourite styles on Pinterest for future reference. It’s a great way for us to share the possibilities of what she’d like me to make next. Most of what she pins, slightly terrifies me but I already overcame my fear of sewing trousers by making her a jumpsuit (which you can see here). She was so delighted with the outcome and that spurred me on to investigate the method of making a cowl skirt.

I’d seen them before, but couldn’t for the life of me work out how to set about it until I came across this tutorial on YouTube by Ruralafricanshop.

It’s a pattern-free tutorial that transforms a length of fabric like magic! Thank you Ruralafrican shop!

I set about making one for myself first. You know, just to test the waters (*read, because I really wanted one too!) and the great thing about sewing with African wax fabric is that it is so darned cheap you can afford to toile it and make one out of the same bolt. Which is clearly the best thing to do in order to see the results for real.

I found me some red and black, of course. It’s quite an unusual colour palette among the wax cotton shelves it seems. Everything else under the sun but not much red and black without other colour interference. I just love the sunbursts. It’s got a great graphic feel about it. And totes lends itself to this crazy sculpture of a skirt!

It cuts some pretty cool shapes with one little turn here and there:

cowl skirt by ooobop

It looks so elegant from the back.

cowl skirt by ooobop back view

And does it’s finest heart-shape impression in the wind!

cowl skirt by ooobop

The trial was a success. I added a few refinements to the instructions, re neatening seams, interfacing the waistband and inserting an invisible zip on a centre back seam. And I rehearsed using different lengths of fabric to see the difference in length of the skirt. The pleats were formed by eye rather than maths.


Lucy supplied her own fabric which was the chosen fabric for the event. And it was a little bit lighter than what I’d used so the pleats and the drape worked even better the second time around. And the border on the fabric worked beautifully on the waistband.

Lucy cowl skirt detail

She is far taller and way more leggy than me so I made sure the length was appropriate, and warned of the shortness of the front seam!

To be fair, she’d rock a potato sack but still, what joy to see her wearing another ooobop special… I was chuffed to bits when she sent me these photos!

Lucy wearing cowl skirt by ooobop

Lucy wearing cowl skirt by ooobop

I’m not stopping here. African wax fabric is such a pleasure to sew. And I’m ready for my next challenge. Bring on the party!

Other things I’ve made from African wax fabric:

Jumpsuit and baby dress

Self-drafted wax print dress


Gypsy dress and panel placement


ooobop soladida gypsy dress front

I am flexing those self-sabotage skills again. I have had notice of my daughters wedding for almost a year and with only a month away, have I begun making my mother of the bride dress? Don’t be daft. But I did make another Sew La Di Da French Gypsy dress. And I must say, I’m not even a little bit sorry!

ooobop soladida gypsy dress front

I totally blame that upstairs bit at Misan Fabrics, in the Goldhawk Road, where they have the most desirable remnants on sale, way cheaper than the fabrics they have downstairs. There was this 3.5m bolt of bright red panel fabric that was signalling from the top shelf. I didn’t have a clue what I’d do with it at that point. Cutting it up for headscarves was an option. But not a very exciting or fulfilling one. Maybe posh napkins or a gathered skirt? Seriously, I’m so uninspired sometimes. I spread it out on the table and looked to the assistant for a suggestion. A shrug of the shoulders translated that she wasn’t the least bit interested and was I going to buy it or not? The reason I was stalling was that the label said £10. I didn’t imagine for one minute that meant for the whole lot. So when the penny dropped, so did the idea that I could indeed make a gathered skirt but with a French Gypsy dress bodice attached to the top of it… for a tenner!


It’s great to revisit a recently-made sewing pattern: It’s already been traced; the fit is established – though I had to keep in mind that the fabric I used last time had a bit of stretch – plus having rehearsed it already, it’s a more confident sew and the process is therefore quicker.

ooobop soladida gypsy dress bodice

There was an issue of placement though. There were not going to be any happy accidents here, oh no! The skirt was dead easy to work out. I just used the width of the fabric for front and back and then halved the back for the seam allowance and zip. But I did think to make sure the panels aligned from the same point at the top/bottom… just before I cut, lol

The midriff – which I must have told you a hundred times before, is my favourite section of a dress – deserved a small floral border that came from the centre of the larger panel. I like how it kind of looks like a giant buckle from a distance. The little floral bits at the side were a bonus.

ooobop_soladida gypsy dress midriff

That same little patterned square worked for the sleeves just as well.

ooobop soladida gypsy dress sleeve

Back bodice pieces always give the most placement jip when there’s a zip to factor in. So annoying. Even more annoying when I’d already cut the back skirt pieces apart and could have made life easier for myself if I’d have thought it out properly and allowed for a side closure instead. But then I had a little brainwave and made sure that the placement didn’t need any matching up. I just needed to make sure the design was the same distance away from the zip on either side. Which it is. Kind of!

ooobop soladida gypsy dress back

The only section I’m not crazy about is the front gathered bust section. There wasn’t enough plain red and I didn’t want to repeat too much the ‘lacy’ edging of the panel section. I can live with it though!

I still had enough duchesse satin left over from the last time to make the black binding which is lucky because I love how it outlines the dress at the top.

My new dress had it’s first outing today and proved to be very picnic-worthy and received lots of lovely comments. It also attracted some attention on our little shoot in the neighbourhood earlier this evening. One passing stranger couldn’t resist joining in and worked it so well it would be rude not to include him. Thinking of you, Karen (didyoumakethat). I didn’t even have to tell him what it was for!

ooobop soladida gypsy dress guest

Thanks as always to the lovely Mr O for these lovely photos. x


Self-drafted Liberty lawn dress

Liberty Lawn dress by ooobop

What a glorious weekend. Unlike almost everyone I know, I didn’t make any plans and for a while I was fighting the fomo as I scrolled through hundreds of family getaway posts. But today I am glad. Not only have I ticked off a few niggly household jobs but I’ve had lots of me time to stop and think and evaluate. Those kind of days are as rare as hen’s teeth despite a generalistic view of ones freelance ‘flexibility’.

self drafted dress by ooobop

I did however manage to squeeze in a lovely river walk with Mr O who kindly took some photos for this blog post. He’s so busy with plans for a new show (a very exciting show that I will tell you about soon) that it’s quite difficult to sync a weekend together. But we managed a trot from Hammersmith to Barnes and back and talked and laughed… a lot!


Liberty lawn dress by ooobop

I’m wearing another self-drafted dress. I don’t self-draft nearly often enough, mostly because it’s a time-hungry process but every time I do I’m reminded of how much more satisfying it is to make a dress that is totally bespoke.

Now it’s not the most original or ground-breaking in design… that comes later (lol)… but it fits. Because I made it fit following various stages of tweaks. My pattern pieces look such a mess with all the scribbles and notes but they are truly important scribbles and notes which tell the story of the journey of fit each time they have been used.

self drafted bodice pattern ooobop

My first fitting was practised on a retro-style top in 2014. The next time I used the pattern was for this wax-print dress – same bodice but a half-circle skirt. I had minor issues with the neckline and corrected it for the third fitting: my skulls and roses dress.


The beautiful fabric is of course a luscious Liberty Lawn. It was a birthday present from a very thoughtful friend. I had 2 metres and didn’t want to waste any of it. The bodice is self lined which feels so good against my skin and was perfectly breathable for a hot sunny stroll. I drafted the armholes to cover that squidgy boob-fat bit (is that the technical term?) and so that the straps don’t fall off my shoulders. That combination involves a fine balance as my shoulders are quite slopy. There is a zip in the left hand side –vintage-style –  so that I didn’t have to split the fabric on the back piece.

Dress design by ooobop

For the skirt section, I took the whole 60″ width to make a dirndl. For anyone who’s tried – I’m sure you’ll share my appreciation of how damned satisfying it is to gather lawn. And out of respect for such a beautiful fine fabric, I hand- sewed the hem. Not only does this fabric gather beautifully but there’s a pleasure in pressing it too. It just stays and makes the whole hand stitching thing a breeze.

Dress designed by ooobop

I give small leftover scraps to my local primary school for them to use in their craft projects and I’m sure they’ll be delighted with the quality this month. I’m certainly glad that I didn’t have to bin them. I absolutely could not have brought myself to have even put my foot on the bin pedal!

Our walk was lovely. The air was filled with warm wisteria  perfume. Not too dissimilar to doughnuts I think. Or is that just me?

Liberty lawn dress with wisteria

And can I just mention my shoes. Quite a step away from my usual heels and platforms. They are Lotta from Stockholm Clogs. Handmade and verified well made! And they come in all sorts of styles and colours. Go check them out! I’m not sponsored by them. I’m just very happy to pass on a good find.

Handmade dress by ooobop and Lotta from Stockholm clogs


French Gypsy Dress

1952 French Gypsy dress

And finally, after two years of waiting in the wings, and following a match-made fabric and pattern eureka moment, my French Gypsy Dress is finished and worn already.

The pattern is by Sew La Di Da Vintage, and I knew I would love it but I could never quite decide on the fabric. The samples shown on the site and exhibited at the shows I’ve visited are so gorgeous I could never hope to get close. I love the packaging and the styling of all the patterns.

Gypsey Dress sewing pattern

I found the fabric online at Minerva Crafts, which is unusual for me. I much prefer shopping in real life! I have to touch and feel and think about it and walk from shop to shop and talk about it with the assistants before I make a call. But when I found this beaut on a random scroll, I didn’t give a second thought to what it would feel like or indeed what it was for – I just loved the colours and the black background of course. It’s a stretch cotton sateen. Quite sturdy, moderate stretch and a great lack of creasibility!


Thing is, I didn’t connect to two to begin with. And when sometime after I considered pairing them I thought it would be too weighty for the gathered upper bodice and sleeves. Though I knew the skirt would totally benefit from a bit of weight and the silhouette would be awesome.

French Gypsy Dress back

Then I got busy and all sewing plans were out the window until I got a free weekend. Woohoo! A whole undisturbed Saturday and after a pep talk with my mum it was full steam ahead. She basically said, “What are you so scared of? If it all goes pear shaped you can just get some more fabric.” Which is true of course, if not a little bit wasteful. And I could have tested on something else first but I had a window of opportunity and I wanted a new dress right there and then!

And I couldn’t be more pleased. It fits in all the right places, is flattering and comfortable too.

Construction-wise its really quite simple. The most complicated thing is taking time to make those bodice and sleeve gathers even. I know now after heaps of lazy and rushed gathering attempts in the past, that the key is to sew 2 rows of gathering stitches, either side of the intended seamline and there’s every chance your gathers will keep evenly distributed and pucker free.

1952 French Gypsy Dress

I made the binding for the neck and sleeve edges from some leftover black duchesse satin. I was prepared to rip it off if it didn’t work because I wasn’t entirely sure if it was the right kind of fabric for the job. But it was. Just perfectly right, actually!

There is a length of elastic inside the bias casing that starts and ends on the back sleeve seams. This is such a great idea because it allows for the dress to be worn on or off the shoulders and keeps the back bodice pieces completely flat. Incidentally there are no darts in the back pieces of this dress. Instead, the instructions call for a brilliant fitting stage whereby the back seam is pinned to fit and marked with chalk or an erasable pen (you will need a partner for this). Then the seam is machine tacked and pressed open so the creased edges give the perfect guide for zip insertion. It’s such a cool stage of instruction and one that I am definitely going to consider using on future makes. Is this a typical vintage construction method, I wonder?

French Gypsy dress reflection

I’m so happy with the outcome. It brightened a very drizzly day and feels so great to wear. And better still, it’s another strike off my #makenine2018 – wahooo!

I might try poomfing the skirt more with a layered petticoat and styling it up with flowers in my hair. Definitely a contender for what to wear when the Frida Kahlo exhibition hits the V&A this year.

Well it’s back to work tomorrow. But I’ll be returning with a head full of plans. That’s the trouble with a bit of time off!


Burdastyle satin joggers

I’m definitely on a Burdastyle roll this year. And largely thanks to Saturday Night Stitch who prompted said roll with her #burdachallenge2018 over on Instagram. I didn’t commit to a set number of projects because, knowing me, I’d end up self-sabotaging my own plans (because that’s my favourite hobby apparently) and not make any at all! So in not making a declared commitment I’ve made two glittery bell-sleeve dresses, one black, one red (quelle surprise), a red raglan sleeve top which I’ve yet to blog and these awesome satin joggers that I made for my daughter:

Satin joggers by ooobop

I feel I can say ‘awesome‘, not to big myself up but because the fabric choice and the style was all down to Little Miss O. It’s very rare that she will accept a hand-made offering these days, preferring a high street label or a funky second-hand designer deal from Depop. So when she came to me with this request I couldn’t wait to get started.

I’m so thankful for my collection of Burda mags. There’s always a something I can use or adapt but in this case, the exact pattern I needed was nestled inside issue 04/2017. And if you don’t have it in your collection it’s available as a pdf download from the Burda website

Burda satin joggers
Satin joggers from Burda Style issue 04/2017

I was a bit worried about the non-stretch factor of a satin brocade but the cut of the pattern was excellent. Allowing enough room to negate the need for expansion!


She didn’t want to include the zippered pockets. She felt that it would upset the shape of the leg, create more bulk and look ugly… Who’s the dressmaker round here?! She also rejected the drawstring at the waistline so I just incorporated an extra channel of elastic instead. talking of which, I’m a bit irritated by the ‘roll’ of the elastic. Doe’s anti-roll or non-roll elastic really make that much difference? Please let me know I’ll invest if it does. My loyalty to my Shepherds Bush haberdashery stall is strong but I feel I could possibly betray allegiance for the sake of a well-behaved elastic. Just don’t tell!

I included 3 channels of 1cm elastic at the waist. This technique worked so well for Amelia Fang’s petticoat so I didn’t see why it wouldn’t work so well for these.  The instructions called for 1.5cm width. Maybe that’s where I fell down. Or maybe that there was more fabric to gather at the waist for the petticoat and so less room for the elastic to move around.

satin joggers waistband

It’s not such a biggie when they are on. Seems to straighten out. I did stick to the instruction of 2cm wide elastic for the 2 channels at the ankle cuff and that seemed to stay in place a bit more.

satin joggers ankle cuff

These joggers sew up real quick. Especially if you’re leaving out the pockets. And even quicker when your daughter needs them in half an hour because she is going out and has ‘literally nothing to wear’. These inimitable words groans are recited literally every week accompanied by a stomp up the stairs. I’d like to say they took half an hour though the threading of the elastic probably took that long! But it really wasn’t much longer than an hour or so.

satin brocade joggers

She’s had so many lovely comments about them and already wants another pair in black with pink stripes. I’m sure she could find those in the shops but to be fair, I really like that she wants me to make them. I like that she dictates how she wants them and recognises faults and fitting issues in RTW styles. It might sound a bit princess-like. But it’s also a learning curve. She can see what time is invested and she can see what works and what doesn’t. She’s currently in the process of making herself a slip dress that she is sewing all by herself along with a group of friends, all making the same. I’d like to think that I’ve got something to do with that but I don’t like to pressurise her. I prefer just to plant the seed!

So the trade-off for a second pair was that I got to take some photos of her wearing them for my blog post. Ordinarily not too much to ask but you’d think I was asking the impossible – sabotaging her schedule and ruining her whole life! I managed a five minute shoot. With no head. And a lot of huffs. Oh those hormones. Oh the joys!


Red glitter dress with bell sleeves

red glitter bell sleeve dress

Oh what a difference a sunny day makes. Meant I could withstand a shoot for a whole 15 minutes without a coat! And I’m so happy that Daniel could do them as he did such a fab job and I’m hopeless and impatient at the whole remote thing.


This dress is a bit late to the blog but was well on time for the party. It’s the Burdastyle bell sleeve dress that I made for New Years Eve. I clearly had a bit of time on my hands because I made two of these up in the space of that week between Christmas and New Year. You can see my black glittery version in the previous blog post, here.

red litter bell sleeve dress full length

This one is way more glittery and more red and more suitable for a dance at the disco than mooch down the Marks and Spencer aisles but I think its very likely I’ll be breaking those kinda rules.


The fabric doesn’t have as much stretch as the last one but I still managed to forgo a zip, just the same. It’s a lot less snuggly on account of the high metallic thread-count but that also means it doesn’t need an iron. I only tend to press seams during the making-of, these days and avoid at all cost those mum-style marathon ironing sessions in front of the telly. I’d sooner sew than iron!

red glitter bell sleeve dress Burda style

The downside of a fabric that won’t behave under pressure (and low heat) is of course the issue of pesky popping-out facings. I tacked them down at the shoulders and at the centre back seam and still they found an escape route. So I sewed by hand, tiny little stitches close to the neckline. It’s vaguely visible but way less annoying than flappy bits of fabric spoiling the picture!

red glittery bell sleeve dress

Because I was in a rush with this one, I didn’t overlock the seams. They are ‘pressed’ open. In the loosest sense of the word, lol. But the fabric isn’t ever going to fray because I tested that by giving it a bit of rough treatment and it remained calm and intact under pressure!

red glittery bell sleeve dress

The temptation is to make another 5 of these, so then I will have one for every day of the week. It give’s no grief to sew and it gets so many compliments in return for such little effort. I haven’t really styled it much here but chokers, big floppy 70s hats, a neck-tie, a faux fur scarf or some massive earrings, could all transform this dress for a totally different look.

red glittery bell sleeve dress by the fence

Bell sleeve dress burdastyle pattern

I still might make another one at least, though! I’d like to make it in a woven – with a zip of course – just to test the difference.


Burda bell sleeve dress

burda bell sleeve dress

Happy new year my lovelies! I do hope you’ve all had a fabulous time and that January 2018 hasn’t arrived with too much shock to the system.

Such a weird time of year this first week of Jan. My lead up to Christmas – probably much like everyone else’s – was a flurry of work and panic shopping, drinking and feasting to excess like crazy bear people and without so much of a sniff of sewing time, and then… it’s all back to normal. Or as normal as it gets. And now I’m left in a constant state of thinking I’ve forgotten to do something, or that I’m meant to be somewhere. And it’s really hard to to rein in the graze and remember to go for the tap and not the wine bottle. Sound familiar?!


I awarded myself some sewing time between Christmas and New Year and the balance is still good so far, following week one in the work-house so I’ve signed up to Rochelle’s #2018makenine on Instagram – an easy enough challenge whereby we are encouraged to declare nine things we’d love to make throughout the year. And last night I managed to strike one of my intended projects off the list. Well two, actually, if the one I made for New Years eve counts!

ooobop 2018makenine

This dress a very gentle casual-style ease back into the sewing game kind of project: Burda Style Issue 12/2016 Bell-sleeve dress. It’s been a long while since I made anything Burda and I forgot all about wanting to make this dress till I had a had a sort out of my magazine collection. I’ve been collecting them since December 2010. I’m sure it would be easier to search up what I wanted on the site and download the pdf pattern but I quite like that I always have the pattern already and don’t mind tracing it off too much. Especially when there’s not too many pieces involved.

Burda bell sleeve dress in magazine

Really not very much to report on construction: A couple of bust darts and a neckline facing with a bit of understitching being the only faffs. And then my usual alterations. A sway back adjustment for one. So I just located the waistline and effectively took a horizontal dart 5cms from the back seam tapering to nothing at the side seam. It’s amazing how much of a difference this makes.

burdastyle bell sleeve dress by ooobop

I used a stretch jersey as recommended but was confused by the need for a zip. So I tacked the back pieces together to check the fit before I went and sunk those tiny stretch stitches into the fabric.

It was a good bit of hindsight and proved that I didn’t need a zip at all so I hi-fived myself and stitched it down.

The only other adjustment I made was to nip it in at the waistline a bit by marking in an inch and tapering back out to the side seams. Not too much of an issue as I was going to overlock a small seam allowance afterwards.

The fabric is a very soft, substantial jersey knit with a bit of glitter action so I can still carry a bit of a party round with me even though the season is done and dusted.

burda bell sleeve dress full length

The funnel sleeves are what sold me. They add a bit of fun and create a great silhouette to what is otherwise a very simple V-neck dress. The flounce is added to the sleeve before sewing up the under arm seam and insetting.  And not for the first time, I am so impressed with the perfect amount of ease Burda gets right on the sleeve cap every single time. Not a pucker in sight!

Well this dress has definitely filled a gap in the wardrobe: It’s perfect for work, 80 deniers and boots; worked great with a pair of Doc Martens (and a warm coat) for a river walk today and I’m sure a pair of heels and some twinkly earrings will transform it from a day to night-out dress. All bases covered!

It really does feel so good to be back behind the machine. I was so busy with work leading up to Christmas that there was no time for sewing and I missed it so much. I’m hoping to cut into the next one on my list soon and keep up a bit of wardrobe re-stocking while I can.


Vogue Cocktail Hour dress V9241

V9241 cocktail dress

cocktail hour eve appeal

The first time I’d heard of the Eve Appeal was when I took part in last year’s Vintage Sewalong campaign. They are the ONLY UK  national charity that raises awareness and funding research into the five gynaecological cancers so it wasn’t too much of an ask for me to join in the Cocktail Hour once again, and help McCalls promote a range of Vogue patterns that raise good money for such a great cause.

Last year I made Retro Butterick 5813 for the Big Vintage Sewalong 2016. This year I chose Vogue 9241, a fabulous design by Kathryn Brenne.

V9241_PATTERN_COVER

A little bit Helena Bonham Carter, A little bit Anne Robinson, perhaps… but totally full of character and no doubt a talking point at a cocktail party. Sadly the only cocktail party I’ve ever been invited to was the one at The Knitting and Stitching Show at Ally Pally and I was typically too busy with work to attend. Though I prefer to think that I have been to loads and they were so good, I’ve clean forgotten all about them!

But if I do ever get another invite (nudge, nudge) I would be proud to wear this dress. It would rock a room of standard LBDs and not leave without comment.

I chose this design because of that awesome collar, of course, and because it reminded me of my birthday dress – the skirt section at least – and I considered using silk dupion, the same. But not only do I not like doing things twice, I find the suction of creativity too much to bear if I copy what’s on the packet. ie a red silk dress. I felt like black would have hidden too  much of the detail so I went a bit off piste and used a pinstripe suiting fabric instead, lol!

V9241_cocktail_dress_4

I wanted those pinstripes to emphasise the godets and that collar. Actual stripes would have been a bit too cray-cray (mmmm…. maybe next time though?!) I really wasn’t 100% sure it would turn out as special in what is effectively a boring cheap suiting fabric!

But it did. And I am so happy. Which is lucky really because I hadn’t left any time to change it up!
This dress really isn’t as complicated as it looks. I wouldn’t go as far as to say it’s a doddle but really just more time-consuming than anything. It needs a fair bit of yardage too so watch out if you’ve got any big ideas on fancy pants fabric. It could end up costing an arm and both legs!
V9241_cocktail_dress_5
One thing which I must point out is that there is an error on the layout and pattern pieces. The instructions say to cut 2 of front which threw me a bit because there was no reference to use it anywhere. The layout plan indicated the same. I wondered if it could be a facing/lining of sorts but a quick Tweet message to McCalls confirmed it was an error and that they had contacted the US office to amend.
This pattern has a massive amount of ease. It’s so helpful to have body measurements and corresponding size table on the packet but better still to clock the ease on the pattern pieces themselves. Not all pattern companies do this so kudos to Vogue. With that info at hand, I realised I could afford to drop a whole dress size. I’d suspected I might have to do this because the pattern image itself looks a little bit roomy. I like things more snug, like a hug!
V9241_cocktail_dress_6
The collar is sewn front to facing, then the wire is sewn to the seam allowance of the outer curved edge before turning out. The wire is sewn in using a wide-ish zigzag stitch making sure to keep the needle either side of the wire. Requires a fair bit of concentration. Frightened the bloody life out of me when I took my eye off the ball and the needle clonked on the wire!
V9241_wired_collar
This is the second time in a month that I’ve had the need for animation wire, the first being for the wings of Amelia Fangs outfit. I ordered some more off Amazon. Affiliate link here:

I ordered all three weights as I really wasn’t sure what constituted ‘medium weight’. Initially I tried the lightest one but it was a bit flimsy so I opted for the 2mm diameter.
I’ve been having a lot of fun positioning the collar in all sorts of ways. But there would be more fun I’m sure if my fabric was sturdier or interfaced to give it a bit more structure. I could go totally could go totally Maleficent! This pinstripe stuff is very soft with quite a bit of drape which still works well, mind.
V9241_cocktail_dress collar
The skirt is all about the godets. How do you even say that? Godettes or godays? A little care is needed to insert the points accurately into the open seams of the bodice but if you’ve ever made quilt blocks with inset seams you will be walking it!
I noted the length was kinda granny for me. So I lobbed 4 inches off before I cut it out. And it reaches just shy of knee length now. But by nature of how the godets are tied up inside, I can just as easily lower the hem a couple of inches or so if I must be more demure!
I pretty much followed the instructions to the T but I could have done with taking some of the excess out of the back bodice length – that’s always an issue for me. But skirt seciton moves around and drapes so unusually, I don’t think it’s a biggie! And I hand stitched the bias facings of the armholes, rather than topstitch as instructed. Call me old fashioned!
V9241_cocktail_dress_3
So I am the last entry on the Vogue Patterns Bloggers Calendar 2017. I initially thought that was the best position to be in but the mash-up of anxiety and inspiration was building with each gorgeous post that popped up, every month.  In case you didn’t catch them all, click here to the amazing contributions from all the fabulous sewing bloggers. I just love how everyone has put an individual spin on their own cocktail dresses.
I do hope that some or one of these at least will inspire you to buy a pattern from the Cocktail Hour selection and rustle one up for yourself. Or maybe even buy one for a gift for a sewing friend. All helps towards the amazing work done by the Eve Appeal.
Thanks to The Foldline for including me in the line up, to Dan for the fabulous photos and also to Aska and Tom at the Thatched House in Hammersmith for allowing us to shoot them in their lovely pub.
 

An outfit for Amelia Fang

Laura Ellen Anderson with ooobop

Not for the first time, my day job and passion for dressmaking have come together and partied!

Like when I made an apron for Ellie Simmons to celebrate the launch of her book Ellie’s Magical Bakery, and when I made myself an outfit for Gemma Cairney’s launch party for Open the book. And it only bloody happened again!

Imagine my excitement when Laura Ellen Anderson asked me to make her an outfit for her book launch of Amelia Fang and the Barbaric Ball!

I’d seen the cover of the book already – designed by the super talented Tiffany Leeson at Egmont Children’s Books  – and was called in for a meeting with Laura to discuss the outfit. There wasn’t too much to discuss to be honest, because Laura’s adorable illustrations gave me all the information I needed. So I took a few measurements, scribbled a few plans and couldn’t wait to get started.

If you follow Laura on Twitter – @Lillustrator – you will know how busy she is, not just with her marathon illustration and writing sessions but also flying from workshops to events like nobody’s business! This lady needed some wings at the very least!

Amelia Fang takes the starring role of this ‘terrifying’ tale. She’s fun, fiesty and loyally flanked by her friends, Florence the yeti, Grimaldi the reaper and Squashy her adorable pet pumpkin. When spoilt-brat Prince Tangine captures Squashy they must escape the party to plan a daring rescue! In their race against time, they come to realise things in Nocturnia may not be quite what they seem . . .

It really is such a fun read. The characters are so endearing and I loved it! And so say loads of other readers… it was voted book of the month at Waterstones in October, too!

I started with the petticoat. I figured it was going to take the longest to make. But also the colour of that tangerine made me so happy! It has a poly satin lining and waistband and three double-tiered layers of netting. The joins are prettied with orange satin ribbon and hemlines are finished with orange satin bias binding. I created the waistband to include 4 channels of narrow elastic. I find this helps to move the gathers around if you want to position the volume more at the back or at the sides. I’m not a fan of too much poof at the front! It looks way better, too!

tangerine petticoat

Next was the skirt. I cut a full circle from some black duchesse satin as the overskirt and box pleated some black and white striped cotton for the underskirt. I just love it’s Tim Burtonesque edge. The best find was the orange foil-like fabric for the detail on the overskirt. Oh how it tied in perfectly with the orange foil detail on the cover!

To prevent the shiny bits from fraying, I faced the pointy tips and just pressed under the long sides before topstitching to the skirt. A duchesse waistband sealed in the top edges and an invisible zip at the back was the only notion needed.

Amelia Fang with Unicorn

And then the wings. I have my milliner friend, Jayne Hepsibah Sullivan of the Hepsibah Gallery to thank for the introduction to animation wire. And for a genius solution to making a posable framework that I could cover with bat-like faux leather. They attach as a neck piece that ties at the front with black satin ribbon. The wire has no memory so the wings can be positioned at will. Oh, and I couldn’t resist adding a few cockerel feathers left over from my significant birthday dress. Such fun!!

Amelia Fang wings

The launch party was just fabulous. Held at The Crypt of St Pancras Parish Church, London which was originally designed and used for coffin burials from 1822, when the Church was opened, to 1854, when the crypts of all London churches were closed to burials. It was the perfect choice of venue. And everyone looked amazing… Prince Tangine especially!

Prince Tagine

Laura Ellen Anderson with Sarah McIntyre

Gutted I didn’t get to say hello to Sarah McIntyre. She looked incredible!

But I did get to meet so many other lovely people at the launch. It was such a coven of creative talent – writers, illustrators, art directors, musicians and photographers… It inspires me so much to hear others talk so passionately about their work. And it was thrilling to get so many compliments on Laura’s outfit. I loved making it as much as I loved seeing her wear it. And I was just buzzing with pride.

Amelia Fang launch party

I have clean forgotten that I ever said I couldn’t imagine sewing for anyone else. I guess its a very different story when your customer is so cool and perfectly lovely and you get to make a one-off, bespoke, fun outfit for her. I take it all back…

“This is most definitely my favourite kinda ‘work’!”

Big massive thank yous to Tiffany for putting me forward, to Laura for such an awesome opportunity and to Laura’s mum for the fabulous photos.

And Squashy would like to remind you that he is not just for Halloween… Amelia Fang and the Barbaric Ball would make a perfect Christmas pressie for 7-9 year olds. And it’s on Amazon right here! (affiliate image link below) Along with the next book in the series, Amelia Fang and the Unicorn Lords: