Ready to Party Dress

Original post written for the Crafty Bloggers Club

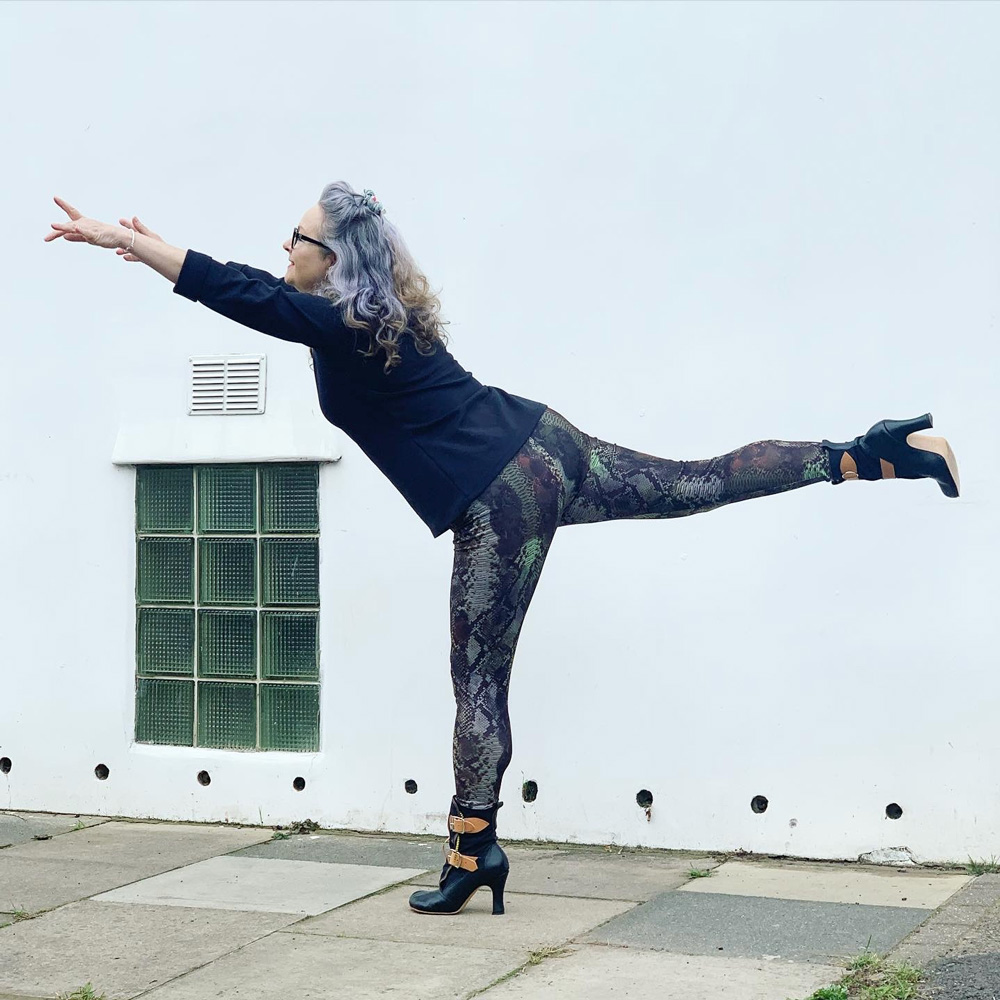
The first time I met the ladies of Crafty Sew and So was at their fabulous Dressmakers’ Ball in 2019. I’ve since been to their Crafty Sewing Camp and can verify that they throw a damn fine party! And so it seemed quite fitting that I chose to sew the Ready to Party Dress for my first experience with a My Handmade Wardrobe sewing pattern.

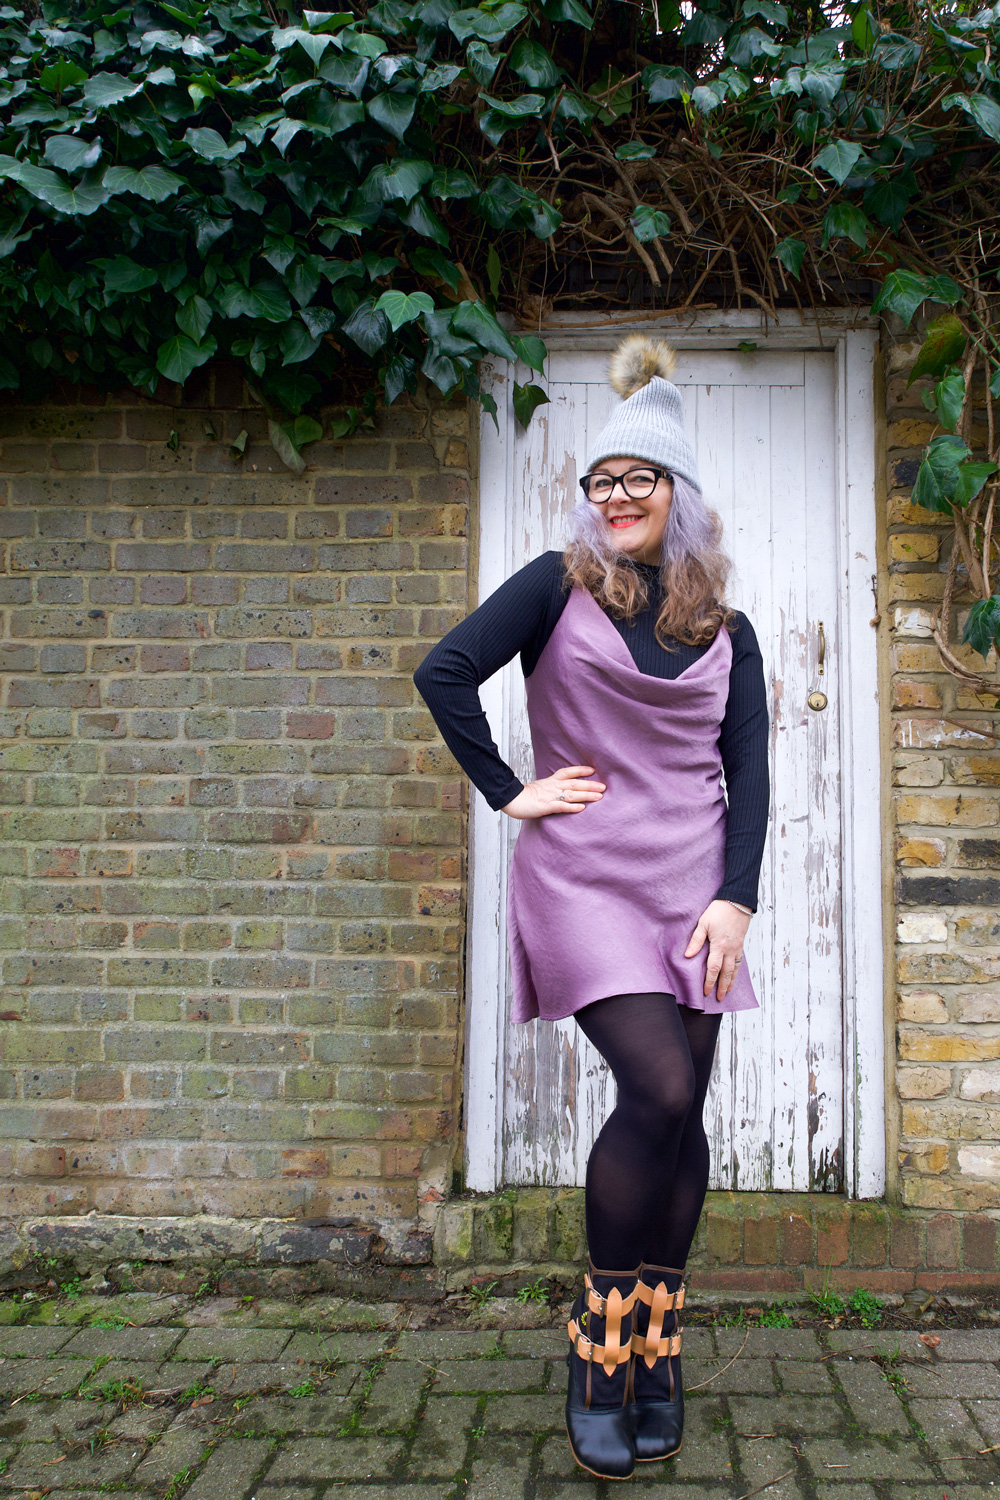
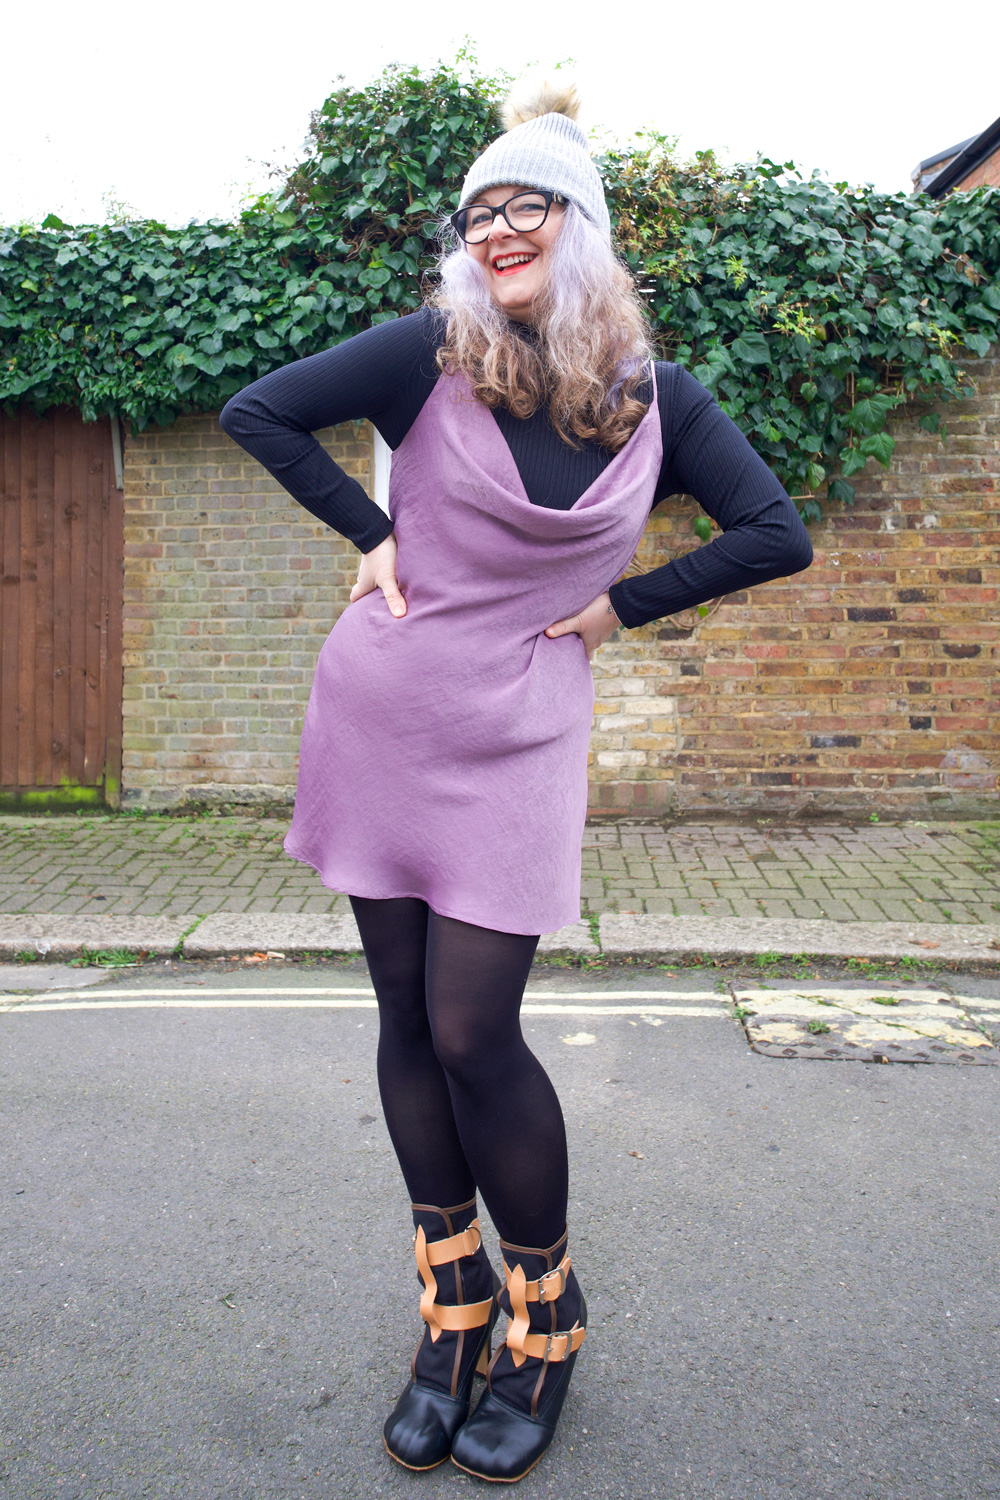
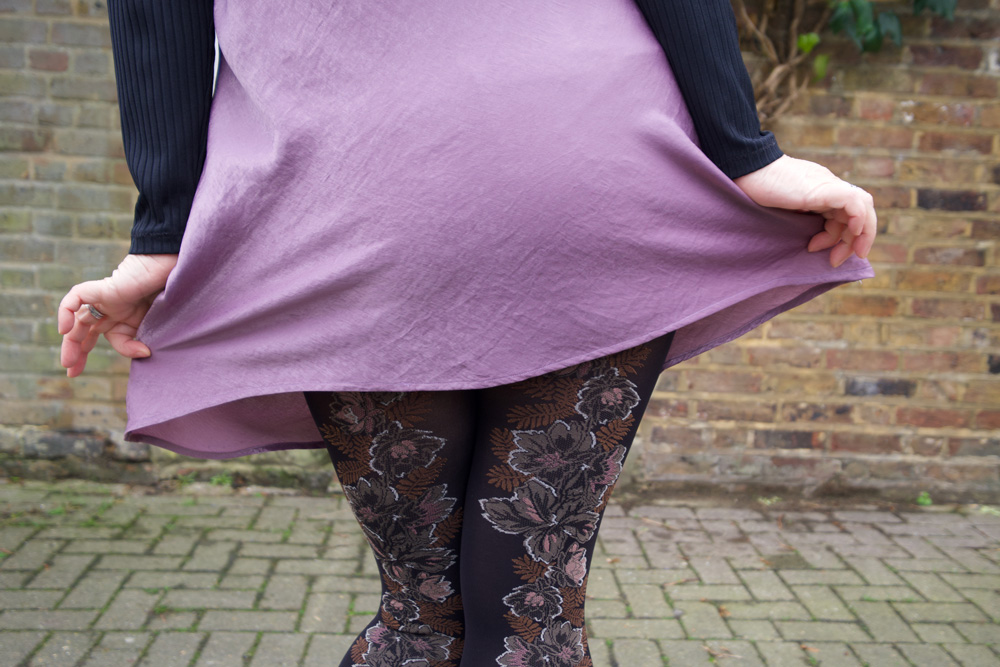
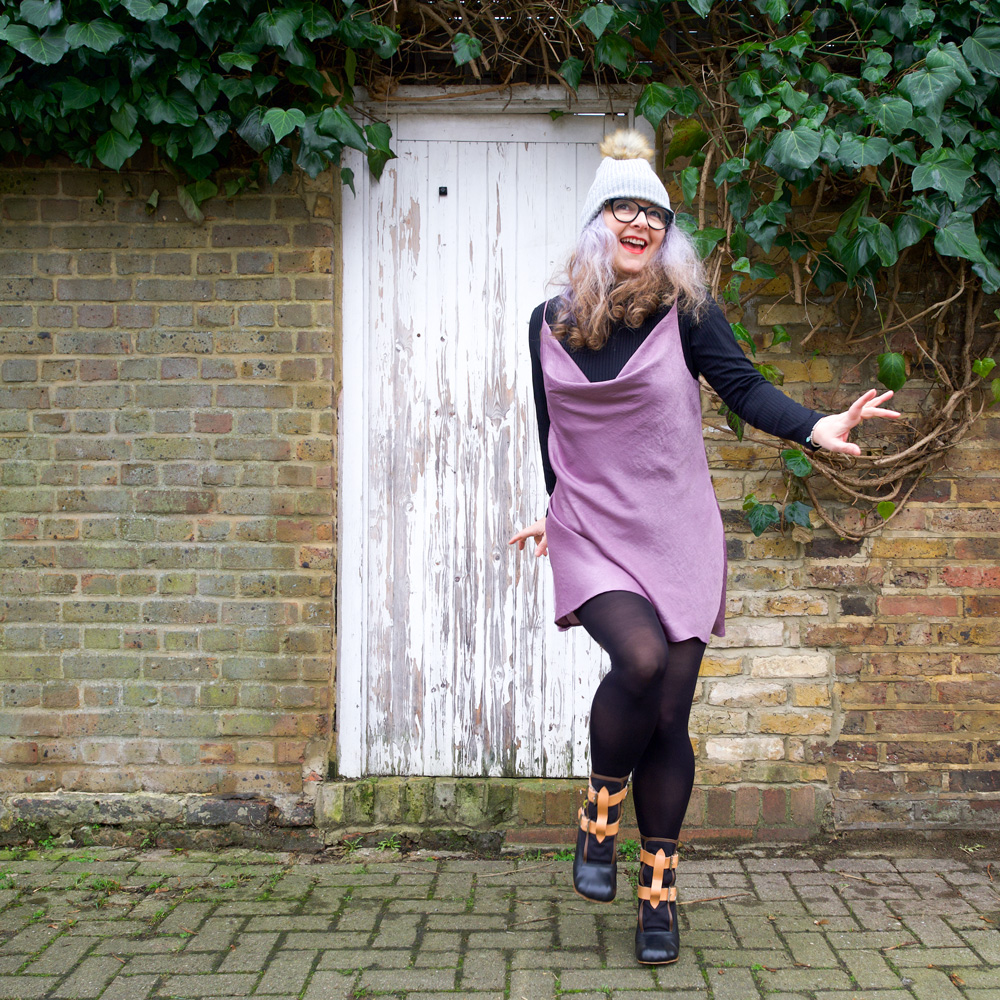
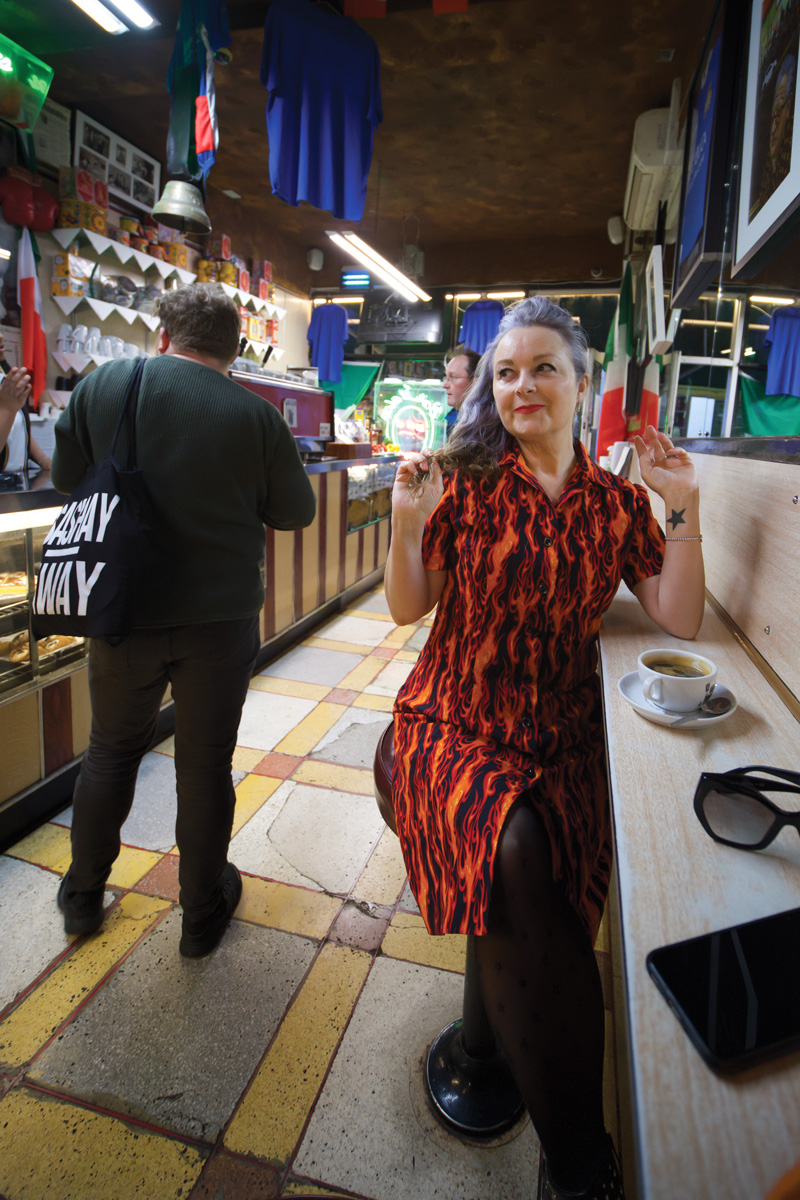
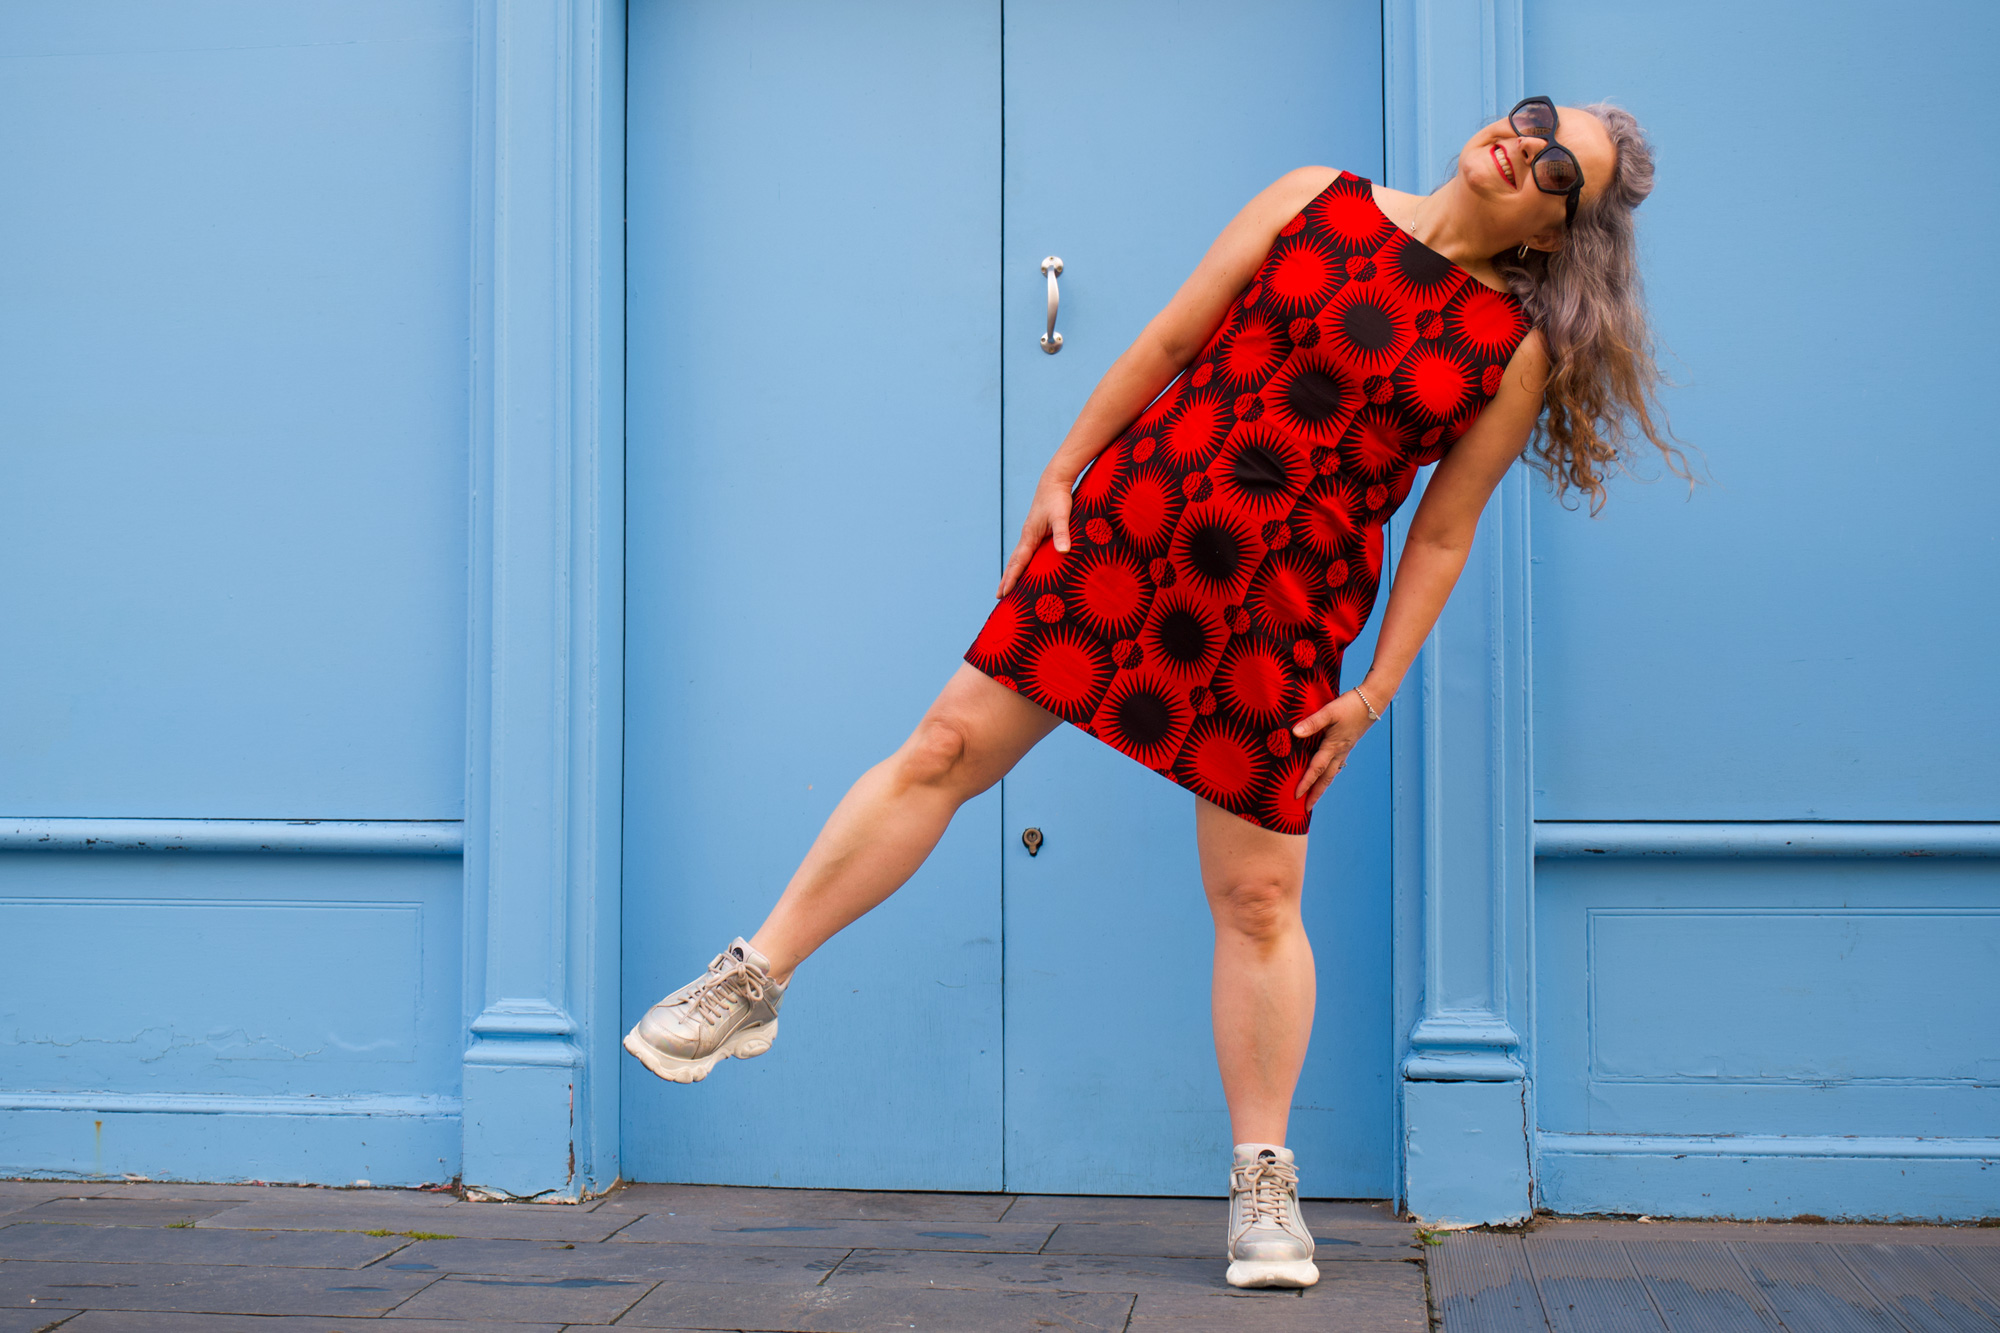
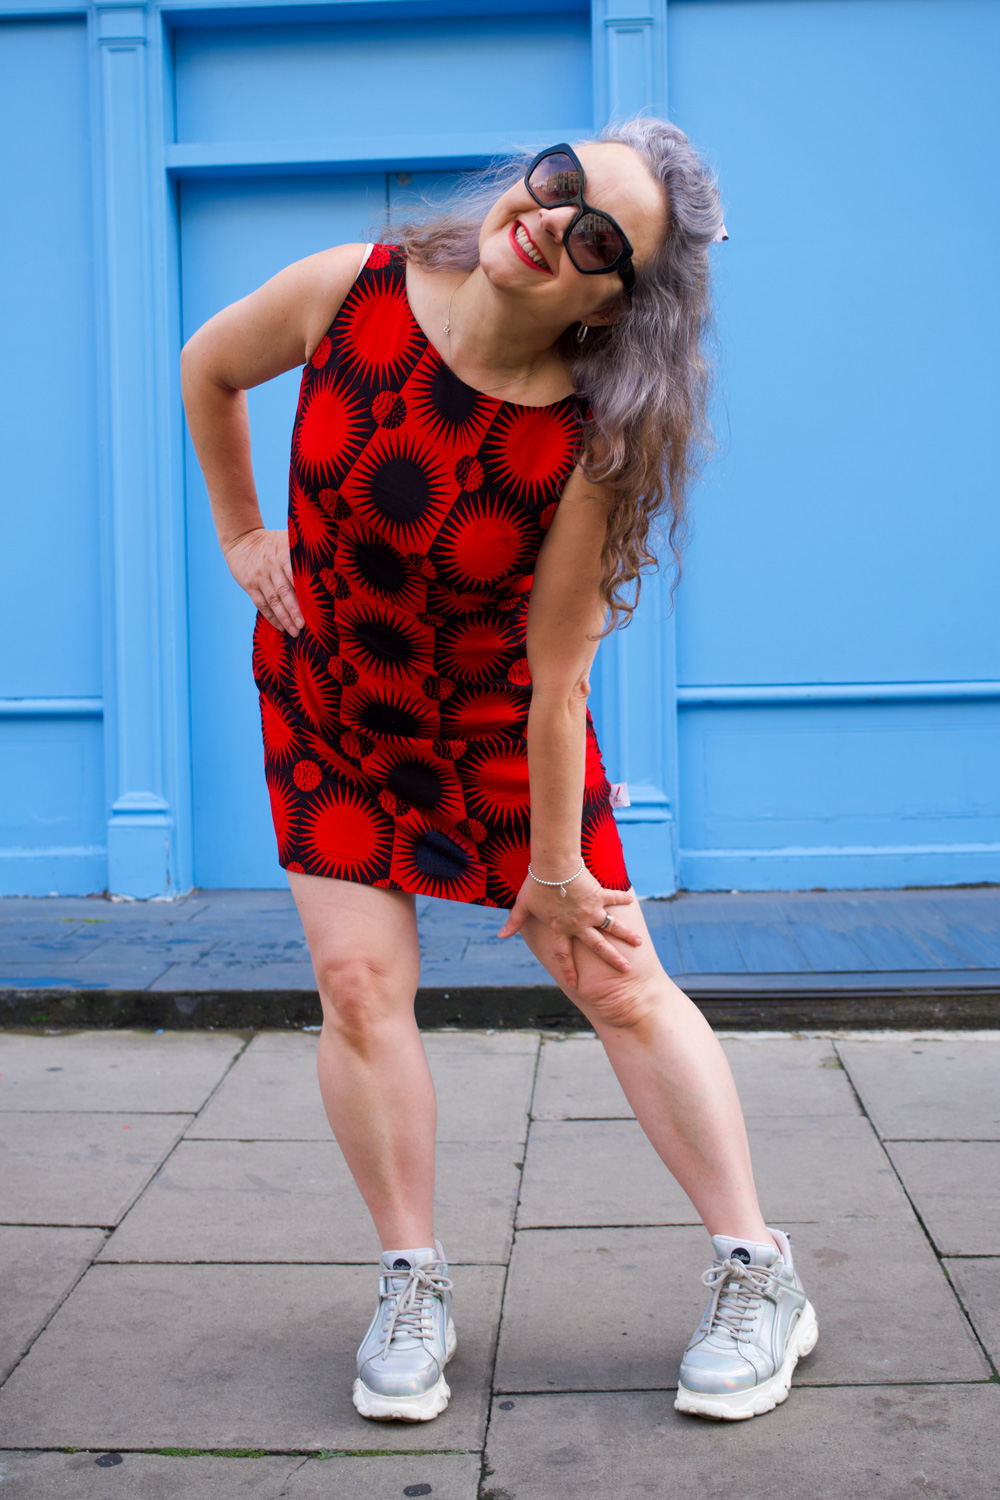
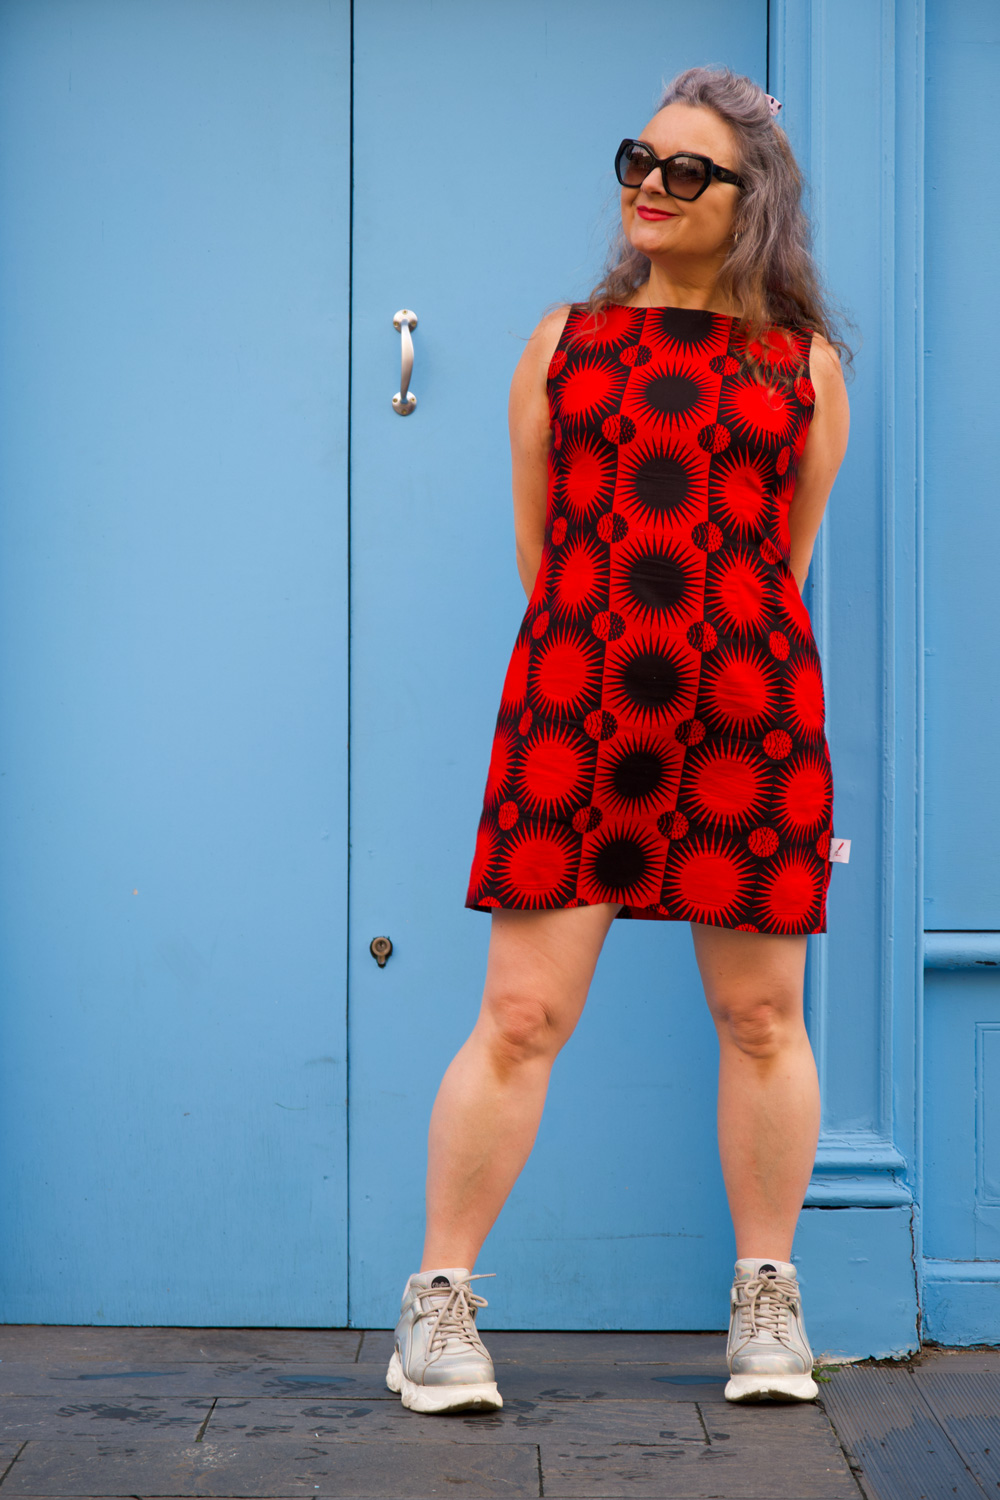
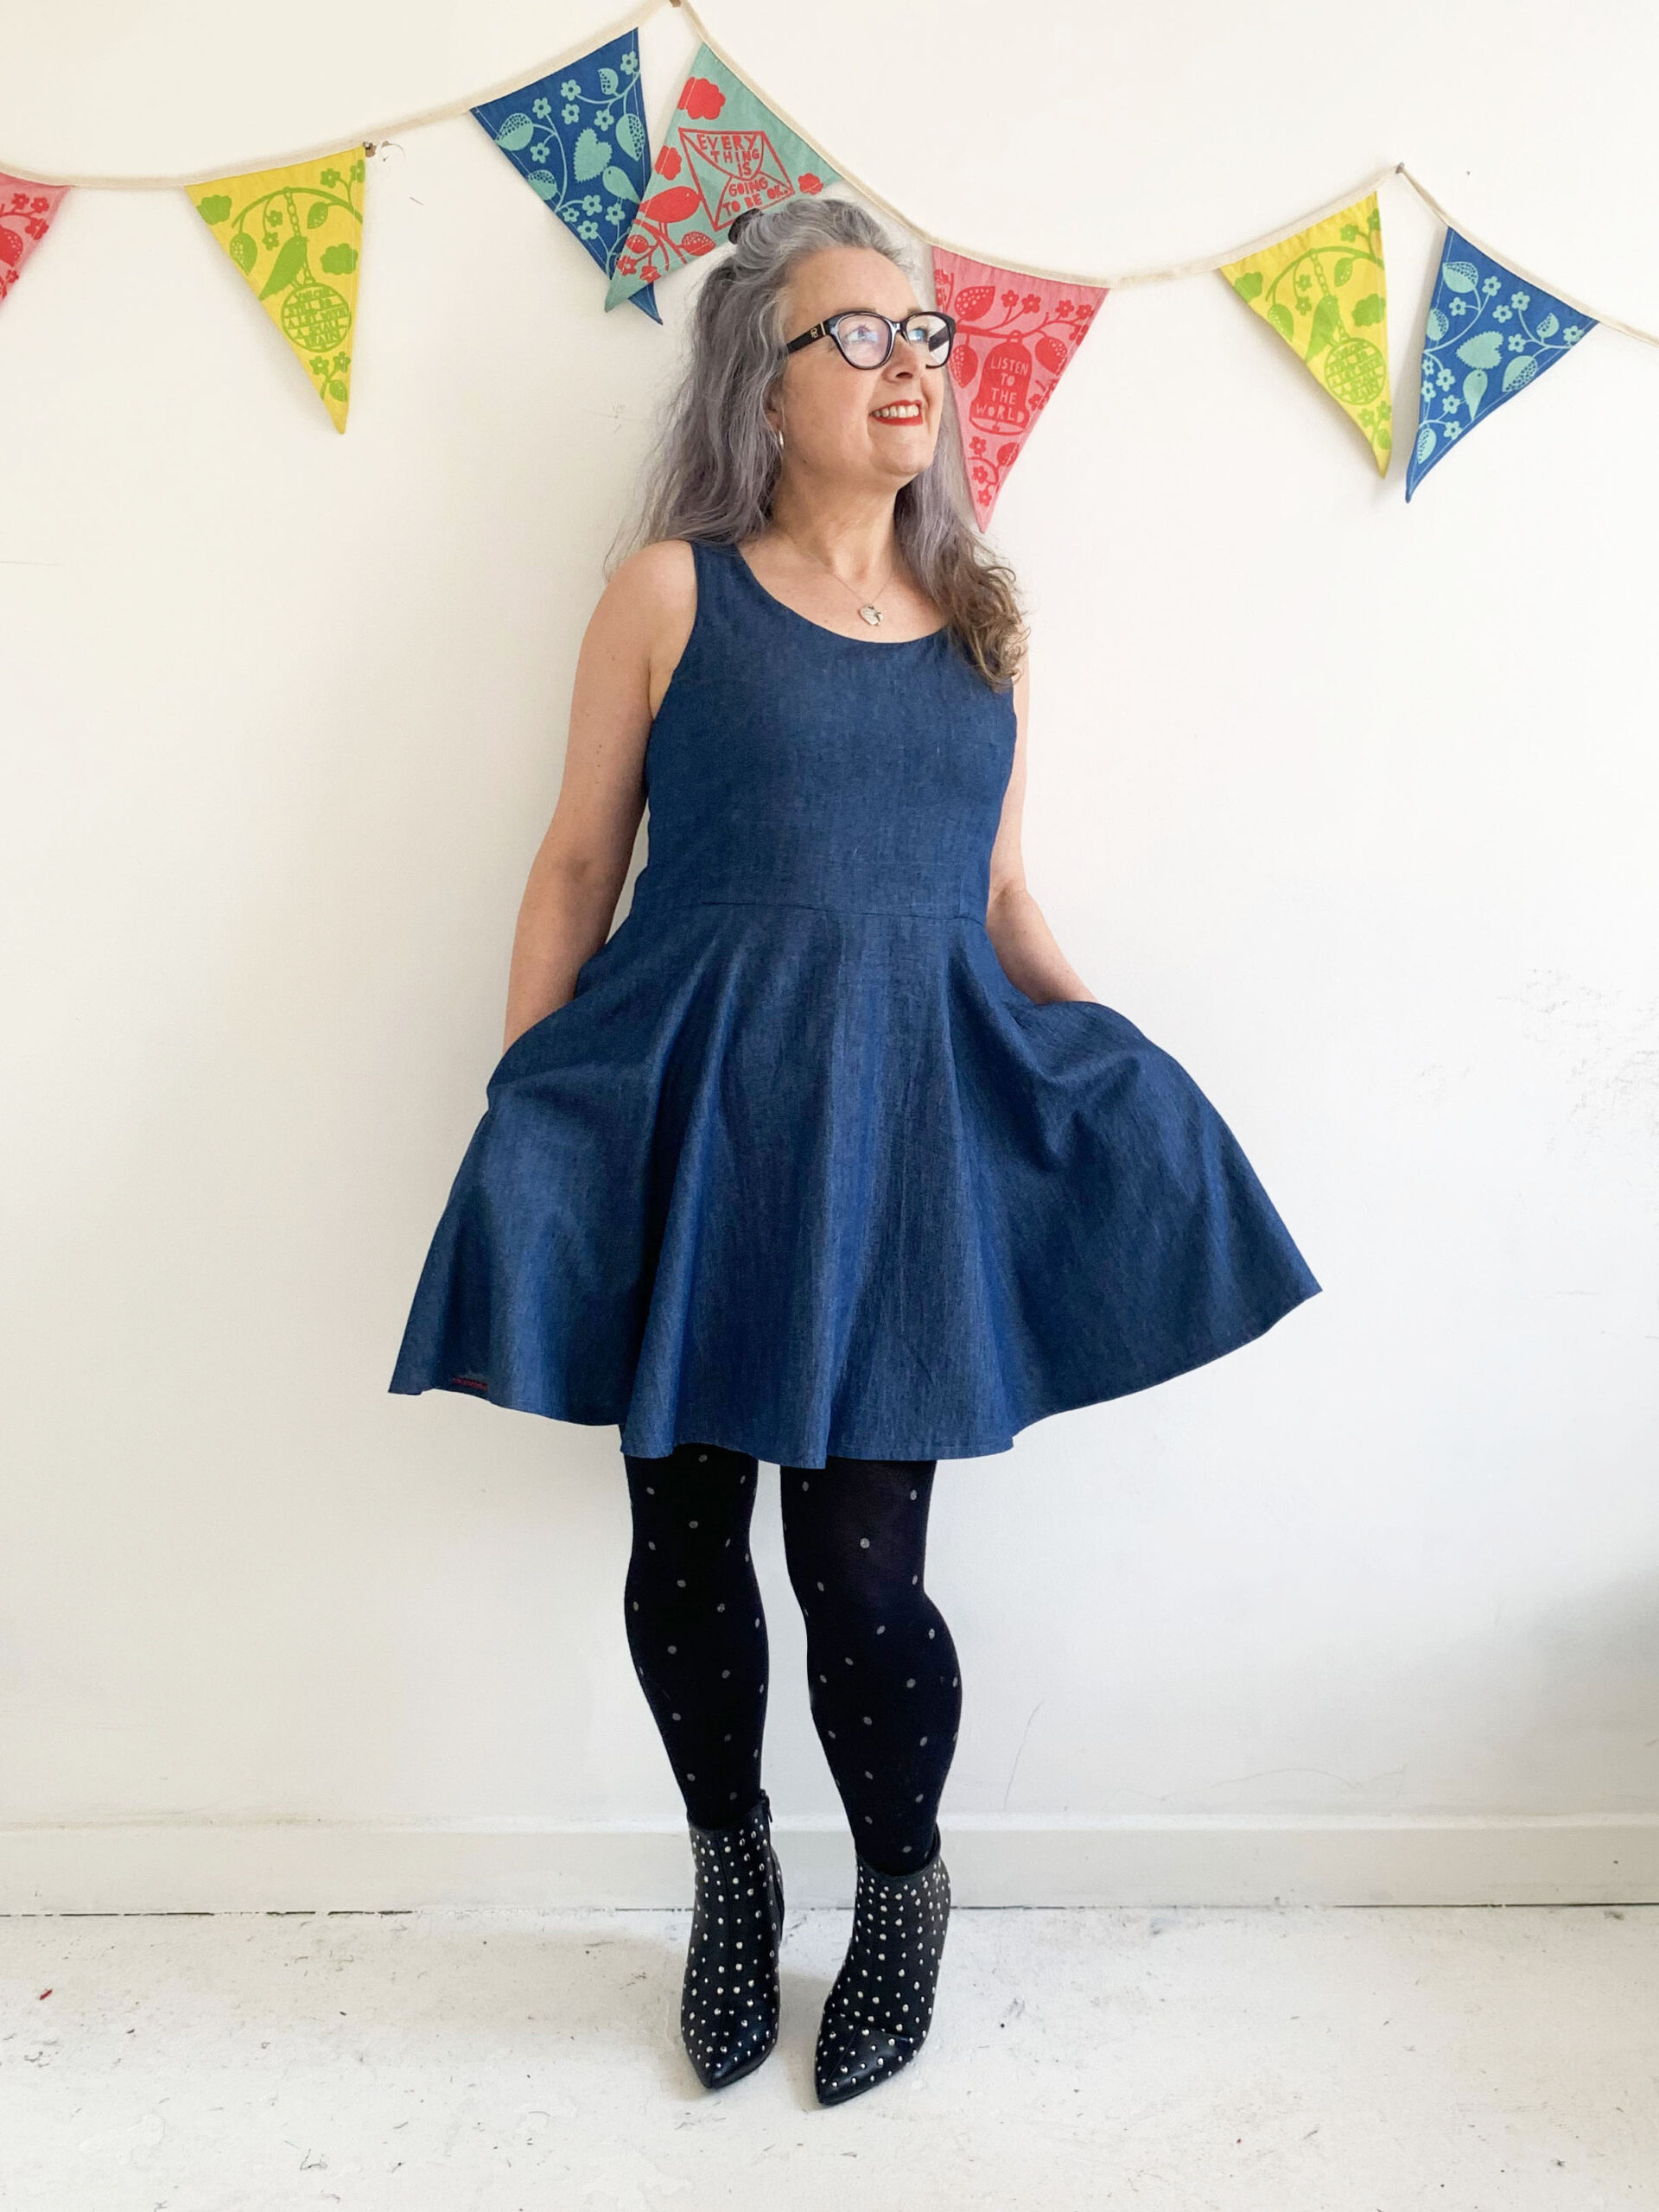
However, true to form and with no imminent fancy parties on the horizon I decided to make it up as an every day-dress instead. 

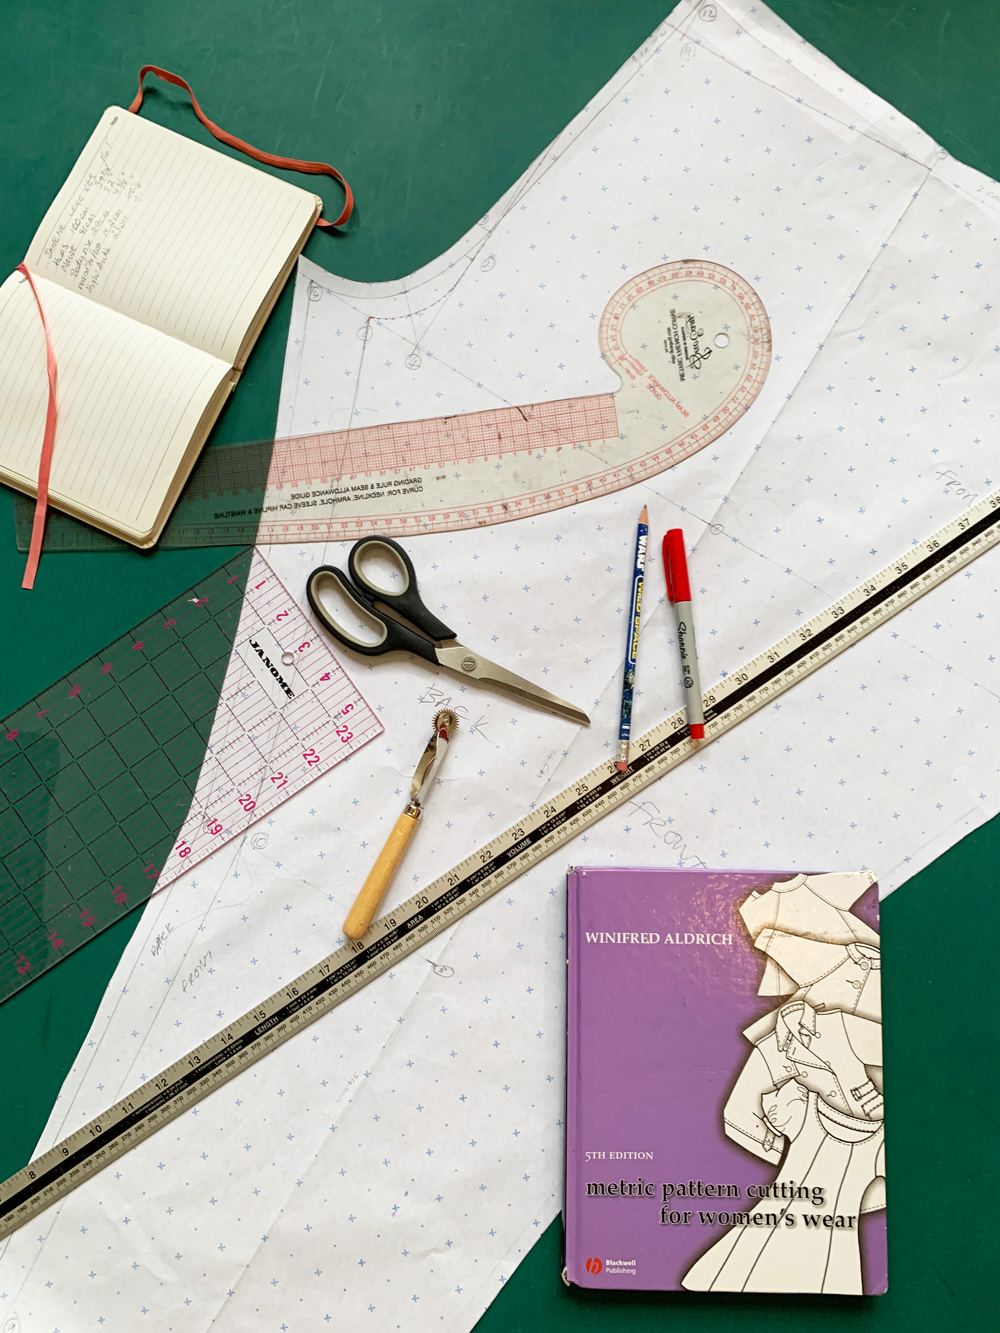
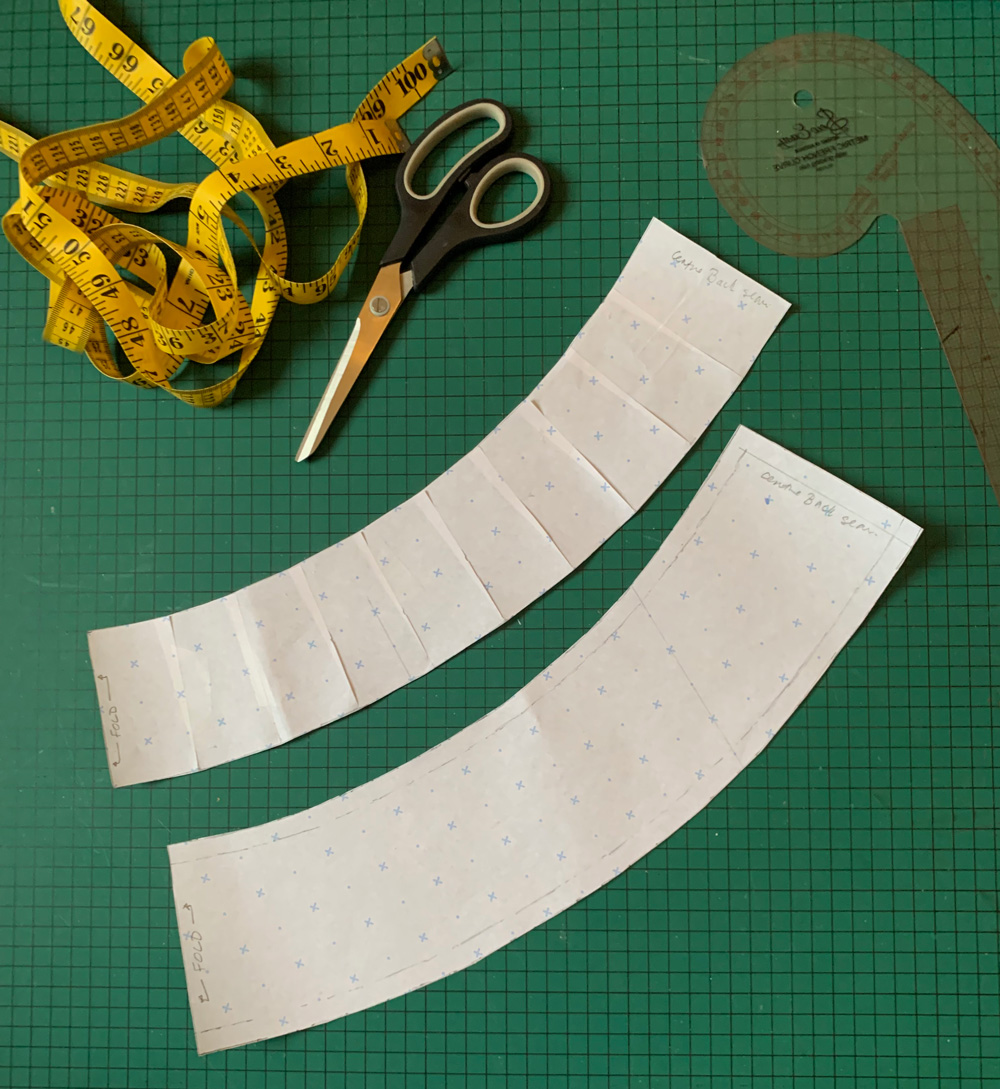
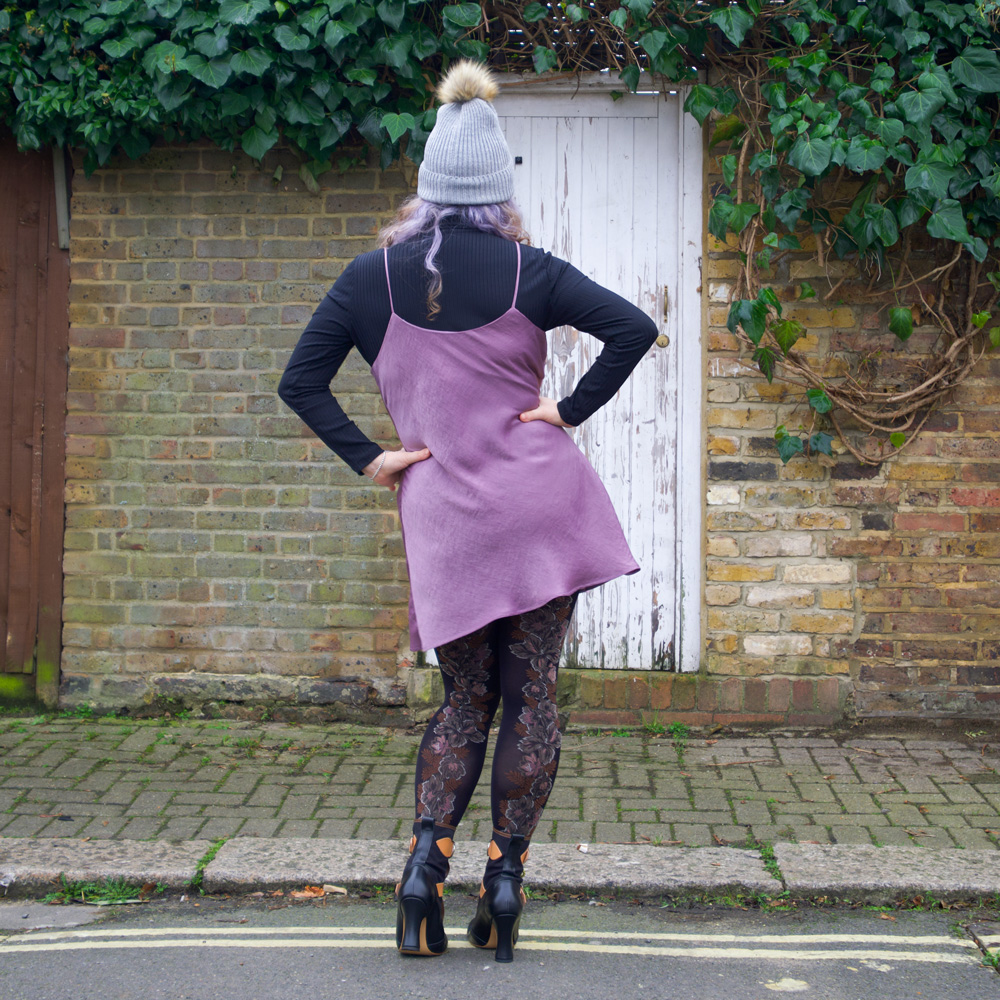
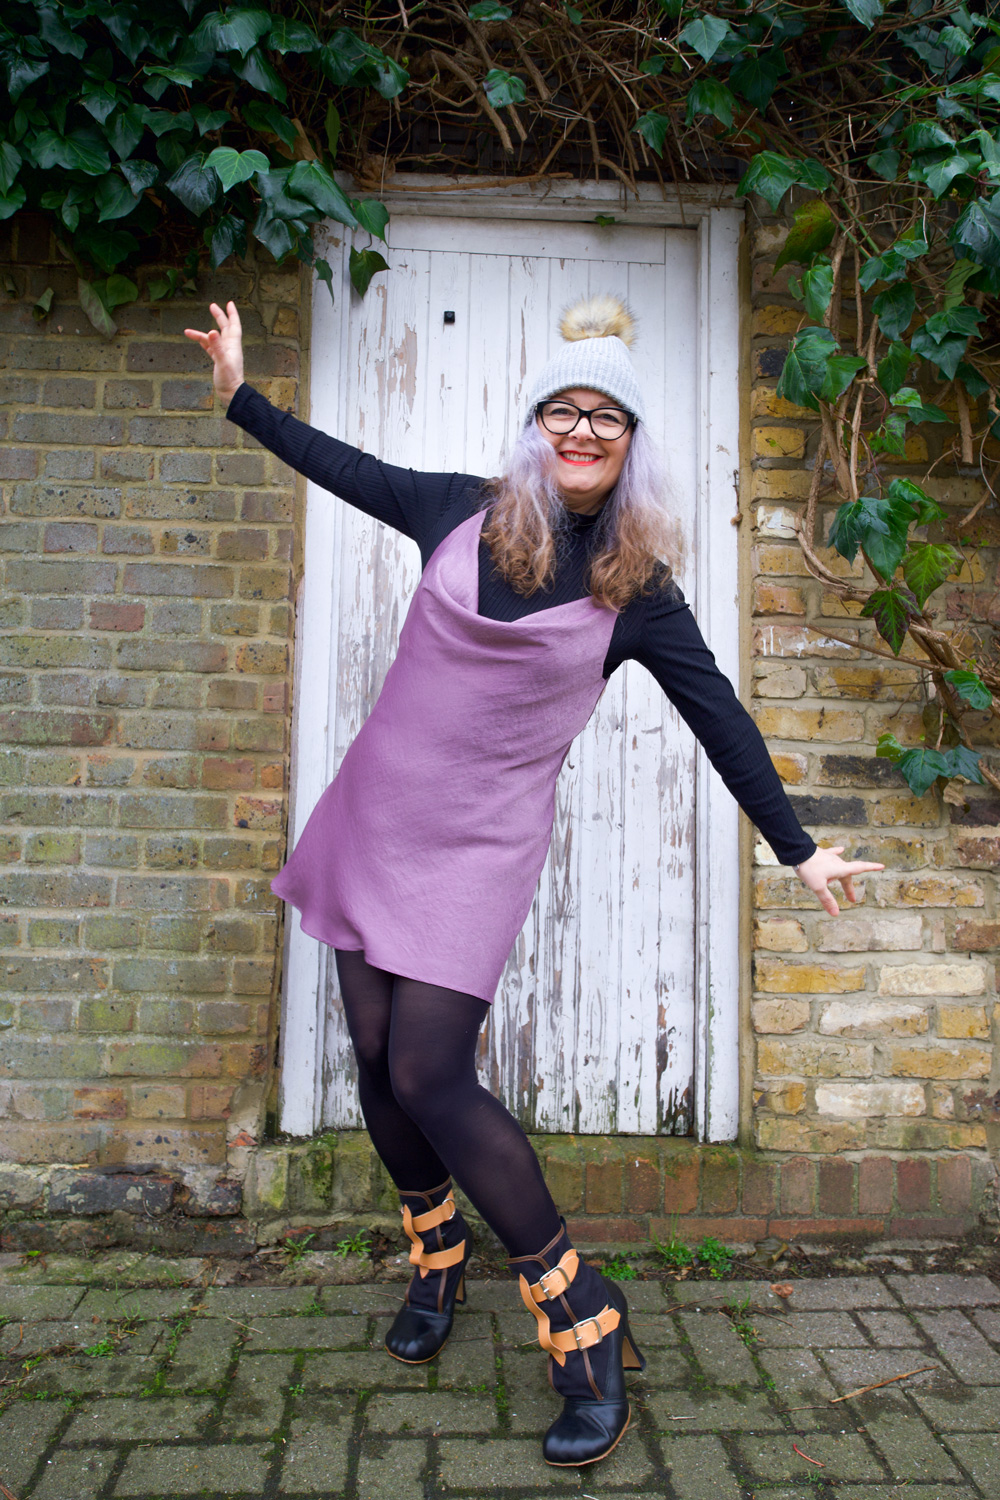
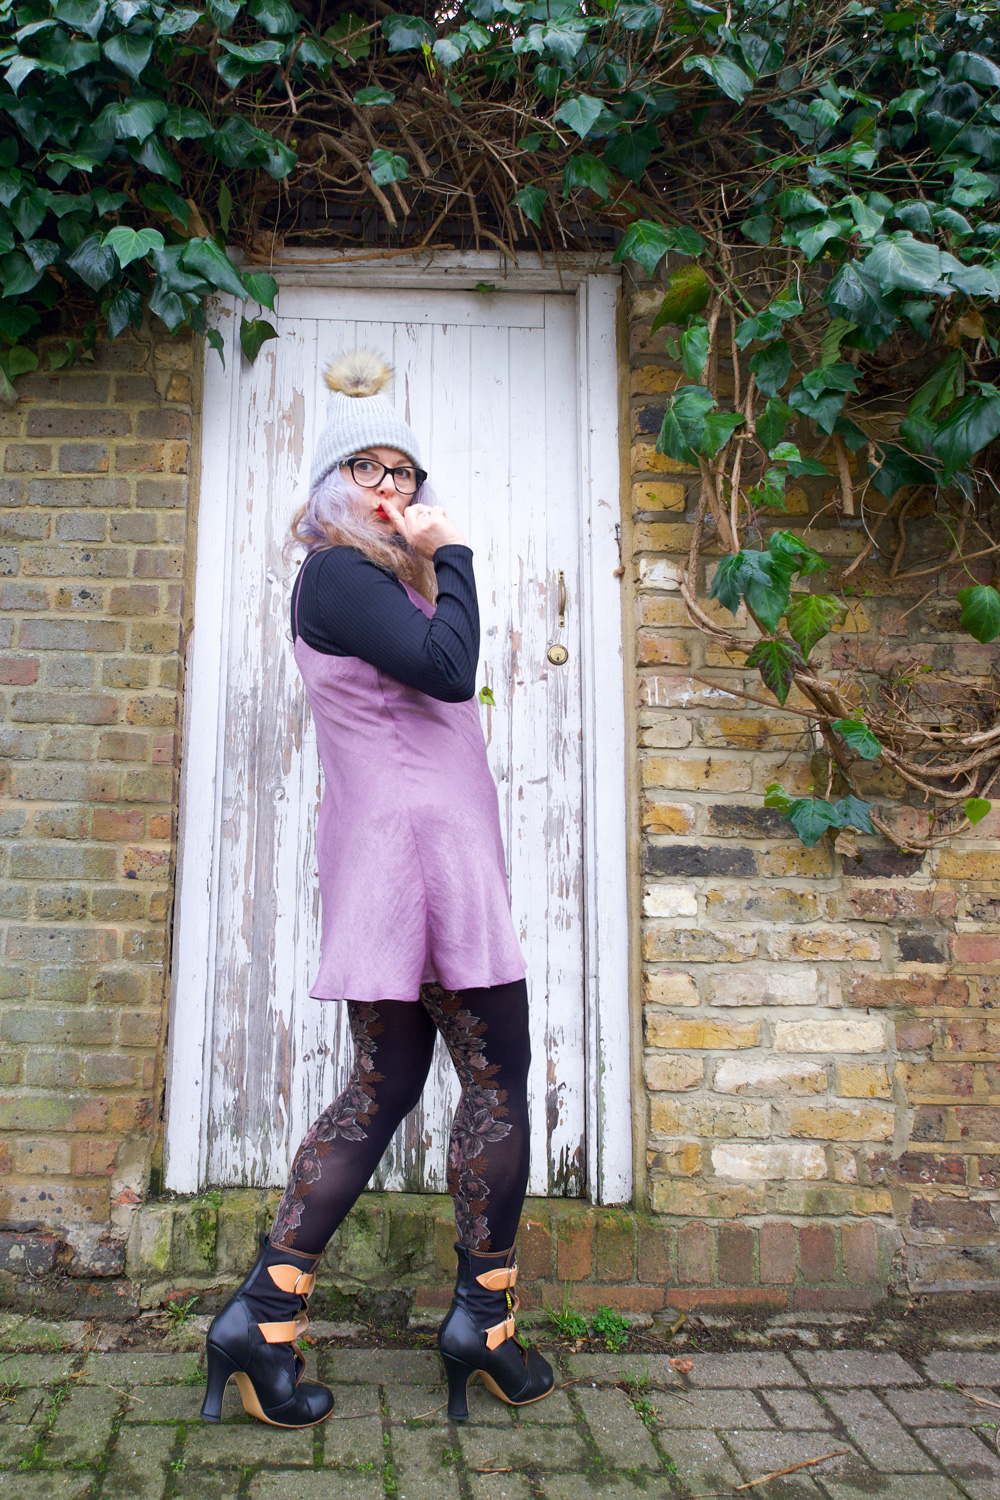
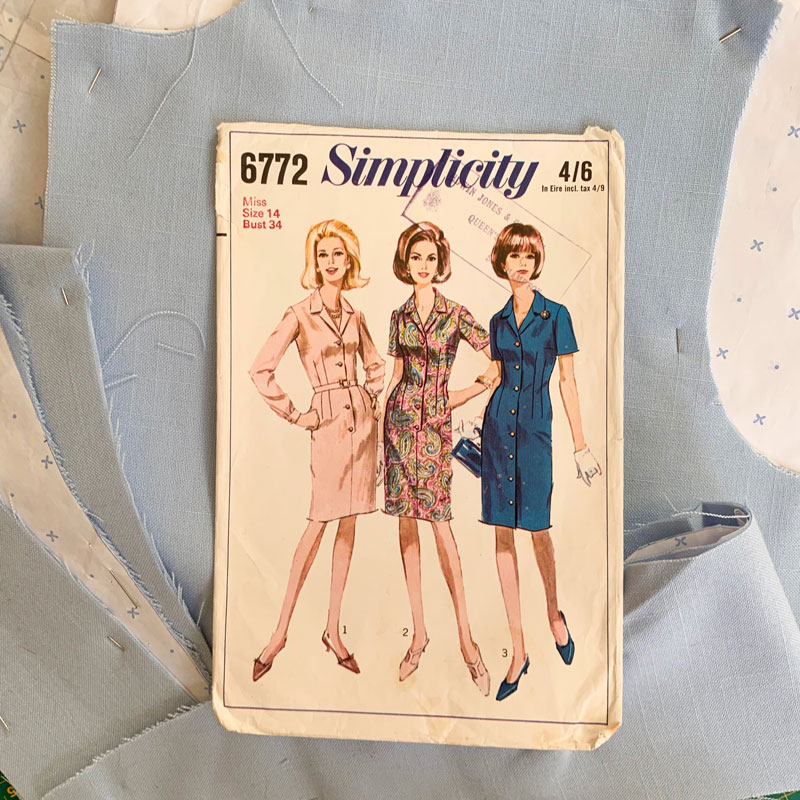
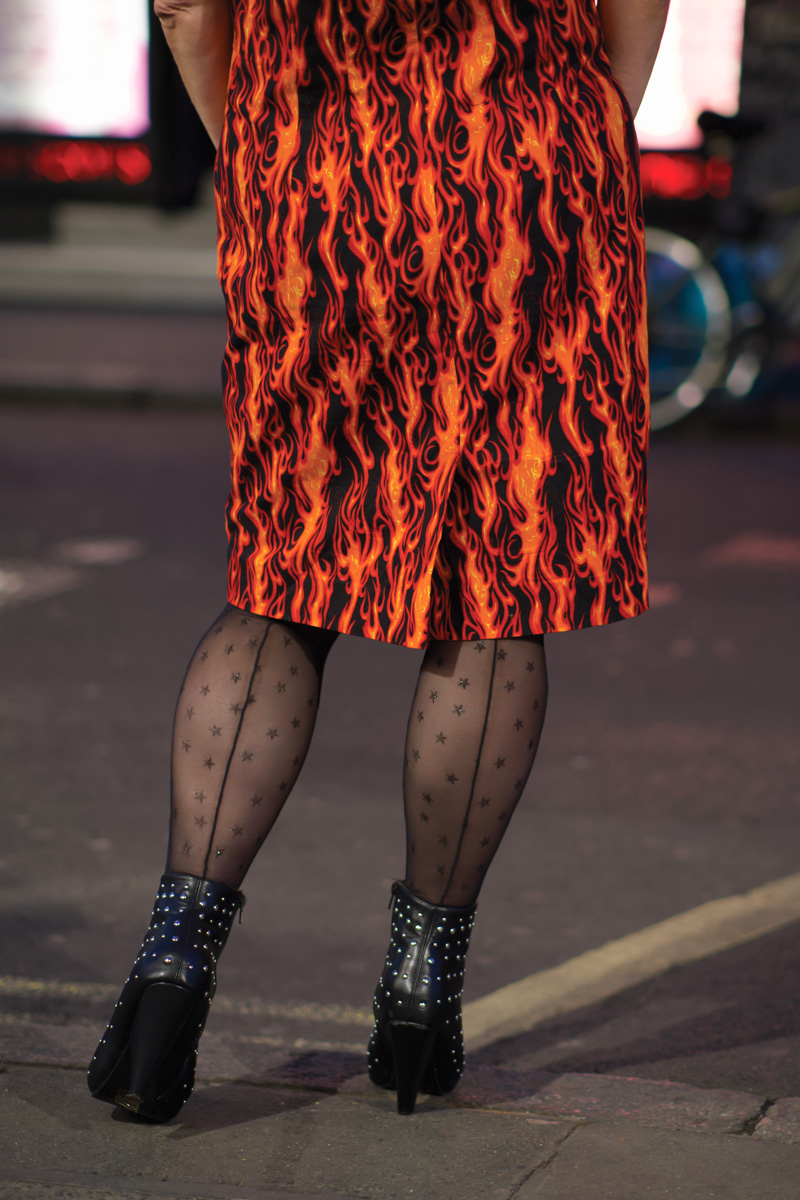
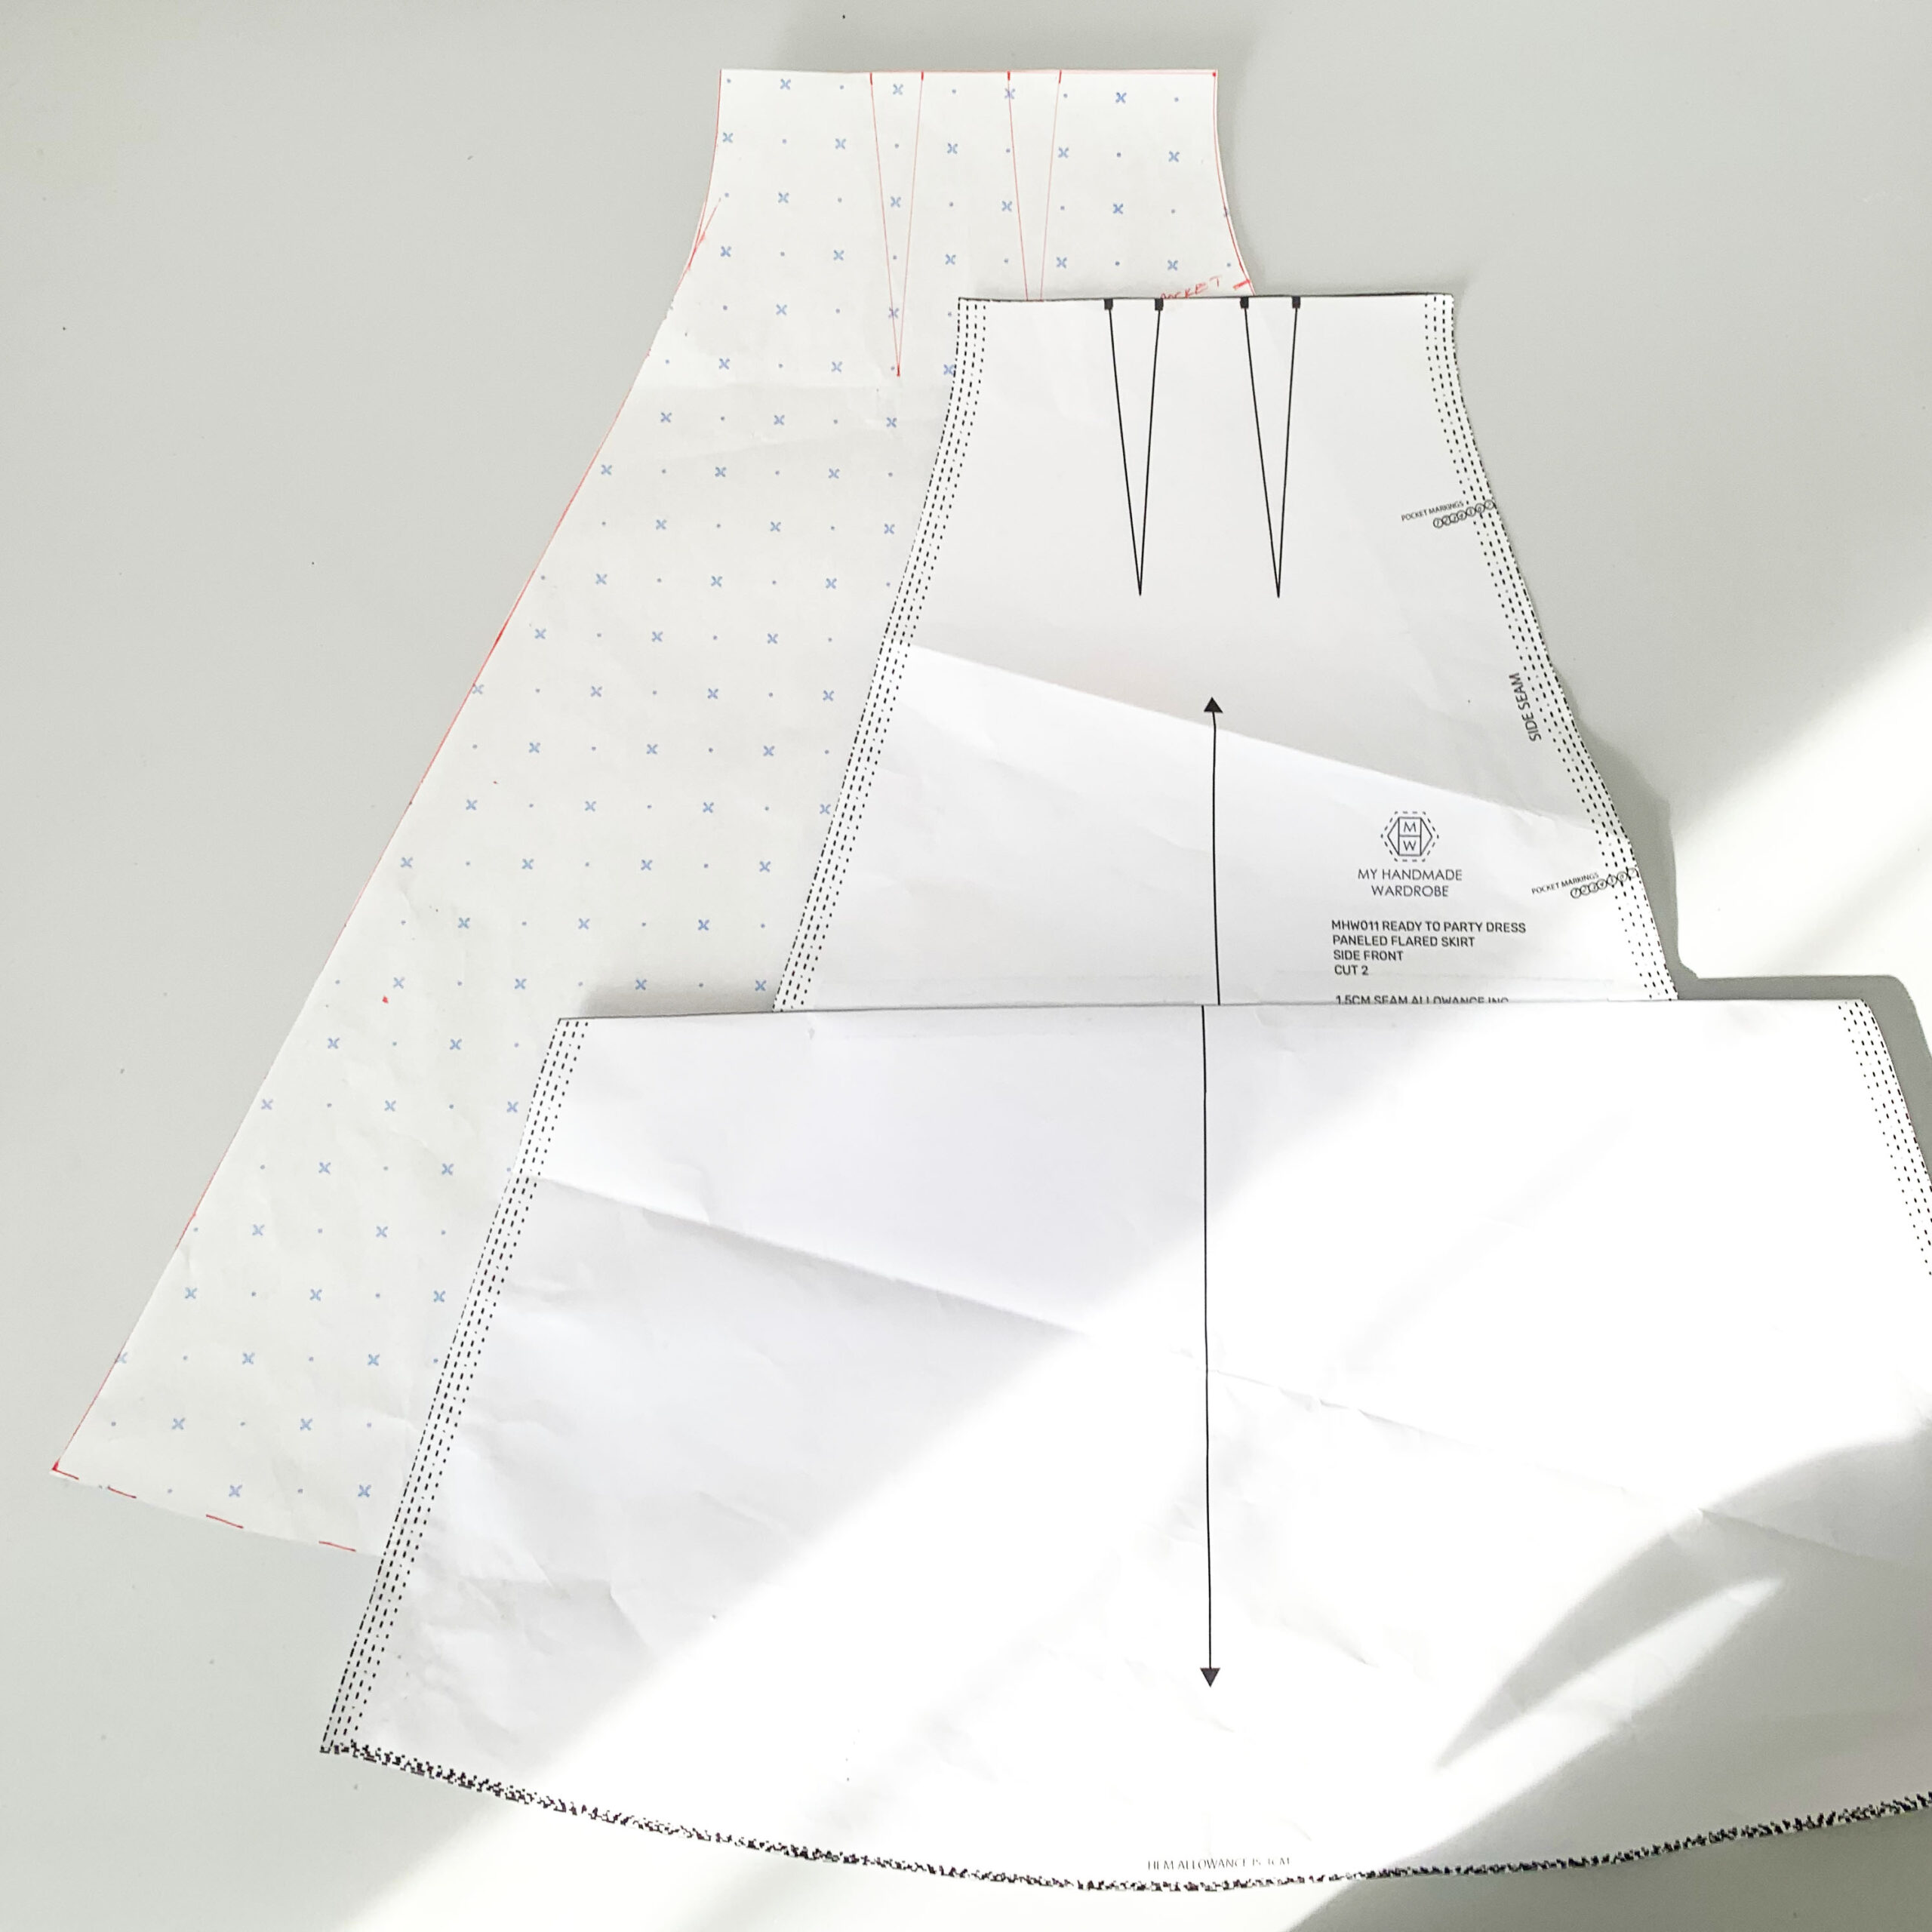
To make it more every-day, this dress was going to have to be substantially shortened for me. Before I go into more detail as to how I did this, I just want to add how interesting this skirt pattern is. It is made up of eight flared panels with a double set of darts on the side front and side back panels and the volume starts after the fitted section at the waist to create such a superb silhouette.

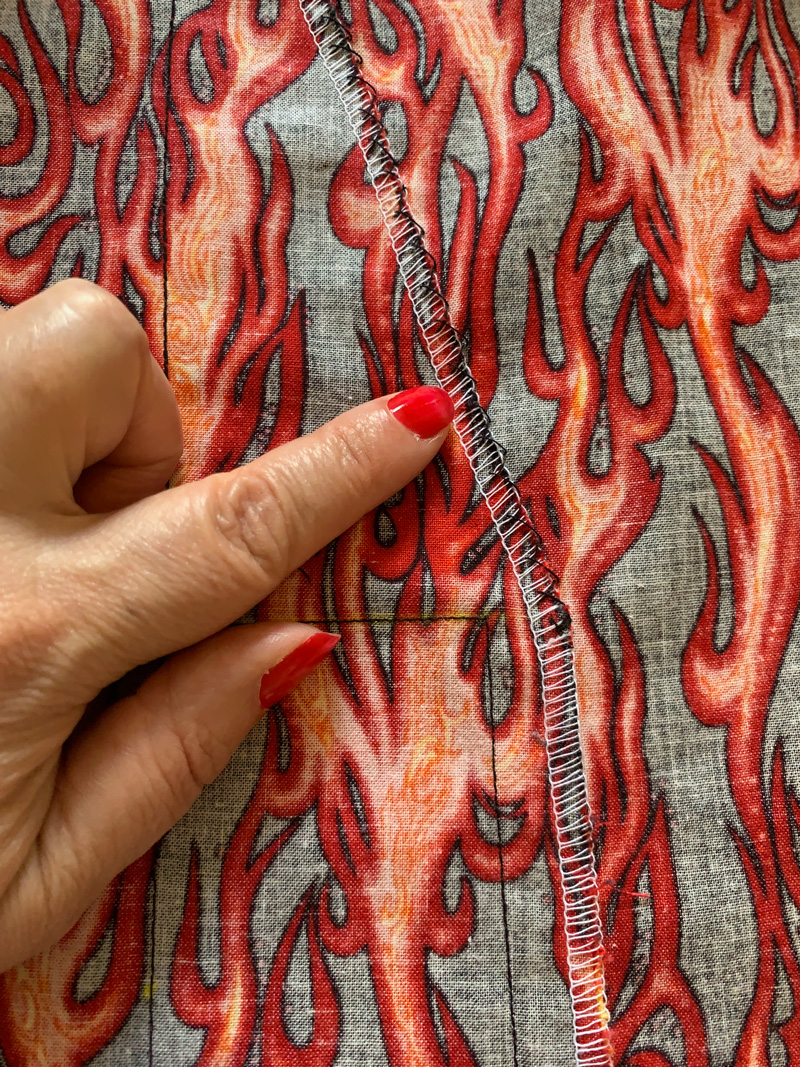
Each panel piece of the sewing pattern has a lengthen/shorten line which is super helpful as I really didn’t want to forego the amazing flare in the design. To be honest I wasn’t totally convinced I could remove a whole 9 inches without some sort of issue but hey, nothing ventured, nothing gained! As you can see there is quite a bit of a step when I folded up the excess. I sat and pondered a while and then convinced myself I just had to average out the difference to create the new pieces. So that’s exactly what I did. I traced the new piece and added the new side lines by drawing from the hem points to just below the waist shaping. And it worked!

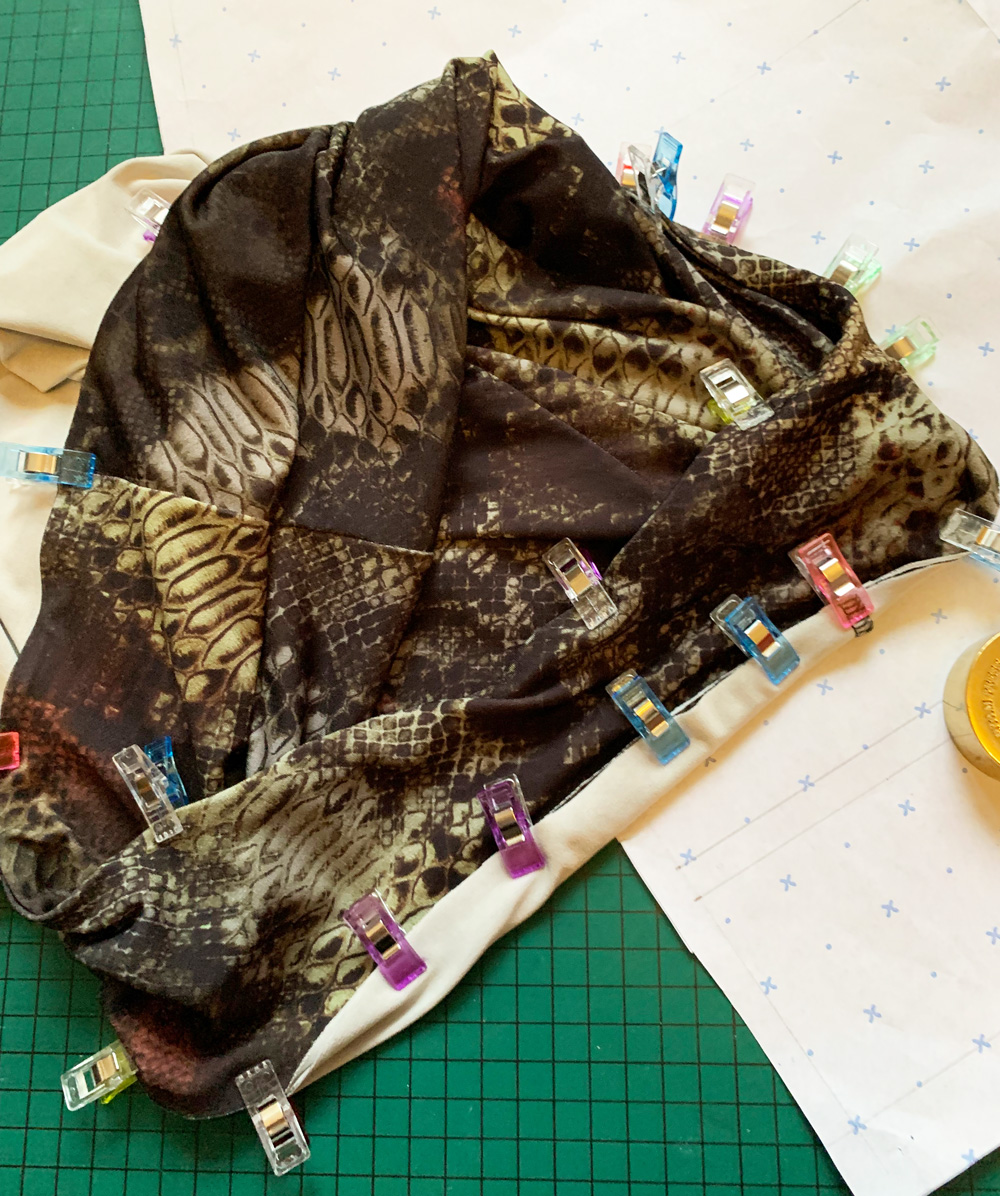
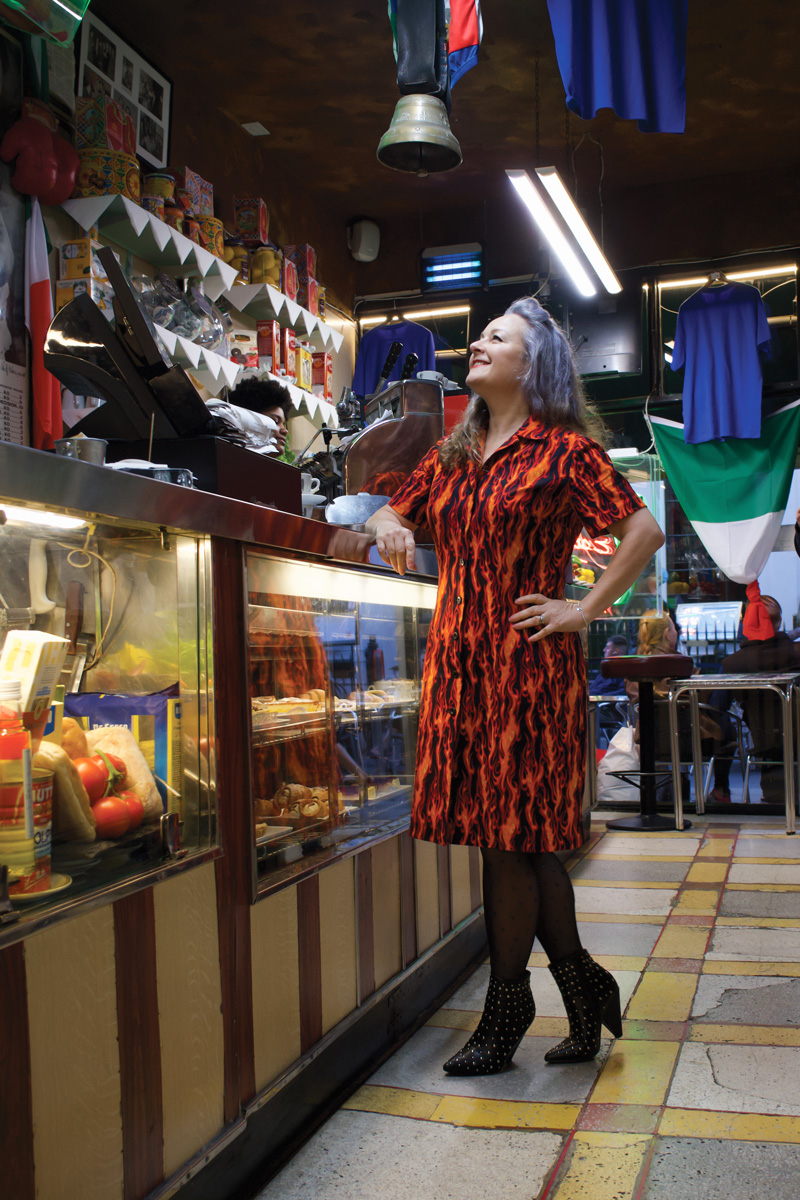
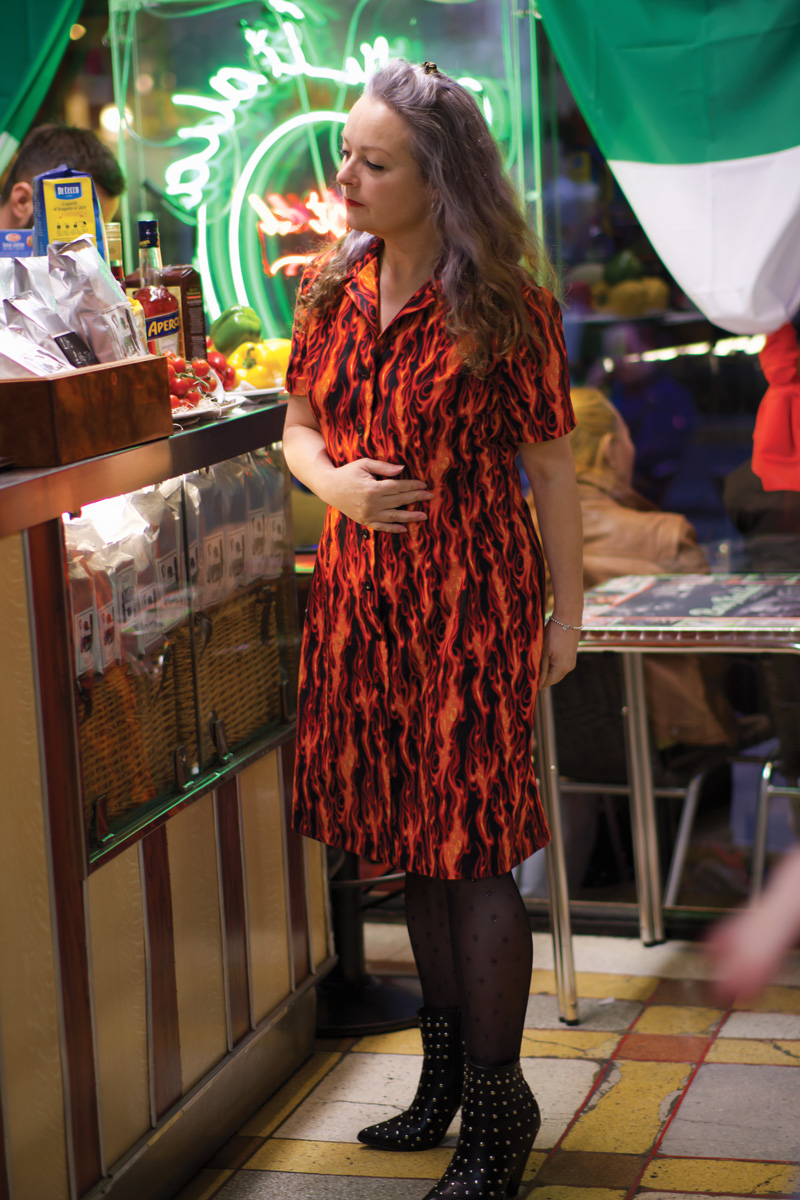
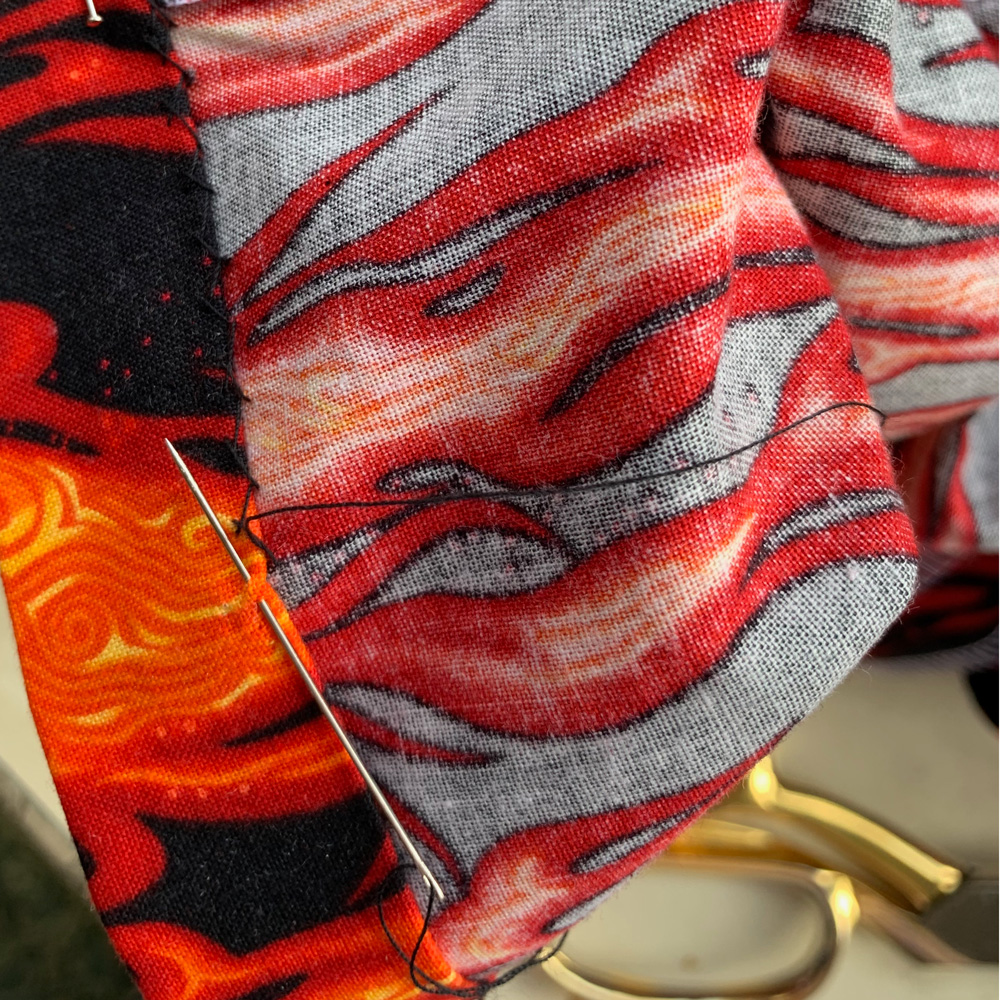
I took my time sewing the panels, being sure not to stretch out the bias seams of which there are many, and I’m sure the results were helped greatly by using this wonderfully soft and forgiving chambray fabric, also from Crafty Sew and So. It drapes so beautifully and seals the deal with my ‘every-day’ mission. 

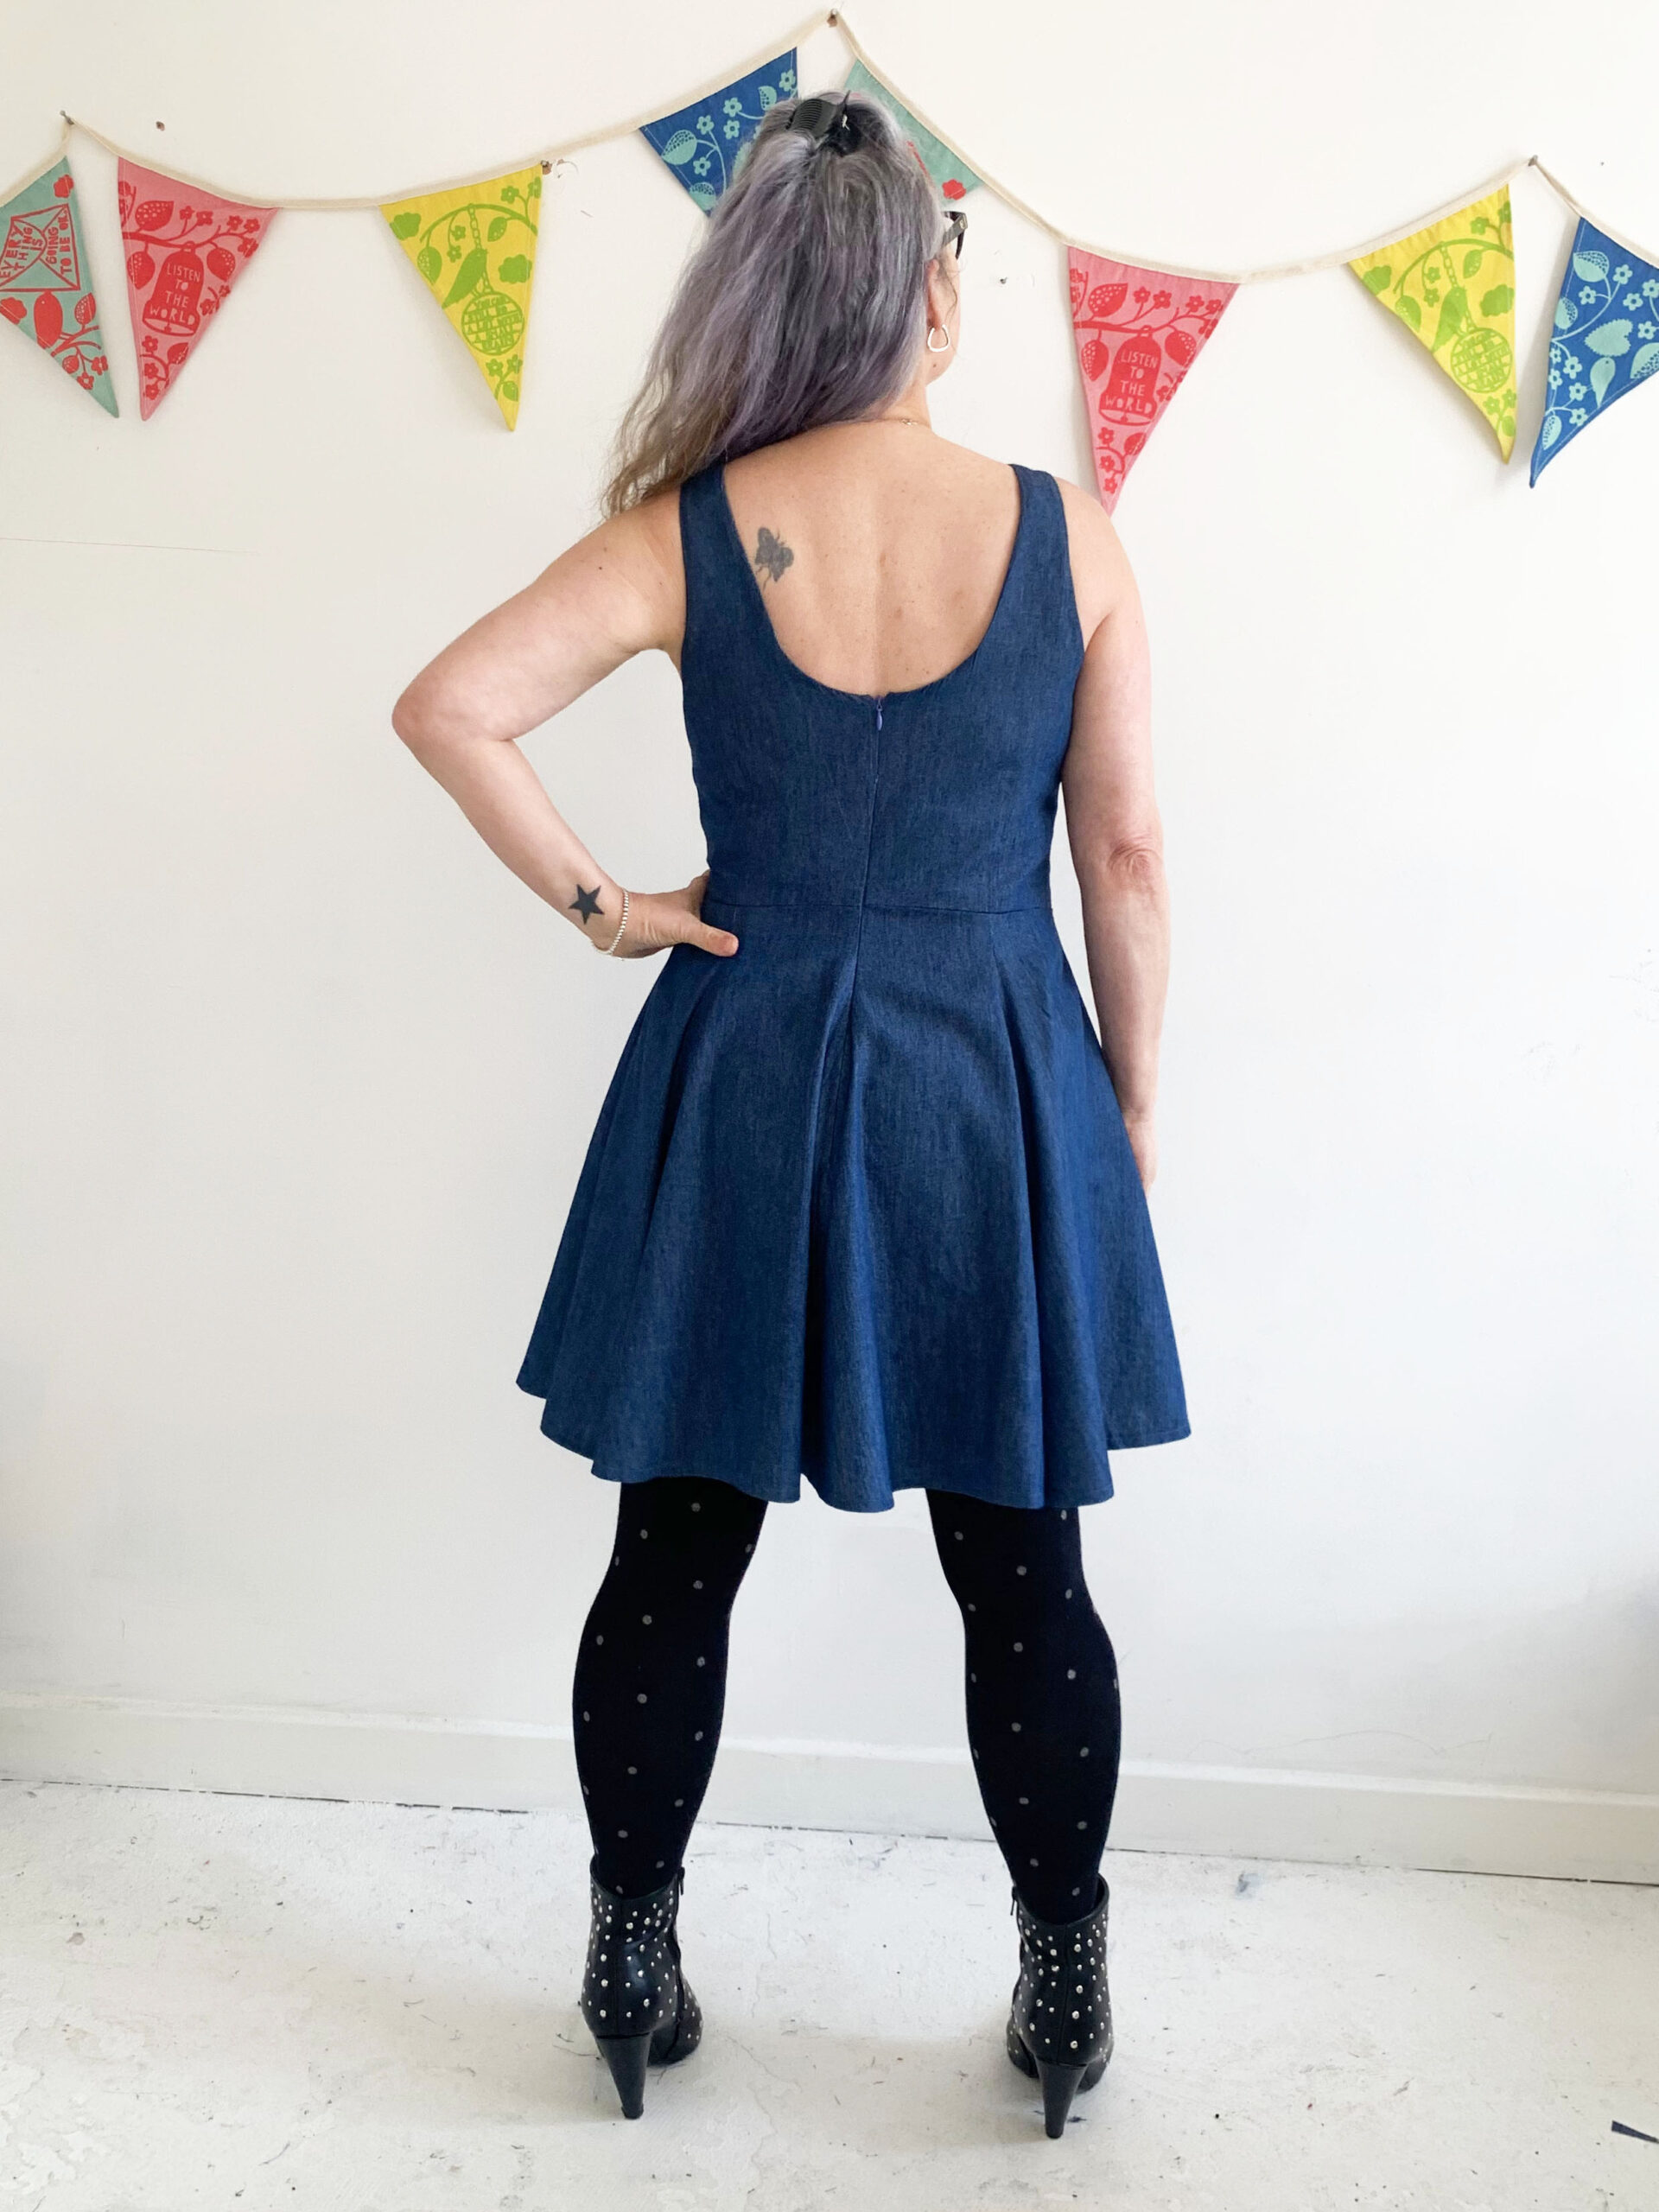
Because of potential bias behaviour, I did tack the sewn up skirt panels to my toile of the bodice while I sewed up the actual bodice. I felt it needed to hang a bit before hemming in case the hemline dropped unevenly and that proved to be a good idea. 

I cut a size 4 for the skirt and graduated down to a 3.5 for the bodice but next time I might just slither a bit more off to go from 3.5 to 3 as it is a bit roomier in the waist than I anticipated. That’s the beauty of having all the size lines to trace off!

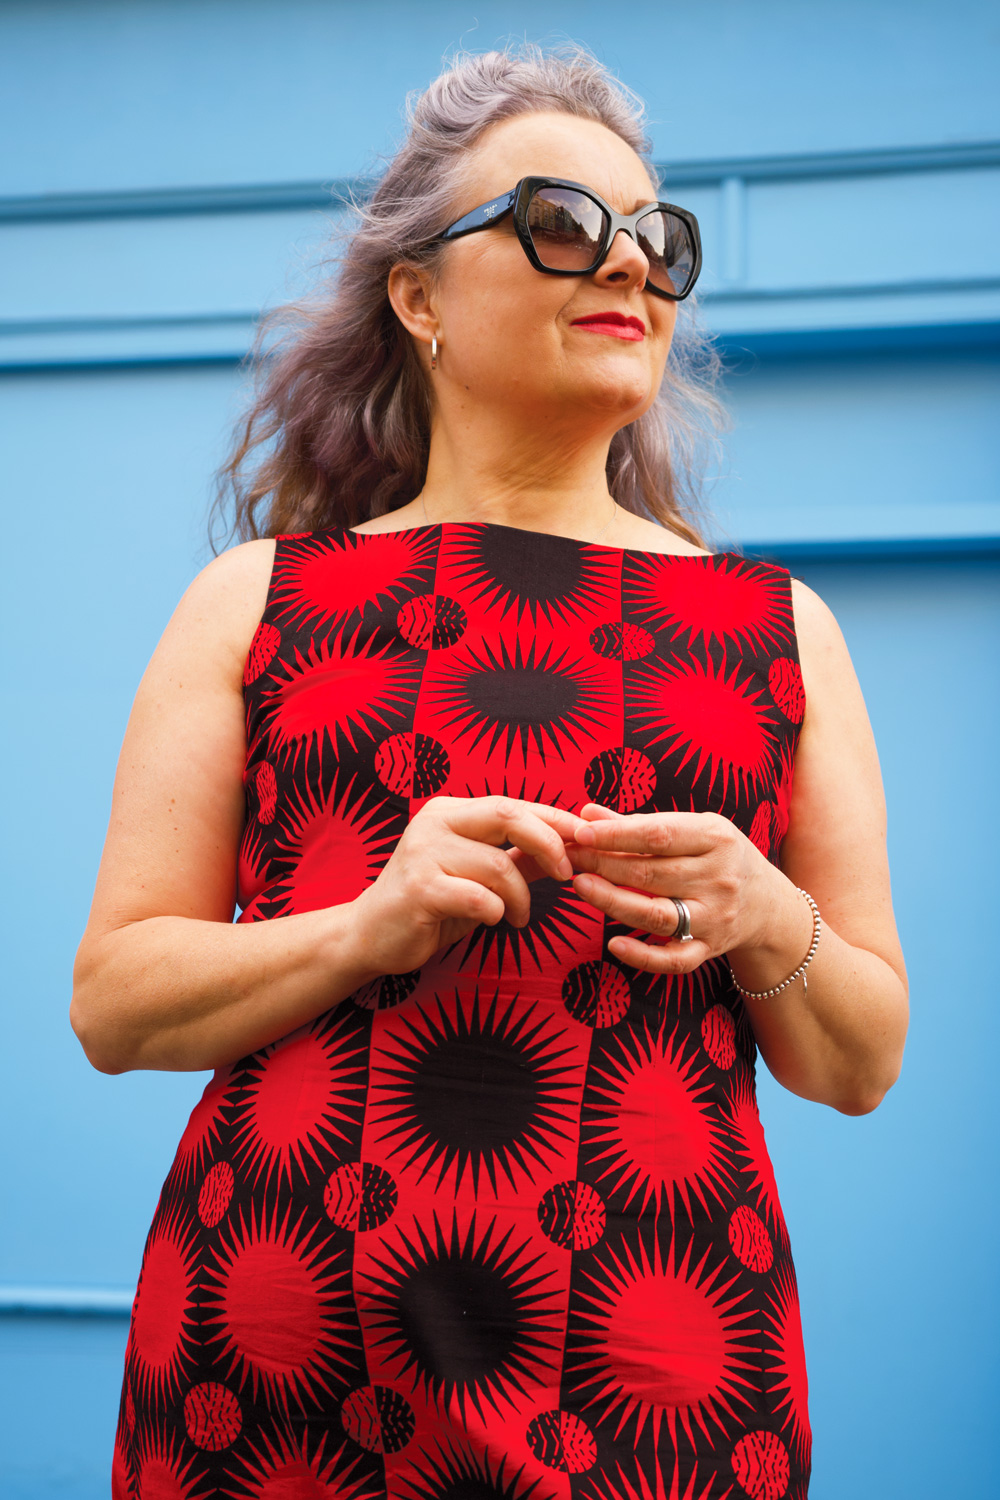
I was torn between choosing the sweetheart neckline and the round neckline of the bodice. And I was almost sold on sweetheart when I realized I could layer the round neckline version more readily with a t-shirt or turtleneck jumper underneath for a change of style and if it got chilly!

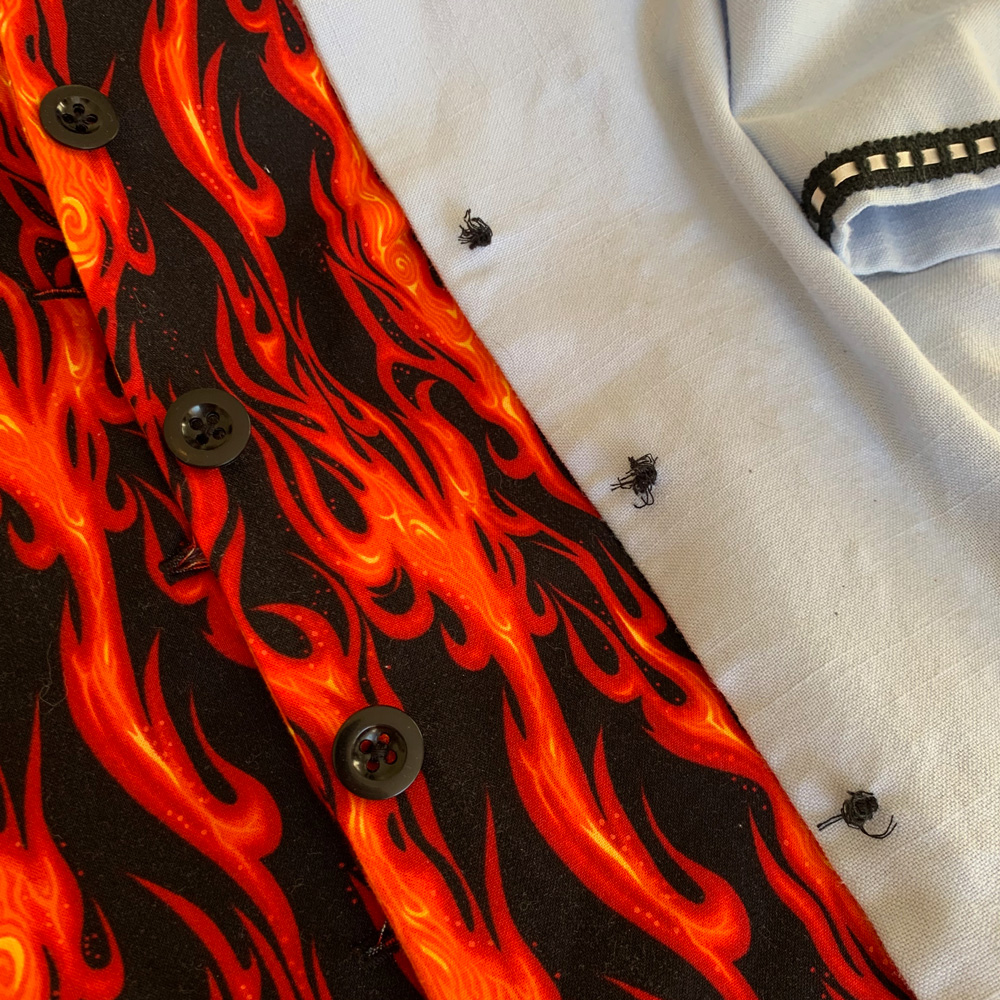
I love that its lined. In fact I love lining and the understitching process because it really does give a nice, neat finish.

Oh and I almost forgot to mention that it has pockets – lovely sized in-seam ones that get disguised in the drapes so you can stick anything you like in them with little chance of distorting the shape of the skirt!

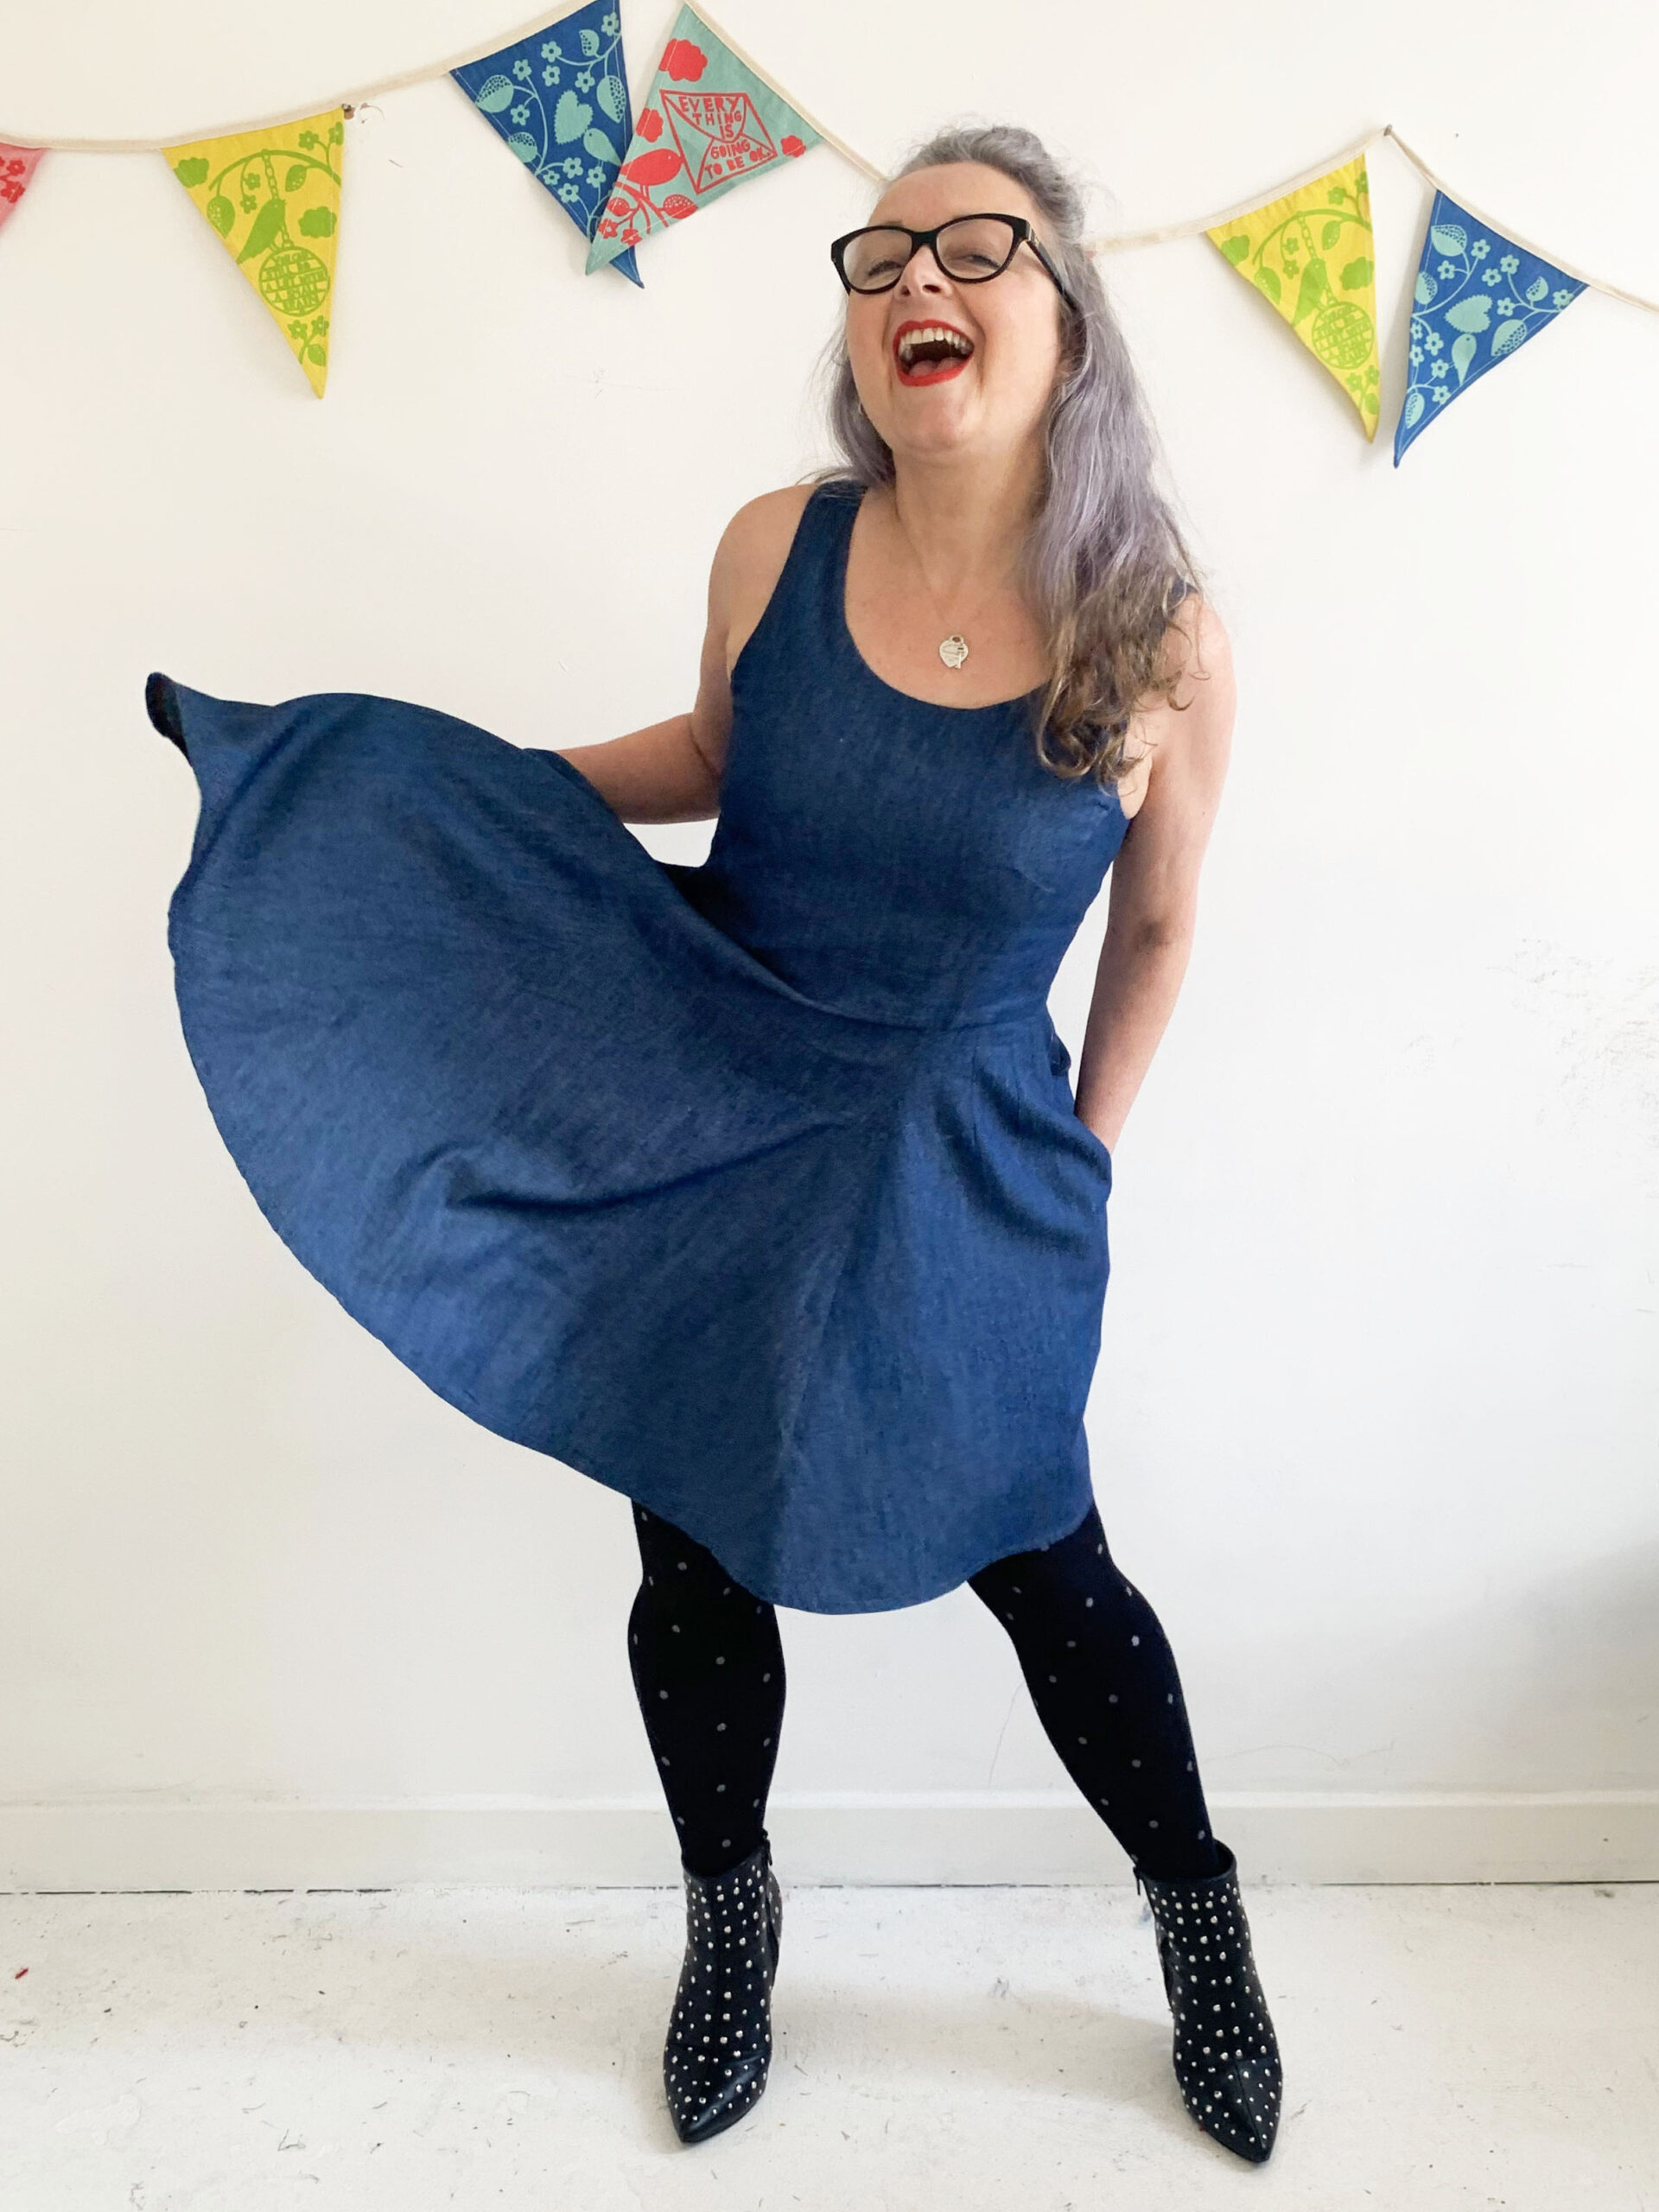
I loved making this dress, it was a real pleasure to sew. And I love wearing it – its comfortable, versatile, flirty and feels good. And I can totally recommend this pattern and fabric combo. Because every day should be a party, right?! 

Putting my self-drafted leggings to the test

Janene is posing sideways, standing on one leg with the other leg straight out and arms forward. She is wearing her snakeskin print leggings with high heel boots and a black rollneck top

I remember quite plainly saying I did not see the point in making my own activewear. Where’s the fun? It’s just boring and functional. And let’s face it, there are plenty more interesting and fun things to be sewing up!

But never say never! I did a rain-check on the RTW pieces I already own – after one pair pretty much disolved, despite various fixing attempts – and realised not one single pair of bottoms actually fit me properly. Mostly the rise is the problem but also the waist elasticity.

I spent the best part of an afternoon perusing patterns online. There are heaps! And I’m sure most of them would work a treat. But I would undoubtedly have had to make adjustments to said patterns and so I figured I may as well draft my own if it wasn’t going to work straight out the packet. 

I followed instructions from Winifred Aldrich’s Metric Pattern Cutting for Women’s Wear – a firm fave in the sewing community. And it didn’t take long at all to draft the one single basic pattern piece.

Flatlay of drafted leggings pattern piece, drafting tools, note book and pattern drafting book

In fact it took longer for me to decide how to finish the waistband!

I sewed up the leggings in a lightish weight very stretchy lycra. Took minutes on the overlocker with 4 threads. I didn’t even need to substitute stretch needles.

flatlay of partially finished leggings. Just awaiting the waistband.

A quick try-on confirmed the fit was OK apart from quite a lot of ease at the waist – the back waist in particular. I didn’t really clock the excess at the thigh at this point. I was poised to take the waist in, before making a casing and threading elastic through – that totally would have been the quickest waistband solution – but then I visualised some gathering at the waist where the elastic waistband would have cinched it all in. I didn’t like how it looked (in my head!). So I set about another solution.

I measured the depth of the waistband from one of my existing pairs (10cm) and then measured the circumference of the leggings, 10cm down from the natural waistband. I halved that measurement to make a rectangular pattern piece that would ultimately be cut on the fold of the fabric.

I marked top edge, fold and side seam on the pattern piece.

To avoid all the gathering at the waistline I marked 10 equidistant slash lines from top to bottom and closed up the top edge until the top now-curved edge measured approximately 80% of the bottom curve.

I then traced the now-curved rectancle onto another piece of paper to add 1cm seam allowance all round apart from the fold edge.

Flatlay of the drafted pattern pieces, one with and one without seam allowance, for the waistband. a tape measure and a pair of scissors are positioned next to the pattern pieces.

I pinned the pattern to the folded fabric and cut 2 fabric pieces. With each piece right sides together, stitched the short edges to make 2 circular bands.

I placed one band inside the other, right sides facing, and stitched along the top (inwardly curved) edge.

I remeasured the top seamed edge of the waistband and cut some narrow (7mm) elastic to that same measurement with no overlap allowed so it would be a wee bit tighter still.

I then overlapped the elastic by 1cm and sewed the ends together to form a circle. I made quarter point markings along the finished top edge of the waistband. And with corresponding marks made on the elastic, I pinned and lightly stretched to fit as I zigzagged the elastic to the seam, making sure the edge of the elastic didn’t go past the actual seam line.

I trimmed 9cm down from the top of the natural waistline of the leggings (to leave 1cm seam allowance) ready to attach the waistband.

Before attaching I gave a quick press to the waistband, right sides out, to shrink the elastic a bit and make sure both pieces were aligned accurately. Then I attached the bottom two edges of the waistband to the top of the right side of the leggings (right sides together). I aligned the seam of the waistband with the centre back seam and clipped the band all round the top of the leggings. There was no need to stretch to fit this time because both measurements were the same. The clips worked a treat by the way, because the pins kept catching on the fabric.

The waistband of the leggings is clipped in position with some colourful plastic clips.

A quick zoom round on the overlocker, and it was clear that all that care taken for accurate positioning paid off.

Now I wouldn’t normally volunteer a photo of my rear end, but I’m so chuffed how those two centre back seams lined up and how nicely that deep waistband hugs my hips and dips into the small of my back!

View of Janene's bottom! She is holding up her top a few inches to reveal the back of the waistband and show how it fits very snugly.

The last thing to do was hemming. Believe it or not I found this bit the most tricky! With everything else going to plan and so quickly, I decided to get the twin needle out and do it properly rather than employ my usual lazy zigzag treatment.

I dug out my barely used Millward stretch twin needle and rehearsed a twin stretch stitch on a scrap piece of the fabric. Took a while to perfect before I sewed for real. But then it messed up before I finished the first round. Sooo annoying! I dug out the manual to see if I’d set it up wrongly and the only thing I did was not to use the needle supplied with the machine, doh!

So I changed up the stretch twin for a regular Brother twin needle and tried again on some scraps. Again, seemed ok until I went to sew the real hem and the same thing happened again. It just got jammed and sucked into the feed dog with the bobbin threads all tangled under. I unpicked and managed to re-sew over the last bit but still, sooo annoying!! I’m totally sticking to zig-zagging next time!

Side view of Janene wearing her handmade snakeskin print leggings and high heel boots. Her head is cropped out of the image.

First test of the finished leggings was at my Zumba class. And I was so chuffed that they didn’t end up round my ankles. However I could feel how loose they were from the knee up the inner thigh and I really didn’t like the wobble factor as I was dancing! I’m so much more used to sturdier fabrics holding me in place!

I’m going to take them in but decided to shoot them as general day wear with heels as inspired by @paulalovestosew! They are entirely fine as… well, tights really!

Front view of Janene wearing her handmade snakeskin leggings. Her feet are slightly apart. There are some small wrinkles on the knees.

And now I am on the hunt for some heavier stretch fabric. Thank you to everyone who have given some brilliant suggestions. I now appear to have too much choice!!

From not wanting to ‘waste time’ making my own, I can see how making these will quickly become addictive. So… absolutely… never say never!

Image of Janene doing a high kick in her handmade snakeskin leggings. She is also wearing high heel boots, a black rollneck top and a pair of black rimmed glasses.

Posed photos by Daniel James

Working on the bias: My first Sicily slip dress

Janene is wearing her handmade Sicily slip dress and is posing with one hand on hip in front on a white door surrounded by brickwork and ivy overhead. She is wearing a self-drafted black turtleneck top, grey bobble hat, black rimmed glasses and Vivienne Westwood Bondage Boots.

I’ve been admiring all the Masin Sicily slips since I saw the very first one, with the same thought in mind each time ~ could I pull it off?!

It’s a very clingy nowhere-to-hide kinda dress and I’ve never been ok with putting my belly out there but I figured I’d never know the level of exposure until I tried!

But why the lilac Janene? Haha, I thought I’d get in there before anyone else does! Because to be fair I don’t often break out of my red and black palette. (I’ll be running back to safety after this post, don’t you chicken curry about that!)

Janene is wearing her handmade Sicily slip dress and is posing with both hands on hips in front on a white door surrounded by brickwork and ivy overhead. She is wearing a self-drafted black turtleneck top, grey bobble hat, black rimmed glasses and Vivienne Westwood Bondage Boots.

Truth be told there was a lilac lovers party going on and fomo got the better of me! Hosted by Cut One Pair and Pigeon Wishes and to celebrate the collaborative button collection this is the second time in the space of a few weeks that an Instagram challenge has given me a push out of my comfy zone. My first being my now favourite jumper!

I have never sewn a bias cut dress. Save a bias cut skirt section of the BHL Jenna dress which I just realized I never blogged (doh!). And I can’t actually remember the last time I sewed a cowl neckline so I was really looking forward to (read, super apprehensive about) making this dress!

Back vew of Janene wearing her handmade Sicily slip dress. She is posing with both hands on hips in front on a white door surrounded by brickwork and ivy overhead. She is wearing a self-drafted black turtleneck top, grey bobble hat and Vivienne Westwood Bondage Boots.

Now for clarity (and first note to self) I have to say that putting together 50-odd sheets of A4 pattern pieces nearly drove me over the edge. And not for the first time. I don’t know why I put myself through this. Rewatching The Crown while I was doing it eased a bit of the pain but I so don’t want to do that again for a very long time!! Took me an age to get back up off the floor, if nothing else!

The next issue I had was cutting it out. I invested in an A0 cutting mat (Affiliate link) some time ago. It was quite pricey but equally worth every penny. I quickly learned that cutting slippery fabrics with scissors was not the best way forward the first time I tried! So I had both mat and rotary cutter lined up but still, working on the floor was a bit of a nightmare. I had to roll the rug back on the living room floor to pin the pattern to fabric and then roughly cut around each piece so they would fit on the mat to then be cut out more accurately.

Janene is wearing her handmade Sicily slip dress and is posing with arms outstretched in front of a white door surrounded by brickwork and ivy overhead. She is wearing a self-drafted black turtleneck top, grey bobble hat, black rimmed glasses and Vivienne Westwood Bondage Boots.

It was better than I expected but the pinning and shifting of pieces was a little detrimental, I’m sure, and I’d have much rather have used pattern weights and cut on a large sturdy eye-level purpose built cutting table. Excuse me while I dream the sewing studio dream… again!

This is the first time I have used a sewing pattern by Masin and I have to say I found the instructions beautifully laid out, concise and super helpful. There’s a clear explanation of bias grain behaviour and how to pick the correct size. Having said that I still managed to pick a size too big because my hips are bigger proportionally than my bust (so I made the wrong choice instead of grading). And I think that is why my cowl neckline appears rather more dramatic than most. I’m still deciding if I’m comfortable with it. It’s perfectly fine layered with an undergarment but I’ve got a whole pack of tit tape at the ready for when I dare to wear it on its own!

waist up image of Janene, wearing Masin Sicily slip dress. She is holding 3 lilac colour carnations with both hands to the bottom of the frame. She is wearing black rimmed glasses and her head is back, laughing.

I was surprised that this view A with the skinny straps was suggested as the easiest version to sew. It’s taken me years to master those spaghetti rouleaus! But I have to say now that I’ve grasped it, I actually quite enjoy making them. I recently posted a little tutorial here if you are interested:  Rouleau Loops Made Simple

There are very few pattern pieces for view A – like front, front facing, back with facing, and strap – and no closures; so the rest of the instructions were super plain sailing BUT… and quite a big BUT…

I think I made a boo boo by stay stitching the bias side edges with a straight stitch. I’m not entirely sure because I could have stretched out the seams when it hung over the edge of the table as I sewed, or perhaps as I was sewing the actual seams. I did use a small wide zigzag stitch to French seam the sides but of course that was like closing the stable door after the horse has bolted! While the dress is hanging, the bias cut fabric is going to stretch more but the stay-stitching is going to… well, STAY! (Second note to self: try zigzag stay-stitching too!)

Side view of Janene wearing her handmade Sicily slip dress and is posing with right index finger on lip in front on a white door surrounded by brickwork and ivy overhead. She is wearing a self-drafted black turtleneck top, grey bobble hat, black rimmed glasses and Vivienne Westwood Bondage Boots.

All was not lost though. The worst of the puckering was near to the hemline and I had been mulling over a choice of midi and mini length at the start. So decision was made when I realised I could crop off the worst areas by going for a mini length!

I’m pretty pleased with my hemming too. I sewed a quarter inch away from the cut line and pressed as instructed and then sewed close to the second fold. Even though this velvet touch poly is totally synthetic I was amazed that it pressed so beautifully.

Detail of small hem on dress. Cropped image of hands holding out skirt to sides

Once again I have learned new things. Testing things but valuable lessons all the same and nowhere near testing enough to put me off trying again – the absolute best thing about sewing adventures!

All in all I am delighted with the outcome and I will be revisiting this pattern again. Leopard print satin is already prewashed and sitting patiently atop the stash! So if anyone has any thoughts about stay-stitching bias dress side seams before I crack on, please let me know in the comments below. And I will love you forever!

Janene is wearing her handmade Sicily slip dress and is skipping towards the lens in front on a white door surrounded by brickwork and ivy overhead. She is wearing a self-drafted black turtleneck top, grey bobble hat, black rimmed glasses and Vivienne Westwood Bondage Boots.

Lovely photos by Daniel James Photographic

Rouleau loops made simple

Rouleau Loops made simple. Title image

I struggled to make a satisfactory rouleau loop for years and dodged any sewing patterns that involved spaghetti straps, button loops, ties and such decoration. Determined to get the technique nailed for my Vogue Liberty silk dressing gown, I rehearsed the following method with great results. I hope this works for you too!

STEP 1: First make a paper template (or you can mark directly onto the fabric.) Your strips should measure 2.5cm/1” wide and however long you need. 

Cut the strip(s) on the bias grain.
  • STEP 1: First make a paper template (or you can mark directly onto the fabric.) Your strips should measure 2.5cm/1” wide and however long you need. 

Cut the strip(s) on the bias grain.

STEP 2: With right sides together, fold your strips in half length-wise and pin in position. Even if you are not using slipery fabric, the bias strips will have a will of their own!
  • STEP 2: With right sides together, fold your strips in half length-wise and pin in position. Even if you are not using slippery fabric, the bias strips will have a will of their own!
STEP 3: Sew a quarter inch/6mm seam along the pinned edge, removing pins and stretching the fabric slightly as you sew.

TIP: start sewing a little way in from the edge so the fabric doesn’t get chewed up by the feed dog (fig 1) Sew to end and then turn your work around, working over the last couple of stitches and sew to end. (fig 2)

Leave a long tail of thread at the end (about 10cm/4”)
  • STEP 3: Sew a quarter inch/6mm seam along the pinned edge, removing pins and stretching the fabric slightly as you sew.

TIP: start sewing a little way in from the edge so the fabric doesn’t get chewed up by the feed dog (fig 1) Sew to end and then turn your work around, working over the last couple of stitches and sew to end. (fig 2)

Leave a long tail of thread at the end (about 10cm/4”)

STEP 4: Trim your seam, close to the stitching line.

Tie the long tails of thread to the eye of a longish needle with a big eye or a bodkin and push up through the tube – eye first – to turn right side out. Cut the threads from the needle.

And there you have it . . .
Rouleau loops made simple!
  • STEP 4: Trim your seam, close to the stitching line.

Tie the long tails of thread to the eye of a longish needle with a big eye or a bodkin and push up through the tube – eye first – to turn right side out. Cut the threads from the needle.

And there you have it . . . Rouleau loops made simple!

Do let me know if you found the layout of these instructions helpful. I sometimes struggle with photographed instructions and I find illustrated steps are easier to follow but that might just be me!

An ooobop original jumper for all reasons!

I like that there’s never a strict order of process. Often I pick a pattern and go looking for the right fabric. Sometimes the other way round. Driven by need or pure desire but in this case it got changed up a bit more.

Diane from @Dreamcutsew was kindly giving away some fabric on Instagram and I just couldn’t pass up her wonderful piece of cable knit jersey. I didn’t have a Scooby what I was going to do with it – I didn’t even know this kind of fabric existed till then!

I considered a cushion cover, a hat, some gloves – even some slippers! (I still have a small piece left so this could still be an option) But it sat for sometime, perched on the top of my own stash until I had a flash of inspiration. And then it came – in the shape of a hashtag challenge: #magamsewalong (Make a Garment a Month) hosted by @suestoney and @sewing_in_spain. This month the theme #naturalnovember was set by guest host @gigi_made_it, and that really got the ball rolling.

I loved how free-range the brief was;

☑️ Make something from a natural fibre
Now I’m pretty sure there wasn’t a speck of natural fibre in that cable knit but I did have a raggedy moth-eaten merino wool jumper which met its demise in an accidental hot wash. I’ve no idea why I kept it but I’m jolly glad I did because I decided to add some black detail. I generally stick to the safety of any colour palette that involves black!

☑️ Choose a make reflecting the weather and rhythms of the season where you live
The weather was definitely a factor in my need for a jumper. I don’t have nearly enough and I can never find any I like that I can actually afford!

☑️ Make something in a nature-inspired print
I figured stars are pretty nature-inspired, aren’t they? And an appliqué is an acceptable swap out for a print.

☑️ Use earth-friendly, sustainable materials in your make
So the main fabric was a leftover piece from another sewist, the appliquéd bits were upcycled from an old jumper. The gold thread was a few leftover strands from a previous project and the only additional notion was the cuffing/ribbing that I bought from Minerva.com

☑️ Make something that totally expresses your natural true self, unconstrained by cultural norms or trends
I’ve been so wanting to make something that does just that. It harks back to my 80s days where I was probably the most experimental with my clothing. Big batwings and balloon skirts the lot! I actually had puffball shorts too!

☑️ A make that occurs without (much) effort. As always, interpret creatively and be natural

I freestyled the pattern. Based on a RTW jumper I already own and simplified further. No shaping for armholes and rectangles for sleeves gathered in at the cuff. That meant less waste too! I shaped the shoulders slightly and cut a V neck but the back piece is fundamentally a rectangle also.

The project began with a very rough sketch! Please do not judge my Adobe Illustrator skills on this sketch alone – I might never work again!

Once the main pieces were cut out, I began by stabilising the shoulder seams. Even though it was going to have a relaxed drop shoulder I still didn’t want it to stretch out. After sewing the front to the back along the shoulders I added the cuffing along the neckline. Incidentally I used a wide shallow zigzag stitch on my regular machine throughout and then overlocked the edges for a smaller neater finished edge.

To make the appliqué shapes I first fused some doublesided fusible stabilizer to the black jumper pieces (sans moth holes) and then cut the shapes. I ironed the pieces to the front of the jumper and to the sleeves while they were flat. I then handstitched all round with a tiny blanket stitch. I’m still not entirely sure how the points of the stars will hold up over time but we’ll see. The big gold stitches are purely for decoration and to complement the glittery gold stripe of the ribbing.

When all the pieces were in place, I closed up the underarm and side seams. I gathered the wrists of the sleeves by hand with reasonably big stitches and then stretched the cuffing to fit, sewing right sides together. I did worry that it might be a bit bulky but it doesn’t feel uncomfortable at all. Just extra warm… and that’s totally fine with me. I can’t stand the cold!

The final step was to add the ribbing to the hem. I really like the contrast of the stripe and the added glitter just makes it pop!

I really loved the whole process from hatching the idea to wearing the finished jumper! It feels so great to be wearing something that is totally unique and totally me. And all thanks to my Insta fam.

I’d like to say this is my new way of working. I’d so love to get even more creative and original about all that I make and I will, in time, but I’ve already got an indie pattern in mind for my next dress. One I’ve never tried before. Watch this space to find out more!

Dan of course is behind the lens of these super shots… we took a 5 minute walk up the road where he’d already planned to factor in some twinkly lights. He is so very good at this and I’m so grateful but also aware that he’s getting more photography gigs of late, so I better keep that leash tight!!

Happy weekend everyone!

Seven useful tips for a rocking pair of M7726/M8168 shorts

M7726 shorts handmade and modelled by Janene @ooobop

I was inspired to make a second pair of these McCall shorts (see here for first pair) by the lovely checked suiting fabric I saw and snapped up in the Crafty Sew and So sale and was then spurred on by the #magamsewalong #rocktober instagram challenge hosted by @suestoney and @sewing_in_spain, themed by @salixsews.

close up of M7726 shorts handmade by Janene @ooobop

I’m still a bit scarred from that loose weave fabric I used last time, but oh the rewarding joy in using a more stable fabric. I did however underestimate the time and patience in cutting and matching those checks though.

TIP 1: Cutting out

I laid out the fabric in a single layer and cut all the pieces individually, using a rotary cutter for more accuracy. I find the fabric moves less and you can get consistently close to the edge of the curved sections.

I flipped the first set of cutout pieces onto the remaining fabric and pinned it in position to cut the corresponding pieces so the checks would line up. And most importantly I marked ‘WS’ (wrong side) on each piece!

detail of front section of shorts overlaid and pinned onto fabric to match checks

TIP 2: Marking the pieces

I know we are constantly reminded to do this. I’m lazy and often don’t – just marking as I get to the correlating instruction, if I feel I need to. But in the case of these shorts it’s crucial to get those marks on, and visible.

I used a combination of tailor’s chalk and tailor tacks and made sure to distinguish the small circles versus large circles, not forgetting the squares and the centre front line versus the fold lines! It seems like such a faff but you’ll thank me later!

TIP 3: Finishing the seams

I overlocked all the edges of all the pieces, after I sewed the seams but I finished the fly section before I added the zip.

I never paid any attention to finishing when I first started out sewing but learned quickly when my favourite memade shirt literally fell apart at the seams!

Also advisable to finish your seams in a matching thread. This doesn’t always matter but read on to tip 7 to find out why.

TIP 4: Tacking is important

When you have such a large and noticeable check pattern, or any pattern tbh, any slight stretch or movement of the fabric can lead to a mis-align of the design. So hand tacks, in a contrasting colour, are a really great way of keeping things in place while you sew.

Believe me, I always try to dodge this bullet thinking I can go quicker without and even this time I tried simply pinning the pleats in position before I sewed and twice had to unpick because the line of the checks formed a ‘step effect’.

TIP 5: Tying up loose ends

To finish off the topstitching neatly, leave a longer thread than your automatic machine cutter might allow for. Take a hand sewing needle and thread it with the loose thread on the right side. Push the needle and the thread through to the wrong side and tie together a few times with the bobbin thread. Trim a few mm’s away from the knot.

detail of how to tie up loose ends with threaded needle sticking out of the front side of the fabric

TIP 6: The roll-up

I used a strip of fusible interfacing to sandwich in the middle of the rolled up hem. The suiting fabric I used was a little sturdier than the last fabric I used but still very soft and I didn’t want the cuff to flop down. It was a good way to use up those little scraps of interfacing too – I hate throwing them away! I also did a blind catch-stitch about a cm inside the top edge of the roll up to keep that cuff in position. Just for good measure!

I wanted a slightly bigger roll up than I did last time but the positioning of those checks played a big part in how much and where I pressed that last fold. As a result the pocket bags have a tendency to show when I’m seated. Slightly annoying and not a biggie, except that’s where I first used non matching (white) overlocking thread. I thankfully changed it up when I remembered that the side seams were going to be visible on the roll-up!

Janene standing with hands

I wore these shorts 5 days straight after I made them – I love them so much. And I think that’s largely due to the time and patience I invested in making sure those details were on point. I even matched the belt loops for goodness sakes!

They are so comfortable to wear, lovely and warm with tights and I love styling them with boots. Its given me a great opportunity to test them out with all my different tops (breaking all the ‘rules’ for pattern mixing) so I’ll be sure to share that with you soon, too.

I do hope these tips come in useful, for this project or any others you’ve got on the go. And please share any additional ones you might have in the comment section. One of my favourite things about sewing is the prospect of it always being a work in progress. There’s more than a lifetimes worth of tips and techniques to keep us busy and sharing them is half the fun!

In the meantime I’m pondering my next project. Could be an actual jumper, a work-out piece or a self-drafted dress. Decisions, decisions…!

Postscript! I’ve since found out that this McCalls pattern has been rereleased under M8168, Taylor McCalls

Other shorts I’ve made:

Simplicity 6772 shirtdress on fire for the #sewvintageseptember challenge

I love it when sewing stars align. Like when Minerva sends a call out to promote their new fabric ranges, and the ideal fabric screams to be made up from my go-to 60s shirtdress pattern during a month when one of my favourite annual Instagram challenges inspires me to dust off those vintage pattern boxes.

Well those flames spelled out the obvious, to me. A retro Rockabilly shirtdress.

The pattern is vintage Simplicity 6772 from 1966. And a perfect project for sewing up in between busy work shifts. I’ve sewn it up twice before – in dogtooth and in blue – and that gave me confidence to forego any toiling though I did make a few fitting adjustments, namely extending the bodice length by quarter of an inch and lowering the bust and top points of the waist darts. There are 12 darts to this dress: 4 diamond waist darts on the front, 4 on the back, 2 bust darts and 2 shoulder darts which seems very excessive but actually this is very commonplace to vintage patterns and all the better for shaping.

The fabric is a Robert Kaufman cotton poplin which I received as part of the Minerva Ambassador programme. I’ve used poplin only once before, for my self-drafted sundress but cannot fault the quality. It is such a lovely genuine medium weight, imho – not too light and not too heavy. The weave is such that it’s an absolute joy to hand finish the hems – so easy to pick up a single thread for a catch-stitch and it presses so effortlessly too.

Another advantage is that it doesn’t crease as easily as regular shirting cotton. Prior to taking these shots I’d been walking around in this dress and sitting down for a couple of hours and it still looked pretty neat.

My dresses usually get shorter as the months get colder but this time I opted for a to-the-knee rather than an above-the-knee hemline for a change. The actual pattern suggestion is quite a bit longer but I think I’ve hit the sweet spot. And the little kick pleat at the back looks more sensible when it’s longer in any case.

In order to keep that kick pleat nice and flat and in position, I stitched it down with with a few catch-stitches inside. I think you can tell how much I enjoyed hand stitching this fabric!

It’s amazing how a quality fabric can make so much difference to the whole sewing experience. For instance, pressing as I’ve mentioned before but also for turning nice sharp points on the collar sections and the corners of the front facings. Setting in the sleeves was a breeze, too.

I decided the buttons had to be plain. I’ve exhausted my stash of black buttons and so I robbed some off a previous dress that won’t get any wear over the next six months at least, on account of it being too summery. So I have plenty of time to replace them!

It was fun to take this dress out for it’s maiden stroll around Soho and stop for a coffee in Bar Italia. I used to hang out here a lot in my clubbing days. A pit stop after dancing the night away when you weren’t quite ready to go home – a quality hit of caffeine and always someone interesting to yabber away to. Some things never change!

Fab photos by Daniel James Photographic

Roll over taggy blankets, there’s a new taggy T- in town!

Let’s face it. There’s not much gratification to get from making children’s clothes – So much effort for such a few amount of wears, if any. And I’ve recently refrained, until a request for my grandson came in: My son cannot find plain unbranded quality cotton toddler T-shirts that don’t have stupid slogans, or images on them and wondered if I’d care to oblige.

At first I was reluctant, especially after recently refusing a similar request for a grown up. But then I realised I could add a very tiny but genius design feature here which would tick two boxes, and make this project more worthwhile.

Anyone else know a toddler with a silky label obsession? I mean, that’s kind of what the taggy blanket (afflink) was invented for (for anyone who doesn’t know, a taggy blanket has lots of silky ribbon loops sewn around the edge of a small piece of fleece fabric and serves as a comforter. ) Or perhaps this is what is responsible for the silky label obsession to start with. Who knows?!

Blake is no exception and loves a label. He’ll find them every where – blankets, cushions, stuffed toys and especially on his own clothes. Trouble is they are always on the inside and he insists on pulling up his top to get at them.

I had a flash of inspiration when I was at the Crafty Sewing Camp, as I sewed my sweary label to the outside of my Ankara dress – far too good to hide inside – that I should sew a label to the outside of his T-shirts! Its kind of like a toddler taggy T- with less chance of a draught, especially with colder months coming up.

For the T-shirt , a quick Google led me to Diby Club and a great free pattern with lots of style variations with very detailed instructions. Such a lot of work invested to give for free. It made me a bit suspicious tbh but I knew proof would be in the making of it and there was zero chance of me wasting any amount of time, drafting a pattern in any case.

I didn’t need to refer to the instructions as I’ve sewn various tops and T’s but I did take heed of the measurements for the neckband as clearly it had been tried and tested on a fabric with the same suggested amount of stretch.

I sewed most of it on the overlocker and was quite excited about doing a blind hem on the body and sleeve section with the overlocker too, until I tested it on a scrap. It was a bit of a heavy finish for such a small garment, especially in this amazing premium cotton jersey. So I just overlocked the edges and hemmed with a zigzag on my regular machine. Again, too lazy to set up the twin needle but its just as cute and I’ve had no complaints! Incidentally I bought this fabric from Minerva. It washes beautifully, presses and recovers well. Lots of different colour options, too.

Blake wasn’t very impressed when I asked him to try it on but when I pointed out the label, there was no hesitation and within seconds of his arms pulling through, went into his little silky stroking trance mode which is generally an indication of nap time! One happy customer and one very happy Nanna who ultimately enjoyed making such a boring project and also seeing it appreciated in real life. You know what? I might even make another!

It was a fantastic little no-brainer of a project to palette cleanse and gear me up for something a little more involved and with #SewVintageSeptember here already, best I get cracking with my next project.

Do you ever sew for little ones or sew something really boring before starting a more complicated project?

Theres a lot to love about a Libby Shirt

I’ve already had people ask if the fabric I used for this shirt was leftover from my latest sheath dress. I’m clearly set in my colour palette ways!

It isn’t, but its a close contender I found it on a pile of Ankara bundles when I was looking for pyjama fabric. And was pleasantly surprised by the light-weightness of it and of the lovely sheen. The shop owner told me it was cotton satin – I didn’t realise that Ankara prints came in any other weight other than the usual medium/heavy structured cotton. Definitely keeping eyes peeled now for different kinds.

And I did have a plan for a lovely lightweight pair of pjs until I saw all the lovely Libby shirts on Insta and that instantly changed things up. I bought, downloaded the pdf pattern, printed and cracked on with tiling the pages together that same evening.

I’ve only ever made one Sew Over It pattern before – the Joan dress – which Im still in love with. If only I could squeeze myself back into it… It was a tough enough wiggle from the outset!

And because of that, I made sure I was being totally realistic about my choice of size this time. Yes I have been known to cheat myself! But to be fair, it does state on the instruction booklet that “Sew Over It patterns tend to have less ease than other patterns as most of the designs are intended to have a closer fit.”

This time ironically it appears I’ve erred on the bigger size! But it really doesn’t matter as it’s so lovely and cool to wear on a humid day. No touching underarm seams and a slight blouson back which really keeps it all nice and airy.

There was nothing complicated about the construction. Though I took time to make sure all the little circles and notches were clearly marked on my fabric pieces. Especially as far as the collar pieces were concerned. And they fitted together a real treat. The fabric pressed nice and sharp too as you’d expect from a quality cotton and a bit of hot steam. And I marvelled at the results. for some time before carrying on with the rest!

I had just about enough fabric to make this shirt and not an iota of thought was given to pattern matching. It would have been very difficult in any case with the design being so random and all. It was looking to be a nasty mismatch at the centre front with the half circle meeting the full circle but I think I’ve got round that by disturbing the design with some black button holes and buttons. I’ll just keep telling myself that!

This image has an empty alt attribute

I cut the longer length version so that I could make up my mind if the cropped length was going to suit me or not. Before I hemmed, I tried it on and cropped was definitely the way forward so I just overlaid the front pattern piece onto the shirt and trimmed to the line. I did however go back to check If there was one back piece for both versions as I wasn’t sure if it was quite right for the back to stay longer. There isn’t and it doesn’t matter. I’d just assumed the back would be cropped too.

I love how the finishes are considered in the instructions for each seam. It comes together so neatly that you are prompted to stand back and admire your progress at each stage. The cuffs in particular are a great way to bind the sleeve hems. And the facings do a great job of housing the overlocked hemline at the centre fronts too.

I would definitely make this shirt again, perhaps in a slightly more draping fabric next time. Maybe a viscose or liquid-like silk satin for a posher version!

I love the style of this shirt, the cropped length option and the cut-on sleeves. Such a timeless vintage vibe. And a very easy fit.

All I’ve got to do is make some bottoms to wear with them, haha. I’m forever in need of simple black skirts or shorts but I just can’t bear to make something that boring. Needs must though!

Photography by Daniel James Photographic

Thanks to Dan for taking these shots under really difficult circumstances. Nagging wife and failing light is never a winning combination. But I love them!

Fitted sheath dress in a graphic Ankara fabric

This is the dress I completed at the Crafty Sew and So camp, weekend before last which feels like a dreamy distant memory already, since I’ve been buried deep in work projects ever since. Thank goodness I realised the importance of taking a simple no-brainer project with me as I had anticipated a lot of chat and I didn’t want to be getting stressed out by fiddly details… or miss out on all the goss!

Sewing a sheath dress is a good test of fine tuning a fit as woven fabric has no forgiveness whatsoever! And I’m pretty sure I’ve nailed it now. It feels like it fits in all the right places and its amazing how that feeling transmits a confidence when I wear it. Well I can hardly blend into the background with this graphic print in any case!

I was hoping the Ankara fabric, with its strength and weight, would give good structure and I wasn’t disappointed. If you’ve sewn with it before, you’ll appreciate how your shears slice so accurately through the threads and the joy of ironing those sharp seams – especially helpful when pressing those understitched facings. They are so never going to pop out!

The dress pattern is simply a front and a back piece and an all in one facing to finish the armholes and the neckline. The zip is at the left side – something I learned from sewing a lot of vintage dresses and a method that means the back piece stays as one so there is no need to pattern match across a zip.

I would normally have tried harder to match across the side seams but I was working with a remnant here, left over from this crazy cowl skirt project, so I was limited with my placement options. Very happy that I used stash fabric though!

And whilst we are on the subject of side seams, I’d like to draw attention to the sweary label that Manisha from Manisha’s Fancy Fabrics kindly and appropriately gifted me from Sew Me In (explicit) Labels. Because, despite the simplicity of this dress, I had to unpick 3 seams at least due to distraction of talking and mostly laughing my head off. In case you need any confirmation, sewing alongside likeminded makers who share as much passion about dressmaking, is incredibly good for the soul but a little bit detrimental to productivity!

This won’t be my last sheath dress for a number of reasons:

  • Its a lovely no-brainer of a sew, once the fit is mastered
  • It uses precious little fabric
  • Its can be office-appropriate in a suiting fabric, casual in a cotton, dressy in a satin
  • It can be customised so easily

Thanks to Dan for these lovely photos. We were in Charlotte Street, and very much drawn in by the blue of the shopfront. We haven’t been up town for a long while and it was good to see the buzz is still there, with lots more pedestrianised areas for al-fresco drinking and dining.

Keep tuned for some more of my pattern drafting adventures. I’ve got a few plans up my sleeve!